Shield EMS User manual
A BrownCastle Product
Adrian, Pennsylvania 16210
Contact us at:
Support@BrownCastle.us
Visit us at:
www.BrownCastle.us
Shield TENS/EMS
Combination Unit
Class IV
User Manual

Thank You for Choosing Shield!
Thank you so much for your
purchase! As a small company, we
strive to provide you with not only
the best products, but the best
service possible.
We know you ordered our Class IV
Unit because you wanted a reliable
and stylish product…that is built to
last and works easily…and that’s
exactly what it’s going to do.
If you ever don’t feel satisfied in your
purchase, or if you have any
questions, do not hesitate to reach
out to us! Every email is answered
personally by us, no automated
messages or confusing
conversations.
Please read this guide so that you
get the most out of your purchase
and we hope you love your new
Shield Unit for years to come!
Regards,
Dr. Steven Brown
BrownCastle Co-Founder
Table of Contents
1. Product Features
2. Product Contents
3. Product Specifications
4. Warnings and Precautions
5. Control Diagram
6. Instructions for Use
7. Stimulation Diagram
8. Maintenance and Storage
9. Warranty Information
Download an easy-to-read digital
copy of the user manual on the
Shield TENS Unit product page at:
www.browncastle.us/collections/shield

1. Product Features
1. Large Touch Screen
The large, clear LCD screen
makes it easier to view and
operate with LED backlights for
viewing in the dark.
2. Dual Channel A and B Outputs
Two outputs allow multiple
treatment areas with
individualized intensities at the
same time.
3. Twenty Four Modes
Six massage types with four sub-
modes means that you are
guaranteed to find the mode that
best suits your need.
4. 20 Intensity Settings
A wide range of intensity settings
allow you to set treatments as
strong or as gentle as you desire.
4. Automatic Timer
Set your desired treatment time
from 10-60 minutes and the unit
will automatically power down
when completed.
5. Screen Lock
Prevent accidentally changing
your settings by disabling the
touchscreen with this button.
6. Rechargeable Internal Battery
Powerful and reliable lithium-ion
battery provides hours of
uninterrupted relief.
2. Product Contents
Shield Class IV Unit
1 Unit
Small Pads
1 Pair
Medium Pads
2 Pairs
Large Pads
1 Pair
Electrode Cables
2 Pairs
Charger + USB Cord
1 Unit
Armband Holder
1 Unit
3. Product Specifications
Power/Voltage
3.7 V
Output Current
84 MA
Intensity Levels
20
Modes
24
Frequency
1-110 HZ

4. Warnings and Precautions
Consult your doctor before using
this device if you have any of the
following medical conditions:
An implanted cardiac pacemaker,
defibrillator or other implanted
metallic or electronic device
Undiagnosed pain syndromes
Have been diagnosed with cancer
Are pregnant
Have suffered acute trauma or
surgical procedure in the past six
months
Have cardiac problems or cardiac
disease
Have epilepsy
Have painful and/or atrophied
muscles
Have abdominal or inguinal hernia
Have limited range of motion in
skeletal joints
Have blood circulatory problems
This device is intended for adult use
on healthy tissues and is not
intended to treat a medical condition
or disease.
Do not place electrode pads on
broken or damaged skin, areas of
reduced sensation, the front of the
neck (over the carotid sinus),
directly over the heart, eyes, or in
the mouth.
Do not use while in water, sleeping,
driving, operating machinery or
during activities in which involuntary
muscle contractions may endanger
you or others.
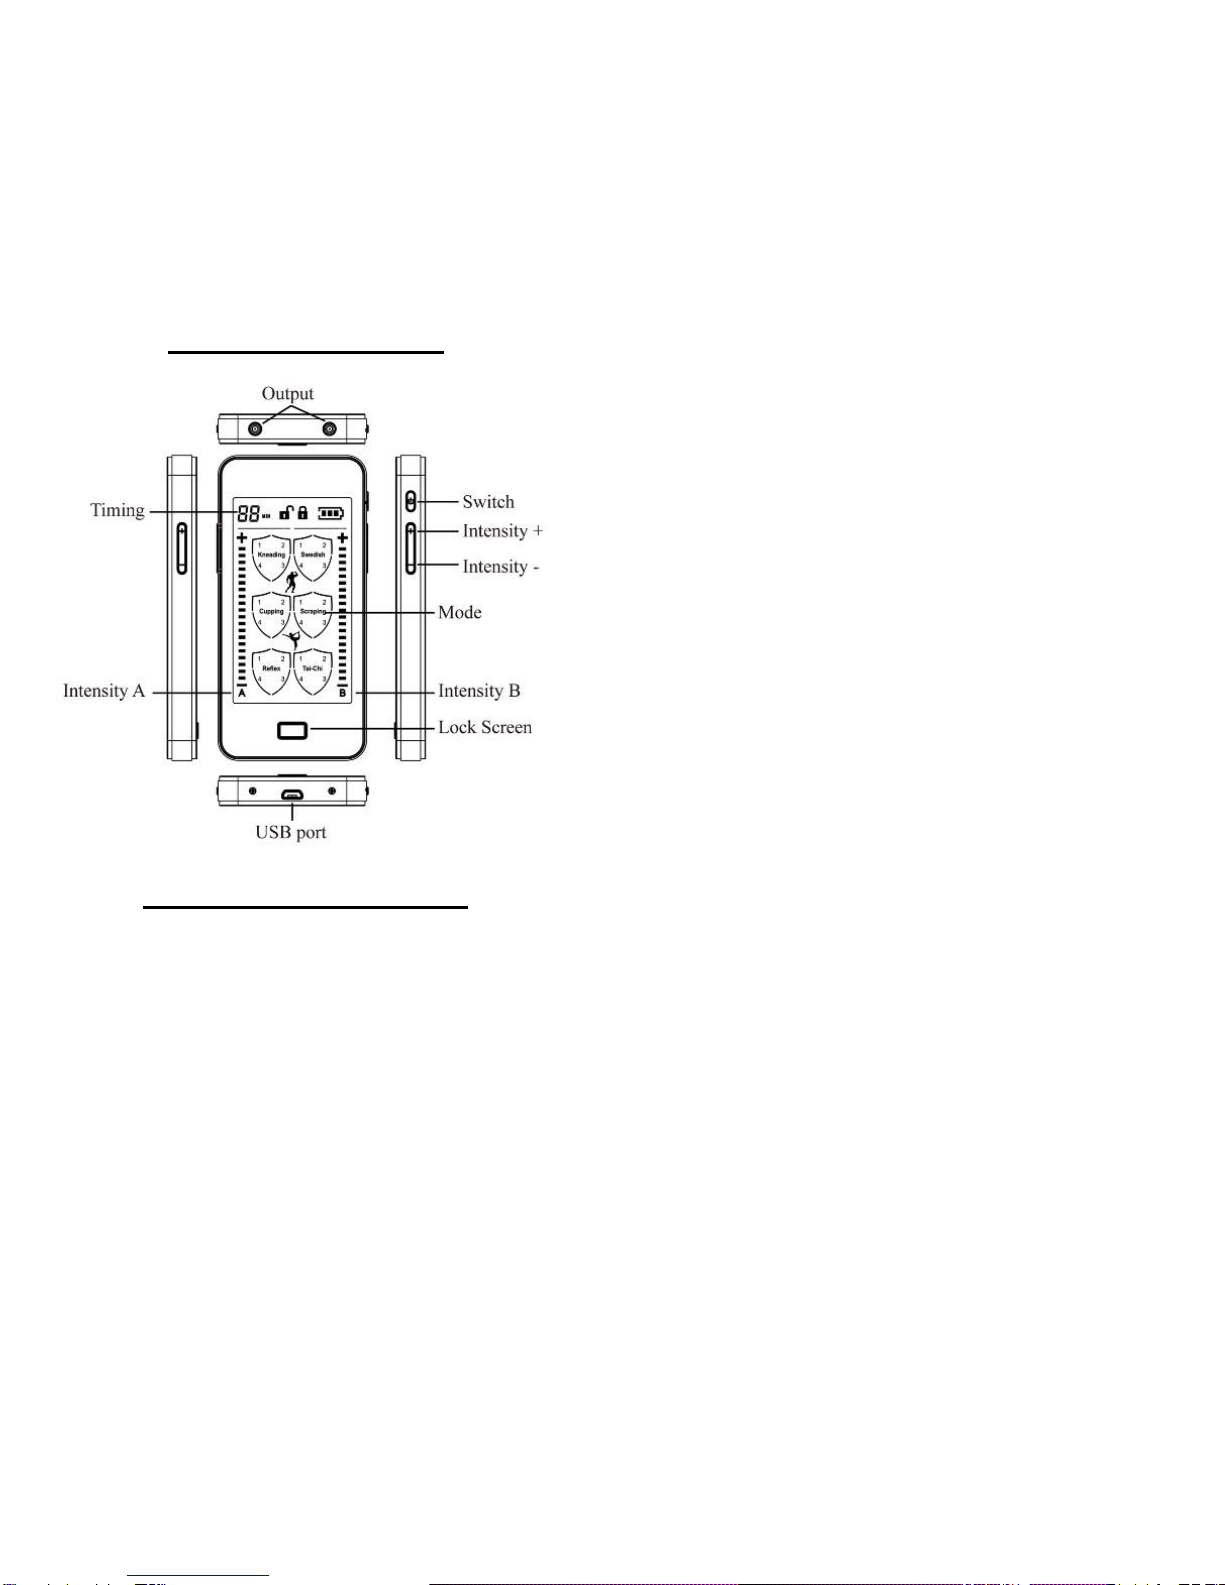
5. Control Diagram
6. Instructions for Use
1. Connect both ends of the
electrode cable with two electrode
pads.
2. Plug the electrode cable into one
of the output jacks located at the top
of the unit. Either side A or B.
3. Use a damp towel to wipe the
skin before you place the pads to
remove any body oil, cosmetics or
dirt. Should the pads be soiled, both
their adhesiveness and reusability
will be reduced.
4. Peel off the protective film from
the pads.
5. Apply the pads to the areas of the
body you want to massage.
6. Press the On/Off button on the
top right hand side of the unit to
enable the display. The mode
selected will flash on the LCD
screen and the timer will
automatically be set to 20 minutes.
7. Click the mode area to select your
preferred mode from the 24 modes
available.
8. Increase the intensity when
changing to a new mode until
stimulation is strong but
comfortable. Intensity will return to
the lowest setting automatically
when selecting a new mode or sub-
mode. Press “+” or “-“ buttons on the
side of the unit or tap “+” or “-“ on
the screen to strengthen or reduce
the intensity output. The ideal power
output depends on your personal
comfort.
9. Tap the timer to adjust the
treatment time. The time is
automatically set at 20 minutes
when the device is powered on.
Each tap will increase the timer by
10 minutes. When the timer ends,
the unit will power off.
10. Press the bottom silver button to
lock the LCD screen once all
settings have been chosen. The
unlock symbol will change to a lock
symbol on the screen. This will
ensure your settings aren’t
accidentally changed during
treatment. Press the same button
again to unlock the screen.
11. If you need to turn off the device
during treatment, hold in the power
button to power down the device.
12. Take off the electrode pads and
return them to the protective films
for storage and reuse.
Notes:
As responses will vary person-to-
person, begin with shorter treatment
times and increase as necessary.
Never put two pads directly together
to avoid a possible short.
You will not feel stimulation unless
both pads are applied to the
treatment area so a current can be
formed between the pads.
Never connect this product with a
common headphone jack.
The USB port is only used for
charging, do not connect to any
other device. Only use the charger
supplied by the manufacturer.
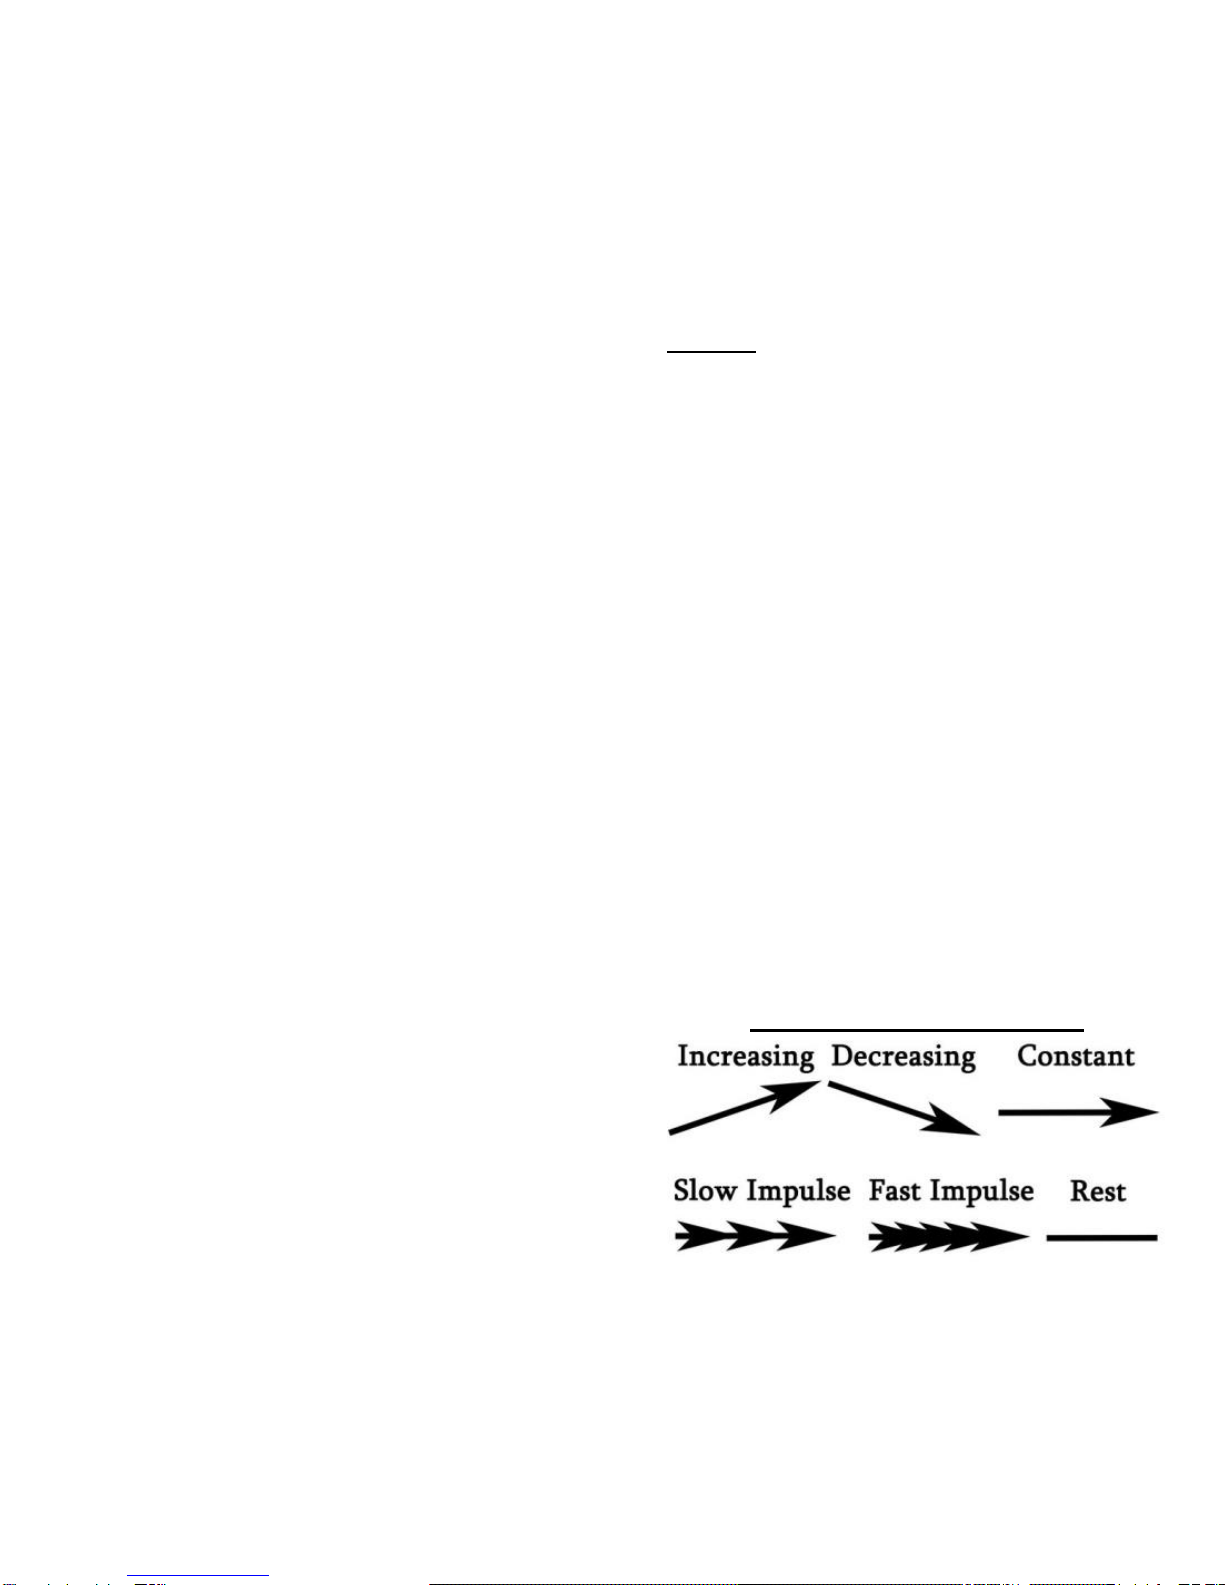
7. Stimulation Diagram


All modes function on a combination
frequency to treat muscle, nerve or
joint pain so choose the mode that is
most comfortable for you and your
pain type.
We recommend the following
modes based on pain treatment:
Muscle Spasms or Trigger Points:
Kneading or Swedish
Chronic Pain:
Cupping, Reflex or Scraping
Muscle Rehabilitation:
Tai-Chi
8. Maintenance and Storage
1. Unplug the electrode cables from
the output jacks after using.
2. Cover both pads with the
protective films for storage. This will
prevent the pads from becoming
soiled or dirty and maintain the
adhesive for more uses. You may
rinse the pads with cool water and
let air dry if they become dirty. This
may allow a temporary restoration of
the adhesive for additional uses
before the pads need to be
replaced.
3. To keep the unit clean, use a soft
dry cloth for dust or a damp cloth for
dirt. Do not use cleaning solutions.
4. Do not use or store the device
where there are magnetic or electric
wave fields such as 1V sets or
speakers.
5. Do not place the device in areas
of high temperature, high humidity,
or under direct sunlight.
6. Keep the device out of reach of
children.
9. Warranty Information
To redeem your unit’s warranty,
contact BrownCastle at:
Support@BrownCastle.us
Include your name and order
number with your inquiry.
This manual suits for next models
1
Table of contents


