shiva SHIVANRP50 User manual

QUICK
START
GUIDE
MODEL:
SHIVA-
NRP50
Designed and manufactured for Shiva Air Conditioning Limited.
Unit 8, Ballymount Cross Business Park, Ballymount Road Lower,
Dublin 24, D24 PYK2 Republic of Ireland
Before pluging in the product,
please read this Quick Start
Guide, and the Full Product
Manual carefully and strictly
follow the inital setup steps
as per instructions.
No Warranty is off ered on
damaged units / parts as a
result of improper setup
Please keep this manual in a
safe place after reading for
further reference.
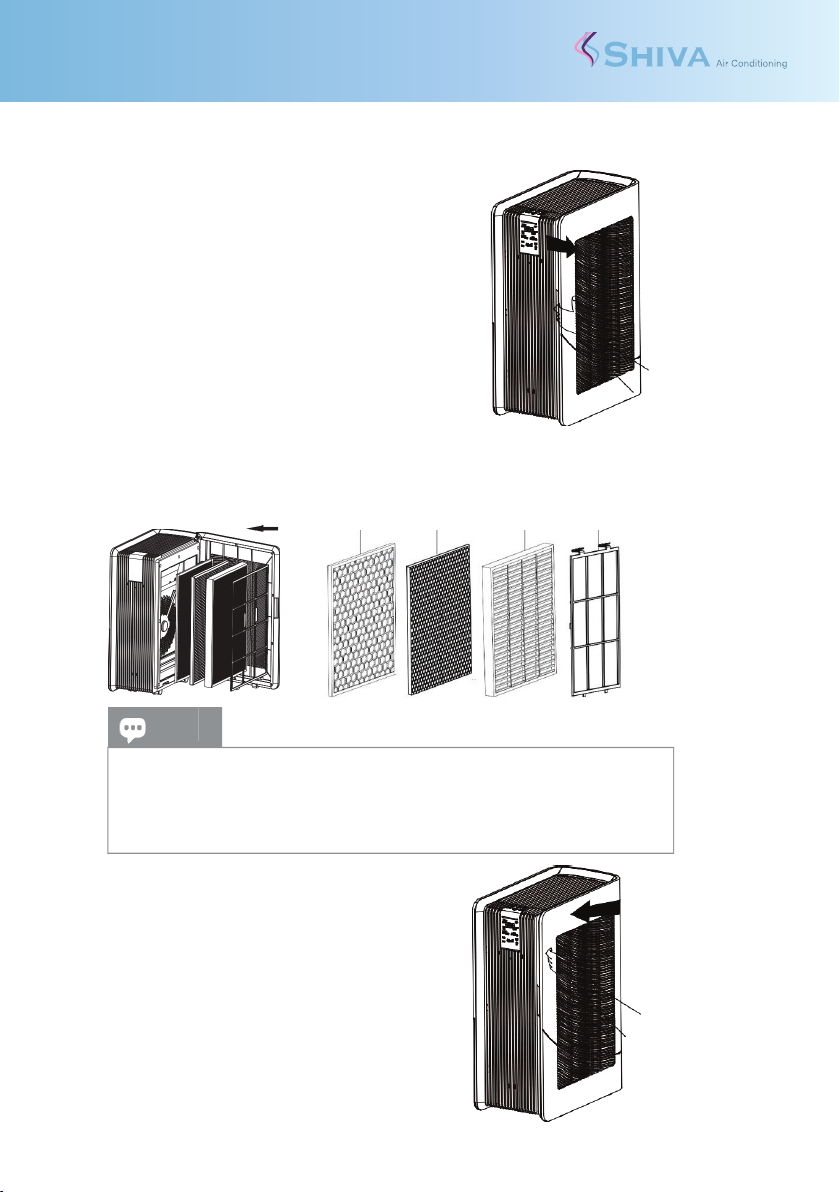
Please remove all packaging and put the air cleaner on a dry, stable, horizontal surface.
Before using this air cleaner, please install the filters correctly as per instructions.
!!Important!!
Please remove all the plastic packaging from all of
the filters in the machine before using the air
cleaner, according to the below instructions:
1. Using one hand, hold the top of the machine;
and gently pull the filter cover sideways.
(as shown in arrow direction)
2. Remove all the filters from inside the machine.
3. Remove all packaging from each filter.
4. Install all the NRP50 filters in correct order;
1
st
TiO² Photocatalyst Filter
(Honeycomb Type)
2
nd Activated Carbon Filter
(Black)
3
rd
HEPA13 Filter
(White)
4
th Pre-Filter
(Fine Fabric)
TiO² Carbon HEPA13 Pre-Filter
5. Carefully close the Filter Panel.
Align and insert it into the fixed grooves,
then gently push it closed.
6. Place the air cleaner on a dry, stable,
horizontal surface. Allow min. 50cm of open space
for sufficient airflow at the Filter Panel.
7. Plug in the machine to the power socket and
press the on/off power button to turn on the machine.
Allow 45 minutes for the sensors to calibrate.
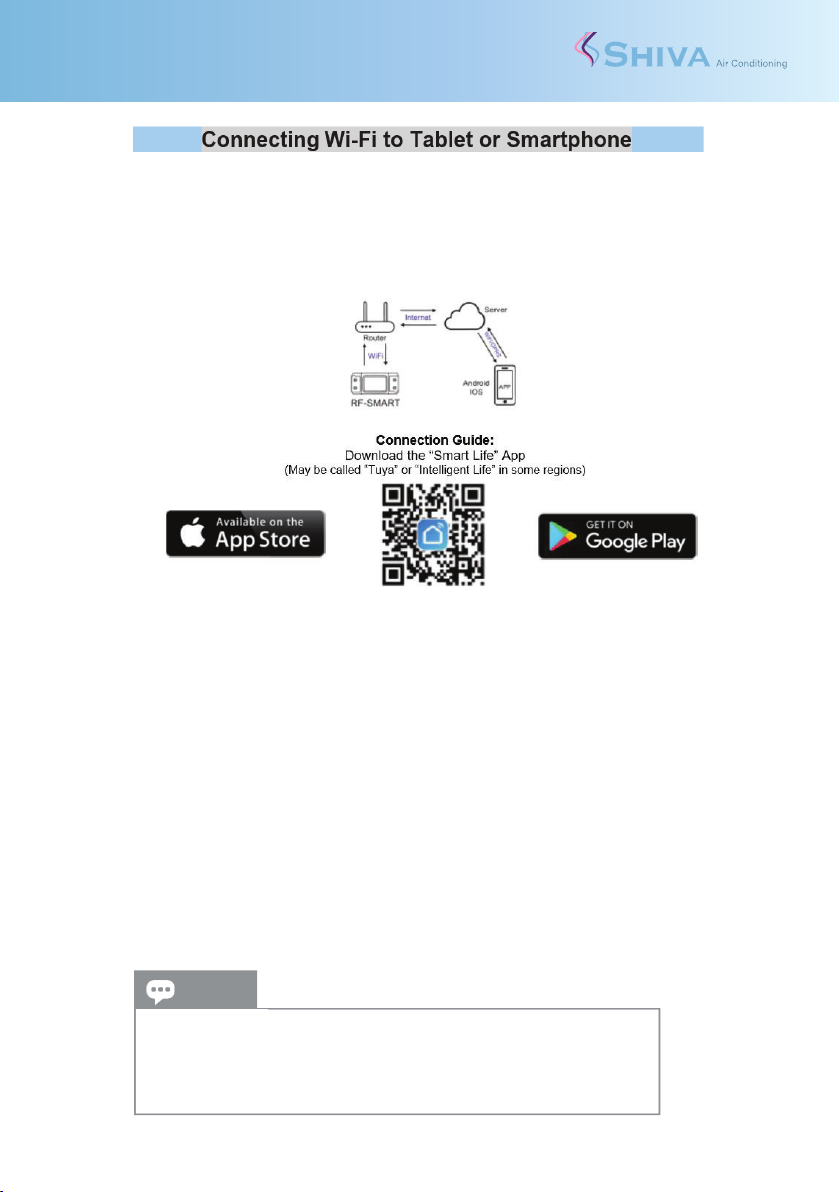
8. (Optional) Set the device up for Wi-Fi Control.
Checklist:
1. Have a Smartphone or Tablet with access to the Google Play or Apple App Store
2. Your Smartphone or Tablet to use the device is connected to the same 2.4G WiFi
Internet network you wish to use.
3. (it is recommended the Customer / Building Manager purchase a dedicated device
to leave on site for control of multiple units)
4. You have the correct WiFi Password to hand.
5. Your Router is MAC-open.
1. Register an account.
2. If you already have an account, Log In.
3. Ensure all filter packaging is removed, and power is connected to the Air Cleaner.
4. Enter the App, Tap “+” on the upper right of the page to enter the connection page.
5. There are 2 Connection Methods; ‘Manual’, and ‘Auto Scan’, Select ‘Manual’.
6. Select ‘Small Home Appliances’ from sections, and select ‘Air Purifier (Wi-Fi)’
7. Select the network you wish to use and enter the network password. (Note: WiFi
Network must be 2.4GHz)
8. After entering password select ‘Next’ to enter the pairing connection page.
9. Power on the unit using the On/Off button, then quickly press and hold the ‘MODE’
button for approximately 5 seconds, until the WiFi Light starts blinking fast.
10. Ensure the WiFi Light is still rapidly flashing, and select ‘Confirm the indicator is
blinking rapidly’ and ‘Next’
11. Air Purifier will display as found on the app. Select this device.
12. (Optional) Name your device accordingly
(example: Reception, Open Plan 1, Canteen, Accounts Office, Johns Office, etc)
13. This device is now connected. Repeat steps if you have other devices and name
them accordingly to identify each one.
Tips
•Look for the fabric pull tag to determine which is the top & front facing
side of each filter.
•Please do not touch the UV-C Lamps, even when powered off.
•Please do not operate the air cleaner without the filters.
Tips
Set up a 7 day on/off automation schedule timer to save you having to
manually turn the machine(s) on and off each day.
Set multiple ‘off’ timers to prevent machine(s) operating unintentionally
through the night, and thus maximise filter usage life
SHIVA-NRP50 - Air Puri er
Quick Start Guide
Quick Start Guide
SHIVA-NRP50 - Air Puri er 1
Please remove all packaging and put the air cleaner on a dry, stable, horizontal surface.
Before using this air cleaner, please install the filters correctly as per instructions.
!!Important!!
Please remove all the plastic packaging from all of
the filters in the machine before using the air
cleaner, according to the below instructions:
1. Using one hand, hold the top of the machine;
and gently pull the filter cover sideways.
(as shown in arrow direction)
2. Remove all the filters from inside the machine.
3. Remove all packaging from each filter.
4. Install all the NRP50 filters in correct order;
1st TiO² Photocatalyst Filter (Honeycomb Type)
2nd Activated Carbon Filter (Black)
3rd HEPA13 Filter (White)
4th Pre-Filter (Fine Fabric)
TiO² Carbon HEPA13 Pre-Filter
5. Carefully close the Filter Panel.
Align and insert it into the fixed grooves,
then gently push it closed.
6. Place the air cleaner on a dry, stable,
horizontal surface. Allow min. 50cm of open space
for sufficient airflow at the Filter Panel.
7. Plug in the machine to the power socket and
press the on/off power button to turn on the machine.
Allow 45 minutes for the sensors to calibrate.
8. (Optional) Set the device up for Wi-Fi Control.
Checklist:
1. Have a Smartphone or Tablet with access to the Google Play or Apple App Store
2. Your Smartphone or Tablet to use the device is connected to the same 2.4G WiFi
Internet network you wish to use.
3.
(it is recommended the Customer / Building Manager purchase a dedicated device
to leave on site for control of multiple units)
4. You have the correct WiFi Password to hand.
5. Your Router is MAC-open.
1. Register an account.
2. If you already have an account, Log In.
3. Ensure all filter packaging is removed, and power is connected to the Air Cleaner.
4. Enter the App, Tap “+” on the upper right of the page to enter the connection page.
5. There are 2 Connection Methods; ‘Manual’, and ‘Auto Scan’, Select ‘Manual’.
6. Select ‘Small Home Appliances’ from sections, and select ‘Air Purifier (Wi-Fi)’
7. Select the network you wish to use and enter the network password. (Note: WiFi
Network must be 2.4GHz)
8. After entering password select ‘Next’ to enter the pairing connection page.
9. Power on the unit using the On/Off button, th
en quickly press and hold the ‘MODE’
button for approximately 5 seconds, until the WiFi Light starts blinking fast.
10. Ensure the WiFi Light is still rapidly flashing, and select ‘Confirm the indicator is
blinking rapidly’ and ‘Next’
11. Air Purifier will display as found on the app. Select this device.
12. (Optional) Name your device accordingly
(example: Reception, Open Plan 1, Canteen, Accounts Office, Johns Office, etc)
13. This device is now connected. Repeat steps if you have other devices and name
them accordingly to identify each one.
Tips
•Look for the fabric pull tag to determine which is the top & front facing
side of each filter.
•Please do not touch the UV-C Lamps, even when powered off.
•Please do not operate the air cleaner without the filters.
Tips
Set up a 7 day on/off automation schedule timer to save you having to
manually turn the machine(s) on and off each day.
Set multiple ‘off’ timers to prevent machine(s) operating unintentionally
through the night, and thus maximise filter usage life
Quick Start Guide
SHIVA-NRP50 - Air Purier2
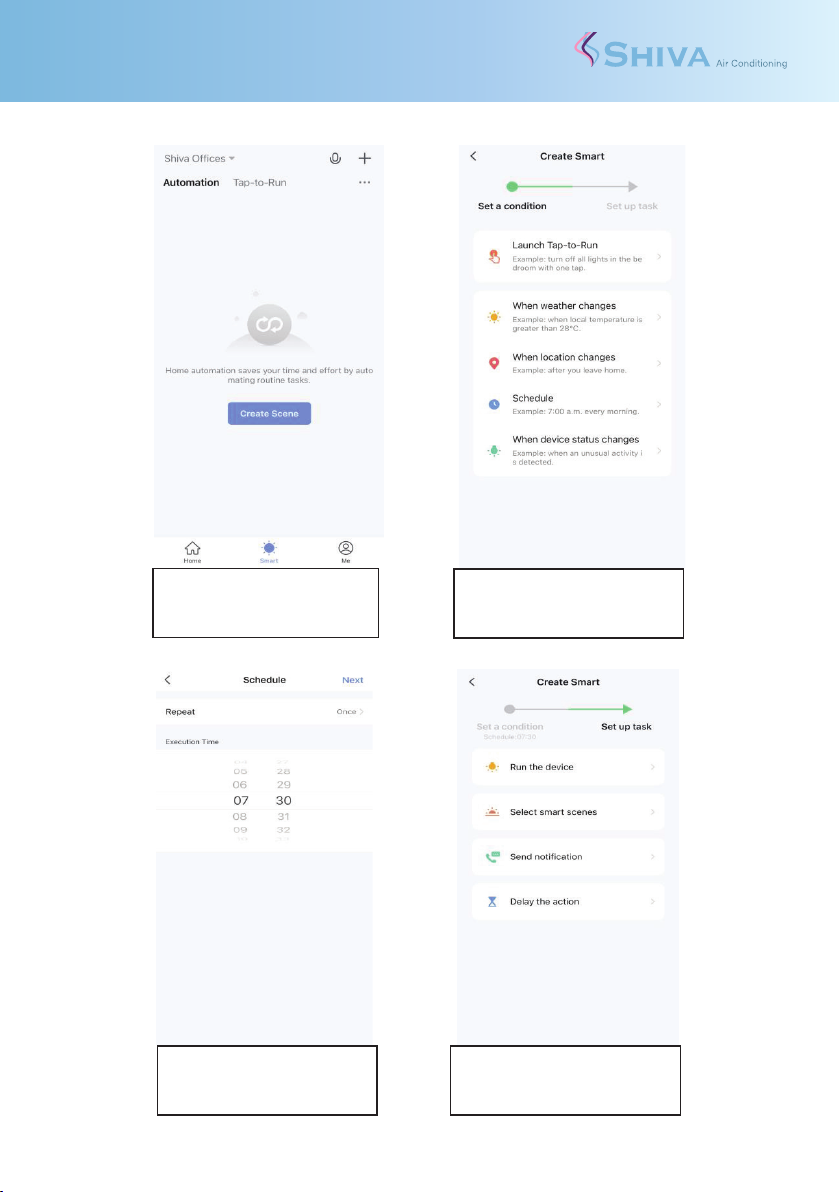
Example Automatic Schedule: Weekdays, 7am –5:30pm, with Multiple ‘Off’Timers:
Note: Future device firmware updates may change the appearance of these instructions
Step 1: (ON Timer Setup)
Select Smart –Automation –
Create Scene
Step 2:
Select Schedule (Recommended)
(other options are available)
Step 3:
Set schedule time you wish
Select repeat, select days
Step 4:
Select ‘Run the device’, and
select the device from the menu
)
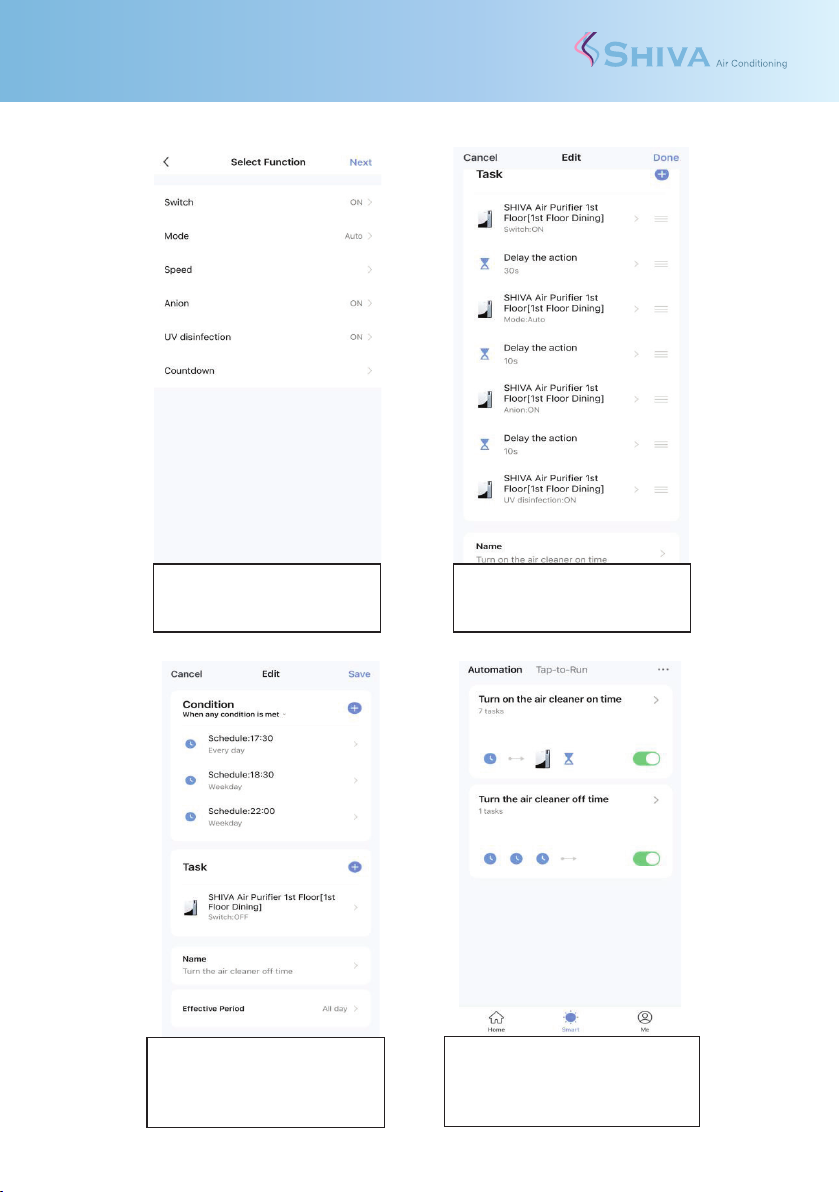
Step 5:
Enter the following settings as
shown above
Step 6:
Add ‘Delays’as shown above
Name Schedule ‘On Timer’etc.
Step 7: (OFF Timer Setup)
Repeat Steps 1 –5,
But this time choose Switch OFF
Name Schedule ‘Off Timer’etc.
Step 8: (Complete)
Congratulations! You can edit these
ON / OFF times anytime, or create
more schedules as you choose
Quick Start Guide
SHIVA-NRP50 - Air Purier 3
Example Automatic Schedule: Weekdays, 7am –5:30pm, with Multiple ‘Off’Timers:
Note: Future device firmware updates may change the appearance of these instructions
Step 1: (ON Timer Setup)
Select Smart –Automation –
Create Scene
Step 2:
Select Schedule (Recommended)
(other options are available)
Step 3:
Set schedule time you wish
Select repeat, select days
Step 4:
Select ‘Run the device’, and
select the device from the menu
)
Step 5:
Enter the following settings as
shown above
Step 6:
Add ‘Delays’as shown above
Name Schedule ‘On Timer’etc.
Step 7: (OFF Timer Setup)
Repeat Steps 1 –5,
But this time choose Switch OFF
Name Schedule ‘Off Timer’etc.
Step 8: (Complete)
Congratulations! You can edit these
ON / OFF times anytime, or create
more schedules as you choose
Other manuals for SHIVANRP50
1
Table of contents
Other shiva Air Cleaner manuals


