ShopMaster MILL TURN User guide
SHOPMASTER
SETUP MANUAL
COPYRIGHT SHOPMASTER 1981-2017
DUPLICATION PROHIBITIED WITHOUT
WRITTEN CONSENT OF SHOPMASTER
Dear owner, thank you for choosing SHOPMASTER. This owner’s manual is
being sent to you in .PDF format prior to the delivery of your machine so that you can
be prepared for it’s setup upon arrival. As the owner, you may print out a hard copy of
this manual or have a bound copy done at a local office supply house for your personal
use. Copying or printing the manual for sale or distribution to others is prohibited.
INSPECTION OF CRATE UPON ARRIVAL

Your machine will arrive at your destination by truck freight. The driver
will ask you to sign the delivery slip. Before you sign, please inspect the
crate carefully for any signs of rough handling such as holes, broken pieces
etc. Because the machines travel a great distance from the factory to you,
scuff marks, scratches and small chips in the crate are normal. However
there should not be any panels broken loose or holes punched through the
wood exterior. The machine sits on 3 steel tube skids, designed to allow
movement by forklifts and some dents on the edges are normal. However,
any skids that appear to be bent over or compressed are an indication of the
unit having been dropped. The slight dents will not show once the bench
assembly is completed. After you have inspected the machine, and if you
find anything you feel is out of the ordinary, make a note on the delivery slip
when you sign and also document the issues with photos.
OPENING THE CRATE AND TAKING INVENTORY
You will see that the wood crate has bend-over metal locking tabs holding
the components together. Using a screwdriver and pliers, straighten out the
tabs and remove the top first, followed by both ends. The sides of the crate
are secured to the bench legs with 10 mm bolts. You will need a ratchet and
socket (17 MM or 11/16) to remove the bolts. Set the bench panels aside and
save the bolts. You will find the rear sheet metal panels and the front doors
for the bench wrapped and secured inside the machine. Remove them and
set them aside. The 2 end panels are already attached. You can now see that
the bench leg assembly is mounted upside down on the base, which allows it
to form a strong support for the crate.
At his point you should look over the machine for any signs of damage
that may not have been apparent while it was crated and document them by
photos. You will find the PC and monitor in a box along with the keyboard,
mouse, power cable and laser tachometer. The tooling is in a separate box as
are the vise and CNC rotary table.
Open the boxes and compare the contents to the list of standard accessories
that was posted on our website before you placed your order. Make a note
of any missing items and send us an e-mail detailing those and any damage
you may have found.
ASSEMBLING THE BENCH
Now its time to remove the bench leg assembly which is held in place by 6
bolts threaded up from below the bench pan into the 6 legs. Remove these 6
bolts and the leg assembly can be lifted off the pan. The leg assembly is not
heavy, but due to its size, its best to have someone help you so you can lift it
straight up and off the machine. Be cautious here that you do not bang the
leg assembly against the machine and chip the paint or break any of the

control knobs. Once the leg assembly is clear of the machine, flip it over so
that it is sitting on the 6 leveling pads. Be sure that it is resting solidly on the
pads, not on the casters. Also be sure to orient the leg assembly so that when
you lift the machine onto it, the front portion faces the front of the machine.
You will see that on one side, the center leg has 2 tabs welded in place on
each side and the outer legs have the door hinge pins welded on, so this leg
should face the front of the machine. Take the 2 doors from their wrapping
and install them on the front of the bench. You will note that the door hinge
pins slide in from the top, so that when the machine is placed on the leg
assembly, they cannot be removed. Now it’s time to lift the machine up onto
the legs. If you have a forklift, it will be easy to just pick the machine up and
slide the legs under it. If you are using an overhead hoist or a roll around
“cherry picker” style hoist, then you will need to place your straps or chains
under the bench pan and get them secured in position so that the machine is
balanced when lifted. Protect the machine finish by placing towels between
the straps or chains and the machine. Also be sure none of the lifting straps
bind against handles, sheet metal etc. At this point, move with care and
caution as you raise the machine up. Do not get your hands or feet under
the machine and keep others away while you proceed. Once the machine is
high enough, slide the leg assembly under it, again noting the position of the
front of the bench. Slowly lower the machine down until it is almost resting
on the legs and then thread the 6 bolts down through the bench pan into the
legs. Lower the machine down completely until it is resting solidly on the
legs and remove your lifting mechanisms. Leave the 6 bolts just finger tight
for now. Don’t be concerned if the assembly seems a bit unsteady at this
point.
In your box of accessories you will find a bag of fasteners for the rear
panels. Place each panel in place and get all the bolts started, but not tight.
Now you may go around and begin tightening all the fasteners for the sheet
metal panels, all the while checking for squareness and even gaps. Once
done, your doors should open and close freely and the latches should catch
the tabs on the center leg when closed. You will also now see that the
assembly has taken on a very strong and solid feel. Now you can tighten
each of the 6 bolts holding the bench pan to the legs, but first, put a bead of
silicone sealer around each hole to prevent leaks if you use a coolant system.
Once those 6 bolts are sealed and tightened, your bench should be rock solid.
Finally, open the front doors and double check the tightness of the 6 bolts
holding the machine to the bench pan. The bolts are accessed by holes in the
3 skids. These holes are sealed at the factory against leaks, but it’s possible
that they may have vibrated loose during transportation.
ADDING SHELVES AND DRAWERS
While your machine is still in the open and accessible from all sides, you
may want to add some shelves and/or drawers. A lower shelf is easy to
measure and cut, and by removing one end sheet metal panel it can be

slipped into place. You can even use the crate material by gluing 2 panels
together and stacking some cinder blocks on them while the glue dries and
then cutting them to size. You can also buy drawer assemblies, or use one of
those low cost toolbox units sold at discount stores placed inside the cabinet
and resting on the lower shelf. There are plenty of variations of shelves and
drawers to suit your own style. The openings behind the doors are 24” wide,
25” tall and 25” deep.
If you install toolboxes with drawers, you may leave the doors in place
to utilize their locking feature, or simply leave them off for fast access to
your tools.

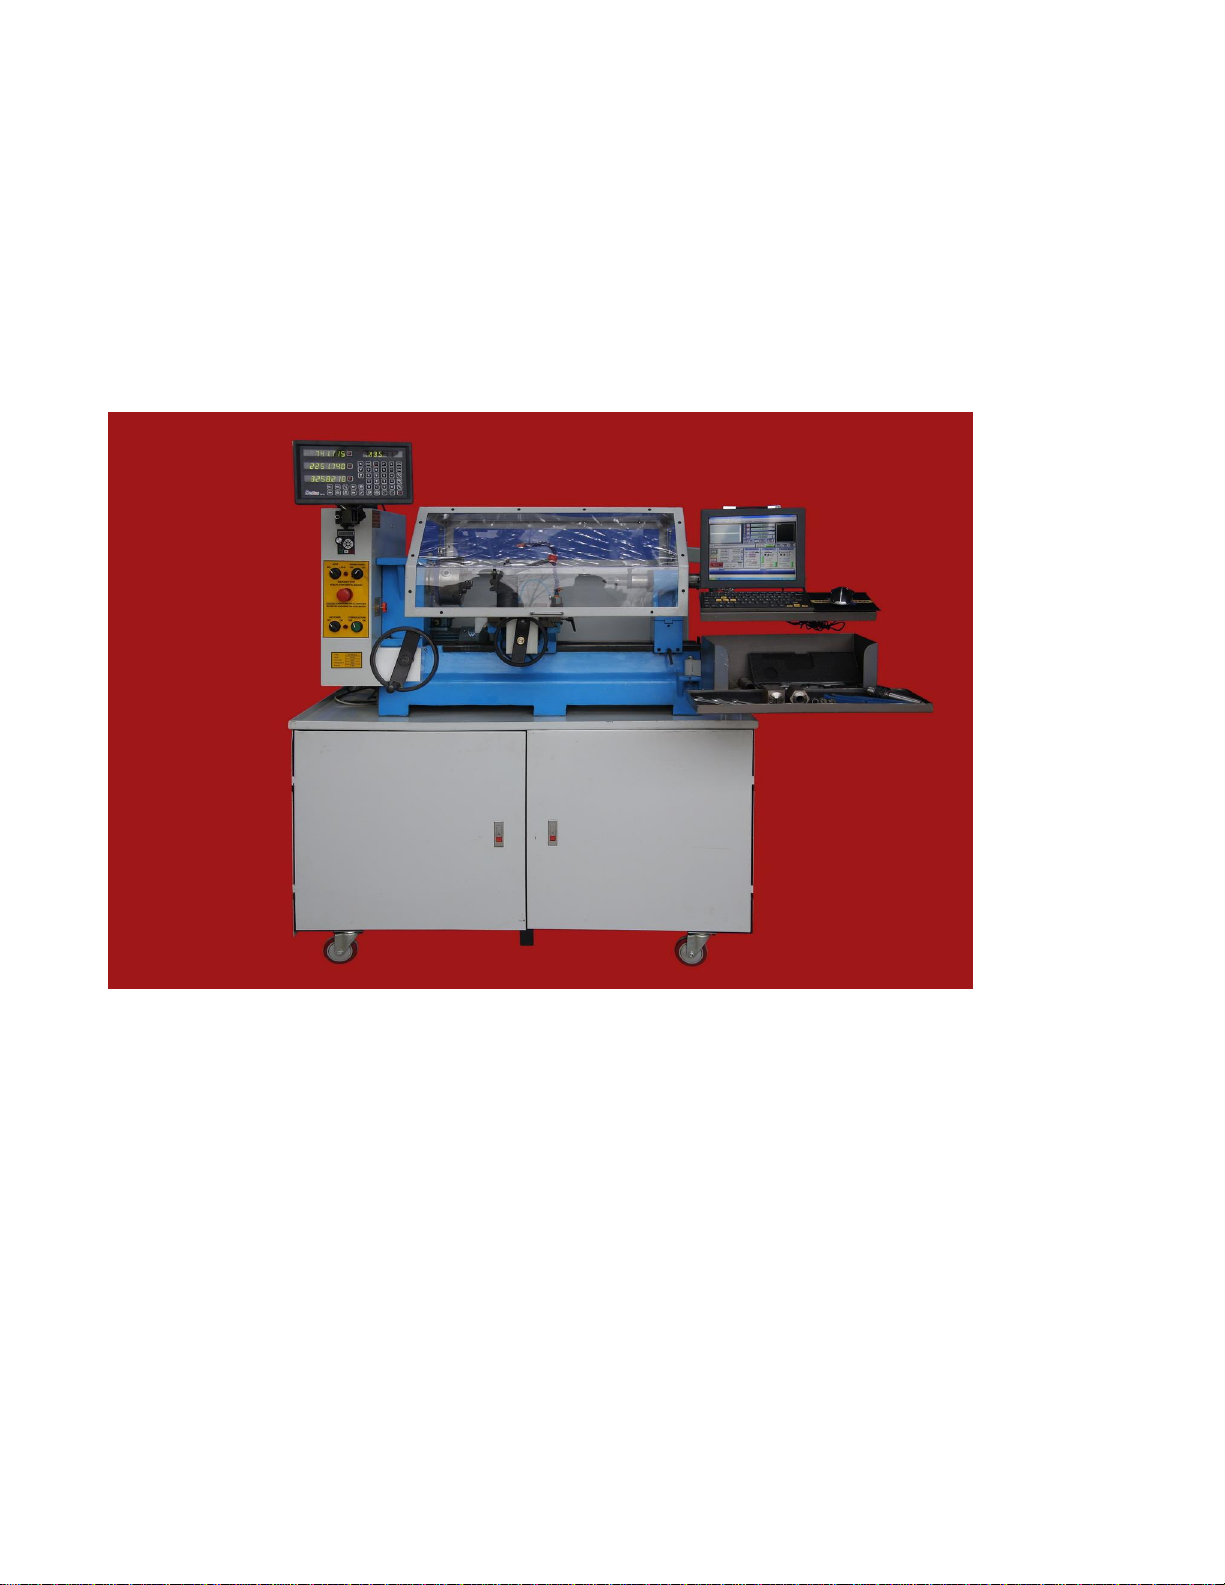
MILL TURN AND TURNADO BENCH ARE THE SAME
picture shows doors removed and toolboxes installed
CHOOSING A LOCATION AND WIRING
Now that your machine is all prepared to move into place, you need to
decide on its placement. Keep in mind access for future maintenance and
cleaning. Ideally, you should be able to walk around the machine, but we
know that many of these machines are going into home garages where space
is limited. With the casters, you can easily move the machine around should
the need arise. Keep in mind that the access panel for your electronics is on
the left as you face the machine and should you be turning long parts in the
lathe which protrude through the spindle, you will need some space on the
left side. You definitely do not want to place the left side in a corner. Once
you have chosen your location, its time to run your wiring. The machine
comes with a 6’ long cord wired to a NEMA 6-15 220 volt plug. The NEMA
6-15 is a common plug found at any home improvement store and you can
find the corresponding outlet as well. You will only need a single 15 amp 220
volt circuit and plug for the machine.

The computer and DRO that come with the machine are 220 volt only and
their cords are hard wired into the control box of the machine.
CAUTION: DO NOT PLUG THE COMPUTER OR DRO INTO A 110
VOLT OUTLET.
The cord comes out the back of the machine on the left side about 36” from
the floor. Measure out your location and have your outlet wired so the cord
can reach. (Use of a 3-4’ extension cord of sufficient wire gauge is
acceptable if necessary) The outlet should be about 48” from the floor. You
will also need a 110 volt outlet near the machine for any lights, fans etc. you
may want to use.
MOVING INTO PLACE AND LEVELING
Now that you are all wired and ready to move the machine into place,
screw the adjustable legs up into the bench legs until the machine is resting
on the casters. Now one person can easily roll the machine around.
However, be careful and move slowly because the machine is very top heavy,
and even a small nut or bolt could stop the caster and cause the machine to
tip over if rolling too fast. Sweep up your entire area before beginning the
move. If you are mounting the machine close to the back wall, be sure to
release the computer mount and swing it out toward the front of the
machine before getting up close to the wall. Once you are in the chosen
place, begin screwing the adjustable levelers out of the bench legs until the
machine is lifted off the casters. Most shops have concrete floors, but in the
unlikely event you are on a wood floor, you should cut some 6” X 6” steel
pads to place beneath the levelers to spread the load. Mark the place on the
floor with paint or sharpie so you can always return there if you should need
to move the machine. If you have a machinist’s level, that is great, but a
good quality carpenter’s level will work as well. Place the level on the top
carriage of the machine and begin to adjust the levelers until you are level
left to right, forward to back and at 45 degrees to both positions. The
machine castings are very rigid, and there is little chance of distortion as
long as all 6 legs are planted firmly on the ground.
REVIEWING THE CONTROLS

For now, leave the machine unplugged from the wall and take some time
to review the controls. You will notice that the DRO display was mounted
upside down during shipping in order to clear the bench legs. At this point
you can remove the nut from the mounting stud and turn the display right
side up. The functions and features of the DRO are covered in the DRO
manual itself. The mill head was placed at its lowest level for shipping, so
you can now unfold the handle from the wheel and move the mill head
upwards manually. There is no lock on the travel, as the stepper motors
lock it into place when at rest. You can also move the Y axis forward and
back and the X axis left and right, but be sure to loosen the carriage locks.
On the front panel to the left are all the controls for the spindles and CNC.
Your machine PC has been pre-configured as well as the VFD inverter, so
your machine will be fully functional when you get ready to turn it on.
Toward the top of the front left panel is the VFD keypad and display. In the
delivered setup, all the functions of the VFD are controlled through Mach 3,
and the display will simply read the Hz reading going to your motors. Please
note, this is not the RPM of the spindle, that will read on your Mach 3
screen. This key pad can also be configured for manual control with the
small knob and the buttons. There is a decal telling how to change the codes
between manual and Mach 3 control. This is all covered in the V-8 manual.
Below the VFD Key pad are the machine controls. The top left switch is for
selecting which spindle will run. Later on you will note that when selecting
either lathe or mill, you will hear a snap sound from the inside of the panel-
that is the magnetic contactor engaging. To the right of this switch is your
main power switch for the VFD inverter and the spindle motors. When this
switch is on, you will also have the red light on. Below these switches in the
center is the E-Stop switch. This switch shuts off all power to the VFD
inverter as well as the stepper motors, so in the event of a crash, all you need
to do is push the red button in. To re-engage the switch you just turn it
clockwise, but be sure to read the instruction and turn off all other switches
first. Below the E-Stop and to the left is the power switch for the Gecko
drive. When this switch is on, your CNC system is activated. To its right is
the stepper motor switch. With the CNC on and the stepper switch on, the
stepper motors are locked in position and can only be moved by Mach 3. If
you want to move the carriages manually, you must turn the stepper switch
off. Check each switch and watch to be sure it is properly “clocked” so the
white stripe points to the proper place on the decal. On the panel at 90
degrees to the switches you will find the flow regulator for the air coolant
system. You will note the air exits through a flex nozzle on a magnetic base
which can be used as a coolant for the cutting tools. Opposite the controls on
the rear of the panel you will find the inlet for the coolant air.
Above the air inlet is the Gecko drive to which the computer and stepper
motors are attached. You will see that Z and X axes are not hooked up, and
A and Y axes are open for use with other CNC tools like the CNC toolpost.
You will also see a small slide switch marked CHARGE PUMP. This should
remain in the ON position. The charge pump is a safety feature that prevents

the machine from moving suddenly if you forget to boot the computer prior
to turning on the CNC power. Above the Gecko drive you will find 3 plugs
marked pins 2,3,4. These are input pins for the Gecko to be used if you want
to attach home and limit switches. The corresponding male plugs are
included in your accessories. Just above these plugs is the auxiliary coolant
fan inlet. The system has 3 fans altogether to keep the operating
temperature at the proper levels.
INSPECTING THE ELECTRONICS
Before plugging the machine into the power, it’s a good idea to look inside
the control cabinet. This will give you an idea what’s inside and how it all
works. Remove the 4 bolts holding the panel in place. Looking inside and
starting at top left you will see the auxiliary cooling fan which pulls air from
outside, blows it across the electronic components and then it exits out down
over the X axis stepper motor. Just below the fan is the Gecko drive with
wires running to the inverter, switches and power supply. To the right of the
fan is the VFD inverter which takes the 220 volt single phase input and
converts it to 220 volt 3 phase out put for the motors. The inverter also
accepts signals from Mach 3 to control the spindle speeds, forward, reverse,
etc. To the right of the inverter are the 2 magnetic contactors that engage the
lathe and mill spindle motors. To the right of the contactors is the CNC
power supply. This converts 220 volts AC into 48 volts DC for the Gecko
drive. Just below the gap between the contactors and the power supply is
the module for the spindle sensors which send signals to Mach 3 for RPM
reading, threading, tapping etc. To the right of the CNC power supply is the
back side of the VFD keypad with the ribbon cable running back to the VFD
inverter. The inverter and the power supply each have their own cooling
fans as well as temperature sensors that shut down in case of overheating.
You will also see the air coolant piping going to the flow regulator. In the
central panel where the lathe spindle and drive belt are located you can see
the lathe spindle sensor mounted to its bracket. Note that this section is
sealed off to prevent any chips or debris from belt wear entering the
electronics components. To the far right you see the backs of the control
switches and you can see the white tab which allows the switch portion to
disconnect from the knob should you need to do maintenance. At the
bottom right you see the Z axis stepper motor and drive belt going to the
pulley on the end of the Z axis ball screw.
While the end panel is open and power disconnected you should check the
drive belt tension, stepper belt tension and adjust any switch knobs that are
not properly “clocked”. When done replace the panel.
NOTE: While the machine is unplugged, we strongly suggest you check
all the wire connections for tightness. Spending 10 minutes now could
save time later should there be a loose wire that becomes disconnected
as the machine is running.

CABLE CONNECTIONS FOR STEPPERS
AND DRO
To prevent any damage to the cables and the Gecko drive, and due to
the position of the DRO display in shipping, the cables are left
unconnected but are labelled for proper connection to the machine.
All cables must be securely attached with the holding screws, because a
loose connection can cause Mach 3 to fault out during a program.
CAUTION- Always turn off the CNC Power
switch before disconnecting a cable.
DRO CABLES
The DRO has 2 modes for lathe and mill, but when first powered up it
should go into the default Mill mode. So just plug the cables into the
display and then watch which display is reading when you move the X
axis and move that cable to the X axis port on the display. The same
procedure for Z. The CNC toolpost will attach to the A axis. You can
swap DRO cables with power on with no problem. Once the cables are
in their proper positions, secure them with the screws.
TEST RUN THE MACHINE
To begin the first test run of the machine, move the Z and X carriages to
their mid travel points, this will give you plenty of clearance for your first
moves. Bring the computer mount around and adjust it to a comfortable
position. Hook up the keyboard and mouse and the monitor and Parallel
port cables. Plug the PC power cable in to the 220 volt wall outlet. Turn the
PC on. It should boot up and on your desktop screen you should have
several icons. RECYCLE BIN, MACH LOADER. Double click Mach
Loader and then select LATHE. If you have some extra selections in the
Mach loader, such as Plasma, Mach3Turn and Mach3Mill, just delete them,
as they are default XML files from the Mach 3 installation and do not have
the correct settings for your machine. Also, delete any extra icons from the
Desktop for Mill, Turn or Plasma and just use the Mach Loader. The Mach
3 screen should load up at this point. Now make sure all your switches on
the machine panel are in the OFF position and plug your 220 cord into the
220 outlet. Be sure your E-Stop switch is engaged by twisting it. Set the
selector switch to LATHE mode and turn on the SPINDLE POWER switch.
You should get a red light and hear the auxiliary cooling fan running. Turn
on the CNC POWER switch and you should get a red light and also hear the

power supply fan running. Turn on the STEPPER switch and you should
hear the steppers jump to locked position. You should not be able to turn
the handles at this point. The DRO display may or may not light up at this
point. It is hard wired into the power switch, but also has a separate ON-
OFF switch on the back of the display. On the lower left of the Mach 3
screen you will see a reset button flashing- click on this to reset. Note- every
time you turn off the stepper switch, the reset will flash and you will need to
reset it. Once the reset button is reset, go to the top of the screen and select
MDI (Manual Data Input). A bar will open up for data entry. First type
G91 and hit enter. G91 is the code for incremental moves. Now type G0 Z1
and hit enter. The carriage should move up 1” to the right. Now try G0 Z-1
and hit enter. The carriage should move 1” to the left. Try the same
commands for X axis according to the chart on the right sheet metal shield.
When testing any axis, if you hear a whining noise and there is no motion,
don’t worry- that is just the stepper stalling and it won’t hurt anything.
Contact us for help with diagnosing the problem.
PLEASE NOTE: The command is G “ZERO” not G “OH”
Now try a spindle command- type M3 S200 and hit enter. The lathe spindle
should turn at 200 RPM. Type M5 and enter to stop the spindle. Type M4
S200 and the spindle should rotate the opposite direction. Always use M5 to
stop the spindle.
If the carriages or spindle move the wrong direction go to the bottom of this
file for instructions.
As your spindle is running, on the Mach 3 screen you will have a display that
shows the RPM you requested and another display showing the true rpm as
read from the spindle sensor. These should be very close, but can be
adjusted in the CONFIG files. At this point you are ready to begin the final
adjustments of the spindle rpm, steps per inch and backlash compensation.
We have included a number of files for these operations on our website. We
have set the adjustments as close as possible, but every machine will be
slightly different and once installed in its final location these fine
adjustments must be completed by the operator. The functions of each of
the VFD codes are set forth in the V-8 VFD manual which we have on our
website. Following are a few of the more common adjustments used in daily
operations.
Codes P0-02 and P0-03 and P0-11 allow you to change from Mach 3 control
of your spindles to manual control according to the settings on the decal.
Codes P0-08 and P0-10 are the Hz settings which control your maximum
spindle speeds. Please note, when adjusting these settings, the 2 code settings
must always match. The factory default setting is the maximum allowable of
120.

Codes P0-18 and P0-19 control the rate in seconds of the acceleration and
deceleration of the spindles. If the setting is too low (.5) it will cause a fault
error as the motor cannot accelerate or decelerate that fast. We recommend
1.5 as the setting.
The V-8 inverter allows you to select the proper settings to match your
motor. These settings are done at the factory according to the nameplate on
the motor. However you may want to compare the inverter settings to the
name plate on your motors. These codes are found in P1-00 through P1-05.
POSSIBLE ISSUES:
1. Stepper motors run the wrong direction according to the
machine decal.
The steppers have 2 wires that are interchangeable in the plug, and
occasionally we find motors with them reversed. Changing the
direction is a simple Mach 3 adjustment-
Go to CONFIG>PORTS & PINS> MOTOR OUTPUTS and find
the column marked DIR LOW ACTIVE - simply change the
check mark from red to green or vice versa to reverse the motor
direction.
Your machine comes with an operating demo version of Mach 3
which will run up to 500 lines of G-code. In order to use more lines
or the special wizards, you will need to purchase the full Mach 3
license.
You can purchase the full license from
DMAUCH@SEANET.COM
DRO updates:
Machines after serial # 15066 on have a new DRO feature unique
to the Shopmaster. Because the axes designations for Lathe and
Mill are different, normal DRO displays require you to remember
which mode you are reading. For example, when in Mill mode, the
X axis is the carriage travelling along the main bed toward and
away from the chuck. But in Lathe mode it is called the Z axis.
This can be confusing when trying to remember which is which.
On those machines after 15066 we have re-designed the DRO
display, and now by pressing the EDM button twice, the display
switches between Mill and Lathe mode so your readings are always
correct.


5C COLLET SET
4 JAW CHUCK

FOLLOW REST

STEADY REST

TOOL TRAY
The CNC toolpost setup manual will be sent as a separate
document.

SETTING STEPS PER INCH AND BACKLASH
COMPENSATION
To get the best results from your machine these settings must be done
to the best possible settings. Because the machine is new, it will wear
in a bit after a certain amount of run time and may loosen up. We
suggest that your first step is to take some time to run all your axes
back and forth their full travel for about an hour. After this
procedure is done, check your gib adjustments and the adjustments on
your thrust bearings to be sure there is no looseness from the assembly
grease having been displaced.
SETTING STEPS PER INCH
1. Go to CONFIG> NATIVE UNITS and set to INCH
2. Go to BACKLASH and be sure it is not enabled
3. In your MANUAL screen, choose an axis to start and put a slight
amount of drag on your carriage lock. First give a G91 command
for incremental mode. Move the axis in any direction –this will
take out any inherent lash in the screw.
4. Now Zero your DRO in Mach 3 and also your machine DRO. Now
give your Mach 3 a G code command to go 1 inch ( G0 X1 )
5. Read the actual motion on your DRO. If the travel was less than 1
inch, you need to add steps in your steps per inch settings in
MOTOR TUNING. If the travel was more than 1 inch, then you
need to subtract steps.
6. Suppose your 1” command resulted in a true motion of only 0.999”
that means you were one thousandth short, so you need to add
enough steps to increase the travel by 0.001”. Go to
CONFIG>MOTOR TUNING and you will find the steps per inch
box. For example, Z axis is set to 20314steps. You need one
thousandth more, or 20314 divided by 0.001 = 20.314steps ( 20 in
round numbers)
7. Add the 20 steps to the factory setting and set the steps to 20334, hit
the SAVE SETTINGS button and go back to your MDI screen.

8. Move your carriage back PAST the start point, then forward to the
start point to take out any inherent lash again and repeat the
procedure. Once you have the steps per inch set such that the travel
matches your command, move on to the other axes and repeat the
procedure.
BACKLASH COMPENSATION
Once you have the steps per inch adjusted on all 4 axes, you can now
measure your backlash and set the compensation.
1. Go to BACKLASH and enable the backlash compensation
2. Using the same procedure as before, move your carriage to a start
point taking out the inherent backlash. Set your DRO to Zero and
give the carriage a command to go 1”. If your steps per inch settings
are correct, it should go exactly 1”.
3. Now give the carriage a command to go 1” in the opposite direction
and read the result on your DRO. If the return move was only
0.998”, then you have 0.002” backlash.
4. Go to CONFIG>BACKLASH and select the axis and put in the
backlash amount, SAVE SETTINGS and repeat the test until your
carriage moves exactly 1” in both directions when given the
command. Repeat this procedure for both axes.
SETTING SPINDLE PULLEYS
1. Set the Hz settings in your VFD to your preference from 50 to a
maximum of 120. ( the factory setting is 120)
2. Follow the instructions in your Laser Tachometer manual for testing the
spindle RPM.
3. Set your Hz setting to its maximum amount and read the spindle RPM
with your tachometer.
4. Go to CONFIG>SPINDLE PULLEYS
5. In the Minimum speed set it to ZERO
6. In Maximum speed put in the reading from your tachometer. Set the
Pulley Ratio to 1.
7. Now test your spindle with various M3S commands( M3S500, M3S750
etc.) and check the spindle RPM with your tachometer and compare to the
spindle speed and STrue readings on your Mach 3 screen.
With some tweaking of the MAX speed settings you should be able to get
the Mach 3 screen settings within a few RPMs of your tachometer reading.
NOTE: If you change the Hz amount in your VFD, you will need to test your
RPM again with the tachometer and adjust the Max speed in your settings.
This manual suits for next models
1
Table of contents


