Shopsmith 555812 User manual
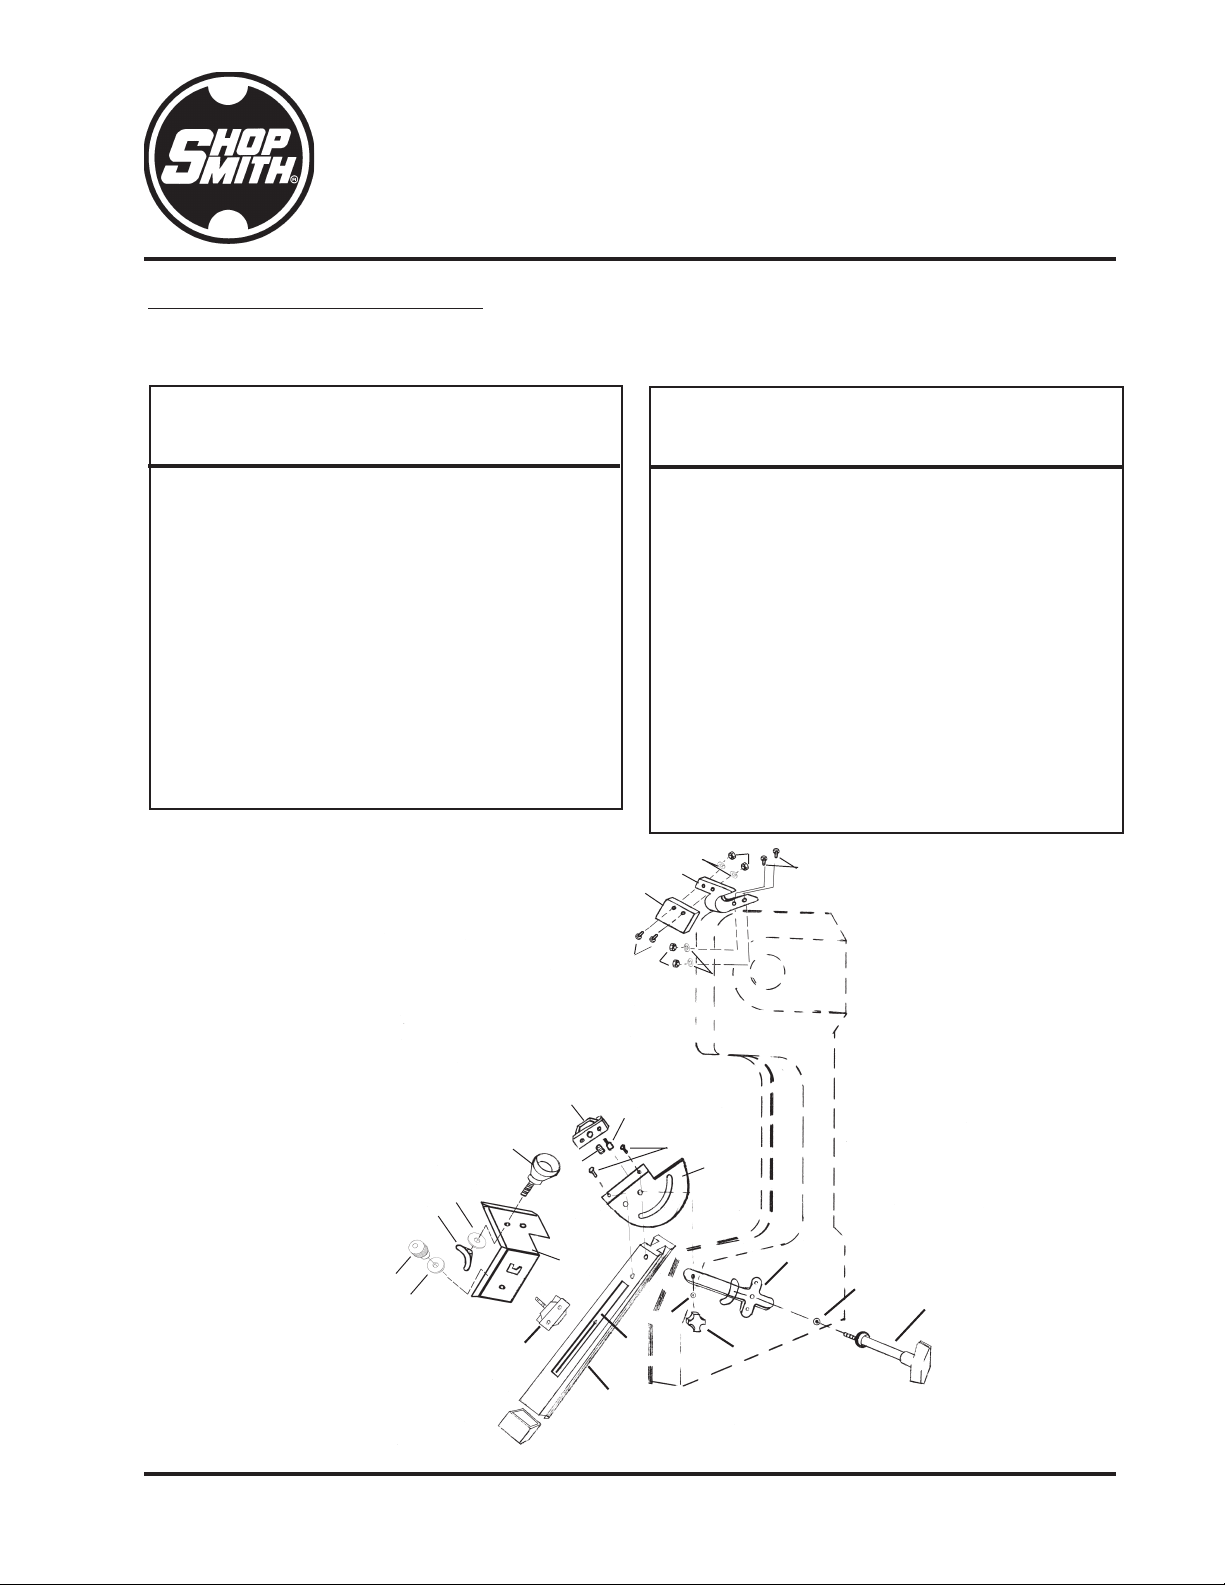
CHISEL SHARPENER
555812
PARTS EXPLOSION
Parts List
Ref Part Item
No. No. Description Qty
— 555812 Mark V Chisel Sharpener
1 120392 . Flat Washer.................................. 2
2 126315 . Carriage Bolt, 1/4-20x1 ............. 1
3 274737 . Nut, 10-24 .................................... 4
4 436691 . Pan Head Machine Screw ......... 2
5 436732 . Philips Screw, 10-24x1/2 ........... 4
6 502973 . Split Washer ................................ 4
7 513216 . Wing Nut ..................................... 1
8 513739 . Flat Washer.................................. 1
9 514491 . T-Nut ............................................ 1
10 515318 . Eye Shield .................................... 1
11 521662 . Knob ............................................. 1
12 521768 . Knob ............................................. 1
13 521846 . Chisel Bracket ............................. 1
14 521847 . Chisel Protractor......................... 1
15 521849 . Support Angle ............................. 1
16 521853 . Set Screw ...................................... 1
17 521854 . Chisel Stud .................................. 1
18 521855 . T-Nut Assembly ......................... 1
—521903 . Arm & Label Assembly ............. 1
19 521856* . . Arm ............................................. 1
20 521899 . . Warning Label, Rotation ......... 1
21 521859 . Cup Assembly ............................. 1
22 521879 . Bracket, Eye Shield ...................... 1
23 521881 . Sharpening Plate (not shown) ... 1
24 521898 . Warning Label, Dust Collection 1
* Not available as a service part.
Ref Part Item
No. No. Description Qty
From your
Strip Sander
2
12
1
13
19
20
18
1
21
8
7
11
15
4
14
17
9
16
56
3
22 65
3
10
CHISEL SHARPENER 555812
Page 2
INTRODUCTION
The Chisel Sharpening Attachment allows
you to sharpen various sizes and shapes of
chisels. Straight -edged chisels, curved edge
chisels, steep-angle lathe scraping tools, and
low angle carving chisels can all be sharpened
in a flash. It is as simple as replacing the Strip
Sander table with the sharpening attachment,
changing the platen, and placing the Strip
Sander on your Mark V.
NOTE
To operate the Strip Sander Abrasive Belt in
an upward direction, the Strip Sander must
be mounted on the Quill End of the Mark V.
SAFETY
WARNING
Throughout this manual, we list WARN-
INGS, CAUTIONS, and NOTES. We advise
that when you come to one of these list-
ings, please read and understand it fully.
Their meanings are:
WARNING
A WARNING is given when failure to follow
the directions is likely to result in injury,
loss of limb, or life.
CAUTION
ACAUTIONisgivenwhenfailuretofollowthedirec-
tionsislikelyto result in damage to the equipment.
NOTE
A NOTE is used to highlight an important
procedure, practice or condition.
WARNING
General Safety
•Wear proper eye and ear protection.
Also, wear a dust mask.
•Keep guards in place. Always keep
guards in working order and in proper
alignment and adjustment. Most inju-
ries occur on unguarded power tools.
•Remove adjusting keys and wrenches.
•Wear proper apparel. Do not wear loose
clothing, ties, gloves, rings or other jew-
elry. Roll sleeves up above your el-
bows, wear nonslip footwear, and tuck
long hair under a hat.
•Do not operate power tools if you are
tired, taking medication, or under the
influence of alcohol or drugs.
•Avoid dangerous environments. Don’t
use power tools in damp, wet or explo-
sive atmospheres.
•Keep work areas well-lit, clean, and free
from clutter.
•Do not force the tool. It will do the job
better and safer at the rate for which it
was designed.
•Use the right tool. Don’t force a tool or
accessory to do a job for which it was
not designed.
•Check damaged parts. A damaged guard
or part should be properly repaired or
replaced before further use. If a strange
noise or vibration develops, immedi-
ately turn off the power, unplug the
machine and correct the problem. Never

Page 3
555812 CHISEL SHARPENER
operate a power tool that is not function-
ing properly.
•Do not overreach. Keep proper footing
and balance at all times.
•Do not leave the tool running unattended.
Turn off the power. Don’t leave the tool
until it comes to a complete stop.
•Avoid unintentional starting. Make sure
the switch is in the “off” position before
plugging in or unplugging the tool.
•Disconnect tools. Turn off and unplug
tools before changing accessories and
setups, making adjustment, and per-
forming maintenance and repair.
•Do not stand or lean on the tool. You
could fall onto the tool or it could tip
over injuring you and/or damaging the
tool.
•Maintain tools. Keep parts and tools
sharp, clean and maintained according
to the instruction manual.
•Make your workshop childproof. Use
padlocks, master switches or remove
starter keys.
•Keep children away. All visitors should
stay a safe distance from power tools,
and wear eye and ear protection.
•Do not permit anyone who is inexperi-
enced to use your power tools without
supervision.
To protect yourself from injury:
•READ, UNDERSTAND and FOLLOW ALL
the information in this Owner’s Manual.
•ALSO READ, UNDERSTAND and FOL-
LOW ALL the information in the instruc-
tion manuals, which came with your
MARK V and Strip Sander.
•Read the Safety section and complete
the Assembly and Setup procedures
before operating your Mark V Chisel
Sharpener.
•DO NOT USE the Mark V Chisel Sharp-
ener to sharpen knives.
•Rotation of the belt must be up against
the platen and away from the cutting
edge.
•DO NOT USE Dust Collection while grind-
ing metal.
•Clean Sawdust from Strip Sander prior
to grinding metal. Sparks from grinding
will ignite sawdust deposits.
TOOLS REQUIRED
5/32" Allen wrench
3/8” Wrench
#2 Phillips Screwdriver
For Strip Sanders Purchased
before January 1, 2001.
3/16” Drill bit
Electric Hand Drill
Center Punch
Hammer
ASSEMBLY
NOTE
The arm comes with the trunnion, t-nut,
pivot,end cap,and warninglabelassembled.
Set this aside.

CHISEL SHARPENER 555812
Page 4
1. Pick up bracket (15), with bent tab down
slide stud of t-nut asm. (18) up through
the round hole. With t-nut asm. parallel,
add washer (8) and knob (11), as shown in
Figure 1. Do not tighten completely.
(5), as shown in Figure 4.
NOTE
ForStrip Sandersmade afterDecember 2000,
skip steps 5-7 and continue on with step 8.
For Strip Sander prior to 2001.
NOTE
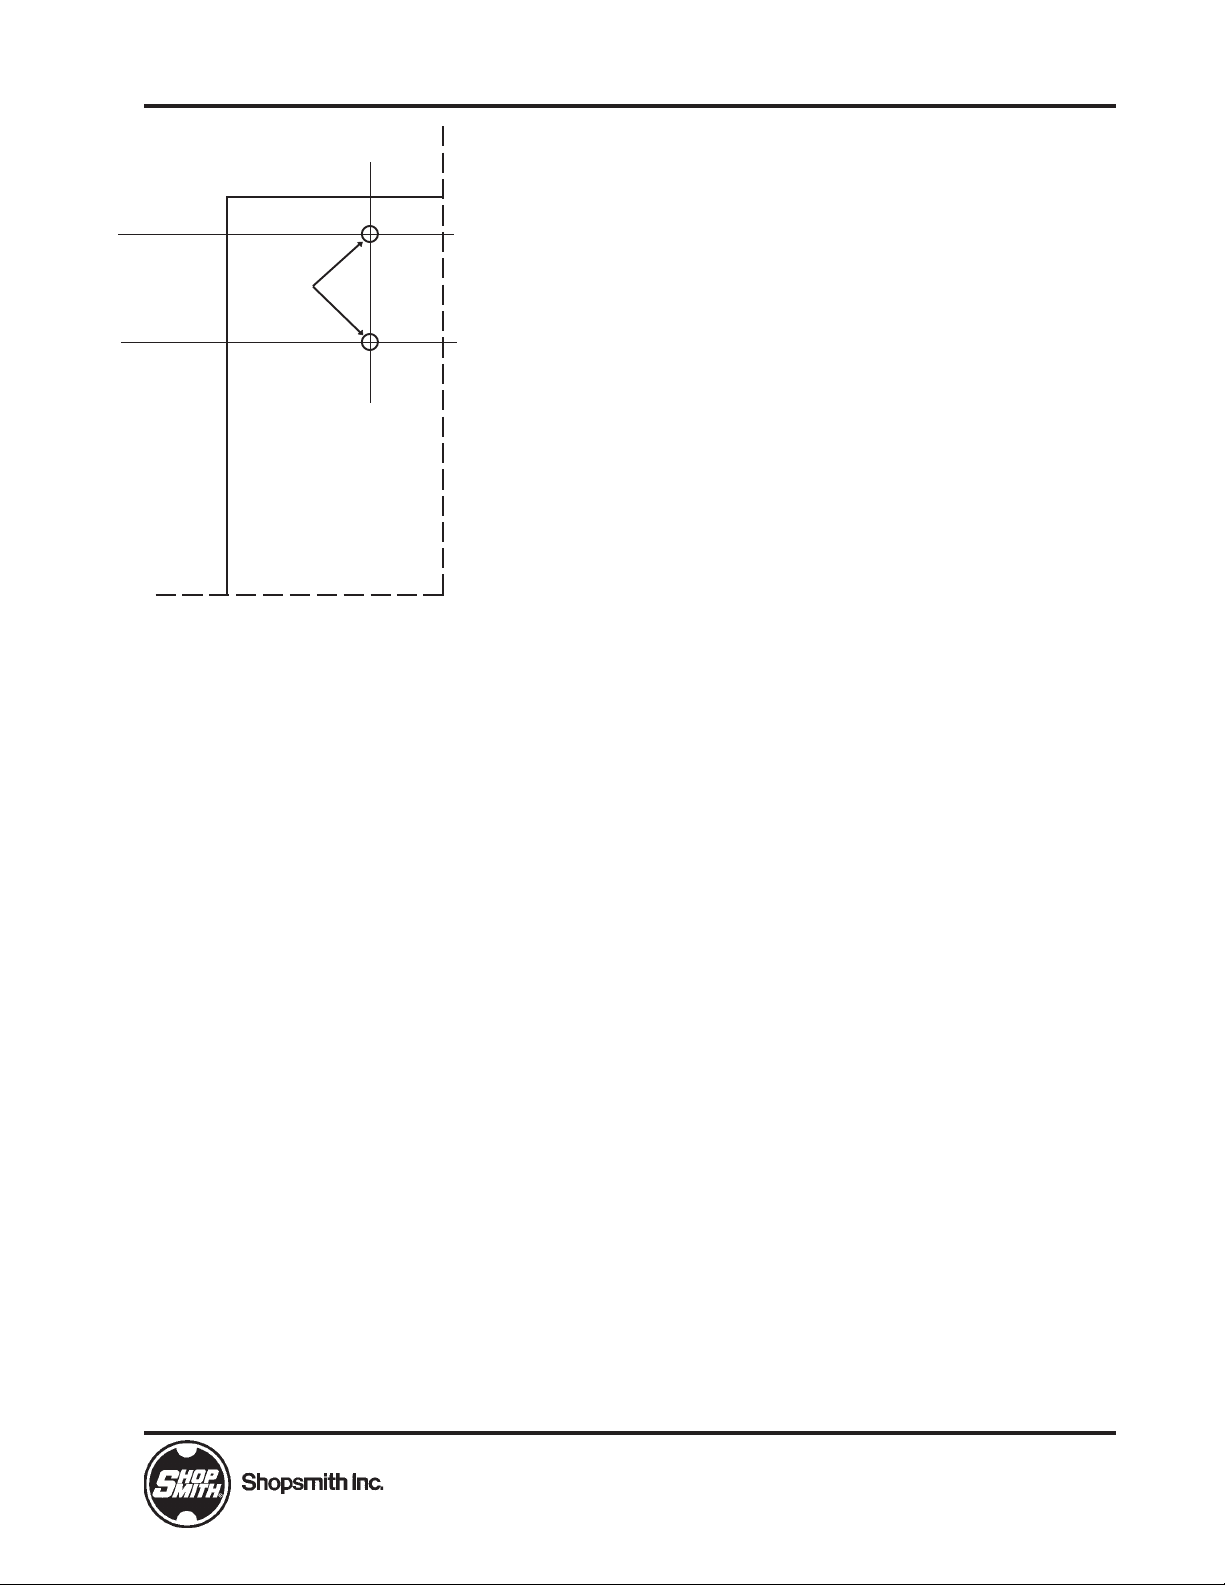
There is a drilling template included with
this Owner’s Manual, you will need to lo-
cate and cut out.
5. Tape template on top of Strip Sander,
align line “A” with edge of cover perpen-
dicular to the Upper wheel and line “B”
with the side edge of cover. Hold in place
with masking tape.
6. Place tip of center punch on the center
lines of the holes and strike it with a
hammer to mark the Strip Sander.
7. Remove template. Use 3/16” Drill bit in
an Electric Drill to drill 2 holes through
the casting where marked.
Figure 1
Figure 3
Figure 4
2. Turn bracket assembly so bottom of t-nut
is vertical and surface with the two holes
is down. Slide cup assembly (21) up
through center hole. Add washer (1) and
wing nut (7) on threads, as shown in
Figure 2. Finger tighten, this is your sup-
port assembly.
3. Place arm assembly on bench with trun-
nion scale facing up. Slide t-nut of sup-
port assembly into t-rail arm asm. (19), as
shown in Figure 3. Tighten knob when
support assembly is half way down arm.
Figure 5
4. Assemble guard to bracket with 2 screws
Figure 2

Page 5
555812 CHISEL SHARPENER
SETUP
WARNING
Make sure the Mark V is set to slow speed,
turned off, and unplugged before begin-
ning setup or operations.
1. Mount the Mark V in similar manner as
shown in Strip Sander Owners manual
for wood sanding, except that in this case
the Strip Sander is mounted in the base
arm of the Mark V and coupled to the
quill in headstock. DO NOT mount the
Strip Sander in the headrest or coupled to
the upper auxillary spindle.
8. Openthe StripSander cover,hold bracket
and guard assembly against the top of the
frame. Slip screw through the hole in the
bracket and through the casting. See Fig-
ure 5. Add lock washer and nut to screw
andtighten withPhillips screwdriverand
3/8” wrench. Repeat this step for other
screw.
Mount Chisel Sharpening
Attachment on Strip Sander
9. Pick up Dust Collection Warning label
(24), remove backing and place on the top
of the dust collection outlet on your Strip
Sander.
WARNING
Read and Follow information on the warn-
ing label. Failure to follow label warning
will result in fire damage to you strip sander,
dust collector, and other personal prop-
erty.
10. Remove abrasive belt from Strip Sander,
by pressing the idler wheel down and
slipping the belt off sideways.
11. Remove table from Strip Sander by re-
moving knob and bolt from slot in table,
then unscrew and remove tilt knob from
Strip Sander.
12. Removeplaten fromStripSander, byloos-
ening the three socket head cap screws
with 5/32" Allen wrench.
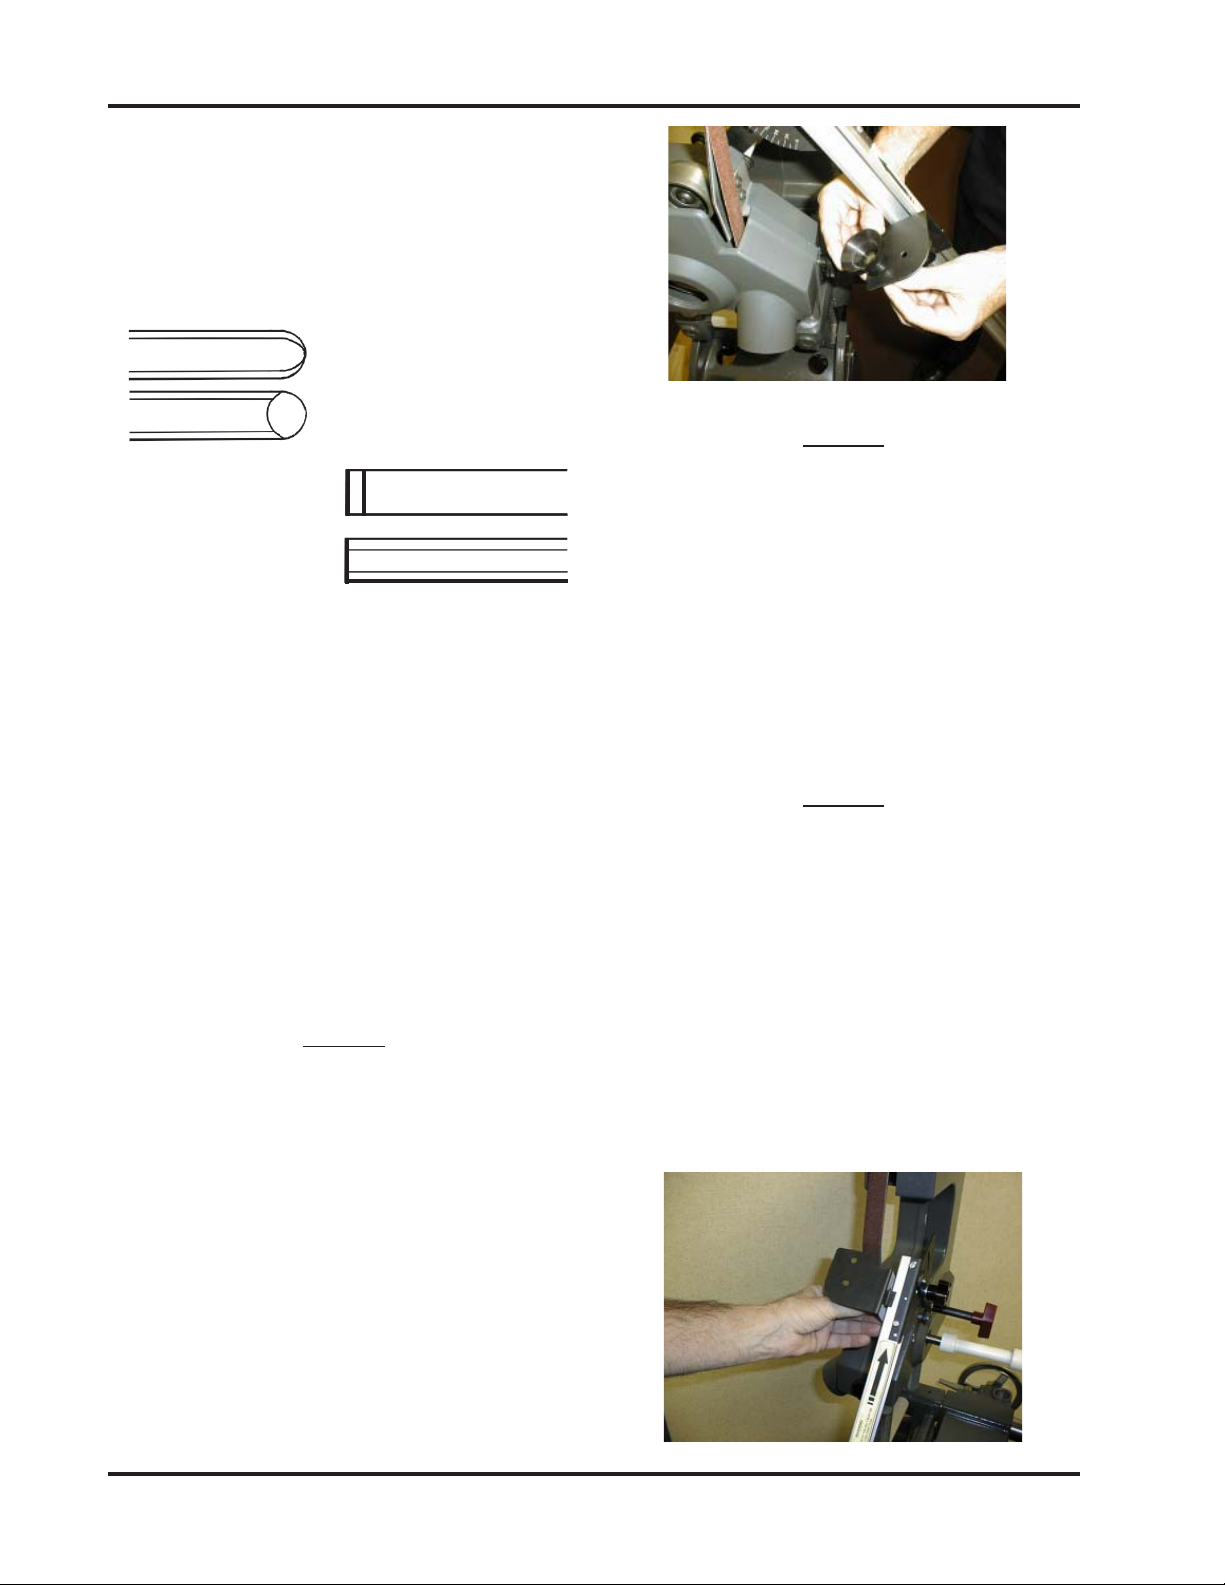
13. Slip trunnion support bracket over trun-
nion support and hold in place with
washer and knob assembly that was used
to hold table in place, as shown in Figure
6. Tighten by hand. Mount the chisel
sharpening platen and install the desired
abrasive belt.
14. Place arm assembly with angle degrees to
left against left side of trunnion support
bracket,so pivotscrewprotrudes through
pivot hole in end of trunnion support
bracket.Insert carriagebolt throughtrun-
nion and trunnion support bracket from
left. Add washer and knob, as shown in
Figure 7.
Figure 6
Figure 7

CHISEL SHARPENER 555812
Page 6
WARNING
Failure to mount Strip Sander (as described
in Step 1) will cause the abrasive belt to run
in the wrong direction, and will cause the
tool to gouge into the belt, damaging both
and throwing the tool.
2. Be sure that you have mounted the hub
with5/8" diameterholeandfour (4)spline
grooves on quill. Position the headstock
as far to the right as possible and lock.
3. Slide the coupler on the Strip Sander hub
and extend the quill until the quill hub
engages in coupler. Lock quill.
OPERATIONS
Basic Operations
CAUTION
Tooltemperatureisveryimportanttothelifeofyour
cutting tools. Cool the tool frequently in water dur-
ing the sharpening process.
1. The recommended speed is “I” (1750
RPM) on your Mark V Speed Dial.
2. In order to keep the hardness and tough-
ness properties of the steel in your cutting
tool, you must overheat the tool while
grinding, sharpening, or honing it. If you
can not touch the tool without burning
your finger, it is too hot. Cool the tool
frequently in water during the sharpen-
ing process.
NOTE
The finer the abrasive you use and/or the
more pressure you exert on the tool the more
heat will be generated. If your cutting tool
gets hot very quickly, you are either using
too much pressure or the belt has become
dull and needs replaced. Finer belts will
wear quickest and will need to be replaced
most often.
Grinding, Sharpening & Honing
1. Grinding - Use coarser grits 60, 80, 100 to
reshape the tools bevel or remove large
nicks in the cutting edge.
2. Sharpening - Use medium grits 100, 150,
220 to remove burrs, small nicks and
sharpen very dull tools.
3. Honing - Use finest grits 320, 400, 600 to
dress and improve the cutting edge of
tools that do not have any nicks or burrs
and only require a light touch-up to keep
them razor sharp.
Tool Care
Most new cutting tools will require at least
sharpening with medium grits and final hon-
ing with finest grit sanding belts. Lathe chis-
els intended for scraping only need grinding
with coarse grits. The burr left on the cutting
edge will help cut. Other lathe, carving, and
bench chisels must be used razor sharp and
are easiest to use when kept that way.
Setting the Tool Angle
The tool angle is a function of both the arm
angle and the cup position. The trunnion scale
is an approximate guide and is only accurate
when the metal shank of the tool being sharp-
ened is exactly parallel to the arm.
NOTE
To set the proper angle, you must first de-
cide whether you are going to copy the tool’s
bevel angle or change it.
Page 7
555812 CHISEL SHARPENER
To Copy the Tool’s Bevel
1. Place a 100, 150, or 220 grit abrasive belt
on the Strip Sander. Refer to Strip Sander
Owner’s Manual for belt installation in-
structions.
7. If the scratches are only at the tool’s tip,
then turn speed on speed dial to “slow”
and turn off the headstock. Loosen the
trunnion lock knob, lower the arm
slightly, lock trunnion lock knob and re-
peat until scratches follow full bevel
length.
8. Repeat with the next finer grits.
To Change the Bevel Angle
1. Place a 60, 80, or 100 grit abrasive belt in
the Strip Sander, refer to the Strip Sander
Owner’s Manual for belt installation in-
structions.
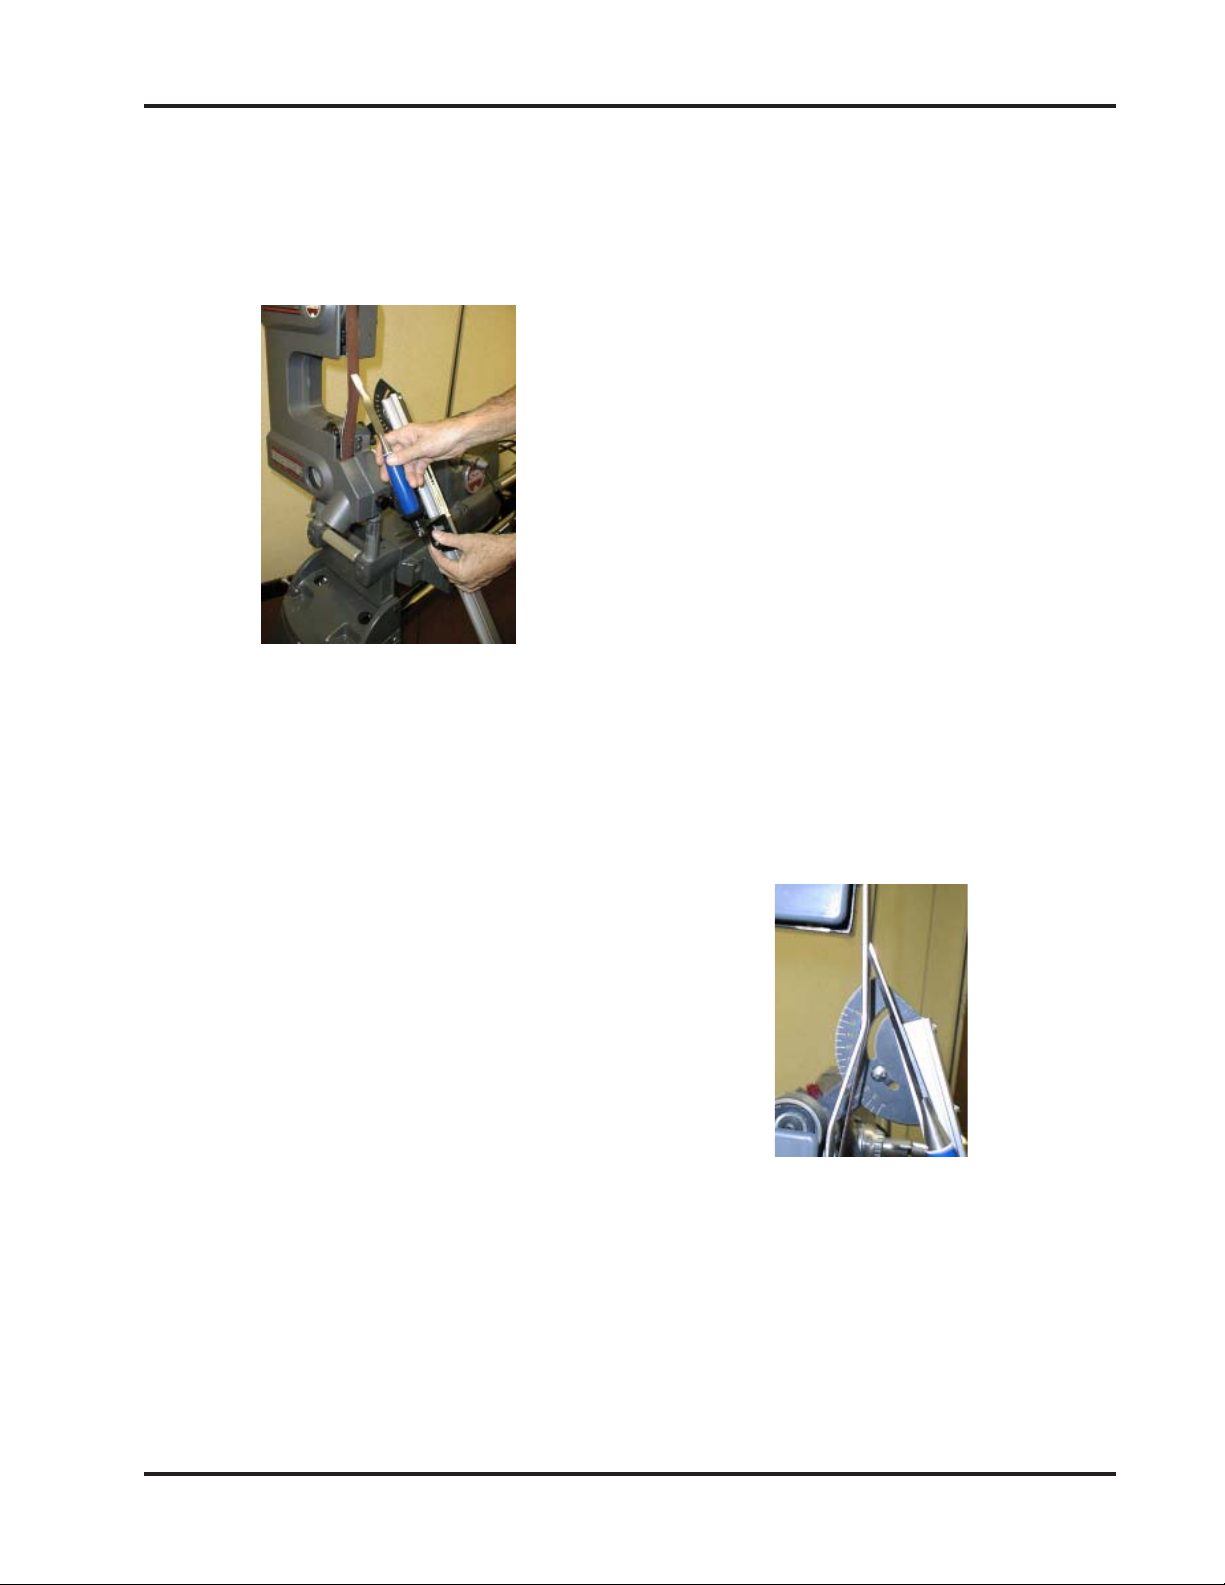
2. Set the chisel handle in the cup, loosen the
support lock knob. Slide the support un-
til the tool’s bevel rests against the belt
and tighten the support lock knob.
3. Loosen the trunnion lock knob and tilt
arm until the cutting tool’s bevel is at the
new angle against the abrasive, as shown
in Figure 9. Lock the trunnion lock knob.
Figure 8
2. Set the chisel handle in the cup, loosen the
support lock knob. Slide the support until
the tool’s bevel rests against the belt and
tighten the support lock knob, as shown
in Figure 8.
3. Loosen the trunnion lock knob and tilt
arm until the cutting tool’s bevel lays flat
against the abrasive belt and the tools
steel shank is parallel to the arm. Lock the
trunnion lock knob.
4. Final minor adjustments to align the tool
shank parallel to the arm should be made
by moving the support on the arm.
5. Remove the chisel from the cup, turn the
headstock on at “slow” speed setting,
check the belt tracking and adjust if neces-
sary. Set speed to “I” (1750 rpm) on the
Mark V speed dial.
6. Place the tool handle in the cup and gen-
tly touch the bevel against the moving
belt and remove. Look for flat, consistent
scratches along the bevel.
4. Final minor adjustments to align the tool
shank parallel to the arm should be made
by moving the support on the arm.
5. Remove the chisel from the cup, turn the
headstock on at “slow” speed setting,
check the belt tracking and adjust if nec-
essary. Set speed to “I” (1750 rpm) on the
Mark V speed dial.
Figure 9
Figure
Figure 8

CHISEL SHARPENER 555812
Page 8
6. Place the tool handle in the cup and grind
the new bevel against the moving belt.
7. After the initial bevel grind is completed,
turn down and turn off the Mark V. Open
the Strip Sander, remove the belt and
install the next finer grit.
NOTE
Each progressively finer grit belt will re-
movescratches andburrsformprevious grits.
8. After changing each belt to a finer grit,
repeat steps 4-6, until you achieve the
sharpnessdesired.
NOTE
A final honing will be required on the in-
side of gouges with a slip stone.
Sharpening a Bench Chisel
NOTE
This is probably the easiest tool to sharpen
and a good tool to use to learn this accessory.
1. Select appropriate abrasive belt and in-
stall on Strip Sander.
2. Set angle as described previously. Turn
on the machine to Speed “I” (1750 rpm)
on your Mark V speed dial.
3. Set the chisel handle in the cup and hold
the chisel against the moving belt with
light, even pressure.
4. Check your progress often and check
chisel temperature. Cool in water as
needed.
5. Use a square to make sure the new cutting
edgeisperpendicular totheside,as shown
in Figure 10. If it is not square, grind more
from the high side by applying more
pressure against that side.
6. Repeat steps 3-5 with progressively finer
abrasives. As you progress to finer and
finer abrasive belts the burr will become
smaller and eventually be removed.
Sharpening a Skew
NOTE
This is very similar to sharpening the bench
chisel, except that you must evenly grind a
bevel on both sides of the tool.
1. Select appropriate abrasive belt and in-
stall on Strip Sander.
2. Set angle as described previously. Turn
on the machine to Speed “I” (1750 rpm)
on your Mark V speed dial.
3. Set the chisel handle in the cup and hold
the chisel against the moving abrasive
belt with light, even pressure. See Figure
11. This time the chisel is rotated slightly
at a skew angle.
Figure 10
Figure 11

Page 9
555812 CHISEL SHARPENER
6. Use a square to make sure the new cutting
edge is perpendicular to the side. If it is
not square, grind more from the high side
by applying more pressure against that
side.
7. You may proceed to finer grits if you
desire, but many woodturners who use
the scraping technique prefer to leave the
burr on the chisel. They believe the burr
cuts smoother than a burr-free edge.
Sharpening a Gouge
1. Select appropriate abrasive belt and in-
stall on Strip Sander.
2. Set angle as described previously. Turn
on the machine to Speed “I” (1750 rpm)
on your Mark V speed dial.
3. Hold the chisel against the moving abra-
sive belt with light, even pressure. Rotate
the chisel in the cup to grind the curved
bevel, as shown in Figure 14.
4. Checkyourprogressoften andcheckchisel
temperature. Cool in water as needed.
5. Turn the skew chisel over and grind the
opposite side, checking that the bevel is a
constant width on both sides. If it is not
consistent, grind more from the narrow-
est part of the bevel by applying more
pressure against that area.
6. Checkthatthe anglesat theheal andtoe of
the chisel are equal, see Figure 12.
Figure 12
7. Repeat steps 3-6 with progressively finer
abrasives. As you progress to finer and
finer abrasive belts the burr will become
smaller and eventually be removed.
Sharpening a Parting Tool
1. Select appropriate abrasive belt and in-
stall on Strip Sander.
2. Set angle as described previously. Turn
on the machine to Speed “I” (1750 rpm)
on your Mark V speed dial.
3. Set the chisel handle in the cup and hold
the chisel against the moving abrasive
belt with light, even pressure, as shown
in Figure 13.
4. Grindboth edgesof theparting toolso the
bevels are the same length and the point
is exactly centered at the widest part of
the sides.
5. Check your progress often, check chisel
temperature,and coolin wateras needed.
Figure 13
Figure 14
Heal
Toe
CHISEL SHARPENER 555812
Page 10
Figure 15
4. Check your progress often to check chisel
temperature. Cool in water as needed.
5. To grind a pointed gouge for spindle
turning, more grinding is done on either
side, see Figure 15.
Figure 17
NOTE
The angle scale is no longer accurate with
the cup set in the inner hole. You must
estimate your bevel angle.
3. Sharpen your chisel as described previ-
ously, refer to the appropriate section.
Sharpening Low Angle Curved
or Straight Scarping Chisels
NOTE
To sharpen scraping chisels you must make
somechanges tothe sharpeningguide setup.
1. Remove the cup and loosen the support
bracket lock knob several turns.
2. Rotate the support bracket 90oclockwise
looking at the knob, so it’s two holes are
approximately parallel to the arm. As
shown in Figure 18,the tab that was pre-
viously in the arm is now above the arm.
6. To grind a square gouge for roughing,
less grinding is done on either side, as
shown in Figure 16.
7. Repeat steps 3-5 with progressively finer
abrasives. As you progress to finer and
finer abrasive belts the burr will become
smaller and eventually be removed.
Sharpening a Long Angle
Carving Gouge, Skew, or
Paring Chisel
NOTE
To grind angles less than 10oon carving
chiselsthe cup thatsupports thechisel handle
must be moved to the inner position.
1. Remove the wing nut and washer, repo-
sition the threads on the cup in the hole
closest to the machine.
2. The new cup position will now allow you
to grind the very long bevels required on
some carving chisels. See Figure 17.
Figure 16
Back
Front
Front
Back
Figure 18

Page 11
555812 CHISEL SHARPENER
3. Slide the support bracket up the arm until
its edge is even with the top end of the
armand tightenthesupport bracketknob.
4. Loosen the trunnion lock knob and rotate
the arm to the 90oposition.
5. Loosen the support bracket lock knob.
Slide and pivot the support bracket to-
ward the abrasive belt. Set your desired
angle, as shown in Figure 19.
Figure 19
CAUTION
Position the support bracket no further than 1/4"
away from the abrasive belt.
6. Turn on the Strip Sander, hold the chisel
flat on support bracket with light even
pressure and slide it toward the belt. For
curved scraping chisels pivot the chisel
from left to right to create the desired
profile on the end of the chisel, as shown
in Figure 20. For straight tools hold the
Figure 20
Right Left
cutting edge against the bent without
rotating the chisel.
7. Check your progress often to check chisel
temperature. Cool in water as needed.
8. You may proceed to finer grits if you
desire, but many woodturners who use
the scraping technique prefer to leave the
burr on the chisel. They believe the burr
cuts nicer than a burr-free edge.
NOTE
If you have further questions or need help,
call our Customer Service Department: Toll
Free 1-800-762-7555 or visit our website at
www.shopsmith.com.

CHISEL SHARPENER 555812
6530 Poe Avenue
Dayton, Ohio 45414
www.shopsmith.com All Rights Reserved
Printed In U.S.A.
RLFSHOP, LLC.
845515 Rev. B 01-10
NOTES
555812 CHISEL SHARPENER TEMPLATE
6530 Poe Avenue
Dayton, Ohio 45414
www.shopsmith.com
845518 Rev. 12/00
All Rights Reserved
Printed In U.S.A.
LINE “A”
LINE “B”
3/16” Diameter
Table of contents
Other Shopsmith Power Tools manuals


Popular Power Tools manuals by other brands


ELORA
ELORA 2034 operation instruction

P.Lindberg
P.Lindberg 9039281 manual

BGS technic
BGS technic 8496 instruction manual

Kurtz Ersa
Kurtz Ersa X-TOOL VARIO operating instructions

Roland
Roland DWX-51D Setup guide

Johnson & Johnson
Johnson & Johnson DePuy Synthes Small Battery Drive II Manual and Mechanical Cleaning Instructions