Showerbuddy SB3T User manual

elimination through innovation
SB3T
Owners Manual

INTENDED USAGE:
The Showerbuddy shower/commode chair is a medical device indicated for use by
persons with limited mobility who are unable to stand, walk and/or seat independently.
The device is specifically designed for individuals who require additional support and
stability during washing, toileting and other hygienic activities. It is a class 1 medical
device, which is intended to be used only as a seating option for toilet issues,
showering and bathing. Its purpose is to help physically handicapped people during
their hygienic activities. Any other use is prohibited.
INDICATIONS:
The device is specifically indicated for individuals who (because of the wide variety
of possible health problems) are unable to stand and /or walk and so they need an
assistance device to maintain some or all daily hygienic tasks.
CONTRADICTIONS:
This type of device must not be used by a disabled person alone. The user should
always be accompanied by a caregiver or assistance person. The device is not
recommended for persons with flaccid paralysis or other diseases that cause
serious body control problems. Such persons require special wheelchairs designed
for extra stability and support of the user’s body. The need for this type of specialty
wheelchair should be always estimated and indicated by a physician or a physical
therapist.
WARNING – Included in this packaging and fitted to the Showerbuddy chair are
small parts, plastic wrap and polystyrene packing that could be dangerous to
children under 5.
Keep children away from this device and do not let them play with any parts.

contents
page 2
Exploded Parts ............................................................... 3
Parts List ........................................................................ 4
Roll-InBuddy + Tilt Assembly .......................................... 5
Roll-InBuddy + Tilt Operation .......................................... 12
Strut Adjustment ............................................................ 17
Cleaning + Maintenance ................................................. 20
Safety Instructions ......................................................... 21
Warranty Information ...................................................... 24
Registration Form ........................................................... 26
Showerbuddy SB3T

exploded parts
page 3 Showerbuddy SB3T
1
90
500-254
500-268
25
69
12
500-259
500-268
500-253 96
81
3
32
39
27
38
37
34
36 35
33
41
76
40A
28
94
80
93
31
95
500-267
500-266
30
75
73
71
70
42
74
72
23
73 A
A
A
A

parts list
Showerbuddy SB3T page 4
15” Castor Wheel
3Tube Cap (25mm)
Leg Tube Cap
12
Tube Washer (25mm)23
Securing Clip (Large)25
Arm Rest Clip27
Cushion Connector28
Cushion30
Commode Bucket Connectors31
Commode Bucket + Lid32
33 Arm Rest (Left)
34 Arm Rest (Right)
Arm Rest Padding (Right)
35 Arm Rest Padding (Left)
36
37 Arm Rest Lock
See the exploded chair image for the location of parts.
Arm Rest Cap38
Arm Rest Knob39
Back Rest Frame
40A
Back Rest Fabric41
Hand Grips42
69 Rolling Base Legs
70 Neck Rest
71 Neck Rest Height Adjustment Tube
Neck Rest Attachment
72
Neck Rest Sleeve73
Neck Rest Handle74
Tilt Handle75
Strut Cable76
Rubber Stopper80
Tilt Stopper81
Calf Strap90
Seat Base93
Strut (Left)94
Strut (Right)95
Height Adjustment Tube96
A
A
A
A
500-268 Footrest Adjust Knob
500-268 Footrest Adjust Knob
500-253 LH Leg Assembly
500-254 RH Leg Assembly
500-266 LH Foot Tray
500-267 RH Foot Tray
500-259 Leg Tube

Insert the arm rests into the sockets on
the seat base until the clip pin clicks and
locates the arm rests in position.
Screw the arm rest knob into the arm rest
to firmly secure the arm rest in position.
Swing the arm rest forward so that it locks
into position in the arm rest clip.
Slide the arm rest lock over the arm rest
clip to lock the arm rest in position.
step 2
Showerbuddy SB3Tpage 5
step 1 assembly
Insert the back rest frame into the seat
base.
Slide the back rest frame into the seat
base until the clip pins click into the holes
on the seat base.
The clip pins secure the chair back frame
in position.
NOTE
- To remove the seat back press the clip
pins in and slide the seat back out of the
seat base.

step 4
Showerbuddy SB3T page 6
step 3
By sliding the armrest lock you can easily
swing the armrest out of the way or
secure the armrest in position.
To unlock the armrest slide the armrest
lock away from the armrest.
To lock the armrest slide the armrest lock
towards the armrest.
NOTE
- The armrest locks should always be used
when the armrests aren’t in the swing-
away position.
The armrests can be easily swung-away
when required.
Unlock the armrest by sliding the armrest
lock away from the armrest. Once this is
done the armrest can be swung away. The
clip pin which secures the armrest in
position stops the armrest from rotating
to far.
NOTE
- The armrest locks should always be used
when the armrests aren’t in the
swing-away position.

step 6
Showerbuddy SB3Tpage 7
step 5
Ensuring the correct orientation attach
the seat cushion to the seat base by
pushing the 4 locating lugs on the
underside of the cushion into the
connectors on the seat base.
Firmly press the cushion into position
so that the 4 locating lugs are securely
located in the connectors.
NOTE
- To remove the cushion, carefully remove
one lug at a time from the connectors until
all 4 locating lugs are removed.
Slide the neck rest height adjustment tube
into the neck rest attachment. Adjust to
the required height and secure in the
correct position.
By screwing the neck rest handle in a
clockwise direction the neck rest
attachment will tighten and secure the
neck rest height adjustment tube in
position.

step 8
Showerbuddy SB3T page 8
step 7
To attach the neck rest, insert the plastic
sleeve into the neck rest height
adjustment tube.
Insert the neck rest into the sleeve on the
neck rest height adjustment tube. Adjust
to the required length and secure in the
correct position. By screwing the neck
rest handle in a clockwise direction the
neck rest height adjustment tube
connector will tighten and secure the
neck rest in position.
NOTE
- The neck rest should always be used and
adjusted to suit the specific user.
Insert the footrests as shown by simply
dropping each leg into the tube holder.
Make sure each leg is fully located in the slot
at the rear to prevent the leg from roating.
To rotated the leg simply lift and rotate out
of the way.

step 10
Showerbuddy SB3Tpage 9
step 9
To swing the footrest out of the way simply
lift the leg out of the slot and spin the leg
away.
WARNING
DO NOT STAND ON FOOTRESTS
Chair will be unstable and tip forward
if body-weight is applied to footrests
After unlocking the footrests rotate the
footrests outwards to allow easy access
to the chair.
When required rotate the footrests
inwards to reposition the footrests.

step 12
Showerbuddy SB3T page 10
step 11
Rotate the chair so that you have easy
access to the underside of the seat base.
From the back of the slide the commode
bucket into the 2 brackets on the
underside of the seat base.
Ensure the commode bucket is pushed in
far enough that the brackets securely hold
the commode bucket in position. The
commode bucket should be centred under
the opening in the cushion.
With the footrest in the swing-away
position the footrest can easily be
removed.
Lift the footrest upwards to slide the
footrest out of the footrest connector.
NOTE
- The footrests should always be used for
safety, especially when the chair is being
reclined.

Showerbuddy SB3Tpage 11
step 13
step 14
To attach the chest belt rotate the chair so
that you have easy access to the back of
the back rest.
Slide the chest belt through the 2
attachment loops on the back rest.
Before use adjust the length of the chest
belt to suit the user.
On the underside of the seat base there
are 4 attachment points for the lap belt.
Unscrew the provided screws and
washers from the front attachment points
on the underside of the seat base.
Choose the attachment points you prefer
for your lap belt.
Slide the washer onto the screw and then
insert through the grommet in the lap belt.
Screw the lap belt securely into
position.

step 2
step 1
operation
page 12Showerbuddy SB3T
To adjust the seat height remove the
securing clips and slide the height
adjustment tubes up or down to the
required height.
Secure both height adjustment tubes at
the required height using 1 large securing
clip on each base leg.
NOTE
- Each height adjustment hole raises the
seat base 1”.
- Check to ensure all securing clips are
fully inserted.
- Ensure both height adjustment tubes are
aligned at the same height.
To attach the calf strap to the footrests
wrap the end of the calf strap around the
outside of the footrest. Connect the velcro
strip which is attached to the end of the
calf strap to the velcro strip in the centre.
Ensure the velcro strips are on the back
side of the calf strap.
Repeat this process to attach the other
side of the calf strap to the footrest.

Showerbuddy SB3T
step 4
step 3
page 13
Before using the chair adjust the neck rest
so that it provides the correct support for
the intended user. Unscrew the neck rest
handles to allow the tubes to easily slide
for adjustment.
Secure the neck rest in the correct
position by securely tightening the neck
rest handles.
NOTE
- Ensure both handles are securely
tightened prior to use to prevent the neck
rest moving.
After adjusting the neck rest you can
adjust the position of the neck rest handle
to prevent it sticking out.
To do this pull the handle to the right and
then rotate. This allows the handle to be
freely rotated without tightening or loos-
ening the neck rest. The handle will then
spring back into position when released.
This method can also be used when
tightening the neck rest .

Showerbuddy SB3T
step 6
step 5
To recline the chair squeeze the tilt handle
on the back rest handle.
When you squeeze the handle both the
locking struts are unlocked and the chair
can be reclined. When the handle is
released, the locking struts will secure the
chair in that position.
page 14
To lock the castor wheels press down
firmly on the end of brake with your foot.
This will lock the castor so that it will not
move or rotate.
To unlock the castor wheels press down
firmly on the front of the brake with your
foot. This will allow the castor to move
freely again.
NOTE
- The castor wheels should always be
locked when performing transfers . The
castor wheels can be rotated forward to
make the chair more stable.

Showerbuddy SB3T
step 7
page 15
step 8
While squeezing the brake handle the
chair can be reclined 30° from upright.
While reclining the chair you can release
the tilt handle and the locking struts will
secure the chair in that position. As the
chair is reclined you will need to support a
small amount of the users weight.
NOTE
- Before reclining the chair is it important
to be confident with the motion and how
the chair operates.
- The chair has safety stoppers which
prevent the chair reclining further than
30°.
To return the chair to an upright position
squeeze the tilt handle on the back rest.
When you squeeze the handle both the
locking struts are unlocked and the chair
can be repositioned. When the handle is
released, the locking struts will secure the
chair in position.

Showerbuddy SB3T
step 9
page 16
While squeezing the brake handle the
chair can be returned to the upright
position.
After returning the chair to the up-right
position release the tilt handle and the
locking struts will secure the chair in
position. While returning the chair to the
up-right position, you will initially need
to support a small amount of the users
weight.
WARNING
Do not place hands or fingers around the outer edge of the
seat cushion when tilting or returning from tilt positions as
fingers may get jammed between the seat frame and the
rubber stop resulting in serious personal injury. Keep arms
and hands on the armrests at all times.

Showerbuddy SB3T
strut adjustment
page 17
Check to ensure that when the handle is
squeezed in then released that the handle
springs back into the position shown.
If the handle doesn’t return to position
freely, use a screw driver to slightly
loosen the screw on the tilt handle. This
will allow the handle to move freely
and will also make the handle easier to
squeeze.
Check to ensure that the stainless steel
cap on the end of the orange cable is
inserted all the way into the tilt handle as
shown. During packaging/shipping and
owner setup this part can sometimes
come out.

Showerbuddy SB3T page 18
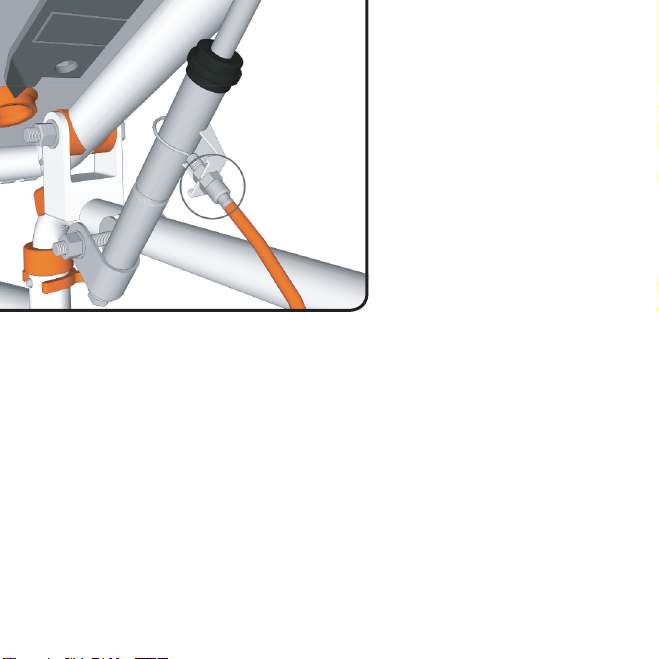
Check to ensure that the cable adjustor is
screwed all the way in as shown.
Also check to ensure that the stainless
steel cap on the end of the orange cable is
inserted all the way into the cable adjustor
as shown. During packaging/shipping
and owner setup this part can sometimes
come out.
Check to ensure that the stainless steel
caps on the ends of both of the orange
cables are inserted all the way into the
cable adjustor as shown. During
packaging/shipping and owner setup
these parts can sometimes come out.
Showerbuddy SB3Tpage 19
Check to ensure that the cable adjustor is
screwed all the way in as shown.
Also check to ensure that the stainless
steel cap on the end of the orange cable is
inserted all the way into the cable adjustor
as shown. During packaging/shipping
and owner setup this part can sometimes
come out.
Check that there is one nut on the outside
of the strut bracket and one nut on the
inside as shown.
If you are still experiencing problems with
the chair reclining screw the cable
adjustor out slightly to fix this.
NOTE
- Be careful not to unscrew the cable
adjustor to far as this will prevent the
struts locking in position when the chair
is reclined.
Other manuals for SB3T
2
Table of contents
Other Showerbuddy Mobility Aid manuals


