Showlite HDO-16 User manual

HDO-16
User Manual
Version: 07/2020
2
Thank you for choosing this product. To ensure that you are fully satisfied with this
product, read and understand this manual carefully.
PLEASE READ CAREFULLY
Please keep this manual in a safe place for future reference. Also hand over all
documents when passing the product on to third parties. Never leave children
unsupervised with the packaging material. For products packed in plastic bags,
there is a risk of suffocation from packaging materials. The product should only be
used under adult supervision. Only use the product if it is in perfect condition. Do not
use the product if damage is visible or suspected. We are not liable for any damage
that occurs as a result of non-observance of the safety instructions or incorrect or
improper handling.
Follow the operating instructions!
The WARNING signal word identifies hazards that, without
precautions, could result in serious injury.
The signal word NOTE indicates general precautions that should be
observed when handling the product.
Images and screen images in this manual may differ slightly from
the actual product's appearance, as long as it does not adversely
affect the technical characteristics and safety of the product.
All personal phrasing in this manual should be considered gender
neutral.
These operating instructions apply to responsible users and to persons who have
been supervised by a person responsible for their safety or have been instructed in
the operation of the device and who have proven to be able to handle the device.
Children should be supervised to ensure that they do not use this
device as a toy.
Never allow children to play unattended with the packaging
material.
Danger of property damage! We are not liable for accidents that
occur as a result of non-observance of the safety instructions or
due to incorrect handling.

3
All information in this manual has been checked to the best of our knowledge and belief.
However, neither author nor publisher can be held liable for any damage related to the
use of this manual.
Other product, brand and company names mentioned herein may be the trademarks
of their respective owners. Compliance with all applicable copyright laws is the
responsibility of the user of this document.
Caution
Please observe the following basic information in order not to endanger yourself or
others and to avoid damage to external devices.
Warnings
Do not disassemble or modify the product. This could result in an electric shock.
Entrust a specialist workshop with any necessary service and maintenance work or
contact your dealer.
If you notice that the power cable shows clear signs of wear, the device
malfunctions, smells burnt or smokes, immediately pull the plug out of the socket
and have a technician repair it.
Before cleaning the product, you should switch it off and disconnect it from the
power supply.
Always place the product on a flat, stable surface to ensure a secure stand.
Use the product, not in a damp or wet environment.
Do not place vessels that are filled with liquids, e.g. vases, glasses or bottles on the
product.
Do not place small objects on top of it that could slip in, e.g. hairpins, sewing
needles or coins.
Precautions
To avoid damage to the product, do not place it in places with high temperatures or
a lot of dust, do not place it directly next to an air conditioner and avoid direct
sunlight.
Do not place the item near other electrical equipment to avoid interference.
Do not use force when handling the product or place heavy objects on it.
Disconnect the power supply if you are not going to use the device for a long time.
To disconnect the device from the power, please pull on the plug, not on the cable.
Please handle the power cable carefully. It should not be near radiators, you should
not place heavy objects on top of it and lay it so that no one can step on it or fall
over it.

4
Mains voltage
If an external power supply unit is required for use, connect it to a socket with the
correct voltage.
Do not connect the device to a different mains voltage than the one for which your
product is intended.
Unplug the power adapter when you are not using the item or when there is a
thunderstorm.
Connections
Turn off all devices before connecting multiple devices. This helps prevent
malfunctions and / or damage to other devices.
Interference with other electrical devices
Nearby radios and televisions can cause interference. Operate this device at a
suitable distance from radios and televisions.
Attention:
The normal functioning of the product can be disturbed by strong electromagnetic interference. In this case, simply
reset the product to resume normal operation by following the operating instructions. If the function still cannot be
continued without any problems, use the product in a different location.
Place
Do not subject the product to the following conditions to avoid warping,
discoloration, or major damage:
Direct sunlight, extreme temperature or humidity, excessively dusty or dirty place,
strong vibrations or shocks, strong magnetic fields.
Cleaning
Only clean the product with a soft, dry cloth. Do not use paint thinners, solvents,
cleaning fluids or chemically impregnated wipes.
Handling
Do not exert excessive force on controls such as switches and buttons..
Do not bring paper, metal, or other objects inside. In this case, pull the mains
adapter / mains cable out of the socket. Then have the device checked by qualified
service personnel.
5
Attention
Please note the following basic information in order not to endanger yourself or
others and to avoid damage to external devices.
Warning
Do not disassemble or modify the device. This may result in an electric shock.
Assign a specialist workshop with all the necessary service and maintenance work
or contact your dealer.
If you notice that the power cord is showing signs of wear, the device is
malfunctioning, has flames, smells, or smoke, immediately unplug the power cord
and have it repaired by a technician.
Before cleaning the instrument, you should disconnect it from the power supply.
Always place the instrument on a flat, stable surface to ensure a secure stand.
Do not use the instrument in a damp or wet environment.
Do not place any containers filled with liquids such as vases, glasses or bottles on
the instrument.
Do not place small objects on top of it that could slip in, such as hairpins, sewing
pins or coins.
Do not place lit candles on the product.
Precautions
To avoid damaging the device, do not place it in places with high temperatures or
dust, do not place it near an air conditioner, and avoid direct sunlight.
Do not place the instrument near other electrical devices to avoid interference.
Do not use force when handling the device and do not place heavy objects on it.
Disconnect the device from the power supply if you will not be using it for a long
time. To disconnect the device from the mains, pull the plug and not the cable.
Please handle the power cord with care. It should not be near radiators. You should
not place heavy objects on top of it and move it around so that no one can step on it
or fall over it.
Power supply
Please connect the supplied power adapter to a socket with the correct voltage. Do
not connect it to voltages other than those for which the device is intended.
Disconnect the power plug if you are not going to use the product for a long time or
if there is a thunderstorm.

6
© 2020
This manual is copyrighted. Copying or reprinting, even in extracts, is only permitted
with the consent of Musikhaus Kirstein GmbH. The same applies to the reproduction
or copying of images, even in modified form.
Content
1. General overview............................................................................................... 8
1.1 Product overview (front) ................................................................................. 8
1.2 Product overview (back)................................................................................10
1.3 General terms ...............................................................................................11
2. OPERATING INSTRUCTIONS.......................................................................... 12
2.1 Configuration.................................................................................................12
2.1.1 Setting up the controller..............................................................................12
2.1.2 Reset DMX Controller.................................................................................12
2.1.3 Addressing DMX devices ...........................................................................13
2.1.4 Copy DMX device settings .........................................................................13
2.2 Functionality..................................................................................................14
2.2.1 Manual mode .............................................................................................14
2.2.2 Calling up scenes or chases.......................................................................14
2.3 COLOR MODE..............................................................................................15
2.3.1 Starting COLOR MODE..............................................................................15
2.3.2 Switching from RGB to RGBW...................................................................15
2.3.3 Color Mode Operation................................................................................16
2.4 Strobe effect in Color Mode...........................................................................18
2.4.1 Activating Strobe Effect..............................................................................18
2.4.2 Deactivating Strobe Effect..........................................................................18
2.4.3 Strobe speed adjustment............................................................................18
2.5 RGB and RGBW Color Mode Programming..................................................18
3. Programming ................................................................................................... 19
3.1 Calling up the programming mode.................................................................19
3.1.1 Programming a scene ................................................................................19

7
3.1.2 Calling up a scene bank.............................................................................20
3.1.3 Overwriting a scene....................................................................................20
3.1.4 Copying a scene.........................................................................................20
3.1.5 Copying a scene bank................................................................................21
3.1.6 Deleting a scene.........................................................................................21
3.1.7 Deleting all scenes.....................................................................................22
3.2 Programming Chase .....................................................................................22
3.2.1 Programming a Chase................................................................................22
3.2.2 Calling a Chase..........................................................................................22
3.2.3 Checking the scene steps in a chase .........................................................23
3.2.4 Editing a Chase (Copy a scene bank into a chase) ....................................23
3.2.5 Editing a chase (copying a scene into a chase)..........................................23
3.2.6 Editing a chase (inserting a scene step into a chase).................................24
3.2.7 Deleting a scene in a chase .......................................................................24
3.2.8 Deleting a Chase........................................................................................25
3.2.9 Deleting all chases.....................................................................................25
3.3 Playback .......................................................................................................25
3.3.1 Activate sound mode..................................................................................25
3.3.2 Starting Auto-Mode ....................................................................................26
4. Using two controllers at the same time.......................................................... 27
4.1 Connecting two controllers............................................................................27
5. Annex ............................................................................................................... 28
5.1 DMX basics...................................................................................................28
5.2 Connect Fixture.............................................................................................28
5.3 DMX Dipswitch Quick Overview....................................................................29
6. Product specifications .................................................................................... 30

8
1. General overview
This controller is a universal intelligent light controller. It enables the control of 12
DMX devices with 16 channels each and up to 240 programmable scenes. Six
chases can contain up to 240 steps consisting of the stored scenes in any order.
Chases can be recalled automatically or manually by music.
On the interface you will find various programming tools such as 16 universal
channel controllers, access scanner and scene buttons as well as an LED display
for easier navigation of controls and menu functions.
1.1 Product overview (front)

9
Number
Buttons or sliders
Function
1
Scanner select buttons
Select DMX devices
2
Scanner indicator LEDs
Indicate if the DMX device is activated
3
Scene select buttons
Buttons for recalling or saving the scenes
4
Channel slider
After activating the Scanner select buttons, the sliders
1 ~ 16 can set the DMX values.
5
Program button
To activate the programming mode
6
Music/Bank Copy button
Used to activate the music mode and as a copy
command during programming
7
LED display
The display shows current settings
8
Mode indicator LEDs
Display the current mode. (Manual, Music or Auto
mode)
9
Bank Up Button
Function key for switching through scenes / steps in
banks or chases
10
Bank Down Button
Function key for switching through scenes / steps in
banks or chases
11
Tap Display Button
Sets the chases speed by tapping and toggles the
display between DMX values (0-255) and DMX percent
(0-100).
12
Blackout button
Sets the shutter or dimmer value of all lights to "0",
which causes all DMX devices to go to the "OFF" state.
13
ADD button
is used to confirm the recording / saving process
14
Auto/Del button
Used to activate the Auto mode and as a delete
function button during programming
15
Chase Buttons
Chase memory locations from 1 ~ 6
16
Speed slider
Scan mode: Adjusts the speed between scenes within
a chase
In Color Mode you can use the slider as a master
dimmer for the brightness of all RGB spotlights.
17
Fade Time slider
Scan Mode: Also considered a crossfade, this sets the
interval time between two scenes in a chase. If you
activate Strobe in Color Mode, you can change the
speed of the flash with the fader
18
color mode
You can switch between Scanner Mode (Scanner 1 -
12) and Color Mode
10
1.2 Product overview (back)
Number
Button or Fader
Function
21
DMX output connector
Connection for the DMX output signal
22
DMX input connector
Connection for the DMX input signal
23
DC Input Connection
Connection for the power supply unit
24
USB Lamp connector
USB connector for a USB LED lamp
25
power switch
Switches the controller on and off

11
1.3 General terms
The following terms are used in intelligent light programming.
Blackout sets the shutter or dimmer value of all lights to "0", which causes all DMX
devices to go to state "OFF".
DMX-512 is an industry standard digital communication protocol used in
entertainment lighting equipment. For more information, refer to the DMX Basics
section in the Appendix.
Fixture refers to your lighting device or other device such as a fog machine or
dimmer that you can control.
Scene banks are a series of scenes stacked one after another. It can either consist
of a single scene or several scenes.
Scene are static lighting conditions.
Fader also known as slider
Chases can also be called programs. A chase consists of a series of scenes that
have been saved one after the other.
Scanner refers to a lighting device with a pan and tilt mirror. However, with the
HDO-16 Controller, it can be used to control any DMX-512 compatible device as a
generic device.
Stand Alone refers to the ability of a device to operate independently of an external
controller and normally in sync with music, thanks to a built-in microphone.
Fade sliders are for setting the time between scenes within a chase.
Speed sliders are used to adjust the speed between scenes within a chase.
Shutter is a mechanical device in the lamp with which you can block the light beam.
It is often used to reduce the intensity of the light output and to flash.
Patching refers to the process of assigning fixtures to a DMX channel.
Playbacks can be either scenes or chases, which are called directly by the user for
execution. A playback can also be used as program memory that can be recalled
during a show.

12
2. OPERATING INSTRUCTIONS
2.1 Configuration
2.1.1 Setting up the controller
1) Connect the power supply to the rear of the unit and to the mains socket.
2) Connect your DMX cables to your DMX equipment as described in the
corresponding manual of your DMX equipment. For a brief introduction to DMX,
refer to the "DMX Basics" section in the appendix of this manual.
2.1.2 Reset DMX Controller
Warning:
This resets the controller to the factory settings.
All programs and settings are deleted.
Action:
1) Switch off the unit.
2) Press and hold BANK UP and AUTO/DEL
3) Turn on the power (while holding down BANK UP and AUTO/DEL).
13
2.1.3 Addressing DMX devices
The controller is programmed to control 16 DMX channels per device. Therefore, the
fixtures that you want to control with the corresponding "SCANNER" buttons on the
unit must each be 16 channels apart.
DMX
devices
or
SCANNER
Default
setting
DMX
Start
address
DIP switch
Switch settings to the
"ON position
1
1
1
2
17
1,5
3
33
1,6
4
49
1,5,6
5
65
1,7
6
81
1,5,7
7
97
1,6,7
8
113
1 ,5,6,7
9
129
1,8
10
145
1 ,5,8
11
161
1 ,6,8
12
177
1,5,6,8
For instructions on DMX addressing, refer to the manual for your particular device.
The table above refers to a binary-configurable 9-dip switch standard fixture.
2.1.4 Copy DMX device settings
To save time, you can copy the settings of one scanner button to another scanner
button.
Example: Copying the settings from scanner 1 to scanner 2
1) Press and hold the SCANNER button you want to copy.
2) While holding down the SCANNER button, simultaneously press the desired
second SCANNER button to which you want to copy the setting and then release
both SCANNER buttons simultaneously.
3) After successful copying, all SCANNER LEDs flash briefly.

14
2.2 Functionality
2.2.1 Manual mode
The manual mode allows direct control of all scanners. You can adjust them using
the channel sliders and change attributes.
1) Press the AUTO DEL button until the AUTO LED goes out.
2) Select a SCANNER button
3) Move the sliders to change the device attributes. Press the TAP/DISPLAY button
to toggle the output display on the LED display between DMX values (0-255) and
percent (0-100).
Comments:
All changes made in manual mode are temporary and are not saved.
2.2.2 Calling up scenes or chases
This instruction assumes that you have already recorded scenes and chases on the
controller. Otherwise, skip this section and continue with the Programming section.
Playing the scene
1) Select one of the 30 banks with the BANK UP/DOWN buttons.
2) Select a SCENE button (1~8) to display.
3) Move the sliders to change the scene setting.
4) Press the selected SCENE button (1-8) again to end the scene. The LEDs of
each SCENE will turn off.
Playing a Chase
1) Press one of the 6 CHASE buttons.
2) Press the TAP/DISPLAY button to show the scene steps on the display.
3) Use the BANK UP/DOWN buttons to view the sequence of scenes in the chase.
Comments:
Make sure that you are still in MANUAL mode.

15
2.3 COLOR MODE
2.3.1 Starting COLOR MODE
Press and hold the COLOR MODE button for about 3 seconds to switch from
SCANNER MODE to COLOR MODE.
2.3.2 Switching from RGB to RGBW
Press and hold the TAP/DISPLAY button, then press the COLOR MODE button to
switch between RGB and RGBW. The display shows the current setting.
RGB (R68)
or RGBW (R68U)
16
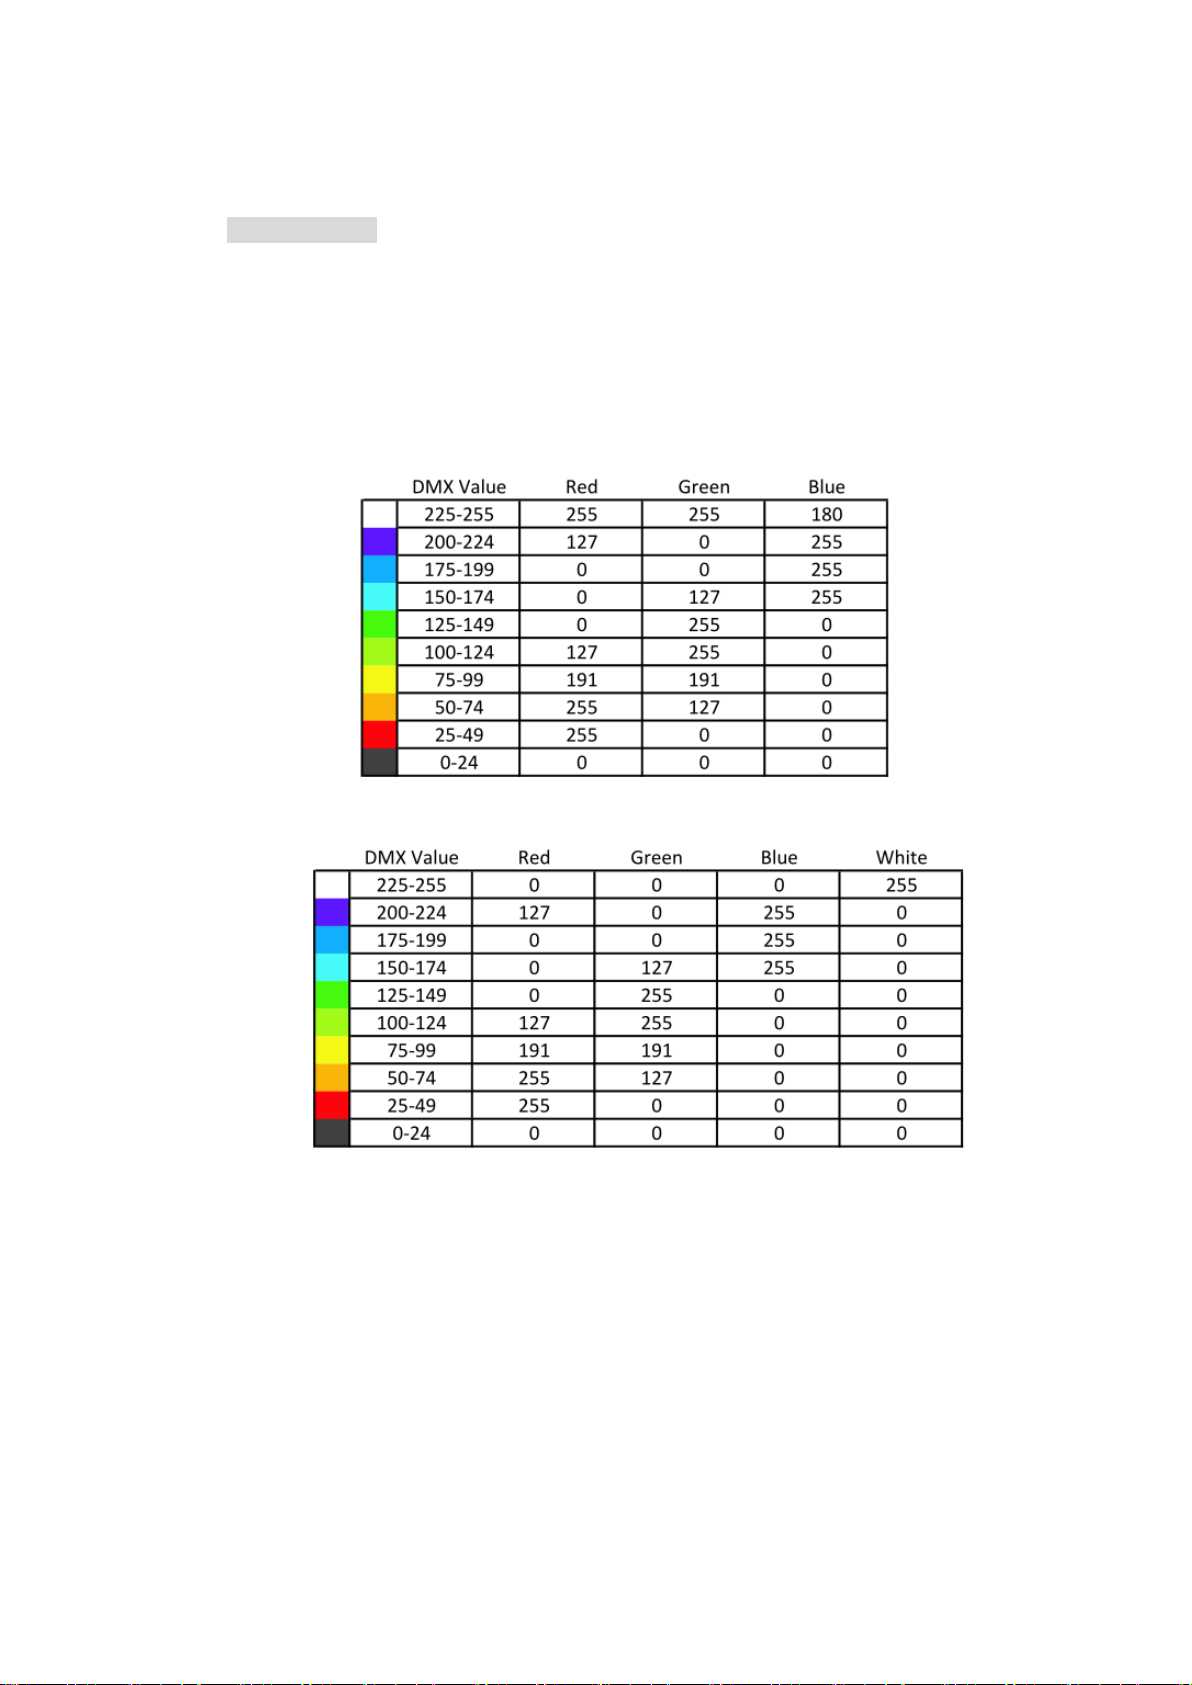
2.3.3 Color Mode Operation
COLOR MODE: The RGB Color sliders start at DMX address 193 (see next page)
16 Color sliders are available with 9 colors for each slider
(black/red/orange/yellow/green/blue/dark blue/purple/white).
When Color Mode is activated, you can use the Speed slider as a master dimmer
and adjust the brightness for all 16 Color sliders at the same time.

17
3 Channel Mode (RGB) 4 Channel Mode (RGBW)
Fader
Color
DMX address
Fader
Color
DMX address
R
193
R
193
1
G
194
1
G
194
B
195
B
195
R
196
W
196
2
G
197
R
197
B
198
2
G
198
R
199
B
199
3
G
200
W
200
B
201
R
201
R
202
3
G
202
4
G
203
B
203
B
204
W
204
R
205
R
205
5
G
206
4
G
206
B
207
B
207
R
208
W
208
6
G
209
R
209
B
210
5
G
210
R
211
B
211
7
G
212
W
212
B
213
R
213
R
214
6
G
214
8
G
215
B
215
B
216
W
216
R
217
R
217
9
G
218
7
G
218
B
219
B
219
R
220
W
220
10
G
221
R
221
B
222
8
G
222
R
223
B
223
11
G
224
W
224
B
225
R
225
R
226
9
G
226
12
G
227
B
227
B
228
W
228
R
229
R
229
13
G
230
10
G
230
B
231
B
231
R
232
W
232
14
G
233
R
233
B
234
11
G
234
R
235
B
235
15
G
236
W
236
B
237
R
237
R
238
12
G
238
16
G
239
B
239
B
240
W
240
R
241
13
G
242
B
243
W
244
R
245
14
G
246
B
247
W
248
R
249
15
G
250
B
251
W
252
R
253
16
G
254
B
255
W
256

18
2.4 Strobe effect in Color Mode
2.4.1 Activating Strobe Effect
Activate the COLOR MODE. Hold down the TAP/DISPLAY button and press the
ADD button simultaneously to activate the Strobe effect. The Strobe LED (on
scanner knob 12) will light up to indicate this.
2.4.2 Deactivating Strobe Effect
Press and hold the TAP/DISPLAY button, then press the ADD button at the same
time to deactivate the strobe effect. When the strobe effect is off, the strobe LED (on
scanner knob 12) will also turn off.
2.4.3 Strobe speed adjustment
There are 2 ways to set the strobe speed.
1) The strobe effect in color mode must be activated. You can adjust the speed of
the strobe effect by tapping the TAP/DISPLAY button twice briefly.
2) The strobe effect in color mode must be activated. You can adjust the tempo of
the strobe effect by holding down the TAP/DISPLAY button and then adjusting the
tempo of the strobe with the FADE TIME fader.
2.5 RGB and RGBW Color Mode Programming
Programming of scene and chase works the same way in Color Mode as in Scanner
Mode -> see point 3.1.1 for scene programming and 3.2 for chase programming.
You only need to switch from Scanner Mode to Color Mode with the MODE button.
Then set the desired colors with the Color sliders, adjust the brightness with the
MASTER slider (SPEED slider) and create the desired scenes and chases.

19
3. Programming
A scene bank is a sequence of different scenes (or steps) that are called up one
after the other. 30 scene banks with 8 scenes each can be created. The controller
can store a total of 240 scenes.
3.1 Calling up the programming mode
1) Press the PRGRAM button until the LED flashes.
3.1.1 Programming a scene
A scene is a static lighting condition. Scenes are stored in banks.
1) Press the PROGRAM button until the LED flashes.
2) Press the MODE button to enter either Scanner Mode or Color Mode.
3) Create an illumination by adjusting the sliders of the respective scanner
4) Select another BANK (01~30) if necessary
5) Press and hold the ADD button while pressing the desired SCENES button to
save the scene.
6) Repeat steps 3 to 5 if necessary Up to 8 scenes can be stored in one scene
bank.
7) To exit the programming mode, press and hold the PROGRAM button.
Comments:
When you save a new scene, all LEDs flash to confirm. The LED display now shows
the scene number and bank number used.
When you exit the program mode, deactivate the blackout function if necessary, if
this LED is lit, in order to be able to view the scenes.

20
3.1.2 Calling up a scene bank
1) Use BANK UP/DOWN buttons to select a different scene bank if necessary.
2) Press the AUTO DEL button until the AUTO LED lights up.
3) Adjust the Scene Bank speed with the SPEED slider and the fade time with the
FADE TIME slider.
4) Alternatively, tap the TAP/DISPLAY button twice briefly. The time between the
first and second tap determines the time between SCENES (up to 10 minutes).
Note:
This function is also called Tap-Sync. Deactivate Blackout if the Blackout LED is lit.
3.1.3 Overwriting a scene
Scenes must be changed manually.
1) Keep the PROGRAM button pressed until the LED flashes.
2) Use the BANK UP/DOWN buttons to select a different scene bank if necessary.
3) Select the desired SCANNER MODE or COLOR MODE scene.
4) Change the desired setting using the sliders.
5) Press and hold the ADD button and press the desired SCENE button to save the
data
Note:
Deactivate Blackout if the LED is on.
3.1.4 Copying a scene
1) Press and hold the PROGRAM button to enter the programming mode.
2) Use the BANKUP/ DOWN buttons to select the Scene Bank that contains the
desired scene to be copied.
3) Press the desired SCENE button of the scene you want to copy.
4) Then press the ADD button to copy the scene.
5) Use the BANK UP/DOWN buttons to select the desired BANK to which you want
to copy the scene.
6) Then press the desired SCENE button to complete the copy operation. To
confirm, all LEDs will flash once
Table of contents
Popular Recording Equipment manuals by other brands


uher
uher sg 561 royal operating instructions

Rockwell Automation
Rockwell Automation AB Quality Allen-Bradley MicroLogix... user manual

Selah Effects
Selah Effects Quartz Timer V2 user manual

Tews Technologies
Tews Technologies TPCE863 user manual

WavestoreUSA
WavestoreUSA Wavestore Installer quick start guide

Korg
Korg Electribe ESX-1 Easy start