Shrinkfast MZ Metric CE User manual

perating, Field Maintenance, and Parts Manual Model MZ®Metric CE
Thank you for choosing Shrinkfast products. Please visit us on the web at
www.shrinkfasttools.com for our latest product information and updates.
Customer Service Issues:
Before returning any Shrinkfast product, please call:
(603) 863-7719
or email at inf[email protected]
SAVE THIS MANUAL F R FUTURE REFERENCE

TABLE F C NTENTS
GENERAL SAFETY PRECAUTIONS & SAFETY CERTIFICATION ........................pages 2-4
REGULATOR OPERATION & MAINTENANCE ........................................................ pages 5-7
STARTING T E EAT TOOL ............................................................................................ page 8
REGULATOR MAINTENANCE & SAFETY FEATURES ......................................... pages 9-10
EXCESS FLOW DEVICE ............................................................................................. pages 9-10
C OOSING T E CORRECT PROPANE TANK ....................................................... pages 11-12
TANK PRESSURE, TEMPERATURE & OPERATION ............................................ pages 13-14
VENTILATION REQUIREMENTS .................................................................................. page 15
GENERAL INFORMATION ON S RINK FILM & S RINK BAGS ...................... pages 16-17
S RINK WRAPPING TEC NIQUES
(PALLET BAGS & ODD S APED OBJECTS)
........ pages 18-22
OPERATING OVERVIEW .......................................................................................... pages 23-24
MZ PART NUMBER AND DESCRIPTION .............................................................. pages 25-27
ASSEMBLY AND DISASSEMBLY ............................................................................ pages 28-31
EAT TOOL SERVICE INSTRUCTIONS ........................................................................ page 32
DAILY EAT TOOL INSPECTION .................................................................................. page 33
MONT LY EAT TOOL INSPECTION .......................................................................... page 34
TROUBLES OOTING GUIDE ................................................................................. pages 35-36
TEC NICAL SPECIFICATIONS .................................................................................... pages 37

2
GENERAL SAFETY PRECAUTI NS -
READ ALL INSTRUCTI NS BEF RE PERATING THIS HEAT T L
•This heat tool can only be used with vapor withdrawal propane tanks (BBQ Grill Style) and
should never be used with liquid withdrawal tanks (Fork Truck Style).
See Page 11 of this User’s Manual for additional information on the proper tank style.
• This heat tool should never be used with gasses such as Butane or Methane - Propane O LY.
•Do not operate this heat tool below 1.4 bar or damage to the heat tool will occur.
• Before using any heat tool, check all parts for proper function and damage to
component parts including the hose, regulator and heat tool.
• " idden areas such as behind walls, ceilings, floors, soffit boards and other panels may
contain flammable materials that could be ignited by the heat tool when working in these
locations. The ignition of these materials may not be readily apparent and could result in
property damage and injury to persons. When working in these locations, keep the heat tool
moving in a back and forth motion. Lingering or pausing in one spot could ignite the panel
or the material behind it."
• Do not use the heat tool to remove paint.
• Do not point this heat tool at anyone and do not operate in an area where there
is a risk of an explosion or fire.

3
GENERAL SAFETY PRECAUTI NS
• When working with any type of heat or open flame, always keep a fire extinguisher close by.
• Always were safety glasses and gloves (flame retardant or leather is suggested)
when shrink wrapping. Never obstruct or cover the air inlet at the back of the heat tool.
If the air flow is reduced the heat tool will not work properly.
• When shrink wrapping outdoors, do not shrink wrap when the wind is stronger than 16 kph.
• When shrink wrapping indoors, make sure the work area is well ventilated.
• Keep the work area clear of debris, wood shavings, paper products, flammable
chemicals and anything else that may catch fire from the heat of the tool.
• Do not wear loose clothing while shrink wrapping and also keep long hair tied back.
• Stay alert, watch what you are doing, and use common sense when operating the heat
tool. Do not use tool while tired or under the influence of drugs, alcohol or medication.
A moment of inattention while operating the heat tool may result in serious personal injury.
• Do not overreach. Keep proper footing and balance at all times. Proper footing
and balance enables better control of the heat tool in unexpected situations.
• Never operate the heat tool with the combustor nozzle hard up against a surface;
this could ignite any material you are shrink wrapping.
• Do not place the combustor nozzle (where the fla e co es out of the heat tool)
next to anything while it is hot. Never allow the combustor nozzle to come in
contact with clothing or skin.

4
• Do not look down the combustor nozzle while the tool is in operation or attached to a
fuel source.
•The heat tool should be kept 15 cm – 20 cm away from the shrink film when in
operation. Never keep the heat on one area for more than a few seconds.
Once heat is applied to the shrink film, it will continue to shrink even after
the heat is moved away from the area.
• Never modify the tool in any way and use only Shrinkfast replacement parts.
• Never operate in a basement or closed in, non-ventilated area or on an area that you
cannot see.
• Always operate the heat tool with the flame guard installed.
• This heat tool generates a db level under 85 db, however proper ear protection is always
recommended when operating any heat tool.
Safety Certification:
This Shrinkfast model MZ heat tool kit has been safety certified following the EU
required testing methods listed under the 2006/42/EC Machinery Directive,
E 746-1:1997+A1:2009. The Shrinkfast model MZ has been designed, assembled and
tested following directives listed in the ISO 9012-2008(E) “Gas welding equipment —
Air-aspirated hand blowpipes — Specifications and tests” document. Shrinkfast has
successfully completed these testing directives and has permission to apply the
CE mark and distribute throughout Europe.
5
REGULAT R PERATI N & MAINTENANCE
Regulator Technical verview:
• The MEGR-6120 is a high capacity, bar to bar, industrial gas regulator. It is designed to
conform to UL®Standard 144 for use with LP Gas. The maximum supply pressure is
17.25 bar. The maximum output pressure is printed on the regulator nameplate.
• This regulator is not intended for use in pressure applications below .21 bar and
the heat tool should not be operated at a pressure below 1.4 bar. The operating
temperature range is -40 to 93 degrees Celsius.
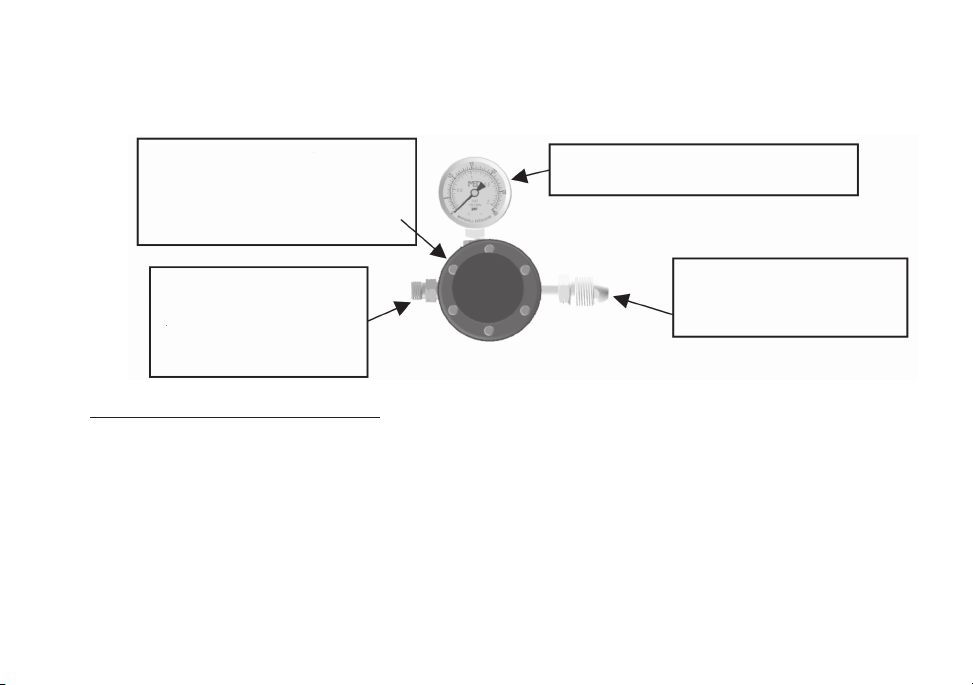
POL – Attaches to
the Propane Tank
Adjustable and Wheel
– Adjusts bar Setting of
the Regulator
ose Adapter – Attaches
to the Supplied
7.62 meter ose
0-2.0 bar Pressure Gauge
6
This is a variable regulator assembly and the heat tool will operate
properly between 1.4 bar and 2.0 bar. The pressure can be changed by
loosening the hex nut located under the black, round hand wheel on the
regulator assembly and then turning the hand wheel to the desired pressure.
owever, the optimum and factory recommendation is that you do not
adjust the pressure and keep the regulator set at the factory setting of 1.5 bar.
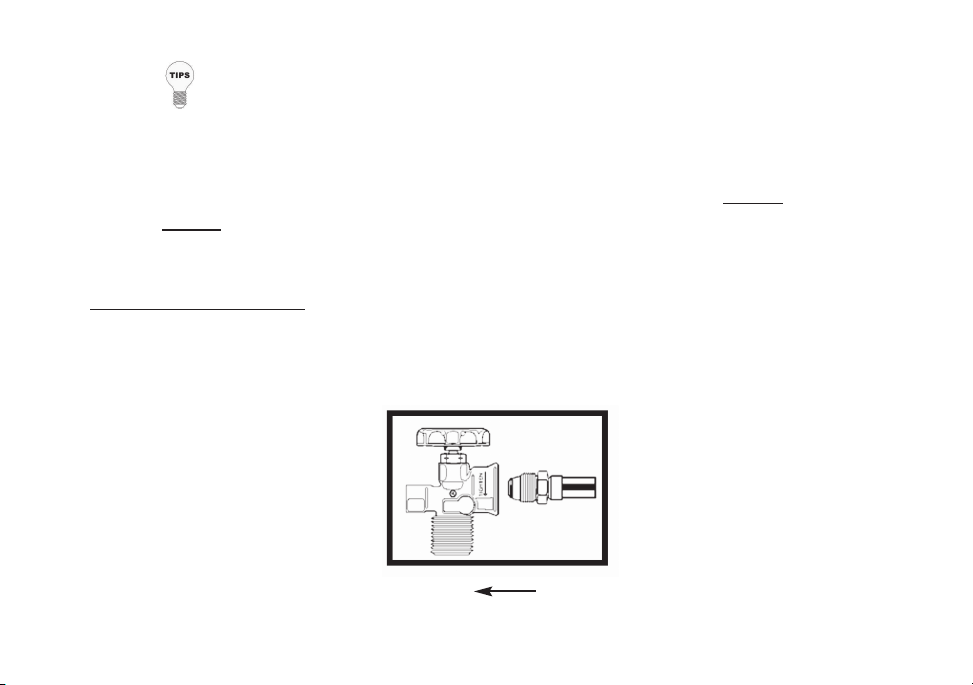
Regulator Installation:
1.Remove the yellow cap from the POL (brass, bull nose fitting) and connect the
POL to your propane tank and tighten with the supplied wrench (all threads
are left handed thread, so tighten counter clockwise).
Propane Tank Regulator POL

7
2.Connect one end of the supplied 7.62 meter hose to the hose adapter on the regulator
and the other end of the hose to the heat tool. Tighten all fittings with the
supplied wrench (left handed threads, so tighten counter clockwise).
3.Open the propane tank valve and check for any leaks by spraying a soapy
water mixture on the fittings. If any bubbles are visible, shut off the propane
tank and tighten the fittings.
4.When you first turn on the propane tank, the pressure gauge on the regulator
will slowly move toward the factory setting of 1.5 bar. Once the hose is fully
pressurized, the needle on the gauge will stop at 1.5 bar. Now the heat tool is
ready to be fired.
Pictured: and wheel
on top of your supplied
propane tank.
To open the flow of
propane, turn the tank
hand wheel in a counter
clockwise motion and
watch the regulator gauge

STARTING THE HEAT T L
1.Depress the yellow safety that sits in the palm of your hand. If you do not
depress the safety first, you will not be able to pull the trigger with your finger
tips and ignite the heat tool.
2.With the safety depressed, slowly pull the trigger with your fingertips so you
first hear a slight “hissing” of propane flow, then pull the trigger completely
and the heat tool will “click” then ignite.
3.Should the gun fail to ignite, release both the safety and trigger fully to ensure
that the igniter is reset and repeat the starting procedure.
WARNING: MANY NEW USERS PULL THE TRIGGER T
QUICKLY AND MULTIPLE TIMES BELIEVING THIS IS THE BEST
WAY T IGNITE THE HEAT T L. PULLING THE TRIGGER T
QUICKLY D ES N T ALL W THE PIEZ CRYSTAL INSIDE THE
IGNITER T SEND PR PER V LTAGE T THE SPARK PLUG, S
PULL THE TRIGGER SL WLY IN RDER T IGNITE EVERY TIME.
WARNING: D N T T UCH THE WIRE METAL GUARD AFTER THE
HEAT T L HAS BEEN FIRED.
8

9
REGULAT R MAINTENANCE & SAFETY FEATURES
• Because the Shrinkfast UL®approved regulator assembly is assembled and tested at
the factory to conform to UL®Standard 144, any maintenance or repairs should be in
accordance with this listing as well as any other applicable regulations. Regulator
parts showing wear should be replaced as necessary. Contact your local distributor or
Shrinkfast directly for descriptions and part numbers.
IMP RTANT SAFETY FEATURE: Inside the P L fitting on the
Regulator Assembly there is a safety featured called the “Excess Flow Device”.
• This safety feature is designed to stop the flow of propane if the hose becomes
cut or detached from the regulator or heat tool during operation.
• The Excess Flow Device does not stop the propane flow 100%, but it does
reduce the flow so the user has time to get to the tank and shut off the propane
and prevent a dangerous situation from occurring.
How the Excess Flow Device Works:
• When the propane tank is first turned on the Excess Flow Device believes there
may be a downstream leak and temporarily closes the POL. The POL does not
stop the flow entirely, so there is enough propane entering the hose to begin
pressurizing the system.

10
• Once the fuel has filled the entire hose and the regulator gauge reaches 1.5 bar,
the Excess Flow Device reopens and the heat tool is ready for operation (you
will hear an audible “click” fro the POL when the pressurization is co plete).
• This pressurization process can take anywhere from 7-10 seconds from when
the tank is first turned on and may take a little longer with propane tanks that
are partially filled. This feature is all for the safety of the user, but you must
wait the 7-10 seconds for the pressurization to complete before operation.
Attempting to Ignite the Heat Tool before Pressurization is Complete:
• If the user attempts to fire the heat tool before the pressurization is complete,
the pressure gauge will drop down to 0 bar and the heat tool will not ignite.
In order to ignite the heat tool, the user must wait for the system to pressurize
(1.5 bar) and then the heat tool will operate properly. *This wait time will only occur
when the user first turns on the propane tank.*
WARNING: As the amount of propane in the tank drops, the pressure
gauge on the regulator will decrease accordingly. Do not operate the heat
tool once the pressure drops down to 1.4 bar. Operatin the heat tool
below 1.4 bar, will result in dama e to the heat tool’s internal components.

11
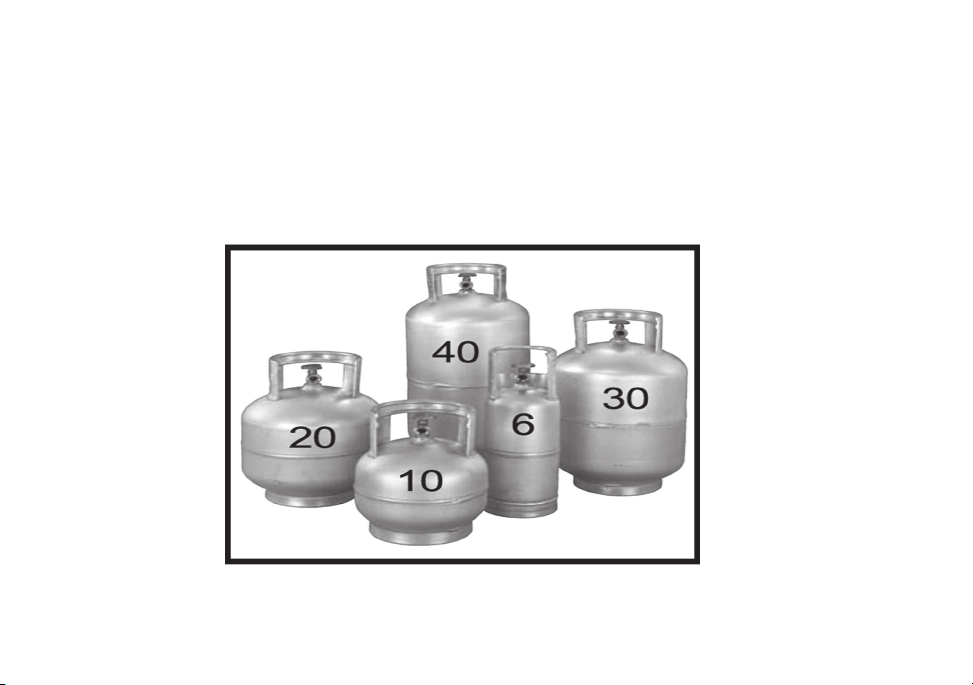
CH SING THE C RRECT PR PANE TANK
• There are two types of propane tanks commonly available:
A. Correct: Vapor withdrawal—Use this style (exactly the same as a BBQ grill tank)
B. Not Correct: Liquid withdrawal—Do not use this style (used on fork trucks)
WARNING: Using a liquid withdrawal (fork truck) propane tank will clog
the orifice in the heat tool and result in an extremely long and dangerous flame.
12
CH SING THE C RRECT PR PANE TANK (C NTINUED)
• Propane tanks are available in a variety of sizes. The most popular tank sizes:
• 9.07 kg tank similar to a BBQ propane tank for smaller applications.
• 18.14 kg tanks are commonly used in most industrial applications.
The weights listed on the above tanks are in lbs.

13
TANK PRESSURE, TEMPERATURE & PERATI N
• Tank pressure depends on the temperature of the tank. At room temperature (22.22º C the
pressure in a full tank is 7.58 bar and drops to 1.5 bar at -17.77º C. )
If the propane tank ices up during operation:
When the heat tool is in operation, the temperature of the tank drops due to the evaporation
process of liquid propane to propane gas. After prolonged use and continued drop in propane
pressure, the temperature of the tank may drop to -17.77º C usually accompanied by icing on
the outside of the tank and regulator.
0
2
4
6
8
10
12
14
16
18
20
-43 -29 -18 -1 16 27 32 38 43 54
Propane Tank Pressure (bar)
Propane Temperature (degree C)
Temperature of Propane
A pressure relief valve vents propane vapor whenever the tank pressure
exceeds 17.23 bar and prevents excess tank pressure.

14
WARNING: Icing of the tank and regulator is quite common when
running the heat tool continuously with a partially filled propane tank.
However, if you are ever in doubt regarding the safety or operation of
your heat tool, shut off the tank and contact your authorized Shrinkfast
distributor or Shrinkfast directly.
• Small or nearly empty tanks ice up faster than larger, full tanks. Typically, a
full 9.07 kg tank, if operated continuously, will run for 90 minutes before ice
builds up on the outside of the tank.
• If your shrink wrapping project requires continuous use of the heat tool, try the
following methods:
• Use multiple tanks — Switch the heat tool from one tank to another.
• Use a portable fan — Point an ordinary desk fan at the tank, and
the air flow around the tank will help the tank from icing up.

15
VENTILATI N REQUIREMENTS
WHEN PERATING HEAT T L
WARNING: During operation, the heat tool consumes propane and air
and produces carbon dioxide, carbon monoxide (C ), and water vapor.
Prolonged exposure to Carbon Monoxide is lethal and adequate ventilation
must be provided if the heat tool is to be operated indoors.
• To maintain a safe CO concentration (50 parts per million as set by OS A
Standard 1910.1000 – Air Contaminants), ventilation requirements are 57
cu. m. /min. of fresh air while the heat tool is operated at a maximum operating
pressure of 2.0 bar.
• Based on a 1 1/2 minute heating cycle per pallet, the fresh air requirements are
85 cu. m. /pallet. Example: If the production rate is 10 pallets per hour, a
ventilation system needs to provide 14 cu. m. /minute.
• In areas where ventilation is provided by open doors or windows, a safe level of
CO will be maintained as long as the room temperature does not rise above 65° C.

16
GENERAL INF RMATI N N SHRINK FILM & SHRINK BAGS
Shrink Wrap (#4 LDPE):
• The shrink wrap is manufactured in multiple colors and is typically a 6 or 7 mil,
low density polyethylene (#4 for recycling purposes). What makes this material
different than construction plastic sheeting is that it contains shrinking resins,
UV inhibitors, anti-brittling compounds, and strengtheners so that it will not rip
or tear. Make sure the shrink film is manufactured using only virgin resin material.
WARNING: Shrink wrap can burn. If heat is applied incorrectly, shrink
wrap can ignite into open flame. It can also drop down on to other
combustible material and cause secondary ignition and fire. If at any time
you observe the shrink wrap on fire, immediately stop what you are doing
and carefully inspect the area where you are working for a possible fire.
Keep a fire extinguisher available at all times.
Measuring for the Shrink Film:
• Regardless of the shape of the object you are covering, it must be viewed as a
cube in order to find the proper shrink film size. In general, you measure the
width by starting at the lowest point of the object or however far down you

17
want the film cover to reach. Measure up the side, over the top, and down the
opposite side to the lowest point. Add one foot to this number to accommodate
heat welds and this will indicate how wide your shrink wrap should be. This
process will determine the square footage of the object being shrink wrapped.
• For boat wrapping or storage purposes, a 6 or 7 mil shrink film is installed, but
the mil thickness depends on the project requirements and can be best
determined by a shrink film distributor.
Measuring for the Shrink Pallet Bags:
• For shrink wrapping a pallet, a 4 mil shrink bag is typically used for loads of
453 kg or less. You should always add at least 2.54 cm to the length and width of
your measured object when sizing the correct pallet bag and add at least 10.16 -
15.25 cm to the height (including the pallet) to account for the material shrinking
when applying the heat.
• Again, not all plastic bags are shrink bags; therefore, be specific. Shrink film
should be made of virgin resin, and not reprocessed material.

18
MEASURING F R A SHRINK PALLET BAG
1) Measure the length, width and height of the
pallet to be covered.
2) Determine the length (L) of the bag, by
adding 5.08 cm to the length of the pallet.
3) Determine the Width (W) of the bag, by adding
5.08 cm to the width of the pallet.
4) The eight ( ) of the bag is determined by
measuring the height of the pallet (including the
height of the pallet itself) and adding 10-15 cm.
The added len th allows you to tuck the ends
of theba under the pallet before applyin heat
so that it does not pull up over the pallet ed es.
Example: If the pallet size is 122 cm (length) x
101 cm (wide) x 127 cm (height), the bag dimen-
sions are as follows: Length (L) is 127 cm, Width
(W) is 107 cm eight ( ) is 142 cm (always go
higher in height if they do not have the exact bag
height available).
Table of contents
Other Shrinkfast Power Tools manuals


