Shurco Donovan Spring Trap 2 User manual

READ BEFORE INSTALLING
3353 GRAN PARK WAY • STUART, FL 34997
PHONE: 1-800-327-8287 • FAX: 1-772-287-0431
www.DONOVAN-TARPS.com
TARP SYSTEMS, PARTS & TARPS
Spring Trap 2™
P/N 1128261 Rev. A

DONOVAN
®
HELP LINE: 1-800-327-8287
PREPAID FREIGHT POLICY.
Shur-Co®, LLC will prepay freight on eligible
orders* of Florida-manufactured Donovan
®products and tarp items shipped
from our Florida branch that meet the dollar requirements for the shipping
destinations specifi ed below.
*Valid within the continental 48 states only. Applies to products purchased at standard pricing; any
special pricing will void standard prepaid freight policy and will be addressed on a case-by-case
basis. Does NOT apply to complete Waste systems or ShurTite™ fl atbed products. To see a list of
eligible products consult the Index of the Donovan
® Tarp Systems catalog.
INTO FL: Freight prepaid on orders of $2,500 or more or tarp-only orders of
$1,500 or more. INTO ZONES 1 & 2: Freight prepaid on orders of $3,000
or more or tarp-only orders of $2,500 or more. INTO ZONES 3 & 4: Freight
prepaid on orders of $6,000 or more or tarp-only orders of $3,000 or more.
WARRANTY.
We warrant all new products are free of defects in materials and
workmanship.* This warranty is effective if products are properly installed and
used for the purpose for which they were intended and applies to the original
buyer only. Except as set forth above or in any product-specifi c warranty docu-
mentation, we make no other warranties, express or implied, including but not
limited to warranties of merchantability of fi tness for a particular use.
Returns of a product for warranty must be accompanied by a Return Merchan-
dise Authorization number (RMA#), obtained by by calling Customer Service
at 800-327-8287, and sent, freight paid by us, to Donovan, 3353 SE Gran Park
Way, Stuart, FL 34997. All products returned without an RMA# will be refused.
When we issue the RMA#, we will also issue a call tag to have U.P.S. (or
other freight company) pick up the product. C.O.D. returns not accepted.
We will pay no storage fees for a warranty product return prior to pick by us
or the freight company. If a warranty product return is scheduled to be picked
up by us, we will pick up the product at our earliest convenience.
If a product
returned is found, in our judgement, to be defective in material or workman-
ship, our obligation under this warranty is limited to the repair or replacement
of the product, which will be made by us. Repair or replacement will be at our
discretion, with replacements being made using current products performing
in the equivalent function. Labor charges, other than those incurred at our fac-
tory, including, but not limited to, any labor to install a repaired or replacement
product, are not covered under this warranty. All expenses associated with
delivering defective products to our factory and delivering repaired or replace-
ment products from our factory to the owner will be paid by us.
If the product returned is found, in our judgement, to be non-warrantable, the
owner will be contacted to authorize repair work, purchase of a replacement
product or return of the product, all of which will be at the owner’s expense.
Payment authorization must be received by us before any non-warrantable
product is repaired, replaced or returned. All expenses associated with deliver-
ing the repaired non-warrantable product, a replacement product or the non-
warrantable product from our factory to the owner will be paid by the owner.
In no event will we be liable for any damages of any kind to person, product or
property, including but not limited to indirect, incidental, special, consequential
or punitive damages, or damages for loss of profi ts or revenue, even if we
have been advised of the possibility of such damages. There are no warran-
ties for used products or products that have been repaired, altered, modifi ed
or subjected to misuse, negligence or accident. We will not repair or replace
products that fail or malfunction due to ordinary wear and tear, except as ex-
pressly noted in a product-specifi c warranty. Use of non-Shur-Co®
, LLC parts
in conjuction with Shur-Co®, LLC products will void this product warranty.
*Certain products have specifi c warranties that differ from this warranty, for example motors and elec-
tronics. Product-specifi c warranty documentation is available for these items. In the event of a confl ict
between this warranty and a product-specifi c warranty, the product-specifi c warranty will govern.
RETURN POLICY. All sales fi nal. See WARRANTY above for return details.
OTHER.
All prices, product listings, sizes, weights and manufacturing details
are subject to change without notice. No person is authorized to modify the
foregoing conditions of sale whatsoever.
ZONE 4 ZONE 3 ZONE 2
ZONE 1
FL
FL
M
MI
Shur-Co®, LLC Terms & Conditions
SHUR-CO®, LLC SERVICE AND DISTRIBUTION CENTERS
Corporate HQ
SHUR-CO
® of SOUTH DAKOTA
2309 Shur-Lok St., Yankton, SD 57078
Ph 800.474.8756 | Fax 605.665.0501
SHUR-CO
®of IDAHO
610 N. 16th Ave., Caldwell, ID 83607
Ph 866.356.0246 | Fax 217.877.8270
SHUR-CO
® of ILLINOIS
3993 E. Mueller Ave., Decatur, IL 62526
Ph 866.356.0246 | Fax 217.877.8270
Preferred Donovan®Brand Seller
SHUR-CO® of FLORIDA
3353 SE Gran Park Way, Stuart, FL 34997
Ph 800.327.8287 | Fax 772.287.0431
SHUR-CO®of NORTH DAKOTA
1746 4th Ave. NW, West Fargo, ND 58078
Ph 877.868.4488 | Fax 701.277.1283
SHUR-CO®of OHIO
4676 Lynn Rd.
Rootstown, OH 44266
Ph 866.356.0242 | Fax 330.297.5599
SHUR-CO® of VERMILLION
1212 N. Norbeck St., Vermillion, SD
Ph 605.658.1020 | Fax 605.658.1022
SHUR-CO®of CANADA
490 Elgin St., Unit #1
Brantford, Ontario N3S 7P8
Ph 800.265.0823 | Fax 519.751.3997
SHUR-CO®UK, Ltd.
Unit 41 Rochester Airport Estates
Laker Rd., Rochester, Kent ME1 3QX
Ph +44 (0)1795.473499
Fax +44 (0)871.272.8278
For more information, log on to our website:
www.donovan-tarps.com
P/N 1128261 Rev. A
2

DONOVAN
®
HELP LINE: 1-800-327-8287
Spring Trap 2™
P/N 1128261 Rev. A
Hardware Identication.......................................................................4
Pivot Mount Installation ......................................................................5
Elbow Assembly .................................................................................6
Crossbar Assembly.............................................................................7
Operation and Maintenance ...............................................................8
Replacement Parts.............................................................................9
1. Wrench Set
2. Ratcheting Socket Wrench
3. Socket Set
4. Hammer
5. Tape Measure
6. Drill
7. Grinder
8. Pliers
9. Metal Saw
Thank you for buying this tarping system from Donovan®Tarps. We
appreciate your condence in our products. Please read and thor-
oughly understand this manual before installing and/or operating this
system.
Pay particular attention to important safety and operating instructions,
as well as warnings and cautions. The hazard symbol ! is used to
alert users to potentially hazardous conditions and is followed by cau-
tion, warning or danger messages.
Failure to READ AND FOLLOW INSTRUCTIONS could result in fail-
ure of your tarping system and/or personal injury. Your trailer require-
ments may, however, call for minor variations to these instructions.
Please inspect your tarping system periodically. Repair or replace
worn or damaged parts to your system.
QUESTIONS? CALL OUR HELP LINE:
1-866-748-7435
MON-FRI 8 AM-5 PM CENTRAL TIME
We at Donovan® Tarps are concerned with your safety and the safety
of all those operating this system. Therefore, we have provided safety
decals at various locations on your tarping system. Keep decals as
clean as possible at all times. Replace any decal that has become
worn or damaged, painted over or otherwise difcult to read. Replace-
ment decals are available through Donovan® Tarps dealers.
To prevent rust, paint all exposed metal, such as weld seams and/or
metal exposed by grinding or cutting, with corrosion-resistant paint.
TOOLS REQUIRED
RUST PREVENTION
SAFETY
TABLE OF CONTENTSMESSAGE TO OWNERS
3
1. Always wear safety glasses during installa-
tion and operation.
2. Stay clear of moving parts.
3. No other use of this system is authorized,
except as designed.
SAFETY INSTRUCTIONS

DONOVAN
®
HELP LINE: 1-800-327-8287
P/N 1128261 Rev. A
4
Hardware Identication
AA
GG
BB
HH
CC
DD
JJ
EE
FF
KK
1705924 - Self-Tapping Screw - 3/8" x 1" - Black Zinc 1700419 Nylon Lock Nut - 5/16"
1705919 - Nylon Lock Nut - 5/16" - Black Zinc
1705918 - Nylon Lock Nut - 3/8" - Black Zinc
1700428 - Flat Washer - 5/16"
1700429 - Flat Washer - 3/8"
1706097 - Fender Washer - 1/2"
1202899 - Hex Cap Screw - 5/16" x 2-1/4"
1705923 - Hex Cap Screw - 5/16" x 2-1/4" - Black Zinc
1705914 - Hex Cap Screw - 1/2" x 3-1/2" - Black Zinc

DONOVAN
®
HELP LINE: 1-800-327-8287
P/N 1128261 Rev. A
5
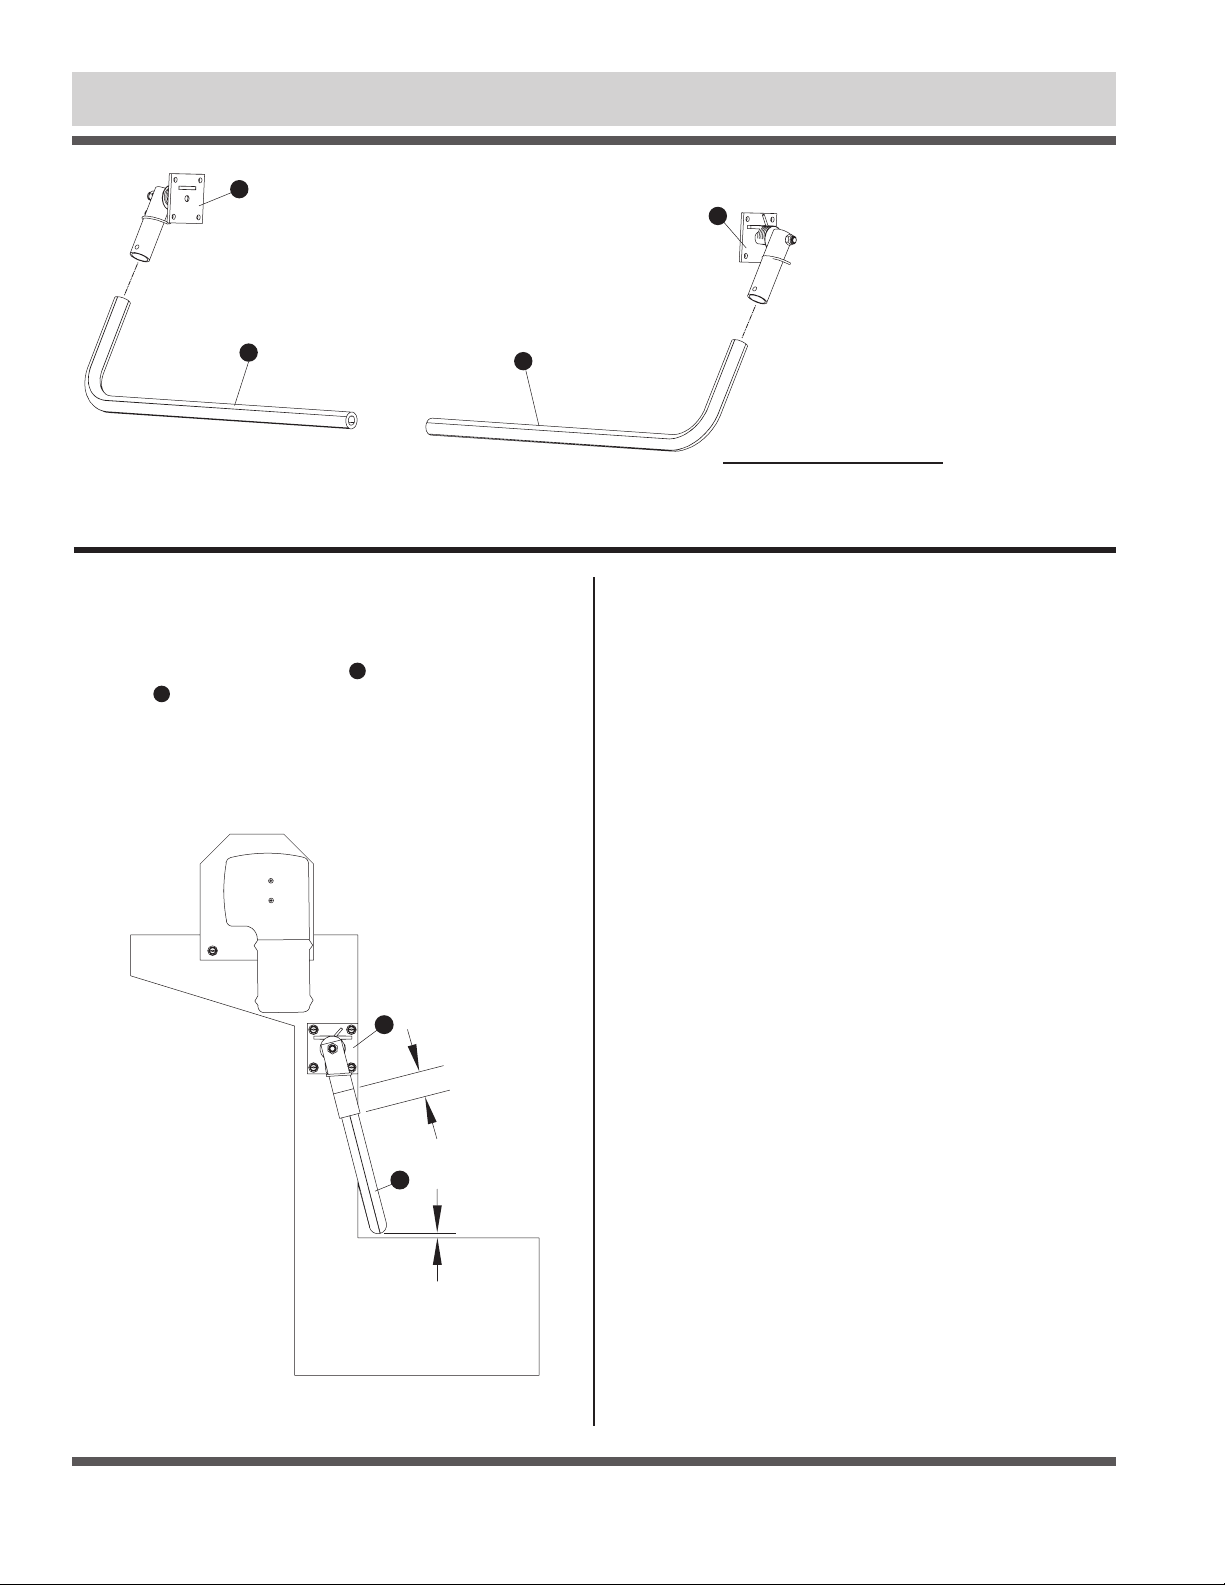
Pivot Mount Installation
STEP 1: Spring pivot assemblies should be mounted approxi-
mately half way between top rail and top of direct drive motor.
Left hand (driver side) assembly 11 can be welded or mounted
using the 3/8″ cap screws AA and associated washers JJ and
lock nuts GG, if needed.
STEP 2: Note location of pivot sleeve in unloaded position.
STEP 3: Repeat steps 1 & 2 for right hand (passenger side)
pivot assembly 22. Mount at same height as driver side.
Item Part # Description
1. 1128254 Pivot Assembly LH Spring Trap 2™
2. 1128255 Pivot Assembly RH Spring Trap 2™
A. 1705924 Self-Tapping Screw - 3/8″ x 1″ - Black Zinc
G. 1705918 Nylon Lock Nut - 3/8″ - Black Zinc
J. 1700429 Flat Washer - 3/8″
DRIVER SIDE MOUTNING
SPRING PIVOT ASSEMBLY
DRIVER SIDE
DRIVER SIDE
SPRING CATCH
ON TOP
PIVOT SLEEVE
PASSENGER SIDE
PASSENGER SIDE
2
2
1
1
A
A
G
G
J
J
DONOVAN
®
HELP LINE: 1-800-327-8287
P/N 1128261 Rev. A
6
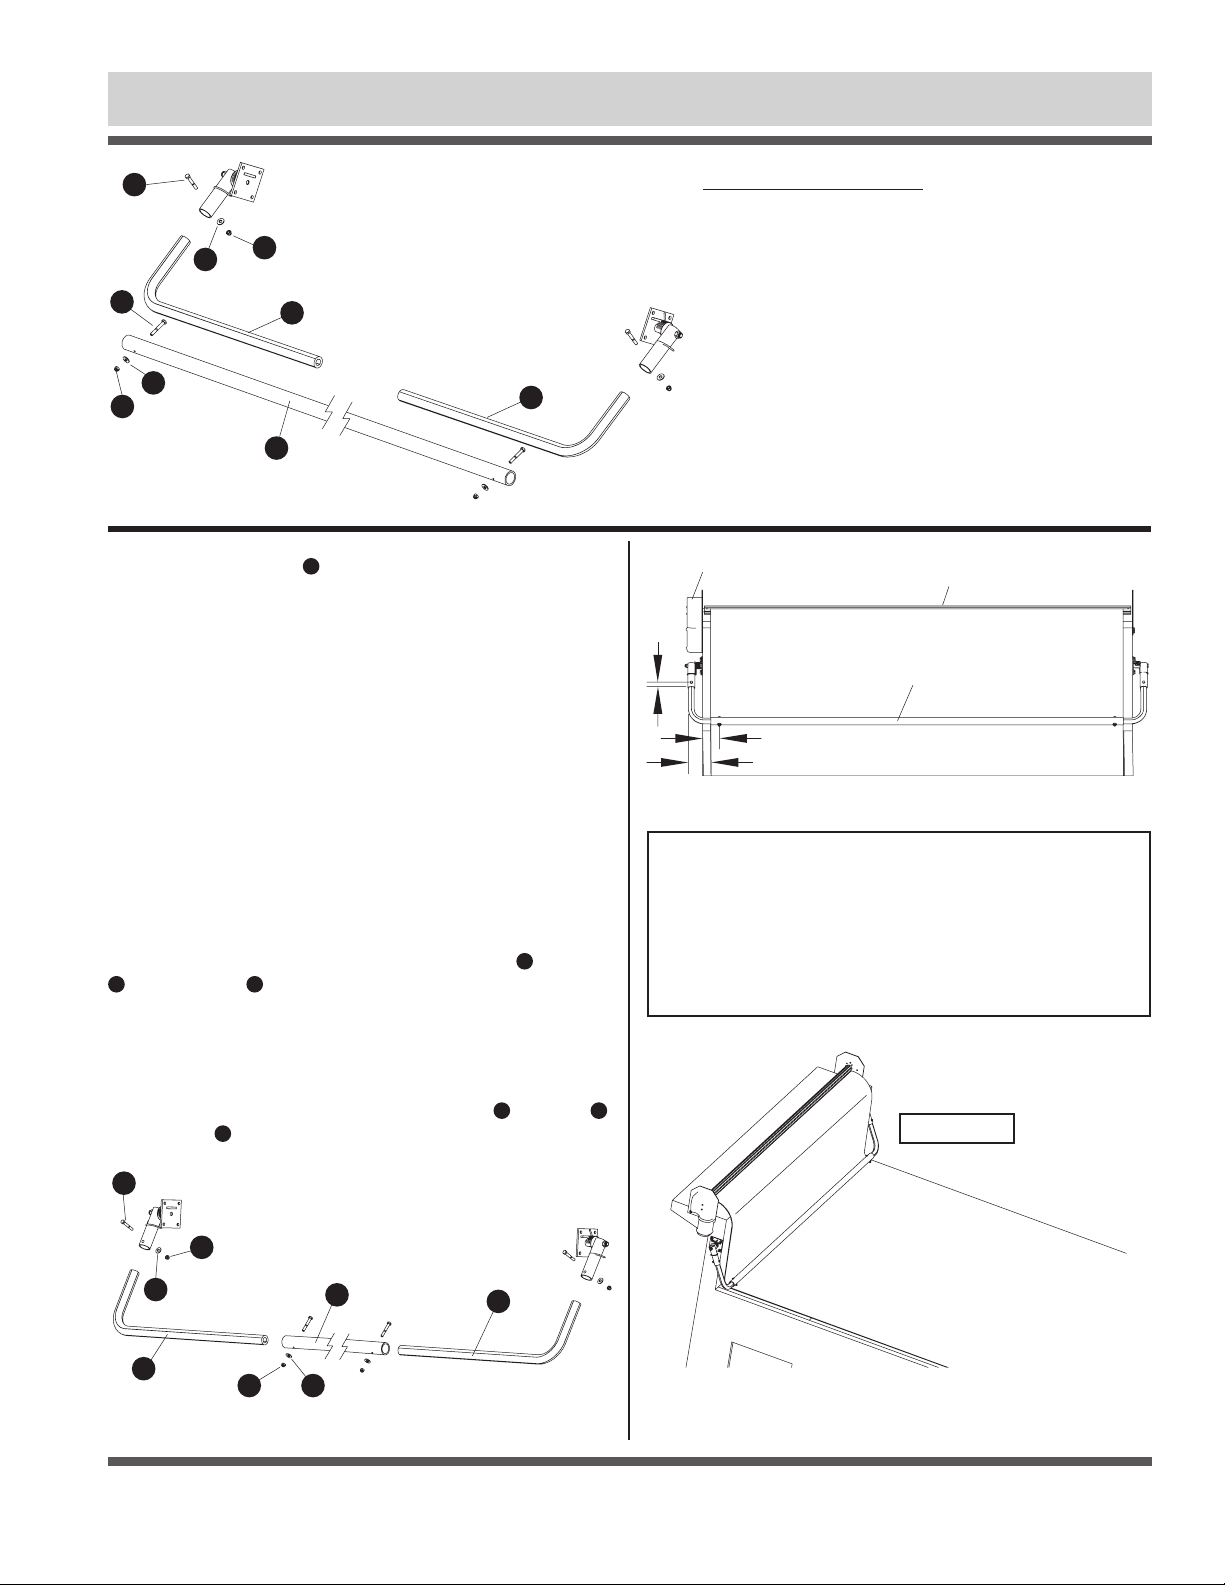
Elbow Assembly
STEP 1: Apply load to spring pivot assembly by pulling it coun-
ter clockwise towards rear of box.
STEP 2: Insert short end of elbow 33 into the driver’s side pivot
assembly 11.
STEP 3: Adjust length of elbow until it rests just above top rail of
box as shown below.
STEP 4: Mark location where elbow exits bottom of the pivot
sleeve, remove and add 4″ to mark, then cut to length.
STEP 5: Trim passenger side elbow to same length as driver
side elbow.
1
3
Item Part # Description
1. 1128254 Pivot Assembly LH Spring Trap 2™
2. 1128255 Pivot Assembly RH Spring Trap 2™
3. 1128628 Elbow
PRE-LOAD ASSEMBLY
AND INSERT ELBOW
MINIMUM 2"
2" MINIMUM
.25" MINIMUM
3
2
3
1
DONOVAN
®
HELP LINE: 1-800-327-8287
P/N 1128261 Rev. A
7
Crossbar Assembly
STEP 2: Insert long ends of both elbows into cross bar.
STEP 7: Secure with fasteners using cap screws BB, washers
HH, and lock nuts EE.
STEP 3: Insert elbows into spring pivot sleeves.
STEP 8: Drill a 5/16″ hole through each pivot sleeve and elbow
approximately 1-1/2″ From bottom of each sleeve.
STEP 4: For narrow boxes, cross bar may need to be cut down
to width.
STEP 9: Secure with fasteners using cap screws CC, washers JJ,
and lock nuts FF.
STEP 5: Adjust cross bar so it is centered between pivot as-
semblies.
STEP 1: Lay cross bar 11 on top of tarp (with tarp in covered
position).
STEP 6: Line up grooves in cross bar and elbows as a drilling
guide. Drill 5/16″ hole through each end of cross bar approxi-
mately 2″ in from each end.
NOTE: When installing Elbow, ensure that a minimum of
2″ inserts into Spring Pivot. If this cannot be achieved with
short end of Elbow, Elbow may be ipped so that long end
is inserted into Spring Pivot. If Elbow is ipped, it may be
necessary to cut long end down so that it meets minimum
dimensions shown. Short end would then insert into
Crossbar.
Item Part # Description
1 1706186 Aluminum Crossbar
2 1128628 Elbow
3 1128254 Pivot Assembly LH Spring Trap 2™
4 1128255 Pivot Assembly RH Spring Trap 2™
B 1202899 Hex Cap Screw - 5/16″ x 2-1/4″
C 1705923 Hex Cap Screw - 5/16″ x 2-1/4″ - Black Zinc
F 1705919 Nylon Lock Nut - 5/16″ - Black Zinc
H 1700428 Flat Washer - 5/16″
C
F
H
H
2
2
E
1
DRIVER’S SIDE MOTOR
TARP BENEATH CROSS BAR
EQUAL DISTANCE BOTH SIDES
2"
1-1/2"
ROLLER BAR
INSTALLED
C
B
H
E
HF
2
2
1

DONOVAN
®
HELP LINE: 1-800-327-8287
P/N 1128261 Rev. A
8
NOTE: Noise level is less than 72 dB(A).
Operation and Maintenance
CAUTION
Before operating this or any tarper, check your sur-
roundings for any overhead power lines tree limbs or
other obstruction in path of tarper travel from open
to close and back.
!
CAUTION
Before servicing or repairing SpringTrap 2™ system,
disconnect power to components from vehicles bat-
tery or other power source.
!
DONOVAN
®
HELP LINE: 1-800-327-8287
P/N 1128261 Rev. A
9
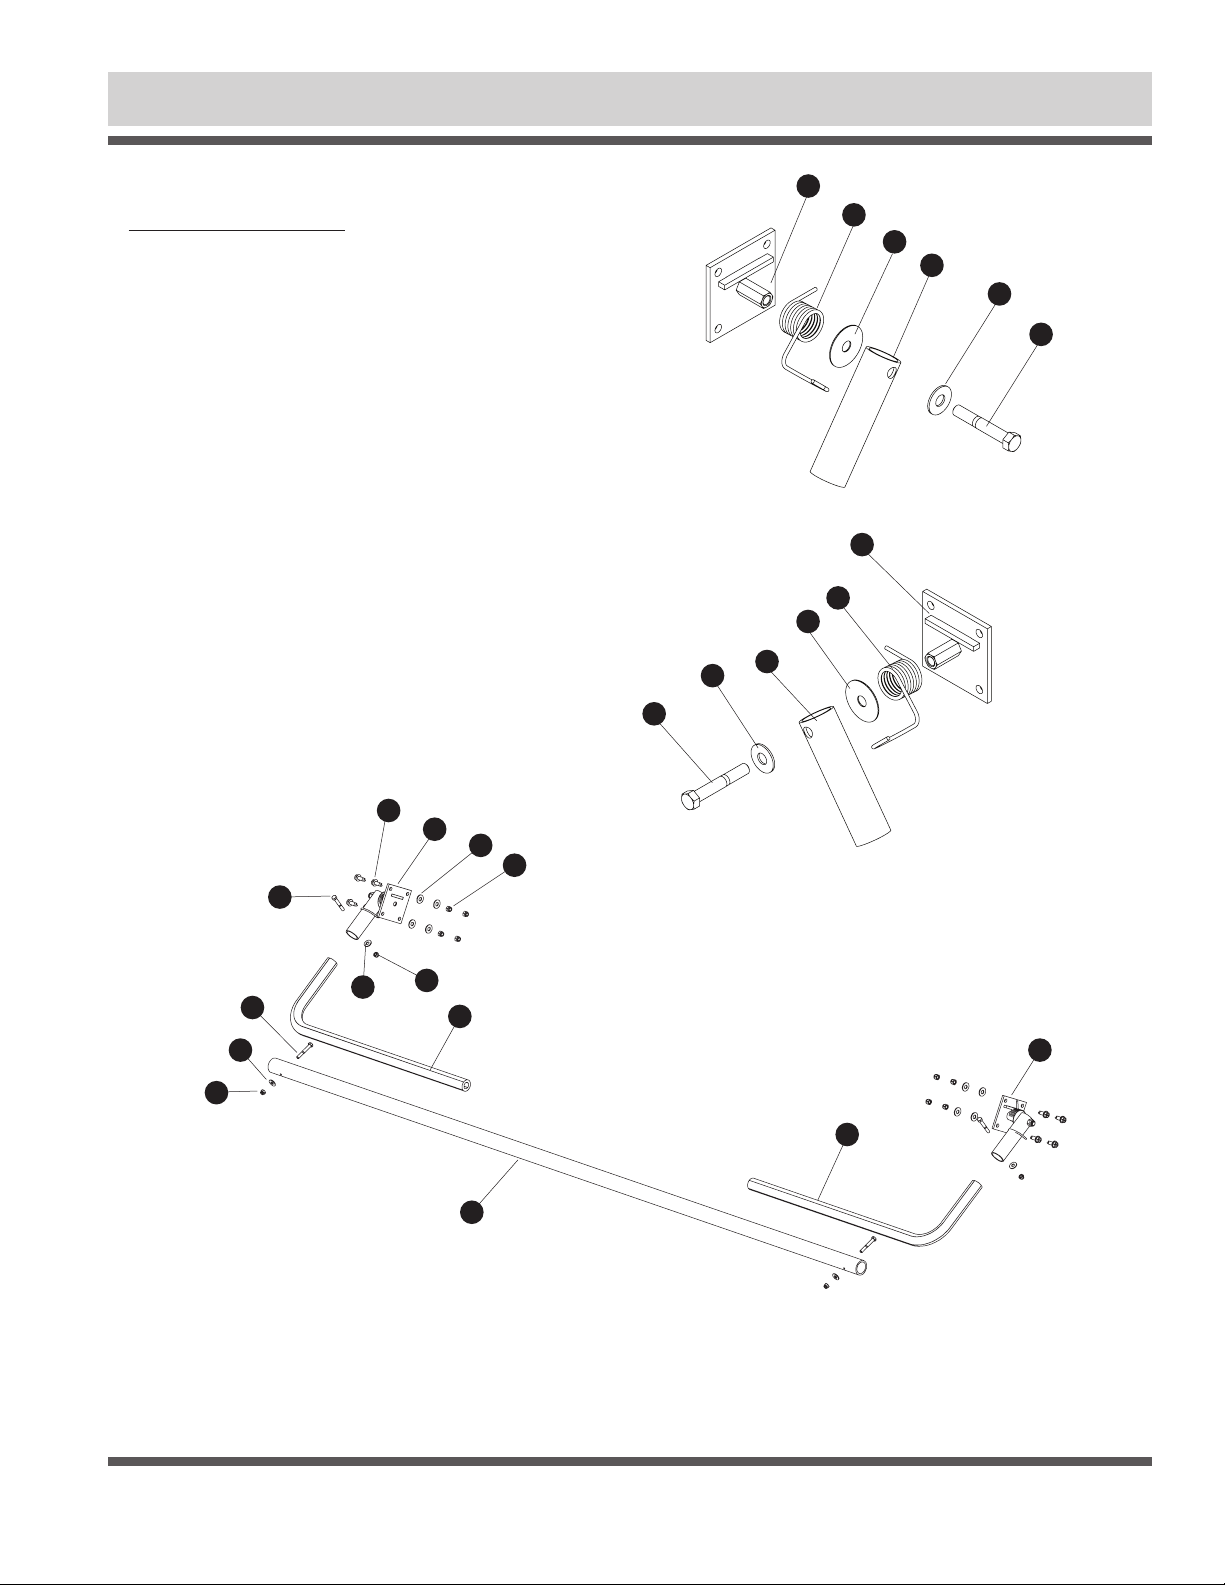
Replacement Parts
SPRING TRAP 2™
Item Part # Description
1 1706186 Aluminum Cross Bar
2 1128628 Elbow
3 1128255 Pivot Assembly RH
4 1128254 Pivot Assembly LH
5 1705923 Hex Cap Screw - 5/16″ x 2-1/4″ - Black Zinc
6 1705924 Self-Tapping Screw - 3/8″ x 1″ - Black Zinc
7 1202899 Hex Cap Screw - 5/16″ x 2-1/4″
8 1700419 Nylon Lock Nut - 5/16″
9 1700428 Flat Washer - 5/16″
10 1700429 Flat Washer - 3/8″
11 1705918 Nylon Lock Nut - 3/8″ - Black Zinc
12 1706188 Spring LH
13 1128256 Pivot Sleeve - Black
14 1128257 Pivot Weldment - Black
15 1706097 Fender Washer - 1/2″
16 1705914 Hex Cap Screw - 1/2" x 3-1/4" Black Zinc
17 1706189 Spring RH
18 1705919 Nylon Lock Nut - 5/16″ - Black Zinc
19 1705911 Flat Washer - 1/2" - Black Zinc
DRIVER SIDE
PASSENER SIDE
5
4
918
2
7
9
8
1
2
3
6
10
11
14
12
15
13
16
19
14
17
15
13
19
16

DONOVAN
®
HELP LINE: 1-800-327-8287
P/N 1128261 Rev. A
10
Notes

DONOVAN
®
HELP LINE: 1-800-327-8287
P/N 1128261 Rev. A
11
Notes

CONSTR
UCTION PRODUCTS
• Arm-Matic™
• Flash™
• Bullet™
• Hammer™ II
• DuraPull™
• 5000X
• UT Tarp System™
• 2000SR
WASTE PRODUCTS
• SWAT®
• Quick-Flip™ III
• Sidewinder™
• Sidewinder™ 350
• Hy-Tower™ SL
• Hy-Tower™ DL
• Double-Flip™
• Donovan® Belt & Ratchet (DBR)
MORE QUALITY PRODUCTS FROM DONOVAN®
TARP SYSTEMS, PARTS & TARPS
Table of contents
Other Shurco Industrial Equipment manuals


