SHURflo Water wizard 150 User manual
911-439 Rev. G 5/99 Page: 1 of 4
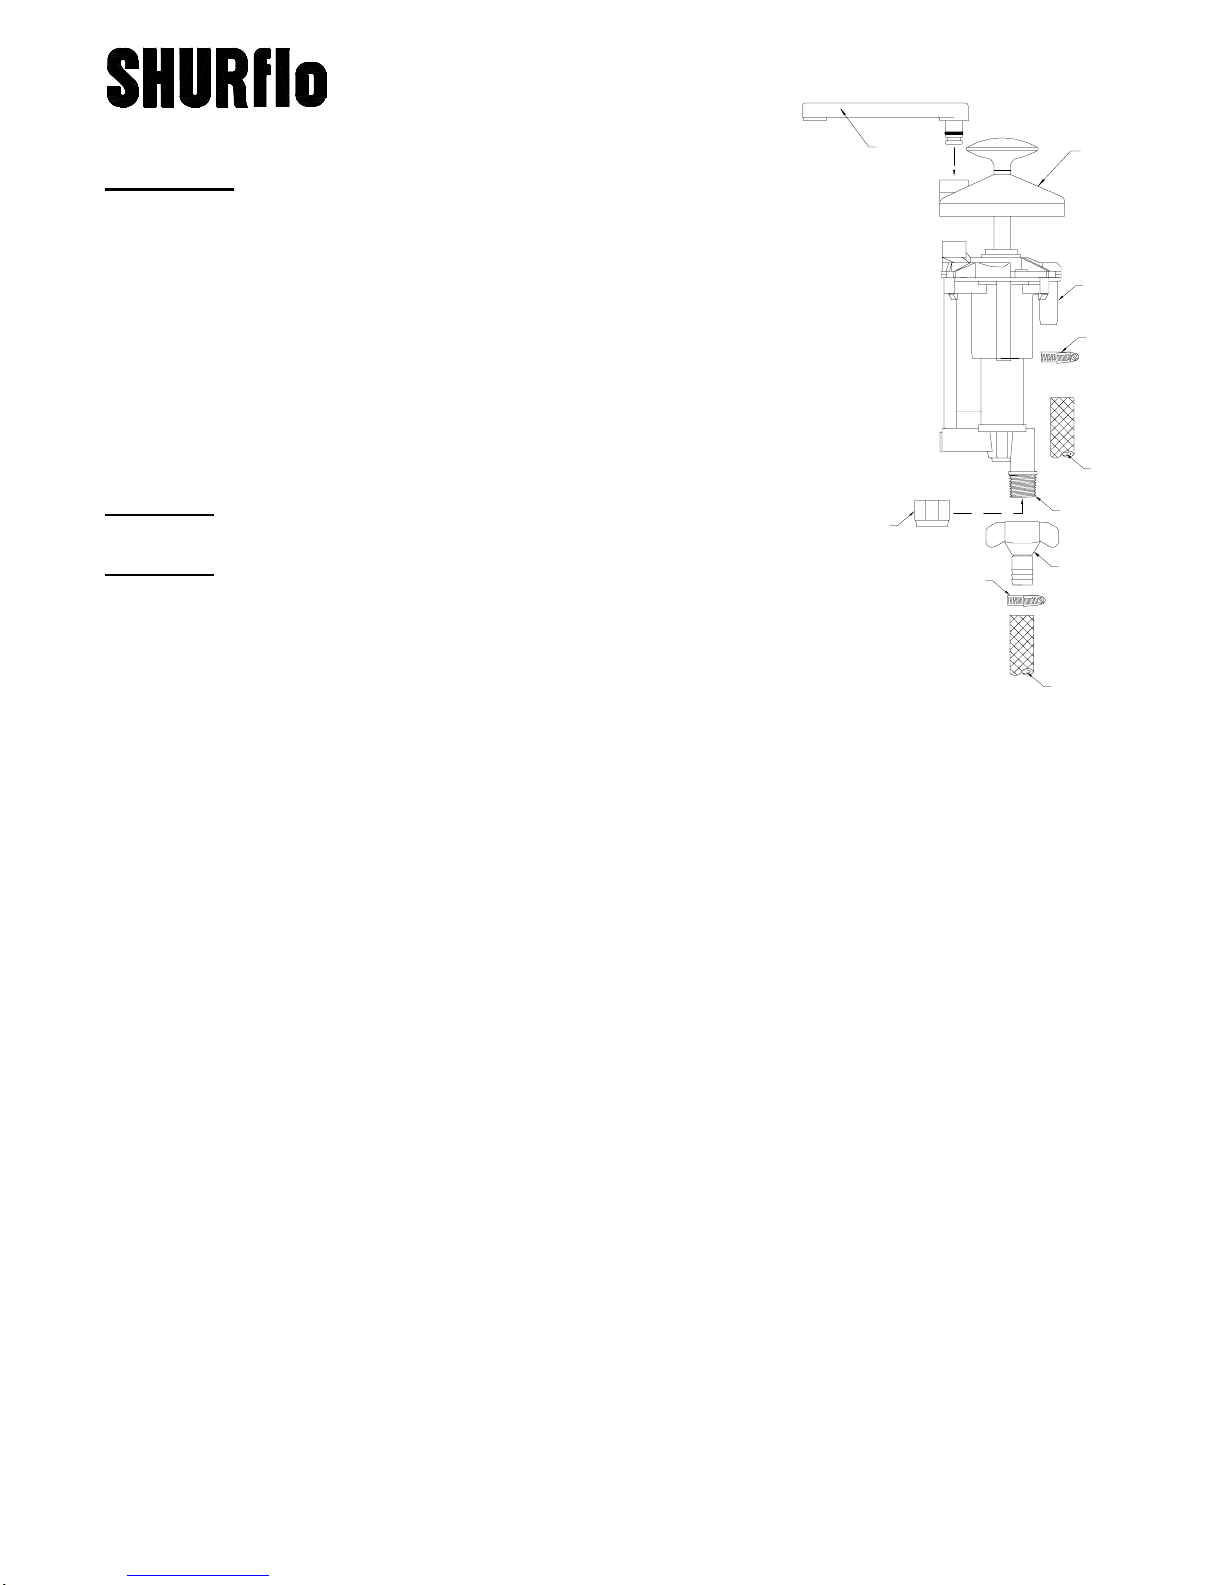
WATER WIZARDTM HAND PUMP MODEL 150
The procedure outlined below is for new installations. To install
the spout there must be 2½" [6.35 cm] clearance from the template centerline to any interference
behind the unit (back wall) and there must be 4¾" [12.06 cm] from the centerline to any
interference to the left side of the unit (see template). If the Wizard is to replace an existing hand
pump, modifications to the existing hole may be required. Use the template to determine if the
trim cover will cover an existing hole after modifications. In most installations there are
limitations on space. Use of a hole saw allows the easiest and most precise method to make the
cut out.
1.Determine the position and check under the counter for adequate space to mount the pump. Make
certain there is sufficient clearance to rotate the spout when installing. Also, if mounted in a flip galley,
check for proper clearance in both positions for the pump and tubing. Mark layout lines in-line with the
center of the drain, and 2¼" [5.72 cm] from the outer edge of the sink rim. The ¼" [6.35 mm] clearance
will allow cleaning between the trim cover and the sink rim.
2.Cut the template (Page: 3) out around the "edge of trim cover." Position the template over the layout
lines and hold in place with tape. Mark (pilot drill) the position of the four 1¾" [4.44 cm] holes.
3.Use a 1¾"[4.44 cm] hole saw to cut the four holes. Trim out the remaining material to attain the cut-out
shown on the template (bold line). The trim cover may not cover the hole if enlarged past the size
shown.
4.Place the pump in the cut-out and square it to the sink. Squaring up the pump is easier if the trim
cover is placed in position, but DO NOT snap it in place! Mark the four mounting holes and
remove the pump before drilling small pilot holes for #6 hardware*. If using a power screwdriver,
pilot holes may not be necessary. If installing into an existing hole, simply install the supplied
screws into the existing holes.
5.On the water line between the tank and pump a water strainer is recommend. To protect the pump
a 50 mesh screen (or finer) is necessary, such as the SHURflo Potable Water Strainer #170-061-XX
*supplied with after market pump #150-001-00
3/8"[10mm]
TANK
1/2" - 14
THREAD
REGULATED
CITY WATER
SEALING
CAP
POTABLE
WATER
FITTING
*
*
*
SPOUT
INLET
TRIM COVER
*
FEATURES
•
••
•
Delivers Water in both stroking directions.
•
••
•
Retrofits into most existing hand pump installations.
•
••
•
"Twist of the Wrist" Hands-Free operation with city water.
•
••
•
Easy winterizing and sanitizing.
•
••
•
FDA materials.
•
••
•
All corrosion resistant materials.
•
••
•
Parts supplied with aftermarket pump, model #150-001-00:
(1) Swivel Barb 1/2" Hose Fitting #8-161-00
(2) Hose Clamps
(4)
#6 Screws
(1) Sealing Cap
READALLINSTRUCTIONS BEFORE STARTING
READALLINSTRUCTIONS BEFORE STARTINGREADALLINSTRUCTIONS BEFORE STARTING
READ ALL INSTRUCTIONSBEFORESTARTING THE INSTALLATION
THEINSTALLATIONTHEINSTALLATION
THEINSTALLATION
CAUTION: DO NOT freeze with water in pump. Refer to page 2 for
Winterizing instructions.
CAUTION: DO NOT snap the square trim cover to the pump until the
unit is correctly located and screwed into position.
NOTE: To remove trim plate, slip screwdriver into slot on plate, and
gently pry up on both sides.

911-439 Rev. G 5/99 Page: 2 of 4
6.Connect the tubing from the potable water tank to the inlet fitting. The regulated city water line (if used) is
connected with the swivel barb fitting*to the threaded port at the bottom of the pump. DO NOT
OVER-TIGHTEN! HAND TIGHTEN ONLY! Secure the tubing with hose clamps*. If the city water
feature is not being used, install the threaded seal cap*. DO NOT OVER-TIGHTEN! HAND
TIGHTEN ONLY!
7.Install the pump back into the hole and fasten in place. DO NOT over tighten the screws. Doing so
can distort the plastic bosses creating difficulty when snapping the trim plate in place.
8.Perform a visual inspection of the installation before snapping the trim plate into position. To
install the spout, align marks on spout and trim plate. Press spout into the hole, and turn to the
forward position. Test the pump for proper operation and check tubing for leaks. Remove and
properly discard spout label.
*supplied with after market pump #150-001-00
OPERATION
A. Water from Tank: Fill water tank. Pump the piston up and down. Make sure all connections are tight.
B. City Water: ON: Turn handle counterclockwise 1/4 turn. OFF: Return handle clockwise 1/4 turn.
SANITIZING
Mix into solution, ½ ounce of common household bleach for every gallon of potable water tank capacity
[liter ≈1 ml] and then fill the tank completely. Operate the pump until the chlorine odor is detected.
Allow the solution to have a 4-hour contact time, and then drain the holding tank. Refill the tank and
operate pump until the line is flushed clear of solution.
WINTERIZING
CAUTION: DO NOT use propylene glycol based anti-freeze fluids. Never allow water freeze in pump.
To winterize the pump, simply drain the holding tank. Operate the pump until all water is flushed from
the lines. Remove the city water inlet fitting or threaded cap and collect the water that drains out.
Operate the pump several strokes then reinstall the city water fitting or cap. Make sure pump is
thawed before using!
Water Wizard
LIMITED WARRANTY
SHURflo warrants the Water Wizardhand pump to be free from material and workmanship defects (under normal
use and service) for a period of one (1) year from the date of manufacture, or one (1) year of use, with proof of
purchase. In no case will the terms of this limited warranty extend beyond two years from the date of manufacture.
Warranty claims may be resolved by the nearest authorized dealer service center, or by a SHURflo service center.
All returns are to be shipped with charges pre-paid. Package all returns carefully. SHURflo will not be responsible
for freight damage incurred during shipping.
For complete warranty details refer to SHURflo Service Bulletin #1041.
!ISO Certified Facility SHURflo reserves the right to update specifications, prices, or make substitutions.
SHURflo !
!!
!
12650 Westminster Ave.
Santa Ana, CA 92706-2100
(800) 854-3218 (714) 554-7709
FAX (714) 554-4721
Shipping/UPS: 12650 Westminster
Ave.
Garden Grove, CA 92843
SHURflo East
52748 Park Six Court
Elkhart, IN 46514-5427
((800) 762-8094 (219) 262-0478
FAX (219) 264-2169
http://www.shurflo.com
© 1999
SHURflo Ltd.
Unit 5 Sterling Park
Gatwick Road, Crawley
West Sussex, RH10 2QT
United Kingdom
+44 1293 424000
FAX +44 1293 421880

2-1/2"
CLEARANCE
4-3/4"
CLEARANCE
2-1/4"
SUGGESTED
EDGE OF
TRIM COVER
1-3/4" DIA.
(4 PLACES)
OUTER RIM OF SINK
[12.06 cm]
[5.72 cm]
[4.44 cm]
[6.35 cm]
SHURflo ALIGN TAB TO INSERT SPOUT
SPOUT INSTALL POSITION
C
L
Water WizardTM
Template
Pa
g
e 3 of 4
911-439 Rev. G 5/99 Page: 4 of 4
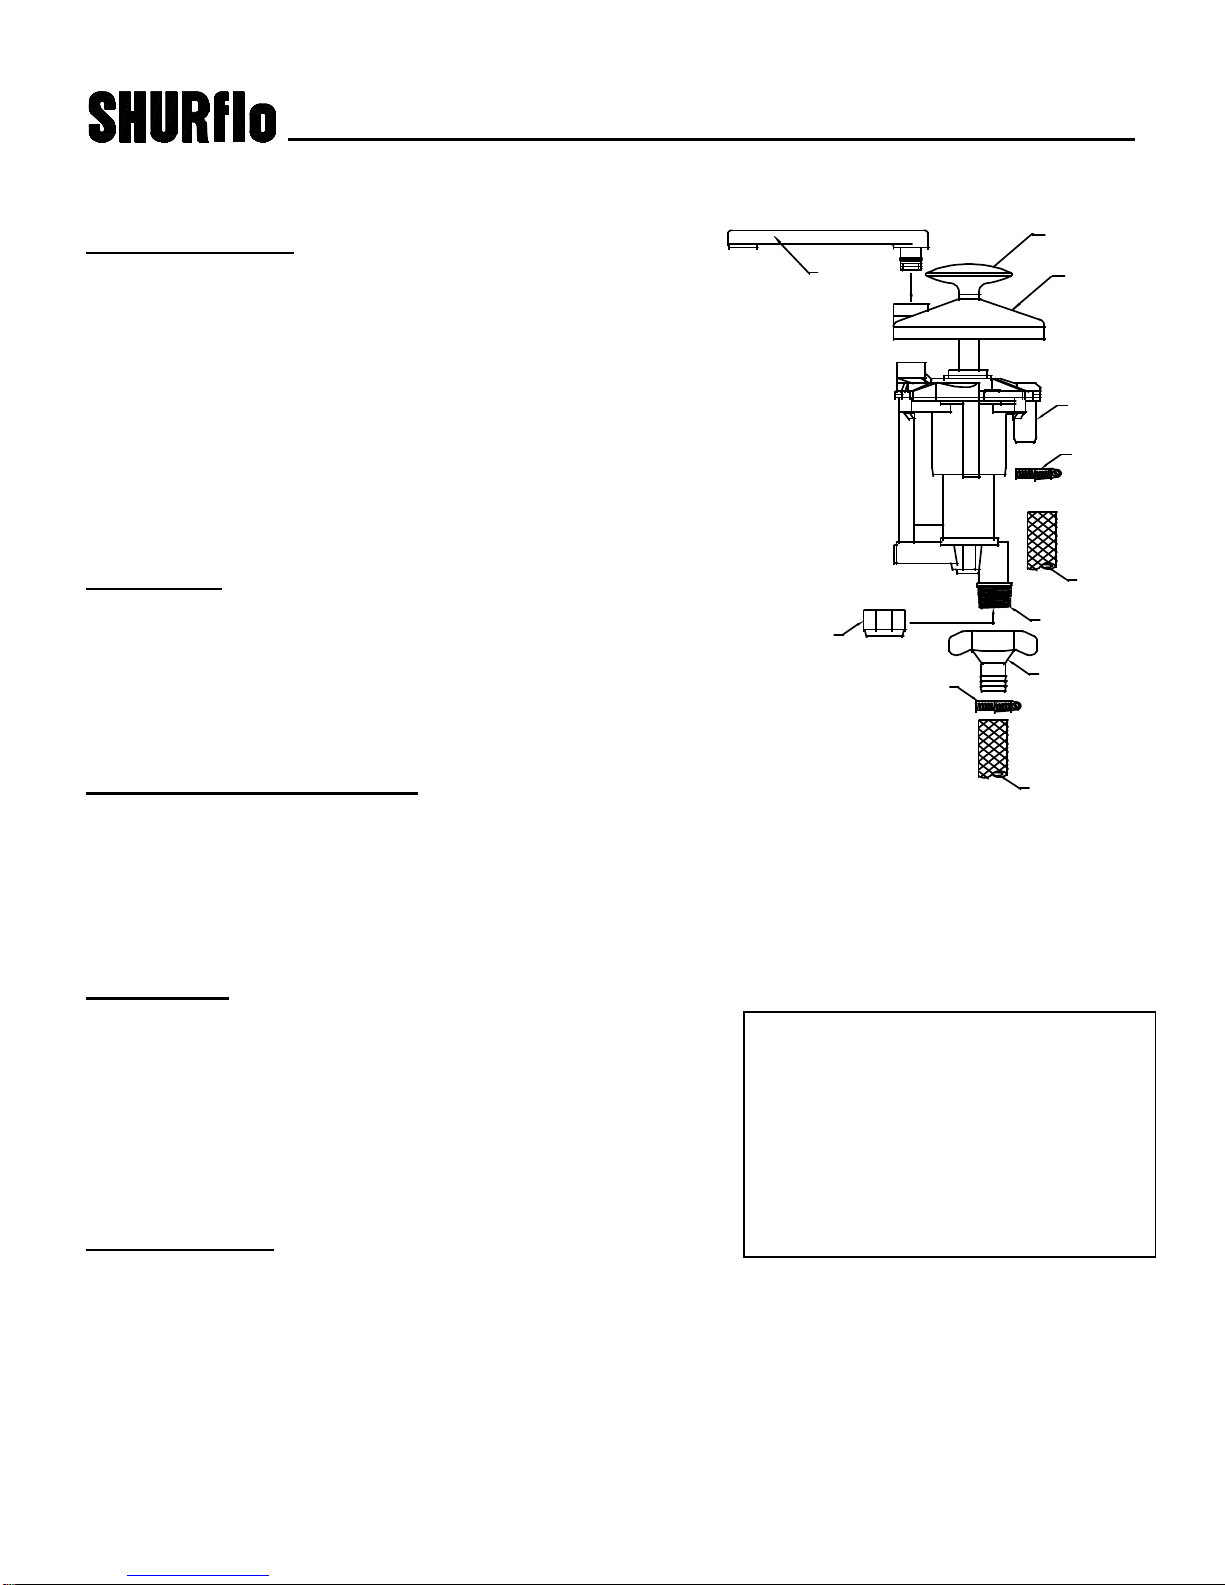
RACCORD
D’ARRIVEE
3/8” (10mm)
FILETAGE 1/2”-14
EAU MUNICIPALE
REGULEE
CAPUCHON
ETANCHE
RESEVOIR
D’EAU
POTABLE
*
*
*
BEC COUVERCLE
*
POIGNEE
POMPE À MAIN WATER WIZARD
MODÈLE 150
Manuel d’utilisation et d’entretien
FONCTIONNEMENT
Nous recommandons qu’un tamis de l’eau est utilisé entre le
Réservoir et la pompe, utilisons une maille 55 ( ou plus fin ),
comme le numéro 170-xxx de teinturier de l’eau potable de SHURflo.
A. Eau d’un réservoir :
Remplir le réservoir d’eau. Actionner la poignée de haut en bas. S’assurer
que tous les raccords sont étanches.
B. Eau municipale :
OUVERTURE : Tourner la poignée d’…de tour dans le sens inverse des
aiguilles d’une montre.
FERMETURE : Ramener la poignée d’…
de tour dans le sens des aiguilles d’une montre.
NETTOYAGE
Mélanger 4 ml d’eau de javel par litre de capacité
d’eau potable du réservoir (oz par gallon) puis complètement
remplir le réservoir. Actionner la pompe jusqu’à ce qu’une odeur
de chlore soit détectée. Laisser la solution reposer pendant 4 heures puis
vidanger le réservoir. Remplir à nouveau le réservoir et actionner la pompe
jusqu’à ce que la conduite soit purgée de toute solution chlorée.
PRÉPARATION AVANT L’HIVER
Avant l’hiver, vidanger le réservoir. Actionner la pompe jusqu’à ce que les conduites soient
totalement vides. Démonter le raccord d’arrivée d’eau municipale ou le capuchon vissé et récupérer l’eau
de vidange. Actionner la pompe plusieurs fois puis remonter le raccord d’arrivée d’eau ou le capuchon.
Attention : N’utiliser pas les fluides antigel basés par glycol de propyline. Ne laisser pas la pompe geles
avec l’intérieur de l’eau. *Fourni en tant que pièce détachée uniquement.
S’assurer que la pompe est dégelée avant de s’en servir !
DÉMONTAGE
Avertissement : Vidanger toute l’eau et débrancher l’arrivée
d’eau municipale.
Bec : Faire tourner le bec de manière à aligner les repères
du bec et du couvercle. Démonter le bec.
Couvercle : Glisser un tournevis dans la fente de la plaque et
soulever délicatement les deux côtés.
Pompe : Démonter les tuyaux. Enlever les 4 vis de fixation de
la pompe.
GARANTIE LIMITÉE
SHURflo garantit que la pompe manuelle Water Wizard
est exempte de tout défaut de
matériel et de fabrication (dans des conditions normales d’utilisation et de service)
pendant une durée d’un (1) an à compter de la date de fabrication ou d’un (1) an d’utilisation, sur présentation du justificatif d’achat. En aucun cas
les termes de la garantie limitée ne pourront s’étendre au-delà de deux ans à compter de la date de fabrication. Les détails complets de la garantie
figurent dans le Bulletin de service SHURflo n°1041.
SHURflo se réserve le droit de modifier les caractéristiques ou les prix de ses produits ou d’effectuer des substitutions.
Essayez ces autres produits SHURflo :
* Filtres à eau municipale Waterguard
* Robinets électriques
* Pompes à eau potable 12 V
* Réservoirs à accumulation
* Arrivées d’eau municipale
* Filtres à tamis et raccords
* Pompes de transfert générales et de vidange d’huile
Water Wolf
* Gamme complète de pompes marines et accessoires
Consultez notre catalogue électronique sur notre
site Internet : http//:www.shurflo.com
Table of contents
Languages:
Other SHURflo Power Pump manuals

Popular Power Pump manuals by other brands

BLACKMER
BLACKMER GNXH2A Installation, operation and maintenance instructions

Eaton
Eaton Vickers VT16 Overhaul manual

BLACKMER
BLACKMER XLW2F Installation, operation and maintenance instructions

Pfeiffer
Pfeiffer MVP 020-3 AC Original operating instructions

Greenlee
Greenlee 976-22 instruction manual

ProMinent
ProMinent Sigma X Supplementary instructions


