Sienna SSC-0312 User manual

Eco
Steamer
SSC-0312
INSTRUCTION MANUAL

INTRODUCTION
Thank you for choosing Sienna for your household cleaning needs. Our steamer products
use the active power of steam without the use of chemicals; making it a green product
that is safe for the ecosystem. You have begun the first step into transforming your house
into a green, environmentally safe home. Our Sienna steam products are a modern way
of cleaning that is efficient and far more sanitary than conventional methods.
With the power of germ killing steam, dirt and grime can be eliminated in a matter
of seconds. The tiny hot vapor molecules penetrate porous surfaces being cleaned,
expanding and forcing dirt, debris, and bacteria to the surface. When used correctly, our
steamers can kill dust mites and certain types of bacteria pathogens such as salmonella
and E-coli on contact.
Since you do not need chemicals in order to use our products, not only will you see the
savings in your wallet, but you have provided a safer place for you and your family to live
in. We encourage you to improve your way of life, better the environment, and spend
time enjoying your clean chemical free floor.
Eco
The Eco Steamer is a multipurpose steam cleaning system that is a natural and safe
alternative to using harsh chemical cleaning products to sanitize and deodorize
everywhere in your home. The powerful Eco Steamer provides 1350 Watts of professional
steam pressure to 3.5 BAR, ready in minutes. The Accessory Kit includes attachments that
are useful for every household cleaning job. You can clean floors, counters, bathrooms,
windows, walls, and the list goes on. The Eco will also sanitize fabrics, including carpet,
pet beds, and couches. You can clean kitchens, bathrooms, hard floors, table tops, motor
vehicles, and boats. The Eco Steamer is environmentally safe using only tap water for
cleaning. It comes with a deluxe floor brush with 2 floor cloth pads, 2 extension tubes,
angle concentrator, fabric brush with fabric brush pad, glass squeegee, round brushes,
funnel and refill cup.
2
SAFETY GUIDELINES
The Sienna Eco (SSC-0312) Steamer is for indoor domestic use only. Any commercial
use will void warranty. It is designed for sanitizing and cleaning an array of surfaces such
as windows, ceramic tile, grout and more.
Safety Instructions:
WARNING: DANGER OF SCALDING. BE SURE TO READ AND FOLLOW ALL SAFETY
INSTRUCTIONS BEFORE USING YOUR STEAMER. PROPER CARE AND MAINTENANCE
WILL HELP TO EXPAND THE LIFE OF YOUR STEAMER.
When using an electrical appliance, basic precautions should always be followed. To
reduce the risk of fire, electric shock, or injury:
• Be sure to unplug the electrical cord when appliance is not in use and while servicing.
• This steamer is not intended for use by persons (including children) with reduced
physical, sensory, mental capabilities or lack of experience and knowledge unless they
have been instructed to do so by a person responsible for their safety.
• Do not leave appliance unattended while plugged in.
• Children should be supervised at all times and cautioned that the steamer is not a toy
and should not be played with.
• Do not direct steam towards people, pets, electrical outlets, or electrical appliances
such as ovens.
• Do not immerse the steamer in water or other liquids.
• Do not handle steamer with wet hands.
• Do not pull power cord, use cord as a handle, or close a door on the cord.
• Be sure to keep cord away from heat, water, and sharp edges.
• Do not use if cord or plug is damaged. If the power cord is damaged, it must be
replaced by the manufacturer, its service agent or similarly qualified persons in order to
avoid hazard.
• Do not use extension cords or outlets with inadequate current carrying capacity.
• Do not use steamer on any steam sensitive material such as velvet, leather, wax
polished furniture or floors, synthetic and other delicate fabrics.
• Do not use on unsealed hardwood floors. By doing so, you may remove the sheen
from the floor. It is recommended to test an isolated area with the steam mop
before proceeding. As a precaution, you should check the manual made by the floor
manufacturer for proper care instructions.
• Never put additives such as cleaning detergents or chemicals into the water tank. It will
make the product unsafe and damage the unit as well as be dangerous to use.
• Use only manufacturer’s recommended accessories.
• Stop using steamer if circuit breaker activates. Beware of risk of shock.
• Wear proper shoes when operating your steamer. Open-toed shoes, slippers or bare
feet may cause you to slip and fall or cause hot steam on your feet.
• Allow your steamer to cool down and empty out water before storing in a cool, dry
place.
3
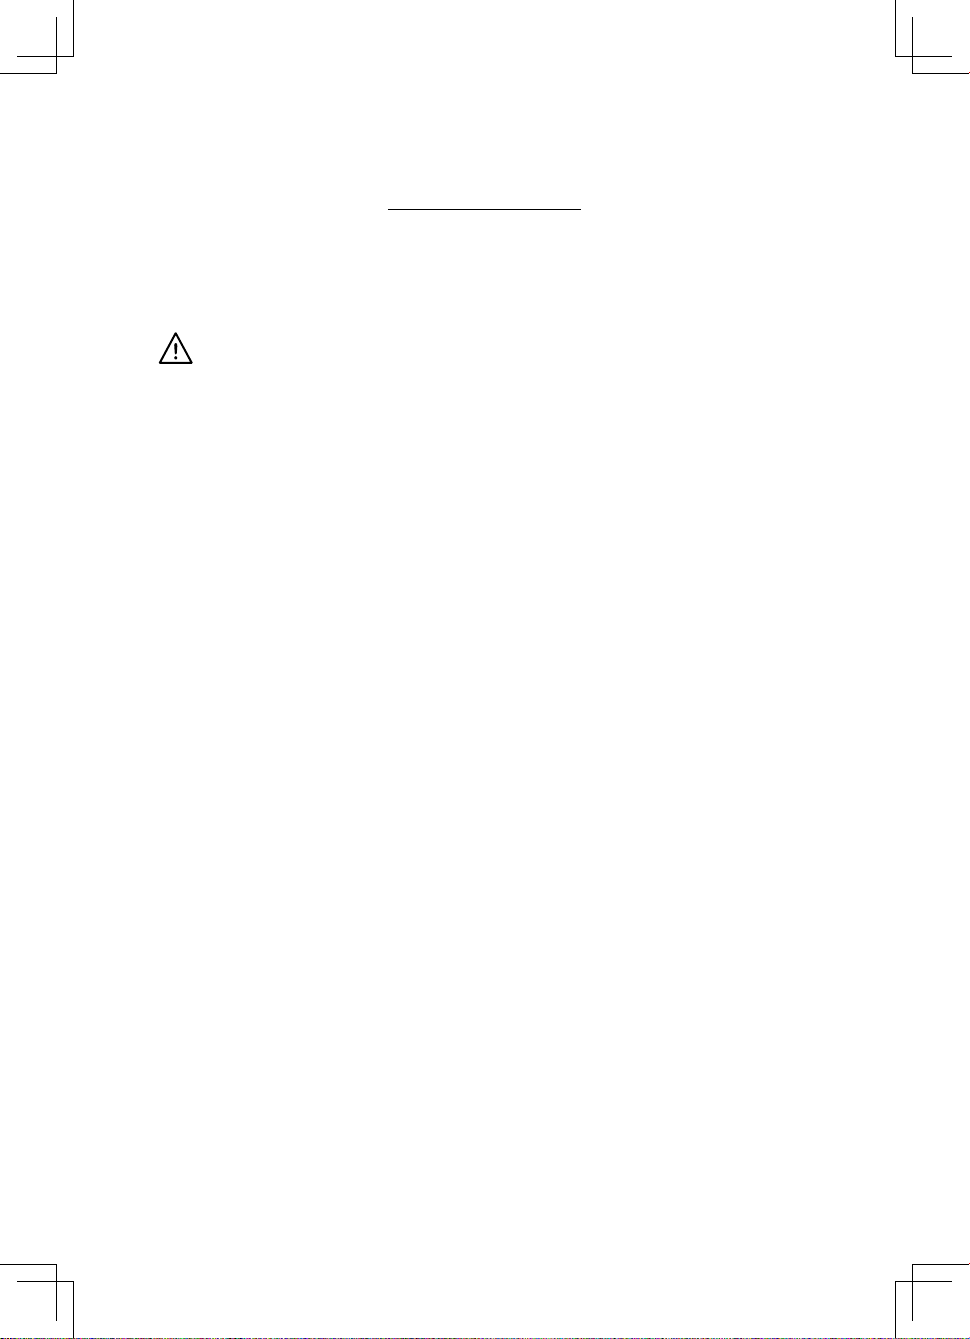
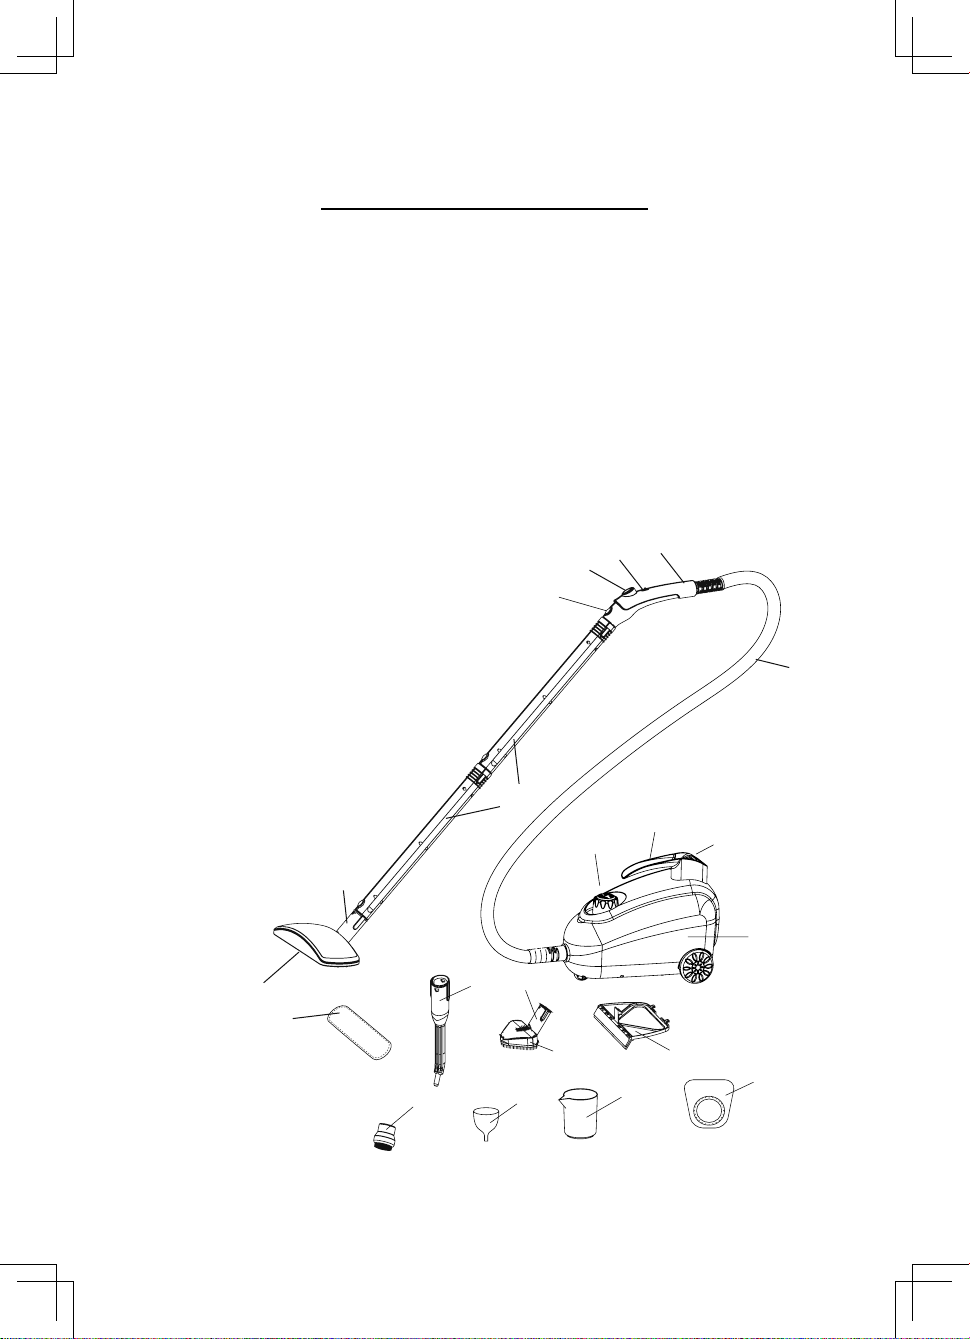
KEY FEATURES
A. STEAMER HEAD
B. CONNECTOR(S)
C. ATTACHMENT RELEASE BUTTON
D. STEAM TRIGGER
E. TRIGGER RELEASE SWITCH
F. TRIGGER HANDLE
G. HOSE
H. EXTENSION ARM(S)
I. WATER TANK CAP
J. BASE HANDLE
K. ON/OFF BUTTON
L. STEAMER BODY
M. FLOOR CLOTH PAD
N. ANGLE CONCENTRATOR
O. TRIANGLE FABRIC BRUSH HEAD
P. SQUEEGEE
Q. ROUND NYLON BRUSH(ES)
R. FUNNEL
S. REFILL CUP
T. SMALL CLOTH PAD
4
QR S
T
A
B
H
C
DE
G
F
M
NB
I
JK
L
OP
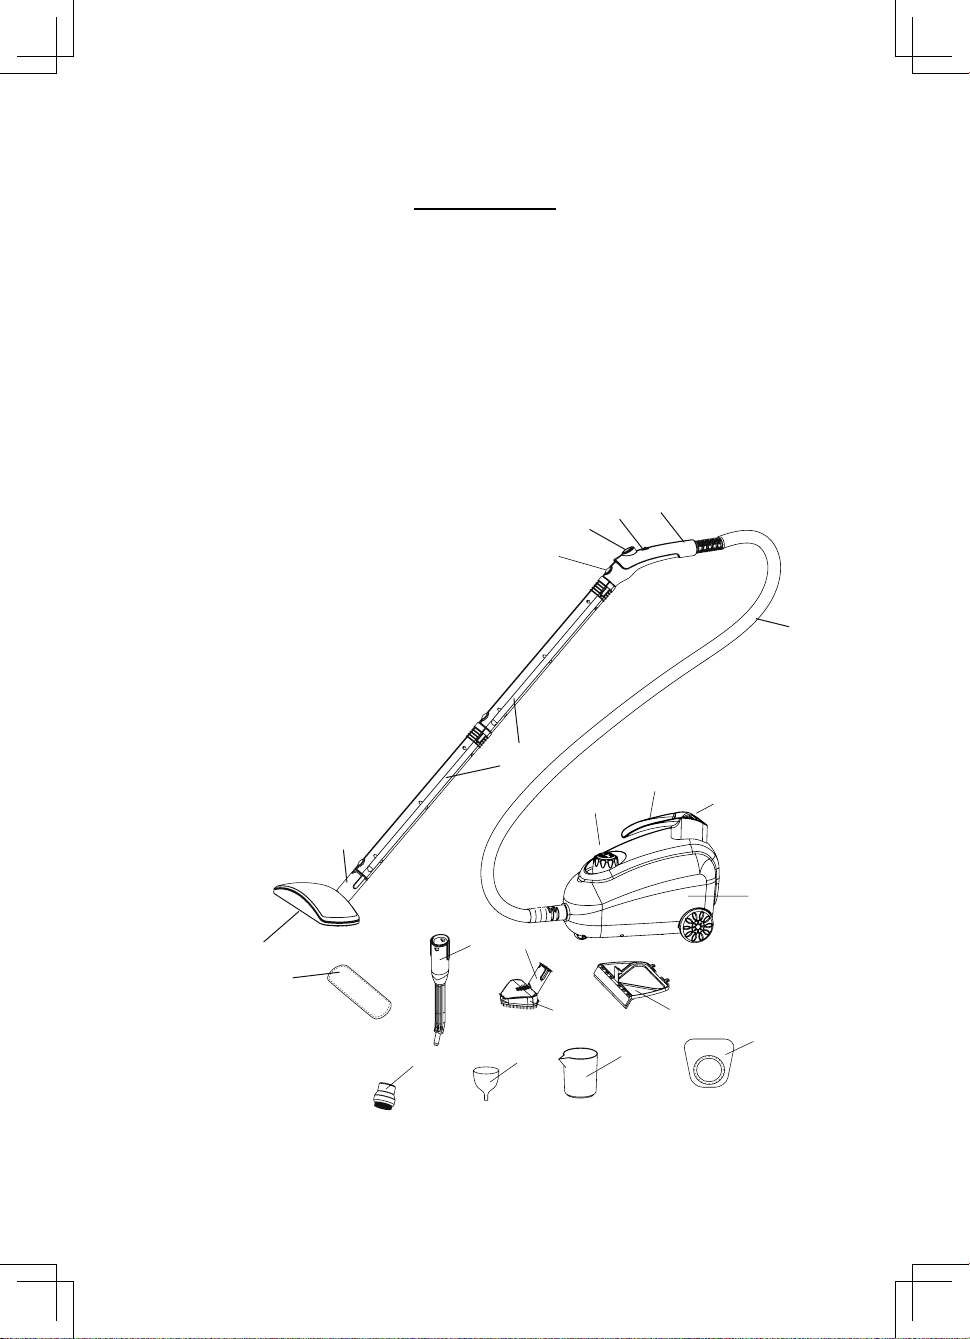
ASSEMBLY AND USE
Connector:
The connector (B) already comes attached to the triangle fabric brush head (P) and the
steamer head (A). To connect the parts together, match the flat side of the connector (B)
tip to the rectangular bump in the triangle fabric brush head (P) and steamer head (A).
Push the connector (B) all the way in and turn 180 degrees for a tight fit. (If you purchase
additional accessories, the connector will need to be used on other parts in the same
way.)
Extension Arm(s):
The extension arm (H) can be inserted into the trigger handle (F). You can attach the
angle concentrator (O), steamer head (A), or the triangle fabric brush head (P) to extend
your reach. To attach, press firmly on the purple button located on the trigger handle (F)
and insert into the hole at the end of the extension arm (H). To remove, press firmly on
purple button and pull out extension arm (H).
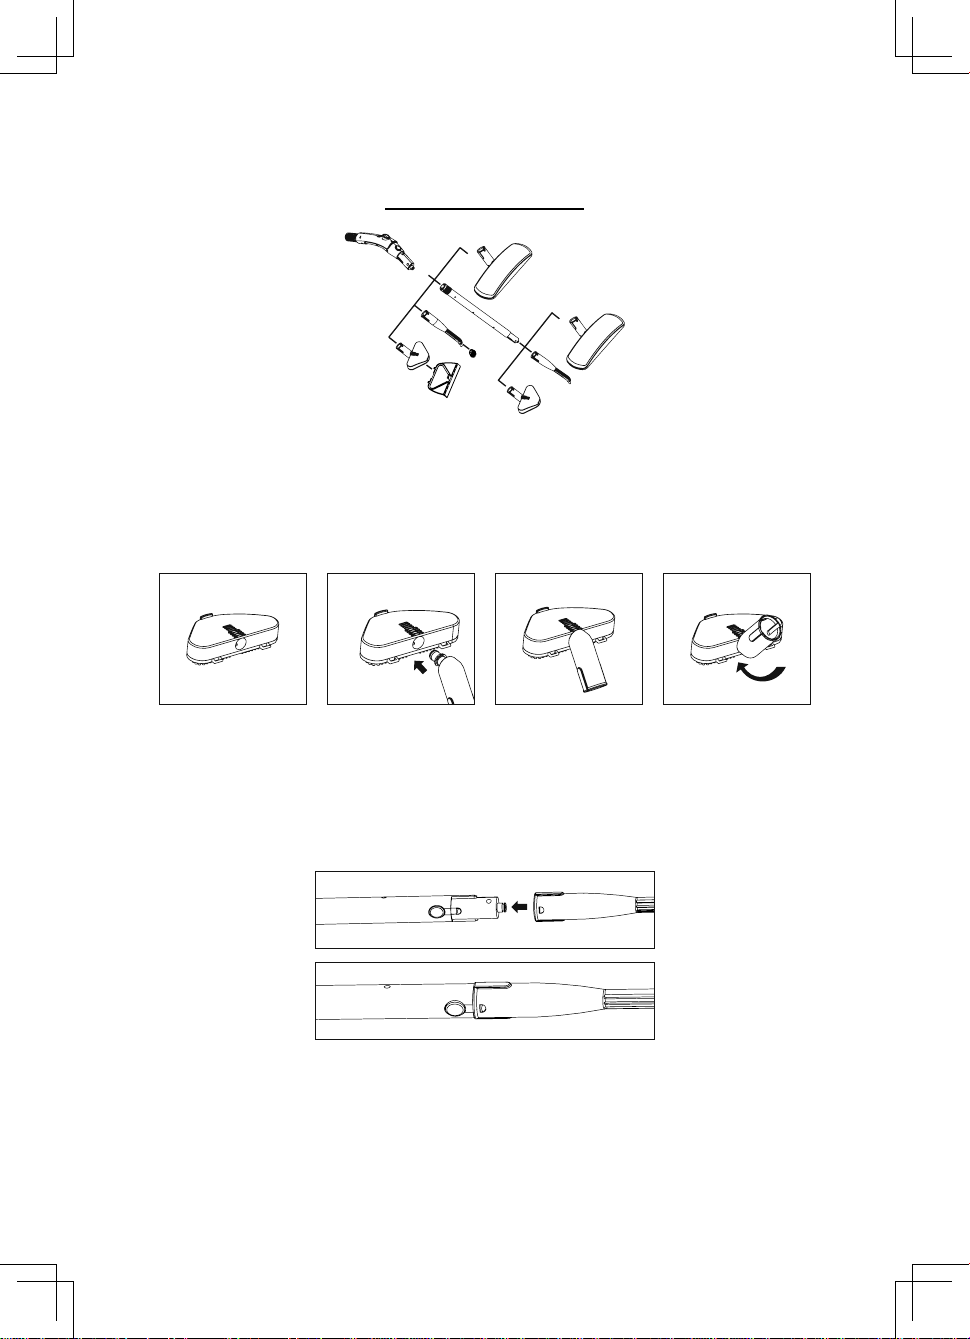
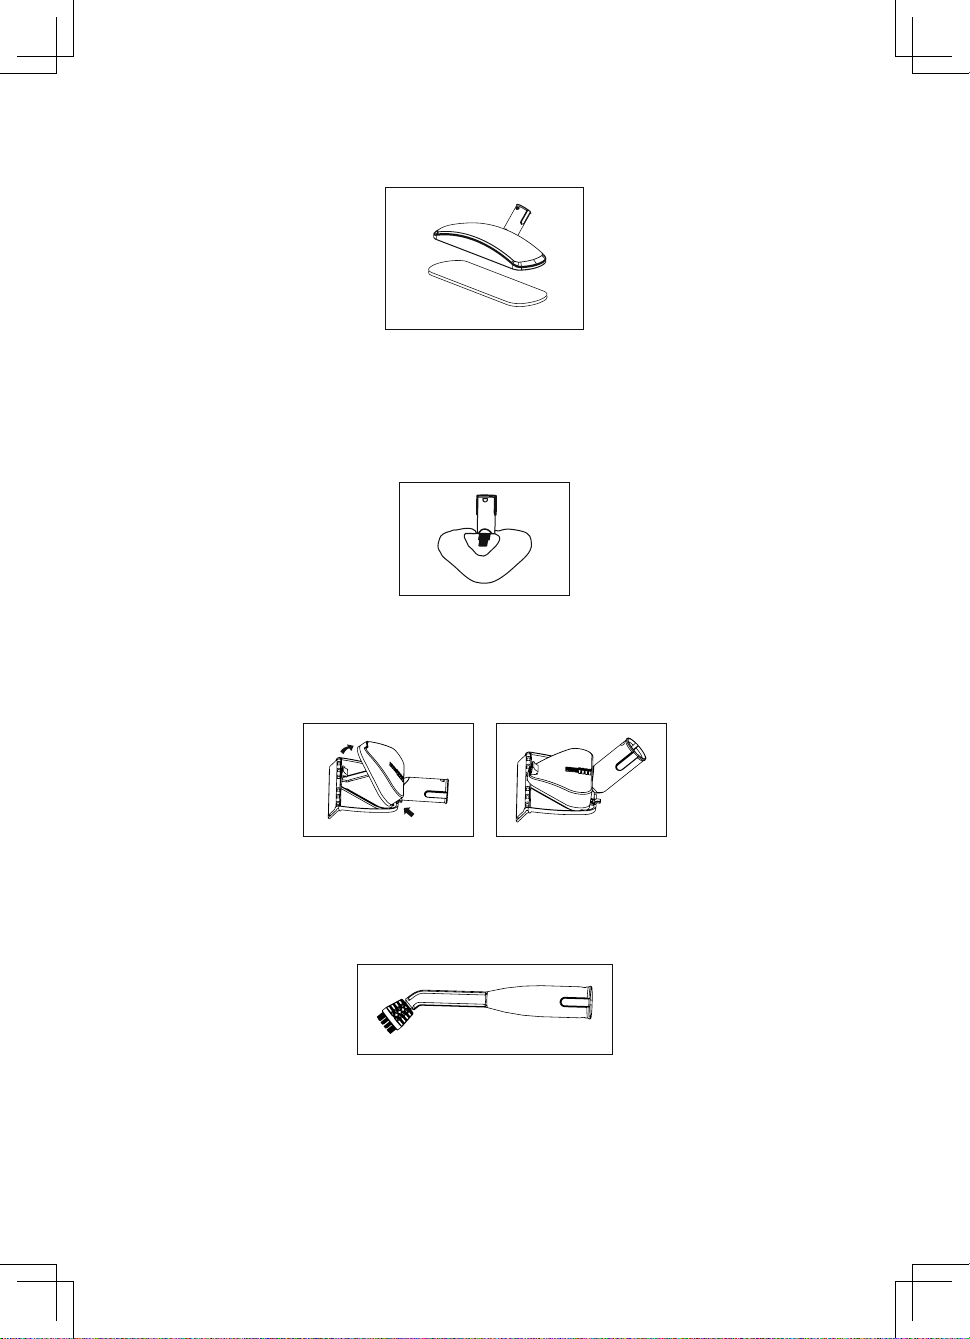
Floor Brush Head/Floor Cloth Pad:
Lay the floor cloth pad (M) on the ground. Lay steamer head (A) down on top of pad.
Press firmly.
o
180
5
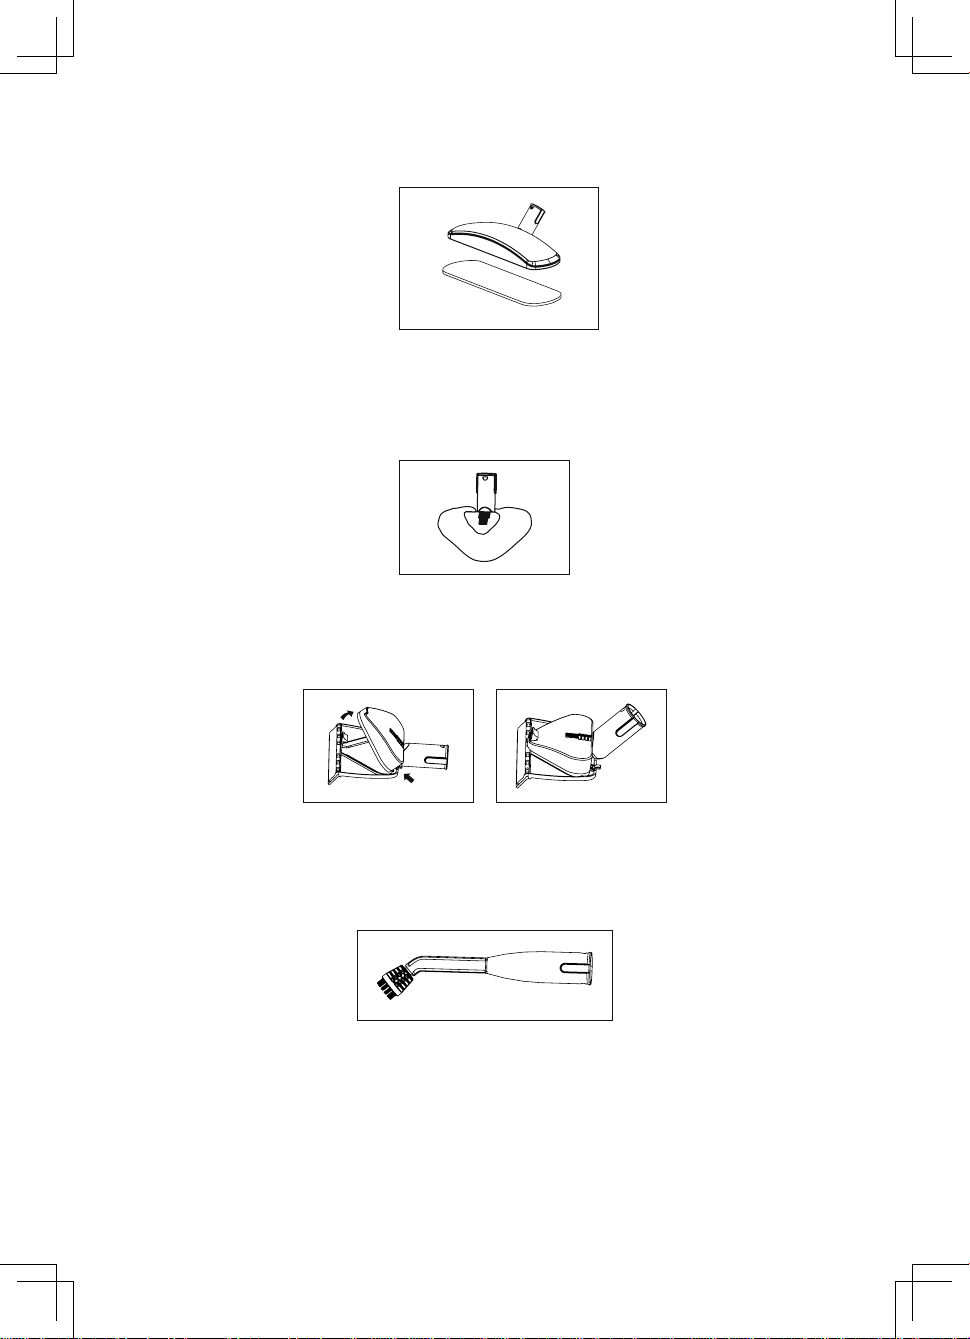
Triangle Fabric Brush/Triangle Brush Pad:
The triangle fabric brush head (P) can be inserted into the trigger handle (F) or extension
arm (H) using the connector (B). To attach, align holes and push together until it locks
into place. To remove, press firmly on the purple button located on the trigger handle (F)
or extension arm (H) and pull.
Glass Squeegee:
The glass squeegee (Q) connects onto the triangle fabric brush head (P) and can be
used for mirrors or windows. Insert the tabs on rear of the squeegee (Q) into the hooks
located on the bottom rear of the triangle fabric brush head (P) and firmly snap the
pieces together.
Angle Concentrator/Round Brush:
Attach the angle concentrator (O) to the trigger handle (F) or extension arm (H). You can
attach the round brush (R) if you need additional scrubbing. Fit tip of concentrator into
the end of the round brush.
IMPORTANT: Make sure the accessory is pushed as far as possible onto tip to ensure the
fit is sealed. This will prevent steam from seeping out unwanted areas and prevent injury.
6

NOTE: The steamer does not require distilled water. Residents in areas with hard water
should use distilled water for better performance.
USE:
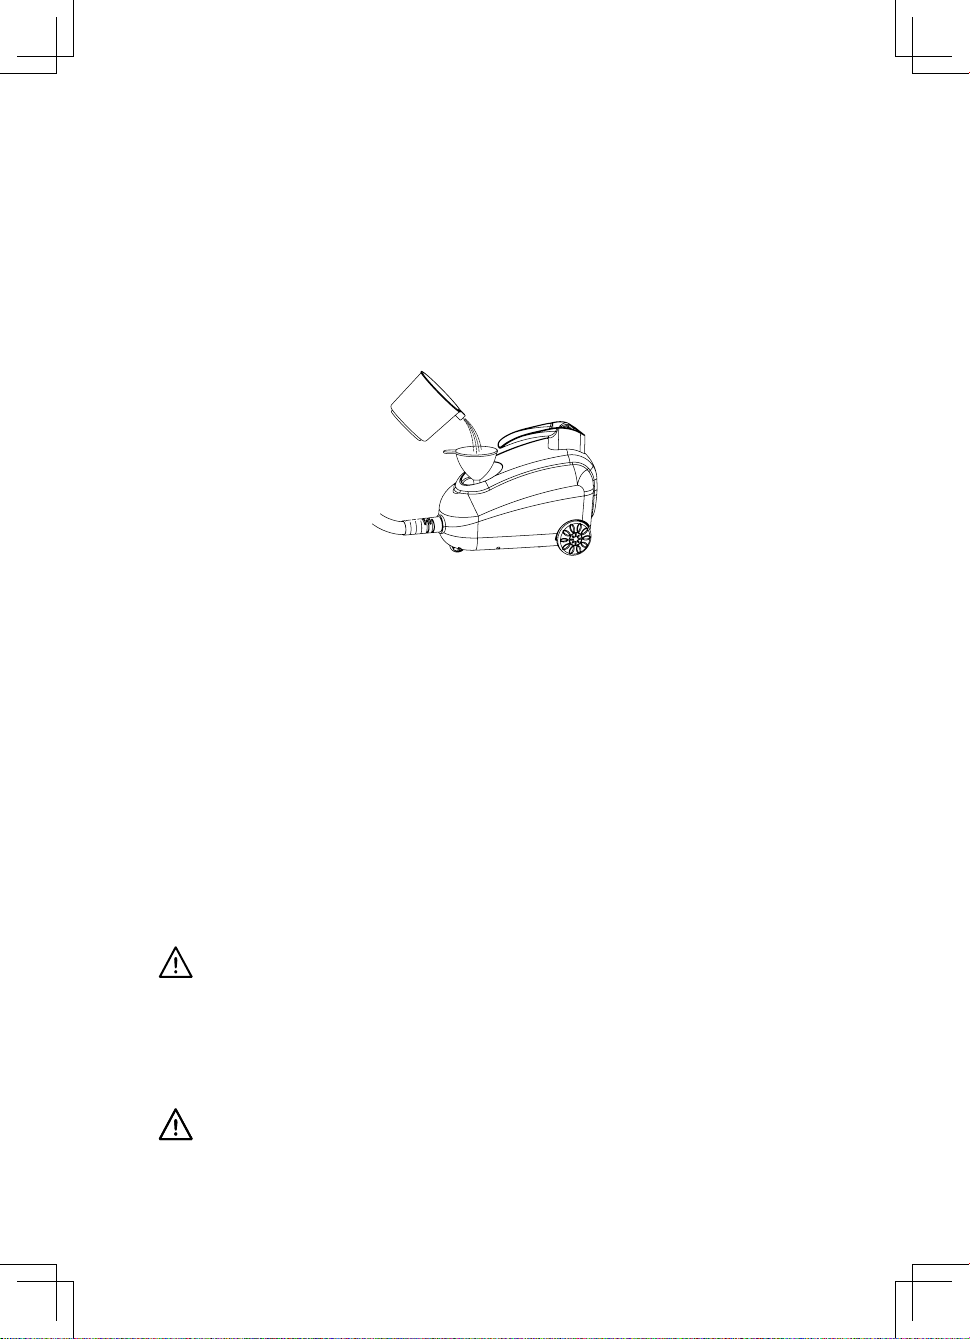
1) Before plugging in your steamer, unscrew the water tank cap (I). Use the refill cup (T)
and funnel (S) to fill water tank completely. Screw water tank cap (I) back onto the
steamer body (L) firmly.
2) Place desired attachment onto trigger handle (F). To switch attachments, press
attachment release button (C) to remove attachment pieces from trigger handle (F).
3) Plug in steamer and turn power on/off button (K) on. A red power light will illuminate
to indicate unit is working. Be sure desired attachments are already in place before you
turn on your steamer. Be sure steam trigger (D) is not locked while steamer is heating
up.
4) Upon initial use, press steam trigger (D) and aim steam/water into a sink. In order for
the unit to prime, it will need to push out any water that has been trapped in the hose
before it can begin to produce steam. Once steam begins spewing out, the steamer
will be ready to use.
5) The steam trigger (D) will immediately begin steaming in constant steam mode. To
stop emitting steam, slide trigger release switch (E).
6) When steamer stops emitting steam simply unplug the unit, wait for it to cool down
and refill the water tank with water.
NOTE: It is recommended that another high wattage appliance is not operated on the
same circuit to avoid a circuit overload.
WARNING: ON SURFACES THAT HAVE BEEN TREATED WITH WAX, THE WAX MAY
BE REMOVED BY THE HEAT AND STEAM ACTION. DO NOT USE ON UNSEALED WOOD
FLOORS OR LET UNIT STAND ON ANY WOOD FLOOR FOR AN EXTENDED PERIOD OF
TIME. THIS MAY CAUSE THE WOOD GRAIN TO RISE. IT IS RECOMMENDED THAT A
SECTION BE TESTED IN AN ISOLATED AREA OF THE FLOOR. IT IS ALSO RECOMMENDED
THAT YOU CHECK THE USE AND CARE INSTRUCTIONS FOR CLEANING FROM THE FLOOR
MANUFACTURER TO ENSURE STEAM CLEANING IS ACCEPTABLE FOR YOUR WAXED
SURFACE.
WARNING: NEVER RUN THE STEAMER WITHOUT WATER.
7) When you finish cleaning, unplug power cord from outlet then release pressure from
steamer. Be sure to empty water tank and carefully remove any accessories for drying.
7

CAUTION: The cloth pad may be very hot.
SUGGESTED USES
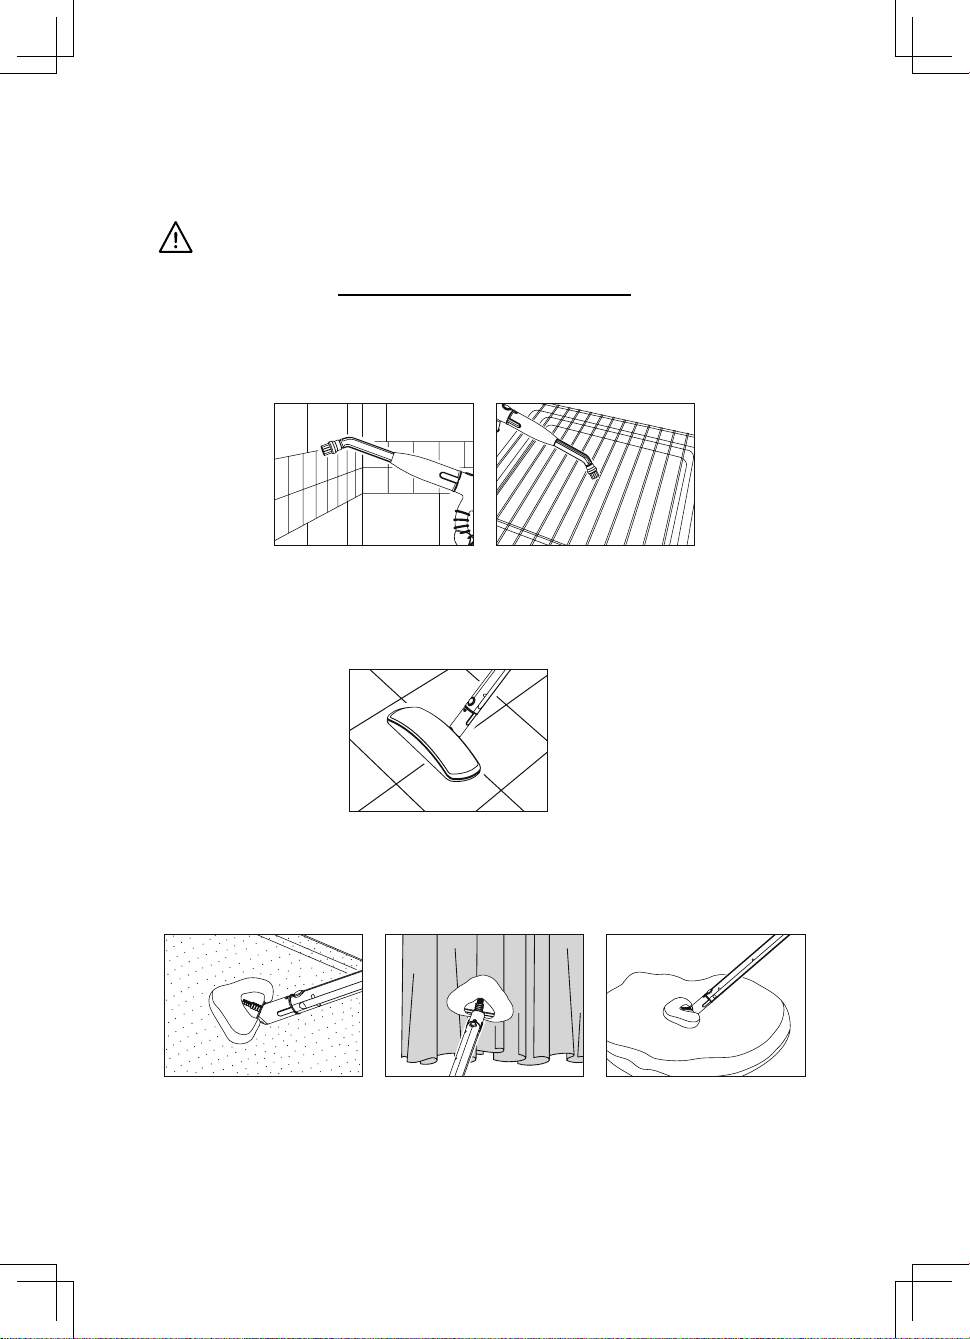
Angle Concentrator/Round Brush:
The angle concentrator combined with the round brush can be used to clean grout,
around faucets, sinks, appliances, blinds, vehicle rims, grills, etc.
Floor Brush Head/Floor Cloth Pad:
The floor brush head combined with the floor cloth pad can be used to clean hard floor
surfaces such as tile, sealed hardwood, linoleum, stone, and laminate.
Triangle Fabric Brush/Triangle Brush Pad:
The triangle fabric brush combined with the triangle brush pad can be used on different
upholstered furniture as well as curtains, pet beds and bedding.
Triangle Fabric Brush/Squeegee:
The triangle fabric brush combined with the squeegee can be used on flat surfaces such
as windows, shower walls, and mirrors.
8

CLEANING AND MAINTENANCE
CAUTION: Prior to cleaning or maintaining your steamer, isolate the unit by
removing the cord from the power socket and avoid immersing the unit in water.
1) The cloth pads can be machine washed in hot water. Do not tumble dry. Do not iron.
Allow to fully dry before use. Do not use bleach or fabric softener.
2) Wipe steamer with soft cloth when/if necessary.
3) Periodically, when unit is cooled, removed water cap, using your measuring cup add
one cup of water into the unit. Replace cap and shake unit to lift any calcium build up
left in water tank. Open cap and pour out water in sink. Repeat as necessary.
Product Specs:
Voltage supply: 120V, 60 Hz
Output: 1350 W
Water tank capacity: max. 40.6 fl oz.
Cord: 16.4 ft.
Weight: 10.34 lbs.
Protection class: 2
Pads: SSC-0312-FP-2PK
CUSTOMER SUPPORT
For problems with your Sienna steamer, please refer to Troubleshooting guide. Additional
inquiries should be directed to our Customer Service department by calling 1-888-574-
3662 or by e-mail to: customerservice@anvidproducts.com.
You may purchase replacement pads and accessories on our website at:
www.siennadirect.com.
9
TROUBLESHOOTING
CAUTION: Prior to assessing your steamer, isolate the unit by removing the cord
from the power socket.
PROBLEM SOLUTION
Red power button is not on • Ensure steamer power cord is correctly plugged into a
120V AC power outlet only.
• Ensure circuit breaker is operational.
• Try operating steamer from another power outlet.
• If unit is still not working, call customer service at
1-888-574-3662.
No steam • Ensure water tank is full.
• Calcium and mineral deposits can build up and impact
the performance of your steamer, use distilled water
if necessary.
Pale residue left on floor • This can be caused by leaving the steamer in the same
spot for too long. This residue can be removed by
using a decalcifying product or with a few drops of
vinegar on a cloth and wiped away.
• Alternatively, reheat the area for one minute to
remove residue (do not overheat area.)
Steamer is leaking water all
over the floor
• Be sure steamer is at proper steam level before
steaming.
• The microfiber cloth pad may be overused and needs
to be changed out with additional cloth pad(s)
provided. Cloth pads can be cleaned in washer. Over
time, however, the cloth pads can start to wear.
• Be sure microfiber cloth pad is attached properly.
• Condensation may form inside the unit dripping water
upon initial use; continue to press the steam release
button until steam appears. If necessary, lay a towel
on the floor underneath unit during process.
Floors are cloudy, streaky or
spotty after mopping floor
• Be sure to use light detergent when cleaning cloth
pads, any residue on pad may be transferred onto
floor. To remove, wash your pads at least once,
sometimes twice to remove the film from the pads.
Go over your floor again and streaks should disappear.
• Replace cloth pad with a new; clean one for effective
cleaning.
• If initial use of steamer, past cleaning products may
have left a residue on your floor, continue to go over
affected area until there is not residue or streaks left
behind.
10

ONE YEAR LIMITED WARRANTY
Our Sienna product warranty extends only to the original customer purchaser of the
product. It is warranted by the manufacturer to be free from all defects in materials or
workmanship for a period of one year from the date of original purchase. This warranty
is subject to the following conditions, exclusions and exceptions.
Exclusions:
This warranty does not cover normal wear and tear of parts and does not apply to any
product that has been tampered with or used for commercial purposes. This warranty
does not cover damage cause by misuse, abuse or negligent handling or damage
due to mishandling in transit or shipping. This warranty does not cover damage or
defects caused by or resulting from repairs, service or alterations to the product or
any of its parts, which have been performed by a repair person not authorized by the
manufacturer. This warranty is effective only if the product is purchased and operated in
the USA, and does not extend to any units which have been used in violation of written
instructions furnished by the manufacturer, or to units which have had the serial number
removed, altered, defaced or rendered illegible.
Performance:
During the limited warranty period, the manufacturer will, at its option, repair or replace
free of charge a defective product or part that is covered by this warranty. As a matter
of warranty policy, the manufacturer will not refund the purchase price. A repaired or
replacement product will be covered by this warranty for the balance of the initial one
year warranty period.
To contact Customer Service:
Write: Anvid Products, Inc.
1401-1499 Greenville Rd.
Livermore, CA 94550
E-mail: customerservice@anvidproducts.com
Call: 1-888-5SIENNA (1-888-574-3662)
Please refer to your product name and model number when contacting Customer
Service.
Customer Service will give you further instructions for returning a defective product for
repair or replacement. When returning a defective product, carefully pack the item to
avoid damage in shipping, the manufacturer cannot assume responsibility for loss or
damage during incoming shipment. We recommend that you insure the package, as
damage in shipping including the shipping cost is not covered under our warranty. Be
sure to include the following items with your product: any accessories related to the
product, a completed warranty form, and a copy of your sales receipt or other proof of
purchase to determine warranty status. C.O.D. shipments cannot be accepted.
11

Limitations of Remedies: No representative or person is authorized to assume for the
manufacturer any other liability in connection with the sale of our products. This limited
warranty is not transferable and any sale, transfer or other disposition of the product
voids this limited warranty. There shall be no claims for defects or failure of performance
or product failure under any theory of tort, contract or commercial law including, but not
limited to, negligence, gross negligence, strict liability, breach of warranty and breach of
contract.
ANY IMPLIED WARRANTIES, OBLIGATIONS, OR LIABILITIES, INCLUDING, BUT NOT
LIMITED TO, THE IMPLIED WARRANTY OF MERCHANTABILITY AND FITNESS FOR A
PARTICULAR PURPOSE, SHALL BE LIMITED TO THE DURATION OF THIS WARRANTY.
Some states do not allow limitations on how long an implied warranty lasts, so the above
limitations may not apply to you.
REPAIR OR REPLACEMENT SHALL BE THE SOLE REMEDY OF THE PURCHASER UNDER
THIS LIMITED WARRANTY, AND IN NO EVENT SHALL THE MANUFACTURER BE LIABLE
FOR ANY SPECIAL, INCIDENTAL, OR CONSEQUENTIAL DAMAGES, LOSSES OR EXPENSES
YOU MAY INCUR IN CONNECTION WITH YOUR PURCHASE PRIOR TO USE OF THE
PRODUCT OR FOR ANY BREACH OF THIS OR ANY OTHER WARRANTY, EXPRESS OR
IMPLIED, WHATSOEVER. Some states do not allow exclusion or limitation of special,
incidental, or consequential damages, so the above limitation may not apply to you. This
limited warranty gives you specific legal rights, and you may also have other rights which
vary from state to state.
Correct Disposal of this Product
This marking indicates that this product should not be
disposed with other household wastes throughout the US. To
prevent possible harm to the environment or human health
from uncontrolled waste disposal, we recommend recycling
it responsibly to promote the sustainable reuse of material
resources. To dispose of your used device, please contact your
local city for proper disposal locations.
Copyright © 2015 Anvid Products, Inc. Made in China ●Printed in China
12
Eco
Nettoyeur à vapeur
SSC-0312
MANUEL D’UTILISATION

INTRODUCTION
Merci d’avoir choisi Sienna pour vos besoins de nettoyage ménager. Nos produits
de nettoyeurs à vapeur utilisent la puissance active de la vapeur sans utiliser aucun
produit chimique; cela donne ainsi un produit vert sans risque à l’écosystème. Vous
avez pris le premier pas dans la transformation de votre maison en une maison verte
sans danger pour l’environnement. Nos produits à vapeur Sienna sont une méthode
moderne de nettoyage qui est efficace et beaucoup plus hygiénique que les méthodes
conventionnelles.
Avec le pouvoir destructeur de germes de la vapeur, on peut éliminer la poussière et
la saleté en quelques secondes. Les petites molécules de vapeur chaude pénètrent les
surfaces poreuses à nettoyer, s’étendent et forcent la poussière, les débris et les bactéries
à la surface. Quand on les utilise correctement, nos nettoyeurs à vapeur peuvent tuer les
acariens et certains types d’agents pathogènes bactériens comme la salmonelle et l’E-coli
au contact.
Puisque vous n’avez pas besoin de produits chimiques pour l’utilisation de nos produits,
vous constaterez non seulement des économies, mais vous avez également fourni un
milieu plus sûr où vous vivez avec votre famille. Nous vous encourageons d’améliorer
votre mode de vie, d’améliorer l’environnement et de passer du temps à apprécier votre
foyer propre sans produits chimiques.
Eco
Le nettoyeur à vapeur Eco est un système de nettoyage à vapeur à usages multiples qui
est une solution naturelle et sûre au lieu d’utiliser des produits de nettoyage chimiques
agressifs pour désinfecter et désodoriser dans toute la maison. Le nettoyeur à vapeur
puissant Eco donne une pression de vapeur de 1 350 watts de qualité professionnelle
jusqu’à 3,5 bars et il est prêt à utiliser en quelques minutes. La trousse d’accessoires
comprend des accessoires utiles pour toute tâche de nettoyage ménager. On peut
nettoyer les planchers, comptoirs, salles de bain, fenêtres, murs et plus encore. L’Éco
désinfecte aussi les tissus, y compris les tapis, lits d’animal de compagnie et sofas. On
peut nettoyer les cuisines, salles de bain, parquets durs, dessus de table, véhicules à
moteur et bateaux. Le nettoyeur à vapeur Eco est inoffensif pour l'environnement,
n’utilisant que de l’eau de robinet pour le nettoyage. Il comprend une brosse à planchers
de luxe avec deux lingettes pour plancher, deux tubes de rallonge, un concentrateur
d’angle, une brosse pour tissu avec lingette pour brosse pour tissu, une raclette pour
vitres, des brosses rondes, un entonnoir et un gobelet de remplissage
14

CONSIGNES DE SÉCURITÉ
Le nettoyeur à vapeur Eco (SSC-0312) de Sienna est conçu uniquement pour l’usage domestique
intérieur. Toute utilisation commerciale annule la garantie. Il est conçu pour la désinfection et le
nettoyage de diverses surfaces telles que les fenêtres, les carreaux céramiques, le coulis et encore
plus.
Directives de sécurité :
MISE EN GARDE : RISQUE DE BRÛLURE. ASSUREZ-VOUS DE LIRE ET DE SUIVRE TOUTES
LES DIRECTIVES DE SÉCURITÉ AVANT D’UTILISER VOTRE NETTOYEUR À VAPEUR. UN USAGE
CONVENABLE ET UN BON ENTRETIEN AIDERONT À PROLONGER LA DURÉE DE VIE DE VOTRE
NETTOYEUR À VAPEUR.
Lors de l’utilisation d’un appareil électrique, on doit toujours observer des précautions
élémentaires. Afin de réduire le risque d’incendie, d’électrocution et de blessure :
• Assurez-vous de débrancher le cordon d’alimentation quand l’appareil n’est pas utilisé et lors de
l’entretien.
• Ce nettoyeur à vapeur n’est pas conçu pour être utilisé par des personnes (y compris les enfants)
à capacités physiques, sensorielles ou mentales réduites ou manquant de l’expérience et de
connaissances à moins qu’ils n’aient reçu des instructions d’une personne responsable de leur
sécurité.
• Ne laissez pas l’appareil sans surveillance quand il est branché.
• Il faut surveiller les enfants en tout temps et les avertir que le nettoyeur à vapeur n’est pas un
jouet et qu’ils ne doivent pas jouer avec l’appareil.
• Ne dirigez pas la vapeur vers les gens, animaux de compagnie, prises de courant ou appareils
électriques comme les fours.
• N’immergez pas le nettoyeur à vapeur dans l’eau ou d’autres liquides.
• Ne manipulez pas le nettoyeur à vapeur avec des mains mouillées.
• Ne tirez pas le cordon d’alimentation, ni utilisez le cordon comme poignée, ni fermez une porte
sur le cordon.
• Assurez-vous de maintenir le cordon à l’écart de la chaleur, de l’eau, et des bords tranchants.
• N’utilisez pas l’appareil si le cordon ou la fiche est endommagé. Si le cordon d’alimentation
est endommagé, il doit être remplacé par le fabricant, son agent de service ou une personne
qualifiée semblable afin d’éviter un danger.
• N’utilisez pas de rallonge ou de prise de courant de puissance inadéquate.
• N’utilisez pas le nettoyeur à vapeur sur des surfaces sensibles à la vapeur comme le velours, le
cuir, les meubles ou planchers cirés, les tissus synthétiques et d’autres tissus délicats.
• N’utilisez pas l’appareil sur les sols en parquet non vitrifié. En faisant cela, vous pourriez enlever
le lustre du plancher avec la vapeur. Il est recommandé de faire un essai dans un endroit peu
visible avec le nettoyeur à vapeur avant de continuer. Comme mesure préventive, vous devez
vérifier le manuel du fabricant du revêtement de sol pour connaître les instructions d’entretien
appropriées.
• Ne mettez jamais d’adjuvants comme les détergents et produits chimiques nettoyants dans le
réservoir d’eau. Cela rendra le produit dangereux et endommagera l’unité et présentera un
danger à l’utilisation.
• Utilisez uniquement les accessoires recommandés par le fabricant.
• Cessez d’utiliser le nettoyeur à vapeur si le disjoncteur est activé. Attention au risque de choc
électrique.
• Portez des chaussures appropriées quand vous utilisez votre nettoyeur à vapeur. Les chaussures
ouvertes, pantoufles ou pieds nus peuvent vous faire perdre l’équilibre et tomber ou entraîner
la vapeur chaude sur vos pieds.
• Laissez votre nettoyeur à vapeur refroidir avant de le ranger dans un endroit frais et sec.
15
PRINCIPALES CARACTÉRISTIQUES
A. TÊTE DU NETTOYEUR À VAPEUR
B. RACCORD(S)
C. BOUTON DE DÉGAGEMENT DE L’ACCESSOIRE
D. GÂCHETTE À VAPEUR
E. INTERRUPTEUR DE DÉGAGEMENT DE LA GÂCHETTE
F. POIGNÉE DE DÉCLENCHEMENT
G. TUYAU
H. BRAS D’EXTENSION
I. BOUCHON DU RÉSERVOIR D’EAU
J. POIGNÉE DE LA BASE
K. BOUTON DE MARCHE/ARRÊT
L. CORPS DU NETTOYEUR À VAPEUR
M. LINGETTE POUR PLANCHER
N. CONCENTRATEUR D’ANGLE
O. TÊTE DE BROSSE TRIANGULAIRE POUR TISSU
P. RACLETTE
Q. BROSSE(S) RONDE(S) EN NYLON
R. ENTONNOIR
S. GOBELET DE REMPLISSAGE
T. PETITE LINGETTE
QR S
T
A
B
H
C
DE
G
F
M
NB
I
JK
L
OP
16

ASSEMBLAGE ET UTILISATION
Raccord :
Le raccord (B) est déjà attaché à la tête de brosse triangulaire pour tissu (P) et à la tête
du nettoyeur à vapeur (A). Pour raccorder les pièces, alignez la face plate de l’embout
du raccord (B) avec la bosse rectangulaire de la tête de brosse triangulaire pour tissu (P)
et de la tête du nettoyeur à vapeur (A). Enfoncez le raccord (B) à fond et tournez-le de
180 degrés pour un ajustement optimal. (Si vous achetez d’autres accessoires, il faudra
utiliser le raccord de la même façon avec d’autres pièces.)
Bras d’extension :
On peut insérer le bras d’extension (H) dans la poignée de déclenchement (F). On peut
attacher le concentrateur d’angle (O), la tête du nettoyeur à vapeur (A), ou la tête de
brosse triangulaire pour tissu (P) pour étendre la portée. Pour attacher l’accessoire,
appuyez fermement sur le bouton mauve de la poignée de déclenchement (F) et insérez-
le dans le trou à l’extrémité du bras d’extension (H). Pour l’enlever, appuyez fermement
sur le bouton mauve et retirez le bras d’extension (H).
Tête de brosse pour plancher/Lingette pour plancher :
Posez la lingette pour plancher (M) sur le sol. Placez la tête du nettoyeur à vapeur (A) sur
la lingette. Appuyez fermement.
o
180
17
Brosse triangulaire pour tissu/Lingette pour brosse triangulaire :
On peut insérer la tête de brosse triangulaire pour tissu (P) dans la poignée de
déclenchement (F) ou le bras d’extension (H) utilisant le raccord (B). Pour l’attacher,
alignez les trous et poussez-les ensemble jusqu’à ce qu’elle se verrouille en place. Pour la
retirer, appuyez fermement sur le bouton mauve de la poignée de déclenchement (F) ou
du bras d’extension (H) et tirez.
Raclette pour vitres :
La raclette pour vitres (Q) est raccordée à la tête de brosse triangulaire pour tissu (P) et
peut s’utiliser pour les miroirs ou fenêtres. Insérez les languettes à l’arrière de la raclette
(Q) dans les crochets qui se trouvent au fond de l’arrière de la tête de brosse triangulaire
pour tissu (P) et encliquetez fermement les pièces ensemble.
Concentrateur d’angle/Brosse ronde :
Attachez le concentrateur d’angle (O) à la poignée de déclenchement (F) ou au bras
d’extension (H). Vous pouvez attacher la brosse ronde (R) si vous avez besoin de plus de
récurage. Ajustez l’embout du concentrateur dans l’extrémité de la brosse ronde.
IMPORTANT : Assurez-vous que l’accessoire est poussé autant que possible sur l’extrémité
afin d’assurer un ajustement étanche. Cela empêchera une fuite de vapeur sur des zones
indésirables et préviendra les blessures.
18
REMARQUE : Le nettoyeur à vapeur ne nécessite pas l’eau distillée. Les habitants de
régions où l’eau est dure doivent utiliser l’eau distillée pour une meilleure performance.
UTILISATION :
1) Avant de brancher le nettoyeur à vapeur, dévissez le bouchon du réservoir d’eau (I).
Utilisez le gobelet de remplissage (T) et l’entonnoir (S) pour remplir complètement le
réservoir d’eau. Vissez de nouveau le bouchon du réservoir d’eau (I) fermement sur le
corps du nettoyeur à vapeur (L).
2) Placez l’accessoire voulu sur la poignée de déclenchement (F). Pour changer
d’accessoire, appuyez sur le bouton de dégagement de l’accessoire (C) pour retirer les
pièces de l’accessoire de la poignée de déclenchement (F).
3) Branchez le nettoyeur à vapeur et mettez le bouton de marche/arrêt (K) en marche.
Un voyant rouge d’alimentation s’allumera pour indiquer que l’unité fonctionne.
Assurez-vous que les accessoires voulus sont déjà en place avant de mettre le
nettoyeur à vapeur en marche. Assurez-vous que la gâchette à vapeur (D) n’est pas
verrouillée pendant que le nettoyeur à vapeur se réchauffe.
4) Lors de la première utilisation, appuyez sur la gâchette à vapeur (D) et dirigez la
vapeur/l’eau dans un évier. Pour que l’unité s’amorce, elle devra expulser toute eau
enfermée dans le tuyau avant qu’elle ne puisse commencer à émettre de la vapeur.
Quand la vapeur commence à cracher, le nettoyeur à vapeur est prêt à utiliser.
5) La gâchette à vapeur (D) commencera immédiatement à émettre de la vapeur en
mode de vapeur constante. Pour cesser l’émission de la vapeur, glissez le bouton de
dégagement de la gâchette (E).
6) Quand le nettoyeur à vapeur cesse d’émettre de la vapeur il suffit de débrancher l’unité,
de la laisser refroidir et de remplir le réservoir d’eau avec de l’eau.
REMARQUE : Il est recommandé de ne pas utiliser un autre appareil à puissance élevée
sur le même circuit pour éviter une surcharge du circuit.
MISE EN GARDE : SUR LES SURFACES TRAITÉES À LA CIRE, L’ACTION DE LA CHALEUR
ET DE LA VAPEUR PEUT ENLEVER LA CIRE. N’UTILISEZ PAS L’APPAREIL SUR LES SOLS
EN BOIS NON VITRIFIÉ NI LAISSEZ L’UNITÉ RESTER SUR UN SOL EN BOIS POUR UNE
PÉRIODE PROLONGÉE. CELA PEUT DÉFORMER LE GRAIN DE BOIS. IL EST RECOMMANDÉ
DE FAIRE UN ESSAI SUR UN ENDROIT PEU VISIBLE DU SOL. IL EST RECOMMANDÉ AUSSI
DE VÉRIFIER LES INSTRUCTIONS D’UTILISATION ET D’ENTRETIEN POUR LE NETTOYAGE
DONNÉES PAR LE FABRICANT DU SOL POUR VOUS ASSURER DE SA COMPATIBILITÉ AVEC
UN NETTOYAGE À LA VAPEUR.
MISE EN GARDE : N’UTILISEZ JAMAIS LE NETTOYEUR À VAPEUR SANS EAU.
19
7) Quand vous avez terminé le nettoyage, débranchez le cordon d’alimentation de la
prise de courant et relâchez la pression du nettoyeur à vapeur. Assurez-vous de vider
le réservoir d’eau et de retirer tout accessoire avec soin pour le séchage.
ATTENTION : La lingette peut être très chaude.
SUGGESTIONS D’UTILISATION
Concentrateur d’angle/Brosse ronde :
On peut utiliser le concentrateur d’angle en combinaison avec la brosse ronde pour
nettoyer le coulis, autour des robinets, les éviers, appareils, stores, jantes de véhicule,
grilles, etc.
Tête de brosse pour plancher/Lingette pour plancher :
On peut utiliser la tête de brosse pour plancher en combinaison avec la lingette pour
plancher pour nettoyer les sols durs comme les carreaux, le bois dur vitrifié, le linoléum,
la pierre, et le parquet lamellaire.
Tête de brosse triangulaire pour tissu/Lingette pour brosse triangulaire :
On peut utiliser la brosse triangulaire pour tissu en combinaison avec la lingette pour
brosse triangulaire sur divers meubles rembourrés ainsi que les rideaux, les lits pour
animaux et la literie.
Brosse triangulaire pour tissu/Raclette :
On peut utiliser la brosse triangulaire pour tissu avec la raclette sur les surfaces planes
comme les fenêtres, parois de douche et miroirs.
20
Other manuals for SSC-0312
2
Table of contents
Languages:
Other Sienna Kitchen Appliance manuals


