Sienna Birdie User manual

Birdie
Handheld Steamer
SSC-0316
INSTRUCTION MANUAL

2 3
INTRODUCTION
Thank you for choosing Sienna for your household cleaning needs. Our steamer products use
the acve power of steam without the use of chemicals; making it a green product that is safe
for the ecosystem. You have begun the first step into transforming your house into a green,
environmentally safe home. Our Sienna steam products are a modern way of cleaning that is
ecient and far more sanitary than convenonal methods.
With the power of germ killing steam, dirt and grime can be eliminated in a maer of seconds.
The ny hot vapor molecules penetrate porous surfaces being cleaned, expanding and forcing
dirt, debris, and bacteria to the surface. When used correctly, our steamers can kill dust mites
and certain types of bacteria pathogens such as salmonella and E-coli on contact.
Since you do not need chemicals in order to use our products, not only will you see the savings in
your wallet, but you have provided a safer place for you and your family to live in. We encourage
you to improve your way of life and spend time enjoying your steam cleaned, chemical free
environment.
Birdie
The Birdie Handheld Steamer is lightweight, portable and easy to use. It is an innovave product
that cleans and sanitizes your home by harnessing the natural cleaning power of hot steam
vapor. This unique steamer is well-suited to clean a variety of surfaces that li dirt and debris
from stubborn areas. The Birdie heats water up to 212° F and produces steam by pumping the
handle. It can be relled swily for up to 10 minutes of steam me. The user-friendly design and
high pressure direct steam feature is intended to tackle the toughest dirt and debris. The Birdie
requires no assembly, just attach the tools and go. It features a 1500-watt heating element,
a 200ml/6.8 fl oz water tank, 9 piece accessory kit, and comes with a one year manufacturer
warranty.

3
SAFETY GUIDELINES
The Sienna Birdie (SSC-0316) Handheld Steamer is for domesc use only. This product must be
operated in accordance with these instrucons. Any commercial use will void warranty. It is
designed for sanizing and cleaning an array of surfaces such as windows, ceramic le, grout,
and more.
Safety Instrucons:
WARNING: BE SURE TO READ AND FOLLOW ALL SAFETY INSTRUCTIONS BEFORE USING
YOUR STEAMER. PROPER CARE AND MAINTENANCE WILL HELP TO EXPAND THE LIFE OF YOUR
STEAMER.
When using an electrical appliance, basic precauons should always be followed. To reduce the
risk of re, electric shock, or injury:
• Carefully read all instrucons prior to use.
• Be sure to unplug the power cord when appliance is not in use.
• The steamer is not intended for use by persons (including children) with reduced physical,
sensory, mental capabilities or lack of experience and knowledge unless they have been
instructed to do so by a person responsible for their safety
• Do not leave appliance unaended when plugged in.
• Children should be supervised and cauoned that the steamer is not a toy and should not
be played with.
• Do not direct steam towards people, pets, or electrical outlets.
• Do not immerse the steamer in water or other liquids.
• Do not handle steamer with wet hands.
• Do not pull power cord or use cord as a handle.
• Be sure to keep cord away from heat, water, and sharp edges.
• Do not use if power cord or plug is damaged. If the power cord is damaged, it must be
replaced by the manufacturer.
• Do not use extension cords or outlets with inadequate current carrying capacity.
• Do not use steamer on any steam sensive material such as velvet, leather, synthec and
other delicate fabrics, or wax polished furniture.
• Do not use on unsealed hardwood oors. By doing so, you may remove the sheen on your
oor. It is recommended to test an isolated area before proceeding. As a precauon, you
should check the manual made by the oor manufacturer for proper care instrucons.
• Never put addives such as cleaning detergents or chemicals into the water tank as it will
make the product unsafe, damage the unit as well as be dangerous to use.
• Use only manufacturer’s recommended accessories.
• Stop using steamer if circuit breaker acvates. Beware of risk of shock.
• Wear proper shoes when operang your steamer. Open-toed shoes, slippers or bare feet
may cause you to slip and fall or cause hot steam to come in contact with your feet.
• Allow your steamer to cool down before storing in a cool, dry place.
NOTE: To ensure only the highest quality products are produced, Sienna has pre-tested all
steamers. This is why you may see some water condensaon on the inside of the water tank.

45
KEY FEATURES
A. JET NOZZLE
B. STEAMER NOZZLE
C. WATER TANK CAP
D. STEAM PUMP (Steam Release Buon)
E. HANDLE
F. STEAMER BODY
G. POWER INDICATOR LIGHT
H. NYLON BRUSH
I. ANGLE CONCENTRATOR NOZZLE
J. STEAM HEAD
K. REFILL CUP
L. EXTENSION HOSE
M. WINDOW SQUEEGEE
N. CLOTH PAD
E
G
D
C
A
B
F
A
L
HI
J
M
K
N

5
USE AND ASSEMBLY
Filling your steamer with water:
1) Unscrew water tank cap (C) and ll steamer with water by using the rell cup (K). Replace
water tank cap (C) and ghten prior to use.
NOTE: The steamer does not require dislled water. Residents in areas with hard water should
use dislled water for beer performance.
NOTE: Be sure to have desired aachments in place before plugging in the unit
2) Plug power cord into outlet. The power indicator light (G) will illuminate solid red. The
steamer will heat up and will be ready to use in less than 30 seconds.
NOTE: It is recommended that another high wattage appliance is not operated on the same
circuit to avoid a circuit overload.
3) This is a pump driven steamer. In order to produce connuous steam, repeatedly push the
steam pump buon (D) as needed for desired steam ow.
4) If steamer is out of water, unplug the steamer from outlet and then simply rell the water
tank and connue steaming. There is no cooldown me required.
5) When nished steam cleaning, unplug power cord from outlet. Be sure to empty water tank
and carefully remove any accessories for drying.
WARNING: NEVER RUN THE STEAMER WITHOUT WATER.

6 7
Connecng jet nozzle (A) or extension hose (L) :
1) Insert jet nozzle (A) or extension hose (L) to steamer nozzle (B) and align tabs.
2) Rotate jet nozzle (A) or extension hose (L) clockwise unl it locks into place with the steamer
nozzle (B).
Connecng nylon brush (H):
3) Aach nylon brush (H) to p of jet nozzle (A) or extension hose (L) and press rmly.

7
4) Angle concentrator nozzle (I). This aachment is used for hard to reach places that you need
to get to with an angle. The nylon brush works best when using this aachment.
IMPORTANT: Make sure the accessory is pushed as far as possible onto p to ensure the t is
sealed. This will prevent steam from seeping out unwanted areas and prevent injury.
5) To remove nylon brush (H), make sure the unit is unplugged and has cooled down. Firmly
pull on nylon brush (H) to remove from the nozzle ps.
NOTE: The nylon brush is ideal for cleaning grout, sinks, or any surface requiring light scrubbing
action. The bristles are made of a soft nylon to be delicate and safe on most surfaces. With
steam these bristles quickly lose their original shape. This is perfectly normal. You can connue
to use the brushes unl the bristles are worn out. Replacements can be ordered at
www.siennadirect.com.
Connecng steam head (J):
6) Aach steam head (J) to p of jet nozzle (A), angle concentrator nozzle (I), or extension hose
(L) and press rmly. Add the cloth pad (N) to the steam head (J) to steam surfaces such as
garments, window coverings, upholstery and more.
CAUTION: The cloth pad may be very hot.
89
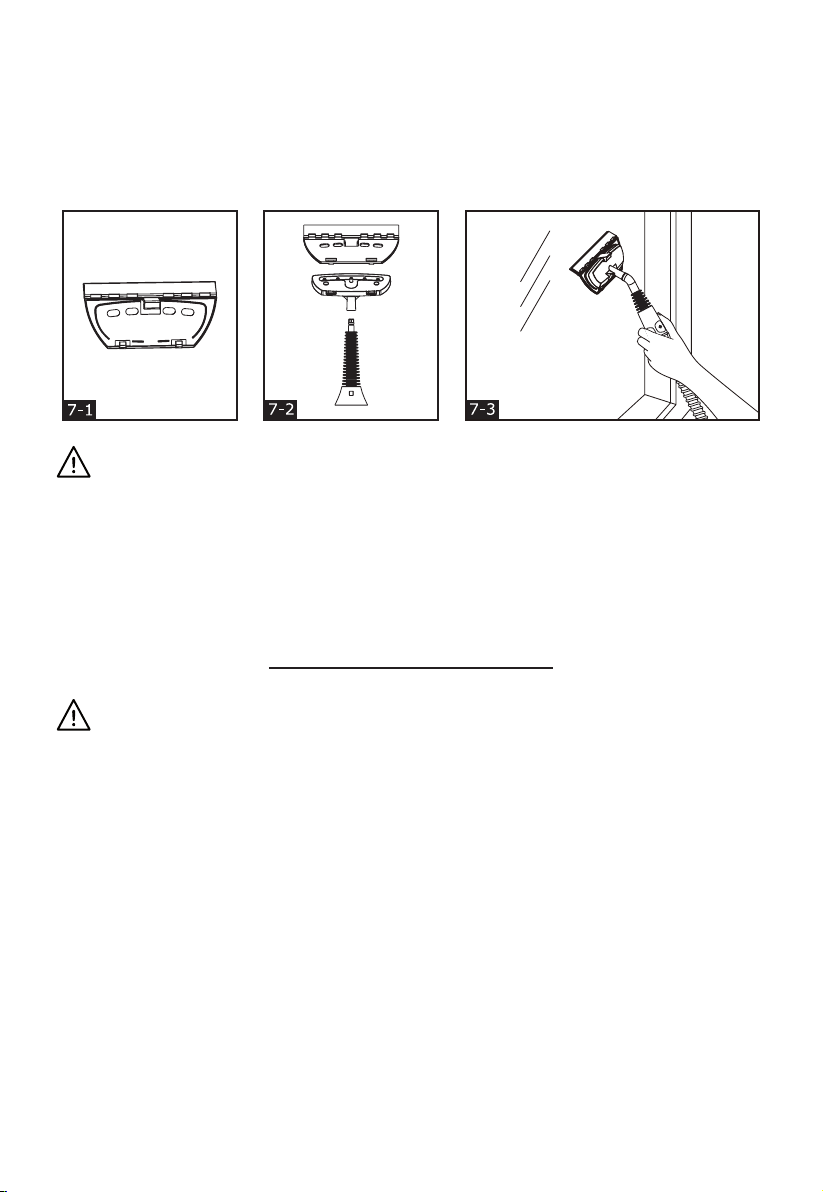
Connecng squeegee (M):
7) Connect the squeegee to the steam head (J) by aligning and connecng the tabs located at the
boom of the squeegee (M) with the boom of the steam head (J). Press and snap in place.
WARNING: ON SURFACES THAT HAVE BEEN TREATED WITH WAX, THE WAX MAY BE
REMOVED BY THE HEAT AND STEAM ACTION. DO NOT USE ON UNSEALED WOOD FLOORS
OR LET UNIT STAND ON ANY WOOD FLOOR FOR AN EXTENDED PERIOD OF TIME. THIS MAY
CAUSE THE WOOD GRAIN TO RISE. IT IS RECOMMENDED THAT A SECTION BE TESTED IN AN
ISOLATED AREA OF THE FLOOR. IT IS ALSO RECOMMENDED THAT YOU CHECK THE USE AND
CARE INSTRUCTIONS FOR CLEANING FROM THE FLOOR MANUFACTURER TO ENSURE STEAM
CLEANING IS ACCEPTABLE FOR YOUR WAXED SURFACE.
CLEANING AND MAINTENANCE
CAUTION: Prior to cleaning or maintaining your steamer, isolate the unit by unplugging
the power cord from the outlet and avoid immersing the unit in water.
1) The microber cloth pad can be machine washed in hot water and tumble dry. Do not use
bleach or fabric soener. Allow to dry fully before use.
2) Wipe steamer with so cloth when/if necessary.
Product Specs:
Voltage supply: 120 V, 60 Hz
Output: 1500 W
Water tank capacity: max. 6.8 oz.
Cord: 16.4 .
Weight: 2.3lbs.
Protecon class: 2

9
TROUBLESHOOTING
PROBLEM SOLUTION
Power indicator light is
not on
• Ensure steamer power cord is correctly plugged into a 120V AC
power outlet only.
• Ensure circuit breaker is operaonal.
• Try operang steamer from another power outlet.
• If unit is sll not working, call customer service at 1-888-574-3662.
No steam
• Ensure water tank is full.
• Steam is only produced when pumping the steam release buon.
• Calcium and mineral deposits can build up and impact the
performance of your steamer. We recommend lling your water
tank using equal parts household white vinegar and water to help
break up the buildup in your steamer.
Drops of water leaks
from unit and or
aachments
• Condensaon can be created from non-use.
• Be sure microber cloth pad is aached properly.

10 11
ONE YEAR LIMITED WARRANTY
Our Sienna product warranty extends only to the original customer purchaser of the product. It
is warranted by the manufacturer to be free from all defects in materials or workmanship for a
period of one year from the date of original purchase. This warranty is subject to the following
condions, exclusions and excepons.
Exclusions:
This warranty does not cover normal wear and tear of parts and does not apply to any product
that has been tampered with or used for commercial purposes. This warranty does not cover
damage caused by misuse, abuse, negligent handling or damage due to mishandling in transit or
shipping. This warranty does not cover damage or defects caused by or resulng from repairs,
service or alteraons to the product or any of its parts, which have been performed by a repair
person not authorized by the manufacturer. This warranty is effective only if the product is
purchased and operated in the USA, and does not extend to any units which have been used in
violaon of wrien instrucons furnished by the manufacturer, or to units which have had the
serial number removed, altered, defaced or rendered illegible.
Performance:
During the limited warranty period, the manufacturer will, at its opon, repair or replace free
of charge a defecve product or part that is covered by this warranty. As a maer of warranty
policy, the manufacturer will not refund the purchase price. A repaired or replacement product
will be covered by this warranty for the balance of the inial one year warranty period.
To contact Customer Service:
Write: Anvid Products, Inc.
1401-1499 Greenville Road
Livermore, CA 94550
E-mail: customerservice@anvidproducts.com
Or call: 1-888-5SIENNA (1-888-574-3662)
Please refer to your product name and model number when contacng Customer Service.
Customer Service will give you further instructions for returning a defective product. When
returning a defective product, carefully pack the item to avoid damage in shipping, the
manufacturer cannot assume responsibility for loss or damage during incoming shipment. Be
sure to include the following items with your product: any accessories related to the product,
completed warranty form, and a copy of your sales receipt or other proof of purchase to
determine warranty status. C.O.D. shipments cannot be accepted.
Limitations of Remedies: No representative or person is authorized to assume for the
manufacturer any other liability in connection with the sale of our products. This limited
warranty is not transferable and any sale, transfer or other disposition of the product voids this

11
limited warranty. There shall be no claims for defects or failure of performance or product failure
under any theory of tort, contract or commercial law including, but not limited to, negligence,
gross negligence, strict liability, breach of warranty and breach of contract.
ANY IMPLIED WARRANTIES, OBLIGATIONS, OR LIABILITIES, INCLUDING, BUT NOT LIMITED TO,
THE IMPLIED WARRANTY OF MERCHANTABILITY AND FITNESS FOR A PARTICULAR PURPOSE,
SHALL BE LIMITED TO THE DURATION OF THIS WARRANTY. Some states do not allow limitations
on how long an implied warranty lasts, so the above limitations may not apply to you.
REPAIR OR REPLACEMENT SHALL BE THE SOLE REMEDY OF THE PURCHASER UNDER THIS
LIMITED WARRANTY, AND IN NO EVENT SHALL THE MANUFACTURER BE LIABLE FOR ANY
SPECIAL, INCIDENTAL, OR CONSEQUENTIAL DAMAGES, LOSSES OR EXPENSES YOU MAY INCUR
IN CONNECTION WITH YOUR PURCHASE OR USE OF THE PRODUCT OR FOR ANY BREACH OF
THIS OR ANY OTHER WARRANTY, EXPRESS OR IMPLIED, WHATSOEVER. Some states do not
allow exclusion or limitation of special, incidental, or consequential damages, so the above
limitation may not apply to you. This limited warranty gives you specific legal rights, and you
may also have other rights which vary from state to state.
Correct Disposal of this product
This marking indicates that this product should not be
disposed with other household wastes throughout the
US. To prevent possible harm to the environment or
human health from uncontrolled waste disposal, we
recommend recycling it responsibly to promote the
sustainable reuse of material resources. To dispose of
your used device, please contact your local city for proper
disposal locations.
12 13
Birdie
Neoyeur à vapeur portaf
SSC-0316
MANUEL D’UTILISATION

13
INTRODUCTION
Merci d’avoir choisi Sienna pour vos besoins de neoyage ménager. Nos produits de neoyeurs
à vapeur utilisent la puissance active de la vapeur sans utiliser aucun produit chimique; cela
donne ainsi un produit vert sans risque à l’écosystème. Vous avez pris le premier pas dans la
transformation de votre maison en une maison verte sans danger pour l’environnement. Nos
produits à vapeur Sienna sont une méthode moderne de neoyage qui est ecace et beaucoup
plus hygiénique que les méthodes convenonnelles.
Avec le pouvoir destructeur de germes de la vapeur, on peut éliminer la poussière et la saleté en
quelques secondes. Les petes molécules de vapeur chaude pénètrent les surfaces poreuses à
neoyer, s’étendent et forcent la poussière, les débris et les bactéries à la surface. Quand on les
ulise correctement, nos neoyeurs à vapeur peuvent tuer les acariens et certains types d’agents
pathogènes bactériens comme la salmonelle et l’E-coli au contact.
Puisque vous n’avez pas besoin de produits chimiques pour l’utilisation de nos produits, vous
constaterez non seulement des économies, mais vous avez également fourni un milieu plus sûr
où vous vivez avec votre famille. Nous vous encourageons à améliorer votre mode de vie et à
passer du temps à apprécier votre environnement neoyé à vapeur sans produits chimiques.
Birdie
Le nettoyeur à vapeur portatif Birdie est léger, portable et facile à utiliser. C’est un produit
novateur qui neoie et désinfecte votre maison en exploitant le pouvoir neoyant naturel de la
vapeur chaude. Ce neoyeur à vapeur unique convient bien au neoyage de diverses surfaces
pour enlever la saleté et les débris des zones de saleté tenace. Le Birdie chaue l’eau à 100 °C (212 °F)
et génère la vapeur quand on pompe la poignée. On peut le remplir rapidement pour obtenir
jusqu’à 10 minutes de vapeur. La concepon conviviale et la caractérisque de vapeur directe à
haute pression visent à s’aaquer à la saleté et aux débris les plus coriaces. Le Birdie ne nécessite
aucun assemblage, il sut d’aacher les ouls et procéder. Il comprend un élément chauant de
1500 was, un réservoir d’eau de 200 mL/6,8 oz liq et une trousse d’accessoires de 9 pièces; il
ore une garane d’un an par le fabricant.

14 15
CONSIGNES DE SÉCURITÉ
Le nettoyeur à vapeur portatif Birdie (SSC-0316) de Sienna est conçu uniquement pour l’usage
domesque. Ce produit doit être ulisé conformément aux présentes direcves. Toute ulisaon
commerciale annule la garane. Il est conçu pour la désinfecon et le neoyage de diverses surfaces
comme les fenêtres, les carreaux céramiques, le coulis de ciment et encore plus.
Direcves de sécurité :
MISE EN GARDE : ASSUREZ-VOUS DE LIRE ET DE SUIVRE TOUTES LES DIRECTIVES DE
SÉCURITÉ AVANT D’UTILISER VOTRE NETTOYEUR À VAPEUR. UN USAGE CONVENABLE ET UN
BON ENTRETIEN AIDERONT À PROLONGER LA DURÉE DE VIE DE VOTRE NETTOYEUR À VAPEUR.
Lors de l’utilisation d’un appareil électrique, on doit toujours observer des précautions
élémentaires. An de réduire le risque d’incendie, d’électrocuon et de blessure :
• Lisez toutes les instrucons avec soin avant l’usage.
• Assurez-vous de débrancher le cordon d’alimentaon quand l’appareil n’est pas ulisé.
• Le nettoyeur à vapeur n’est pas conçu pour être utilisé par des personnes (y compris
les enfants) à capacités physiques, sensorielles ou mentales réduites ou manquant de
l’expérience et de connaissances à moins qu’ils n’aient reçu des instrucons d’une personne
responsable de leur sécurité.
• Ne laissez pas l’appareil sans surveillance quand il est branché.
• Il faut surveiller les enfants et les averr que le neoyeur à vapeur n’est pas un jouet et
qu’ils ne doivent pas jouer avec l’appareil.
• Ne dirigez pas la vapeur vers les gens, animaux de compagnie ou prises de courant.
• N’immergez pas le neoyeur à vapeur dans l’eau ou d’autres liquides.
• Ne manipulez pas le neoyeur à vapeur avec des mains mouillées.
• Ne rez pas le cordon d’alimentaon ni ulisez le cordon comme poignée.
• Assurez-vous de maintenir le cordon à l’écart de la chaleur, de l’eau, et des bords
tranchants.
• N’ulisez pas l’appareil si le cordon ou la che est endommagé. Si le cordon d’alimentaon
est endommagé, il doit être remplacé par le fabricant.
• N’ulisez pas de rallonge ou de prise de courant de puissance inadéquate.
• N’ulisez pas le neoyeur à vapeur sur un matériel sensible à la vapeur comme le velours,
le cuir, le ssu synthétique et tout autre tissu délicat ou sur les meubles cirés.
• N’ulisez pas l’appareil sur les sols en parquet non vitrié. En faisant cela, vous pourriez
enlever le lustre de votre plancher. Il est recommandé de faire un essai dans un endroit
peu visible avant de connuer. Comme mesure prévenve, vous devez vérier le manuel du
fabricant du revêtement de sol pour connaître les instrucons d’entreen appropriées.
• Ne meez jamais d’adjuvants comme les détergents ou produits chimiques neoyants dans
le réservoir d’eau. Cela rendra le produit dangereux, et endommagera l’unité et présentera

15
un danger à l’ulisaon.
• Ulisez uniquement les accessoires recommandés par le fabricant.
• Cessez d’uliser le neoyeur à vapeur si le disjoncteur est acvé. Aenon au risque de
choc électrique.
• Portez des chaussures appropriées quand vous utilisez votre nettoyeur à vapeur. Les
chaussures ouvertes, pantoufles ou pieds nus peuvent vous faire perdre l’équilibre et
tomber ou entraîner le contact de la vapeur chaude avec vos pieds.
• Laissez votre neoyeur à vapeur refroidir avant de le ranger dans un endroit frais et sec.
NOTE : Pour assurer que seuls les produits de la plus haute qualité sont fabriqués, Sienna a pré-
testé tous les neoyeurs à vapeur. Pour cee raison vous pourriez voir une condensaon de l’eau
à l’intérieur du réservoir d’eau.

16 17
PRINCIPALES CARACTÉRISTIQUES
A. AJUTAGE
B. BUSE À VAPEUR
C. BOUCHON DU RÉSERVOIR D’EAU
D. POMPE À VAPEUR (Bouton de déclenchement de vapeur)
E. POIGNÉE
F. CORPS DU NETTOYEUR À VAPEUR
G. TÉMOIN D’ALIMENTATION
H. BROSSE À POILS EN NYLON
I. BUSE CONCENTRATEUR COUDÉE
J. TÊTE À VAPEUR
K. GOBELET DE REMPLISSAGE
L. RALLONGE DE TUYAU
M. RACLETTE À VITRES
N. LINGETTE
E
G
D
C
A
B
F
A
L
HI
J
M
K
N

17
UTILISATION ET ASSEMBLAGE
Remplir votre neoyeur à vapeur d’eau :
1) Desserrez le bouchon du réservoir d’eau (C) et remplissez le neoyeur à vapeur d’eau
ulisant le gobelet de remplissage (K). Remeez le bouchon du réservoir d’eau (C) et
resserrez-le avant l’usage.
NOTE : Le neoyeur à vapeur ne nécessite pas l’eau disllée. Les habitants de régions où l’eau est
dure doivent uliser l’eau disllée pour une meilleure performance.
NOTE : Assurez-vous d’avoir les accessoires voulus en place avant de brancher l’unité.
2) Branchez le cordon d’alimentaon à une prise de courant. Le témoin d’alimentaon (G)
s’allumera en rouge connu. Le neoyeur à vapeur réchauera et sera prêt dans moins de
30 secondes.
NOTE : Il est recommandé de ne pas faire fonconner un autre appareil de haute puissance sur le
même circuit pour éviter une surcharge du circuit.
3) C’est un nettoyeur à vapeur activé par une pompe. Pour générer une vapeur continue,
appuyez sur le bouton de pompe à vapeur (D) à plusieurs reprises au besoin pour obtenir le
débit de vapeur voulu.
4) Si le nettoyeur à vapeur n’a plus d’eau, débranchez le nettoyeur à vapeur de la prise de
courant et il suffit de remplir le réservoir d’eau et de continuer le nettoyage à vapeur.
Aucun temps de refroidissement nécessaire.
5) Quand vous avez terminé le neoyage à vapeur, débranchez le cordon d’alimentaon de la prise.
Assurez-vous de vider le réservoir d’eau et rerez avec soin tout accessoire pour le séchage.
MISE EN GARDE : N’UTILISEZ JAMAIS LE NETTOYEUR À VAPEUR SANS EAU.

18 19
Raccorder l’ajutage (A) ou la rallonge de tuyau (L) :
1) Insérez l’ajutage (A) ou la rallonge de tuyau (L) dans la buse à vapeur (B) et alignez les languees.
2) Tournez l’ajutage (A) ou la rallonge de tuyau (L) dans le sens horaire jusqu’à ce qu’il/elle se
verrouille en place avec la buse à vapeur (B).
Raccorder la brosse à poils en nylon (H) :
3) Attachez la brosse à poils en nylon (H) à l’embout de l’ajutage (A) ou de la rallonge de
tuyau (L) et pressez fermement.

19
4) Buse concentrateur coudée (I). Cet accessoire est ulisé pour les pour les endroits diciles
d’accès auxquels vous avez besoin d’accéder avec un angle. La brosse à poils en nylon
fonconne le mieux en ulisant cet accessoire.
IMPORTANT : Assurez-vous que l’accessoire est poussé le plus possible sur l’embout pour vous
assurer qu’il est emboîté et scellé. Cela évitera que le vapeur suinte des zones indésirables et
préviendra des blessures.
5) Pour rerer la brosse à poils en nylon (H), assurez-vous que l’unité est débranchée et a refroidi.
Tirez fermement sur la brosse à poils en nylon (H) pour la rerer de l’embout de la buse.
NOTE : La brosse à poils en nylon est idéale pour neoyer le coulis de ciment, les éviers, ou toute
surface nécessitant une acon de récurage léger. Les poils sont fabriqués d’un nylon doux an
d’être délicats et sûrs pour la plupart des surfaces. Avec la vapeur ces poils perdent rapidement
leur forme iniale. Cela est parfaitement normal. On peut connuer d’uliser les brosses jusqu’a
ce que les poils soient usagés. On peut commander des rechanges à parr de
www.siennadirect.com.
Raccorder la tête à vapeur (J) :
6) Aachez la tête à vapeur (J) à l’embout de l’ajutage (A), à la buse concentrateur coudée (I),
ou à la rallonge de tuyau (L) et pressez fermement. Ajoutez la lingee (N) à la tête à vapeur
(J) pour le neoyage à vapeur des surfaces comme les vêtements, les couvre-fenêtres, les
meubles capitonnés et encore plus.
ATTENTION : La lingee pourrait être très chaude.

20 21
Raccorder la raclee (M) :
7) Raccordez la raclette à la tête à vapeur (J) en alignant et raccordant les languettes qui se
trouvent au bas de la raclee (M) au bas de la tête à vapeur (J). Pressez et enclenchez en place.
MISE EN GARDE : SUR LES SURFACES TRAITÉES À LA CIRE, L’ACTION DE LA CHALEUR ET
DE LA VAPEUR PEUT ENLEVER LA CIRE. N’UTILISEZ PAS L’APPAREIL SUR LES SOLS EN BOIS NON
VITRIFIÉ NI LAISSEZ L’UNITÉ RESTER SUR UN SOL EN BOIS POUR UNE PÉRIODE PROLONGÉE.
CELA PEUT DÉFORMER LE GRAIN DE BOIS. IL EST RECOMMANDÉ DE FAIRE UN ESSAI SUR UN
ENDROIT PEU VISIBLE DU SOL. IL EST RECOMMANDÉ AUSSI DE VÉRIFIER LES INSTRUCTIONS
D’UTILISATION ET D’ENTRETIEN POUR LE NETTOYAGE DONNÉES PAR LE FABRICANT DU SOL
POUR VOUS ASSURER DE SA COMPATIBILITÉ AVEC UN NETTOYAGE À VAPEUR.
NETTOYAGE ET ENTRETIEN
ATTENTION : Avant de neoyer ou d’entretenir votre neoyeur à vapeur, isolez l’unité en
rerant le cordon de la prise de courant et évitez d’immerger l’unité dans l’eau.
1) La lingette en microfibres peut être lavée à la machine dans l’eau chaude et séchée par
culbutage. N’ulisez pas d’eau de javel ni d’assouplissant. Laissez-la sécher complètement
avant l’usage.
2) Essuyez le neoyeur à vapeur avec un chion doux au besoin.
Spécicaons du produit :
Tension d’alimentaon : 120 V, 60 Hz
Sore : 1500 W
Capacité du réservoir d’eau : max. 200 mL/ 6, 8 oz liq
Cordon : 5 m (16,4 pi)
Poids : 1.04 kg (2.3lbs)
Classe de protecon : 2
This manual suits for next models
1
Table of contents
Languages:
Other Sienna Kitchen Appliance manuals


