SightCare CloverNote User manual

CloverNote
Video Magnifier
User Guide
REV1.0

Contents
Precaution ....................................................................................1
Quick Start ................................................................................... 2
Overview ..............................................................................................................2
Compositions ....................................................................................................... 3
Accessories .......................................................................................................... 4
Device Setting Up ................................................................................................5
Battery Charging ..................................................................................................5
Power LED .......................................................................................................... 6
Battery Replacement ............................................................................................6
Device Folding .....................................................................................................7
External Camera Setting Up and Disconnecting ................................................ 8
Reading & Writing Assist Tray (Optional)......................................................... 9
Operation ................................................................................... 10
Power Button ..................................................................................................... 10
Home/Exit Button ..............................................................................................10
Magnification .....................................................................................................11
Brightness .......................................................................................................... 11
Color Mode ........................................................................................................12
Contrast Control ................................................................................................ 12
Lighting ..............................................................................................................13
Volume ............................................................................................................... 14

Image Freeze ......................................................................................................14
Image Storage .................................................................................................... 14
Line and Mask ................................................................................................... 15
Location Function ..............................................................................................16
Live Panning......................................................................................................17
Focus Control .....................................................................................................18
Toggling System ................................................................................................18
Open Application ...............................................................................................20
Setting Menu ......................................................................................................26
HDMI Output .....................................................................................................28
Hardware Reset ..................................................................................................28
Troubleshooting ........................................................................ 29
Specification .............................................................................. 31

1
Precaution
Before using CloverNote for the first time, you must
charge its battery. Refer to the Battery Charging
section for more details.
Always operate the unit in a place where the
temperature is between 10°and 35°C (50°and 95°F).
Keep the unit away from wet areas, rain, and other
sources of liquids. Do not submerge the unit.
Do not attempt to repair the unit. Any unauthorized
attempt will void the product warranty. Please contact
with your distributor.
Use the supplied power adapter and battery.

2
Quick Start
Overview
Thank you for purchasing CloverNote!
CloverNote is a 12.5-inch portable video magnifier which can
satisfy all the daily requirements and work across 3 main market
segments of home, work and education for the low vision people.
The elaborated multi-camera system ensures superior and crisp
images quality with 2.2-50 times continuous and lossless
magnification. The physical buttons operation and touch screen
gesture with audio are both supported so that more convenient
interaction can be chosen by your preference.
The device owns all basic and practical functions, allowing you to
read, change color, capture images. Real-time Navigation,
Reading Line & Mask and Location function are achieved on this
device.

3
Compositions
1. Front camera
2.LCD Screen
3. Home/Exit Button
4. Enhanced Color Button
5. Joystick
6. Zoom Button
7. Enter Button
8. Power Button
14. Voice Up Button
9. DC Port
15. Voice Down Button
10. HDMI Out Port
16. Camera Stick Port
11. Earphone Port
17. Focus Control Button
12. Switch Button
18. Freeze Button
13. Line/Mask Button
19 SD Card Slot
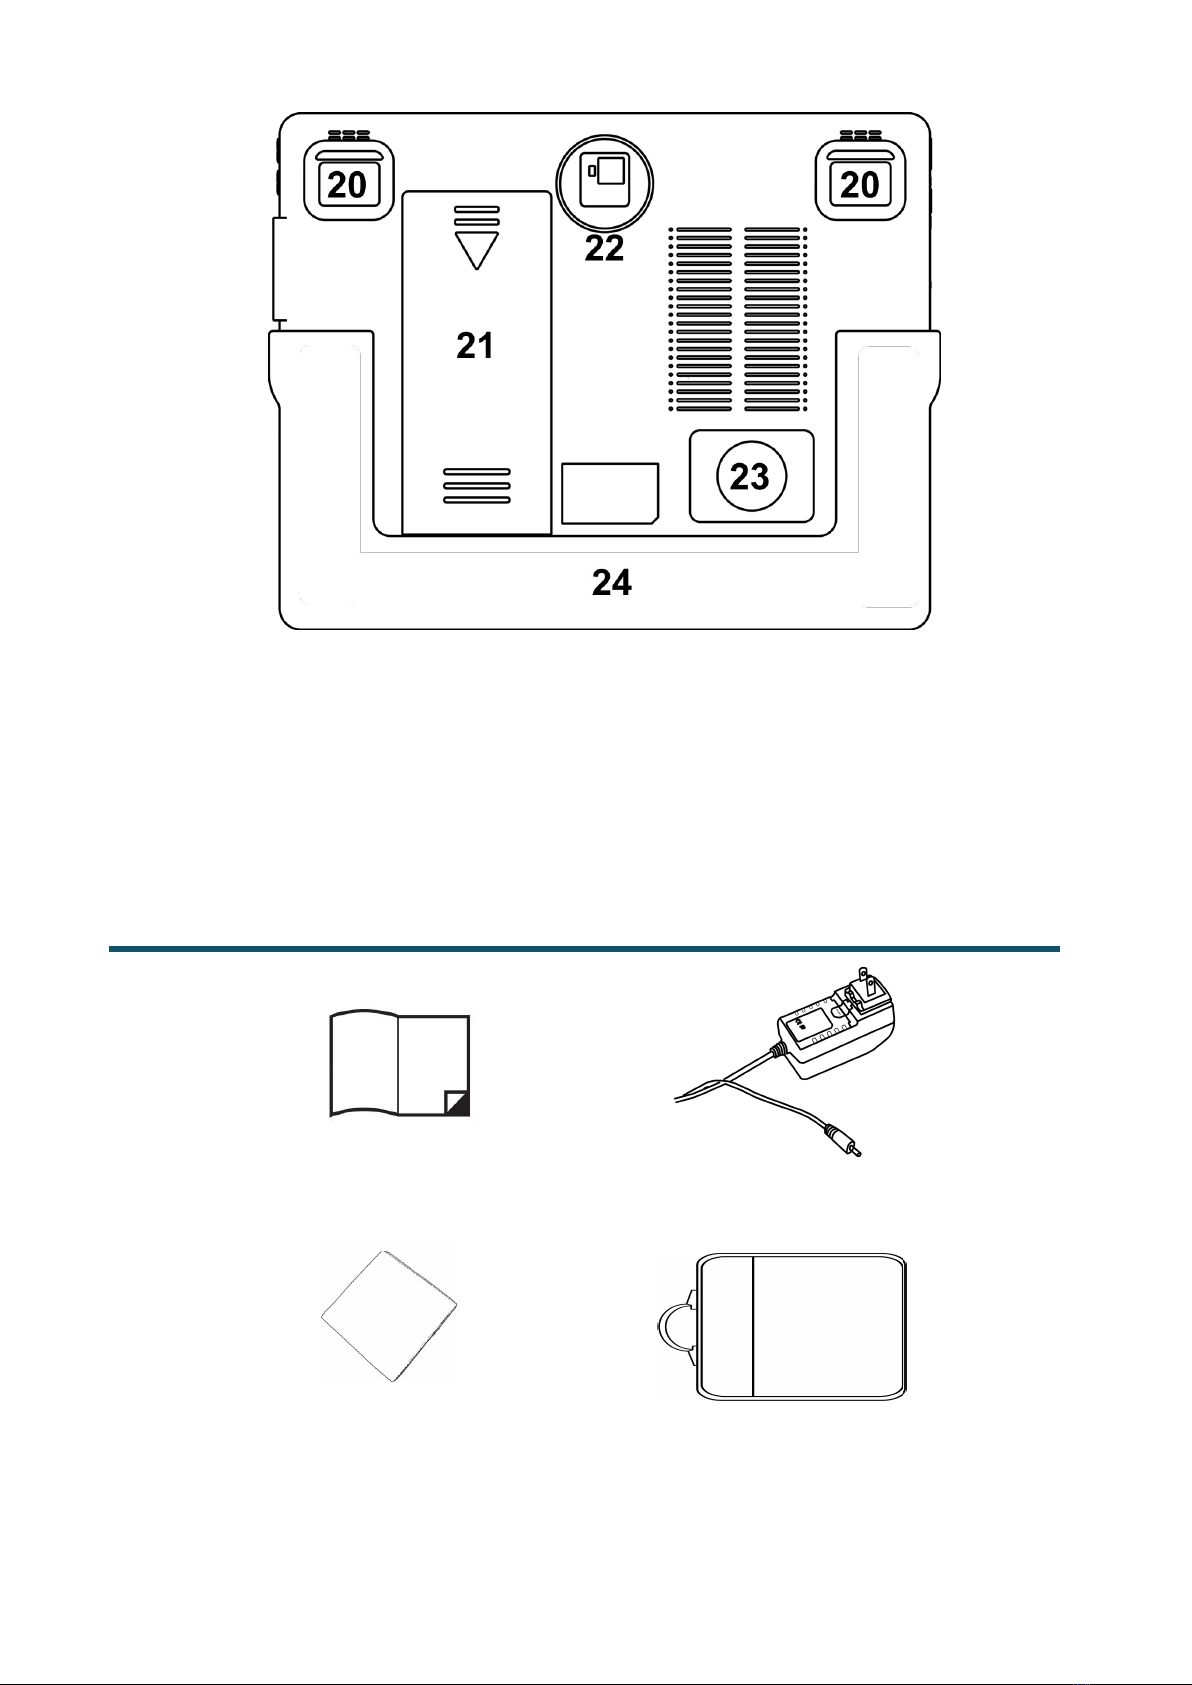
4
20. LED Light
21. Battery
22. Main Camera
23. Speaker
24. Stand
Accessories
User Manual
Power Adapter
Cleaning Cloth
Carrying Case
5
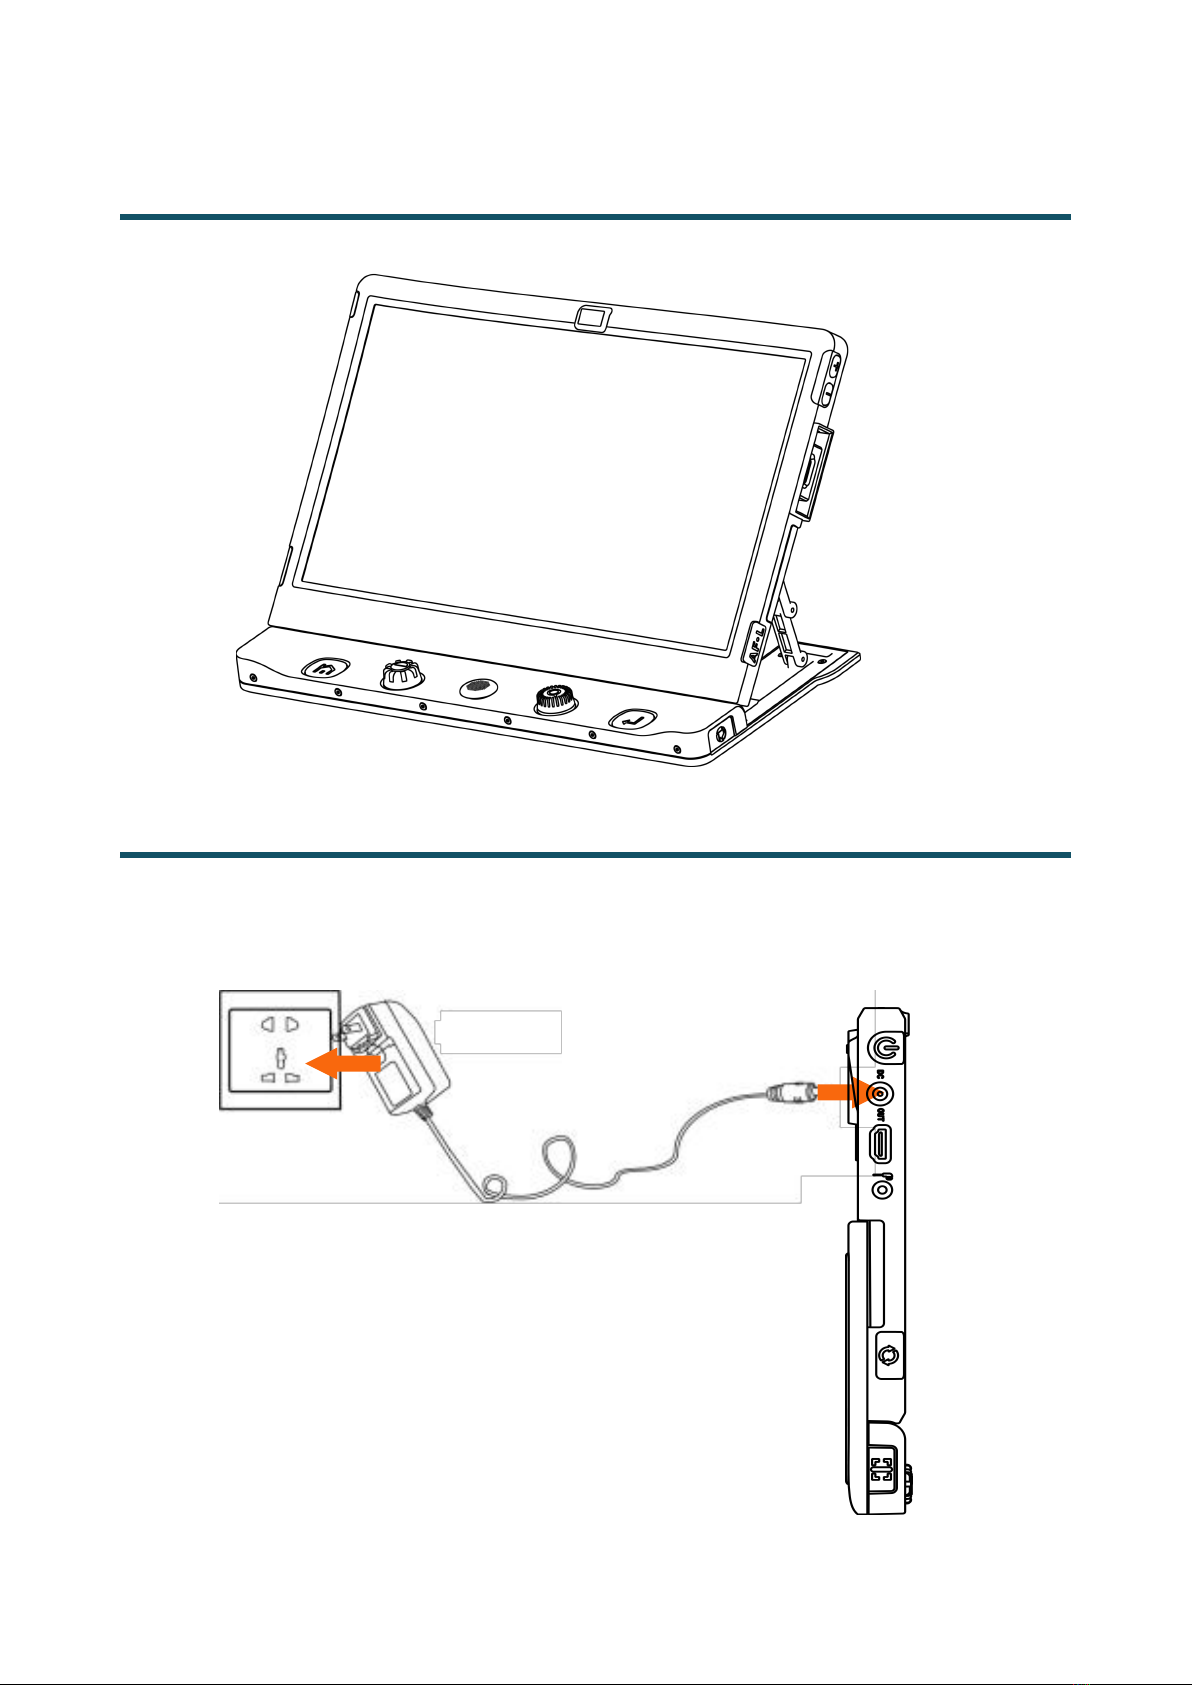
Device Setting Up
Unfold the stand to set up the device on the flat surface.
Battery Charging
Connect the supplied power cable to the unit’s charging port, then
connect the power adapter into an AC outlet to start charging.

6
Power LED
Charging when the unit is off, the power LED will be green and
auto turn off when fully charged. A full Charge will take about
2.5 hours and support the unit working for about 4-4.5 hours.
Charging when the unit is on, the power LED will keep green.
When the unit is on without charging, the power LED will be
green when the battery level is high, and will be red when the
battery is dying.
Battery Replacement
The battery can be separated and detachable from the device.,
which is very convenient to be exchangeable.
Step 1
With the stand unfold and turn the device around.

7
Step 2
Slide down the battery cover to expose the battery. Take the
battery out and insert a new one, then slide the cover back.
Device Folding
Use the finger to push the stand support until it bends first as the
pictures show, then close the stand.

8
External Camera Setting Up and Disconnecting
Insert the external camera into the Camera Stick port.
Press down the two buttons on the camera first to loose the
connection and then pull it out directly.
Note: The angel of the camera stick can be adjusted based on
user’s requests and the knob is also can be rotated. More using
cases please refer to the next chapter.

9
Reading & Writing Assist Tray (Optional)
Put the device on the assist tray in centre.
Press down device and insert it into the stand.
With the device on the tray, it can capture half page of A4 size
at a time. With the wheel underneath the tray and more space
supplied, it is very convenient and easy to move the tray for
reading and handwriting.

10
Operation
Power Button
Press and hold the Power button for 3 seconds to turn on the
unit.
When the unit is on, press the Power button to check the
current status of battery capacity.
Long press and hold the Power button when the unit is on
for 3 seconds to turn Off.
Home/Exit Button
Long press the Home/Exit button for 2 seconds get into the
Home Page, including Magnifier Application,Open
Application and Setting Menu. The chosen one will be
highlighted. Choose the specific icon with touchscreen gesture
(or use the Joystick to choose and Enter button to
confirm).
In the application with the Quick Control Bar, short press the
Home/Exit button to pop up the Quick Control Bar; in other
situations, short press the Home/Exit button will act as the
exit/back function.

11
No operation for 5 seconds or short press the Home/Exit
button or tap gesture will close the Quick Control Bar.
Magnification
Turn the Zoom button clockwise to zoom In.
Turn the Zoom button counterclockwise to zoom out.
In addition to the Zoom button , use the pinch and zoom
gesture on the touchscreen to adjust the zoom level.
Magnification range: 2.2 -- 50 times (Near View)
Brightness
In the Magnifier Application, short press the Home/Exit button
to pop up the Control Bar.
Tap to choose the icon below (or use the Joystick ).
Finger slide (or rotate the Zoom button ) to
increase/decrease the brightness.
No operation for 5 seconds or short press the Home/Exit
button or tap the inactive area to close.

12
Color Mode
A color mode is a predefined color combination. Full-color mode is
suitable for viewing pictures or maps. Enhanced Color mode is
combined with different foreground and background colors which
can help to read more clearly.
Turn the Enhanced Color button to go through all the
enhanced color.
Press down the Enhanced Color button to quickly switch
between the nature color and the latest enhanced color.
Press and hold the Enhanced Color button for 5 seconds to
enter the Customized Color Page, use the tap gesture to
activate/inactivate the enhanced color combination (or use the
Joystick to choose and Enter button to confirm).
Tap the Exit icon to exit the Customized Color Page (or
press the Home/Exit button ).
Note: The Customized Color Page can also be entered via the
Setting Menu.
Contrast Control
In most cases, the blend ratio of the two contrast colors can be
adjusted appropriately. In addition, manual contrast adjustment

13
can be further applied.
Press down the Enhanced Color button and turn the Zoom
button at the same time to pop up the Contrast Control Bar.
Use the slide gesture or turn the Zoom button to change the
contrast color of background and foreground.
No operation for 5 seconds or short press the Home/Exit
button /Enter button or tap the inactive area to close.
Lighting
In the Magnifier Application, short press the Home/Exit Button .
The two lights can be both on/off and the left/right lights can also
be controlled separately.
Use the tap gesture on the specific icon to control the lights (or
slide the Joystick to choose the icon and Enter button to
confirm).
No operation for 5 seconds or short press the Home/Exit
button or tap the inactive area to close.

14
Press the Voice Up button or Voice Down button to adjust the
volume. With bar appears, you can also slide to adjust the volume
level.
Button/Voice Volume Bar
Text-to-Speech Volume Bar
Image Freeze
Freezing a live image can be useful for the moving objects.
Further magnification as well as enhanced color change is still
available in this mode.
Press Freeze button to lock/unlock the image.
For the locked image with increased magnification, you can use
the pinch and zoom gesture or the Joystick to navigate around
freely.
Image Storage
In the Magnifier Application, long press the Freeze button for
3 seconds to store the current image.
Volume
15
Note: When the saved images reach at the maximum capacity (2
GB, Memory Full icon appears), you will need to delete some
pictures first in Playback mode before the next successful saving.
Line and Mask
Press the Line/Mask button to switch among different Reading
Line & Mask modes. The Live-panning function is still available.
When the reading line is available, long press the Line/Mask
button and rotate the Enhanced Color button can change the
line color.
One horizontal line
Press and hold the Line/Mask button and slide the
Joystick up/down to change the position of horizontal
reading line;slide the Joystick left/right to decrease/increase
the width of the line.
One vertical line
Press and hold the Line/Mask button and slide the
Joystick left/right to change the position of vertical reading
line ;slide the Joystick up/down to increase/decrease the
width of the line.
Horizontal mask

16
Press and hold the Line/Mask button and slide the
Joystick up/down to change the position of the masks;slide
the Joystick left/right to narrow/enlarge the distance between
the masks.
Vertical mask
Press and hold the Line/Mask button and slide the
Joystick left/right to change the position of the masks;slide
the Joystick up/down to enlarge/narrow the distance
between the masks.
Location Function
When in a higher zoom level, sometimes you may be lost and
confused about which paragraph of the paper you are reading
now. The location function is elaborately designed to help relocate
what you are interested in.
Short press the Zoom button and the image will zoom out to
the minimum magnification with the Location box appears to
highlight the text part that you were reading.
Use the drag gesture (or slide the Joystick ) to change the
position of the location box.

17
Rotate the Zoom button can quickly back to the original
position of the box. Push the joystick to to any direction and
press down the Zoom button can re-center the box.
Short press the Zoom button again (or double tap inside the
box), then the highlighted context will zoom in to the previous
higher zoom level automatically.
In a higher zoom level, use the slide gesture (or use the
Joystick ) to navigate the image for seeing more without
moving the paper.
Change the panning speed
Push the Joystick to any directions and turn the Zoom
Button to pop up the Panning Speed Bar.
Use the slide gesture or turn the Zoom button to
increase/decrease the panning speed.
No operation for 5 seconds or short press the Home/Exit
button / Enter button or tap the inactive area to close the
Speed Bar.
Live Panning
Table of contents
Other SightCare Magnifier manuals


