Signature Solar EG4-LL User manual

1
EG4 (48V/100AH) LL Battery Manual
Please read this manual prior to installing or using your new EG4-LL battery. It
contains information about the correct installation, operation, and maintenance of
your purchase.
Thank you for your purchase of an EG4-LL battery from Signature Solar. Welcome to the EG4
battery family. This manual contains information about how to install, operate, and care for your
EG4-LL battery. If this is your first time purchasing a battery from Signature Solar, this manual
can instruct you on how to properly use and care for your new battery. If you have purchased an
EG4-LL battery in the past, you will find this manual to be a useful reference tool.
Table of Contents
What Is Included With Your Purchase 2
What Tools Are Needed For Installation 2
How To Connect Cables To Your Terminals 2
Connecting The Batteries In Parallel 3
Why connect in parallel? 3
How do you wire your batteries in parallel? 3
Connecting The Batteries In Series 4
Why connect in series? 4
How do you wire your batteries in series? 4
How To Properly Charge The Batteries 5
An Introduction To The BMS 6
What is a BMS? 6
Battery Storage and Maintenance 7
How do you properly store your battery? 7
What steps should you take to maintain a healthy battery? 7
Battery End Of Life 7
How should you properly recycle or dispose of your batteries? 8
EG4 Warranty 8
Diagrams and Specs 9-10

2
What Is Included With Your Purchase
When you purchase an EG4-LL battery, you will receive multiple items. Sometimes these items
will be inside the box with the battery, or they may be included in the shipment in separate
packaging. These items include the following:
● (1) EG4-LL Battery
○ Rack Style Design
○ Built-in BMS (Battery Management System)
○ High Performance A+ cells with laser welded connections
○ Hardware for connections is included with battery
● Battery Communication Cable
● Positive and Negative Color Coded Connection Cables
What Tools Are Needed For Installation
Tools required may vary depending on how you choose to mount your battery. In general, you
will need the following items to install your battery into a racking solution and to attach cables to
the terminals of the battery.
● 10mm socket and ratchet
● Phillips screwdriver
● Torque wrench of proper size
How To Connect Cables To Your Terminals
1. Identify the positive and negative terminals on your battery. These are labeled and color
coded red for positive (+),and black for negative (-).
2. Verify you have all finishing hardware to attach the cable properly. Check to ensure the
bolt insert for the terminal fully seats and can be tightened to the proper torque.
3. Connect the cables to your battery terminals by removing the terminal bolts, inserting
them through the eyelet of the proper cable, and reseating the bolt into the terminal
block to the correct torque.
4. DO NOT finger tighten the terminal bolts. They require a specific torque to ensure they
do not loosen during operation. Failure to properly tighten the terminal bolts can result in
serious damage and will void your warranty.
Connecting Your Batteries Together
When you are connecting your batteries together, you will need to ensure you are following
correct practices and procedures to guarantee proper operation. Signature Solar recommends,
in most cases, connecting your batteries to a busbar in order to connect it to your system. When
operating in parallel this helps ensure that batteries stay close in voltage. It is important to verify
your system requirements and use before connecting, and when making decisions on whether
to connect in series or in parallel.

3
Connecting The Batteries In Parallel
Why connect in parallel?
You are able to connect multiple EG4-LL batteries in parallel to increase the capacity and
current of your power storage system. When you connect multiple EG4-LL batteries in parallel,
you maintain the same voltage. For example, if I have two 48V 100AH EG4-LL batteries wired in
parallel, the output voltage will still be 48V. However, when wired in parallel, the capacity and
current limits are additive. In the previous example, you would have increased the storage
capacity from 100AH total to 200AH.
How do you wire your batteries in parallel?
Note: When wiring in parallel, you must ensure that the rest of your system can handle the
increased current limits. Signature Solar recommends that you verify the fuses and circuit
breakers downstream of your batteries can protect any components or appliances from current
spikes or short circuits.
1. Identify the positive and negative terminals on your batteries. These are color coded red
for positive (+),and black for negative (-) for your convenience.
2. Make a proper connection to the positive terminal of your first battery. Ensure that you
have followed directions to properly connect the cable to the terminal. Improper
connections can cause severe damage and may void your warranty.
3. Connect the other end of your positive cable to the positive terminal of the other battery
you are connecting to. Repeat step 2.
4. Repeat steps 2-3 for the negative connections on the negative terminals of your
batteries.
5. For additional batteries in your system, repeat steps 2-4 until you have connected all the
batteries together properly.
6. From the positive terminal of one battery on the end of the string of batteries, connect
your cable leading from your battery's positive side to the rest of your system.From the
negative terminal on the battery at the opposite end of your battery string, connect
your cable leading from your battery's negative side to the rest of your system.

4
Connecting The Batteries In Series
Why connect in series?
Connecting your batteries in series has an opposite effect on your system that connecting in
parallel does. In this case, the capacities and current stay the same, but the system voltage is
additive. For example, if I have two 24V 100AH EG4-LL batteries connected in series, the
output voltage will be increased to 48V. In this example, the total capacity of the system remains
at 100AH, but that capacity will be delivered at a higher voltage.
How do you wire your batteries in series?
Note: EG-4 Batteries are capable of being connected in series up to 48v. DO NOT exceed a 48v
setup or you may severely damage your batteries and may void the warranty. When you wire
your batteries in series, ALL BATTERIES SHOULD BE AT THE SAME STATE OF CHARGE
PRIOR TO CONNECTING. Please take a moment to charge your batteries with a proper
lithium charger to ensure they are at the same voltage.
1. Identify the positive and negative terminals on your batteries. These are color coded red
for positive (+),and black for negative (-) for your convenience.
2. Make a proper connection to the negative terminal of your first battery. Ensure that you
have followed directions to properly connect the cable to the terminal. Improper
connections can cause severe damage and may void your warranty.
3. Connect the other end of your cable to the positive terminal of the other battery you are
connecting to. Ensure you have followed directions to properly connect the cable to the
terminal.
4. Repeat steps 2-3 for additional batteries, but ensure that you DO NOT exceed 48V.
5. From the positive terminal of one battery on the end of the string of batteries, connect
your cable leading from your battery's positive side to the rest of your system.
6. From the negative terminal on the battery at the opposite end of your battery string,
connect your cable leading from your battery's negative side to the rest of your system.

5
How To Properly Charge The Batteries
Once you are ready to charge your batteries, you want to ensure that you use the proper
settings to ensure that you are not over-charging or damaging your batteries. Although the
batteries have an included BMS system built in, it is always a best practice to make sure all
parts of your system are programmed correctly to prevent any possible damage to your
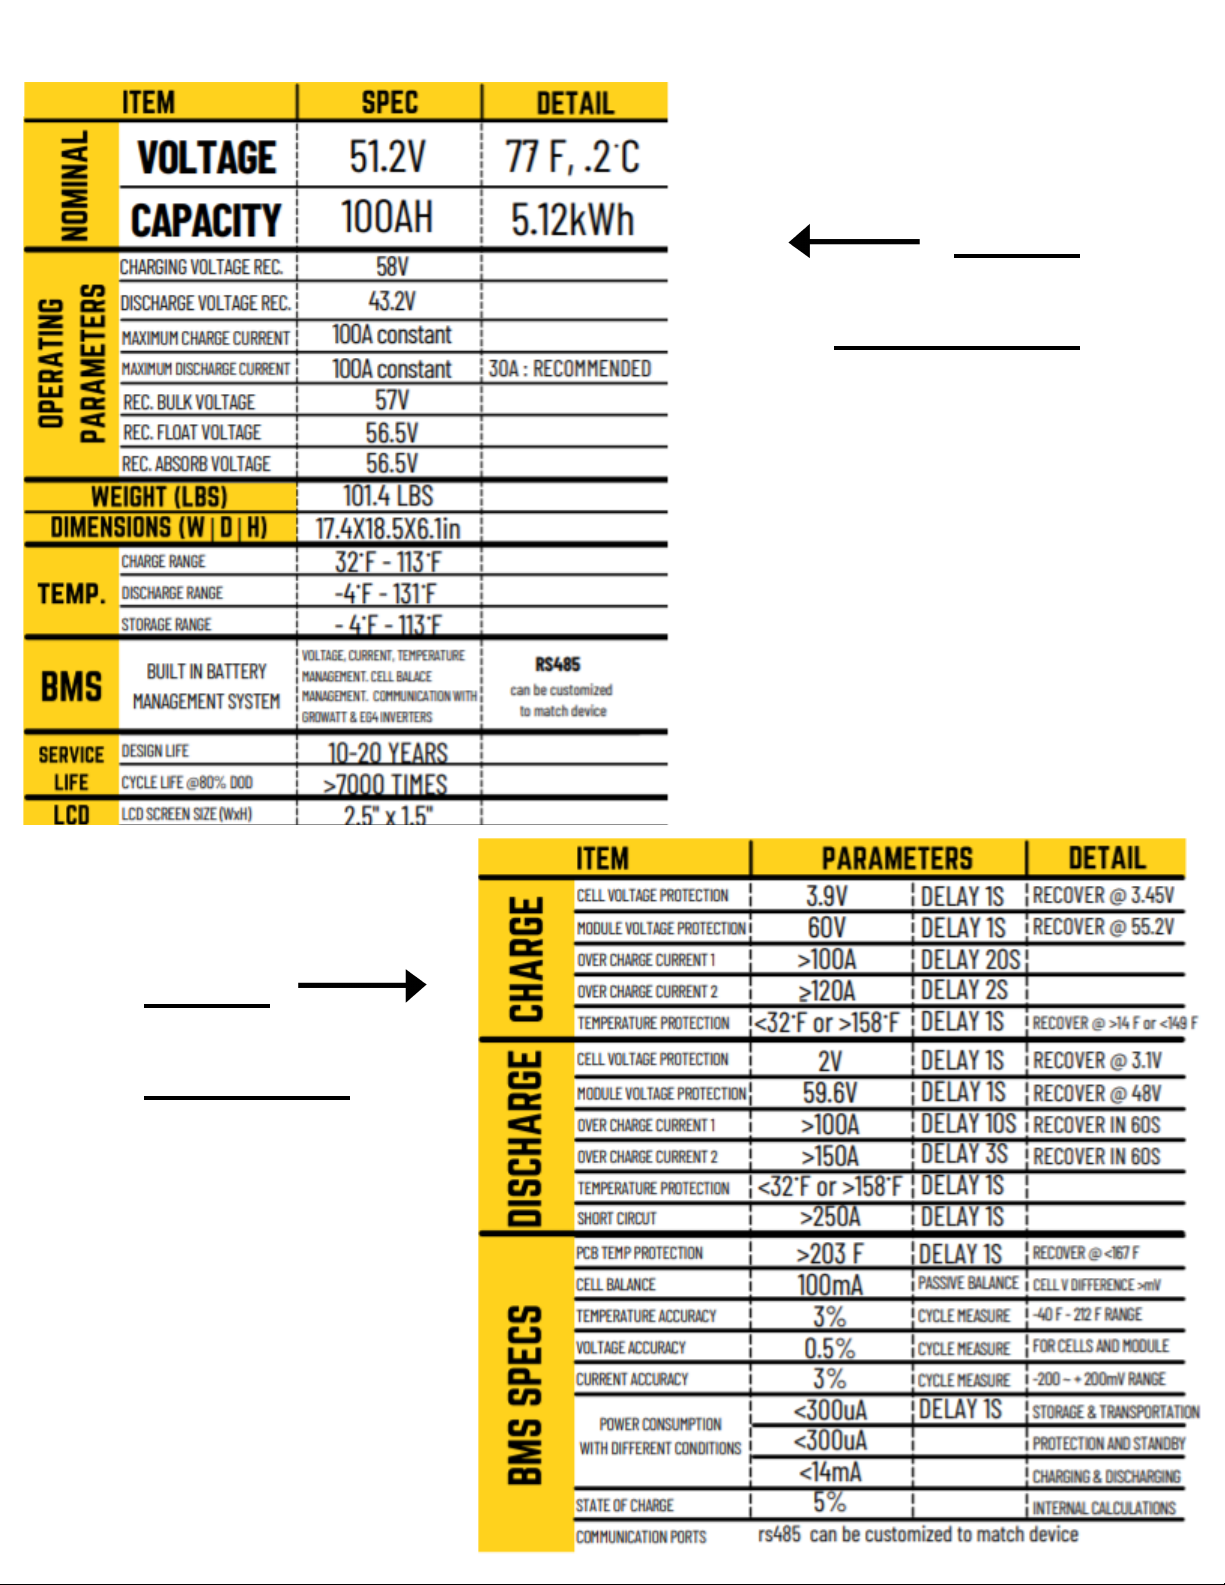
purchase. Below are the necessary specs for your EG4 (48V/100AH) LL Battery
● Bulk/Absorption: 57.5V
● Float: 56.5V
● Battery charge temp range: 32°F - 113°F
● Battery discharge temp range: -4°F - 131°F
● Cell charge temp protection: <32°F or >158°F
● Cell discharge temp protection: <32°F or >158°F
An Introduction To The BMS
What is a BMS?
BMS stands for Battery Management System. This built in software is included with all EG4
batteries, and is designed to protect your battery and battery cells from a number of situations
that may damage or destroy your system. This protection also helps to keep battery cells
operable for a larger number of life cycles. Each EG4 battery is specifically configured to ensure
optimal performance and operation of the unit. The exact specifications of your battery can be
found after the definitions listed below. The BMS includes the following protections:
PCB Temperature Protection
The PCB Temperature Protection of the BMS will ensure that the PCB does not overheat. The
PCB is the Printed Circuit Board - much like a motherboard on a computer. This is the part that
contains most of the ‘brains’ of your battery. Much like a computer has fans and other cooling
devices to ensure it doesn’t overheat, the PCB Temperature Protection feature of your BMS will
turn the unit off in an event of overheating.
Cell Balance Protection
Cell balance is crucial when it comes to ensuring your battery is operating correctly and for
many years. Cell balance is the act of ensuring that each cell is within a specific range of all the
other cells of your battery. This is done automatically at all times - there is no need to manually
charge and discharge your battery to balance the individual cells.
Environmental Temperature Protection
In periods of extreme heat or cold, it may be dangerous for your battery to operate. Continued
operation in these conditions can cause permanent damage to your battery, electrical system,
and reduce the lifespan of your battery drastically. To ensure this does not happen, the BMS is
designed to measure the temperature while it is charging or discharging, and will stop the action
when it may cause damage.

6
Voltage Protection
The EG4 battery is designed to monitor the voltage of each individual cell and ensure that they
do not become overcharged or undercharged. It constantly measure the voltage and will ensure
that each cell does not exceed a specific voltage while charging, or go below another voltage
while discharging.
Current Protection
The EG4 will measure the current at all times, and has built in protections against exceeding
specific currents while charging or discharging. These include built in timers that will shut off
quickly in an event of an extremely large amount of current, and be delayed for a short period
when the current is only slightly over the allotted amount. This ensures that the battery shuts off
quickly when there is a possible short or other issue, and prevents the battery from turning off if
there is only a minor current spike that would not result in damage or unsafe conditions.
Integrated Communication
Each EG4 is built with the user in mind, and designed to show you as much information as
possible as easily as possible. We include an option to connect to your battery and software to
monitor the status of your battery. This allows you to see and understand exactly what your
battery is doing, as well as allowing you to troubleshoot if you run into any issues.
Battery Communications
The EG4 line of batteries from Signature Solar offer a communication system that you can
utilize in order to monitor your batteries remotely, as well as to communicate with compatible
inverters. This system will allow you to program your system for optimal performance, and to
further protect your investment by allowing you to make changes depending on how you plan to
use the battery. Signature Solar fully supports assisting customers who have purchased an EG4
battery and compatible battery on making sure this communication is configured correctly.
Additionally, we have provided downloadable software from our website that can be installed on
a local computer and allow you to manage your battery or make changes directly. This software
can be located on our website at (https://www.signaturesolar.us). We strongly recommend
watching our videos on how to configure this software. If you have any questions or trouble
while setting up your communication, please contact our customer service team for further
assistance. As a general guide, we have included step by step directions below that will work
with most systems.
1. Looking at the front of your battery, you will see 4 RS485 ports (these look like ethernet
ports).
2. To connect to your inverter, you will use the CAN or RS485 port. To connect to a
computer, you will use the RS485 port. To connect between batteries, you will use the
BATTERY COMM port. Insert the plug into the desired port.
3. Connect the other end of your communication cable to the device you are connecting to.
When connecting, ensure the main battery has the right dipswitch settings. For EG4-LLs,
this will be (Down, Down, Down, Up).

7
4. Upon starting up the battery, you should be able to see the settings on your monitoring
software or inverter. If you have any issues, please review our Youtube video regarding
battery communications or contact Technical Support.
Battery Storage and Maintenance
How do you properly store your battery?
If you plan to store your batteries, there are a few steps you can take to ensure that they are
stored safely and in a state that will ensure they are not damaged while storing them. These
include a few factors as detailed below.
Battery State
The state of the battery when placed into storage will affect how long it can be stored for as well
as the condition when you begin using it again. Signature Solar recommends that each battery
is brought to a SOC (state of charge) of 100% prior to placing it in storage. LiFePo Batteries will
lose a certain percentage of their total charge while in storage, depending on how long they are
stored and the conditions they are stored in. Our recommendation is to ensure they are fully
charged to allow them to be stored as safely and for as long as possible.
Environmental Factors
The environment you store your EG4 battery in can greatly affect the health of the battery. The
temperature should remain temperate. Exact temperature specifications can be located at the
end of the manual. We also suggest keeping the battery away from locations where it may get
wet, or locations with extremely high humidity.
What steps should you take to maintain a healthy battery?
EG4 batteries are an advanced lithium iron phosphate battery. This means that in reality, they
require very little maintenance. If used correctly by following this manual, we have designed
these to be ‘set it and forget it’ for most of their lifespan. We do recommend connecting to the
batteries periodically using the monitoring software to ensure there aren’t any irregularities, and
if you are placing the batteries in series without a bus-bar, to ensure you fully charge your
batteries periodically. Beyond that, after initial set up you shouldn’t need to do much with your
batteries at all.
Frequently Asked Questions and Troubleshooting
Battery End Of Life
How should you properly recycle or dispose of your batteries?
The EG4 battery is designed to last for 15+ years when used correctly. We have worked
tirelessly to ensure that our batteries will maintain a charge after thousands of cycles, and

8
typically the battery will outlast most enclosures. However, when it does come time to retire your
battery, there are a few things you must consider.
LiFePo batteries are considered a hazardous material and should not be disposed of by simply
placing them in the trash. There are a number of online websites and organizations that will
accept your battery to recycle at little to no cost to you. At Signature Solar, we understand that
we are working with customers across the United States and the world. Our best
recommendation is to visit your favorite search engine, and search the term “Lithium Battery
Disposal Near Me”. You will likely get an assortment of organizations that can safely dispose of
your battery. We highly recommend calling ahead of time to ensure that the location is still open
and accepting materials.
If, however, you are unable to locate a disposal location safely, we are here to help. Before
dumping your battery or disposing of it incorrectly, please contact our customer service team for
further assistance.
EG4 Warranty
Your warranty must be registered within the first year of purchase to remain valid. If you choose
not to register your warranty, your warranty may be invalidated. This limited warranty is to the
original purchaser of the product and not transferable to any other person or entity. All BMS and
Cell Exchanges are covered throughout the warranty period. If a full replacement warranty is
needed the warranty is prorated 1/9th per year after the first year at the current retail pricing.
Warranty Exclusions - Signature Solar has no obligation under this limited warranty for product
subjected to the following conditions (including but not limited to):
● Damages incurred during installation or removal
● Damages caused during mishandling of product
● Inappropriate Environmental Exposure
● Damages caused by improper maintenance
● Tampering, Altering, and/or Disassembly of product
● Using product in applications other than which it was intended for by manufacturer
● Lightening, Fire, Flood, or Acts of God
● Any product whose serial number has been altered, defaced, or removed
The equipment sold by Signature Solar is designed by the manufacturer to be installed only by
licensed, trained, and insured solar electrical installation professionals. We strongly advise the
customer to seek the assistance of such a professional to exclusively perform the
implementation of any of these products, and we make no warranty of the purchaser’s safety,
success of equipment implementation, or compliance with local codes and regulations.
Signature Solar disclaims all warranties, expressed or implied, including but not limited to, any
implied warranty with respect to the accuracy or completeness of the information they
disseminate and /or fitness of the materials sold for a particular purpose.Some of the USED or

9
grade B titled equipment sold may not include a manufacturer’s warranty. No warranty may be
created or extended by sales or promotional materials on these items. Each party hereby
irrevocably waives its rights to trial by jury in any Action or proceeding arising out of this
agreement or the transactions relating to its subject matter. All installation advice provided by
Signature Solar before, during, or after purchase of solar equipment is purely for the purpose of
general concept education and must not replace the expertise of a licensed and trained solar
specialist. The Customer agrees to full indemnification for Signature Solar henceforth from any
legal recourse relating to and arising out of the installation of the products purchased by the
customer.
Diagrams
10
Battery
Specifications
Battery
Parameters

11
Battery Module Performance Curve
Table of contents


