SIGURO SGR-MP-X600S User manual
SGR-MP-X600S
Multifunction Pressure Cooker
Multifunction Pressure Cooker
Multifunktionaler Schnellkochtopf
Multifunkční tlakový hrnec
Multifunkčný tlakový hrniec
Multifunkciós kukta
Autocuiseur multifonctionnel
Pentola a pressione multifunzione
Aparat de gătit multifuncțional
sub presiune
EN Translation of the operating instructions from the original language.
DE Übersetzung der Bedienungsanleitung aus der Originalsprache.
CZ Návodkpoužitívoriginálnímjazyce.
SK Prekladnávodunapoužitiezoriginálnehojazyka.
HU Ahasználatiutasításfordításaeredetinyelvről.
FR Traduction du mode d‘emploi à partir de la langue d‘origine.
IT Traduzione delle istruzioni per l‘uso dalla lingua originale.
RO Traducereainstrucțiunilordeutilizaredinlimbaoriginală.

ENGLISH 4
Safety information 4
Use 11
Cleaning and maintenance 17
Troubleshooting 17
DEUTSCH 19
Sicherheitshinweise 19
Verwendung 27
Reinigung und wartung 33
Problemlösung 34
ČESKY 36
Bezpečnostní informace 36
Použití 43
Čištění a údržba 49
Řešení problémů 49
SLOVENSKY 51
Bezpečnostné informácie 51
Použitie 57
Čistenie a údržba 63
Riešenie problémov 64
MAGYAR 65
Biztonsági információk 65
Használat 71
Tisztítás és karbantartás 77
Problémamegoldás 78
FRANÇAIS 79
Informations relatives à la sécurité 79
Utilisation 87
Nettoyage et entretien 93
Problèmes et solutions 94
ITALIANO 95
Informazioni di sicurezza 95
Uso 103
Pulizia e manutenzione 109
Risoluzione dei problemi 110
ROMÂNĂ 111
Informații privind siguranța 111
Utilizare 118
Curățare și întreținere 124
Depanare 125
12
3
4
5
7
6
8

EN
EN - 4 EN - 5
Thank you for purchasing a SIGURO appliance. We are grateful for
your trust and are pleased to introduce the device to you on the
following pages and introduce you to all its functions and uses.
We believe in a fair and responsible company, and therefore we only work
with suppliers who meet our strict criteria of protecting the interests of their
employees, preventing their abuse and providing fair working conditions.
If you need help with extensive maintenance or repair of the product, which
requires intervention in its internal parts, our authorized service is available
at the email address siguro@alza.cz or operators at the seller's info line. For
your convenience in solving any problems with the product, we have unied
these contact points and the above contacts can be used in the event of any
complaints or post-warranty service.
SAFETY INFORMATION
Please read this manual carefully before use and
keep it for future reference.
1. This appliance is not intended for use by children. Keep
the appliance and its power cord out of the reach of
children.
2. This appliance is intended for use by persons with
reduced physical, sensory or mental capabilities, or
lack of experience and knowledge, provided they have
been given supervision or instruction concerning use
of the appliance in a safe manner and understand the
potential hazards.
3. Children must not play with the device.
4. Cleaning and user maintenance shall not be done by
children.
5. If the power cord is damaged, it must be replaced
by the manufacturer, its service agent or similarly
qualied persons in order to avoid a dangerous
situation.
6. Do not immerse the appliance, power cord or plug in
water or other liquids.
7. Wash the inner pot in warm water with a little kitchen
detergent. Rinse and wipe dry.
ENGLISH

EN
EN - 4 EN - 5
ENGLISH
8. This appliance is intended for domestic and indoor
use. This appliance is not suitable for outdoor use.
9. Check the power cord regularly for signs of damage
and the appliance must not be used if it is damaged.
10. This appliance is not intended for operation via an
external timer or remote control.
11. This appliance is intended for use in the home and
similar spaces, such as:
‐ kitchenettes in shops, ofces and other workplaces;
‐ appliances used in agriculture;
‐appliances used by guests in hotels, motels and
other residential environments;
‐appliances used in bed and breakfast
establishments.
12. Place the appliance in a stable position with the
handles positioned to prevent hot liquids from spilling.
13. Lines in the pressure regulator that allow steam to
escape should be checked regularly to ensure that
they are not blocked.
14. Follow the instructions in this manual to open the
cooker safely.
15. The cooker must not be opened until the pressure has
been sufciently reduced.
16. WARNING: Do not pour water on the plug.
17. WARNING: There is a risk of injury if used incorrectly.
18. The surface of the heating element contains residual
heat after use.
19. Before connecting the plug to the electrical outlet, make sure that the
voltage indicated on the type plate of the appliance corresponds to the
voltage in your power outlet.
20. Plug the power cord into a properly grounded electrical outlet. We
recommend connecting the appliance to a separate electrical circuit. Do
not use extension cables.
21. Place the appliance on a at, dry, rm and heat-resistant surface. Do not
place the appliance near re or other heat sources. Place the appliance
away from heat - sensitive surfaces or objects.
22. Do not let the power cord hang over the edge of the counter or table. Do
not let the power cord touch the electric or gas plate or any hot surface.
23. Use the appliance only with the supplied accessories. The use of

EN
EN - 6 EN - 7
accessories that are not intended for this appliance or are not specied
by the manufacturer as suitable may cause a dangerous situation.
24. Always make sure that the appliance is properly assembled before
connecting it to the power supply.
25. Do not touch the appliance or the power supply with wet or damp hands.
26. Clean the appliance after each use. Always allow the appliance to cool
completely before cleaning it.
27. Always switch off the appliance and unplug the power cord from the
mains when you are not using the appliance, if you leave it unattended,
before cleaning, moving, folding or unfolding it.
28. Do not cover the appliance while it is in operation.
29. Do not leave the appliance unattended while it is in operation.
30. Always disconnect the power cord by grasping the plug, not by pulling
on the power cord.
31. Do not use the appliance if there are any signs of damage, the inner
pot or seal is damaged, the power cord or plug is damaged. Contact an
authorized service center if the appliance needs to be repaired, adjusted
or serviced that cannot be performed by the user.
32. Do not use the appliance in conditions other than those for which it was
designed.
33. This appliance is intended for food preparation. Do not use it for purposes
other than those for which it is intended.
34. This appliance is not intended for sterilizing containers.
35. Do not use this appliance empty, without the inner pot or without liquid
in the pot.
36. Always observe the minimum and maximum lines when lling the
inner pot. Never ll the inner pot above the maximum line. Follow the
instructions in this manual.
37. This appliance cooks food under pressure. There is a risk of burns or
scalding if used incorrectly.
38. The appliance heats up when in use. Do not touch the lid or external
walls. There is a risk of burns.
39. Make sure that the safety valve and pressure valve are clean, dry and
working properly before each use.
40. Do not insert any objects into the safety or pressure valve. It is forbidden
to manipulate the valves, to touch them while the appliance is in
operation. There is a risk of serious injury.
41. Always use heat-insulated handles and grip when handling the
appliance. Do not use the lid handle to carry the appliance.
42. Do not place any objects between the lid and the rim of the appliance.
Make sure that the lid seal is tted correctly.
43. Open the lid so that the steam is directed from your face or hands. The
steam is hot and there is a risk of serious scalding if handled incorrectly.
44. Never open the lid while the appliance is in operation. Never force the lid
open. Always wait until the pressure inside the appliance drops.
45. Do not place any objects on the lid.
46. Keep your hands and face away from the appliance when releasing
steam.

EN
EN - 6 EN - 7
47. Do not heat the inner pot in an oven or other heat source. Do not use the
inner pot with another appliance. Do not use other than the supplied
inner pot with appliance.
48. Always pierce food with rind, skin or membrane before cooking. Such
foods may swell during cooking. If this happens, never pierce them
immediately after cooking.
49. Gently shake the appliance before opening the lid if you are cooking food
of a denser consistency (e.g. legumes) to relieve the pressure in the food.
50. If steam accumulates signicantly at the rim of the lid, immediately
disconnect the plug from the power supply and wait for the pressure
inside the pot to drop before opening the lid.
How to close and open the lid
Turn the handle to the left towards "Close" to close the lid (see gure "Close lid dia-
gram"). Turn the handle to the right to "Open" to open the lid (see gure "Open lid
diagram"). If the pressure inside the pot is higher than the pressure in the room, the
pressure in the pot must be released before opening the lid by opening the pressure
valve. The lid will remain closed automatically and it will not be possible to open it until
the pressure is completely equalized.
Safety instructions
DO NOT CARRY the pot by the lid handle. Use the pot handles to carry the pot.
DO NOT PUT your hands or face near the pressure valve, especially if steam is escaping.
DO NOT FORCE the lid open until the lid is automatically released when the pressure
is fully equalized.

EN
EN - 8 EN - 9

EN
EN - 8 EN - 9
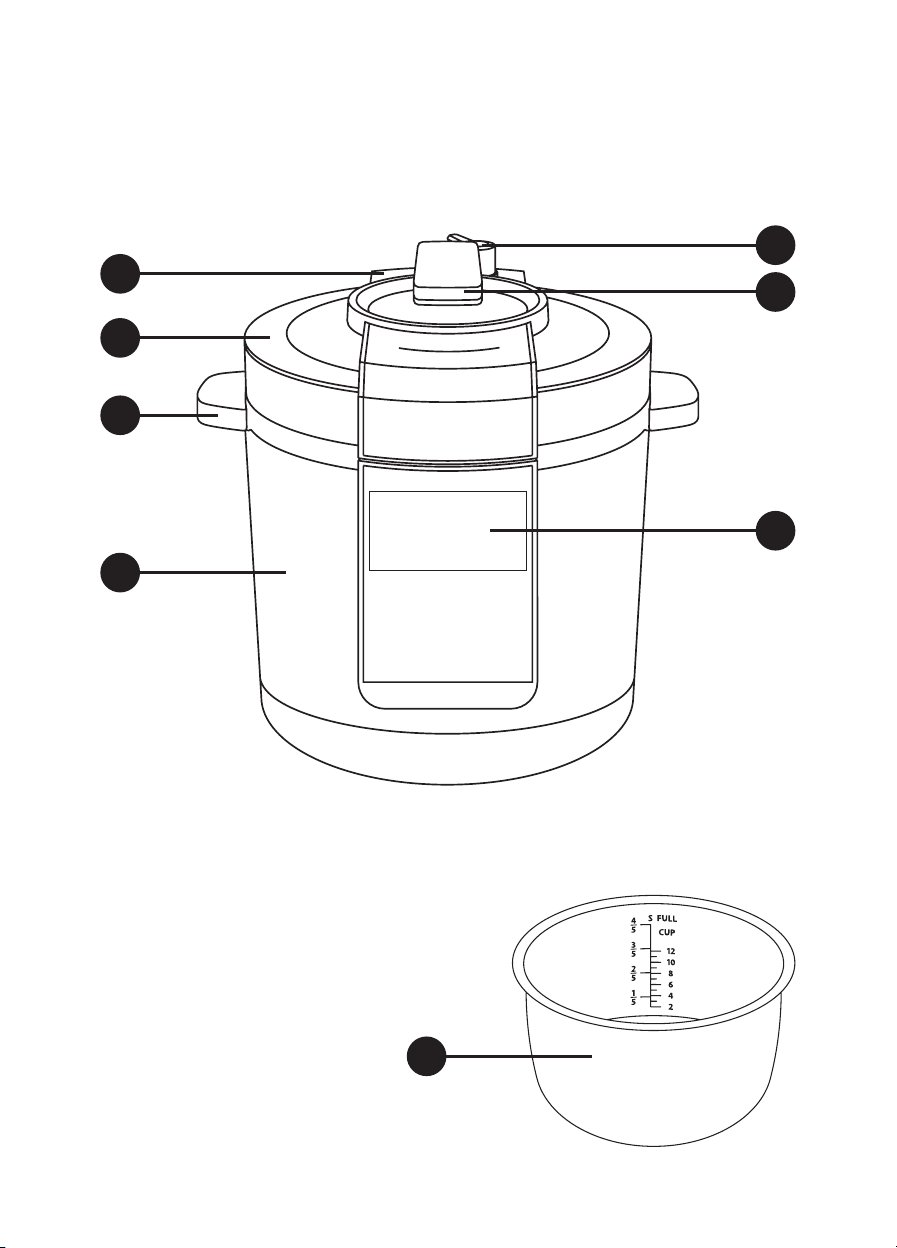
The body of the appliance
1 Safety valve
2 Lid handle
3 Lid
4 Pressure cooker handles (located on both sides)
5 Pressure cooker body
6 Pressure valve
7 Control panel with display
8 Inner pot
9 Removable power cord (not shown)
10 Rice spoon (included, not shown)
11 Measuring cup (included, not shown)
Overview of the buttons on the control panel
WARM/CANCEL
Used to start heating
(WARM); to cancel cooking
or setting (CANCEL)
/
+/- buttons
Used to set the tempera-
ture, cooking time, delayed
start time, etc.
PRODUCT SELECTION
used to select the type of
food being cooked: MEAT
(meat) – FISH (sh) – VEGE-
TABLES (vegetables)
START
Used to start the cooking
process
DELAYED START
Used to set the delayed
start function
TIME/TEMPERATURE
Used to set the tempera-
ture and cooking time
MENU
Used to select cooking
programs
CHEF
Used to adjust the preset
cooking time
Overview of icons and symbols on the display
Buttons mute sound icon
SOUP cooking program:
suitable for making soups;
option to choose the type
of cooked food: MEAT
(meat) – FISH (sh) – VEGE-
TABLES (vegetables)
The HEAT icon indicates
heating to operating tem-
perature
RICE cooking program:
suitable for cooking rice or
legumes
3

EN
EN - 10 EN - 11
The COOKING icon indi-
cates cooking in the pot
MILK PORRIDGE cooking
program: suitable for cook-
ing milk porridge
The WARM icon indicates
that the food is kept warm
after cooking
STEW cooking program:
suitable for preparing
stews; option to choose
the type of prepared food:
MEAT (meat) – FISH (sh) –
VEGETABLES (vegetables)
The MEAT icon indicates
the food type "meat"; avail-
able for SOUP and STEW
cooking programs
RISOTTO cooking program:
suitable for preparing
risotto
The FISH icon indicates the
food type "sh"; available
for SOUP, STEAM and
STEW cooking programs
STEAM cooking program:
suitable for steaming food;
option to choose the type
of prepared food: FISH
(sh) – VEGETABLES (veg-
etables)
The VEGETABLES icon
indicates the food type
"vegetables"; available for
SOUP, STEAM and STEW
cooking programs
NOODLES cooking pro-
gram: suitable for cooking
noodles or pasta
MULTICOOK cooking pro-
gram
OMELET cooking program:
suitable for making egg
omelettes
FRYING cooking program:
suitable for frying Delayed start icon
CAKE cooking program:
suitable for making cakes
Temperature setting pro-
gram
Cooking program SLOW-
STEW: suitable for slow
cooking
Numeric display
JAM cooking program:
suitable for preparations of
jams and marmalades
YOGHURT cooking pro-
gram: suitable for making
yogurt
EN
EN - 10 EN - 11
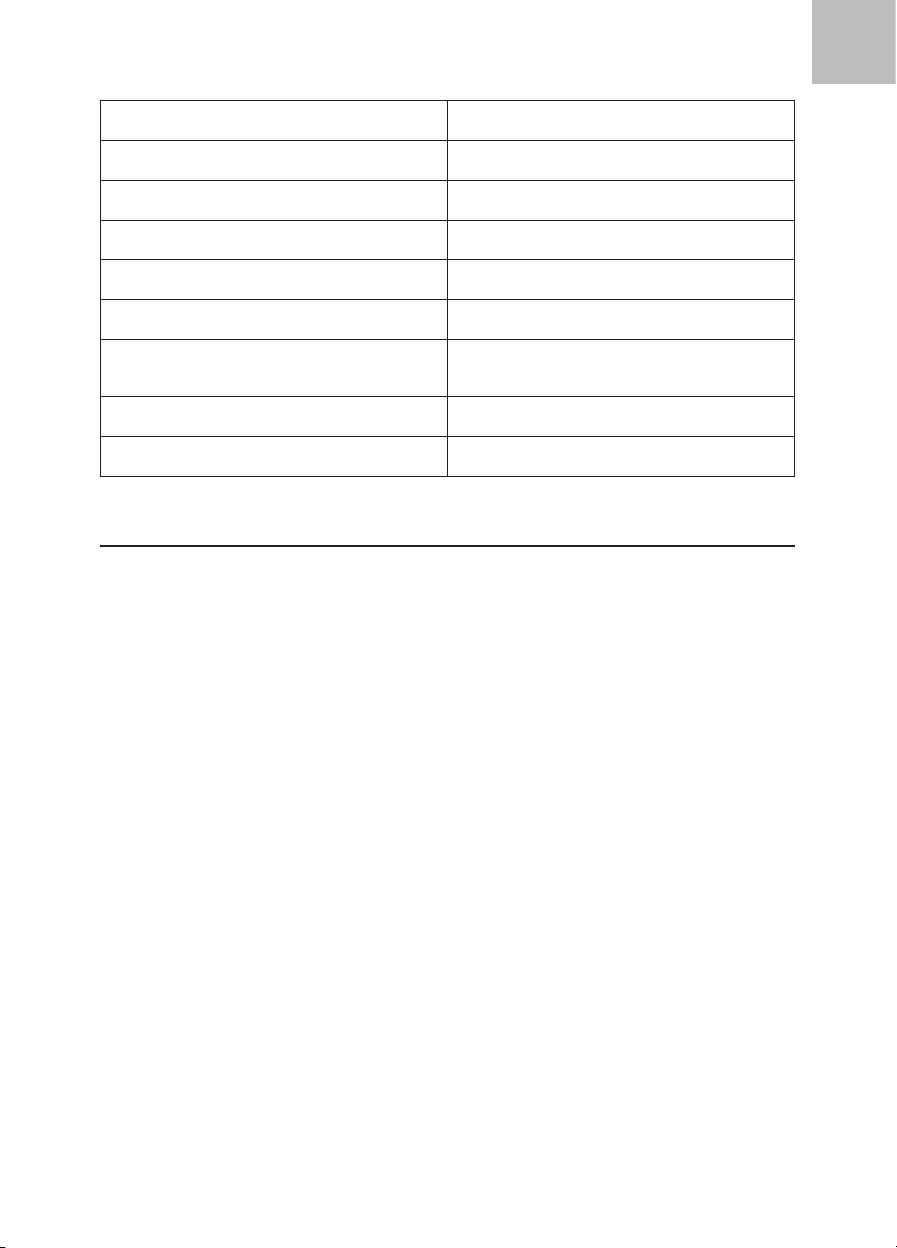
Power 220–240 V~, 50/60 Hz
Power consumption 1,000 W
Maximum volume 6 l
Operating pressure 0–70 kPa
Maximum pressure 90 kPa
Allowable pressure 1.05 bar
Temperature of the keep warm
function
60–80 °C
Dimensions 32 × 33.5 × 33.5 cm
Weight 5.2 kg
USE
Before rst use
Remove the appliance and its accessories from the packaging. Before disposing of the
packaging, be sure to remove all components. Check the appliance and accessories for
damage.
Wipe the outside of the appliance, the inside of the appliance and the lid with a soft
sponge slightly moistened with warm water. Wipe dry with a clean cloth.
Wash the inner pot in warm water with a little kitchen detergent. Rinse and wipe dry.
Make sure that all parts of the appliance are dry before use.
Opening and closing the lid
1. To open the lid, turn the lid handle counterclockwise to the open lock symbol. Then
carefully lift the lid.
2. Before tting in the lid, make sure that the lid handle points to the open lock
symbol. Place the lid on the pot so that the holes and cutouts on the lid and the
pot t together. Then turn the lid handle clockwise to the closed lock symbol.
Using the pot
1. Place the pot on a dry, level and rm surface at a sufcient distance from the
mains socket.
2. Open the lid and remove the inner pot.
3. Put the ingredients you want to cook in the pot. When lling the container, the
level of the liquid with food must not exceed the level 4/5, which represents the
maximum possible level and is marked on the inner wall of the pot. If you are
preparing foods that gain in volume during cooking, the level of the liquid with
food must not exceed 3/5. When lling the pot, also observe the minimum line, 1/5.
EN
EN - 12 EN - 13
Warning:
Always follow the maximum and minimum food with liquid levels. Failure
to do so may result in damage to the appliance, property damage or
serious injury.
4. Wipe the bottom of the container with a dry cloth to remove water or dirt and
place the lled inner pot in the outer pot.
5. Insert and lock the lid Make sure that the lid is properly closed.
6. Check that the valves - safety and pressure, are clean and fully functional. The
safety valve should move freely. Turn the pressure valve to position if you will
be using the cooker in pressure cooker mode or turn it to position if you select
a program that does not require cooking in the pressure cooker mode – see the
program table below.
7. Insert the power plug into the socket on the back of the cooker and plug the plug
into the mains socket.
8. Select the required cooking program and start the cooking process by pressing
the START button.
9. Icons and information about the ongoing preparation will appear on the display
one after the other. The lid HEAT icon means that the water is heating up and
building up pressure inside the pressure cooker. The lit COOKING icon means that
the pressure inside the pot has reached operating value and the cooking process
starts. A lit WARM icon means that the cooking process has ended and the cooker
switched to keep food warm mode.
10. If you want the cancel the cooking, press the WARM/CANCEL button.
11. Once the cooking is nished, turn the pressure valve to position and release the
steam from the cooker. As the steam is released from the pot, the pressure in it
will drop. As soon as the pressure drops sufciently, the safety valve drops, which
means that the lid can be opened safely.
Warning:
Keep your hands and face away from the appliance when releasing
steam.
12. Remove the plug from the mains socket and the plug from the socket at the back
of the pot.
13. Open the lid and remove the pot. We recommend using kitchen gloves when
handling the hot pot. Place the hot pot on a heat-resistant surface at a sufcient
distance from heat and steam sensitive materials.
Warning:
Be careful not to get scalded by the accumulated steam when opening
the lid. Not all steam in the pot is removed during steam release.
14. Allow the container and pot to cool down and clean them according to the
instructions in the "Cleaning and maintenance" section.
Temperature and cooking time settings
1. Press briey the TIME/TEMPERATURE button and the icon t°C lights up on the
display.
2. Use the +/- buttons to set the desired temperature. You can set the temperature
from 30 ° C to 160 ° C. The temperature can only be adjusted in the MULTICOOK
program.

EN
EN - 12 EN - 13
3. Press briey again the TIME/TEMPERATURE button to set the cooking time.
4. Use the +/- buttons to set the desired cooking time. You can set it from 1 to 24
hours.
5. Press the START button to begin the cooking process.
Cooking programs menu
1. Use the MENU button to select a cooking program.
2. Press repeatedly the MENU button to select a cooking program. Each program has
a preset cooking time and additional functions - more in the table below.
3. In addition, for the SOUP, MILK PORRIDGE, STEW, STEAM, RICE, OMELET and
NOODLES programs you can select the type of food – MEAT (meat), FISH (sh),
VEGETABLES (vegetables). Select the type of food by repeatedly pressing the
PRODUCT SELECTION button.
4. If you need to adjust the preset cooking time, press the CHEF button.
5. Press START to start the cooking process.

EN
EN - 14 EN - 15
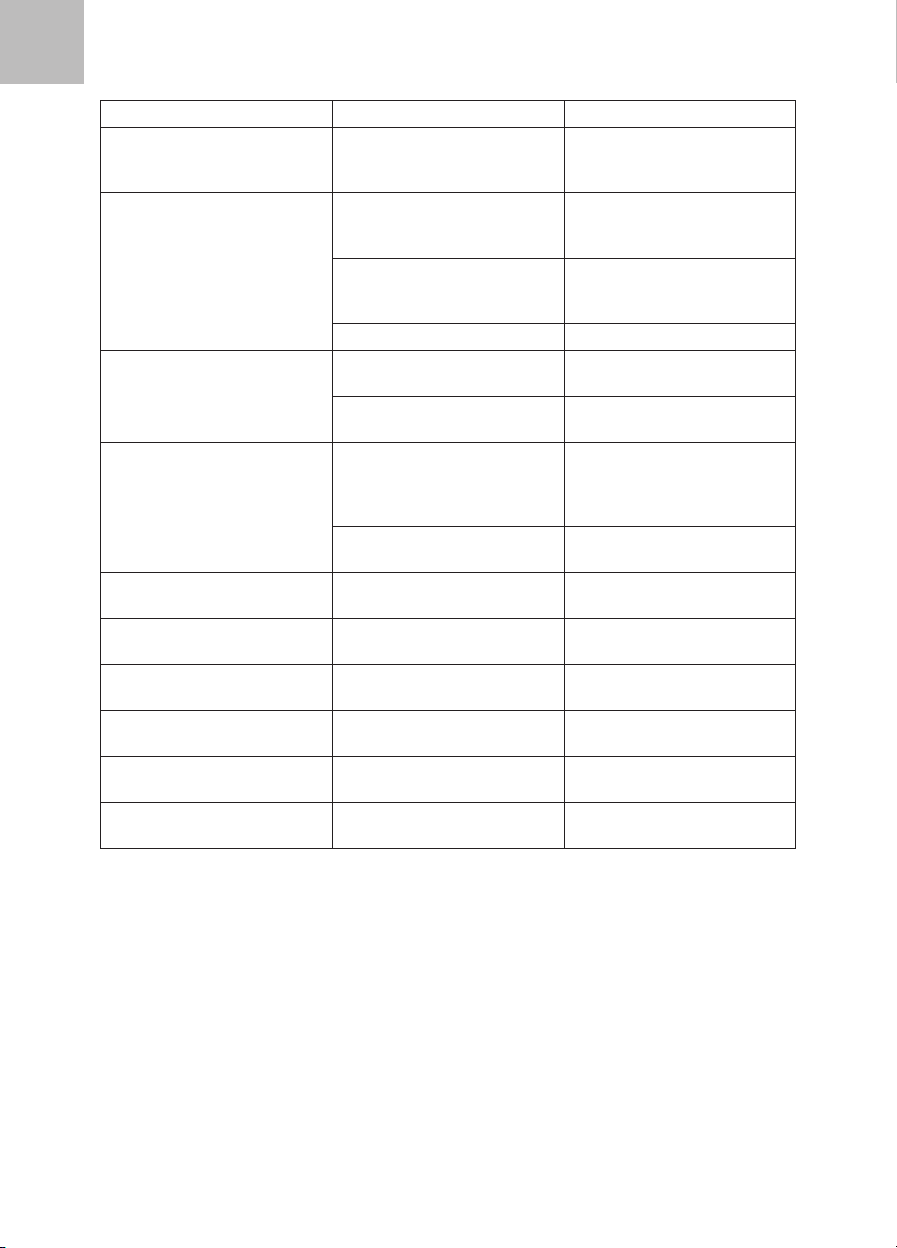
Cooking programs table
Coking program Default
cooking
time
Adjust-
ment of
cooking
time
Default
tempera-
ture
Temper-
ature ad-
justment
Icon Cook-
ing in
pressure
cooker
Delayed
start
Keeping
warm
Lid position
MULTICOOK 10 min 10 min-
utes to 12
hours
30 °C 30 °C to
160 °C
MULTI-
COOK
icon
No Yes No Yes Yes Yes
SLOWSTEW (slow
cooking)
2 hours 1 to 12
hours
95 °C -- SLOW-
STEW icon
No Yes Yes Yes No No
FRYING (frying) 10 min 1 to 60
minutes
160 °C -- FRY icon No No No No No Yes
JAM (jam) 30 min 1 to 60
minutes
100 °C -- JAM icon No Yes No No Yes No
CAKE (cake) 25 min 1 to 3
hours
140 °C -- CAKE icon No No No Yes No No
YOGHURT (yoghurt) 1 hours 1 to 12
hours
40 °C -- YOGHURT
icon
No No No Yes No No
SOUP
(soup)
MEAT 45 min 1 to 3
hours
155 °C -- SOUP,
MEAT
icons
Yes Yes Yes Yes No No
FISH 30 min SOUP,
FISH icons
VEGETA-
BLES
25 min SOUP,
VEGE-
TABLES
icons
MILK PORRIDGE (milk
porridge)
5 min 1 to 60
minutes
155 °C -- MILK
POR-
RIDGE
icon
Yes Yes Yes Yes No No

EN
EN - 14 EN - 15
Coking program Default
cooking
time
Adjust-
ment of
cooking
time
Default
tempera-
ture
Temper-
ature ad-
justment
Icon Cook-
ing in
pressure
cooker
Delayed
start
Keeping
warm
Lid position
STEW
(stew)
MEAT 30 min 1 to 3
hours
155 °C -- STEW,
MEAT
icons
Yes Yes Yes Yes No No
FISH 20 min STEW,
FISH icons
VEGETA-
BLES
15 min STEW,
VEGE-
TABLES
icons
STEAM
(steam)
FISH 10 min 1 to 3
hours
155 °C -- STEAM,
FISH icons
Yes Yes Yes Yes No No
VEGETA-
BLES
5 min STEAM,
VEGE-
TABLES
icons
RICE (rice) 15 min 1 to 60
minutes
155 °C -- RICE icon Yes Yes Yes Yes No No
OMELET (omelette) 20 min 1 to 60
minutes
155 °C -- OMELET
icon
Yes Yes Yes Yes No Yes
RISOTTO (risotto) 30 min 1 to 60
minutes
155 °C -- TAHDIG
icon
Yes Yes Yes Yes No No
NOODLES (noodles) 5 min 1 to 60
minutes
155 °C -- NOODLES
icon
Yes Yes Yes Yes No No

EN
EN - 16 EN - 17
Food type selection
Press repeatedly the PRODUCT SELECTION button to select the type of food for cook-
ing. MEAT (meat) – FISH (sh) – VEGETABLES (vegetables). Each time you press the
corresponding icon lights up on the display.
Food type selection is only available for cooking programs: SOUP (soup), STEAM
(steam) or STEW (stewed food).
Adjust the preset cooking time
If you need to change the preset cooking time of the selected cooking program, press
the CHEF button after the selected program and then use the +/- buttons to set the
desired cooking time.
You can only adjust the cooking time for cooking programs in the pressure cooker.
Delayed start
The delayed start function allows you to start the pressure cooker at a time you set.
1. Prepare the ingredients, put them in the pot and select the cooking program, or
adjust the cooking time.
2. Briey press the START DELAY button and use the +/- buttons to set the time after
which the pot will start automatically. You can set a delayed start time from 1 to 24
hours.
3. Press the START button and the countdown of the set time will start.
4. Once the set time has elapsed, the pot will turn on automatically.
Note:
Do not set a long delayed start time for perishable foods, such as eggs,
dairy products, fresh meat, sh, etc. There is a risk of spoiling the food
being cooked and possibly food poisoning.
WARM/CANCEL button
While the pot is in the standby mode, press the WARM/CANCEL button to start heat-
ing up.
If you press the WARM/CANCEL button while the cooker is in operation or your are
setting functions, the cooking or actions you performed are cancelled and the cooker
switches to standby mode.
Child lock
Child Lock allows you to lock all the buttons on the control panel to prevent accidental
setting changes.
Press and hold the CHEF button for about 3 seconds, until the numerical display shows
"LOC" (locked).
To cancel the Child lock press and hold the CHEF button for about 3 seconds and the
control panel buttons will function again.
Mute the buttons
Each press of the button on the control panel is accompanied by an audible signal. If
you need to cancel the button audible signal, press an hold the START DELAY button
for about 5 seconds. The icon lights up on the display.
If you need to turn on the button audible signal, press and hold the START DELAY
button for about 5 seconds and the icon on the display turns off.
EN
EN - 16 EN - 17
CLEANING AND MAINTENANCE
Before cleaning or any maintenance, always switch off the appliance, unplug the pow-
er cord from the outlet and allow it to cool down completely.
Clean the pressure cooker after each use.
Warning:
Never immerse the appliance, the power cord or the plug of the power
cord in water or any other liquid.
Do not use plastic or metal scrapers, harsh cleaners, chemicals, petrol, solvents or
other similar substances to clean any parts of the appliance. The surface nish could
be seriously damaged.
Outer surface
Wipe the outside of the appliance and the inside of the appliance with a soft sponge
slightly moistened with warm water. Wipe dry with a clean cloth.
Inner pot
Wash the inner pot in warm water with a little kitchen detergent. Rinse and wipe dry.
Lid
The lid consists of three basic parts - the outer lid, the inner lid and the seal.
Remove the inner lid and take off the silicon seal.
Wipe the inner and outer lids with a soft sponge slightly moistened with warm water.
Wipe dry with a clean cloth.
Wash the silicone seal in warm water with a little kitchen detergent. Rinse and wipe
dry.
Check the safety and pressure valve and clean them if necessary, remove food, water,
etc. Make sure that both valves are fully functional before further use.
Place the silicone seal on the inner lid, which is then inserted into the outer lid.
Warning:
Check the silicone seal regularly. If it is damaged or worn, it must be re-
placed with a new one. It is forbidden to use the appliance with a dam-
aged or worn silicone seal. Contact and authorized service centre.
Storage
Before storing, make sure that the appliance and its accessories are cool and clean.
Store the appliance and its accessories in a dry and well-ventilated place out of the
reach of children or pets.
Do not place any objects on the appliance.
TROUBLESHOOTING
Problem Cause Solution
It is difcult to close the lid. The silicone seal is inserted
incorrectly.
Install the silicone seal
correctly.
The safety valve is jammed. Push on it gently to release
it.
EN
EN - 18
Problem Cause Solution
It is difcult to open the lid. The safety valve did not
drop yet after the steam
was released.
Carefully push the safety
valve with a longer skewer
or a Chinese chopstick.
Steam or water leaks from
the lid.
The silicone seal is not
installed correctly or is
entirely missing.
Install the silicone seal
correctly.
The silicone seal is dirty
and has food residue on it.
Clean the silicone seal. It
must be cleaned after each
use.
The silicone seal is worn. Replace the silicone seal.
Steam or water leaks from
the safety valve.
The safety valve seal is
dirty.
Clean the safety valve seal.
The safety valve seal is
worn.
Replace the seal.
The safety valve does not
rise to the top position.
There is not enough food
and water inside the pot.
Make sure there is at least
a minimum amount of
ingredients and water in
the pot.
The safety valve is dam-
aged or worn.
Contact and authorized
service centre.
EO error message. The lid is not properly
closed.
Fit the lid correctly and
secure it.
Error message E1. Internal circuit damage. Contact and authorized
service centre.
Error message E2. Internal circuit damage. Contact and authorized
service centre.
Error message E3. The inner pot temperature
is too high.
Allow the inner pot to cool.
Error message E4. Low pressure switch error. Contact and authorized
service centre.
Error message E5. High pressure switch error. Contact and authorized
service centre.
If the problem is not listed in the table above or if the problem persists, switch off the
appliance, disconnect the plug from the electrical outlet and contact an authorized
service center.
DE
DE - 19 DE - 19
Wir bedanken uns für den Kauf des Gerätes der Marke SIGURO.
Wir sind dankbar für Ihr Vertrauen und freuen uns, Ihnen das
Gerät auf den folgenden Seiten vorzustellen und Sie mit all seinen
Funktionen und Verwendungszwecken vertraut zu machen.
Wir glauben an ein faires und verantwortungsvolles Unternehmen und
arbeiten daher nur mit Lieferanten zusammen, die unsere strengen Kriterien
zum Schutz der Interessen der Mitarbeiter, zur Verhinderung von Missbrauch
und fairen Arbeitsbedingungen erfüllen.
Wenn Sie Hilfe bei der umfassenden Wartung oder Reparatur des Produkts
benötigen, die einen Eingriff in die Innenteile erfordert, stehen Ihnen unser
Hotline des Verkäufers zur Verfügung. Bei der Lösung von Problemen mit
dem Produkt haben wir diese Kontaktstellen vereinheitlicht. Die oben gen-
annten Kontakte können auch bei Beschwerden oder Nachgarantieservice
genutzt werden.
SICHERHEITSHINWEISE
Lesen Sie vor der Anwendung dieses Benutzer-
handbuch durch und bewahren Sie es für den
künftigen Gebrauch auf.
1. Dieses Gerät darf nicht von Kindern bedient werden.
Bewahren Sie das Gerät und das Netzkabel außerhalb
der Reichweite von Kindern auf.
2. Dieses Gerät kann von Personen mit verminderten
physischen und mentalen Fähigkeiten oder
mangelnden Erfahrungen und Kenntnissen
verwendet werden, sofern diese beaufsichtigt sind
oder über die sichere Anwendung des Geräts belehrt
wurden und mögliche Gefahren verstehen.
3. Kinder dürfen nicht mit dem Gerät spielen.
4. Die Reinigung und Wartung durch den Benutzer darf
nicht von Kindern durchgeführt werden.
5. Wenn das Netzkabel beschädigt ist, muss es vom
Hersteller, seinem Servicetechniker oder einer ähnlich
qualizierten Person ersetzt werden, um gefährliche
Situationen zu vermeiden.
DEUTSCH

DE
DE - 20 DE - 21
6. Tauchen Sie das Gerät, das Netzkabel oder den Stecker
nicht in Wasser oder andere Flüssigkeiten.
7. Waschen Sie den Innenbehälter in warmem Wasser
mit ein wenig Geschirrspülmittel. Spülen Sie ihn ab
und wischen Sie ihn trocken.
8. Dieses Gerät ist ausschließlich für den Gebrauch im
Haushalt und innerhalb von Gebäuden vorgesehen.
Dieses Gerät ist nicht für den Gebrauch im
Außenbereich vorgesehen.
9. Überprüfen Sie das Netzkabel regelmäßig auf
Anzeichen von Beschädigungen. Ist das Kabel
beschädigt, darf das Gerät nicht verwendet werden.
10. Das Gerät ist nicht für den Betrieb über eine externe
Zeitschaltuhr oder eine Fernbedienung vorgesehen.
11. Dieses Gerät ist für den Gebrauch im Haushalt und in
ähnlichen Bereichen vorgesehen, wie z.B.:
‐Küchenzeilen in Geschäften, Büros und anderen
Arbeitsplätzen;
‐Geräte, die in der Landwirtschaft verwendet werden;
‐Geräte, die von Gästen in Hotels, Motels und anderen
Beherbergungsbetrieben verwendet werden;
‐Geräte, die in Betrieben, die Übernachtung mit
Frühstück anbieten, verwendet werden.
12. Stellen Sie das Gerät in eine stabile Position, so dass
die Griffe so positioniert sind, dass keine heißen
Flüssigkeiten verschüttet werden können.
13. Die Leitungen im Druckregler, über die der Dampf
entweicht, sollten regelmäßig überprüft werden, um
sicherzustellen, dass sie nicht blockiert sind.
14. Um den Behälter sicher zu öffnen, befolgen Sie
die in dieser Bedienungsanleitung angeführten
Anweisungen.
15. Der Behälter darf erst geöffnet werden, wenn der
Druck ausreichend reduziert ist.
16. WARNUNG: Vermeiden Sie, dass Flüssigkeiten über
das Netzkabel gegossen werden.
Other manuals for SGR-MP-X600S
1
Table of contents
Languages:
Other SIGURO Electric Pressure Cooker manuals


