Silit Sicomatic-D User manual
Before First Use
36
1. Before using your pressure cooker for the first
time, make sure to read the information on safety (see
page 39) and observe the instructions for use.
2. Remove all tags and stickers.
3. Clean out all parts thoroughly using your hands.
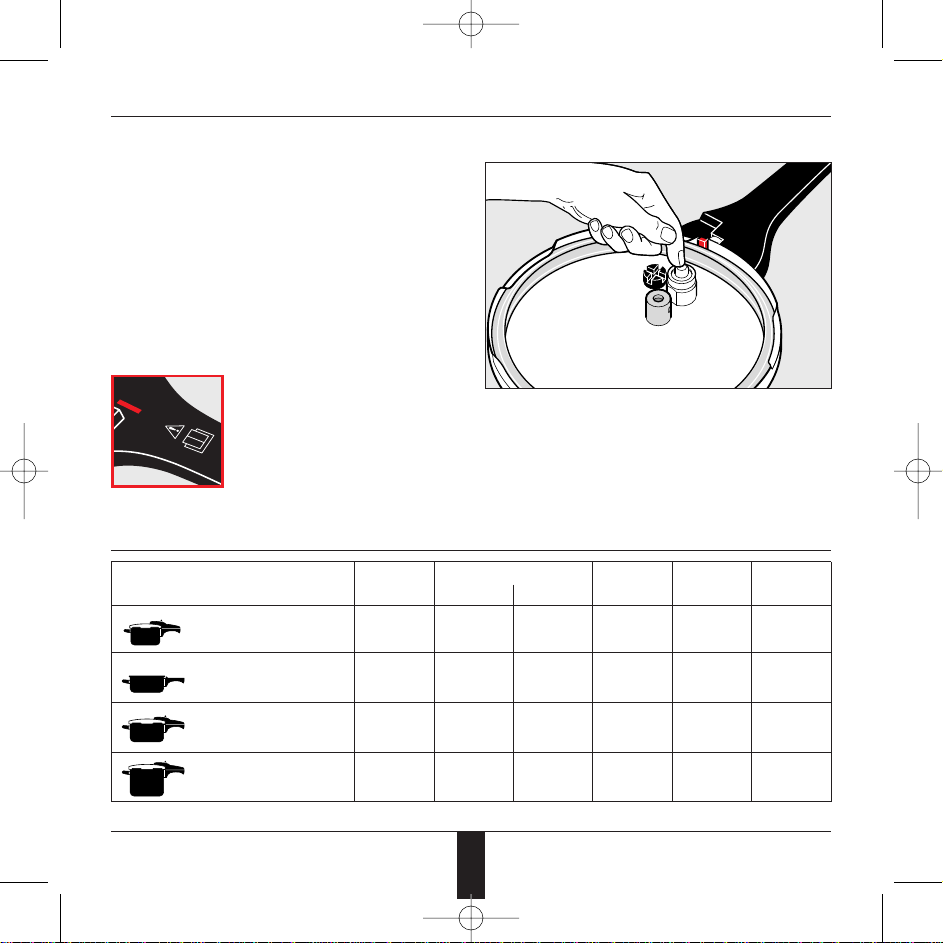
4. Check mobility of pressure indicator and red safety
bolt (see fig. on page 40) by pushing them in. Both of
them must automatically pop out again. Take care not
to damage the pressure indicator seal.
Please do not forget to read
through the instructions before
first use.
Assortment
Net volume
Volume of content ∅Silargan®SS 18/10
of Pot in liters
max. 2⁄3max. 1⁄2*cm …2400 …7022
8302
without insert 2.5 1.7 1.3 18 • •
8303 without lid
and insert 3.0 2.0 1.5 22 • •
8305
without insert set 4.5 3.0 2.3 22 • •
8307
without insert set 6.5 4.3 3.3 22 • •
* In the case of foods which increase in volume or produce large amounts of foam
02 Sico D / Inhalt (gb).QX4 09.03.2005 09:03 Uhr Seite 36

Fill in liquids (see page 39) and foodstuffs according
to the recipe instructions.
Cooking levels
Set the desired cooking level using the slider control:
1 (I) Gentle level for vegetables and fish
2 (II) Fast level for solid foodstuffs
Bring to the boil at high energy level. The Sicomatic®-D
ventilates automatically.
37
Functions at a Glance
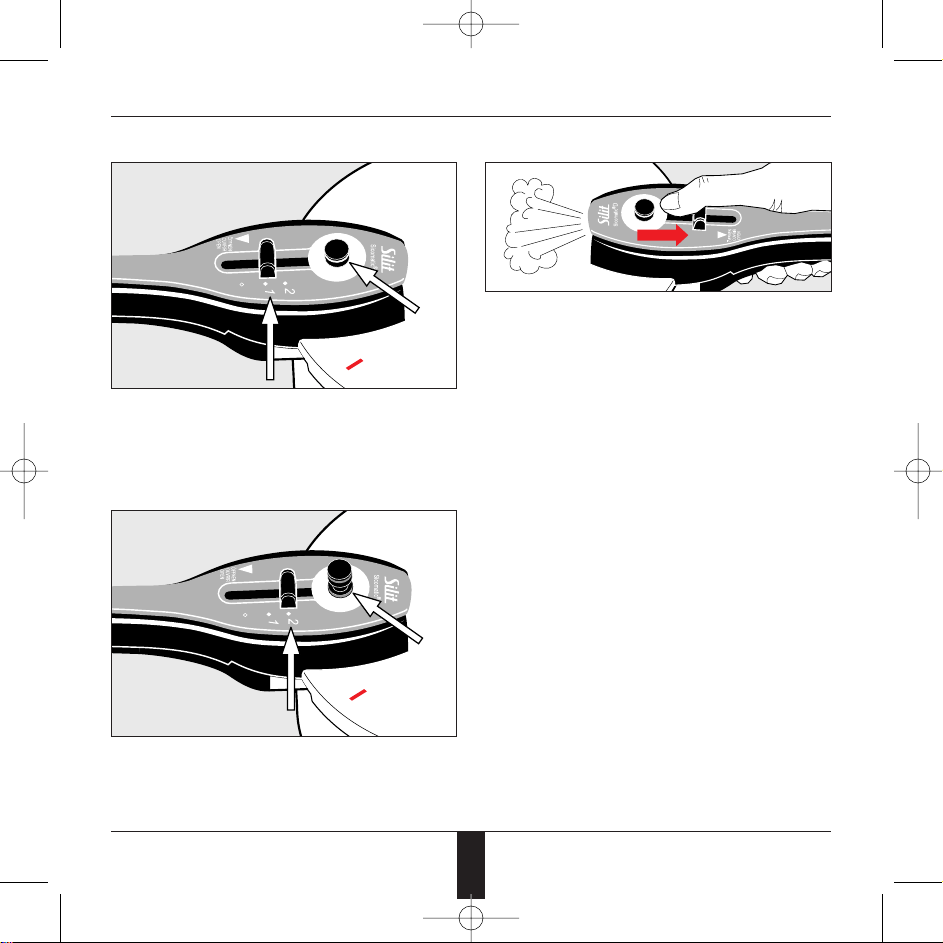
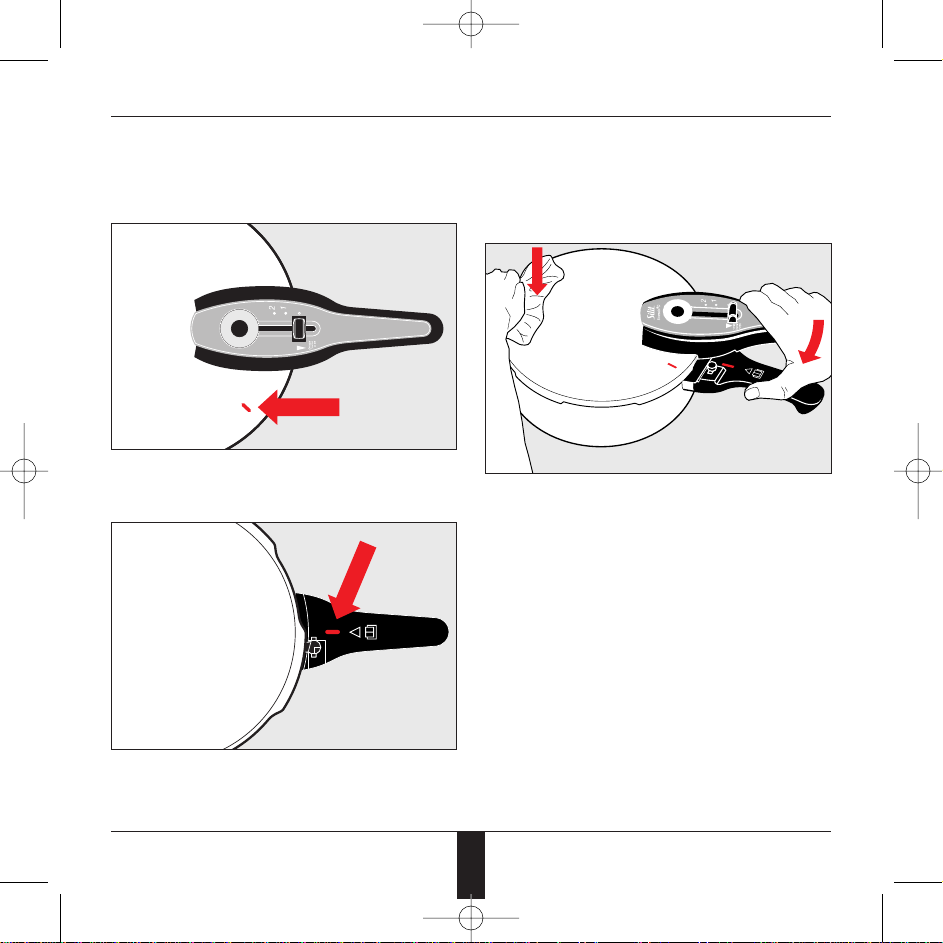
Opening Cooking
Take Sicomatic®off the cooking zone resting it on a
suitable coaster. Slowly pull back the slider control (up
to ‘open’-position) and in the case of mushy contents
briefly shake the pot. Hold the slider control in this
position pushing the lid handle to the right until the
marks on the lid (I) and on the lid handle (I) align.
Now take off the lid.
Closing
Push down the lid aligning both handles with each
other.
0 mm
02 Sico D / Inhalt (gb).QX4 09.03.2005 09:03 Uhr Seite 37
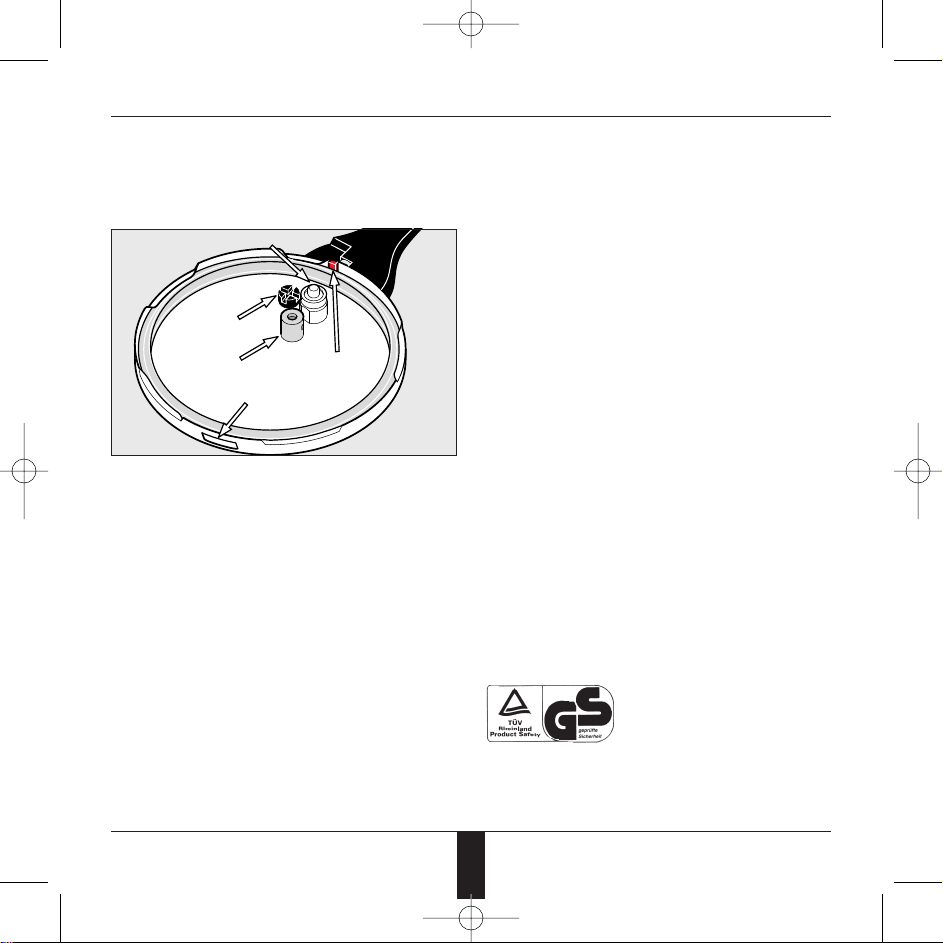
Functions at a Glance
Cooking level display Steam release/cooling down
38
After cooking and for opening always take the
Sicomatic®-D off the hob putting it in some suitable
place.
lIn the case of broth, soup and mushy dishes, wait
until pressure indicator has entirely sunk back into
lid handle.
lIn all other cases pull down slider control to 0 posi-
tion until there is no further steam release.
Make sure to read the paragraph on ‘opening’ (see
page 47).
First white ring for cooking level I
As soon as the first white ring of the cylindrical
pressure indicator zone become visible, the cooking
time starts as referred to in the recipes.
Second white ring for cooking level II
As soon as the second white ring of pressure indicator
becomes visible, the cooking time starts as referred to
in the recipes.
Please bear in mind: Never force the pot open nor
modify safety devices. Only when not under pres-
sure does the cooker open up with ease.
02 Sico D / Inhalt (gb).QX4 09.03.2005 09:03 Uhr Seite 38

For your safety
39
1. Before using your pressure cooker for the first time,
make sure to read this information carefully and rinse
lid and pot thoroughly.
2. Before each use, check mobility of red safety device, of
the pressure indicator and the lid gasket.
3. If you use the pressure cooker when children are
nearby, be particularly careful.
4. Always fill your pressure cooker with enough liquid for
the building-up of steam. Under no circumstances
whatever must the pressure cooker boil dry, as this
overheating may cause serious damage to hotplate and
pot (melting of stainless steel sandwich bottom or sticking
of the bottom).
lAlways watch carefully when bringing to the boil at hig-
hest level.
lTurn down energy supply in time.
lUse pressure cooker only on corresponding size of hot-
plate.
5. Please observe the prescribed volumes:
Minimum: 2.5 l Sicomatic®=1⁄8water
3.0 l Sicomatic®=1⁄4water
4.5 l Sicomatic®=1⁄4water
6.5 l Sicomatic®=3⁄8water
Maximum: 2⁄3of pot’s net volume: i.e. 1.7 l for 2.5 l pot;
2.0 l for 3.0 l pot; 3.0 l for 4.5 l pot;
4.3 l for 6.5 l pot.
Important: Volume of content should not exceed 1⁄2of
pot’s volume for foods which increase in
volume or produce large amount of foam
(for ex. legumes; cook them in open pot first
and then close the lid). Maximum volume of
content: 1.3 l for 2.5 l pot; 1.5 l for 3.0 l pot;
2.3 l for 4.5 l pot; 3.3.l for 6.5 l pot.
6. Do not use pressure cooker to pressure-fry foods with
oil.
7. Only use the pressure cooker for the prescribed purpo-
se. Please never put into the oven or the microwave.
8. Start cooking process only when pot is closed, handles
are exactly aligned with each other and locked.
9. Handle the pressure cooker very carefully when it is
under pressure. Do not touch hot areas, but use the
handles instead. If necessary, use hot pads.
10.Never force the pot open when under pressure. Always
adhere to the opening instructions. Do not modify the safe-
ty devices, otherwise there is danger of scalding by hot
steam. When releasing steam, always keep your hands,
face and body out of the way of the escaping steam.
11. If you have cooked meat with skin (e.g. ox-tongue)
which can swell under pressure, do not pierce it while the
skin is bulging, as you may burn yourself.
12.After cooking time is over, take the pot off the hob
resting it on a stable, heatproof coaster. Briefly shake it
before opening. Only when not under pressure, the pot will
open easily. Do open only when not under pressure.
13. Only use original Sicomatic®spare parts. This is vital
for the proper functioning and safety of your pressure coo-
ker. Do not use your Sicomatic®‚ if it or any of its parts are
damaged or not working as described in the operating
instructions. In this case please immediately contact your
Silit dealer. Do not make any changes or modifications.
Only use spare parts, lids and bottom parts which are
approved for your particular model.
14.Inside the lid gasket the printed name of Sicomatic®
must be visible. If rubber gasket and valve plug become
brownish, please replace them by original spares. Handles
with cracks or such not fitting correctly should be replaced
by new original spares.
15.Under no circumstance use deformed or damaged
pressure cooker. First have it fixed through authorised
Silit service partner.
16. At least every 10 years, the pressure cooker must be
checked by an authorized dealer.
17. Keep these instructions in a safe place.
(I)
02 Sico D / Inhalt (gb).QX4 09.03.2005 09:03 Uhr Seite 39
The five-fold safety of your Sicomatic®-D
40
The Sicomatic®-D you acquired is a technically fully deve-
loped appliance. It is the result of decades of experience
in the development and production of pressure cookers.
1. Working valve
If on the desired cooking level the foreseen pressure is
exceeded, the working valve (grey valve plug) at the top
of the lid handle opening opens up releasing excessive
steam and reducing any overpressure automatically.
2. Safety valve with automatic venting
a) Automatic venting function
The safety valve comprises two chambers (see fig. on
page 42), one beneath and one on top of the lid.
There is a metal ball in the lower chamber. When not
under pressure, this ball lies low enough to give the ven-
ting openings free and so the pot is still unsealed. While
the closed Sicomatic®-D is being heated up, superfluous
oxygen, which only spoils the flavour of the food, is auto-
matically expelled (automatic venting).
b) Function as a safety valve
If steam has built up to such an extent that due to the air-
flow the ball is pushed towards the sealing edge of the
lower chamber, the valve automatically seals. Beside the
working valve, this valve helps to increase safety. In
normal use it is not triggered off, only when the
pressure continues to rise after the working valve failed.
If the metal ball is pushed into the upper chamber (see
fig. on page 42), the safety valve opens up and the pres-
sure decreases. A new pressure build-up is possible only
after the ball has been pushed back into the lower cham-
ber. Make sure not damage valve then (see page 36).
3. Safety slot
Only in case the working and the safety valve should fail,
there is this so-called „emergency exit“ on the lid rim. As
soon as excessive pressure has built up, the lid gasket is
being pushed out in such a way that steam is released.
4. Safety bolt
If lid and cooker handles are not aligned correctly with
each other, this red safety bolt on the lid handle prevents
any pressure build-up and steam is released.
5. Residual pressure valve
As soon as the slightest amount of pressure builds up,
the residual pressure valve rises (the pressure indica-
tor becomes visible). Not until the residual pressure
valve has disappeared completely inside the handle
can the pot be unlocked and opened, preventing any
risk of inadvertently opening the pot while it is under
pressure.
Safety valve
Residual pressure valve
Working valve
Safety slot
Safety bolt
The Sicomatic®-D‚ fulfills the standards laid out by the
guidelines for pressure appliances 97/23/EG. The legally
prescribed safety regulations are surpassed in part to a
considerable degree.
02 Sico D / Inhalt (gb).QX4 09.03.2005 09:03 Uhr Seite 40

The Details of the Sicomatic®-D
41
bo
7
1
6
5
4
3
2
bn
9
bl
bm
8
1Pressure indicator
big and clearly visible. For cooking level 1 (section see
fig. of grey indicator) and cooking level 2 (section see
fig. of yellow ring).
2Slider control
extra big and handy for you to set the desired cooking
level and open the pot with ease.
3Lid handle
with slider control and pressure indicator.
4Pot handle
Lying comfortably in your hand, this practical safety
handle with flame-guard impedes accidental slipping.
5Handle mark
for the correct alignment of the lid.
6Lid mark
for the correct alignment of the lid.
7Opposite handle
with flame-guard and grip-through opening for safe
handling.
8Spring-loaded safety bolt
The red safety bolt impedes pressure build-up, in case
the handles are not correctly aligned with each other.
9Pressure indicator seal
Aroma protection.
bl Working valve (grey valve plug)
impeding overpressure.
bm Safety valve
with automatic venting.
bn Safety slot
the “emergency exit“ at the lid rim serving as an addi-
tional safety device.
bo Lid gasket
sealing lid and cooker.
bp Insert (perforated)*
for gentle cooking (special accessories, see excessive
steam, page 52)
bq Insert support*
resting insert trays (see page 52 for special accesso-
ries).
* no standard equipment
bp*
bq*
02 Sico D / Inhalt (gb).QX4 09.03.2005 09:03 Uhr Seite 41
Before You Start Cooking
42
lBefore each use, check mobility of safety devices:
- Check mobility of spring-loaded red safety bolt
at lid handle.
- Check safety valve.
lCheck unobstructed mobility of pressure indicator.
lCheck if lid gasket is in close contact with inner
lid rim.
If the lid gasket has become brownish or hard, please
replace it. (Please only use original Sicomatic®spa-
res). This will be necessary only after using the cooker
about 400 times, yet after two years at the very latest.
Disregarding these data can seriously reduce the
safety of the lid gasket.
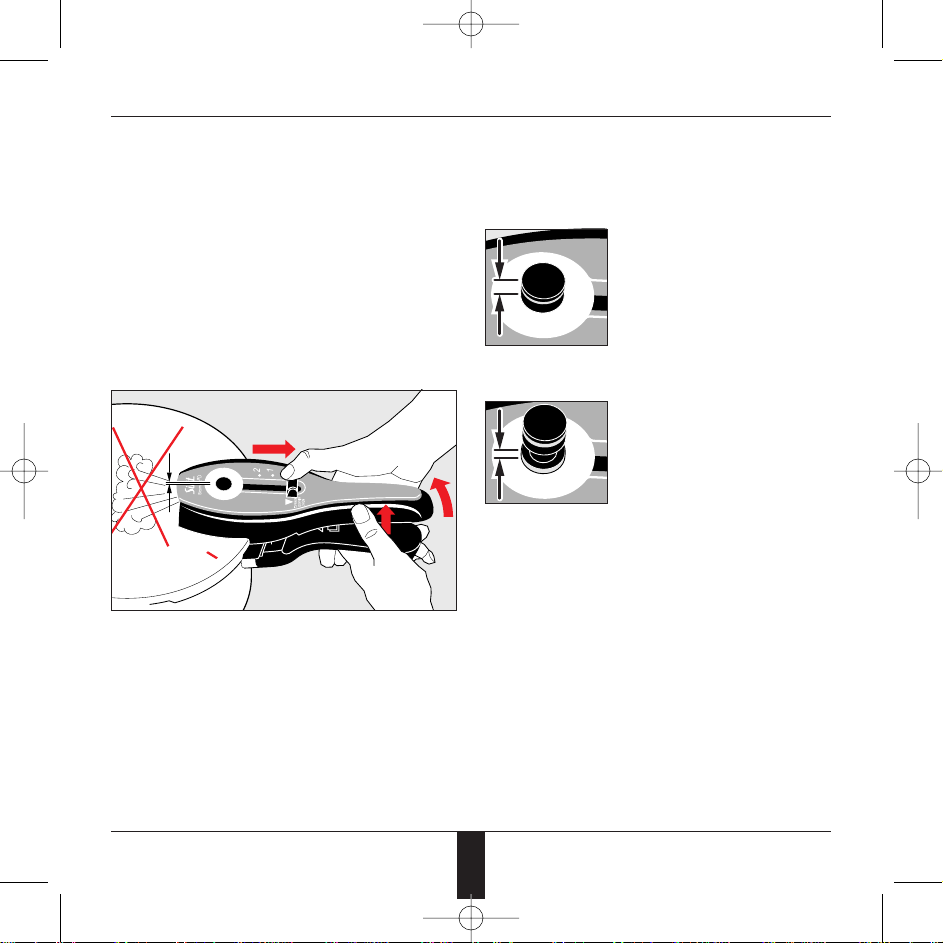
Causes/Errors
having led to the deployment of the second black
safety device must be eliminated before further use
(e.g. working valve “grey valve plug“ obstructed?)
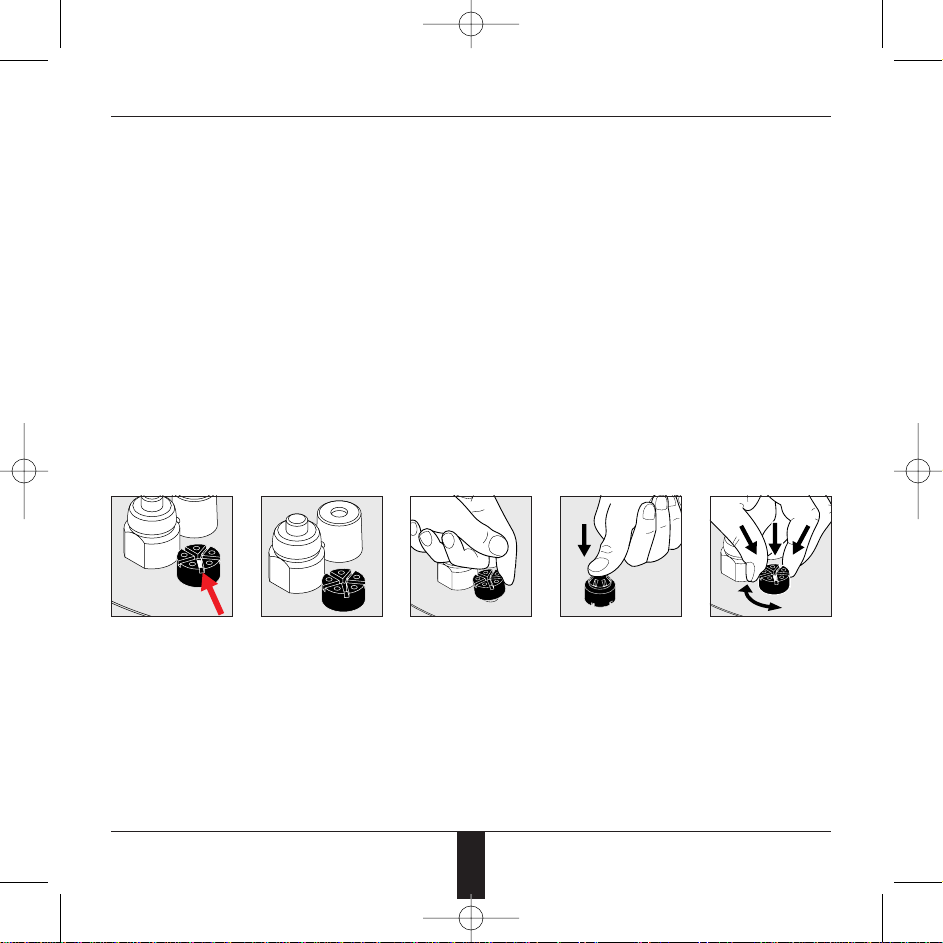
see e.g. “black safety valve“
Black safety valve is
operable, i.e. the
stainless steel ball is
well visible inside the
lower chamber.
Make black safety
valve operable. Take
elastic rubber valve
body out of valve
hole using just your
hands and rinse
under running water.
Then use your finger-
tip to push stainless
steel ball back into
lower chamber.
Stainless steel ball
must be well visible
(see fig. on the extre-
me left).
Now, squeezing and
turning it, fix slightly
humid valve body
into the respective
valve hole again.
Stainless steel ball
must continuously be
well visible. Black
safety valve is ope-
rable again.
Pot constantly not
tight. Black safety
valve actuated and
not operable. Stain-
less steel ball is only
partly visible inside
the upper chamber.
Black Safety Valve
02 Sico D / Inhalt (gb).QX4 09.03.2005 09:03 Uhr Seite 42
Closing the Sicomatic®-D
43
Before closing your pressure cooker, please wipe dry
the cooker rim and the lid gasket so that no particles
whatever may impede sealing.
Put on lid so that both marks on the lid (fig. 1) and on
the cooker handle (fig. 2) are aligned with each other
(fig. 3).
Push the lid evenly down on the side opposite the lid
handle. While pushing the lid down pull lid handle to
the left until it is exactly aligned with the cooker hand-
le and the lock audibly shuts with a clicking sound.
Please only use the lid of the Sicomatic-D (18 or
22 cm dia.) in combination with the corresponding
Sicomatic-D pot (18 or 22 cm dia.).
1
2
3
02 Sico D / Inhalt (gb).QX4 09.03.2005 09:03 Uhr Seite 43
Cooking with your Sicomatic®-D
44
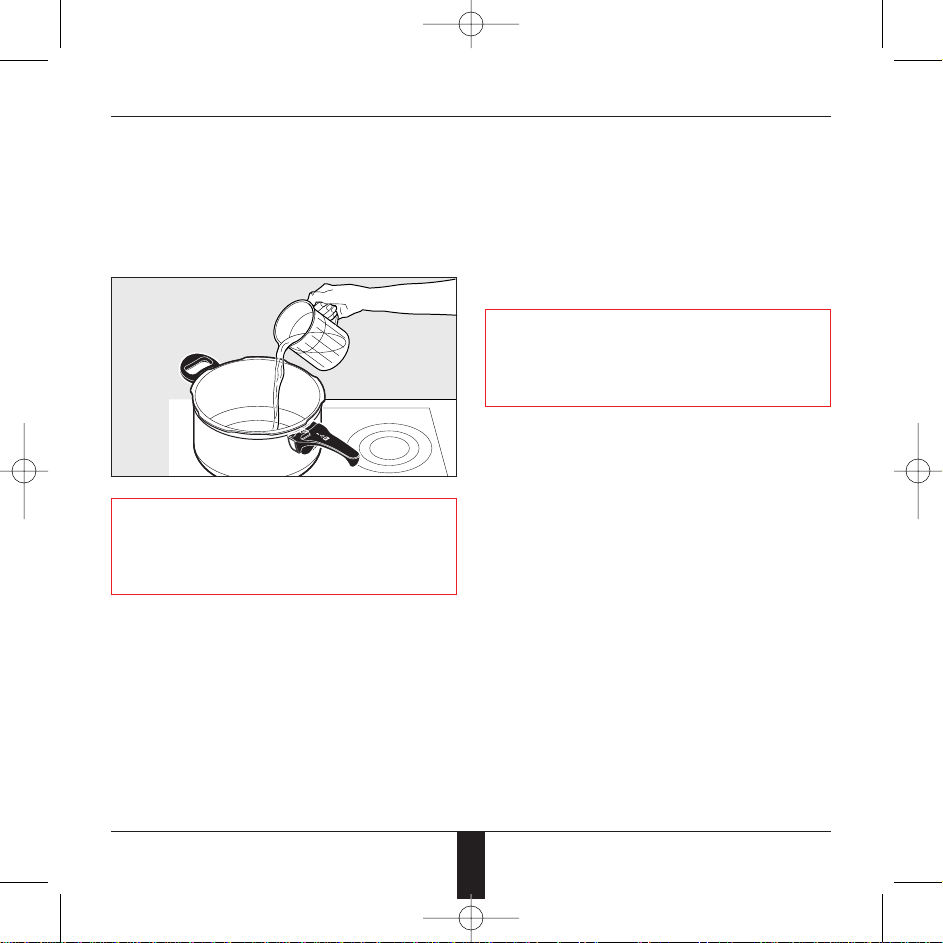
1. Filling the pressure cooker with liquid
Fill the pressure cooker with the quantity of liquid
necessary for steam build-up. (2 cups for the 4,5-l
Sicomatic®, 3 cups for the 6,5-l Sicomatic®; one cup
corresponding to about 1⁄8l). Water, meat juices, sauce,
etc. may also be regarded as liquids.
Important:
Always fill in enough liquid (water) for steam to build
up. Under no circumstances must the pressure coo-
ker boil dry, as this may seriously damage pressure
cooker and hotplate.
2. Filling in the ingredients
Fill in the ingredients either in direct contact with the
cooker bottom or use an insert.
lPlease add salt only to boiling water stirring it so that
the cooker bottom is not damaged due to the salt.
lMax. 1⁄2filling in case of swelling and frothing dis-
hes. Before closing the Sicomatic®, frothing dishes
should be brought to the boil and the foam be
skimmed off.
lMax. 2⁄3filling in all other cases.
Check if there is enough distance between the food to
be cooked and the lid, the pressure indicator and the
valve parts. This distance is indispensable any time.
3. Closing the pressure cooker
Please observe the information on page 37.
4. Bringing to the boil on suitable cooking
zone at high temperature setting
Important:
When using your pressure cooker on a gas stove, do
not allow gas flame to exceed the diameter of the
cooker bottom in order to avoid energy waste, over-
heating or damage to the cooker handles.
5. Setting of cooking level/bringing to the boil
Set cooking level I or II by pushing the slider control.
Venting is automatically being done by an automatic
venting mechanism activated depending on the air-
flow, so for bringing to the boil, there is no need for
manual venting any more. Once the airflow is strong
enough, the valve closes all by itself. Then the pressu-
re indicator begins to rise.
6. Cooking
The actual operating pressure, i.e. operating tempera-
ture and thus the beginning of the cooking time is
reached when the first ring (temperature setting I) or
the second ring (temperature setting II) becomes visi-
ble respectively. See diagram on pg. 46. If the
Sicomatic®still gets too much energy supply, then,
accompanied by a continuously increasing sound,
steam is released over an outlet in the lid handle (at
the centre of the lid). Reduce the energy supply avoi-
ding useless waste of energy and the danger of ‘boi-
ling dry’. Always keep an eye on your Sicomatic®.
7. Steam release/cooling down see page 38.
8. Opening the Sicomatic®see page 37.
02 Sico D / Inhalt (gb).QX4 09.03.2005 09:03 Uhr Seite 44

45
Cooking in the perforated insert
(special accessory)
lVegetable
lFish
lPreserving
lExtracting juice
lDelicate food
In the case of vegetable pour 2-3 cups (depending on
cooker size) of liquid for steam build-up direct onto
the bottom of the cooker (herbs and spices etc. may
also be added for seasoning). Then put in the perfora-
ted insert filled with the peeled and washed vegeta-
ble. The insert prevents the vegetable from getting
into direct contact with the water thus actually coo-
king in steam only. Fill cooker only by 2/3 making sure
there is always enough distance between the food
and the lid, the pressure indicator and the valve parts.
Cooking in the unperforated insert
(special accessory)
lFrozen food
lSide dishes, e.g. rice
lExtracting juice (as a collecting bowl)
Quantity of liquid to be added (onto the bottom of the
cooker): see comments on ‘cooking in the perforated
insert’.
Liquid quantities (see page 39) must be strictly
observed.
Cooking at the bottom of the cooker
(meat)
Heat up fat inside the open Sicomatic®browning the
seasoned meat on all sides. Then add hot water
(depending on the recipe). Larger pieces of meat
should be cut into slices in order to reduce the coo-
king time.
02 Sico D / Inhalt (gb).QX4 09.03.2005 09:03 Uhr Seite 45
Cooking with your Sicomatic®-D
46
Modern pressure cookers like the Sicomatic®have
two cooking levels:
1. Cooking level 1 for gentle cooking
2. Cooking level 2 for fast cooking
These two cooking levels enable you to cook tender,
delicate food like dishes normally requiring longer
cooking times.
The Sicomatic®-D has two fixed cooking level settings
to be selected with ease by means of the slider con-
trol.
What do ‘two fixed cooking level settings’
mean, actually?
Pressure and temperature are two concomitant physi-
cal properties, i.e. the higher the pressure, the higher
the temperature.
On cooking level 1, the working valve opens up at a
pressure of 0.3 bars. So the temperature inside the
pressure cooker is limited to ca 107°C. Gentle steam
release is an indicator for excessive energy supply.
Cooking level 2 is working on the same principle yet at
a pressure of 0.9 bars and a temperature of ca 119°C.
●
Temperature setting I (approx. 107°C/first white ring)
This is used for steaming and ste-
wing delicate foods which require
only a short cooking time. The
food is cooked in inserts, which
prevents the boiling water from
draining it of nutrients and aro-
mas. Suitable for fine vegetables
and fish, for example.
●
Temperature setting II (approx. 119°C/second white ring)
This is used for boiling and ste-
wing foods which require a long
cooking time and for preserving
and sterilizing foods and extrac-
ting juices. Particularly suitable for
hearty foods and dishes such as
meats, soups and stews.
Today’s Sicomatic®generation is technologi-
cally unrivalled.
The Sicomatic®has a unique torsion-spring valve
system. Once the preset cooking level is exceeded,
there is no sudden or shocking outburst of steam, just
a gradual setting in of the steam release.
In the case of some pressure cookers having two coo-
king levels, the desired temperature of cooking level 1
is considerably exceeded in part, if the energy supply
is reduced too late. The Sicomatic®valve systems pre-
vents this. Even minimum excess of cooking level
temperature initiates gentle steam release. Now redu-
ce energy supply in order to avoid any further tempe-
rature increase.
2-3 mm 1 mm
0 mm
02 Sico D / Inhalt (gb).QX4 09.03.2005 09:03 Uhr Seite 46

Proper steam release and opening
47
1.0 Reducing pressure
Before being able to open it up you must reduce the
pressure inside your cooker. Therefore, after cooking
time is over, always take the pressure cooker off the
hob resting it on a suitable coaster. Pressure may be
reduced in one of the following ways.
1.1 Rapid steam release
This is the most common method. Gradually pull back
the slider control to the “0“ position until no more
steam escapes and the pressure indicator has sunk
back entirely into the lid handle. Always keep your
hands, face and body out of the way of the escaping
steam in order to avoid scalding.
Yet, this method is not applicable in the case of fro-
thing and mushy dishes like soups, peas and beans,
stews, broths, innards and pasta.
1.2 Letting cool down
A second method is to wait simply until the pressure
indicator has sunk back entirely into its initial position
in the lid handle. This is especially advisable in the
case of frothing and mushy dishes. Please reduce
cooking times accordingly, as through the slow coo-
ling down procedure the foods will still be cooking on
for a while.
1.3 Cooling down under water
A third method is cooling the pressure cooker with
water. The cooker is then held under cold running
water until the pressure indicator has sunk entirely
into the lid handle all by itself. Do not pour water onto
the lid handle because of the valves, or else cooling
water might enter the cooker.
This method should always be the last resort only, as
hereby condensation forms on the lid interior dripping
onto the cooked foods, making them „mushy“. In
addition, condensation impairs the colours and the
aroma of the cooked food.
2.0 Opening
Take the Sicomatic®-D off the cooking zone resting it
on a suitable coaster, pulling back the slider control to
the “0“ position and shake it a bit. Then holding the
slider control in this position push lid handle to the
right until the marks on the lid (I) and on the cooker
handle (I) align. Now take off the lid.
Attention!
If the sliding knob is pulled back too far in the direc-
tion of the stop position while the pot is still under
pressure, the residual pressure valve will be activa-
ted and block the opening mechanism. To release,
move the sliding knob in the direction of the pressu-
re indicator shortly so that the pressure valve can be
released when the pot is no longer pressurized.
Please bear in mind: Never force the pot open nor
modify safety devices. Only when not under pres-
sure does the cooker open up with ease.
02 Sico D / Inhalt (gb).QX4 09.03.2005 09:03 Uhr Seite 47

Maintenance
48
Cleaning your pressure cooker
Normally food residues can most easily be wiped out,
if directly after the food has been taken out, the cooker
is rinsed with water. Yet in the case of persistent resi-
dues, do not scratch or use a wire brush. Instead first
soak and then bring them to the boil adding a special
cleaner from Silit suitable for Silitsteel, stainless steel
or Silargan®. Of course, the cooker body may be cle-
aned in the dishwasher, too.
Cleaning the lid
All you need is to rinse the lid under hot running water
(optionally adding some washing-up liquid). Take out
lid gasket before cleaning it separately.
The valve and the steam release opening also just
need to be rinsed under running water.
lClean lid only manually. Do not put into the dish-
washer (protecting the seals).
lNot even for intensive care should you detach the
lid handle. Have taking apart and mounting of the
lid handle be done only by an authorised expert (i.e.
any Silit dealer or Silit after-sales service).
lFor thorough cleaning (manually rinsing) take out
the grey working valve and the black safety valve
cleaning them separately.
Cleaning / replacing the lid gasket
Wipe clean, rinse under warm running water or clean
in washing-up water.
As soon as the lid gasket has hardened (brownish
discoloration), it must be replaced. Mostly after using
the cooker about 400 times, yet after two years at the
very latest. Disregarding these data can impair the
safety of the lid gasket.
Replacing the pressure indicator seal
If the seal is defective, please replace immediately by
a new one. First clean the pressure indicator area
before putting on the moistened pressure indicator
seal.
Storage
After cleaning and drying your Sicomatic, store it in a
clean, dry and protected place. Do not mount lid in
operating position or seal it. Rest it on rim of pot upsi-
de down, for example. Do not place any heavy objects
on top as these can damage the lid.
Only use original Sicomatic®spare parts. Only this
way, function and safety of your Sicomatic®can be
guaranteed. Inside the lid gasket the printed name
of Sicomatic®must be visible.
02 Sico D / Inhalt (gb).QX4 09.03.2005 09:03 Uhr Seite 48

It is that easy to fix malfunctions
49
Malfunctions… Possible causes… How to fix them…
bringing to the boil takes too long energy supply too low – use higher setting
steam and water droplets constantly leaking from pressure indicator seal defective – replace by new one
pressure indicator
pressure indicator does not rise 1 slider control still in initial position – push slider control into desired position
2 energy supply too low – use higher setting
3 liquid for steam build-up missing – open cooker adding liquid
4 lid gasket defective – replace by new original Sicomatic®lid gasket
5 black safety valve does not close – push stainless steel ball into correct chamber
(see page 42)
during the whole of the bringing to the boil, steam 1 foreign body on lid gasket or on cooker rim – open cooker wiping clean lid gasket as well as
and water droplets are constantly oozing (short-term cooker rim
oozing is meaningless and not a to be regarded as a 2 lid gasket defective – replace by new original Sicomatic®lid gasket
malfunction) from the lid rim.
during the whole of the cooking process, steam and lid gasket defective, hardened, brittle, cracked, – replace by new original Sicomatic®lid gasket
water droplets are constantly oozing from the lid rim. scorched, damaged or worn
leakage especially on cooking level 1: 1 check pushing the slider control to level 2: –
reduce energy supply in time or take Sicomatic®-
D
slider control positioned on ‘gentle cooking’ yet steam if there is no more steam release, energy supply off the hotplate releasing steam by pulling back
is continuously being released was too high for ‘gentle’-cooking level 1 slider control to cooking level 1
2 if despite cooking level 2 steam continues to be – rinse grey working valve and clean in boiling
released, the grey working valve is soiled or water or replace it respectively
defective
during cooking there is a constant undesired steam 1 grey working valve is soiled or gummed up – rinse valve plug or clean in boiling water
release at the front of the lid handle outlet. 2 grey working valve is defective – replace it by a new valve plug
during cooking there is a sudden outburst of steam 1 grey working valve is soiled or gummed up – rinse grey working valve plug or clean in boiling
from under the valve cover. water
2 grey working valve is defective – replace it by a new grey working valve
on opening, handles are blocked cooker is under pressure – release steam or let it cool down until the pressu-
re indicator has fully sunk back in, on no account
force open
long handle at cooker body is loose normal wear and tear – fasten screw with screwdriver
cooker handle is defective wrong handling – do have replaced by a new original Sicomatic®
cooker handle consulting your expert dealer
Sliding knob cannot be moved from 0 position to the
desired pressure setting after the pot is sealed.
1. Pressure indicator is raised and protrudes above
surface of handle.
2. Sliding knob jams pressure indicator.
3. Sicomatic is slightly pressurized.
– Release pressure indicator.
– Move sliding knob back and forth gently.
– Remove Sicomatic from cooking zone, release
steam, open pot, reseal pot, move sliding knob to
desired pressure level and return Sicomatic to
cooking zone to continue cooking process.
02 Sico D / Inhalt (gb).QX4 09.03.2005 09:03 Uhr Seite 49

The specified cooking times are only recommendations
enabling you to find out soon your personal ones.
Cooking times do not only depend on the quality of the
food to be cooked, but also on the following facts:
lThe finer the vegetables are cut, the shorter the coo-
king times. If not otherwise specified, the cooking
times refer to pieces having the size of sugar cubes.
lThe crispier or more ‘al dente’ you wish your vege-
tables to be, the shorter the cooking times. We
have listed the times for ‘al dente’ and ‘well coo-
ked’ separately.
lThe larger the quantity of the vegetables, the longer
their cooking time. For ‘al dente’ the quantity must
not be too large, otherwise they are ‘al dente’ outsi-
de and crude inside.
In most cases, small time differences are of little or no
significance. In the case of vegetables, however, one
single minute may well make the difference between
‘al dente’ and ‘well cooked’.
Cooking times always begin with a first gentle and
very brief venting.
If in doubt, always mind the following fundamental
rule:
As excessively cooked, flaccid vegetables
never become crisp again, you had rather boil
them less than too much. For, then you may still conti-
nue their cooking process.
Soups and stews Vegetables
50
Ideal for soups and stews with roast meat:
If the respective cooking times of meat and vegetable
are not too wide apart, roast the meat whilst already
adding the vegetable together with the water or wine
for the gravy.
If, however, the respective cooking times are too diffe-
rent, you interrupt the cooking of the meat adding the
vegetable during the last few minutes so that in the
end everything is cooking together ready to be served
at the same time.
Mind the following rules when preparing soups and
stews:
lfrothing dishes, as e.g. peas and beans and meat
for making soups, should be brought to the boil in
the open cooker and the foam be skimmed off tho-
roughly before the lid is closed.
lrelease steam gradually and very slowly or let cool
down.
lin the case of peas and beans push slider control
onto cooking level 2 yet keeping energy supply low.
Average cooking times
On principle, the cooking time applies to 400 grams of
meat to be cooked on cooking level 2. You need more
liquid than usual. With such cooking times, there is no
need for soaking.
02 Sico D / Inhalt (gb).QX4 09.03.2005 09:03 Uhr Seite 50

Meat Fresh fish
51
lRoast meat is first seared in the Sicomatic®. The
necessary quantity of water or wine being added
only later on.
lIf the joints are too big, they are divided up, seared
separately and then be stacked for further cooking.
lMeat for soups and stews is cooked in 1.5 litres of
liquid at the bottom of the cooker.
lCooking times very much depend on the quality,
age, consistency and size of the meat. So within
the recommended cooking times, you will find
several categories taking account of this fact.
lCooking times, referring to 500 grams on cooking
level 2, start as soon as the yellow ring on the
pressure indicator begins to show.
Mind the following: Before closing the cooker,
always skim off excessive froth from meat for soups
and stews. Before opening it, release steam gradually
and very slowly or let it cool down.
Fish stock is very sticky. Therefore do not under
any circumstances release steam. Take the
cooker off the hotplate instead and let it cool
down. As soon as the pressure indicator has sunk
back into the lid handle, please open lid at once. The
cooking times indicated apply for cooking level 1, i.e.
for 1,000 grams in the 4.5 litre Sicomatic®.(250 ml of
liquid for steam build-up) and 1,000 grams in the 6.5
litre Sicomatic®.(375 ml of liquid for steam build-up).
Whole foods
The basis of healthy nutrition is formed by various kinds
of cereal crops, which, as we all know, have very long
cooking times and in most cases even do require to be
soaked for hours on end before. In the Sicomatic®, such
long cooking times as well as the preceding time for
soaking can be reduced by about 2/3. Another advanta-
ge of cooking whole foods in the Sicomatic®, lies in the
fact that vitamins and minerals of the whole cereals are
particularly well preserved when cooking at level 1.
Besides, a lot of energy is saved. Mind the general rule
for cooking cereals: the quantity of liquid must be about
twice as much as the amount of the cereals, i.e.
200cm3of liquid for 100 grams of cereals.
02 Sico D / Inhalt (gb).QX4 09.03.2005 09:03 Uhr Seite 51
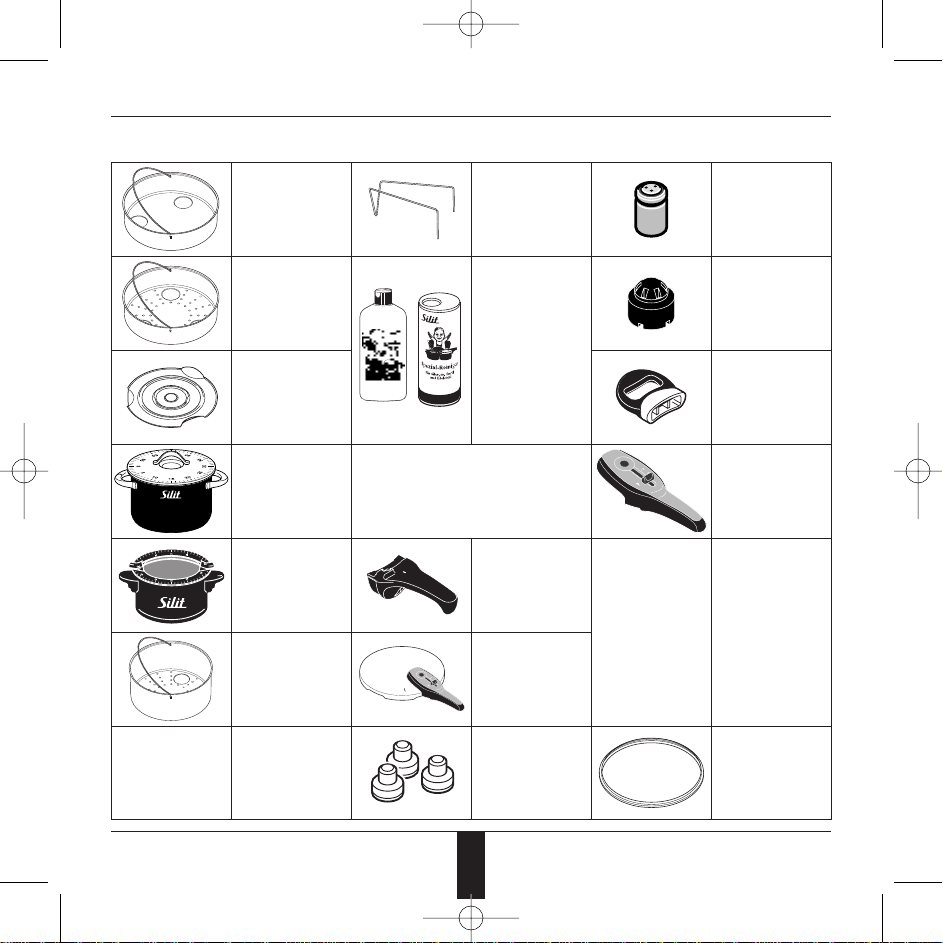
Accessories for Sicomatic®-D
(optional, only in part standard equipment)
52
1 2
Unperforated insert, low
∅22 cm Art.-Nr. 8031.7011.01
for 4.5 and 6.5-litre Sicomatic®-D
Insert support
∅22 cm
Art.-Nr. 0066.6000.01
for 4.5 and 6.5-litre Sicomatic
®
-D
Valve plug
Art.-Nr. 9523.8020.01
Perforated insert, low
∅18 cm Art.-Nr. 8018.7011.01
for 2.5-litre Sicomatic®-D
∅22 cm Art.-Nr. 8032.7011.01
for 4.5 and 6.5-litre Sicomatic®-D
Liquid detergent (1)
Art.-Nr. 9808.0000.01
Special detergent (2)
(Powder)
Art.-Nr. 9806.0010.01
Safety valve, complete
(black valve plug with metal
ball)
Art.-Nr. 9519.8003.01
Steamer platform
∅22 cm Art.-Nr. 7022.6022.01
for 4.5 and 6.5-litre Sicomatic®-D
Opposite handle
(clip-on handle with spring)
∅18 cm
Art.-Nr. 9252.9302.01
∅22 cm
Art.-Nr. 9252.9304.01
Timer
Elements
mechanical
Art.-Nr. 0068.2420.01
Lid handle, complete
(including lid handle screw
and
pressure indicator unit)
Art.-Nr. 9249.9008.01
Timer Silit 2000
mechanical
Art.-Nr. 0068.0010.01
Cooker handle, complete
(handle, locking bolt, spring,
screw, square nut)
∅18 cm Art.-Nr. 9253.9002.01
for 2.5-litre Sicomatic®-D
∅22 cm Art.-Nr. 9253.9003.01
for 3.0-litre Sicomatic®-D
∅22 cm Art.-Nr. 9253.9004.01
for 4.5 and 6.5-litre Sicomatic®-D
Perforated insert,
high
∅22 cm
Art.-Nr. 8033.7011.01
for 4.5 and 6.5-litre Sicomatic
®
-D
Spare lid, complete
∅18 cm
Art.-Nr. 8003.7021.01
∅22 cm
Art.-Nr. 8005.7021.01
Sealing caps
(3 pieces in a bag)
Art.-Nr. 9524.8020.01
Lid gasket
∅18 cm
Art.-Nr. 9067.8900.01
∅22 cm
Art.-Nr. 9067.8901.01
Spare parts for Sicomatic®-D
02 Sico D / Inhalt (gb).QX4 09.03.2005 09:03 Uhr Seite 52

Table of cooking times
53
Cooking level
Cooking time
in minutes
Cooking level
Cooking time
in minutes
The following cooking times are to be regarded as
mere guidelines referring to a 4.5-litre Sicomatic and 500 grams of food to be cooked. Exact times depend
on quality, size and nature of the food.
Vegetables (al dente)
(Cooking times based on sugar-
lump sizes)
Asparagus (whole) I approx. 3 min.
Aubergines I approx. 2 min.
Beans, French I approx. 7 min.
Broccoli I approx. 3 min.
Brussel sprouts I approx. 4 min.
Cabbage, Bavarian, ”Bayrisch Kraut” II approx. 4 min.
Cabbage, Chinese I approx. 1 min.
Cabbage, pickled, ”Sauerkraut” II approx. 10 min.
Cabbage, red II approx. 4 min.
Cabbage, savoy (sixths) I approx. 6 min.
Cabbage, savoy (sliced) I approx. 3 min.
Cabbage, white (sixths) I approx. 6 min.
Cabbage, white (sliced) I approx. 3 min.
Carrots I approx. 3 min.
Cauliflower (segments) I approx. 3 min.
Celery I approx. 2 min.
Chicory I approx. 1 min.
Courgettes I approx. 2 min.
Kohlrabi I approx. 4 min.
Leeks I approx. 2 min.
Mushrooms I approx. 1 min.
Pepper I approx. 2 min.
Potatoes I approx. 4 min.
Potatoes, jacket II approx. 12 min.
Salsify (whole) I approx. 6 min.
Spinach, whole leaves I approx. 1⁄2 min.
Tomatoes (whole) I approx. 1 min.
Fish
(do not relase steam; see page 51)
Cooking time applies to 1000 g of fish.
Cod I approx. 7 min.
Eel I approx. 7 min.
Haddock I approx. 7 min.
Halibut I approx. 7 min.
Plaice fillet I approx. 4 min.
Pollack fillet I approx. 7 min.
Rosefish I approx. 7 min.
Shark steak I approx. 6 min.
Trout au bleu I approx. 5 min.
Side-dishes
Dumplings I approx. 6 min.
Pasta II approx. 6 min.
Rice I approx. 7 min.
Risotto I approx. 7 min.
Stews
(Skim off the foam before closing
the cooker; see page 50) Cooking
time applies to 400 g of pulses.
Beans, haricot II approx. 20 min.
Peas, shelled II approx. 10 min.
Fruit
Apple purée (eights) I approx. 4 min.
Stewed apple (eights) I approx. 3 min.
Stewed cherries I approx. 2 min.
Stewed gooseberries I approx. 3 min.
Stewed pear (eights) I approx. 3 min.
Stewed rhubarb I approx. 3 min.
02 Sico D / Inhalt (gb).QX4 09.03.2005 09:03 Uhr Seite 53

54
Cooking level
Cooking time
in minutes
Cooking level
Cooking time
in minutes
Meat
Beef II approx. 25 min.
Filet steak II approx. 10 min.
Goulash II approx. 15 min.
Kidney II approx. 15 min.
Liver II approx. 20 min.
Pot roast II approx. 20 min.
Roulade II approx. 15 min.
Veal
Fillet steak II approx. 15 min.
Kidney II approx. 15 min.
Liver II approx. 20 min
Pot roast II approx. 20 min.
Pork
Fillet II approx. 8 min.
Knuckle, fresh II approx. 30 min.
Liver II approx. 20 min.
Pot roast II approx. 20 min.
Minced meat
Meat loaf II approx. 15 min.
Stuffed cabbage II approx. 10 min.
Chicken
Breast/leg II approx. 15 min.
Lamb
Pot roast II approx. 10 min.
Mutton
Pot roast II approx. 10 min.
Meat
Venison
Leg II approx. 20 min.
Pot roast II approx. 20 min.
Saddle II approx. 15 min.
Rabbit
Leg II approx. 15 min.
Pot roast II approx. 15 min.
Turkey
Breast II approx. 15 min.
Leg II approx. 15 min.
Goose
Breast II approx. 30 min
Leg II approx. 30 min.
Duck
Breast II approx. 15 min.
Leg II approx. 15 min.
Wholefoods
Some of the cereals here require
soaking times of 6 to 10 hours and
swelling times of 10 to 30 minutes
Buckweat I approx. 2 min.
Dehusked barley I approx 23 min.
Dehusked oats I approx. 5 min.
Millet I approx. 10 min.
Natural rice I approx. 10 min.
Rye I approx. 20 min
Spelt I approx. 15 min.
Wheat I approx. 30 min.
02 Sico D / Inhalt (gb).QX4 09.03.2005 09:03 Uhr Seite 54
Table of contents
Popular Electric Pressure Cooker manuals by other brands

san ignacio
san ignacio LIFECOOK Instrucions for Use | Recipes

B+K precision
B+K precision B5927.406 user manual

Cook's essentials
Cook's essentials K41143/EPC-678 instruction manual

Crock-Pot
Crock-Pot CSC051 instruction manual

Swiss Pro+
Swiss Pro+ SP-PC.5LE instruction manual

Concept2
Concept2 CK8001 manual


