SIIG USB 3.0 Dual Head Docking Station User manual

1
USB 3.0 Dual Head
Docking Station
Quick Installation Guide
Introduction
The USB 3.0 Dual Head Docking Station is a unique design
for a computer that has extra connectivity demands.
Features and Benefits
•Adds dual displays, Gigabit, audio out, MIC in, and
6 USB 3.0/2.0 to your USB 3.0 enabled system
•Video outputs: HDMI and DVI supporting 1080p
and up to 2048 x 1152 resolution
•Gigabit port compatible with IEEE 802.3
•CompatiblewithSuperSpeedUSB3.0andbackwards
compatible with USB 2.0 specification
•Audio out to support 2.1 & virtual 5.1 channel
sound & a MIC jack
System Requirements
•Dual core CPU at 2.0 GHz or higher processor clock
with an USB 3.0 port available
•Windows®
8 (32-/64-bit) / 7 (32-/64-bit) / Vista (32-
/64-bit) / XP (32-bit)
Packagecontents
•USB 3.0 Dual Head Docking Station
•Power Adapter
•USB 3.0 cable
•Software CD
•Quick installation guide
04-0800B

2
Layout
Figure 1: Layout
1. Power indicator: Lights up when the power is on
2. USB indicator: Lights up when a USB device is
plugged into this unit
3. USB 3.0 ports: Connects to USB 3.0 devices
4. Speaker jack: Connects to a speaker or earphone
5. MIC jack: Connects to a microphone
6. USB 2.0 ports: Connects to USB 2.0 devices
7. RJ45 port: Connects to an Ethernet network
8. DVI connector: Connects to a DVI monitor or
projector
9. HDMI connector: Connects to a HDMI monitor or
projector
10. USB 3.0 port (Type B): Connects to a computer
11. Power jack: Connects to the power adapter
Front side Rear side

3
Application
To connect USB peripherals, Ethernet, speaker and
microphone, follow the illustrations below to connect the
corresponding connectors.
Software Installation
Make sure the proper version driver for your graphics
card is installed, the USB 3.0 Dual Head Docking Station is
not designed to work with Windows' Standard VGA
Graphics Adapter driver.
Important: Do not plug the docking station into the
computer until instructed to do so.
Windows 8 (32-/64-bit) / 7 (32-/64-bit)
1. Insert the driver CD. Close the CD AutoPlay box.
2. Click Start, in the Search programs and files box,
type D:\setup.exe, then press Enter.
Figure 2: Connections

4
Or press Windows key and R, type D:\setup.exe in
theRun window,and clickOK. (ChangeD: tomatch
your CD/DVD-ROM drive letter)
3. At the User Account Control, click Yes.
4. Select I Accept.
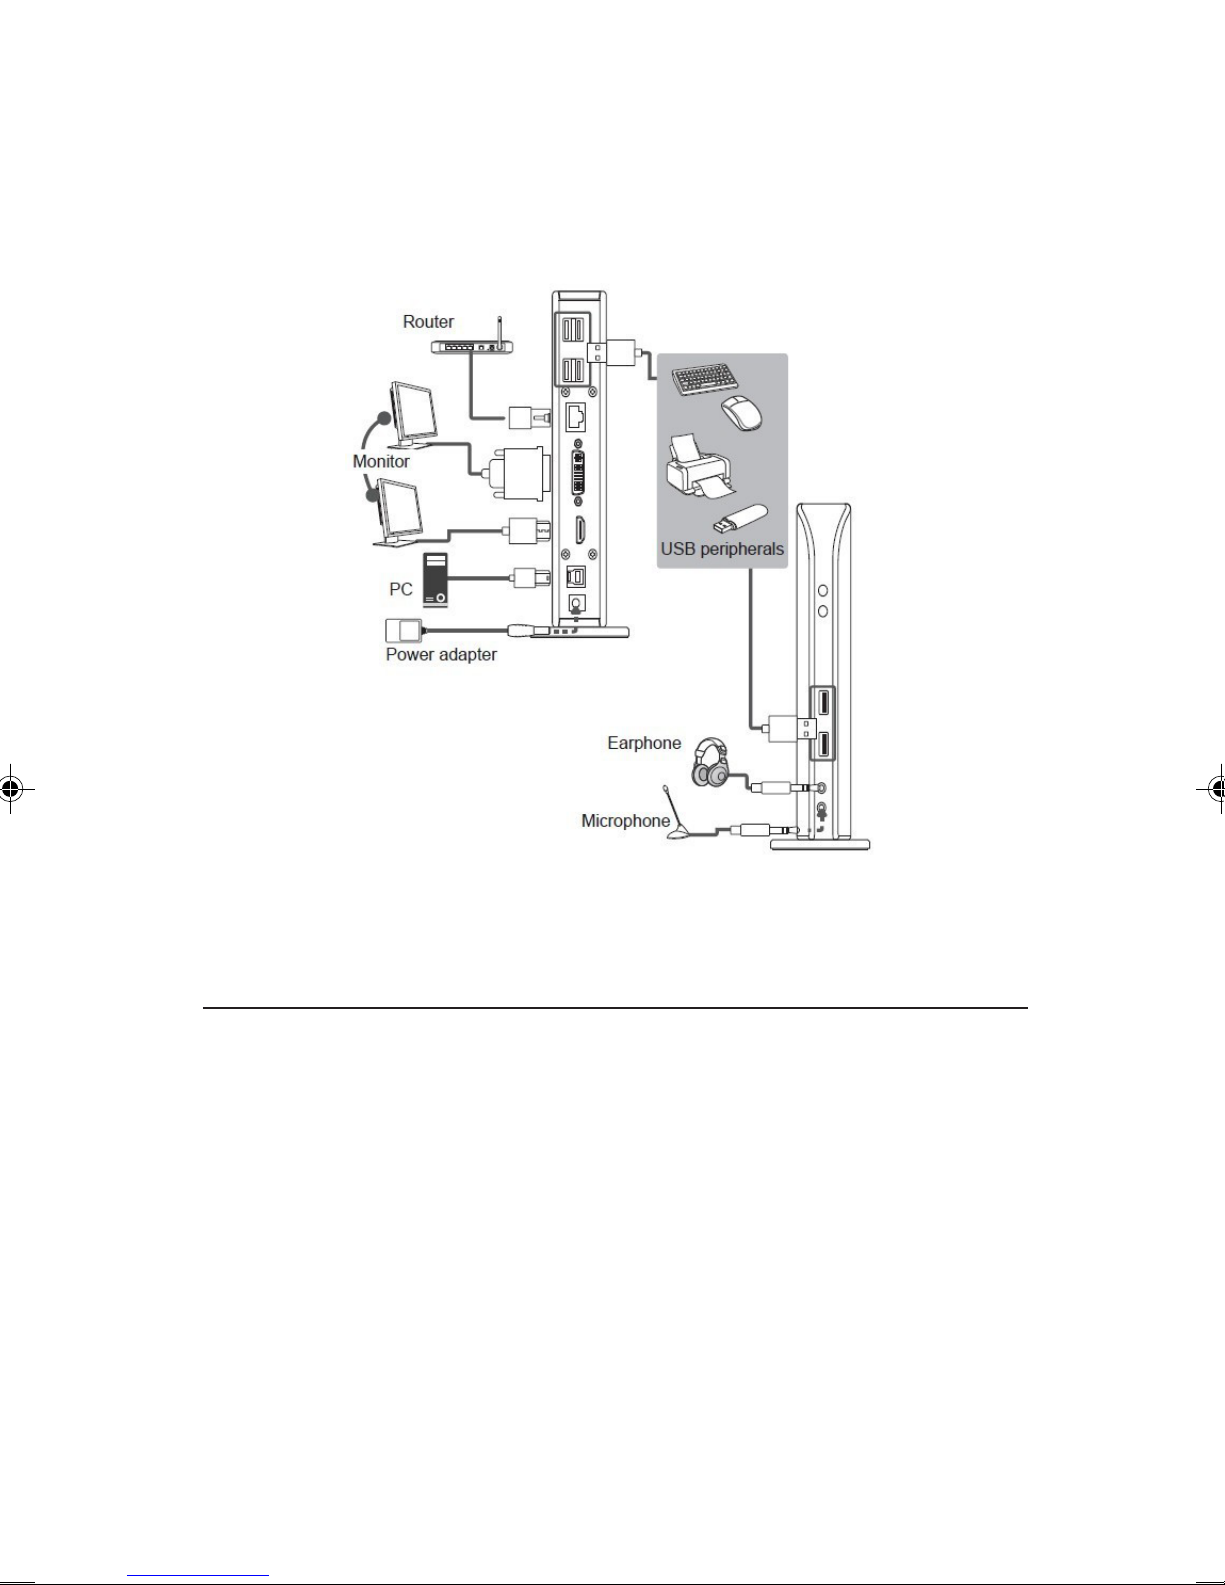
5. Connect your second monitor to the Docking and
turn it on.
6. Connect the Docking to the computer with the
included USB 3.0 cable, and the driver will be
installed automatically.
7. Restart your system to complete the installation.
Windows Vista (32-/64-bit)
1. Insert the driver CD. Close CD autoplay box if
prompted.
2. Click Start, in the Start Search box, type
D:\setup.exe, press Enter.(Change D: to match
your CD/DVD-ROM drive letter)
3. Click Allow, and select I Accept.
4 Connect your second monitor to the Docking and
turn it on.
5. Connect the Docking to the computer with the
included USB 3.0 cable, and the driver will be
installed automatically.
6. Restart your system to complete the installation.
Windows XP (32-bit)
1. Insert the driver CD. Click Start, Run, type
D:\setup.exe, then click OK. (Change D: to match
your CD/DVD-ROM drive letter)
2. Select I Accept.

5
3. Connect the Docking to the computer with the
included USB 3.0 cable, and the driver will be
installed automatically.
4. Connect your second monitor to the Docking and
turn it on.
5. Restart your system to complete the installation.
To Verify Windows Installation
1. From the desktop, right click Computer or My
Computer, then click Manage.
For Windows 8 / 7 / XP: Click Device Manager.
ForWindows Vista:Click Continue,thenclickDevice
Manager.
2. Double click USB Display Adapters.
DisplayLink Display Adapter (4307) and USB 3.0
Dual Video Dock should be displayed.
Note: If there is a (yellow question mark) or
(exclamation mark) next to that item, then the driver
is not properly installed. In this case, please delete
the item, unplug the Docking and repeat the driver
installation steps
Display Configuration
After successful driver installation, a display utility icon
will appear in the taskbar by the system clock.
Note: The icon may be hidden in the Windows
System Tray. Click the arrow icon to bring it up.
Selectable Viewing Modes
Access the utility by clicking the utility icon , and click
USB 3.0 Dual Video Dock.

6
Figure 3: Utility Settings
•Screen Resolution: Click to select an available
resolution. Note: This function is disabled in mirror
mode, as the resolution is defined by the resolution
of the primary monitor
•Screen Rotation: Rotates the screen according to the
desired orientation
•Extend To: Extends the screen according to the
desired orientation
•Extend: This is the default setting of the USB 3.0
Dual Head Docking Station. This mode extends your
desktop for easy viewing of multiple windows. The
window will move off the primary display from the
right side and enter the extended display from the
left side
•Set as Main Monitor:Sets theextendedscreen asthe
main screen
IMPORTANT: In Windows XP, set the USB 3.0
Dual Head Docking Station to Off before selecting
Set as Main Monitor.
•Mirror: Duplicates the primary monitor to the
monitor which connects with the USB 3.0 Dual Head
Docking Station

7
• Off: Turns off the USB 3.0 Dual Head Docking Station
• Optimize for Video (not available in Windows XP):
Optimize the video quality when playing back.
Text may appear less clear when enabling
• Fit to TV: Adjusts the size of the desktop on the TV.
Note: This function works only when one display is
connected
Multi-Monitor Configuration
The add-on monitors can be configured by clicking the
utility icon and selectingDisplayLink Manager or Video
Setup. The configuration page can also be opened using
the steps below.
Position the mouse anywhere on the desktop:
1. For Windows 8 / 7: Right click, then select Screen
resolution.
2. For Windows Vista: Right click, select Personalize,
then click Display Settings.
3. For Windows XP: Right click, select Properties, then
select Settings tab.
Figure 4: Monitor Orientation

8
Extended Mode
1. Refer to the Multi-Monitor Configuration on page
7 to open the configuration page.
2. Inthe Displaydrop-downmenu, selectthe preferred
monitor.
For Windows 8 / 7: In the Multiple displays drop-
down menu, select Extend desktop to this display.
For Windows Vista: Check the Extend the desktop
onto this monitor box.
For Windows XP: Check the Extend my Windows
desktop onto this monitor box.
3. Click OK to confirm and close the settings screen.
4. Once the setting is completed, simply drag and
drop the application icons or the opened window,
in restore down mode, to the add on monitor.
However, some applications may not support the
extended desktop.
Mirror Mode
1. Refer to the Multi-Monitor Configuration on page
7 to open the configuration page.
2. Inthe Display drop-downmenu,select thepreferred
monitor.
For Windows 8 / 7: Check Multiple displays,then
select Duplicate these displays.
For Windows Vista: Uncheck the Extend the desktop
onto this monitor box.
For Windows XP: Uncheck the Extend my Windows
desktop onto this monitor box.
3. Click OK to confirm and close the settings screen.

9
Primary Monitor
1. Refer to the Multi-Monitor Configuration on page
7 to open the configuration page.
2. Inthe Display drop-downmenu,select thepreferred
monitor.
3. For Windows 8 / 7: Check the Make this my main
display box.
For Windows Vista: Check the This is my main
monitor box.
For Windows XP: Check the Use this device as the
primary monitor box
4. Click OK to confirm and close the settings screen.
Windows Shortcut
Press Windows key and Pto bring up the menu and
choose a desired mode (Available in Windows 8 and
Windows 7 only)
Figure 5: Windows Shortcut
Cursor Disappearing
In some cases, when removing the Docking while in
extended mode, the desktop will still be paired to the
add-on monitor(s) and the mouse cursor may not return
to the primary monitor. If this happens, connect the add-
on monitor(s) and Docking again or keep moving the
mouse.

10
Video Playback in Extended Mode
If the video or DVD playback quality is poor or skips
frames in the extended mode, please playback on the
primary monitor instead of the add-on monitors.
Uninstall the Adapter Driver
Windows 8 (32-/64-bit) / 7 (32-/64-bit)
1. Open Control Panel> Programs> Programs and
Features.
2. Click DisplayLink Graphics, click Uninstall, then
click Yes.
3. At User Account Control, click Yes, and click OK.
4. Click Yes to restart the computer.
Windows Vista (32-/64-bit)
1. Open Control Panel> Programs> Programs
and Features.
2. Click DisplayLink Graphics, click Uninstall, then
click Yes.
3. At User Account Control, click Allow.
4. SelectAutomatically closeapplications andattempt
to restart them after setup is complete, click OK,
and click OK.
5. Click Yes to restart the computer.
Windows XP (32-bit)
1. Open Control Panel>Add or Remove Programs.
2. Click DisplayLink Graphics, click Remove, and
click Yes.
3. Click Yes to restart your computer.

11
Technical Support and Warranty
QUESTIONS? SIIG’sOnline Support has answers! Simply visit our web site
at www.siig.com and click Support. Our online support database is updated
daily with new drivers and solutions. Answers to your questions could be just
afewclicksaway. Youcanalsosubmitquestions online and a technical support
analyst will promptly respond.
SIIG offers a 3-year manufacturer warranty with this product. This warranty
covers the original purchaser and guarantees the product to be free of any
defects in materials or workmanship for three (3) years from the date of
purchase of the product.
SIIG will, at our discretion, repair or replace (with an identical product or
product having similar features and functionality) the product if defective in
materials or workmanship. This warranty gives you specific legal rights, and
you may also have other rights which vary from state to state. Please see our
web site for more warranty details.
If you encounter any problems with this product, please follow the procedures
below.
A) If it is within the store's return policy period, please return the product to
the store where you purchased it.
B) If your purchase has passed the store's return policy period, please follow
these steps to have the product repaired or replaced.
Step 1: Submit your RMA request. Go to www.siig.com, click Support,
then Request A Product Replacement to submit a request to SIIG RMA or
fax a request to 510-657-5962. Your RMA request will be processed, if the
product is determined to be defective, an RMA number will be issued.
Step 2: After obtaining an RMA number, ship the product.
•Properly pack the product for shipping. All software, cable(s) and any
other accessories that came with the original package must be included.
•Clearly write your RMA number on the top of the returned package.
SIIG will refuse to accept any shipping package, and will not be
responsible for a product returned without an RMA number posted on
the outside of the shipping carton.
•You are responsible for the cost of shipping to SIIG. Ship the product
to the following address:
SIIG, Inc.
6078 Stewart Avenue
Fremont, CA 94538-3152, USA
RMA #:
•SIIG will ship the repaired or replaced product via Ground in the U.S.
and International Economy outside of the U.S. at no cost to the
customer.

About SIIG, Inc.
Founded in 1985, SIIG, Inc. is a leading manufacturer of IT connectivity
solutions (including Serial ATA and Ultra ATA Controllers, FireWire, USB,
and legacy I/O adapters) that bridge the connection between Desktop/
Notebook systems and external peripherals. SIIG continues to grow by
adding A/V and Digital Signage connectivity solutions to our extensive
portfolio. Allcentered around the distribution and switching of A/V signals
overCAT5/6,these productsincludematrix switches,distribution amplifiers,
extenders, converters, splitters, cabling, and more.
SIIG is the premier one-stop source of upgrades and is committed to
providing high quality products while keeping economical and competitive
prices. High-quality control standards are evident by one of the lowest
defective return rates in the industry. Our products offer comprehensive
user manuals, user-friendly features, and most products are backed by a
lifetime warranty.
SIIG products can be found in many computer retail stores, mail order
catalogs, and e-commerce sites in the Americas, as well as through major
distributors, system integrators, and VARs.
PRODUCT NAME
USB 3.0 Dual Head Docking Station
FCC RULES: TESTED TO COMPLY WITH FCC PART 15, CLASS
B OPERATING ENVIRONMENT: FOR HOME OR OFFICE USE
FCC COMPLIANCE STATEMENT:
This device complies with part 15 of the FCC Rules. Operation is
subject to the following two conditions: (1) This device may not cause
harmful interference, and (2) this device must accept any interference
received, including interference that may cause undesired operation.
THE PARTY RESPONSIBLE FOR PRODUCT COMPLIANCE
SIIG, Inc.
6078 Stewart Avenue
Fremont, CA 94538-3152, USA
Phone: 510-657-8688
USB 3.0 Dual Head Docking Station is a trademark of SIIG, Inc. SIIG and the SIIG logo are registered
trademarksofSIIG,Inc. MicrosoftandWindowsareregisteredtrademarksofMicrosoftCorporation.
All other names used in this publication are for identification only and may be trademarks of their
respectiveowners.
September, 2012 Copyright © 2012 by SIIG, Inc. All rights reserved.
Table of contents
Other SIIG Computer Accessories manuals