Silampos traditional User manual

Instruction Book
Notice d’Emploi
Manual de Instrucciones

Read carefully these instructions until the end, in order to become familiar with the
pressure cooker characteristics and potentialities.
Silampos pressure cookers are totally safe when all the instructions, presented in this book, are followed.
Comply with the instructions of this booklet to enjoy maximum safety when using your pressure cooker.
MADE IN PORTUGAL
SAFETY INSTRUCTIONS PAG01
PRODUCT DESCRIPTION PAG03
AVAILABLE SPARE PARTS PAG06
PRIOR TO FIRST USE PAG08
USING THE PRESSURE COOKER PAG09
UPKEEP AND MAINTENANCE PAG15
WARRANTY CERTIFICATE PAG19
DECLARATION OF COMPLIANCE PAG21
COOKING TIMES PAG23
ENGLISH CONTENTS

SAFETY INSTRUCTIONS PAG01
1. The pressure cooker works under pressure. An inappropriate use can cause serious burns and damages.
Make sure the pressure cooker is properly closed before putting it on the heat source. Read the chapter:
“Using the pressure cooker”.
2. Do not let children near the Pressure Cooker when in use.
3. Do not use the pressure cooker for other purposes than the intended.
4. Do not put the pressure cooker in a heated oven.
5. Use the heat sources in accordance with the instructions of use.
6. Do not use the pressure cooker on heat sources of over 3000 W.
7. Do not use the pressure cooker to fry food.
8. When the pressure cooker is pressurised, move it very carefully.
9. Do not touch the warm surfaces. Use the handles and, if necessary, kitchen gloves or another type of pro-
tection.
10. Keep your hands off the steam escape zones.
11. Do not force the pressure cooker opening or remove its lid without checking first if the pressure has
been released. Read the instructions about pressure release in “Using the pressure cooker” chapter.

PAG02 SAFETY INSTRUCTIONS
12. Do not use the pressure cooker without any liquid inside as this practice may cause serious damage. Read
chapter “Prior to first use”.
13. Before each use, check if the valves are clear. Read chapter “Using the pressure cooker”.
14. Do not fill the pressure cooker over the 2/3 of its capacity. When cooking food that expands like rice or dry
vegetables, do not fill the pressure cooker over the half of its capacity.
15. The skin of some meats swells under the effect of pressure (e.g. beef tongue). After cooking, do not prick
the meat if it looks swollen; you may scald yourself. Prick the meat before cooking it in the pressure cooker.
16. When making greasy foods, you should shake the pressure cooker slightly before opening the lid, this way
you will prevent food from spitting out.
17. Do not operate the safety systems more than which it is recommended in the cleaning and maintenance
instructions. Read the chapter “Upkeep and maintenance”.
18. Do not use the pressure cooker when it, or any of its components, is damaged or does not correspond to
the functions described in the usage instructions.
19. Only use replacement parts of Silampos brand and of the model in question. Contact Silampos after-sales
service.
READ, FOLLOW AND KEEP THESE INSTRUCTIONS.
Capacity (Total)
Liters
4,5
6
8
10
12
15
16
18
Capacity (Of use)
Liters
3
4
5,3
6,7
8
10
10,7
12
Persons
2-5
4-6
5-8
8-10
10-12
12-15
13-15
15-18
PRODUCT DESCRIPTION PAG03
The Traditional pressure cooker main characteristic is its progressive opening/closing system, which ensures,
together with the perforated sealing ring – Silampos patent – the sealing of the cooker with minimum effort
and ensures pressure and temperature increasing, in exclusive safety conditions for this type of pressure
cooker.
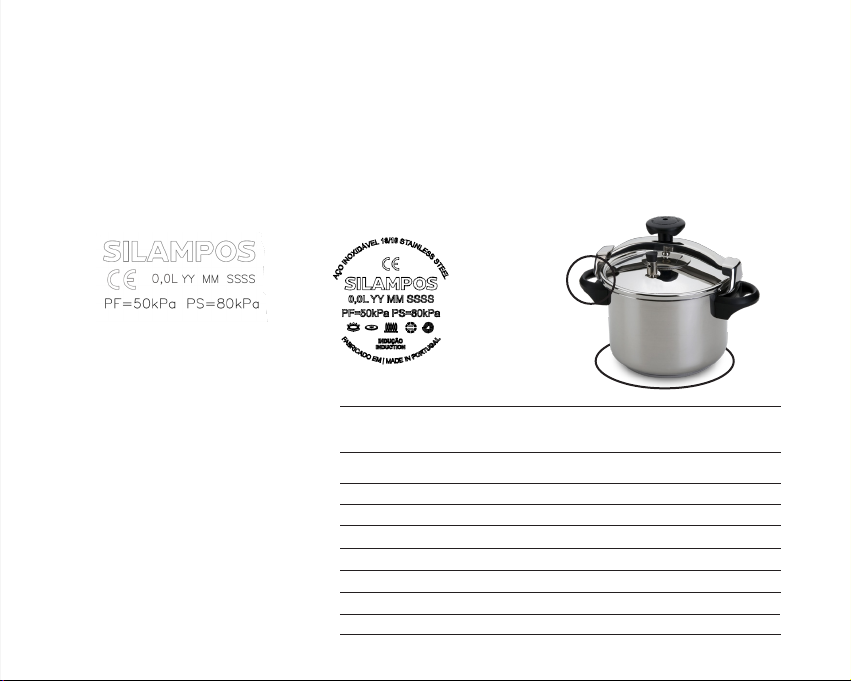
You can confirm the characteristics of your Pressure Cooker in the corresponding marking on the product:
1
1 - Aluminum Pressure Cooker 2- Stainless Steel Pressure Cooker
2
Operating / regulating pressure (Pf) =
50 kPa / 0,5 bar
Acceptable maximum pressure (PS) =
80 kPa / 0,8 bar
YY MM SSSS: Batch / serie number
CE: CE Mark - European Conformity
Boiling temperature = 111 à 113ºC

Silampos aluminium pressure cooker is made
from highly pure aluminium (99 to 99, 5 %), ful-
filling all the food compatibility norms.
Do not wash the aluminum pressure cooker or
the steamer basket in the dishwasher.
For the aluminium pressure cooker with the
thermic bottom suitable for induction, all the
other features remain the same as the Tradi-
tional Silampos aluminium pressure cooker, in
addition to induction compatibility.
Material
Aluminium
Capacity
(Liters)
4,5
6
8
8
10
12
12
15
18
Inner diameter
D (cm)
22
24,5
27
ALUMINIUM
18
20,5
21
BOTTOM INDUCTION
17
18,5
Unavailable
Bottom diameter - Df (cm) Food
contact area of
the gasket
29 cm2
54 cm2
46 cm2
GAS ELECTRIC VITROCERAMIC
RADIANT OVEN
GAS ELECTRIC INDUCTION
VITROCERAMIC
RADIANT OVEN
AND ALUMINIUM WITH BOTTOM SUITABLE FOR INDUCTION
PAG04 TRADITIONAL ALUMINIUM PRESSURE COOKER

Besides the enormous advantages described previously, this pres-
sure cooker also has a thermic bottom - Impact Disc Plus gives rap-
id and uniform heat transference, improving the thermic efficiency
and compatibility with induction.
TRADITIONAL STAINLESS STEEL PAG05
PRESSURE COOKER
GAS ELECTRIC INDUCTION
VITROCERAMIC
RADIANT OVEN
Material
Stainless
Steel
Capacity
(Liters)
4,5
6
8
10
12
10
12
16
Inner diameter
D (cm)
22
24,5
28
Bottom diameter
Df (cm)
17,3
19,4
23,2
Food
contact area of
the gasket
32 cm2
54 cm2
58 cm2

PAG06 AVAILABLE SPARE PARTS
Pressure cooker diameter (D)
Capacity (L)
1. Bakelite locking lever
2. Locking lever screw M5X13
3. Centre axis
4. Fixing nut TR10X1,75
5. Stainless steel yoke
6. Limiter yoke
7. Safety valve
Safety device which opens and closes automatically,
releasing excess pressure inside the pressure
cooker, releasing vapour quickly.
8. Control valve
Device which stabilise the inner pressure, when in
operation.
9. Control valve pivot
10. Stainless steel ring
11. Rubber sealing ring
Allows the pressure cooker to be sealed
12. Bakelite side handle
13. Handle fixing screw
14. Aluminium inner basket (optional)
22cm
4,5L | 6L | 8L
621000019960
621000019962
***
***
621000019963
621000019961
***
621000019965
621000019969
621000019913
24,5cm
8L | 10L | 12L
621000019960
621000019962
***
***
621000019963
621000019961
***
621000019964
621000019969
622000019913
27cm
12L | 15L | 18L
621000019960
621000019962
***
***
621000019963
621000019961
***
Unavailable
621000019969
Unavailable
Unavailable
Aluminium
Steel
Aluminium
Steel
28cm
10L | 12L | 16L
621000019960
621000019962
***
***
621000019963
621000019961
***
621000019969
Unavailable
621000019966
623000019903
64D000019901
Unavailable
Unavailable

PAG07
AVAILABLE
SPARE PARTS
***
Available from the
Silampos After
Sales Assistance service
Only use replacement
parts of the Silampos
brand and of the
model in question.

PAG08 PRIOR TO FIRST USE
1. Remove all the labels and tags from the cooker before using it for the first time. Wash it with warm water
and detergent. Dry it with a cloth.
2. Assemble the 2 side handles and the respective screws that you will find inside the pot:
1st: Place the bakelite handle against the metal handle of the pot and check that the holes match.
2nd: Point the screw at the hole in the bakelite handle and tighten it with a screwdriver or star screwdriver.
3rd: Check if the handle is well fixed.
4th: Repeat the procedure to assemble the other side handle.
NOTE THAT if the handle is not securely fixed, it could come loose and put your safety at risk when han-
dling the pressure cooker. Confirm that the screws are properly tightened.
3. Lubricate the sealing gasket with a little cooking oil to open and close the pot easier, not forgetting the
inside of the lip, in the case of lip gaskets.
4. Check for the steam release devices are unobstructed, including the control valve and the safety valve.
5. In ALUMINIUM Pressure cooker, to avoid the inner surface from getting darker:
fill the pressure cooker with water and baking soda. Let it boil for a few minutes.
In case you have an aluminium basket repeat the procedure of the last paragraph;
6. Test the use of the cooker with half a litre of water. Leave it on for 10 minutes after the control valve begins
to release steam.

USING THE PRESSURE COOKER PAG09
MINIMUM AMOUNT
The pressure cooker should not be used with less than 250 ml of liquid inside, as this could damage it and/
or the heat source.
MAXIMUM AMOUNT
Do not fill the pressure cooker to over 2/3 of its capacity. (See useful capacity in the table on page 3).
Never fill the pressure cooker with more than 1/2 of its capacity when cooking food that increases in volume or
form a lot of foam when cooking (beans, chickpeas, dried peas, spinach, pasta, rice, etc.)
PLEASE NOTE that
exceeding the capacity may cause steam and/ or food leakage through the regulator
valve/or the edge of the lid, as could also occur if the heat source is too high.
PRIOR TO EACH USE
1. In pans with lip sealing gasket, check that the gasket is correctly placed on the edge of the lid and that the
lip is not glued (Fig.01). If it is stuck, remove it with a little cooking oil.
2. Check whether the control valve holes are clean. The holes must be visible. (Fig.02)
3. Check whether the safety valve is clear and working properly, by pressuring lightly the valve piston via the
interior of the lid. It should move with no efforts. (Fig.03)
4. If you want to use the basket for steaming, place it inside the pan, placing the edge with the largest
diameter on the rivets. If you want to use the basket as a container for food, place it on the bottom of the pan,
making the edge of smaller diameter pass through the rivets.
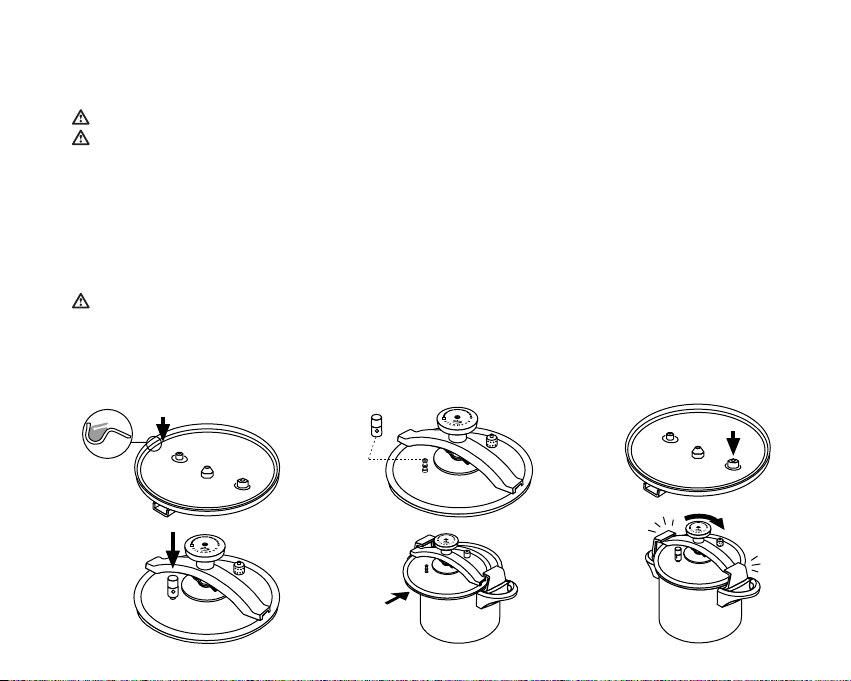
PAG10 USING THE PRESSURE COOKER
NOTE THAT you must not use the basket without liquids inside.
NOTE THAT the food must be evenly distributed on its base, so that the basket does not become unbalanced
and overturn.
5. Place the lid horizontally and check if the lid is well-positioned related to the body of the cooker. (Fig.05)
6. To close the pressure cooker, place the lid (Fig.05), turn the locking lever in the direction indicated by the
arrow (Fig.06) until the yoke touches the handles. From this position, turn the locking lever at least two more
turns in the same direction (with a complete turn representing a 360º rotation). In the case of pressure cook-
ers with a diameter of 280mm, tightening must be at least two and a half turns.
PLEASE NOTE
if the pressure cooker is not securely fastened, steam may escape or drip from the lid edge.
7. Place the control valve on the lid, pressing it against the base. Check if it is well-positioned. (Fig.04)
ONLY AFTER THE CONCLUSION OF ALL THESE OPERATIONS, THE PRESSURE COOKER WILL BE READY
TO USE OF THE HEAT SOURCE.
(FIG.01) (FIG.02) (FIG.03)
(FIG.04) (FIG.05) (FIG.06)

USING THE PRESSURE COOKER PAG11
DURING THE USE
1. Place the cooker on the connected heat source.
PLEASE NOTE
Do not carry it using the closure button, use only the side handles and if necessary kitchen
gloves or another mean of protection. (Fig 12)
PLEASE NOTE
the heat source flame or disc should never exceed the diameter of the base of the cooker
in order to ensure greater energy efficiency and to prevent the cooker from being damaged.
PLEASE NOTE
that when using a glass-ceramic or induction hob, ensure both the plate and the base of
the cooker are cleaned and dried in order to guarantee your safety. Do not drag the cooker so as not to scratch
the heat plate / source.
PLEASE NOTE
that induction heating reaches extremely high temperatures are attained in a few seconds, requi-
ring greater precaution and vigilance.
2. Start counting cooking time after checking if the steam is coming out continuously, rotating the control
valve. From this moment, the cooker will be reaching its functioning pressure. (Fig.07) For greater energy
savings, you can reduce the heat source intensity.
3. A. If during the use of the pressure cooker, the control valve does not release steam, check whether the
power of the heat source is strong enough. Should this persist, depressurize the pressure cooker and check:
- Whether the quantity of liquid inside the pressure cooker is sufficient;
- Whether the pressure cooker is properly closed;
- Whether the control valve is clear;
- Whether the sealing ring and the edge of the lid are in good conditions.
PLEASE NOTE
that it is normal for the control valve not to release steam or to release intermittent steam
in the first few minutes of cooking.

PAG12 USING THE PRESSURE COOKER
B. If the steam is released through the edge of the pressure cooker and/or by the safety valve, remove the
pressure cooker from the heat source, depressurize it and check if:
- the cooker is properly closed. Open and close it again (see 6. of chapter “before each use”)
- the control valve is unobstructed;
- the sealing ring is clean, placed correctly and is not damaged (see chapter “upkeep and maintenance”)
- the cooker pressure edge shows no sign of deterioration that prevent the effective ajustment of the sealing
ring.
4. Do not place any object on the control valve, whilst the pressure cooker is working.
5. During the use, vapour can be released slightly from the safety valve, due to its main characteristics.
6. In the case of the stainless steel pressure cooker, you can take advantage of the thermic bottom and save
energy by disconnecting the heat source before the cooking time has finished. (Fig.08)
7. If steam is released via the lid edges, depressurize the pressure cooker. Open it and close it again, following
the instruction of 6. of chapter “Before each use”.

(FIG.10) (FIG.11) (FIG.12)
USING THE PRESSURE COOKER PAG13
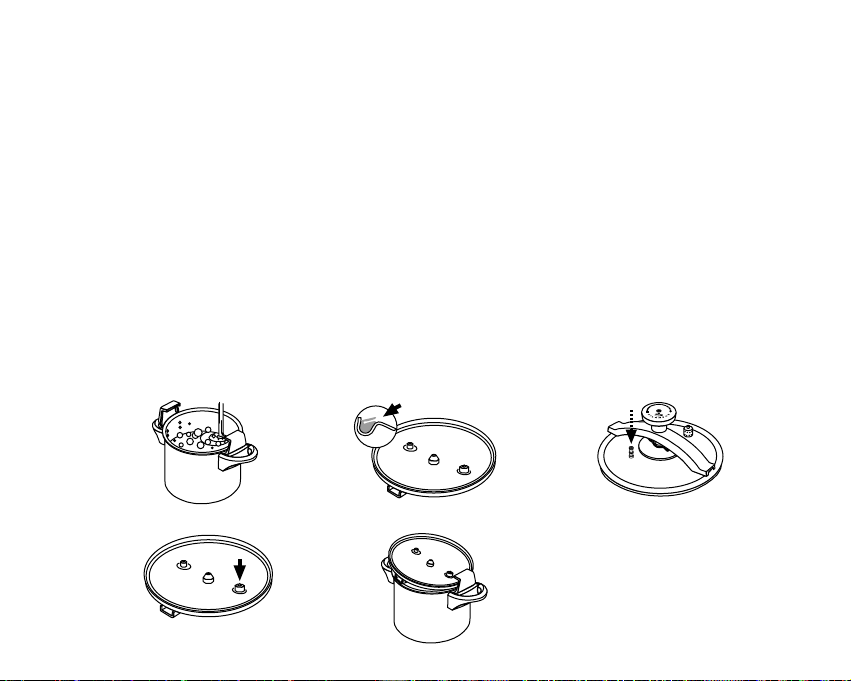
UPON COMPLETION OF USE
1. Once the cooking time has elapsed, remove the pressure cooker from the heat source and depressurize it,
by removing the control valve from the lid (Fig. 09) You can also put the pressure cooker under cold water
to provoke its cooling and then remove the control valve. (Fig.10)
PLEASE NOTE
that you should be extremely careful so as not to be burned by the released steam.
if necessary, use oven gloves or other means of protection.
2. When all the steam has been released from the control valve pivot, you can open the pressure cooker. Turn
the button in the opposite direction of the arrow and remove the lid (fig 11)
- If you are unable to remove the lid due to a vacuum having formed inside after the cooker has cooled down,
reheat it slowly until you are able to remove the lid easily.
(FIG.07) (FIG.08) (FIG.09)
PAG14 USING THE PRESSURE COOKER
3. Wash the pressure cooker, immediately after use. With running water and detergent to avoid salty and acid
food to attack the pressure cooker. Do not keep cooked food in the pressure cooker, to avoid damaging it.
3. Wash the pressure cooker, immediately after use. With running water and detergent to avoid salty and acid
food to attack the pressure cooker. Do not keep cooked food in the pressure cooker, to avoid damaging it.
4. If during the cooking process you let the food burn: leave the pan soaked in water and a little bit of deter-
gent for a few minutes before washing it.
5. Wash the control valve pivot with a flush of water or clean it with barbwire. Make sure it is completely clear.
(Fig.15)
6. Clean the safety valve base and check its functioning. (Fig.16)
7. At the end, dry the pressure cooker and the inner lip of the sealing ring with a cloth. (Fig.14) After having
(FIG.13) (FIG.14) (FIG.15)
(FIG.16) (FIG.17)
UPKEEP AND MAINTENANCE PAG15
1. Do not heat the pressure cooker when it is empty.
2. Salty cooking water and water with washing-up liquid should not remain in the pressure cooker for any
length of time.
3. If the lid is difficult to thighten, lubricate the center screw of the pressure cooker with cooking oil.
4. We recommend you to have the pressure cooker serviced at the Silampos post-sales assistance:
- After 10 years of use
- If you have left your pressure cooker empty on a connected heat source,
5. Replace the sealing ring every year or at least every two years. It will need to be replaced early whenever
the following occur:
- Cracks or dents;
- Deformations;
- Lack of flexibility.
Any of the aforementioned faults may prevent the pressure cooker from being properly sealed or closed.
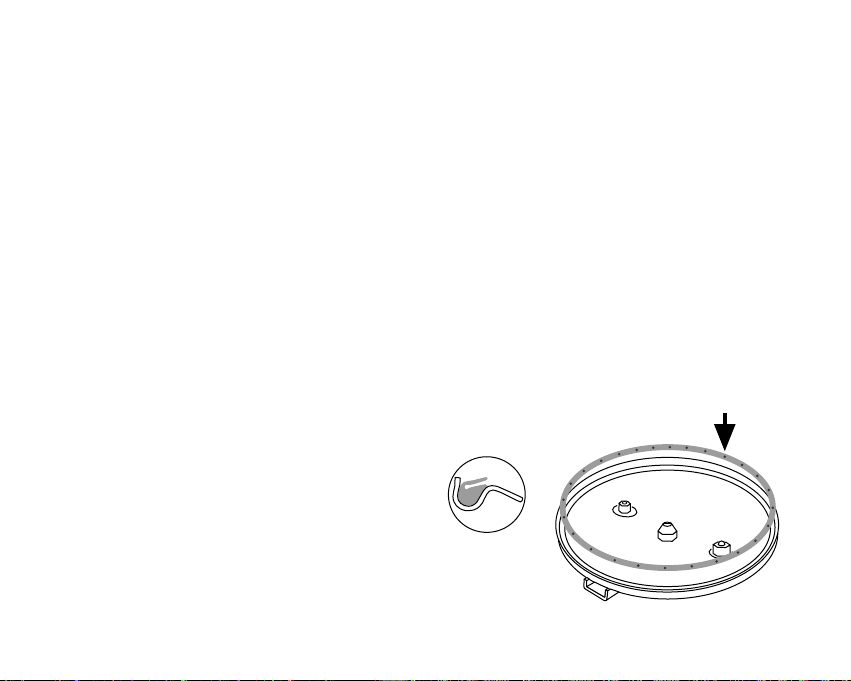
HOW TO REPLACE THE LIP SEAL GASKET
Select the appropriate Silampos gasket (see page 6).
Place the gasket on the inner edge of the lid, so that
they are juxtaposed and make sure the holes are
visible – facing upwards. Position the gasket evenly
distributed across the lid, then press the lip against the edge of
the pot to fit the gasket securely. Close the pot with more force than
usual and open it again. Repeat this procedure until the gasket is adjusted
and correctly placed.
PAG16 UPKEEP AND MAINTENANCE
(FIG.18)
(FIG.19)
(FIG.20)
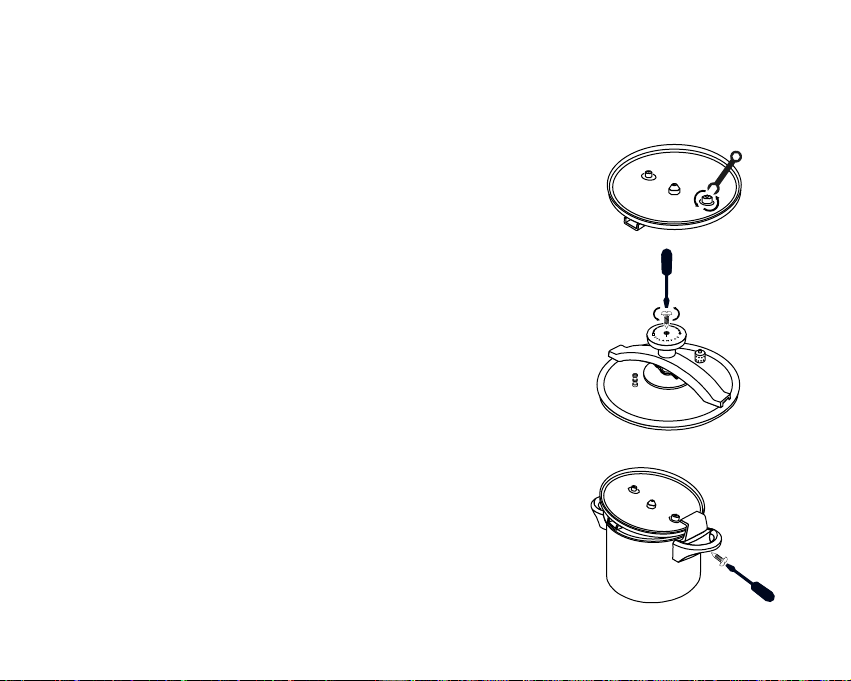
HOW TO REPLACE THE CONTROL VALVE AND/OR THE SAFETY VALVE
- Turn the lid inwards and unscrew the hexagonal nut counterclockwise
using a spanner wrench (Fig. 18). Remove the nut.
NOTE: Use a wrench number 10 for the regulation valve and a wrench
number 14 for the safety valve.
- Turn the lid outwards and remove the valve by pulling it out of the lid;
- Fit the new accessory from the outside of the lid.
- Turn the lid inwards, holding the accessory, and tighten the nut.
HOW TO REPLACE THE SCREW LOCKING LEVER
- Hold the locking lever with one hand and use a screwdriver or cross-head
screwdriver to unscrew the screw by turning the wrench counterclockwise.
(Fig.19)
- Remove locking lever.
- Place the new locking lever and its screw.
- Press the button and tighten by turning clockwise.
HOW TO REPLACE BAKELITE SIDE HANDLES
- Put down the pot.
- Use a screwdriver and unscrew the screw on the side handles, turning it coun-
terclockwise. (Fig.20)
- To assemble a new handle, see chapter “Before first use”.

UPKEEP AND MAINTENANCE PAG17
Removing Labels
RECOMMENDATION
Wet the label in very hot water and remove it.
Need to use abrasive pads
RECOMMENDATION
This type of wipe scratches the surface of the piece.
Rub horizontally and not vertically.
Use of detergents
RECOMMENDATION
Do not use disinfectants containing bleach or other detergents containing chlorine (Cl).
The use of aggressive detergents can lead to the appearance of stains.
Burnt food
RECOMMENDATION
Add some water and ammoniac detergent and allow to stand for a few minutes.
Wash the cooker as usual.
If necessary, wipe with a stainless steel scourer.
Calcareous spots (whitish spots)
RECOMMENDATION
Add some vinegar and water and bring the cooker to warm for a few minutes.
Let it cool and wash normally.
Rust spots (brown spots)
RECOMMENDATION
Do not use steel wool scouring pads when cleaning stainless steel parts.
This type of mops can leave rust spots, permanently damaging the surface of the piece.
Choose stainless steel scourers.

PAG18 UPKEEP AND MAINTENANCE
Food stains
RECOMMENDATION
Add a little bit of baking soda and water and let the cooker warm up for a few minutes.
Let cool and wash.
Excessive heat stains (colored spots)
RECOMMENDATION
Wash the cooker with ammonia detergent.
You can also choose to use brighteners for chrome.
SILAMPOS cleaning product is recommended and effective at removing stains and residues, making stain-
less steel cookware shine again.
END OF LIFE CYCLE:
When your pressure cooker runs out of service life, do not put it in the trash. Deli-
ver it to an Ecocenter or to our factory: Silampos, S.A. Rua das Cortinhas, 301 |
3700-605 Cesar
In this way you will contribute to the environmental preservation, through the
appropriate recycling of the materials used in the manufacture of our cookware.
Other manuals for traditional
2
Table of contents
Other Silampos Electric Pressure Cooker manuals


