Silencer 58SL User manual
REMOTE START with KEYLESS ENTRY SYSTEM
58SL
Quick Reference Install Guide
FOR PROFESSIONAL INSTALLATION ONLY!
If you are not proficient in the installation of this product or would like a full ver-
sion of the installation manual, please visit our web site @www.magnadyne.com
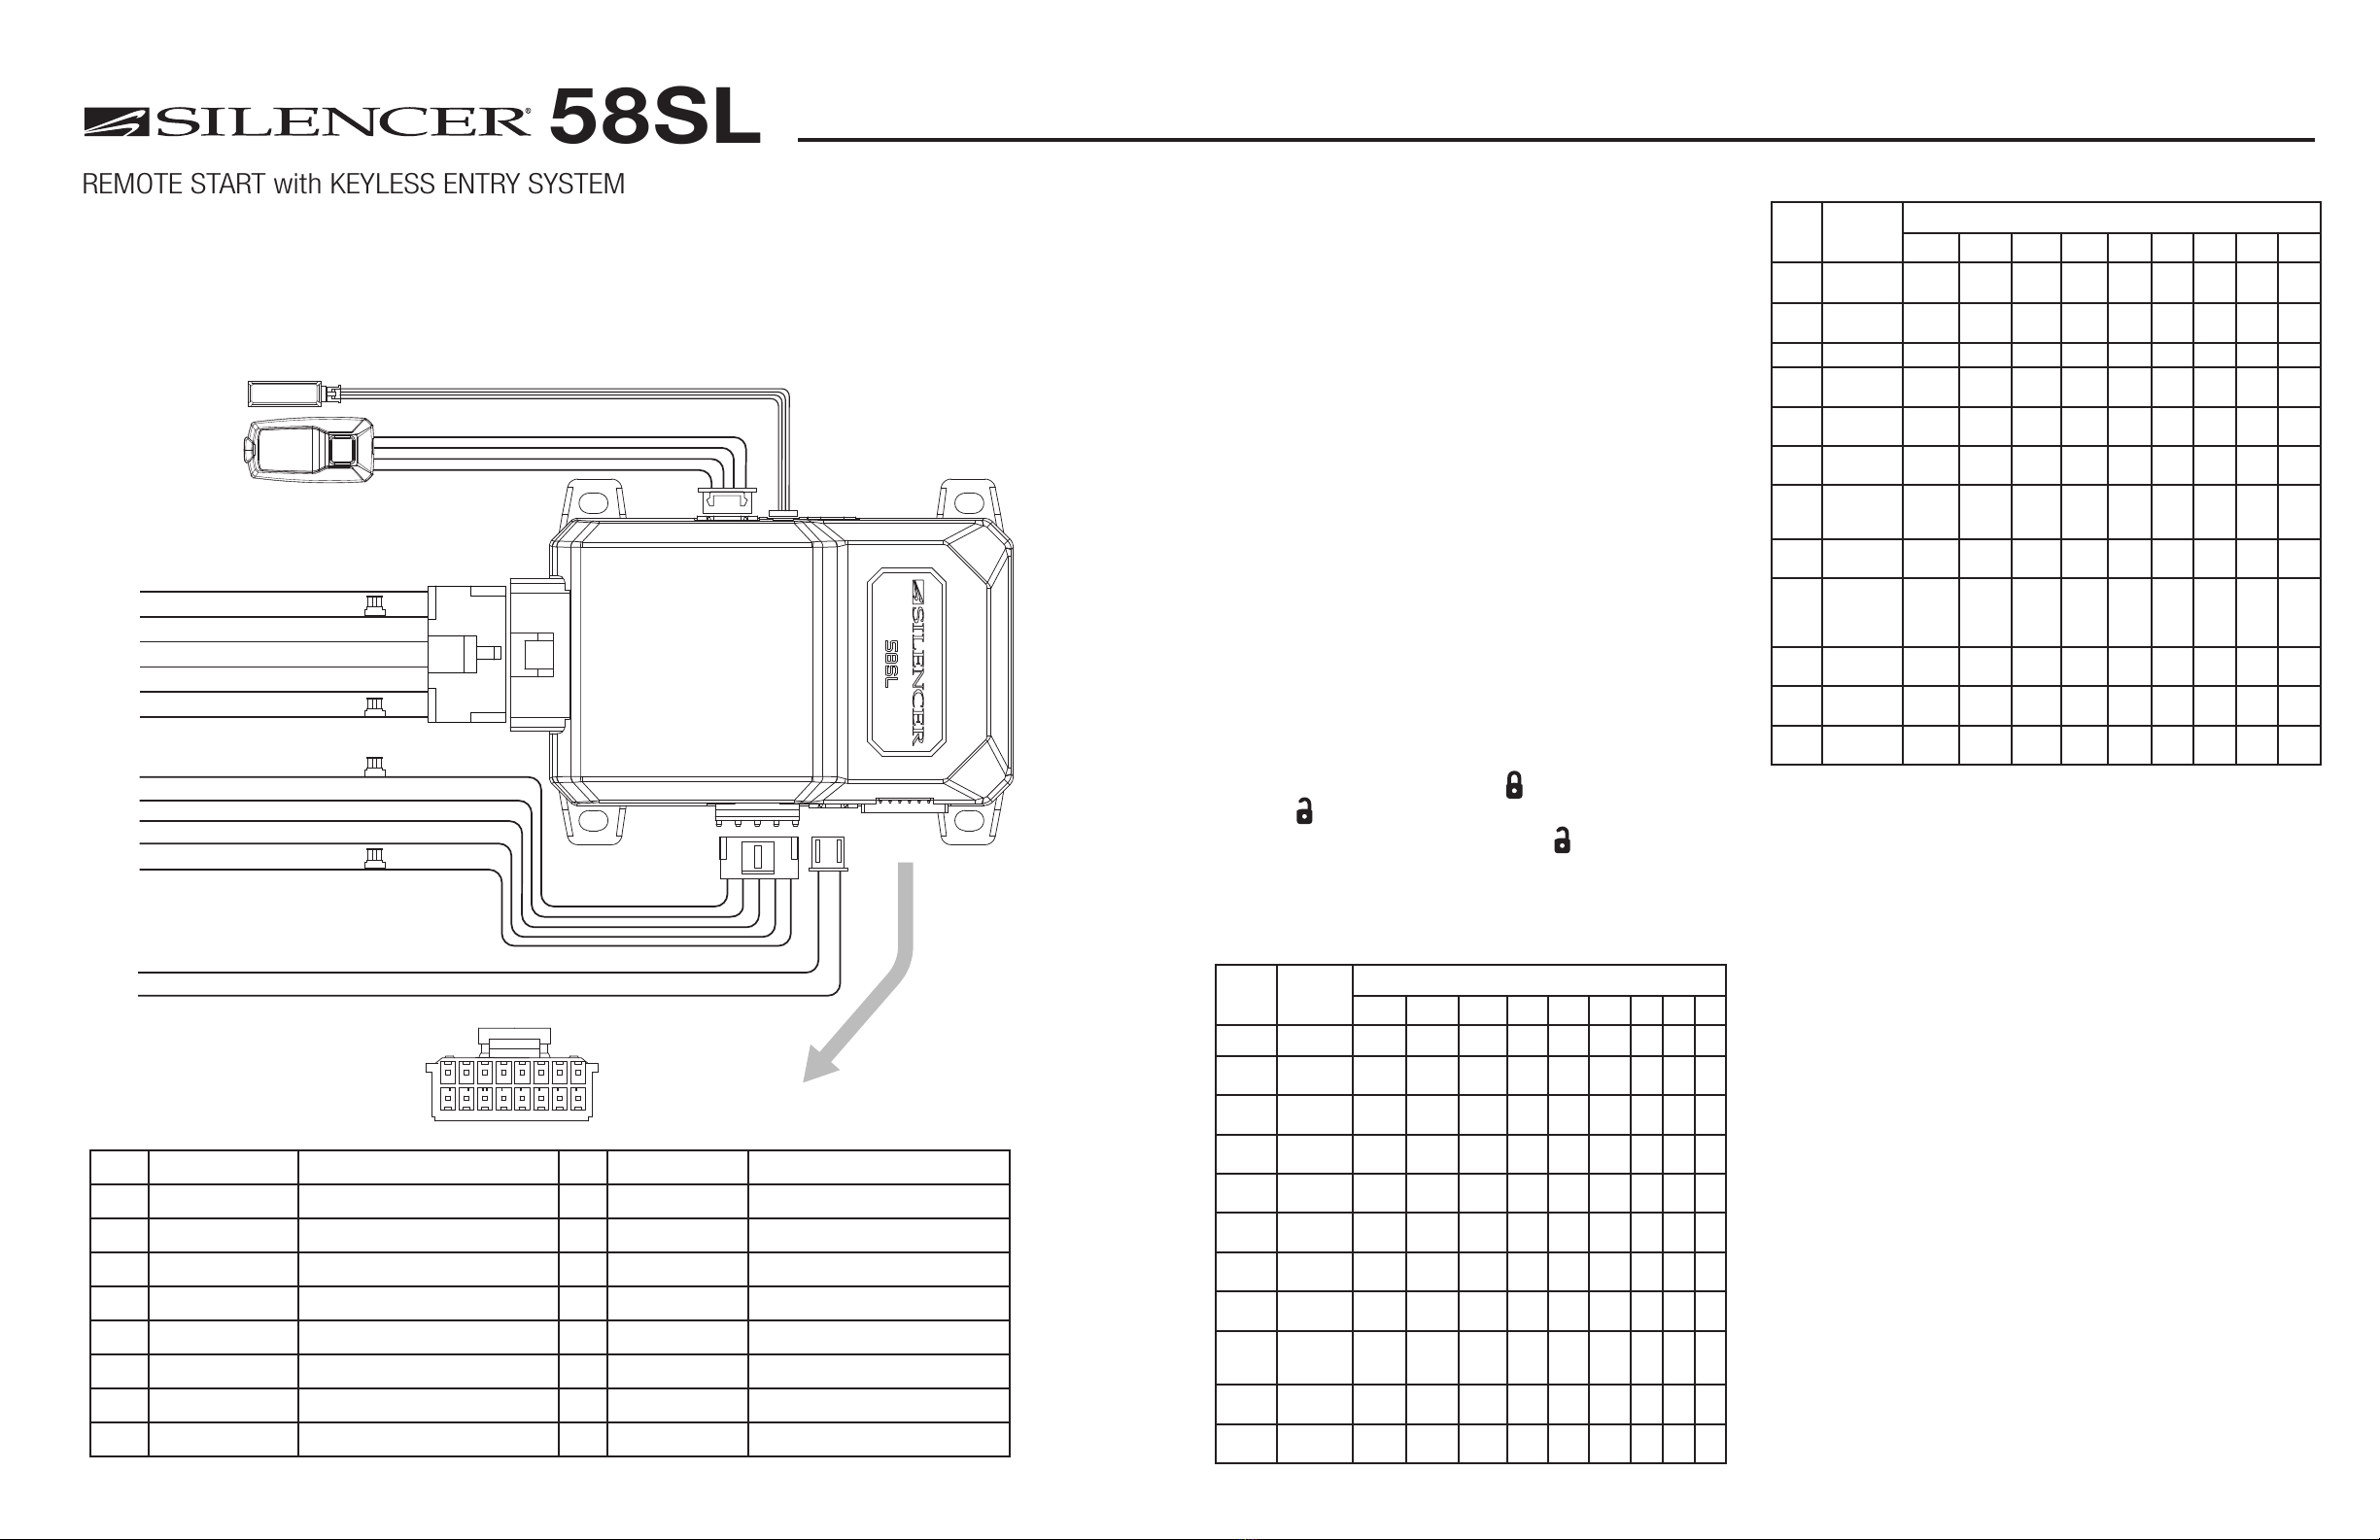
Receiver/Control
Center(RCC)
Pink: (+) Ignition 1 Input/Output
Red: +12V Input
Red: +12V Input
Red: +12V Battery Power
Brown: (-) Horn Output
16 PIN
(see chart)
Black: System Main Ground
White: Parking Light Relay Output
Blue: - Negative Door Unlock Output
Green: - Negative Door Lock Output
White: Parking Light Relay Power Input
Violet: Starter Output
Pink/White: Ignition 2 Output
Orange: Accessory Output
Fortin or iDatalink
Bypass Module
30A
30A
15A
10A
16
5678
9101115 14 13
432
12
1
16 Pin Accessory Harness Wiring:
Pin Color Function Pin Color Function
1 Green/White (-) Factory Alarm Re-Arm Output 9 Orange (-) GND When Armed/Lock
2 Gray (-) Hood Pin Safety Input 10 Red/White (-) Channel 3 Output (Trunk)
3 Black/White (-) Parking Brake Input 11 Lt. Purple/Yellow (-) Starter Output
4 Open None 12 Lt. Green/Black (-) Factory Alarm Disarm Output
5 Brown (+) Vehicle Brake Safety Input 13 Blue/White (-) 2nd Status/Defrost Output
6 White/Blue External Activation Input 14 Dk. Blue (-) Status Output
7 Yellow (+) Ignition Output (to alarm) 15 Orange/White (-) Accessory Output
8Lt. Violet/White Tach Input (AC) 16 Pink (-) Ignition Output
Mounting the Receiver/Control Center (RCC):
1. Choose a location on the upper or sides of the vehicle windshield.
A higher location is best.
2. Remove the backing liner from the mounting tape on the backside of the
RCC and stick it to the windshield glass.
3. Route the RCC cable to the location of the control module.
Programming System Features:
All SILENCER remote start systems have a menu of features that can
be programmed to suit the installation requirements of any vehicle.
These features can be set by using the RCC button Feature Programming
procedure or by Windows PC programming and the SILENCER web app.
Feature Programming by RCC Button
1. Open the drivers door.
2. Turn the ignition key ON then OFF.
3. Within 5 seconds, press and hold the RCC button to select the menu.
- A single chirp and LED flash indicates Menu #1.
- Hold the button longer for two chirps and two LED flashes.
You are in menu #2.
4. When the desired menu is reached, release the RCC button.
5. Within 5 seconds, press and release the RCC button the number of
times corresponding to the feature you want to change then press and
hold the button once more to lock the feature. Chirps and LED flashes
will confirm the feature chosen. Release the button. Use the buttons on
the SILENCER remote to adjust the feature.
6. For features with only two options, the = 1 Chirp setting,
while the = 2 Chirp setting.
7. For features with more than two settings, the button selects the
settings in ascending order. Horn chirps indicate which option is selected.
8. Turn on the igntion key to exit Feature Programming.
Menu #1 (Default in Bold)
Item Feature Chirps
1 2 3 4 5 6 7 8 9
1 Data Protocol ADS Fortin
2Ignition
Locking Off On
3Ignition
Unlock Off On
4Panic with
Ignition On Off On
5Door Lock
Pulse 0.8 sec. 3.5 sec. 0.4 sec.
6Double Pulse
Lock
Off
(Single)
On
(Double
7Double Pulse
Unlock
Off
(Single)
On
(Double)
8Factory Alarm
Disarm Pulse Single Double
9Factory Alarm
Disarm
With
Unlock
Before
Unlock
Remote
Start
Only
10 Horn Output 20 ms 30 ms 40 ms 50 ms Panic
Only
11 Comfort
Closure Off CC1 CC2
Menu #2 (Default in Bold)
Item Feature Chirps
1 2 3 4 5 6 7 8 9
1 Transmission
Type
Automatic
Manual
2
Engine Checking
Mode
Wireless
Tach Voltage Wired
Tach
Off
3 Cranking Time 0.6 sec 0.8 sec 1.0 sec 1.2 sec 1.4 sec 1.6 sec 1.8 sec 2.0 sec 4.0 sec
4 Remote Start
Run Time 12 min 24 min 60 min
5 Anti-Grind
Output On Off
6 Diesel Start
Delay Off Timed
15 sec
Timed
30 sec
Timed
45 sec
7
ACC Output
During Diesel
Wait to Start
Off On
8 2nd Ignition
Behavior
Ignition 1
ACC
9
Blue / White
Wire
Behavior
GND
When
Running
Rear
Defog
Latched
10 min
Rear
Defog
Pulse
10 External Trigger
Pulse Count 1 Pulse 2 Pulse 3 Pulse
11 Parking Light
Behavior Constant Flashing
12
Timer Mode Run
Time
12 min 3 min 6 min 9 min
Access another feature within the same menu
1. Press and release the RCC Button the number of times to advance from
the last feature programmed to the next feature to be programmed.
2. Press the RCC button and hold it.
3. Use the SILENCER remote and follow steps 5 or 6 above to adjust
the feature.
Access another menu
1. Press and hold the RCC Button
2. After 3 seconds, the system will advance to the next menu and conform
with chirps and LED flashes.
Exiting the feature program mode
1. Set the ignition key to ON. A long confirmation chirp will be hear if a
horn or siren is connected.
2. Automatic after 30 seconds with no input from the RCC button
(long chirp).
3. The RCC button has been press too many times (long chirp).
Feature Programming by PC/App
1. A windows computer with internet support is required. The APP supports
Windows 7 (sp1) thru Windows10 (Apple/Mac computers are not supported)
2. The programming adaptor model #ALA-21P is required
3. Follow the instructions provided with the ALA-21P accessory.

Engine Checking Mode:
The engine checking mode on all SILENCER remote start systems is set at
“Wireless Tach” by default. Once all the wiring is complete and correct, the
engine can be remote started without any other changes.
Engine type, Extreme weather etc. may require a more defined type of
engine checking for reliable operation. Use the information enclosed to
setup alternate engine checking modes.
Wireless Tach Learning
1. After the installation is completed, use the SILENCER key fob and
initiate the remote start sequence.
2. If the engine does not start on the first attempt, let the SILENCER
module cycle and attempt to start the engine again. Up to (3) cranking
attempts may be needed to start and run the engine.
3. When the engine starts and runs, let it run for at least 30 seconds.
4. Use the SILENCER key fob to shut down the engine.
Wireless Tach is programmed.
Hardwire Tach or Data Tach
- Hardwire Tach requires the Lt.Violet/White wire to be connected to
a fuel injector wire or a coil wire.
- Check the data bypass module spec to make sure it will provide a data
tach signal. Additional pre-programming of the data module may be
required. Refer to the data module instructions.
To learn the tach signal
1. Start the vehicle with the key.
2. Within 5 seconds, press and hold the valet button on the RCC.
3. Once the tach signal is learned, the blue LED on the RCC will
light or flash.
- When tach learning from a hardwire connection, the parking
lights will flash one time
- When tach learning via the data module, the parking lights will
flash two times.
Note: Depending on the data bypass module used, you may have to put
the bypass module into tach learning mode first before performing the
above procedure. Review the instructions of the data bypass module
before proceeding.
Pairing a Remote Controller:
The SILENCER remote controllers provided with this kit have already been
paired to the control module. In the event that the pairing is lost or an
additional remote needs to be paired, follow the enclosed procedure.
1. Open the driver’s door.
2. Turn the ignition key to the ON position.
3. Within 5 seconds, press and release the RCC button.
4. Within 5 seconds, press and hold the RCC button. The LED will flash, and
the horn/siren will chirp one time. You are now in remote pairing mode.
Release the RCC button.
5. Press and hold the button on the new remote control.
6. Press and release the button 5 times.
A. The LED on a 4 button transmitter will begin to flash slowly.
B. The word (PAir) will be displayed in the clock area of a 5 button LCD
transmitter. The remote will remain in this state for 15 seconds.
7. Press and release the button on the new SILENCER remote.
The horn/siren will chirp one time to conform the code is learned.
8. Turn OFF the ignition key. The horn/siren will long chirp to confirm exit of
remote pairing mode.
Remote Start Shutdown Diagnostics
If the remote starter activates but the engine fails to remain running, a
diagnostic procedure can be run to try and determine where the fault
in the system is.
To Perform Shutdown Diagnostics
1. With the ignition key Off, press and hold the RCC button.
2. While holding the RCC button, turn the ignition key On then Off.
3. Release the RCC button.
4. Press and release the RCC button one time.
The RCC LED will report the last shutdown reason for 1 minute or
until the ignition key is turned On again. Compare the LED flashes
to the chart below.
Status LED Flashes Reason for Shutdown
1 Over-Rev Shutdown
2 Runtime Expired
3Shutdown by Transmitter (or
Optional Push button)
4 Low or No RPM Detection
5 Hood Open Shutdown
6 (+) Brake Shutdown
7 (-) Parking Brake Shutdown
9Low Vehicle Battery (Voltage
Checking Mode Only)
Reset and Deletion
If the programmable features need to be reset to default or the
Wireless Tach feature needs to be reset for re-programming,
follow the enclosed procedure.
1. Open the drivers door.
2. Turn the ignition key to the ON position
3. Within 5 seconds, press and release the RCC button the number
of times required below to perform the task.
- Press and release the RCC button two times to delete all of the
programmed remote controls.
- Press and release the RCC button three times to delete all features
programming back to their default settings.
Note: This procedure does not erase Wireless Tach information.
- Press and release the RCC button four times to erase all pre-learned
Wireless Tach information.
4. Once you have selected the function you want to perform, press and
hold the RCC button. The RCC LED will flash and the horn will chirp
(if connected) to confirm the functional step chosen. Do Not release
the button.
5. Press and release the (lock icon picture) button of a programmed re-
mote. The horn will chirp to confirm the feature has been reset/deleted.
6. Release the RCC button and turn off the ignition key. The horn will chirp
(if connected) to confirm exit.
GOVERNMENT REGULATION
This device complies with Part 15 of FCC rules. Opera-
tion is subject to the following two conditions: (1) This
device may not cause harmful interference, and (2) This
device must accept any interference received, including
interference that may cause undesirable operation.
This equipment has been tested and found to comply
with the limits for a class B digital device, pursuant to
Part 15 of the FCC Rules. These limits are designed to
provide reasonable protection against harmful inter-
ference in a residential installation. This equipment
generates and can radiate radio frequency energy and,
if not installed and used in accordance with the instruc-
tion manual, may cause harmful interference to radio
communications. However, there is no guarantee that
interference will not occur in a particular installation. If
this equipment does cause harmful interference to radio
or television, which can be determined by turning the
equipment OFF and ON, the user is encouraged to try to
correct the interference by one or more of the following
measures:
• Reorient or relocate the receiving antenna.
• Increase the separation between the equipment
and receiver.
• Connect the equipment into an outlet on a circuit
different from that to which the receiver is connected.
• Consult the dealer or an experienced radio / TV
technician for help.
To satisfy FCC RF exposure compliance requirements,
the device and its antenna must maintain a separa-
tion distance of 20cm or more from the person’s body,
except for the hands and wrists, to satisfy RF exposure
compliance.
WARNING! Changes or modifications not expressly
approved by the party responsible for compliance could
void the user’s authority to operate this device.
© Copyright 2021 Magnadyne Corporation. All Rights Reserved. No part of this publication
may be produced without the expressed written permission of Magnadyne Corporation.
Silencer is a registered trademark of Magnadyne Corporation.
For Warranty Information, please visit our website at www.silencer.com
www.silencer.com | call 310-735-2000 | IM_QS-58SL
Other Silencer Automobile Accessories manuals


Popular Automobile Accessories manuals by other brands

Toyota
Toyota 74102-02140 quick start guide

Rostra
Rostra Converse instructions

EVBox
EVBox BusinessLine Installation and commissioning manual

injen technology
injen technology SP1230 quick start guide

Whelen Engineering Company
Whelen Engineering Company Cenator WeCan installation guide

Farad
Farad BARS PR25 - 2 quick start guide

American muscle
American muscle 71324 manual

Schiller
Schiller 75-71310 installation instructions

Rexing
Rexing Intelligent Hardwire Kit user manual

Motorola solutions
Motorola solutions PMLN8305 Installation and user manual

Ecoological
Ecoological GapShield installation manual

Google Nexus One Car Dock manual


