Torklift F3004/FMTFDRO5 User manual

Page 1
F3004/FMTFDRO5
IMPORTANT OWNER-OPERATOR INSTALLATION INSTRUCTIONS
APPLICATION FITS
REAR TIEDOWNS W/ FACTORY INSTALLED RECEIVER
Minor movement (or settling) can occur in some incidental harsh driving conditions
(on or off road).
A rubber bed mat is not a requirement to maintain the lifetime warranty on a Torklift sys-
tem, but a strong recommendation, simply as a safety precaution to protect the truck bed,
the bottom of the camper and to give the camper additional support.
Warning!!
TORKLIFT DOES NOT RECOMMEND: Installing your truck camper in your truck on top of
a drop in plastic bed liner!!! THIS WILL VOID YOUR WARRANTY!
The drop in plastic bed liners can slide on top of the truck bed surface, and the camper can
slide on top of the slick surface of the bed liner. The liner can also act as a spring causing a
trampoline effect increasing vertical truck camper movement, independent of the vehicle,
possibly resulting in truck bed damage and/or camper damage!

Page 2
INSTALLATION INSTRUCTIONS:
1. Find one tiedown receiver and install the insert with a 1/4” pin. Slide the re-
ceiver into the factory trailer hitch cross tube with the welded bolt facing towards
the back of the truck (as seen in Photo A).
2. Install the retainer bracket and place a 1/2” lock washer and acorn nut on the
threads, as seen in Photo B. Tighten to 55 ft lbs. It is important that the channel
bracket overlaps the trailer hitch plate. Tighten all fasteners until there is no slack
or play between any component.
F3004 PARTS INVENTORY
2 TIEDOWN RECEIVERS 2 SPECIAL 16 1/2” STRAIGHT INSERTS
2 ADAPTER SLEEVES 2 1/4” PINS
2 RETAINER BRACKETS 2 1/2” LOCK WASHERS
2 1/2” ACORN NUTS
NOTE: THE HOLES IN THE RETAINING BRACKETS ARE PUNCHED
OFFSET SO THAT THEY CAN BE REVERSED FOR ABETTER FIT.
**IMPORTANT INFORMATION **
FOR OWNERS OF 2005 F250/F350
On 2005 F250/F350 trucks with a 2.5” X 2.5” Inside diameter cross tube,
you will nd it necessary to use the two supplied adapters on the tiedown.
Slide the supplied adapter onto the end of the tiedown that you will slide
into your receiver hitch crosstube. This adapter will allow the tiedown to
t snugly inside of the crosstube.

Page 3
INSTALLATION DIAGRAM
PHOTO A
PHOTO B

Page 4
INSTALLATION DIAGRAM
COMPLETED INSTALLATION

Page 5
Frame Mounted Tie Downs
Leading the camper tie down industry in strength,
quality, advanced design and installation. TorkLift TRUE
frame mounted tie downs are far superior to all tie
down systems available.
The TorkLift system is unique in its design and is pat-
ented. Four independent tie down points (with no belly
or crossbar) working much like your receiver type trailer
hitch as the inserts are removable allowing the system
to be virtually undetectable when not in
use.
They are designed for each make and mod-
el to t tight to the frame so as not to compromise ground clearance. TorkLift tie downs are
not universal ‘one size ts all’ therefore all the problems with correct t for each particular
application have been eliminated.
Super Hitch
High strength extended hitch system engineered for safely towing all types of trailers
behind your truck and camper. With a towing capacity of 12,000 lbs. with an extension,
(17,000 lbs. without) the SuperHitch is rated the strongest in the industry.

Page 6
This bottom example shows the bolt when it’s completely shed
through the vehicle. You may nd it easier to keep the bolt sher
attached until you get the tie down receiver in place so that the bolt
doesn’t fall into the vehicle frame.
TORKLIFT’S BOLT FISHING GUIDE
Coiled End of Bolt Fisher
Note: The hardware may vary
as to what is being shed along
with the bolt. In this instance
a 1” X 2” plate washer is being
shed along with the hex bolt.
Different applications may req-
ire shing through various star
washers and at washers for
example.
Your guide to understanding the installation of our frame mounted tie downs.
This side of the Bolt Fisher should come
out of a hole where the required hardware
(for example 1” X 2” plate washer) can
pass through
Opposite End of Bolt Fisher
Desired Hole on Vehicle (Place the coiled
end of the bolt sher through this hole).

Page 7
TIEDOWN INSERT INSTALLATION
INSTRUCTIONS
On one end of each of your tiedown inserts is a triangular plate
referred to by Torklift as a bullet plate. Your tiedown inserts should be
installed with the shorter side of the bullet plate facing away from each
other, i.e.. The shorter side of the front insert should point to the front of
the truck and the shorter side of the rear insert should point towards the
rear of the truck.
Once installed, attach the TorkLift directional stickers to the face of
the bullet plate on the insert as a reminder.
SHORTER SIDE
DRIVERS SIDE REAR
DRIVERS SIDE FRONT

Page 8
TURNBUCKLE SPRINGLOAD OPTIONS
SPRINGLOAD XL KIT - S9050
CONTACT YOUR LOCAL DEALER FOR MORE DETAILS
Torklift requires all 4 tiedown points to be spring
loaded in order to qualify for our manufacturer’s
Industry Exclusive Camper Anchor and Truck Frame Warranty
BASIC SPRINGLOAD KIT -
S9000
Includes 2 External Springload Units
& 2 Heavy Duty Forged Turnbuckles.
Lifetime Guarantee
This set includes 2 Long Chrome Barreled
Turnbuckles with an Internal “Set” Spring.
The Springload XL Kit comes with a Pol-
ished Chrome Finish and is compatible
with the FastGun Derringers.
2 year warranty
Includes 2 Stainless Steel Turnbuckles with an Internal
“Set” Spring. Available in 2 Lengths and 3 Finishes
(Grey, White or Polished Stainless Steel)
Lifetime Guarantee
FASTGUNS LEVER ACTION TURNBUCKLES
FOR BED MOUNTED TIEDOWNS
S9522-GREY SS/ S9523-WHITE SS/ S9526-POLISHED SS
FRAME OR BUMPER MOUNTED TIEDOWNS
S9520-GREY SS / S9521-WHITE SS / S9527-POLISHED SS
FASTGUN DERRINGERS
Transforms Your Pre-Existing Conventional
Turnbuckles into a Lever Action
FastGun Style Turnbuckle.
Kit includes 4 lever action Derringers
Zinc S9524
Stainless Powdercoat S9525
Polished Stainless S9528

Page 9
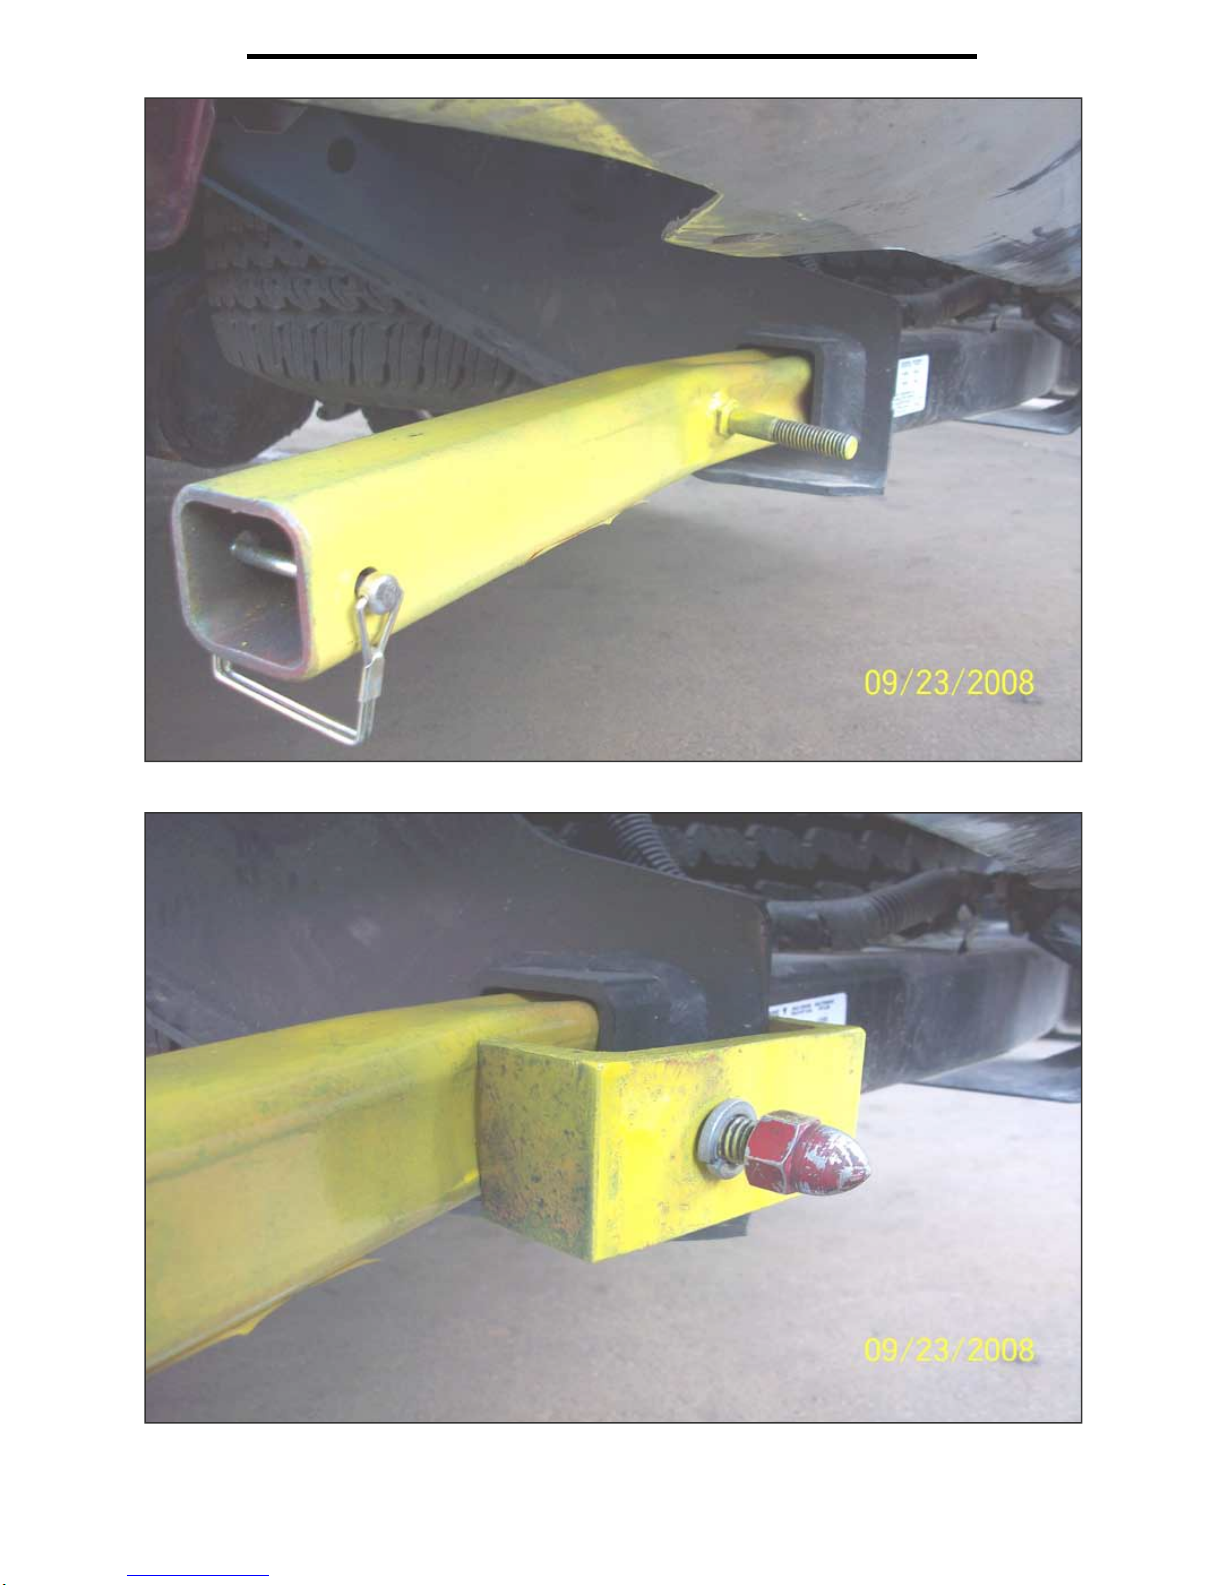
When securing any heavy load (especially a camper) in your truck bed, your front tie down points
should pull the load forward as much as possible. Some camper anchor points may differ with dif-
ferent manufacturers, as well as the camper jack mounting locations. Your Torklift tie down inserts
have offset triangular brackets to increase the angle of pull. These are designed to be used in the
front facing forward, and the rear facing rearward but can be used in either front or rear. These
recommendations are to be considered and followed as a basic rule of thumb . Obviously there will
be some applications where this may not be possible.At a minimum, if opposite pull of both front
and rear tiedowns cannot be achieved for whatever reason, you should have at least a forward pull
at the front or rear location.
If your camperdoes not come with Rubber Bumpers on the front lower portion of the camper, install-
ing Rubber Bumpers (Torklift has Rubber Bumpers available Part
A7001) or using a block of wood such as a 2 x 4 in the bed, will prevent the camper from damaging
the front bulk head of the truck bed.
Minor movement (orsettling) can occur in some incidental harsh driving conditions (on oroff road).
A rubber bed mat is not a requirement to maintain the lifetime warranty on a Torklift system, but
a strong reccommendation simply as a safety precaution to protect the truck bed, the bottom of the
camper and to give the camper additional support.
TORKLIFT DOES NOT RECOMMEND: Installing your truck camper in your truck on top of a
drop in plastic bed liner!!! The drop in plastic bed liners can slide on top of the truck bed surface,
and the camper can slide on top of the slick surface of the bed liner. The liner can also act as a
spring causing a trampoline effect increasing vertical truck camper movement, independent of the
vehicle, possibly resulting in truck bed, and camper damage!
RECOMMENDED TRUCK CAMPER
INSTALLATION INSTRUCTIONS
INSTRUCTIONS FOR FINISH MAINTENANCE
OF TORKLIFT PRODUCTS
POWDER COATED STEEL:
To keep your Torklift products looking good follow these guidlines. All steel powder coated Torklift
products are sandblasted for maximum adhesion and use a high quality industrial urethane based
powder coat. Due to the extreme, harsh, undercar environment that your Torklift products live in,
(consistantly sprayed with corrosive road chemicals such as salt, and road debris), Torklift does not
warranty the power coated nish.
To minimize corrosionfromthesefactors on powdercoated steel products,Torklift recommendsregu-
larly cleaning and inspecting the powder coated surface and touching up any affected areas with an
enamel or urethane based aerosol paint product. If there are any areas of surface rust, there are also
aerosol spray rust converters available on the market that can be used as a preparation to touch-up
paint application. These nish maintenance products are available at any automotive parts supplier.
POLISHED STAINLESS STEEL :
Torklift utilizes quality grade 304 stainless steel in our stainless steel polished products. 304 stain-
less steel is well known for its anti-corrosive properties. However, in some environments such as
coastal regions or when coming in contact with some road chemicals, corrosion may occur.
For a quick clean simply use WD40 and a cloth rag. We also recommend occasional polishing of
our polished stainless products to maintain their attractive nish. Use an approved stainless steel
chrome or aluminum mag wheel polish cleaning product which can be purchased from any auto-
motive parts supplier.
Table of contents
Other Torklift Automobile Accessories manuals

Torklift
Torklift D2100 User manual

Torklift
Torklift F1008-30 User manual

Torklift
Torklift S9050A User manual

Torklift
Torklift C3205 User manual

Torklift
Torklift F2012 User manual

Torklift
Torklift A7726 Hidden Power User manual

Torklift
Torklift Hidden Power E Series User manual

Torklift
Torklift C4201 User manual

Torklift
Torklift A7202 User manual

Torklift
Torklift C3215A User manual
Popular Automobile Accessories manuals by other brands

ScentLok Technologies
ScentLok Technologies OZ20 HD user manual

Rhino-Rack
Rhino-Rack S512X manual

ECS Electronics
ECS Electronics LX-001-07U manual

FABBRI PORTATUTTO
FABBRI PORTATUTTO 17516400 Assembly instructions

Ingeteam
Ingeteam NEO Installation and operation manual

Smappee
Smappee EV One Home installation manual