Silent Call Communications MR1214-MC User manual
Document #
1081243126052
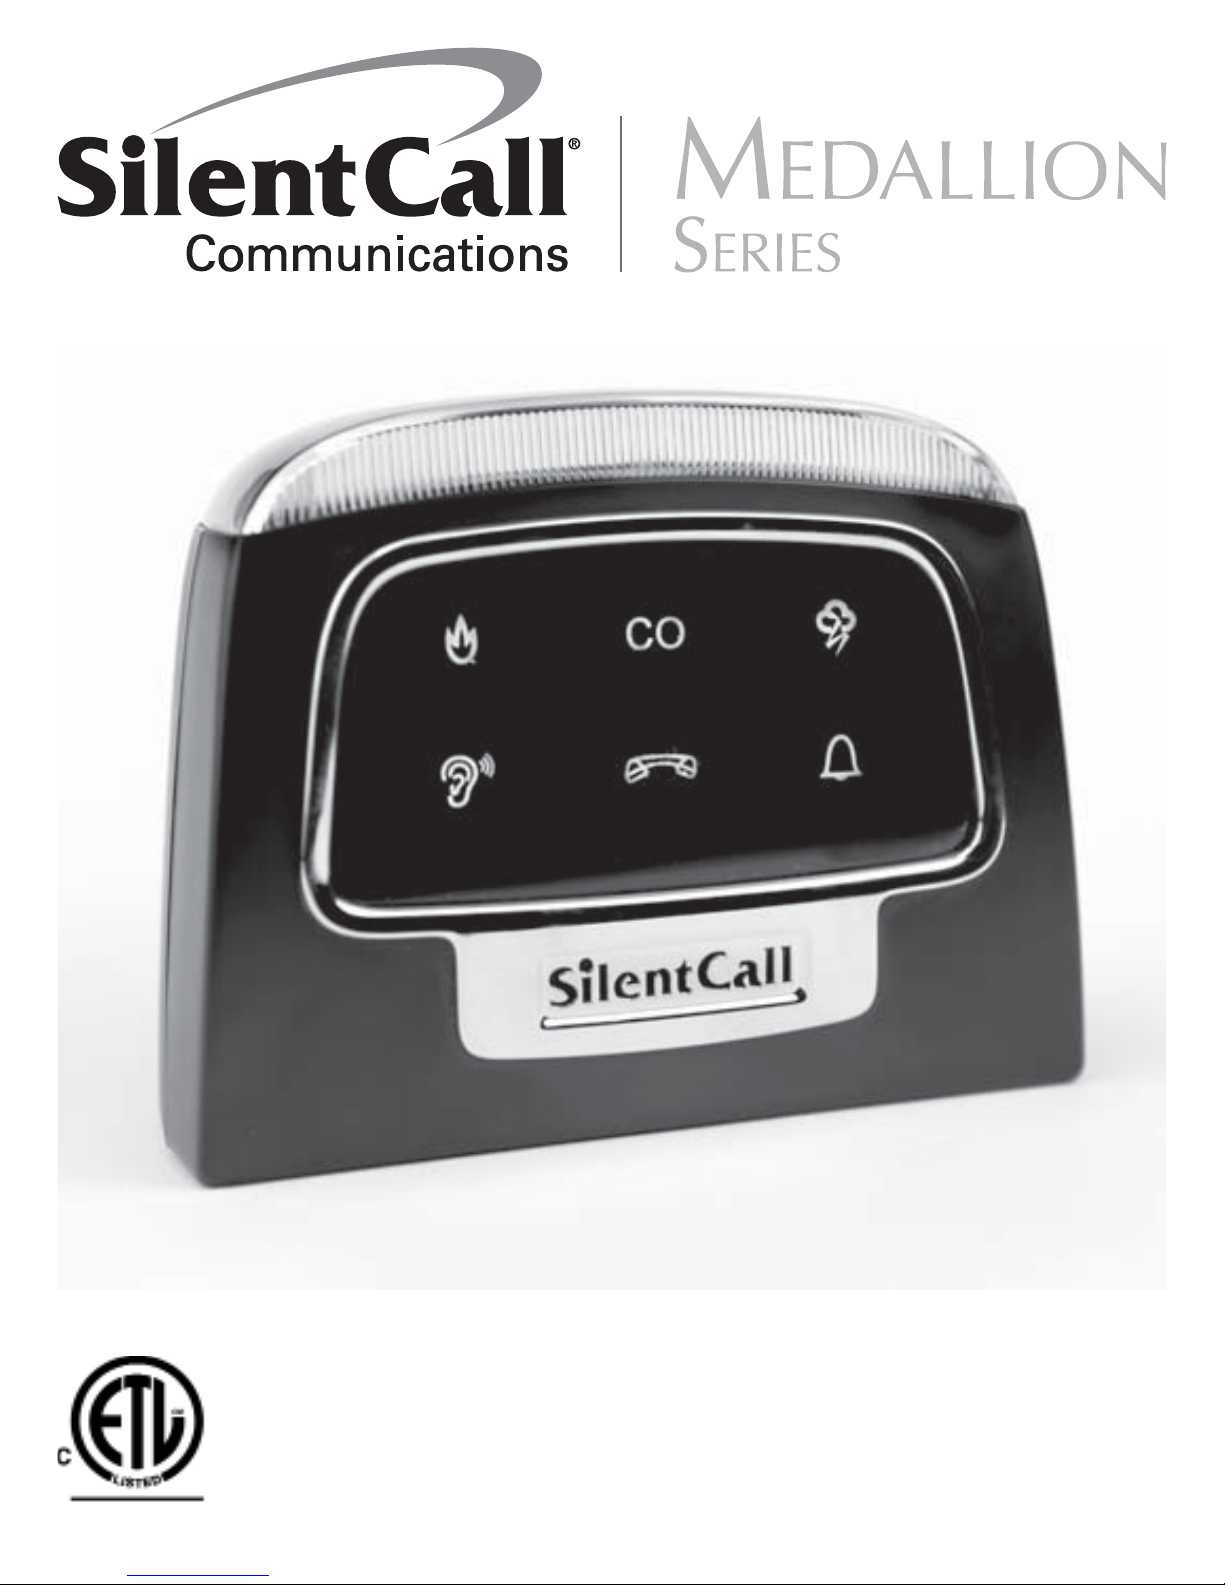
MINI RECEIVER
Installation and Operation Manual
Model # MR1214-MC
418 MHZRECEIVER


General:
The Mini Receiver is a 418 MHz wireless alerting device equipped
with 24 hour battery backup. Main Power is supplied using a
Silent Call 18 watt AC/DC Wall mount Adapter P/N 890007-2. The
Mini Medallion Series Receiver can store up to 20 from a possi-
ble one million, Silent Call 418 MHz Medallion Series transmitter
address codes.
Installation:
Installing the Mini Receiver consists of locating it where it can be
noticed most effectively by the user. Plug the AC/DC wall mount
adapter into any standard household 110VAC 60Hz outlet. Insert
the adapters DC barrel plug into the Mini Receiver Barrel Jack
Labeled “Power”. Slide the power switch to the ON position and
confirm the Power ON GREEN LED is illuminated under the top
strobe lens. The receiver is now ready to be programmed.
Programming:
NOTE:All Medallion Transmitters will be required to be pro-
grammed to your new receiver.The receiver leaves the
factory with the memory cleared.
Apply power to the receiver as described in the Installation sec-
tion.
With the receiver powered, press and hold the program button
located at the back of the receiver case. All display icons will illu-
minate. Continue to hold the program button until the icons goes
out (about 3 seconds) and then the GREEN PHONE icon blinks 3
times. Release the program button. The receiver display icons
will come back on to indicate that the receiver is now in program
mode. The receiver will remain in program mode for approxi-
mately 30 seconds, and the display icons will start to go out to
indicate the program time remaining. While in program mode,
the transmitter you wish to program must be activated (Trans-

mitting) for the receiver to memorize the code of the transmitter.
The transmitter can be activated by pressing the test button on
the corresponding transmitter. When the receiver receives the
transmitted signal, it will memorize the code. The receiver should
activate and flash the top strobe light, and the appropriate display
icon will illuminate.
Programmed transmitter codes are retained in memory even
when the power is removed.
Erase memory:
To erase all programmed codes:
All Erase – Press and hold the program button, the Display icons
will come on for about 3 seconds, go off and then the GREEN
PHONE icon will blink 3 times. Continue to hold the program
button an additional 3 seconds until the icons scroll in a counter-
clockwise direction several times indicating all previous learned
transmitters that were stored in memory have been erased.
Release the program button and all previously learned transmitter
codes will have been successfully erased.
Battery Backup Mode:
In the event of a main power loss or failure of the wall adapter,
the Mini Receiver will automatically enter into the battery backup
mode. The Mini Receiver has been tested to provide at least 24
Hours of Battery backup operation with 15 minutes of Alerts.
Located under the top strobe lens cover is an AMBER LED. The
AMBER LED will blink once every 10 seconds, indicating Input
DC power loss to the receiver and it is operating on the back-up
battery. The AMBER LED will blink at a one second rate once the
back-up battery has reached minimum operating voltage. Operat-
ing the receiver during a low battery indication is not recommend-
ed.
IMPORTANT: The Mini Receiver will need to charge two hours for
every hour in Battery backup mode or a full 40 Hours after low
battery indication to ensure complete battery recharge.

Mini Receiver operating on Main power and the amber LED is ON
or blinks, indicates a failure of the unit. Return the MR1214-MC
with AC/DC adapter to the manufacturer for repair.
Battery Replacement:
The MR1214-MC Mini Receiver has a UNITECH 12VDC 800maH
Ni-MH back-up battery. Silent Call Battery Part Number (BU-12).
Replacement batteries can be ordered online at www.SilentCall.
com or by calling 800-572-5227.
Carefully follow below instructions when replacing the battery.
Replace the battery pack as follows:
1. Place the unit on its side, using a flat bladed screwdriver or
similar, insert into the plastic notches on the bottom of the
unit. Gently twist blade and the bottom plastic housing will
disconnect.
2. Place the unit on its feet, and pull the front plastic housing
away from the back at the bottom until the top lens discon-
nects.
3. Hold the circuit board in place with one hand and remove the
2 pin white connector from the green battery pack by pulling
it straight out.
4. The battery is secured in place with double sided tape. To
remove the battery pack from the plastic case, hold the 2 wire
harness close to the battery pack and rock the pack back and
forth while pulling it out of the case.
5. Using the flat bladed screwdriver or similar, gently remove
any excess tape from inside the plastic housing before install-
ing the new battery.
6. Remove double-sided tape protective covering from the new
battery pack before inserting into the case. Position the bat-
tery so the tape is on the top side, push the new battery into
the plastic case in the same position as the old battery.
7. Reconnect the battery by plugging in the 2 pin connector
to the circuit board, and tuck the wire harness beside the
battery.

8. Set the receiver on a flat surface and position it with the front
facing you. Take the front plastic cover removed in step
2, and align it with the back cover and squeeze the bottom
portion of the two together. The top will not snap into place
because the top lens cover is in the way.
9. Lift up on the front of the top lens cover so the locking tabs
clear the plastic housing, snap the top portion of the front
and back cover together, and push the lens cover back down
and snap into place.
10. Place the ON/OFF switch to ON, Amber LED should blink at
a 10 second rate. Indicating unit is operating on sufficient
battery power.
11. Plug the unit into the wall power supply. Observe the Amber
LED stops flashing and stays out.
12. Perform operation test of all Fire/Smoke detectors, CO detec-
tors IAW testing section.
13. Battery replacement procedure completed.
LED Intensity Selection:
Located on the back of the receiver at the top is a switch that
will allow the user to select the brightness, or the Intensity of the
LED’s. LED intensity High, Medium, and Low selections are avail-
able. When making the selection of the LED brightness make sure
the LED strobe is off and the receiver is not processing a received
alert.
It is recommended by the National Fire Protection Agency that
when this unit is used for a fire indication to use the high setting.
Operation:
When the Mini Receiver detects a signal from a Silent Call Medal-
lion Series pre-programmed transmitter, it illuminates the corre-
sponding indicator icon and activates its built-in High Intensity
LED strobe light. The indication will continue for approximately
16 seconds after the transmitted signal ceases. As long as the
Medallion Series Smoke Detector, Fire Alarm Transmitter, or CO

Detector continues to send an alert signal, the Mini Receiver alert-
ing mechanisms will remain on. The Mini Receiver has a Coded vi-
brator output for use with the Silent Call Bed Vibrator P/N VIB-PJ.
Optional Bed Vibrator Auxiliary Output:
Located on the rear of the Mini Receiver is an auxiliary output jack
labelled “Vibrator” for interfacing Silent Call VIB-PJ bed vibrator.
See the chart below for the vibration pulse pattern. The pattern
repeats during the 16 second receiver cycle.
Carbon Monoxide Transmitter
Smoke Detector or Fire
Transmitter
Three Short Pulses and One
Long Pulse
Continuous Short Pulses
Mini Receiver Display Indications and ICON Color
Carbon Monoxide Detector
CO5-MC Transmitter detects a
warning from the CO detector.
Smoke Detector or Fire Transmitter
SD4-MC/FA3-MC/FA4-MC Transmitter
detects a Smoke/Fire warning
CO Red
Red
Operational and Performance TESTING:
Test the MR1214-MC after installation, repositioning of the receiv-
er, associated transmitters are relocated, battery is replaced, the
unit is repaired, or the receiver back-up battery is replaced. Test
the Mini Receiver Fire/Smoke and CO alerts once a week to ensure
proper operation of both the Detectors transmitters and the Mini

Receiver operation. Accessory transmitters programmed into the
Mini can be tested at the user’s discrepancy.
IMPORTANT: The Environment and Building Materials may affect
the receiver reception. Locate Silent Call Medallion Series Trans-
mitters and Receivers in an area away from High Wattage appli-
ances and objects made from metals or alloys. Testing theMini
Receiver with Transmitters will help to locate a suitable location.
Fire/Smoke and CO Alert Test:
1. Program and Mount Fire transmitters and/or Smoke Detec-
tors in desired location. Reference Transmitters Installation
and Operation Manual for mounting location information.
2. Place Mini Receiver in a location to best view Strobe, Alert
Icons, and use of optional Bed Vibrator if required.
3. Mini receiver requires Power from supplied AC/DC wall
mount adapter. Plug AC/DC adapter into a 120VAC 60HZ wall
outlet.
4. Plug opposite side barrel style plug into the MINI Power input
Jack.
5. Turn Mini Receiver ON. Observe the Green LED is illuminat-
ed.
6. Remove the Barrel style power plug from the Mini Receiver
and confirm the Green LED stays illuminated and that the
Amber LED begins to blinks once every 10 seconds.
7. Reinstall Barrel style Power Plug and verify Amber LED stops
blinking and stays out.
8. Plug Bed Vibrator into Mini Receiver (Optional). Be sure
3.5mm plug is fully seated into the receivers jack.
9. Set LED Intensity to desired selection. High-Medium-Low.
10. If Mini Receiver is not visible from Fire transmitter or Smoke
Detector location, a testing assistance may be required. When
testing the Transmitter and Receiver a 16 second timeout will
occur once the test button on the transmitter is released.
11. Locate and depress Fire transmitter or Smoke Detector Test
button for approximately 3 seconds and release. Observe
Mini Receiver and confirm following:

12. Repeat for each Fire Transmitter/Smoke Detector and CO
detector installed weekly.
13. Test all auxiliary transmitters in the same manner. Verify
Correct ICON is displayed on front lens corresponding to the
Medallion series transmitter tested.
14. Testing Complete.
• Mini Receiver TOP THREE LED’S are flashing at a 1.5HZ
rate.
• Appropriate Mini Receiver RED FIRE or CO Alert is illumi-
nated.
• Bed Vibrator is Pulsing appropriate tactile code as listed in
Optional Bed Vibrator Auxiliary Output section.
• Green LED Remains ON. Amber LED Remains OFF.
• Approximately 16 seconds after depressing Transmitter
test switch Mini Receiver will Stop Flashing the Strobe,
RED Fire or CO Light will go OUT, Bed Vibrator will no
longer pulse.
• Silent Buddy will return to Idle/Receive condition.

SPECIFICATIONS:
Frequency:
Power Adapter:
Backup Battery:
418 MHz
Grand Power Model PA1015-3HU AC to DC
Adapter. Input: 100~240 VAC 50~60Hz 0.4A
Output: 16.0 VDC 1.12A, 18 Watts Max. 12 VDC
Unitech 800 mAH Ni-MH Battery. P/N BU-12
WARNING:
Use only Battery specified in marking. Use of a different battery
will have a detrimental effect on alarm operation. Constant expo-
sures to high or low temperatures or high humidity mat reduce
battery life.
Input:
Operating Ambient
Temperature Range:
Operating Humidity Range:
Agency Listings:
16Vdc @ 0.5A Max. During Alert w/
Strobe High and VIB-PJ in use.
40° to 100°F (4.4° to 37.8°C)
15% to 95% Relative Humidity,
non-condensing
Certified to UL-217 and UL-2034


For Warranty Claims/Repairs Please Contact the Manufacturer:
Silent Call Communications
5095 Williams Lake Road, Waterford MI 48329
800-572-5227
Please Visit www.SilentCall.com
Technical Support
For technical support on this or any other Silent Call product,
please feel free to contact us. You can reach us by phone at
800-572-5227 (voice or TTY) or by Email at technicalsupport@
silentcall.com.
Limited Warranty
Your Mini Receiver is warranted to be free of defects in material
and workmanship for five years from the date of initial purchase.
During that time, the unit will be repaired or replaced free of
charge when shipped prepaid to Silent Call Communications.
This warranty is void if the defect is caused by customer abuse or
neglect.
Table of contents
Popular Security System manuals by other brands


Whelen Engineering Company
Whelen Engineering Company SSNF360 installation guide

Black cat
Black cat 6802002 Operation manual

Telect
Telect HPGMTXX installation guide

Clifford
Clifford Bullet 4 user manual

Honeywell
Honeywell Galaxy 2 Series installation manual

Dualtech
Dualtech TS100T Description and installation manual


