Silvalea AIR COMFORT DELUXE V2 User manual

If any part of the chair is damaged,
it should be removed from service
until repaired or replaced.
Reference: SC-AIRCOMFORT-IOU
Product Code/s: SC-CHAIR-SND
Revision: 26.09.2023
Copyright : SilvaleaLtd
STANDARD
AIR COMFORT DELUXE V2 CHAIR
Instructions of Use
SILVA CARE RANGE
WARNING
Seat
Air Cushion
Lumbar Air
Cushion
Back Rest
Air Cushion
Leg Rest
Air Cushion
Push Handle
Swing away
Head Wings
Arm Rest Lever
Brake Castors
Head Rest Cushion
Drop down
Arm Rests
Leg Rest Lever
Meal Tray insert
Meal Tray lock
Foot Rest Insert
Foot Rest Lock

How to use brake and castors:
NB: It is good practice when the chair is stationary that all three RED twin lock castors MUST be in the braked position.
To disengage the brake, using your foot, push the
RED lever UP.
1 2
3
To engage the brake, using your foot, push the RED
lever DOWN.
PLEASE NOTE: Castors should be inspected daily, ensuring that all foreign matter (hair, lint etc) is removed from
the castors as soon as possible, allowing free movement.
For a forward inline travel the GREEN directional lock
castor needs to be locked in a FORWARD position.
4
To engage, using your foot, press the GREEN lever
DOWN. To disengage, push GREEN lever UP.

1 2
How to use positioning adjustment levers:
To tilt and recline the chair, operators are required
to pull the pushbars until required angle has been
achieved. The Deluxe V2 pushbars have been
ergonomically designed to allow operators of various
heights to have a multitude of hand positions, ensuring
comfort and maximum leverage when manoeuvring
the chair and occupant.
Pull in the ‘S’ labelled Seat Adjustment Lever and TiS
(Tilt in space) adjust the seat as required. Release to
set in position.
Pull in the ‘B’ labelled Backrest Adjustment Lever and
adjust the back as required. Release to set in position.
PLEASE NOTE: Ensure all drop down arm rests
and swing away head wings are returned to
natural starting position BEFORE adjusting
the seat or backrest of the Deluxe V2.

How to adjust arm rests:
Pull the black release pin head out and begin to rotate
the arm rest into one of the 3 set positions.
Let go of the release pin and rotate the arm until you hear
a ‘CLICK’ which indicates the arm is xed into position.
1 2
1 2
The leg rest can be rotated through 85° and set at any
position throughout that range. Pull the release lever
located at the rear of the leg rest on the right hand
side and rotate the leg rest as required.
Let go of the release lever to set leg rest in position.
How to adjust leg rests:
NOTE: Before adjusting the leg rest, ensure
that all three total lock castors are braked.
NOTE: Ensure arms are in the UP position
before leaving the occupant or moving the
chair.
NOTE: Always use one hand to pull the release pin
and the other hand to guide the arm to the required
position. Allowing the arm to drop down without
guidance may cause damage to the arm.

Let go of the release pin and rotate the head wing
until you hear a ‘CLICK’ which indicates the panel is
xed into position.
1 2
How to adjust swing away head wings:
Innite locking gas struts are located at the rear of the
chair and are activated when levers are pulled for back
rest and seat positions, tilt in space (TiS) and recline.
The swing away head wings can be rotated into four
set positions. To open to the required position, pull
the black release pin head out and begin to rotate
the head wing. NOTE: Ensure wings are in the UP position
before leaving the occupant or moving the chair.
All covers are removable throughout the chair.
Gently detatch hook and loop fastening and remove.
For cleaning, please refer to guidelines featured at the
back of this manual.
NOTE: Always use one hand to pull the release pin
and the other hand to guide the arm wing to the
required position. Allowing the arm wing to drop
down without guidance may cause damage.
Gas struts: Removeable covers:

How to t meal tray:
Insert the two metal poles of the meal tray into either
side of the circular inserts.
Tighten into position by turning the meal tray locks to
x and stabilize.
1 2
1 2
Fasten the clunk-click buckle, secure and adjust.
How to t lap belt:
Attach the strap around the upper frame at the back
of the chair and adjust to the required length by using
the hook & loop attachment.

Tighten into position by turning the foot rest locks to
x and stabilize.
1 2
How to t foot rests:
Insert the two metal poles of the foot rests into either
side of the circular inserts located at the base of the
leg rest panel.
1 2
Enter the head rest cushion over the top of the chair.
Using the height adjustable straps, position the hook
and loop attachments and x securely.
How to adjust head rest cushion:
Check that the cushion is situated at the base of the
patient’s neck and above shoulder level.

.
+44 (0)1626 331 655 customerservices@silvalea.com silvalea.com
For further assistance contact Silvalea
Important, Safety Precautions:
The Deluxe V2 has been designed and manufactured with safety
and function in mind for both the occupant and operator.
• In the unlikely event of a serious incident please report this
immediately to the manufacturer or their authorized
representative in your jurisdiction.
• The MAXIMUM user weight is 180kg/397lbs/281/2 Stone.
• The Deluxe V2 has been designed for indoor use only (not including
wet areas).
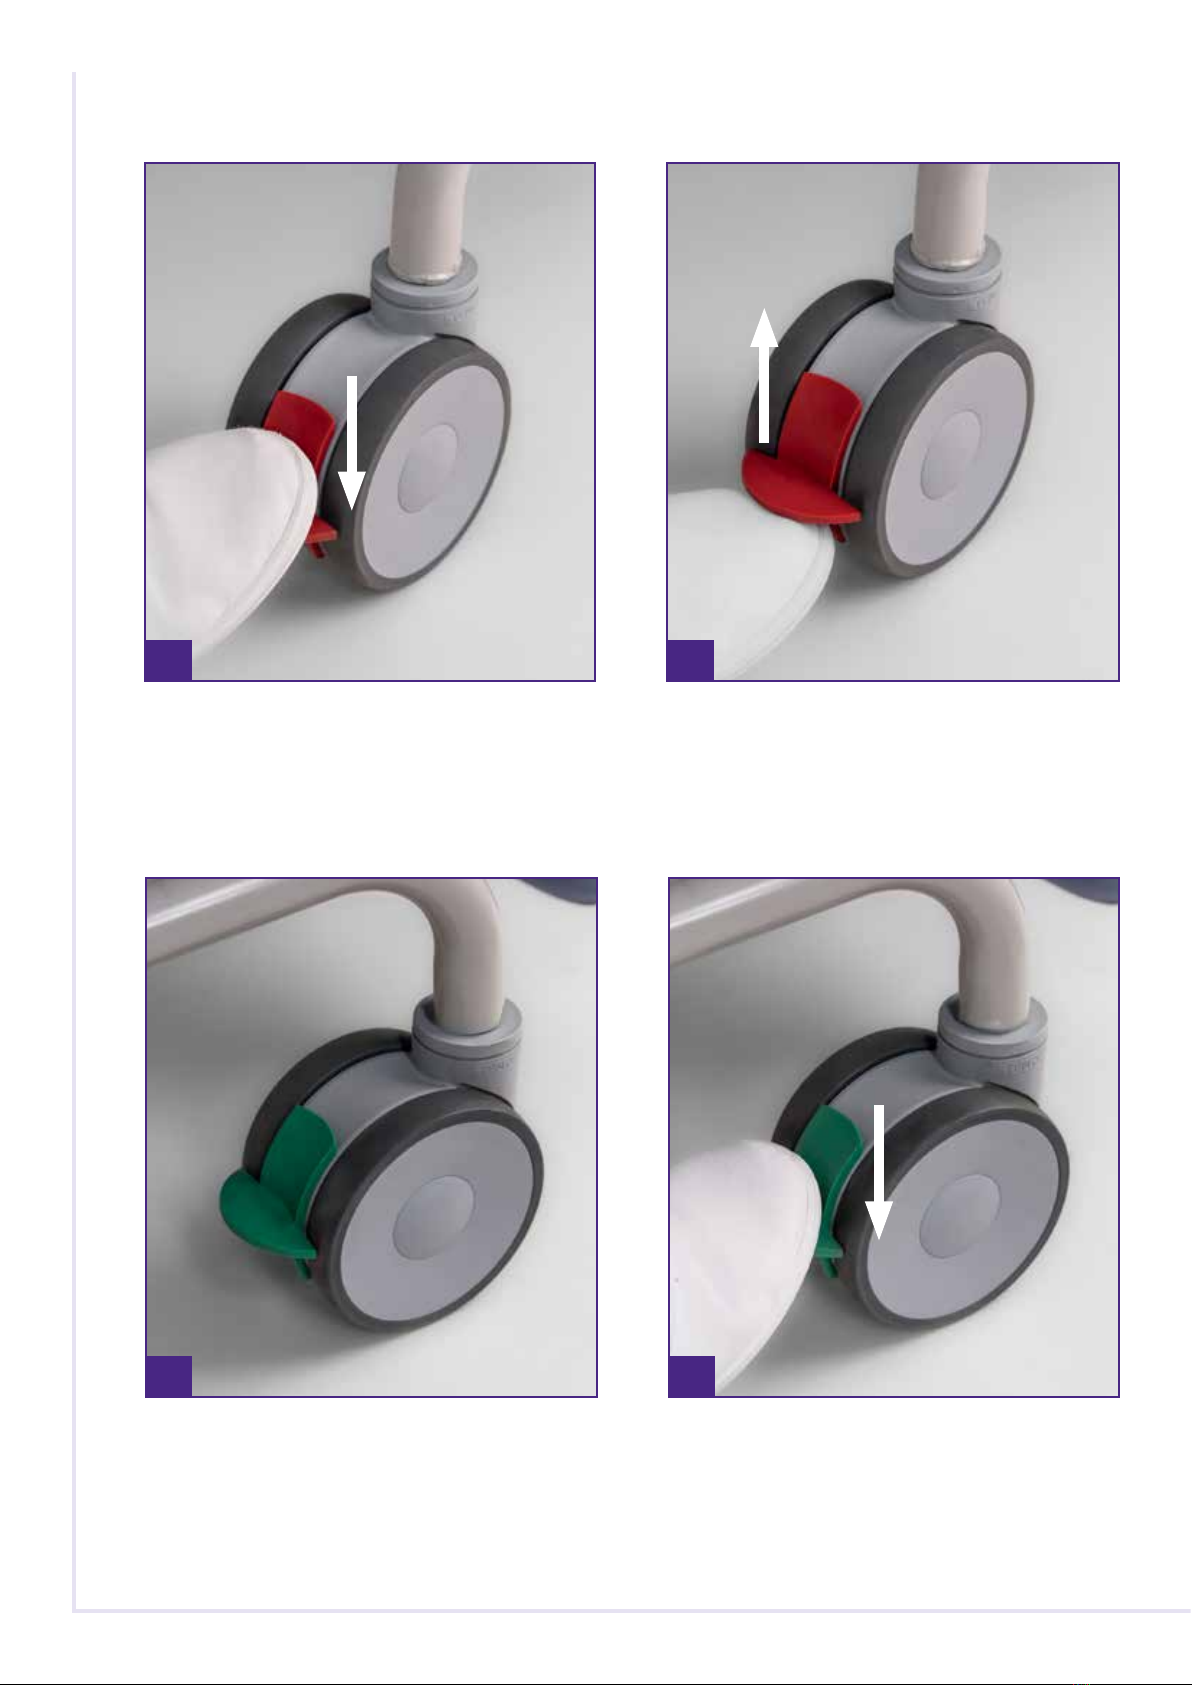
• Always lock ALL the castors when the Deluxe V2 is stationary.
• Users MUST read and follow the Instructions of Use to ensure all
guidelines are followed.
• Ensure the occupant is secure in the seat before operating the
seat tilt or backrest recline functions.
• If using a patient sling, the patient should remain supported by
the sling until the chair is adjusted
• Do not sit on raised leg rest, serious user injury or damage to the
chair may result.
• This chair has been designed for short transits only. Do not use
the chair as a wheelchair for extended client transits
• Do not use the chair in motor vehicles. The chair has not been
designed to be used as a seat in motor vehicles.
Specications:
AC59111. Deluxe V2 Standard. Overall Width: 680mm. Overall
Length: 1130mm. Overall Height: 1260mm. Seat Width: 470mm.
Product Weight: 45kg. Max User Weight: 180kg. Castors: 3 x
125mm quality twin total lock PU castors. 1 x 125mm quality twin
directional lock PU castor. Materials: Mild steel construction.
Epoxy powdercoat nish. High and low density Foam. VersoTela
Osguard PU and Fusion fabrics*. TPU air bladders.
Intended Use Statement:
The device is intended to aid in the prevention of pressure
ulcers related to long-term sitting. A series of inated air cushions
are used to minimize pressure points on the user. This device is
intended to be used within a health care setting such as an aged
care facility or hospital with the assistance of a carer.
Inspection:
The Deluxe V2 should be inspected on a daily basis for damage.
Areas to be checked include: • Upholstery • Levers • Gas struts
• Push handle • Exposed framework • Castors
All moving parts of the Deluxe V2 should operate freely and be
void of any foreign matter. (especially the castors). Any exposed
bolts (including castorbolts) should be checked every 6 months
and tightened if required.Castors should be checked and kept
free from foreign matter. If any part of the Deluxe V2 is damaged,
it should be removed from service immediately until repaired or
replaced.
Product Care & Cleaning:
The Deluxe V2 should be cleaned regularly with mild disinfectant
wipes (not bleach) on heavily stained areas as referenced by the
hand wipe icon opposite on the product label. Treat stains promptly
to prevent permanent staining on upholstery. The
castors should be wiped with a mild soapy solution
and then dried after heavy use.
• Do not use harsh chemicals or abrasive cleaning products
• Do not high pressure clean the Deluxe V2.
• Do not autoclave.
• Close hook and loop attachments after detatching removable covers.
Seating System:
This product is tted with the unique Air Comfort Seating System
that is designed to redistribute seating pressure and improve
overall comfort. The Air Comfort Seating System is comprised
of four separate air cushions:
• Backrest air cushion
• Lumbar air cushion
• Seat air cushion
• Leg rest air cushion
Each air cushion is inated to a pre-determined volume that is based
on extensive testing. This ination will be suitable for most users.
Disposal of product:
Please dispose of the product carefully.
Servicing:
We recommend a 6 month preventative maintenance service on
the Deluxe V2. Please contact our service department or your local
dealer to arrange a service programme. Preventative maintenance
service includes:
• Examine Deluxe V2 for structural problems
• Check and clean upholstery
• Check levers and gas struts
• Check and clean castors
Ensure the Deluxe V2 is inspected and repaired if necessary. Please
advise the serial number of the product when contacting Silvalea.
The serial number can found at the rear of the Deluxe V2, on the
left hand side below the backrest.
Product Warranty Period:
All Silva Care Air Comfort Range 12 months. Upholstery 12 months.
All Silva Care Air Comfort Frame Day Chair 36 months Foam 36
months. Air Bags and Gas Struts 12 months. Castors 12 months.
Fabric 12 months.
ADVENA Ltd. Tower Business Centre, 2nd Floor, Tower Street, Swatar, BKR 4013 Malta
836A Fifteenth Street, Mildura, VIC 3500. Australia
K Care
imports
distri
Silverhills Buildings, Decoy Ind. Estate, Newton Abbot, Devon, TQ12 5LZ. UK
Silvalea Ltd a division of
Table of contents
Popular Indoor Furnishing manuals by other brands

Varier
Varier Wing Assembly instructions

Forte
Forte SNWV712 Assembling Instruction

Furniture of America
Furniture of America CM3663T-VN Assembly instructions

DURAVIT
DURAVIT LM 7817 Mounting instructions

hygena
hygena HYG 724/1673 Assembly instructions

Pessotto
Pessotto NILO User guide and assembly instructions

Beautify
Beautify 2500371 quick start guide

Avenue Six
Avenue Six MARIGOLD SB523SA Assembly instructions

Poliman Moveis
Poliman Moveis 9203.6 Assembling instructions

Urban Barn
Urban Barn PAULSEN EXTENSION DINING TABLE Assembly instructions

LTL Home Products
LTL Home Products Reflections Chandel installation instructions

Monarch Specialties
Monarch Specialties I 2774 Assembly instructions