Simplex 4100-1293 User manual

Cautions, Warnings, and Regulatory Information
READ AND SAVE THESE INSTRUCTIONS Follow the instructions in this installation manual. These instructions must be followed to avoid damage to
this product and associated equipment. Product operation and reliability depend upon proper installation.
DO NOT INSTALL ANY SIMPLEX™ PRODUCT THAT APPEARS DAMAGED Upon unpacking your Simplex product, inspect the contents
of the carton for shipping damage. If damage is apparent, immediately file a claim with the carrier and notify an authorized Simplex
product supplier.
ELECTRICAL HAZARD Disconnect electrical field power when making any internal adjustments or repairs. All repairs should be
performed by a representative or an authorized agent of your local Simplex product supplier.
STATIC HAZARD Static electricity can damage components. Handle as follows:
• Ground yourself before opening or installing components.
• Prior to installation, keep components wrapped in anti-static material at all times.
EYE SAFETY HAZARD Under certain fiber optic application conditions, the optical output of this device may exceed eye safety limits. Do
not use magnification (such as a microscope or other focusing equipment) when viewing the output of this device.
Introduction
This publication describes the installation procedure for the 4100-1293 Panel-Mounted Printer.
The Panel-Mounted Printer
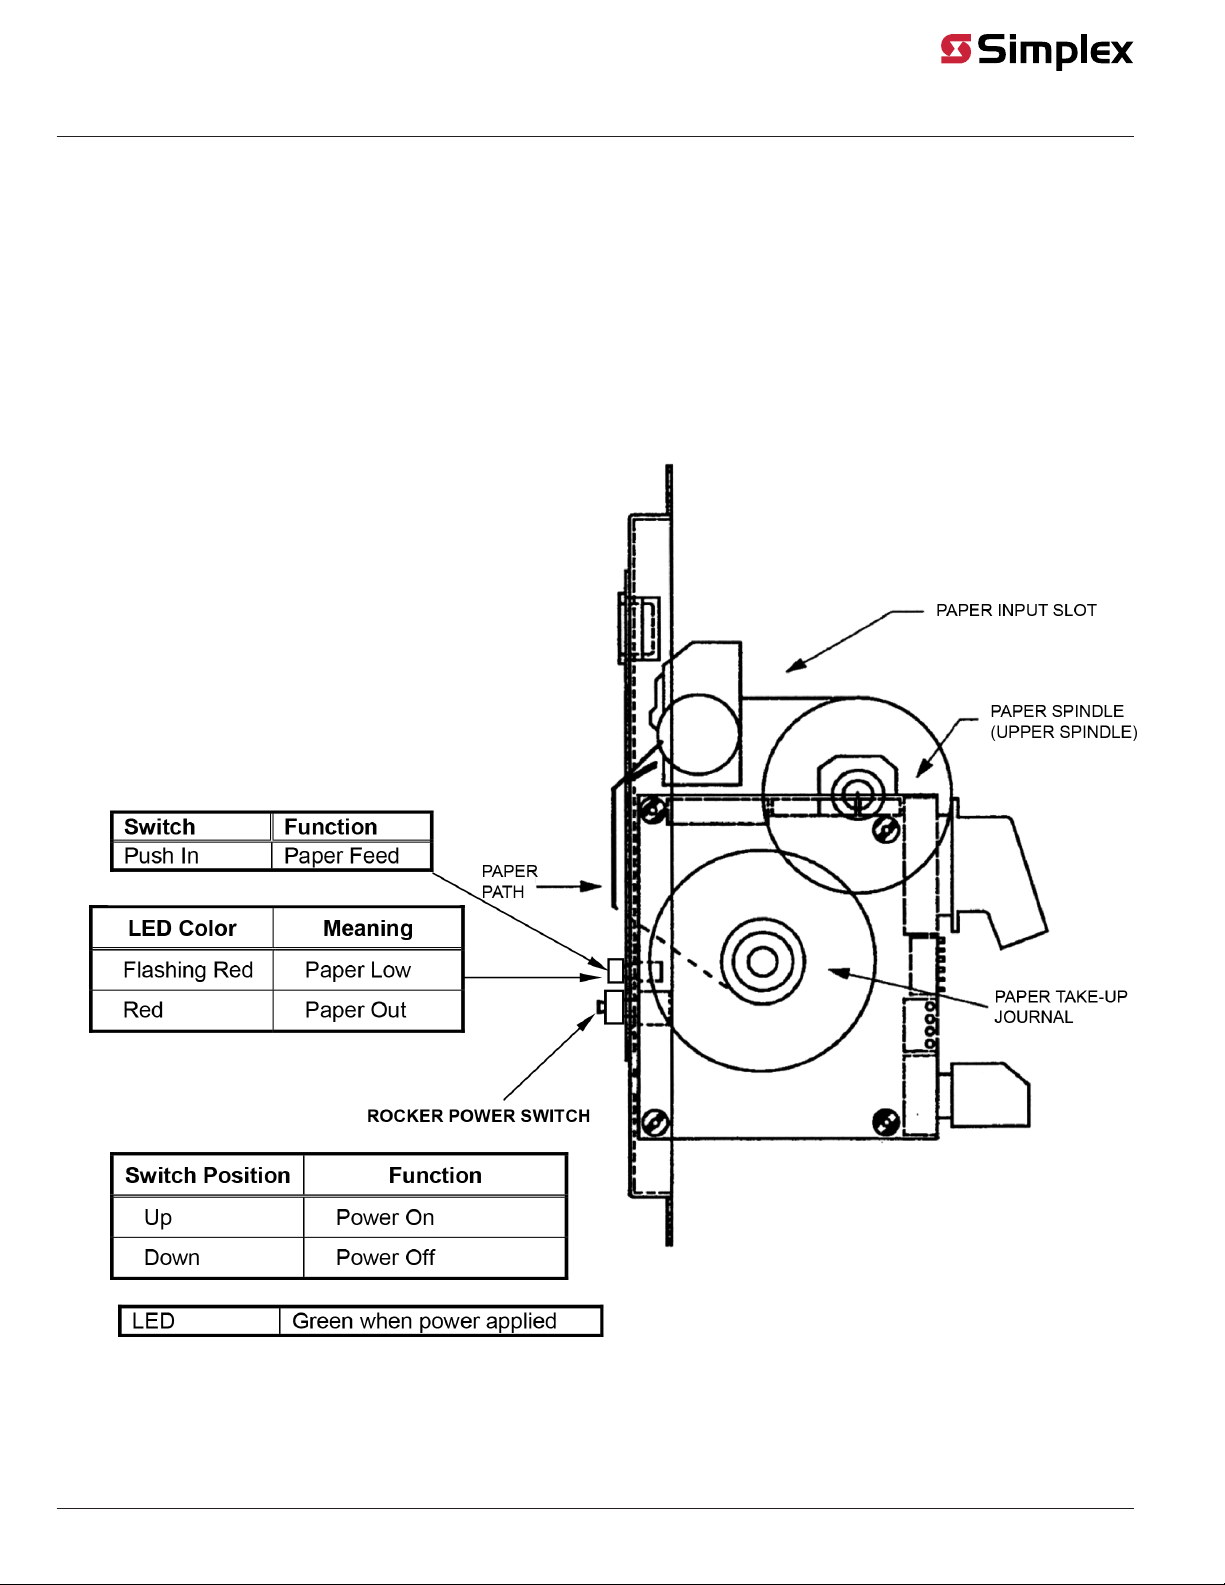
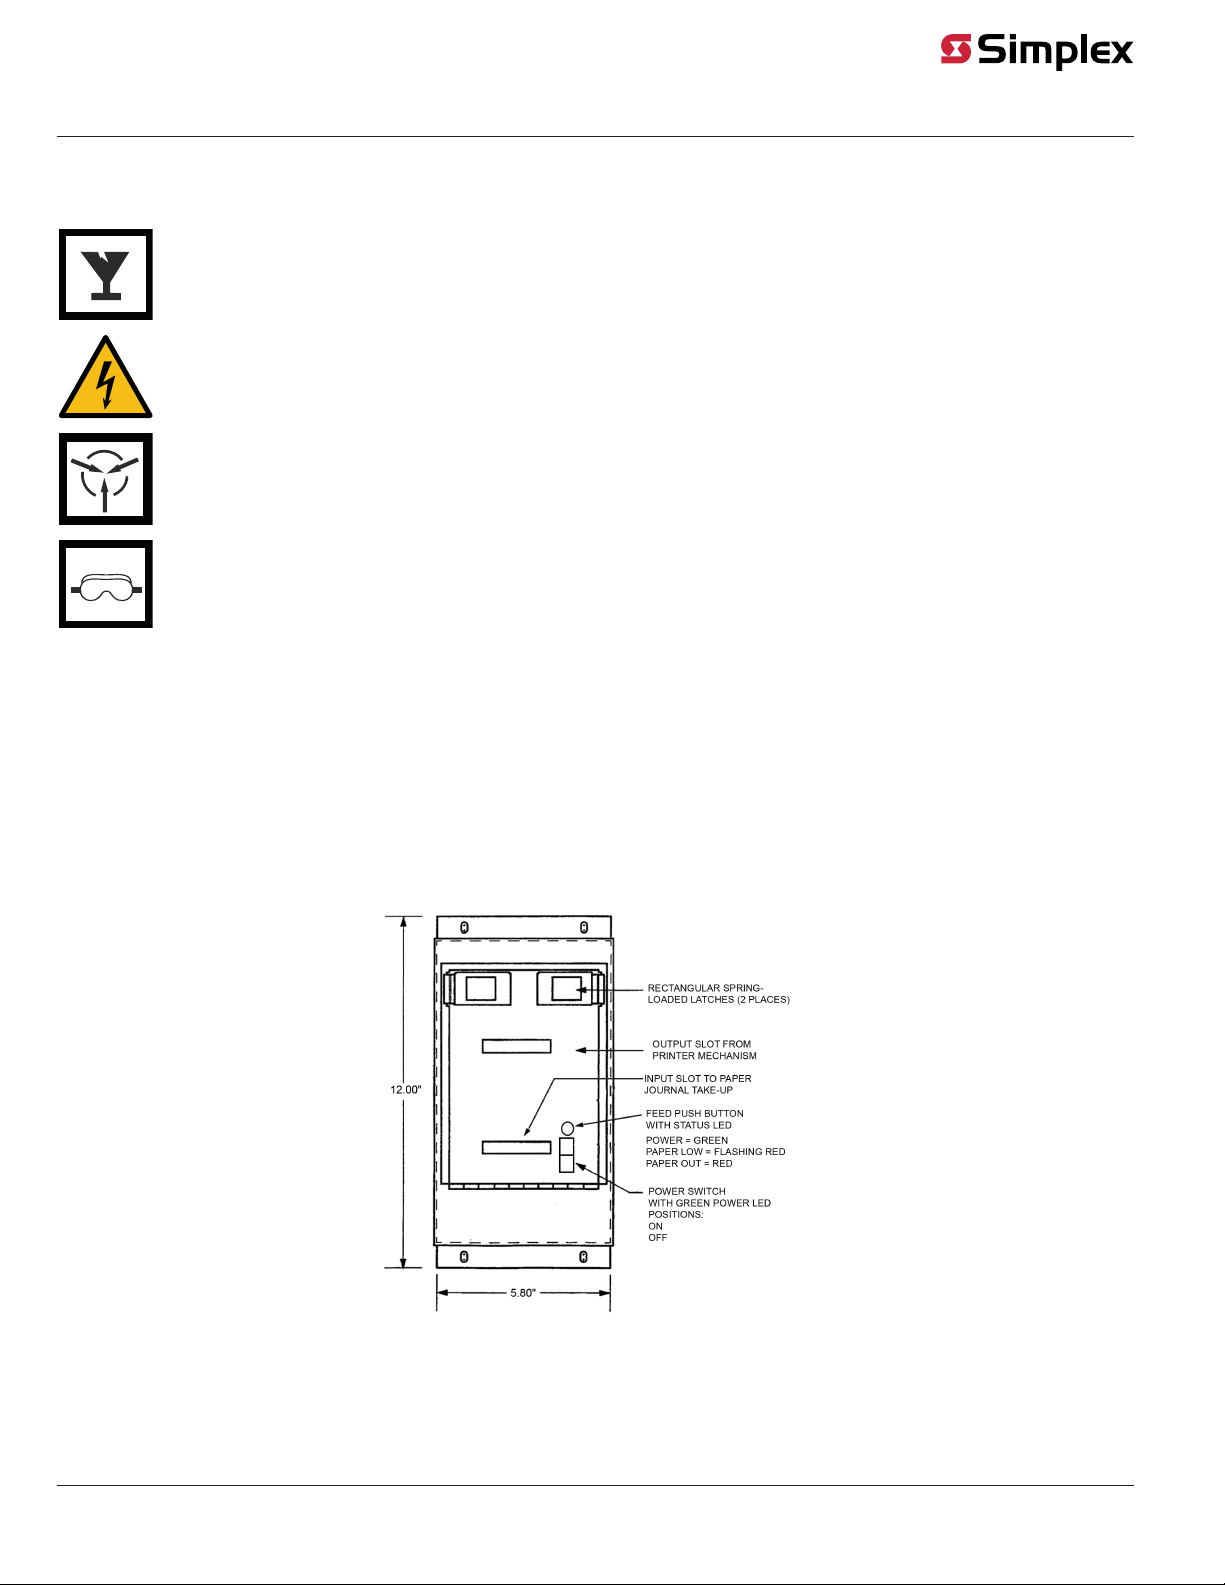
The 4100-1293 Panel-Mounted Printer (Figure 1) is used with the 4100/4100U/4100ES Fire Alarm System. The panel-mounted printer provides hard
copy reports of the master control panel's output and provides conformance with proprietary operation (formally known as NFPA 72D). The thermal,
dot matrix panel-mounted printer displays twenty visible lines of print, has a column width of forty characters, and is capable of printing variable
output formats on standard 2.350-inch wide thermal paper.
The panel-mounted printer does not require any changes to its default switch or jumper settings. It automatically detects the interface which is
sending data and produces the appropriate output. The serial interface parameters are factory-set and stored on the printer firmware. The standard
factory settings for the serial interface parameters are: 9600 baud, no parity, 8 data bits, and 1 stop bit.
Figure 1: Panel-Mounted Printer, Front View
579-249 Rev. G
4100-1293 Panel-Mounted Printer Installation Instructions
*0579249G*

Unpacking and Inspection
Before installing or operating the printer, check the following:
1. Ensure that the primary power setting is correct for your installation.
2. Ensure that the printer mechanism and paper path are clear of all packing materials or other foreign matter.
3. Ensure that paper is installed. DO NOT OPERATE the printer without paper. See Loading Paper.
Mounting overview
This section describes the procedure for mounting the panel-mounted printer to an expansion bay. The printer should be mounted to the panel prior
to wiring.
Mounting
The panel-mounted printer requires 6 inches of space (3 positions in the rack) and is designed for left- or right-justified mounting within an expansion
bay.
Adhere to the following guidelines when choosing the location for the printer.
• If possible, place the printer in the main control panel, middle bay (left- or right-justified).
• If no printer space is available in the main control panel, you must add a one-, two-, or three-bay panel for printer installation.
To mount the printer, align and secure the printer assembly to the frame using four #6/32 screws and four #6 external lockwashers.
Figure 2: Panel Mount Printer Installation
page 2 579-249 Rev. G
4100-1293 Panel-Mounted Printer Installation Instructions

Wiring
Wiring consists of connecting the panel-mounted printer to RS-232 modules via pluggable connectors. This section describes the wiring process.
The panel-mounted printer uses the harnesses listed in the figure below. Pressure-mounted supports are provided on the rear of the printer. Use a tie
wrap to secure the harnesses to the support.
Figure 3: Wiring the Panel-Mounted Printer
page 3 579-249 Rev. G
4100-1293 Panel-Mounted Printer Installation Instructions

Figure 4: Wiring the 4100-1293-Panel Mounted Printer
Note: If Port A is used for the printer, place P2 jumper across pins 2-3 and P5 jumper across pins 1-2. If Port B is used for the printer, place P6 jumper
on pins 1-2.
Pluggable Terminal Block Pinouts
Table 1: Pluggable Terminal Block Pinouts
Pin Signal Description
1 TXD Data output from the printer to host
2 RXD Data input to the printer or display
3 GROUND Signal Ground
4 BUSY -10 V when printer is unable to receive data
Power Requirements
Standby Current: 24V @ 167 mA
Printing Current: 24V @ 1.89A peak
page 4 579-249 Rev. G
4100-1293 Panel-Mounted Printer Installation Instructions

Loading Paper
This section describes the procedure for mounting the panel-mounted printer to an expansion bay. The printer should be mounted to the panel prior
to wiring.
To load the printer paper, follow these steps.
1. Push the spring-loaded, rectangular latches inward and pull forward to release the printer access panel.
2. Install a new roll of Simplex-approved paper (4190-9803 [473-019]) (thermal side up) on the upper spindle.
3. Fold paper back onto itself to form a straight and clean edge and feed it directly into the paper input slot.
4. The printer will automatically feed paper through the PAPER mechanism. Use the FEED push button to advance paper further through the
mechanism. Feed an appropriate amount of paper through the printer to allow the installation onto the paper take-up journal.
5. To load paper onto the take-up journal, unscrew the fastener holding the left-side guide plate and pinch rod. Install the paper between the
main take-up shaft and pinch bar. Secure the left-side guide plate and pinch rod with the fastener. Manually rotate the take-up mechanism as
shown to remove excess slack in the paper.
Figure 5: Loading Paper
page 5 579-249 Rev. G
4100-1293 Panel-Mounted Printer Installation Instructions

Testing
The Self-Test Mode
The self-test feature allows you to quickly determine whether the printer is operating correctly. To activate the self-test:
1. Move the power switch from the OFF position (bottom) to the ON position (top).
2. Hold the FEED button in for 3 seconds, then release.
The panel-mounted printer enters self-test mode and prints out an alphanumeric test pattern.
Maintenance
The panel-mounted printer requires very little maintenance and service. This section provides instructions for cleaning and maintenance. Electrical and
mechanical repairs should be performed only by qualified personnel.
Make certain all electrical connections are disconnected before any service is performed on the panel-mounted printer.
Required Tools and Supplies
• Voltmeter
• Denatured alcohol
• Cleaning cloths
• Cotton swabs
• Lubricant (IBM #23, Lubriplate #70, Silicon #35)
Cleaning
You may clean the exterior cabinet of the printer with a non-abrasive cleanser. Do not allow liquids to enter the inside of the mechanical assembly. In a
dirty environment, you may clean the printhead with alcohol and a cotton swab. You may also use compressed air to clean the printhead. Do not direct
air flow directly to the printer platen; this action may damage the printing surface on the platen. When the printhead is clean and free of dirt, you may
apply a light silicon lubricant (sparingly) to the moving mechanical components.
Printing Problems
Table 2: Print Problems
Problem Possible Cause
Dirty thermal printhead
Worn printhead
Poor quality thermal paper
Poor Print Quality
Damaged thermal
Printing with non-Simplex approved paper
Premature Wear of Thermal Printhead Printing in an environment where abrasive particles enter the printhead
Maintenance Chart
The following chart is a recommended maintenance schedule for the panel-mounted printer. Specific environmental conditions may shorten or
lengthen the periods between cleaning.
Table 3: Periodic Maintenance Schedule
Clean Office or Light Use Once Per Year
Clean Factory Environment or Medium Use Monthly
Dirty Factory Environment or Heavy Use Weekly
579-249 Rev. G
© 2020 Johnson Controls. All rights reserved. All specifications and other information shown were current as of document revision and are subject to change without notice. Additional listings may be applicable, contact your local Simplex®
product supplier for the latest status. Listings and approvals under Simplex Time Recorder Co. Simplex, and the product names listed in this material are marks and/or registered marks. Unauthorized use is strictly prohibited. NFPA 72 and
National Fire Alarm Code are registered trademarks of the National Fire Protection Association (NFPA).
Other manuals for 4100-1293
1
Table of contents
Other Simplex Printer manuals