SimpLinx SMX-IoT10 User manual

SMX-IoT10 Cloud & Edge Computing
User's Guide
12/2020
man-en-smx-IoT10.docx

man-en-smx-iot10
© 2020 SIMPLINX
- 1 -
Legal Notices
Warning Notice System
The document contains alerts and information indications for the safety of you and your devices.
The symbols and meanings used to draw your attention to these notifications are listed below.
Qualified Personnel
It is assumed that what is described in this document will be applied by qualified personnel for
the specific task.
Disclaimer
We have reviewed the contents of this publication to ensure consistency with the hardware and
software described. Since variance cannot be precluded entirely, we cannot guarantee full
consistency.
The information in this publication is reviewed regularly and any necessary corrections are
included in subsequent editions.
Danger: Indicates the death or severe personal injury will result if proper
precautions are not taken.
Warning: Indicates that death or severe personal injury may result if proper
precautions are not taken.
Info: Indicates advice or information.

man-en-smx-iot10
© 2020 SIMPLINX
- 2 -
Change Log
Version
Date
Description
V1.0
12/2020
Initial Release

man-en-smx-iot10
© 2020 SIMPLINX
- 3 -
Preface
Purpose of the Document
This document contains information about the following topics;
SMX-IoT10 Product Information
SMX-IoT10 Setup
Use of SMX-IoT10
Required Level of Knowledge
In order to fully understand and apply this document, it is necessary to have knowledge of IT,
Automation and Electricity.

man-en-smx-iot10
© 2020 SIMPLINX
- 4 -
Contents
Legal Notices ........................................................................................................................................- 1 -
Warning Notice System ................................................................................................................- 1 -
Qualified Personnel ......................................................................................................................- 1 -
Disclaimer.....................................................................................................................................- 1 -
Change Log ...........................................................................................................................................- 2 -
Preface..................................................................................................................................................- 3 -
Purpose of the Document ............................................................................................................- 3 -
Required Level of Knowledge .......................................................................................................- 3 -
1. Product Description and Certificates...........................................................................................- 5 -
1.1. Properties .......................................................................................................................- 6 -
1.2. Approvals / CE.................................................................................................................- 6 -
2. Physical Properties and Drawings................................................................................................- 7 -
2.1. Drawings.........................................................................................................................- 8 -
3. Setup............................................................................................................................................- 9 -
3.1. Mounting ........................................................................................................................- 9 -
3.2. Removing........................................................................................................................- 9 -
4. Electrical Connection .................................................................................................................- 10 -
5. Device Connections ...................................................................................................................- 10 -
5.1. Ethernet Devices...........................................................................................................- 10 -
5.2. Internet Connection Options........................................................................................- 11 -
5.3. Ethernet Connection with PC (Service IP) (Optional) ...................................................- 11 -
Energizing your device................................................................................................................- 12 -
5.4. Making Basic Settings ...................................................................................................- 12 -
6. Web Interface............................................................................................................................- 13 -
6.1. Ethernet1 and Ethernet2 Pages....................................................................................- 13 -
6.2. Wireless Settings Page..................................................................................................- 14 -
6.3. Advanced Settings Page................................................................................................- 15 -
6.4. Import/Export Page ......................................................................................................- 15 -
6.5. Change Password Page.................................................................................................- 16 -
6.6. Info Page.......................................................................................................................- 16 -

man-en-smx-iot10
© 2020 SIMPLINX
- 5 -
1. Product Description and Certificates
The SMX-IoT10 is a Cloud & Edge Computing device. It can collect, save and display data from the field
devices which are desired to be monitored.
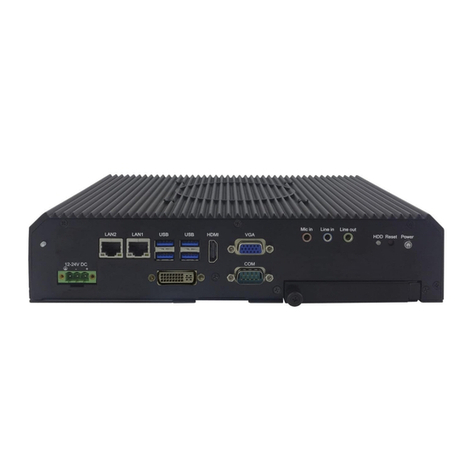
1- USB 2.0 ports
2- USB 3.0 ports
3- Ethernet2/Ethernet1
4- Power supply connection
5- RS-232 Serial Ports
6- VGA Output
7- HDMI Output
8- Audio Output
SMX-IoT10
Processor
Intel®Celeron® J1900 4 Core 2.00Ghz
Ram
Celeron® 4GB
mSATA
64 GB
Wireless ꟾBluetooth
E802.11 b/g/n (Embedded) ꟾBluetooth BT4.1
5
1
5
5
7
2
3
2
6
8
4

man-en-smx-iot10
© 2020 SIMPLINX
- 6 -
1.1. Properties
High degree of robustness.
The SMX-IoT10 module is approved for indoor use only.
Compact design.
Ethernet and USB interfaces.
Embedded Wireless and Bluetooth
1.2. Approvals / CE
The SMX-IOT10 module has received approval from the CE standards.

man-en-smx-iot10
© 2020 SIMPLINX
- 7 -
2. Physical Properties and Drawings
Connection Slots
4x USB 3.0
Type A
2x USB 2.0
Type A
6x RS-232 Serial Port
2x Rj45 Ethernet
10/100/1000 Mbps
1x VGA + 1x HDMI
1x Audio Output
Mounting
Wall Mounted
DIN Rail Mounted (Optional)
Temperature
-10 oC to 60 oC
Work
-20 oC to 60 oC
Storage
Dimensions (mm)
Width : 58,3
Height : 188,6
Depth : 200
Weight (Kg)
1,9

man-en-smx-iot10
© 2020 SIMPLINX
- 8 -
2.1. Drawings

man-en-smx-iot10
© 2020 SIMPLINX
- 9 -
3. Setup
3.1. Mounting
Wall Mounting
The SMX-IoT10 can be mounted to wall from the screws which are placed on the back of the
product.
DIN Rail Mounting (Optional)
Bring the top of the device to the top edge of the standard profile rail and place the device on
the rail track.
Push the device towards the standard profile rail. You will hear the device sitting in place with
the click sound.
3.2. Removing
Wall Mounting
The SMX-IoT10 can be dismounted from the wall by screwing off the with the help of
screwdriver.
DIN Rail Mounting (Optional)
With the help of a screwdriver, pull down the locking spring from the bottom of the device.
Separate the screwdriver from the rail line without separating it from its position, by pulling
towards yourself

man-en-smx-iot10
© 2020 SIMPLINX
- 10 -
4. Electrical Connection
The SMX-IoT10 has DC 12V~24V power supply. Rated voltage, current, should be according to
following table.
SMX-IoT10
Rated Voltage
DC Minimum = 12V
DC Maximum = 24V
Rated Current
5A
Faulty or incomplete connection may damage you, those around you, or devices.
See the relevant documents for detailed information and electrical drawings.
5. Device Connections
5.1. Ethernet Devices
SMX-IoT10 contains 2 Ethernet ports. Both Ethernet ports can be configured separately. To connect
your Ethernet devices to the SMX-IoT, you must set up an IP in the IP range that you have given to the
SMX-IoT.
Example
If your SMX-IoT module is in the following settings
IP: 192.168.168.254
Subnet Mask: 255.255.255.0
In this case, you must provide an IP address for your devices in the range of [192.168.168.1
–192.168.168.249] and [192.168.168.251 - 192.168.168.253]
After you adjust your field device's IP addresses, you can connect your devices to 2 Ethernet ports on
the SMX-IoT10. You do not need to make any adjustments other than IP address.
Faulty or incomplete connection may damage you, those around you, or devices.

man-en-smx-iot10
© 2020 SIMPLINX
- 11 -
5.2. Internet Connection Options
The Internet can be supplied in 3 different ways to the SMX-IoT10 device.
WAN port
Plug the ethernet cable with an Internet connection into your device's Ethernet1 port.
DHCP or IP settings will be made in the next steps.
Phone USB Connection
Plug your iPhone or Android phone into your device's USB port with a charging/data cable.
Turn on mobile access from phone settings.
After energizing your device and the "Power LED" is ON, you may need to turn the mobile
access setting OFF and ON on your phone.
Wi-Fi Connection
Wireless connection can be done with embedded Wi-Fi. There is no need for external
Wireless module.
5.3. Ethernet Connection with PC (Service IP) (Optional)
There are two methods to access the device settings.
Connection over Wi-Fi
Physical connection from the service port with Ethernet Cable
If you connect to the PC via Wi-Fi and want to make settings over Wi-Fi, you can skip this step.
Connect one end of the Ethernet Cable to the SMX-IOT10 Ethernet 1 port, and the other end to
your PC's Ethernet port.
Go to Ethernet Adapter settings on your PC
Double-press on your adapter to go to the detail page
Press the Properties button
Double-press" Internet Protocol Version 4 (TCP/IPv4)" option
Select "Manual IP Adjustment" from the page that opens and enter the following information
IP : 192.168.169.100
Subnet Mask: 255.255.255.0
Close by confirming changes

man-en-smx-iot10
© 2020 SIMPLINX
- 12 -
Energizing your device
Plug in the power supply or adapter which is connected to the SMX-IOT10. Make sure that your field
devices that you want to connect to the SMX-IoT10 are also turned on.
If you are trying to provide internet to your device by phone you may need to turn the mobile
access setting off and on after the “Power LED” lights up.
If you want to use the IP option manually from WAN or if you want to provide internet with
Wi-Fi, your device will connect to the internet after making your settings in the next section.
Faulty or incomplete connection may damage you, those around you, or devices.
See the relevant documents for detailed information and electrical drawings.
5.4. Making Basic Settings
If the device settings will be accessed via Wi-Fi;
View the Wi-Fi networks around you with the Network Icon at the Bottom Right on your PC.
The SMX-IOT10 device will be broadcasting Wi-Fi with serial code.
From the list, select the network in the format "SIX-XXXXX-XXXXX" that matches your device's
serial number and press "Connect"
Enter wifi password
Predefined Wi-Fi login password is "simplinx"
If you have a wired connection on Ethernet1 ready;
Open your browser
On the Address bar, enter " http://192.168.169.254:3000" and press ENTER
The login screen will open for the SimpLinx device settings.
Enter your password and press ENTER
Predefined web login password is "simplinx"

man-en-smx-iot10
© 2020 SIMPLINX
- 13 -
If you have a Wi-Fi connection ready;
Open your browser
On the Address bar, enter " http://172.16.159.1:3000" and press ENTER
The login screen will open for the SimpLinx device settings.
Enter your password and press ENTER
Predefined web login password is "simplinx"
6. Web Interface
6.1. Ethernet1 and Ethernet2 Pages
On the Eth1 settings and Eth2 settings pages, you can define the IP address, network mask of your
Ethernet1 and Ethernet2 ports of SMX-IoT10 separately. The network mask value you have entered
will determine the IP range of your devices which you will connect to your SMX-IOT10 module.
Example 1 (Predefined)
IP: 192.168.168.254
Subnet Mask: 255.255.255.0
In this case, you can use all IP addresses in the range of [192.168.168.1 –
192.168.168.249] and [192.168.168.251 - 192.168.168.253] for field devices.
Example 2
IP: 192.168.0.1
Subnet Mask: 255.255.255.0
In this case, you can use all IP addresses in the range [192.168.0.3 - 192.168.0.254] for
your field devices.
Example 3
IP: 10.0.0.1
Subnet Mask: 255.255.255.0
In this case, you can use all IP addresses in the range [10.0.0.3 - 10.0.0.254] for your
field devices.
Network ranges of both Ethernet1 and Ethernet2 must be different from each other!

man-en-smx-iot10
© 2020 SIMPLINX
- 14 -
If you change the settings, you must restart the device for the new settings to take effect.
6.2. Wireless Settings Page
You can access Wireless Client and Wireless Hotspot settings from this page.
There are two options for WAN connection;
For Wireless Client;
With DHCP, the device receives all configuration(Including IP address) (Recommended)
If you turn off DHCP, you can provide IP, Network Mask and Gateway and DNS configurations
manually.
If you change these settings, you must restart the device for the new settings to take effect.
For Wireless Hotspot connection;
With the Wireless Hotspot setting, you can enable your device to broadcast Wi-Fi. By checking
the “Hotspot Active” option and entering your Hotspot Password you want to set, you can
enable your device to broadcast Wi-Fi with its serial number.
Wireless Client and Wireless Hotspot cannot be used at the same time!
If you change these settings, you must restart the device for the new settings to take effect.
The Hotspot SSID is the same as your device's serial number.

man-en-smx-iot10
© 2020 SIMPLINX
- 15 -
6.3. Advanced Settings Page
You can modify these settings;, Remote IO Password Reset, Reset Device Settings, and Reset Remote
IO Database.
By using the Remote IO Password Reset setting, you can reset your Remote IO password to the
factory setting.
With the Remote IO Password Reset setting, your passwords will be completely wiped out.
This operation cannot be undone.
By using the Reset Device Settings setting, you can reset your device settings to factory settings.
The Reset Device Settings will completely delete your device settings. This operation cannot
be undone.
By using the Reset Remote IO Database setting, you can reset/delete the Remote IO database.
The Reset Remote IO Database setting will completely delete your Remote IO database.
This operation cannot be undone.
If you change these settings, you must restart the device for the new settings to take effect.
6.4. Import/Export Page
You can download your devices configuration files and import it from this page. Downloaded
configuration files can be used in two different ways.
With USB Disk;
Put the downloaded file on a USB disk.
Insert the USB disk with configuration file to any USB port of the device. The settings
will be transferred automatically.

man-en-smx-iot10
© 2020 SIMPLINX
- 16 -
When the process is completed in a few seconds, the device turns off and on and is
ready for use with new settings.
If your device does not turn off and on automatically, your settings are not loaded.
Check the configuration file!
With Web Interface;
Click the Browse button from the Import Settings section.
Select the configuration file on the screen that opens.
Click the Import button.
Restart the device for the new settings to take effect.
6.5. Change Password Page
On the Change Password page, you can change the password you use to login your device's
configuration pages.
If you change these settings, you must restart the device for the new settings to take effect.
6.6. Info Page
You can view the following information on the status page;
Serial Number of Your Device
OS Version
RemoteIO Version
Up Time (in Minutes)
Date and Time information of your device
IP, MASK and MAC information of the Ethernet1 and Ethernet2 interface
If the WLAN is plugged in and connected to a network WLAN type, IP, MASK and MAC
information of the interface

12/2020
man-en-smx-IoT10.docx
SimpLinx Elektronik Ltd.
Halil Rifat Pasa Mh. Nazli Sk. No:1/5 No:17 Sisli/Istanbul
www.simplinx.com
Table of contents
