manuals.online logo
Brands
  1. Home
  2. •
  3. Brands
  4. •
  5. Simrad
  6. •
  7. GPS
  8. •
  9. Simrad Shipmate GN30 mkII User manual

Simrad Shipmate GN30 mkII User manual

Other Simrad GPS manuals

Simrad CP34 User manual

Simrad

Simrad CP34 User manual

Simrad NSO evo2 User manual

Simrad

Simrad NSO evo2 User manual

Simrad GO7 User manual

Simrad

Simrad GO7 User manual

Simrad CS66 User manual

Simrad

Simrad CS66 User manual

Simrad GO XSE User manual

Simrad

Simrad GO XSE User manual

Simrad CX34 NavStation User manual

Simrad

Simrad CX34 NavStation User manual

Simrad CP54 User manual

Simrad

Simrad CP54 User manual

Simrad GN33 User manual

Simrad

Simrad GN33 User manual

Simrad MX525A User manual

Simrad

Simrad MX525A User manual

Simrad CA42 User manual

Simrad

Simrad CA42 User manual

Simrad CP42 User manual

Simrad

Simrad CP42 User manual

Simrad NSS evo2 User manual

Simrad

Simrad NSS evo2 User manual

Simrad GO XSE User manual

Simrad

Simrad GO XSE User manual

Simrad ce32 mkii User manual

Simrad

Simrad ce32 mkii User manual

Simrad NSE8 User manual

Simrad

Simrad NSE8 User manual

Simrad GO XSE User manual

Simrad

Simrad GO XSE User manual

Simrad NSS16 EVO3S User manual

Simrad

Simrad NSS16 EVO3S User manual

Simrad Shipmate CP30 User manual

Simrad

Simrad Shipmate CP30 User manual

Simrad CP33 User manual

Simrad

Simrad CP33 User manual

Simrad P2005 User manual

Simrad

Simrad P2005 User manual

Simrad GO7 User manual

Simrad

Simrad GO7 User manual

Simrad NSS Series User manual

Simrad

Simrad NSS Series User manual

Simrad NSX User manual

Simrad

Simrad NSX User manual

Simrad NSS evo2 User manual

Simrad

Simrad NSS evo2 User manual

Popular GPS manuals by other brands

Polar Electro RCX3 Getting started guide

Polar Electro

Polar Electro RCX3 Getting started guide

Tobii Pro Spectrum user manual

Tobii Pro

Tobii Pro Spectrum user manual

Gosafe G91I user manual

Gosafe

Gosafe G91I user manual

Fisher TW-8800 operating manual

Fisher

Fisher TW-8800 operating manual

LG LN740 Series Specifications

LG

LG LN740 Series Specifications

Prestigio GeoVision 430 user manual

Prestigio

Prestigio GeoVision 430 user manual

JVC KW-NT3HDT instructions

JVC

JVC KW-NT3HDT instructions

Yoctopuce Yocto-GPS user guide

Yoctopuce

Yoctopuce Yocto-GPS user guide

RightWay GPS Navigator RW 200 user manual

RightWay

RightWay GPS Navigator RW 200 user manual

TomTom VIA user guide

TomTom

TomTom VIA user guide

Garmin ECHOMAP PLUS owner's manual

Garmin

Garmin ECHOMAP PLUS owner's manual

Telit Wireless Solutions GM862GPS Series Hardware user's guide

Telit Wireless Solutions

Telit Wireless Solutions GM862GPS Series Hardware user's guide

Hama 53118 Operating	 instruction

Hama

Hama 53118 Operating instruction

Garmin DEZL 580 owner's manual

Garmin

Garmin DEZL 580 owner's manual

Jigabot EX quick start guide

Jigabot

Jigabot EX quick start guide

Pointer Cellocator CelloTrack XT LTE overview

Pointer

Pointer Cellocator CelloTrack XT LTE overview

Queclink GV55LITE user manual

Queclink

Queclink GV55LITE user manual

Starcom Systems Kylos Compact user guide

Starcom Systems

Starcom Systems Kylos Compact user guide

manuals.online logo
manuals.online logoBrands
  • About & Mission
  • Contact us
  • Privacy Policy
  • Terms and Conditions

Copyright 2025 Manuals.Online. All Rights Reserved.


.OTE All electronic navigation equipment is subject to external fac-
tors beyond the control of the manufacturer. Therefore such equip-
ment must be regarded as an aid to navigation. The prudent navigator
will, for that reason, never rely on a single source for position
fixing and navigation.
3()0-!4%'.-+))
$'03.AVIGATOR
%NGLISH
In case someone falls overboard, press the [MOB] key
and hold for two seconds (or activate an external MOB
switch), and the system will provide you with all rele-
vant data for an efficient rescue operation.
An alarm will sound if the
function is activated from
an external MOB switch.
Press [CLR] to confirm
and reset the alarm.
The -/"display will
provide present course,
bearing and distance to
the MOB position.
Elapsed time - first in sec-
onds and then in minutes
(*=over 9999 minutes).
'OTOGRAPHICAL-/"DISPLAY
The #(!24display will provide a graphical impres-
sion of the MOB position - a man waving his arms in
relation to the ship.
0RESS[WIN]REPEATEDLYTORETURNTOTHE-/"DISPLAY
0RESS[MENU], [4],AND[3]TOTURNTHE-/"FUNCTIONOFF
0RESS[MENU], [2],AND[6]TORECALLTHELAST-/"POSI
TIONPLUSTHEEXACTTIMEANDDATEOFTHEINCIDENT
-/" -!./6%2"/!2$ FUNCTION
KEYSTOPRESS
MOB
SEC S
MAN OVERBOARD
C241° B113°
DIST 1.89nm
TIME 8min
MOB 56°52.743N
POS 9°46.572E
Stop MOB: MENU 4+3
WIN
2,6MENU
4,3MENU
GOTO
2
GN30 MKII DGPS Navigator Table of contents
1. Introduction ..............................5
2. Fundamentals & initial start-up
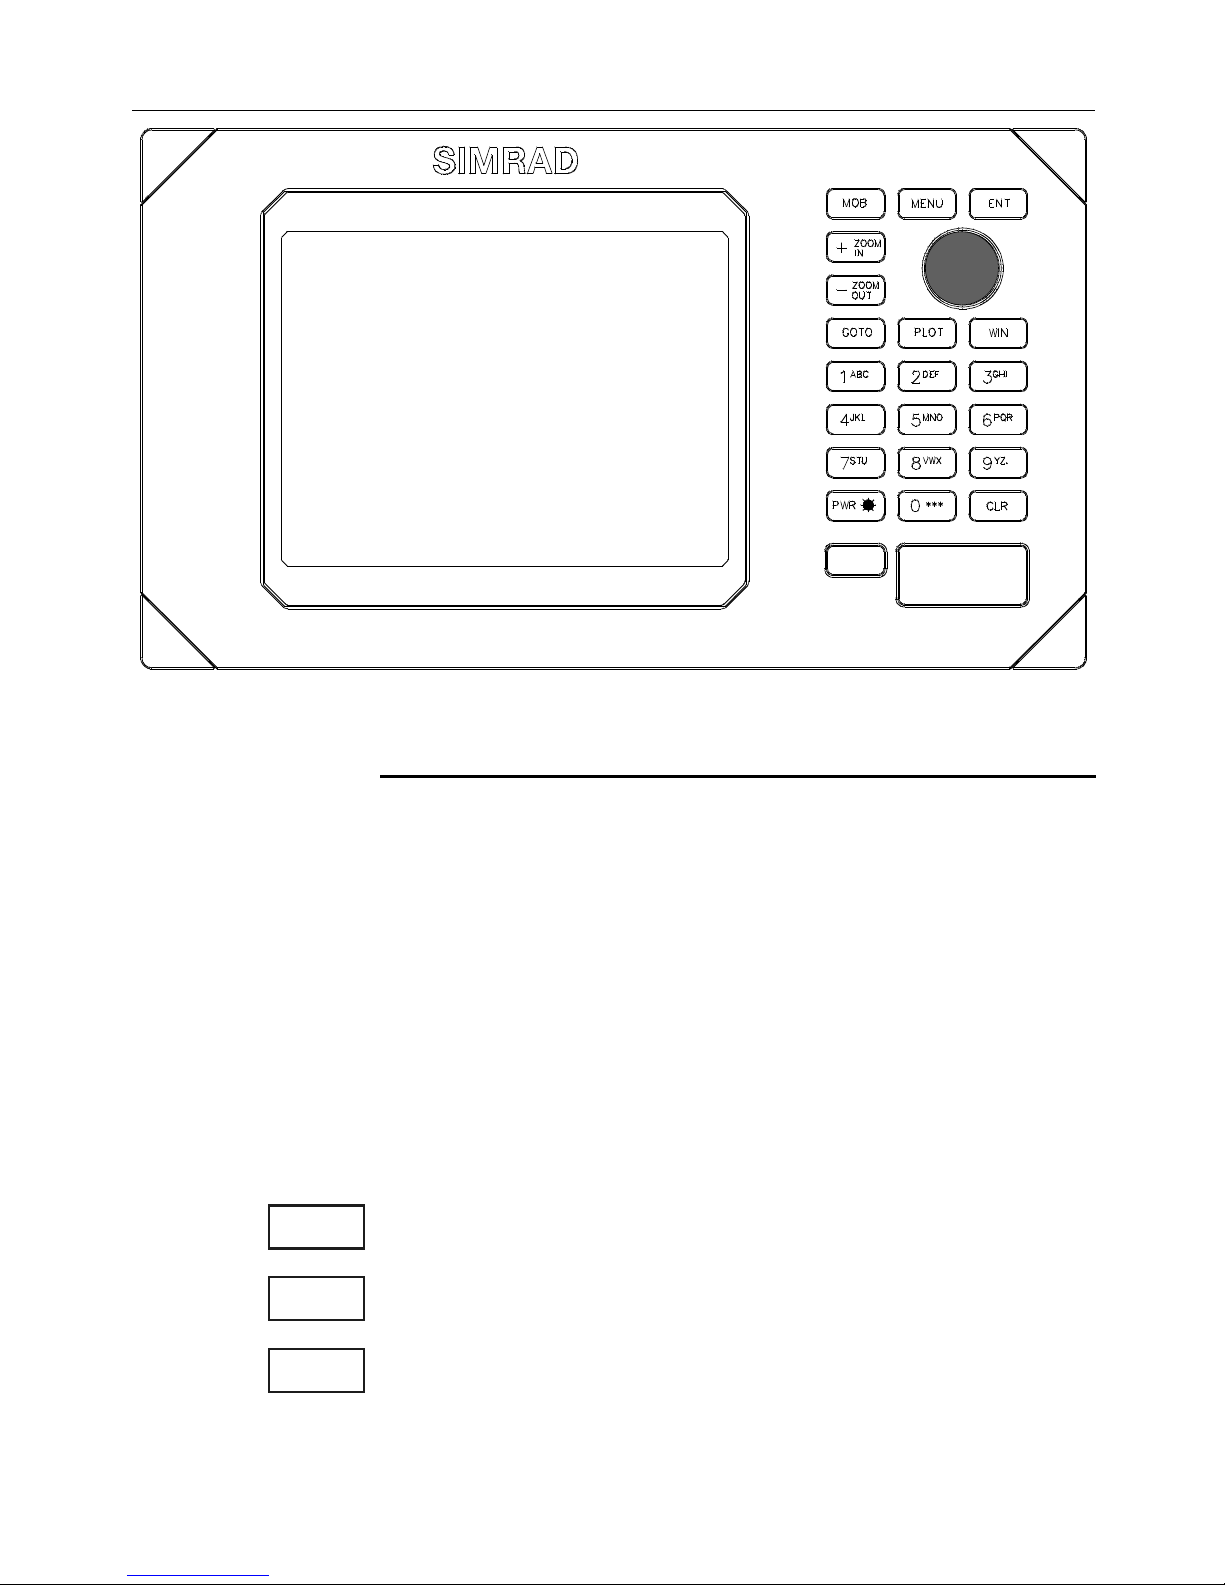
2.1 Keypad .............................................7
2.2 Getting started...............................9
2.3 Menu bar ...................................... 11
2.4 Menu layout ................................. 12
3. Chart and position menus
3.1 Chart menu.................................. 13
3.1.1 Chart ............................................. 13
3.1.2 Chart setup.................................. 18
3.2 Position menu ............................. 19
3.2.1 Position display ........................... 19
3.2.2 Course and speed ...................... 21
3.2.3 Dual speed / Position display... 21
3.2.4 Decca lanes.................................. 23
3.2.5 Loran C......................................... 24
3.2.6 Position setup.............................. 25
3.3 Speed diagram ............................. 28
3.4 DGPS information...................... 30
4. Waypoints and navigation
4.1 Navigation menu......................... 31
4.1.1 Chart / cursor navigation ......... 31
4.1.2 Navigation display....................... 32
4.1.3 Estimated time of arrival (ETA)33
4.1.4 Create route by cursor ............ 34
4.1.5 Waypoint navigation.................. 35
4.1.6 Make a route by using
the WP list ................................... 35
4.1.7 Route navigation......................... 38
4.1.8 Route calculation........................ 39
4.1.9 Editing of route........................... 40
4.1.10 Track navigation ......................... 45
4.2 Waypoint / route menu............ 46
4.2.1 Marks and waypoints................. 46
4.2.2 Plot cursor position on chart.. 47
4.2.3 Plot mark or waypoint as
ship’s position ..............................50
4.2.4 Plot mark or waypoint via
WP list...........................................51
4.2.5 Edit mark or waypoint...............52
4.2.6 Delete mark or waypoint .........54
4.2.7 Trackplotting................................55
4.2.8 Lines (drawing) ............................57
4.2.9 Targets...........................................59
4.2.10 Data transfer................................61
5. Setup
5.1 Setup menu...................................63
5.1.1 Navigation setup .........................63
5.1.2 Setup for speed alarm, units
and language .................................66
5.1.3 Set & drift display........................68
5.1.4 HSD Link setup and data
transfer ..........................................69
6. Interfacing and master reset
6.1 Interface settings.........................71
6.1.1 Interface setup.............................71
6.2 Wind instrument display...........74
6.3 Echo display..................................76
6.4 Master reset.................................78
7. Installation and service
7.1 Installation of GN30 MKII ........79
7.2 Installation of DC30...................80
7.2.1 Operation of DC30....................80
7.3 Installation of antenna................81
7.4 Electrical connections................83
7.4.1 Power supply connections........84
7.4.2 Fuse ................................................84
7.4.3 NMEA 0183 interface
connections ..................................84
7.5 Optional connections ................85
7.6 Maintenance .................................86
GN30 MKII DGPS Navigator Table of contents
7.7 Troubleshooting procedure.....87
7.8 Specifications of GN30..............88
Appendix A
Glossary of terms ....................................89
Appendix B
List of datums............................................93
Index .........................................................95
CE Declaration .......................................100
International warranty ..........................101
List of Simrad distributors
Congratulations on your purchase of 3()0-!4%$'03.AVIGATO
'.-+))- an advanced navigation and high performance position-
ing tool for the professional fleet ....and yet uncomplicated to operate.
The GN30 MKII has a 6" large bright 4 level monochrome LCD dis-
play. The latest GPS receiver technology and built-in differential* re-
ceiver ensures optimum accuracy at all times. Two units can be
connected together forming: The Bridge System ... one at the chart ta-
ble for planning and the other at the helm for navigation. Waypoints
and routes are transferred from planning to helm via a high speed data
link.
3HIPMATE'. -+))ISAVAILABLEWITHORWITHOUTDIFFERENTIAL'03
4HE'LOBAL0OSITIONING3YSTEM is rapidly becoming the most common
system used for navigation and positioning all over the world.
Not only for maritime use, but also for land-based applications and
aviation.
The satellite-based system has been developed and is operated by the
US Department of Defence in order to provide an accurate and reliable
service, which include a 24-hour global coverage.
The GPS system consists of approx. 24 satellites which orbit around
the Earth at an altitude of approx. 20,200 km.
The satellites transmit perfectly syncronized data. However, depend-
ing on the position, the signals will reach the receiver at a slightly dif-
ferent time. By adding the measured time difference to the known
position of the satellites it is possible to calculate the ship’s position to
within a few meters.
(OWTOUSETHISMANUAL
It is a good idea if you make yourself familiar with the key functions
and menu structure described in chapter 2 before you start out, and
then proceed with section 2.2 Getting started.
FSee also Appendix A, Glossary of terms for description of abbrevia-
tions, etc.
'.-+)))NTRODUCTION HAPTER
5
3ERVICE The GN30 MKII is sealed and does not contain any user serv-
iceable parts. Opening of the unit will void its warranty. Touching
electrical parts inside may cause bodily harm or death. If the unit is not
working properly, please check section 7.7 Troubleshooting. If your
GN30 MKII requires servicing or repair, cal your authorized SIMRAD
dealer.
0OWERSOURCEFUSEANDPOWERCABLE Check that the DC power sup-
plied to the unit is within the range of 10 to 32 volts. Note that the ap-
ropriate fuse must be employed (see the fuse rating in section 7.4
Electrical connections. Ensure that the power cord is firmly attached.
'ROUNDING To ensure optimum performance of your equipment and
to reduce electrical interference and risk of electrical shock, you need
to properly ground the unit to the ship’s ground, using the ground
screw on the back of the unit.
HAPTER '.-+)))NTRODUCTION
6
The keypad consists of 21 operation keys which give
very straightforward access to the many features.
The [ENT] key has the special function of opening and
closing for insertion/editing of data. Use the multi-
direction cursor key to move around in the chart dis-
play, and to place the cursor on the function you wish
to change, then select the data by using the alphanu-
meric keys or +/- keys.
(OWTOINTERPRETSPECIALMARKEDKEYSYMBOLSETCIN
THEMANUAL
Either the (plus) or (minus) key may be applied.
Alpha-numeric keys for insertion of figures.
Alpha-numeric keys for insertion of letters.
Emphasizes important points.
F
+EYPAD
+/-
0-9
A-Z
'.-+))&UNDAMENTALSINITIALSTARTUP #HAPTER
7
When the key symbol and "KEYSTOPRESS" appear next
to the start of a new section, it is to point out that when
you press the various keys next to the text in italic,
you will then obtain what the italic text describes.
•Example:
In the manual’s section 3.1.2 Chart setup, you have:
,OADDISPLAYFOR #HARTSETUP 
- meaning that, by pressing [MENU], [1],[3] you will call
up the ’Chart setup’ display.
+EYAPPLICATIONS Some of the key functions are gen-
eral and can be applied at any time, other key functions
are related to a certain menu(s) and can only be applied
when in the appropriate menu.
Turns cursor on/off in data displays. Opens for/con-
firms insertion and editing of data. Calls up informa-
tion on marks, waypoints, etc. in chart display.
Turns the menu bar on/off. Exits any data display with-
out taking any action.
Press for 2 seconds to activate the MOB - ’Man over-
board’ function.
Zooms in for greater details (smaller scale).
+ and - toggles between available values.
Zooms out for better overview (larger scale).
Use the multi-direction cursor key to move around in
menus, displays and charts + activate cursor on chart.
Shortcut to chart display from any other display.
Activates pop-up window for navigation modes.
KEYSTOPRESS
1,3MENU
ENT
MENU
MOB
2 sec’s
ZOOM
+ IN
ZOOM
- OUT
GOTO
#HAPTER '.-+))&UNDAMENTALSINITIALSTARTUP
8
Activates pop-up window for plot modes to plot marks,
waypoints, routes, etc. on chart.
Toggles between four pre-selected windows. Hold two
seconds for automatic rotation of preselected displays.
Press WIN again to return to manual operation.
Turns off the menu bar. Turns off the cursor.
Deletes data, leaps to first vacant WP in WP list.
The Alpha-numeric keys inserts and selects data in data
displays. Keys 1-9 are also Quick scales i.e. selects fixed
chart scales. Key 0 will center the cursor/ship on the chart.
Turns the GN30 MKII on. Calls up an info window where
you can adjust light/contrast in screen and background
light in keypad.
Turns the GN30 MKII off.
Not funcional in this version.
4OTURNTHE'.-+))ONPRESSANDHOLDTHE[PWR]
KEYUNTILTHEREISAPICTUREONTHESCREEN
0RESS[PWR]AGAINTOAD USTLIGHTCONTRASTANDPRESS
[ENT]TOEXITTHEFUNCTION
The unit will now perform a fully automatic start-up
and find the correct position without further data entri-
es. However, to minimize the start-up time, you can key
in the start position by pressing [MENU], [2], [7], [ENT]
and use the cursor key to place the cursor next to ,ATi-
tude, key in the start position by means of the numerical
keys and confirm with [ENT]. The start-up phase is com-
pleted when the letter 3(3tart-up) in the status indica-
0-9
A-Z
PLOT
WIN
CLR
PWR 
Press 2 times,
1 short + 1 long
'ETTIN STARTED
KEYSTOPRESS
PWR 
ENTPWR 
'.-+))&UNDAMENTALSINITIALSTARTUP #HAPTER
9
tor disappears in the position display - see section 3.2.1.
Select display language and insert the correct antenna
altitude:
$ISPLAYLAN UA E
#ALLUPDISPLAY
'OTOTHEBOTTOMLINEINTHEDISPLAY
3ELECTLANGUAGEANDCONFIRM
)NSERTCORRECTANTENNAALTITUDE (above sea level)
#ALLUPDISPLAYFOR 0OSITIONSETUP
/PENFORCHANGEANDGOTO -ANUALANTENNAALTITUDE
)NSERTNEWALTITUDEEGMETRES-altitude can
be set to positive or negative value
#ONFIRMENTRY
2OTATIONOF7).DOWS
0RESS[WIN]REPEATEDLYTOLEAFTHROUGHTHEWINDOWS
CURRENTLYSELECTEDFORROTATION
The sequence of the 4 displays will be as they are se-
lected. If you only need 3 or 2 displays in the rotation,
then you call up the same display in more than one
WINdow to make the total of 4: Press [WIN] to select
the first display, press [WIN] to select the second dis-
play, press [WIN] to select the third display and finally,
press [WIN] to select the fourth and last display.
3TARTAUTOMATICROTATIONOFPRESELECTEDWINDOWSATA
PRESELECTEDTIMEINTERVAL (adjustable, see sec. 5.1.3)
0RESSTHE [WIN] KEYAGAINTORETURNTONORMALOPERATION
WIN
MENU 6,1
+/- ENT
MENU 2,7
ENT
+/- 0-9
ENT
WIN
WIN
SEC S
#HAPTER '.-+))&UNDAMENTALSINITIALSTARTUP
10