Simshine SimCam Ango User manual

SimCam Ango
User Guide
Last updated: 2020-07-11

About the guide
This user guide gives the basics about how to setup and install the
product. There are more detailed in-APP instructions that can guide
you through every step of the way.
Need help from our support team? Email to :
https://www.simshine.ai/support
EN Download the latest user manual at the above address.
AR
FR Téléchargez le dernier manuel d'utilisation à l'adresse
ci-dessus.
DE Laden Sie das neueste Benutzerhandbuch unter der oben
angegebenen Adresse herunter.
ES Descargue el último manual de usuario en la dirección
anterior.
JP 上記のアドレスで最新のユーザーマニュアルをダウンロードして
くだ さい 。
KR 위�주소에서�최신�사용자�설명서를�다운로드하십시오.
IT Scarica l'ultimo manuale dell'utente all'indirizzo sopra
indicato.
RU Загрузите последнюю версию руководства
пользователя по указанному выше адресу.

Contents
Step 1 - Learn about the product..........................................................04
Step 2 - Setup the WiFi.........................................................................07
Step 3 - Install the SimCam Ango........................................................09
Additional information...........................................................................13
Warranty................................................................................................16

Product profile
SimCam Ango is an AI-powered smart video doorbell that
features long battery life, making sure that you never miss a
real visitor.
Key features and benefits
• Person detection - SimCam Ango can alert you to a human
visitors without false alerts.
• Long battery life - If battery powered, the doorbell stays in
sleep mode when not activated. The self-adaptive PIR sensing
and AI person detection eliminates lots of false alerts.
• 1080P & night vision - get a clear view of your front porch
with more details, day and night.
• Cloud storage - save and playback the recorded video on the
APP anywhere, anytime.
• Flexible power supply - SimCam Ango can be battery
powered or hardwired to existing doorbell.
Step 1 - Learn about the product
04
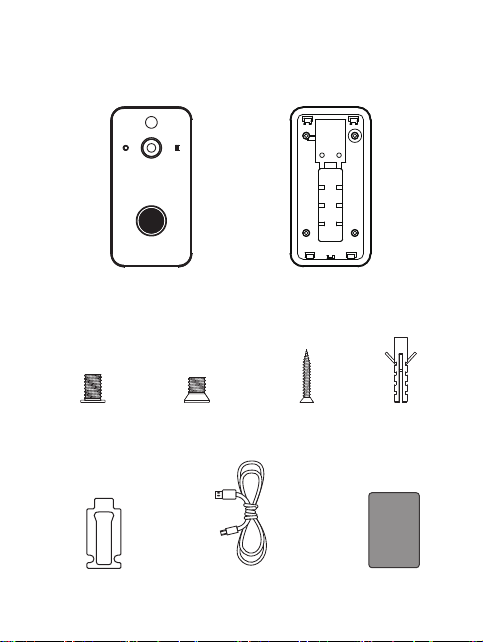
What’s in the box
Security screw x 1
USB charging cable x 1
SimCam
Ango
Mounting screw x 2 Wall screw x 4 Wall anchor x 4
3M adhesive tape x 1 User manual x 1
SimCam Ango
doorbell x 1
Mounting bracket x 1
05

06
Meet the SimCam Ango doorbell
PIR sensor
Microphone
Lens
Light sensor
Infrared LED
Doorbell button
Status LED
Microspeaker
Reset button
USB charging port
SD card slot
Battery

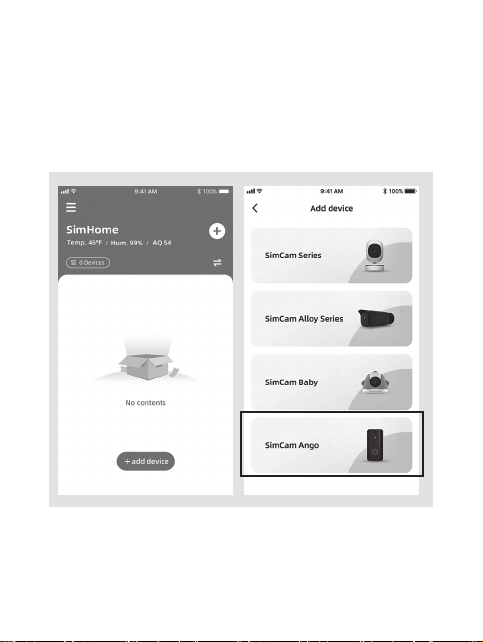
Download and install the SimHome APP
1. Please search for “SimHome” in Google Play or IOS App
Store to download the SimHome APP to your mobile device.
2. Tap “register account” to create an account with your email
address.
Step 2 - Setup the WiFi
Tap here to
create an account
07
08
Pair and WiFi setup
1. Sign in to your account.
2. Add a new device to the APP.
3. Select the SimCam Ango as the device.
4. Please follow the in-APP instruction to setup the WiFi.
Tip: WiFi name and password accepts English characters, symbols and
numbers. If you want to connect the doorbell to a new WiFi, please press
and hold the reset button for more than 10 seconds to reset the doorbell.

The distance between the
doorbell and the WiFi router
is better less than 30 feet.
Find a location for the doorbell
After setup, move the doorbell to the front door and check the
video on the APP. If the video is not working well, please try
moving the WiFi router closer to the doorbell for better WiFi
connection.
Step 3 - Install the SimCam Ango
09

10
1. The recommended install height is 4.6-5.2 feet above the
ground. Check the live stream on the APP to select the best
height to install the doorbell.
2. Screw the mounting bracket to a flat surface with wall screws.
Use wall anchors to hold the screws if the wall is made of brick
or stone.
Brick or stone wallWooden wall
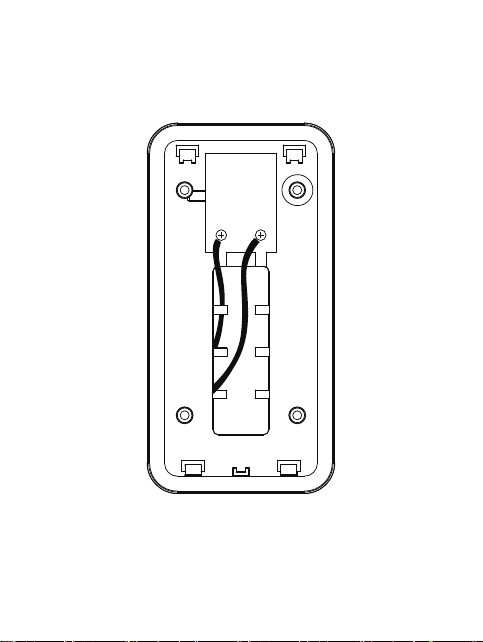
If hardwiring to existing doorbell (8-24V)
Connect AC wires to the mounting screws on the bracket.
Hardwiring vs battery power
1. Hardwiring can trigger alerts and recording faster.
2. Battery can keep the doorbell working during a power outage and
activate the doorbell immediately when a motion is detected.
11

4. Slide the doorbell into the mounting bracket. Secure the
doorbell with the security screw at the bottom of the backplate.
Congratulations! You are all set!
1 2
1 2
12

Additional information
- Status LED guide
Status LED color Product status
Blinking red
Blinking blue
Blinking blue
Solid blue for 3 seconds
Solid red
Solid blue for 3 seconds
Solid red off
The doorbell is powered on.
The doorbell is attempting to connect to WiFi.
The doorbell disconnect from WiFi.
The doorbell is connected to WiFi.
The doorbell battery is being charged.
The doorbell battery is fully charged.
The doorbell button is pressed.
Doorbell
13

You can find more settings of the APP and the troubleshootings
by tapping the hamburger menu on the top left.
Additional information
- More help in the APP
14

You can find the settings of each device and an in-APP
instruction by tapping the 3 dots icon above the live stream.
Additional information
- More help in the APP
15

Warranty
What does this warranty cover?
Simshine warrants that each Simshine’s product you purchase
is free from any defects in material or workmanship under
normal use during the Warranty Period. The warranty period for
a Simshine product is twelve (12) months from the day when the
product is delivered to the first end-user. During the Warranty
Period, SimShine will repair or replace, at no charge, products
or parts of a product that proves defective because of improper
material or workmanship, under normal use and maintenance.
What is not covered by this warranty?
Defects caused by incorrect use or improper installation not
following the product manual instructions;
Defects caused by unauthorized modification, repairs,
disassembly or use with third-party components or product;
The serial number has been removed or defaced from the
Simshine product;
Damages caused by lightning, fire, earthquake, tornado, or
other events of force majeure;
Consumables parts, including but not limited to batteries, unless
damage is due to defects in material or workmanship of the
product;
16

Simshine products purchased from an unauthorized reseller;
Damage caused by third-party service providers who are not
authorized by Simshine;
Fail to provide proof of purchase that you are the authorized
user of the product;
Any non-Simshine branded products, such as batteries, SD card
and cables, even if sold or shipped with Simshine products;
Products marked as “Sample” or “Not for Sale”, or sold “AS IS”;
This warranty cannot be transferred from the original end-user to
others;
Any indirect or consequential damages or losses resulting from
the product failure such as loss of data and loss of business.
Return & Refund
If customers are not completely satisfied with the Simshine
product, they can return it within 30 days after the receipt of the
product.
To be eligible for a return, the product must be unused and
returned in the same condition that you received it. It must also
be in the original packaging. Products that show any signs of
wear, or that are not packaged like new with all accessories and
manuals will not be accepted under this return policy. To
complete your return, we require a receipt or proof of purchase
17

and the serial number. Customers will have to pay all the return
shipping costs. No restocking fee will be charged for the return
of a product.
Once your returned product is received and inspected, we will
email you a notification of receipt. We will also notify you of the
approval or rejection of your refund. If you are approved, then
your refund will be processed, and a credit will automatically be
applied to your credit card or original method of payment, within
a certain amount of days. Please note shipping charges are
non-refundable.
How to obtain warranty service?
or Simshine authorized resellers/repair centers and describe the
product issues. They will attempt to identify and resolve the
problem of your product by offering you tips and advice,
software or firmware updates.
If the problem cannot be identified or resolved through remote
assistance or software updates, you will be requested to return
the product to the address provided by Simshine or authorized
resellers.
Simshine will examine the returned product to identify the
problem, if Simshine determines that the problem in question is
not covered by this warranty, you will have to apply for paid
repair service.
18

Warranty card
If you want to claim warranty service, please fill out the
warranty card below and return it with the product.
Customer’s Name:___________________________________
Email:_____________________________________________
Phone:____________________________________________
Address:___________________________________________
__________________________________________________
Dealer’s name:______________________________________
Dealer’s address:____________________________________
__________________________________________________
Date of purchase(DD/MM/YY):__________________________
Order number:______________________________________
Serial Number:______________________________________
Type of services: Repair Exchange Return
Description of issues:_________________________________
__________________________________________________
__________________________________________________
The serial number can usually be found on the bottom of the product.

Simshine Intelligent Technology Co.,Ltd.
www.simshine.ai
Made in China
Table of contents
Popular Accessories manuals by other brands


Sleep Sense
Sleep Sense 9003 user manual

Heath Zenith
Heath Zenith Wireless Push Button Accessory 598-1105-06 owner's manual

B-Link
B-Link SQUARE SENSE instructions

AVA Sport
AVA Sport Acro Base 2015 Series operating manual

Heath Zenith
Heath Zenith SL-6143 owner's manual

smart home
smart home IQ Temp install guide


