E-matic PMWSM User manual

Ematic_PMWSM_Instructions_Rev01
PMWSM
Instructions
The use of occupancy detectors can significantly reduce energy usage lessening both energy
costs and helping the environment. The PMWSM is a semi-flush mount OCCUPANCY
DETECTOR uses microwave (5.8GHz) by the slight motion of persons or objects passing
through its detection area. Heat does not affect the sensitivity but detection is possible through
doors, panes of glass or thin walls. The microwave sensor
automatically operates the connected load when an area is occupied.
After a preset time on non-activation (when an area is vacated) the
load will be switched off. In addition the built in photocell takes natural
light (daylight) into account when determining its activation.
SPECIFICATION:
Power Sourcing: 230v /AC Detection Range: 180°
Power Frequency: 50/60Hz Detection Distance: 5-15m (adjustable)
Ambient Light: <3-2000LUX (adjustable) HF System: 5.8GHz CW radar, ISM band
Time Delay: Min.10sec±3sec Transmission Power: <0.2mW
Max. 12min±1min Installing Height: 1-1.8m
Rated Load: 1200W Power Consumption: approx 0.9W
300W Detection Motion Speed: 0.6-1.5m/s
LED Load: 150W IP Rating: IP20
FUNCTION:
The “LUX” adjuster adjusts the operation of the PIR in different ambient light. If adjusted to
the “sun” position (max) then the sensor will operate in daytime and at night. If adjusted to
the “3” position (min) then the sensor will only work when the ambient light is less than
3LUX. The “TIME” adjustment will determine the duration of the lights stays on for.
If the sensor has been activated then the timer is reset every time the PIR is still being
activated with the lights on.
SENS adjustable: It can be adjusted according to the location of the sensor. The detection
distance of low sensitivity could be only 5m and high
sensitivity could be 15m which fits for large room.
Ematic_PMWSM_Instructions_Rev01
NOTE: the high-frequency output of the HF sensor is <0.2Mw- that is just one 5000
th
of the
transmission
power of a mobile phone or the output of a microwave oven.
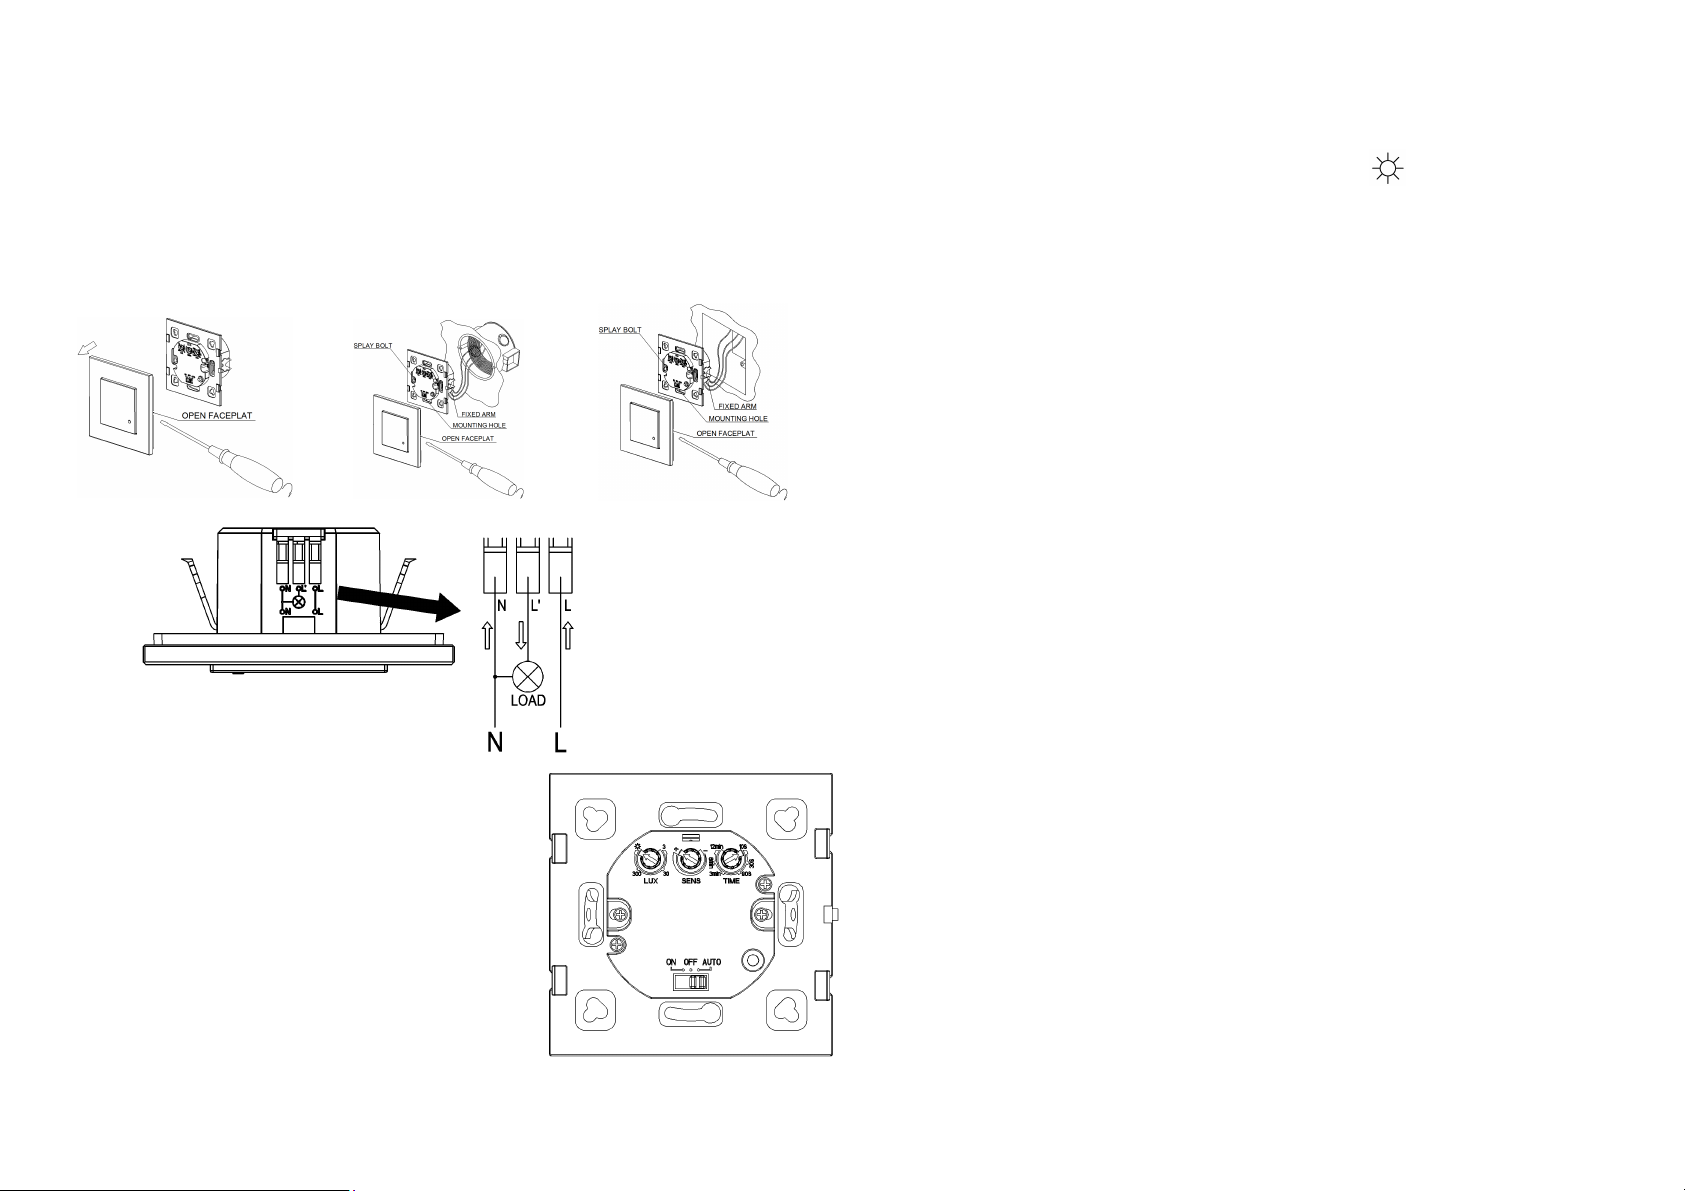
INSTALLATION: (see the diagram)
Unclip the faceplate of sensor with a small flat blade screwdriver and adjust the time and
LUX adjusters (refer to figure 1)
Connect the cables to the corresponding terminals and ensure there are no loose
connections.
Install back the faceplate, switch on the power and then test it.
Figure1 Figure2 Figure3
CONNECTION-WIRE DIAGRAM:
TEST:
Turn the LUX adjuster clockwise on the maximum
(sun). Turn the SENS adjuster clockwise on the
maximum (+).Turn the TIME adjuster anti-clockwise
on the minimum (10s).
When you switch on the power, the light will be on at
once. And 10sec±3sec later the light will be off
automatically. Then if the sensor receives induction
signal again, it can work normally.
When the sensor receives the second induction signals
within the first induction, it will restart to time from the moment.
Turn LUX adjuster anti-clockwise on the minimum (3). If the ambient light is less than 3LUX
(darkness), the inductor load could work when it receives induction signal.
Note: when testing in daylight, please turn LUX adjuster to (SUN) position, otherwise
the sensor lamp could not work!
IMPORTANT NOTES
:
Must be installed by a skilled competent electrician.
Ensure the AC supply is isolated.
Ensure sensor if located on a solid object free from any vibration of movement
Avoid installing it near the metal and glass which may affect the sensor.
Never modify the sensor as there are no user serviceable parts inside.
Not suitable for use with dimmer switches.
Install in accordance with I.E.C. Wiring Regulations
Fault Finding Tips:
The load doesn’t work:
a. Check the power and the load.
b. Whether the indicator light is turned on after sensing? If yes, please check load.
c. If the indicator light is not on after sensing, please check if the working light
corresponds to the ambient light.
d. Please check if the working voltage corresponds to the power source.
The sensitivity is poor:
a. Please check if in front of the sensor there shouldn’t be obstructive object that
affect to receive the signals.
b. Please check if the signal source is in the detection fields.
c. Please check the installation height.
The sensor can’t shut automatically the load:
a. If there are continual signals in the detection fields.
b. If the time delay is set to the longest.
c. If the power corresponds to the instruction.

Ematic_PMWSM_Instructions_Rev01
Due to our policy of continuous improvement we reserve the right to change specification
without prior notice. Errors and omissions excepted.
These instructions have been carefully checked prior to publication. However, no
responsibility can be accepted by Challenger Security Products for any misinterpretation of
these instructions.
E-Matic Energy Management Solutions
Distributed by Challenger
10 Sandersons Way, Blackpool, FY4 4NB
Email: enquiries.challenger@adivision.co.uk
Website: www.challenger.co.uk
Other E-matic Accessories manuals


