Singer Instruments PhenoBooth User manual

USER GUIDE v1.5

·Remove plate lids before imaging. If lids are in place when the input
tray is closed, the machine will crash and may be damaged.
·Keep your hands clear while the input tray is moving. Catching your
hands in the input tray may cause injury.
·Make sure the PhenoSuite and PhenoBooth light settings match.
When capturing an image in PhenoSuite, be sure to match the
settings on the PhenoBooth’s blackout slider.
·Ensure power supply is the correct way round. Plugging the power
supply into the PhenoSuite upsidedown will cause damage to the
machine. See p.9 for details.
·Avoid plugging the USB 3.0 cable in slowly. A common error with all
USB 3.0 devices is that they are recognised as USB 2.0. This happens
when the USB plug is inserted too slowly.
BEFORE YOU START!

3
singerinstruments.com
Before you start!
Introduction
OUT OF THE BOX
Anatomy & features
Unboxing & installation
LET’S START!
PhenoBooth operation
PhenoSuite operation - New
project
Image acquisition
COLONY COUNTING PROJECT
Pre-processing
Detection
Filtering
SGA PROJECT
Pre-processing
Detection
Filtering
Analysis
Visualisation
RCP PROJECT
Pre-processing & Detection
Filtering
Stinger Export
ROTOR HDA / The Stinger
BEST PRACTICE
PhenoSuite icons
Feedback light
Batch processing
Export
History plug-in
Add new plate run
Change heat map colours
Using filters
Notes
2.
3.
4.
6.
8.
10.
12.
13.
14.
16.
18.
19.
20.
22.
24.
25.
26.
27.
28.
30.
32.
33.
34.
36.
40.
42.
44.
45.
46.
47.
48.
49.
50.
51.
PHENOBOOTH™
INTRODUCTION
The PhenoBooth is a fast, semi-automated plate reader for imaging
and analysis of cell colonies. The PhenoBooth can image standard
SBS plates, Petri dishes and Singer PlusPlates.
USER GUIDE
Follow these instructions to get the most out of the PhenoBooth.
This guide outlines getting started and general operation, as well as
PhenoSuite tutorials for each package.
DISCLAIMER
At Singer Instruments, we are constantly seeking to improve our
products and adapt them to the requirements of modern research
techniques and testing methods. This involves modification to
the mechanical structure and optical design of our instruments.
Therefore, all descriptions and illustrations in this user guide,
including all specifications are subject to change without notice.
To download the latest version of this user guide please visit:
singerinstruments.zendesk.com

4

5
singerinstruments.com
OUT OF THE BOX
Find out what comes with the PhenoBooth. We’ll take you
through the steps involved in unboxing and assembling
ready for the exciting world of colony imaging!

6
ANATOMY & FEATURES
Input tray
function button
Filter tray
PHENOBOOTH
Input tray Feedback light Blackout screen
USB 3.0 socket
Power socket
Power switch
Capture
function button
7
singerinstruments.com
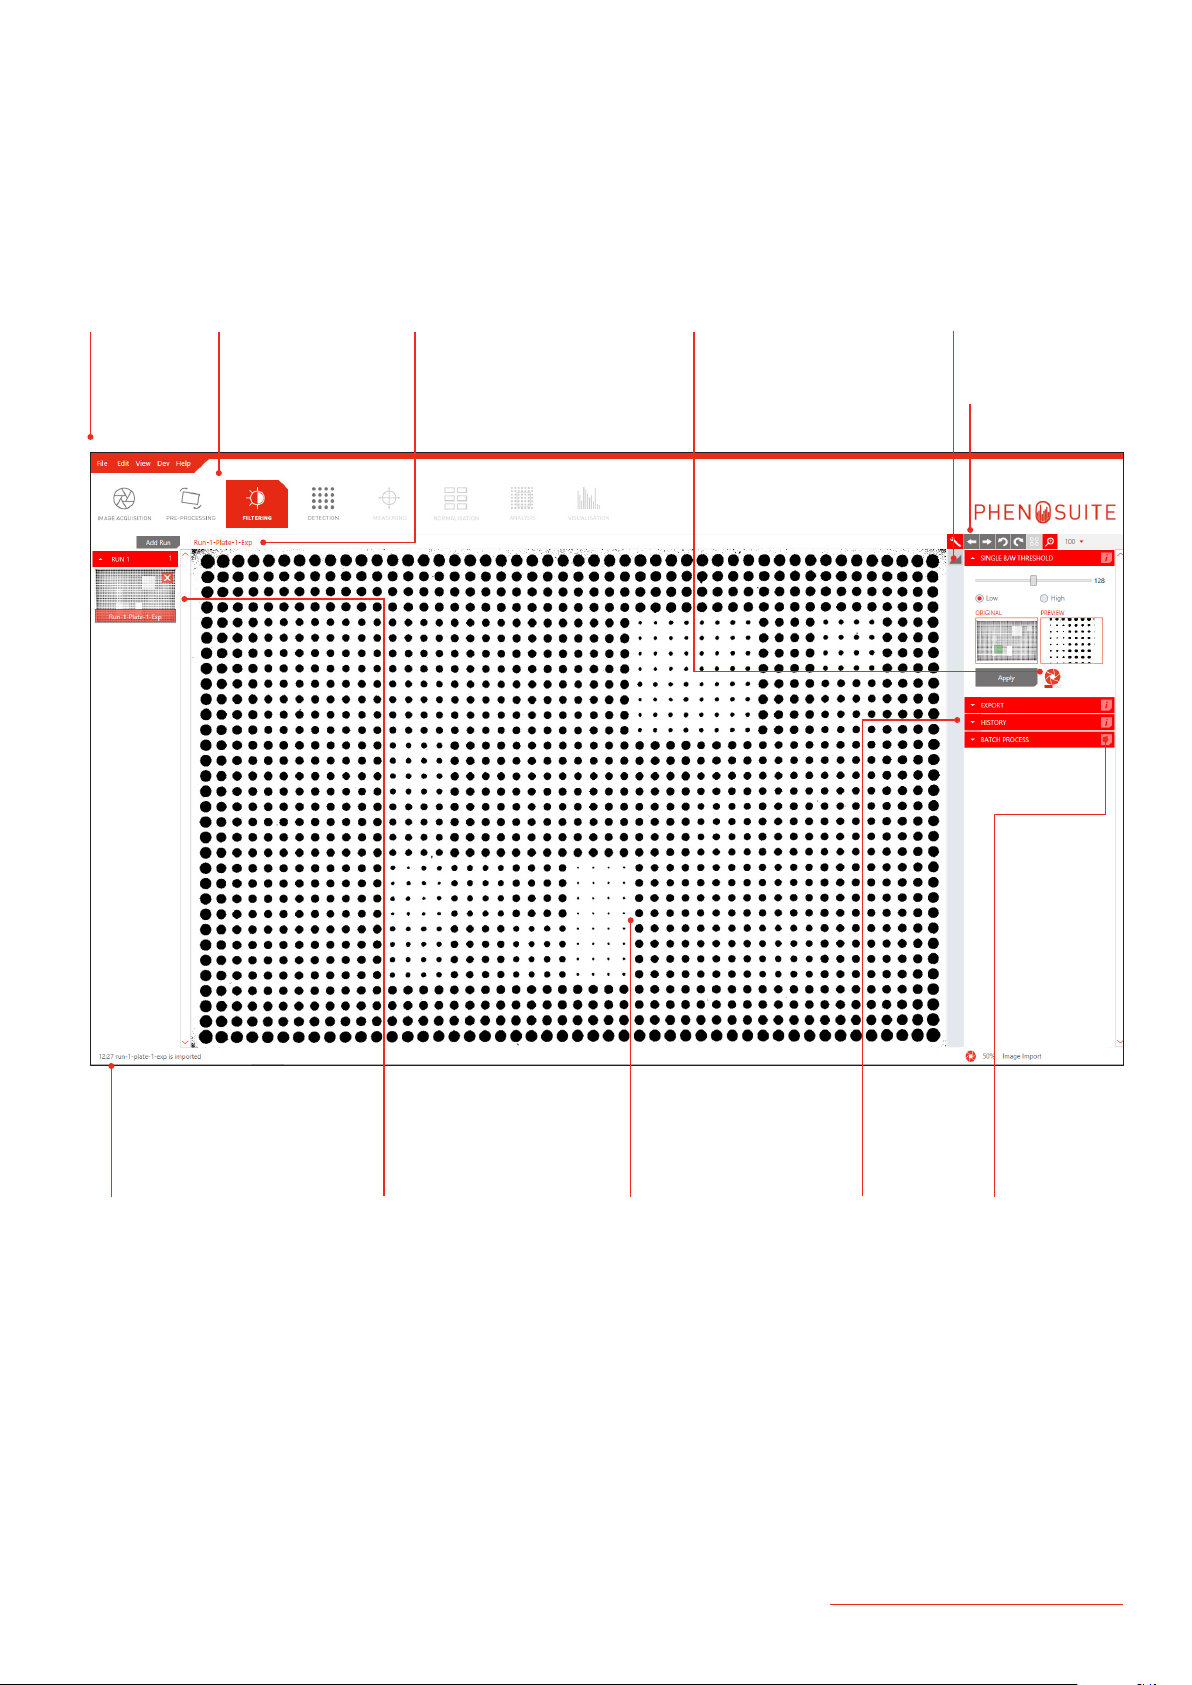
PHENOSUITE
Menu bar Stage selection
General tools
Plug-in tools
Plug-insLast task completed Current plate Plug-in
information
Plate preview
Plate information Progress bar
8
UNBOXING & INSTALLATION
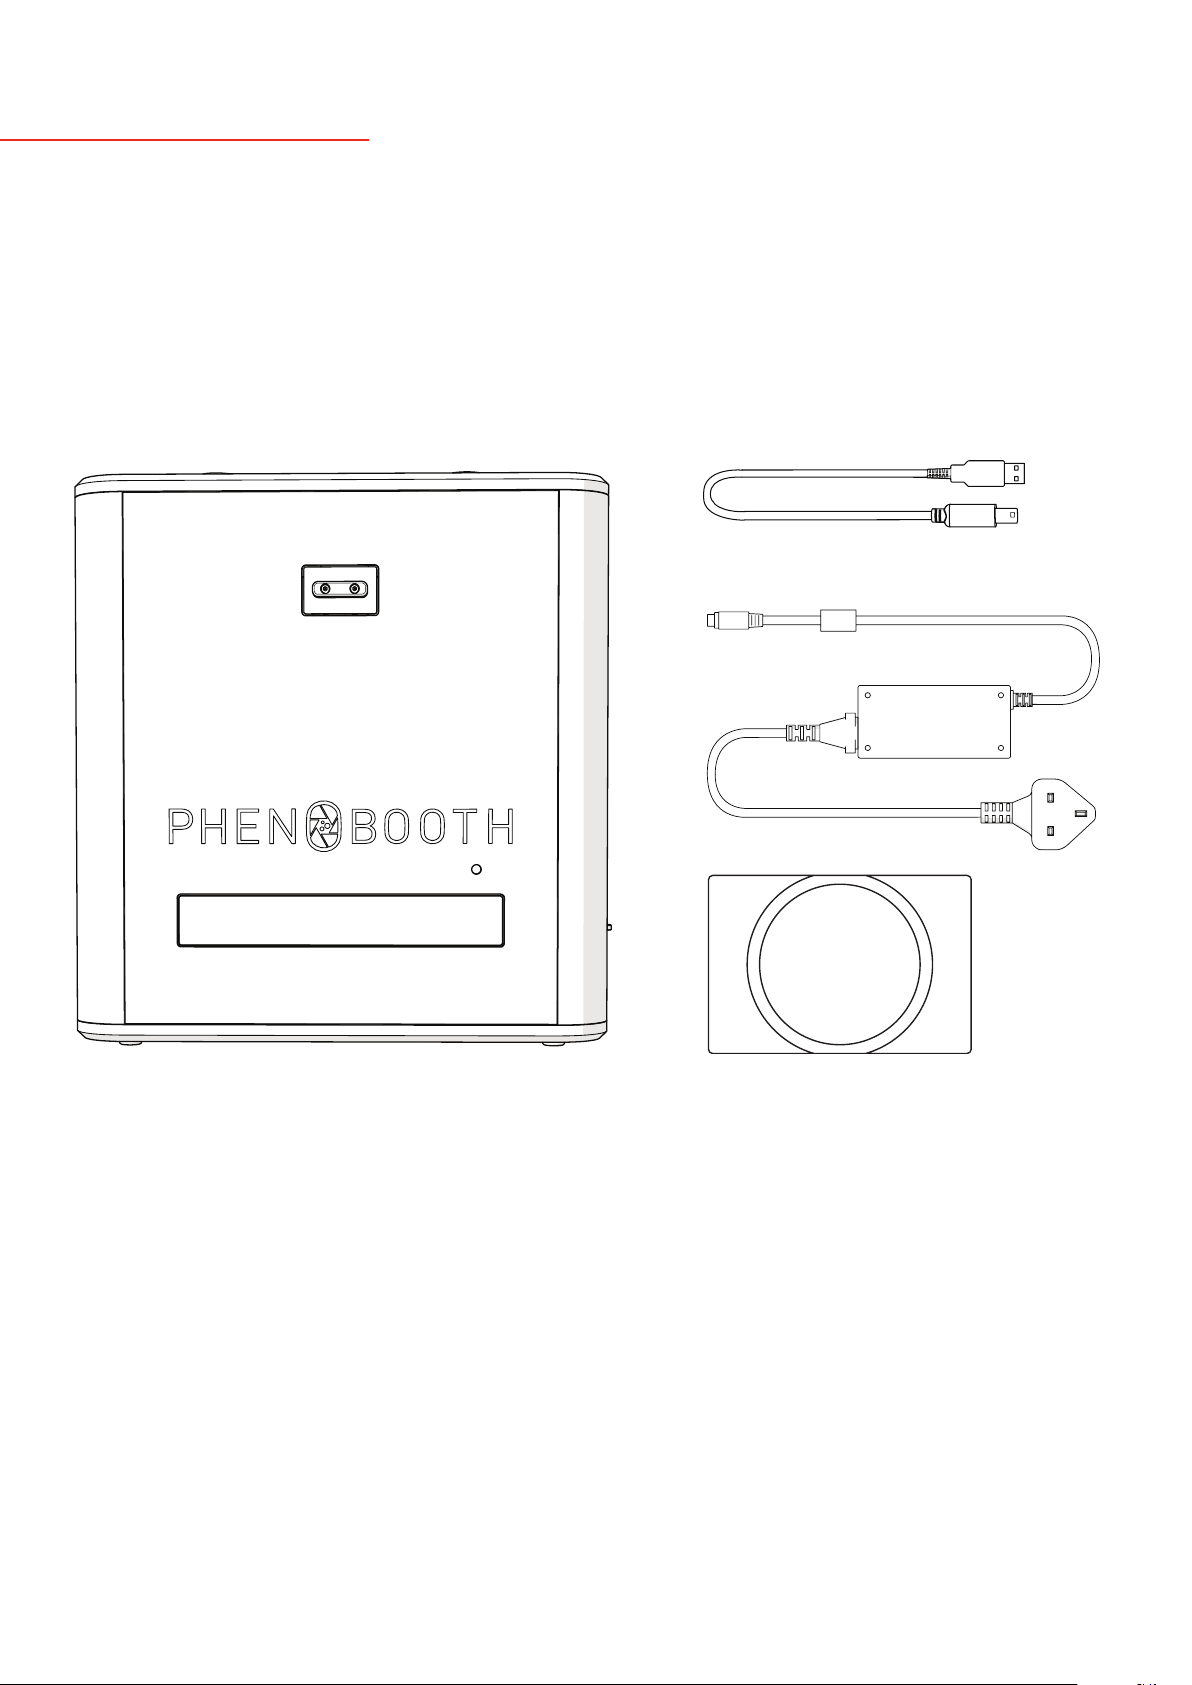
IN THE BOX
1. PhenoBooth
2. USB 3.0 Cable
3. Power Supply
4. 90mm Petri Adapter (Optional Extra)
1. 2.
3.
4.
MINIMUM REQUIREMENTS
· Intel Core i5 2.4GHz
· 4GB of RAM
· 512GB hard disk space
· Microsoft Windows 7 (64-bit)/Windows 8.1 (64-bit)
· USB 3.0 port
·
INSTALLATION STEPS
1. Go to http://si-deployment.azurewebsites.net/install/publish.htm
2. Click install to download PhenoSuite
3. Install PhenoSuite
4. After installation, PhenoSuite will start automatically and ask for
organisation name and licence code
5. Enter the organisation name and licence code that came with your
PhenoBooth packing documents and click Activate
6. After activation PhenoSuite will automatically download and install
dependencies

9
singerinstruments.com
· Insert the USB cable into the PhenoBooth USB 3.0
socket and to the your computer.
· You’re now good to go!
· Carefully remove the PhenoBooth from the box and
stand on your workspace.
· HEAVY: May require 2 people.
· Insert power supply and turn on the power switch.
· WARNING: Make sure the arrow diagram is on top
of the cable. Inserting the power supply upsidedown
will cause damage to the PhenoBooth.
· Download and install PhenoSuite onto your chosen
computer. Follow the steps on page 8.
34
12
UNBOXING & INSTALLATION

10

11
singerinstruments.com
LET’S START!
I’m ready to start!
Here is a quick run-through of how to use the PhenoBooth and get
started with PhenoSuite — it’s all very simple!

12
BOTTOM TOP
· Press the capture function button to focus the
camera and preview the image in PhenoSuite.
· Follow the PhenoSuite instructions on p.13.
· Press the input tray function button to open the
input tray, remove your plate and replace the lid.
· Repeat these steps for the rest of your plates.
· If using petri dishes, you will need to use a petri
dish adaptor. Place the adaptor into the input tray.
· Remove the petri dish lid and insert into the adaptor.
· If you need to purchase a petri dish adaptor, please
contact: sales@singerinstruments.com
· Remove the lid from your plate and place the plate
into the input tray.
· WARNING: Ensure plate is nestled correctly to avoid a
hardware crash.
· Choose between top or bottom lighting by sliding
the blackout screen (left for bottom and right for
top).
· Press the input tray function button to open the
input tray.
5 6
34
12
PHENOBOOTH OPERATION
13
singerinstruments.com
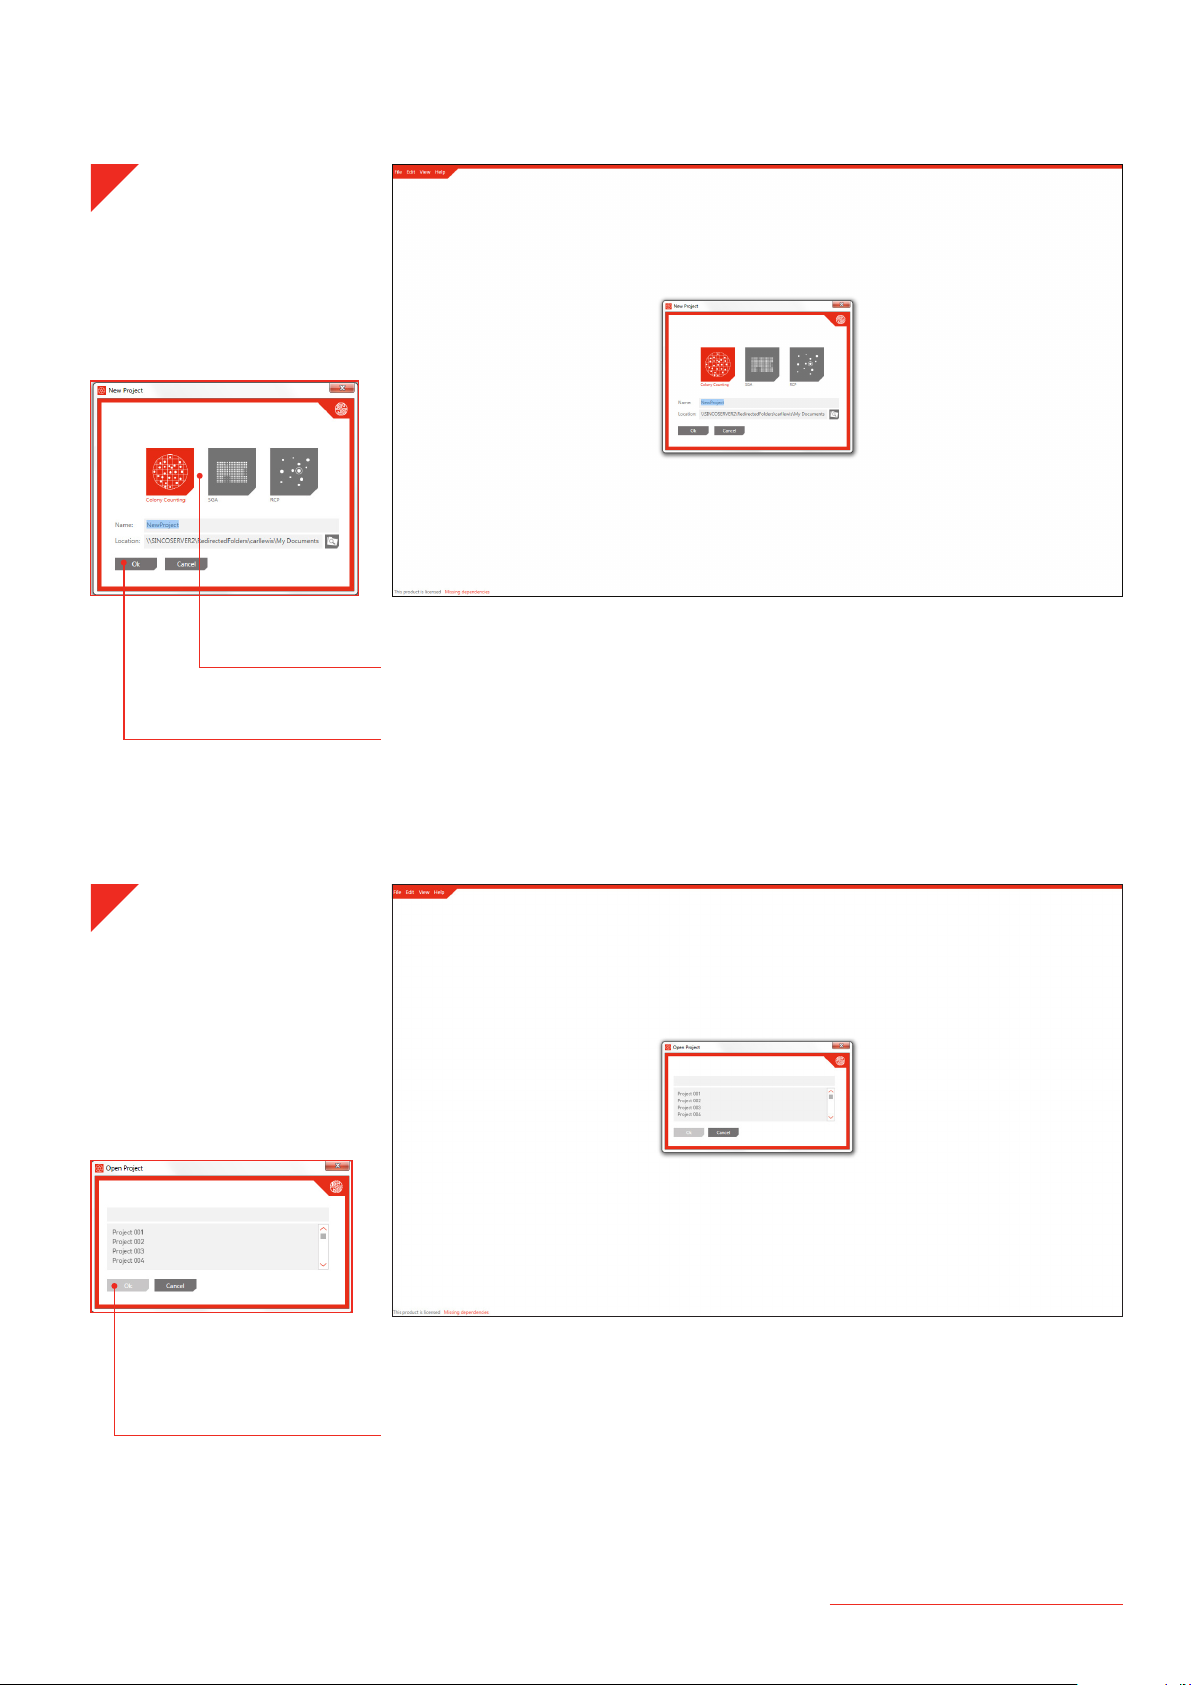
· Open PhenoSuite and select New Project. Select the type of project you want to
create from the icons. Icons will vary depending on which PhenoSuite packages you
have purchased. Your chosen project type is highlighted in red.
· Name your project, select a save location then click OK.
· If you want to open a previous project select Open Project and pick from the list of
existing projects.
· Click OK to continue.
1
2
PHENOSUITE OPERATION - NEW PROJECT
14
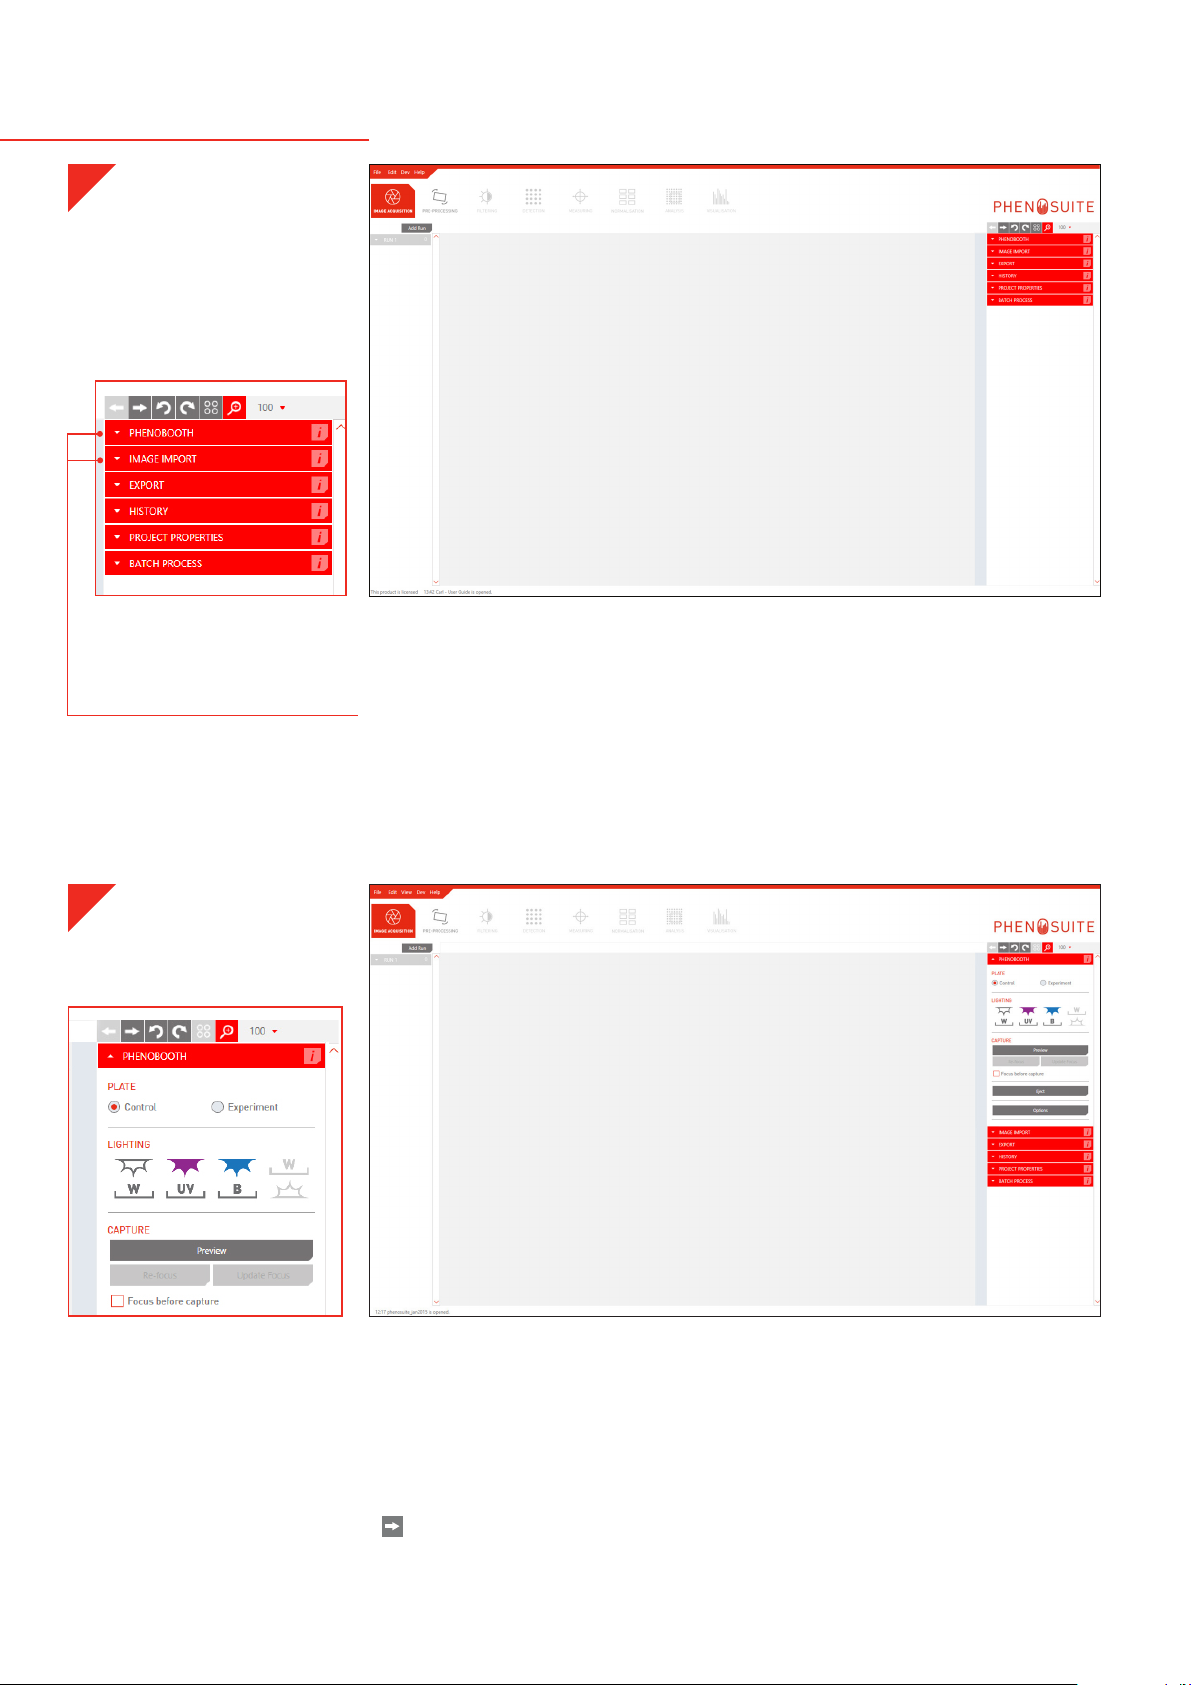
· When you start a new project, the first stage is always Image Acquisition. There are
two options for acquiring an image: PhenoBooth or import an existing image.
· Select the desired method from the plug-in panel on the right of the screen.
· If using a PhenoBooth, click on that tab and enter the plate information. Select
your desired light settings. Also select whether the plate is a control or
experiment. Plate names are automatically generated.
· You can choose to preview your image or, if you’re happy with the settings, acquire
the image.
· This can be repeated until all of your plates have been captured.
· moves onto the pre-processing stage.
1
2
PHENOSUITE OPERATION - IMAGE ACQUISITION
15
singerinstruments.com
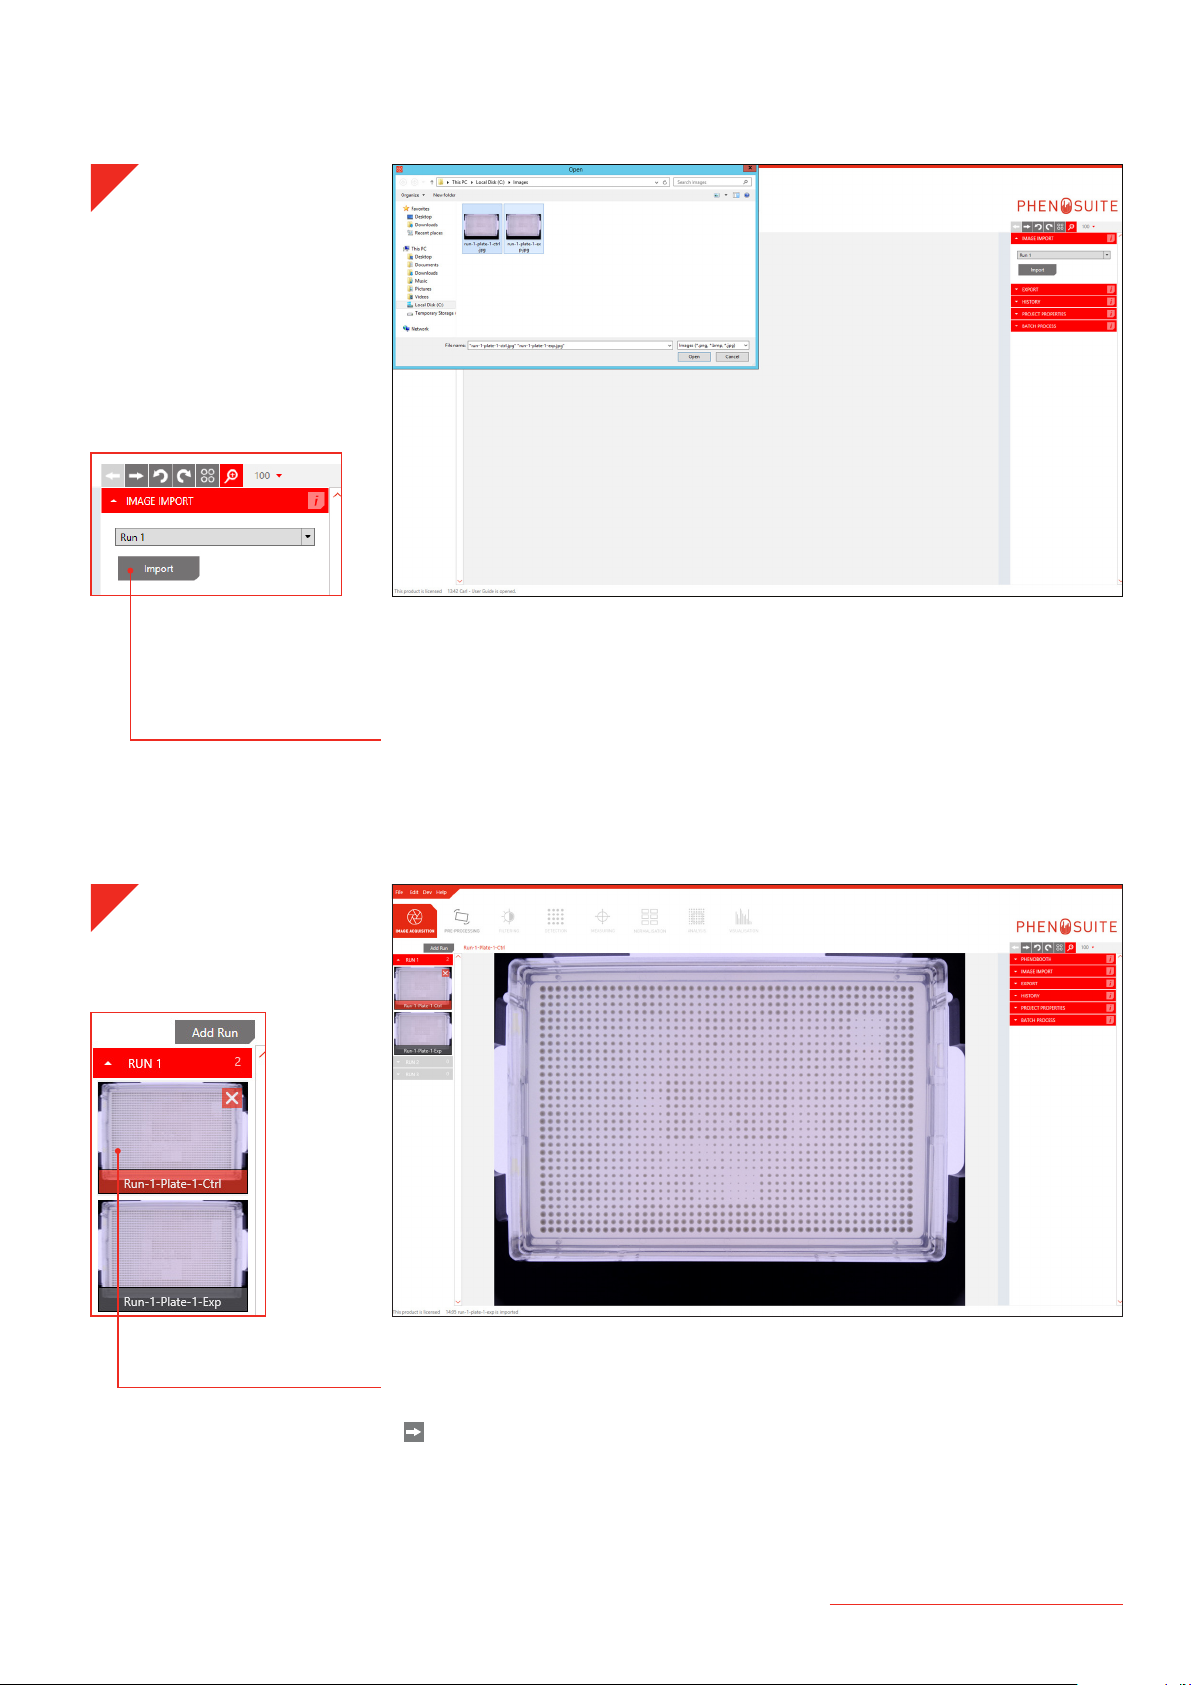
· If using existing images, click the Image Import tab. Here you can select which
run the plate images will be associated. If this is your first run then Run 1 will be
the only option. See p.50 to add new runs.
· Click Import to select images from your computer. The file name needs a specific
format that details run and plate number and whether it’s a control (ctrl) or
experiment (exp) plate. For example: run-1-plate-1-ctrl or run-6-plate-9-exp.
· Your captured or imported images now appear on the left of the screen. The
currently selected plate is highlighted with red.
· moves onto the pre-processing stage of your chosen project type. For Colony
Counting go to p.18; for SGA go to p.24; for RCP go to p.34.
3
4

16

17
singerinstruments.com
COLONY COUNTING
PROJECT
Colony Counting is the basic package included with PhenoSuite. There
are 4 stages in the Colony Counting package: Image Acquisition, Pre-
processing, Detection and Filtering.

18
· Once you’ve acquired your images using the steps on p.14, select which image to
process first. If using the batch process option, this plate’s settings will be applied
to the rest of the plates in the run.
· moves to Pre-processing.
· Click on the Crop plug-in and if using an SBS plate press the Select button and
drag over the colony area of the plate.
· If using a petri dish, press Select Petri to automatically select the colony area.
· Click Crop to remove the edge of the plate and beyond.
· moves to the Detection stage.
1
2
COLONY COUNTING - PRE-PROCESSING

19
singerinstruments.com
· In order to generate colony information, the background needs to be removed.
· Click the Background Subtraction plug-in tab and you will see a preview of the
default subtraction.
· Use the slider to adjust the filter intensity if necessary.
· Check that all the smaller colonies are visible then click Apply.
· Open the Detection plug-in tab and click Detect to highlight the colonies on the
plate.
· The number of colonies and their array formation are shown above the image.
· moves to the Filtering stage.
3
4
COLONY COUNTING - DETECTION

20
· Detected colonies are highlighted with a red circle. turns these highlights on
or off.
· You can use the filter options to set maximum and minimum sizes for colony
detection, discarding items that are too large or small to be colonies. Click the
Update button to apply.
· You can batch process the rest of your plates with the same options using the
instructions on p.45.
· Data can be exported at any time using the instructions on p.46.
· You can also filter by the redness of the colonies. Set maximum and minimum
sizes for colour detection and click the Update button to apply.
· Colonies can also be manually selected by clicking the Add/Remove button in the
Manual Selection plug-in tab. Then simply click on a colony to select or deselect it.
5
6
COLONY COUNTING - FILTERING
Table of contents
Other Singer Instruments Laboratory Equipment manuals

Popular Laboratory Equipment manuals by other brands

Norecs
Norecs HumiStat manual

Techne
Techne Prime Operator's manual

HYRIS
HYRIS bCUBE quick start guide

Newport
Newport Oriel VeraSol LSS-7120 user guide

Thermo Scientific
Thermo Scientific Thermo Scientific Orion Star T900 Series General Settings Guide

Beckman Coulter
Beckman Coulter Cytomics FC 500 Instructions for use

erlab
erlab Captair Bio Smart Series user manual

Labnet
Labnet BioPette PLUS quick start guide

Agilent Technologies
Agilent Technologies 1290 Infinity II user manual

Applied Photophysics
Applied Photophysics LIBS-6 user manual

Sanuvox
Sanuvox S300 Installer's instructions

Agilent Technologies
Agilent Technologies 7890A GC Safety manual


