Soilmoisture Equipment 1768B-.15SYS1 User manual

1768B-.15SYS1
1768B-.15SYS3
QUICK START
GUIDE
(Draft)
Low Tension Lab Setup
Jun 2021
1
SOILMOISTURE EQUIPMENT CORP. P.O. Box 30025, Santa Barbara, CA 93130 U.S.A.
Phone: (805) 964-3525 - Fax: (805) 683-2189 - Email: sales@soilmoisture.com Website: http://www.soilmoisture.com
Figure 1. Low Tension Lab Setup (Model 1768B-.15SYS3).

2
SOILMOISTURE EQUIPMENT CORP. P.O. Box 30025, Santa Barbara, CA 93130 U.S.A.
Phone: (805) 964-3525 - Fax: (805) 683-2189 - Email: sales@soilmoisture.com Website: http://www.soilmoisture.com
UNPACKING
The 1768 Low Tension Lab Setup was thoroughly tested before shipment. When packed, it was in
perfect working order. Unpack with care being sure to remove all packing material. Follow the
instructions carefully in order to assure long, trouble-free service. Any damage found upon receipt
should be reported immediately to the transport carrier for claim. It is important to save the shipping
container and all evidence to support your claim. Be sure to read all operating instructions thoroughly
before operating the unit.
WARRANTY & LIABILITY
Soilmoisture Equipment Corp. (SEC) warrants all products manufactured by SEC to be free from defects
in materials and workmanship under normal use and service for twelve (12) months from the date of
invoice. Soilmoisture Equipment Corp. (SEC) is not liable for any damages, actual or inferred, caused by
misuse or improper handling of its products. SEC products are designed to be used solely as described in
these product operating instructions by a knowledgeable and prudent individual under normal
operating conditions in applications intended for use by this product.

3
SOILMOISTURE EQUIPMENT CORP. P.O. Box 30025, Santa Barbara, CA 93130 U.S.A.
Phone: (805) 964-3525 - Fax: (805) 683-2189 - Email: sales@soilmoisture.com Website: http://www.soilmoisture.com
Specifications
Hanging Water Column Range: 5 to 150 cmH2O.
Resolution: 0.1 cmH2O (0.01 kPa)
Plate Diameter: 10.75 inches.
Pan Diameter: 12.00 inches.
Pan Height: 4.00 inches.
Sand: 320 Mesh Silica Sand.
Sandbox Vacuum Application Range: Up to 300 cmH2O (30 kPa).
System Options
1768B-.15SYS1:
1X Sandbox, 1X Hanging Water Column Stand, 1X Water Trap Jar, 1X Shelf
1768B-.15SYS3:
3X Sandbox, 3X Hanging Water Column Stand, 1X Water Trap Jar, 3X Shelf
Applications:
Model 1768, Low Tension Lab Setup is a system for creating the Moisture Retention
Characteristics Curve. The curve has numerous applications in agricultural sciences,
constructions engineering, mining, oil industry, environmental sciences and more.
Soilmoisture Equipment Corp. has been manufacturing systems for creating Moisture
Retention Curve since 1950s. Low Tension Lab is designed for moisture levels very close to
saturation. Main applications include irrigation studies and also construction engineering
research.
Vacuum method is recommended for tension levels smaller than 0.3 bar (30 kPa). Low Tension
Lab is a Sandbox Tension Table connected to a Hanging Water Column. The system is ideal for
extremely low levels of tension when soil moisture is close to saturation. The system lets user
apply very small levels of tension (less than 150 kPa) with an exceptionally high level of
resolution (0.01 kPa).

4
SOILMOISTURE EQUIPMENT CORP. P.O. Box 30025, Santa Barbara, CA 93130 U.S.A.
Phone: (805) 964-3525 - Fax: (805) 683-2189 - Email: sales@soilmoisture.com Website: http://www.soilmoisture.com
System Items (Model 1768B-.15SYS1)
Figure 2. Large items.
Item
Part Number, Qty, Name
Item
Part Number, Qty, Name
1
XLABBEAKER200PP, 1, BEAKER
12
1930K2, 1, WATER TRAP JAR, 1L
2
1768-001, 1, STAND BASE SUPPORT
13
0932W010, 1, SILICA FLOUR, 325 MESH, 10 LB
3
XFIELDTAPEMEASURE, 1, TAPE MEASURE
14
XPVCEXC1/8-1/4, 12FT, CLEAR PVC TUBING
4
1768-005, 2, STAND EXTENSION
15
1768-1000-01, 1, RESERVOIR TUBE
5
1768-009, 1, STAND END EXTENSION
16
1768-1000-02, 2, RESERVOIR END CAP
6
1275-002, 1, ALUMINIUM STAND BASE
17
1930, 1, LOCKING SYRINGE, 60 CC
7
1768-002, 1, STAND RISER
18
1768-004, 1, RESERVOIR CLAMP
8
1768-010, 20, FILTER PAPER
19
XFSMSS2420CAE04, 2, SET SCREW
9
0675D12TL, 1, TRANSPARENT LID FOR SATURATION PAN
20
XORING2-210, 4, O-RING, FOR RESERVOIR CAP, 1” OD
10
0675B0, 1, ZERO TENSION PLATE
21
XHWCL-2INCHCLIP, 3, Binder Clamp, 2”
11
0675D12X4, 1, SATURATION PAN
22
XLABSHELVINGPP, 1, LAB SHELVING (NOT SHOWN HERE)

5
SOILMOISTURE EQUIPMENT CORP. P.O. Box 30025, Santa Barbara, CA 93130 U.S.A.
Phone: (805) 964-3525 - Fax: (805) 683-2189 - Email: sales@soilmoisture.com Website: http://www.soilmoisture.com
Figure 3. Small items.
Item
Part Number, Qty, Name
Item
Part Number, Qty, Name
a
1768-008, 1, TENSION LEVEL INDICATOR
k
XCNLUHP-MFPVC, 3, WATER-STOP FILTER (PART OF 1930K2)
b
MZL132, 1, STAND END CAP
L
MSL106, 1, ALLEN WRENCH, 1/8”
c
XFNHX1024CAH, 2, HEX NUT
m
XCNLUSC-MMPC, 8, LUER STOPCOCK, MALE-MALE
d
XFWFW010CAR, 2, WASHER
n
MZL133 + XFBCH2420CAF00, 2, SCREW KNOB, ½” LONG
e
XORING2-004, 3, O-RING, FOR SET SCREW
p
XCNLU1/8B-FLPP, 4, FEMALE LUER TO 1/8” BARB
f
XORING2-010, 4, O-RING, FOR DRANAGE PORT
q
XCNLU-MMABS, 6, MALE-MALE LUER COPLING
g
1768-011, 3, DRANAGE TUBE
r
XCNLU-FFPP, 4, FEMALE-FEMALE LUER COPLING
h
XCNLUTEE-FFFPP, 3, LUER TEE, ALL FEMALE
s
XCNLU1/8NPT-FLNY, 7, FEMALE LURE TO MALE 1/8” NPT
i
XCNLUPLUG-MLPP, 3, LUER PLUG, MALE
t
XCNLUCV-MMPC, 2, CHECK VALVE, MALE-MALE LUER
j
1768-002, 1, STUD ADAPTOR
u
1400-001L06IN, 1, STAND STUD, 6”
v
XFSMSS2420CAE12, Set Screw, 2, ¾” long
S

6
SOILMOISTURE EQUIPMENT CORP. P.O. Box 30025, Santa Barbara, CA 93130 U.S.A.
Phone: (805) 964-3525 - Fax: (805) 683-2189 - Email: sales@soilmoisture.com Website: http://www.soilmoisture.com
Low Tension Lab in a Glance
Figure 4. A Low-tension Lab Setup. The setup consists of a Sandbox Tension Table connected to a Hanging
Water Column. The height difference between the surface of the saturated sand (shown in pink) and the
dripping port of the Hanging Water Column determines the tension level applied.

7
SOILMOISTURE EQUIPMENT CORP. P.O. Box 30025, Santa Barbara, CA 93130 U.S.A.
Phone: (805) 964-3525 - Fax: (805) 683-2189 - Email: sales@soilmoisture.com Website: http://www.soilmoisture.com
Assembling the Shelf
See the instructions inside the Lab Shelving
Package.
Assembling the Water Trap Jar
oWater Suction Line:
The Tubing is about 24 inches long.
oSyringe Pump:
Pay close attention to the direction of the Luer Check Valves (item t).
The Water-Stop Filter (item k) might get plugged after being exposed to water vapor. You need to
replace it at that point. The Syringe Pump will still work without the Water-Stop Filter.
p
14
m
s
g
t
h
t
k
17
p

8
SOILMOISTURE EQUIPMENT CORP. P.O. Box 30025, Santa Barbara, CA 93130 U.S.A.
Phone: (805) 964-3525 - Fax: (805) 683-2189 - Email: sales@soilmoisture.com Website: http://www.soilmoisture.com
Syringe Vacuum Pump.
The tubing is about 12 inch long.
oOne-Liter Bottle (comes assembled)
12
p
14
p

9
SOILMOISTURE EQUIPMENT CORP. P.O. Box 30025, Santa Barbara, CA 93130 U.S.A.
Phone: (805) 964-3525 - Fax: (805) 683-2189 - Email: sales@soilmoisture.com Website: http://www.soilmoisture.com
oWater Trap Assembly

10
SOILMOISTURE EQUIPMENT CORP. P.O. Box 30025, Santa Barbara, CA 93130 U.S.A.
Phone: (805) 964-3525 - Fax: (805) 683-2189 - Email: sales@soilmoisture.com Website: http://www.soilmoisture.com
Setting Up the Sandbox Tension Table
Washing the Sand
The sand included in the system is 325 mesh (44 micron and finer) powdered sand. It is
recommended to wash the sand. The procedure below eliminates particles finer than 10 microns
from the sand.
oWear a face mask before handling dry silica powder.
oPour about 2 kg of dry silica powder in a 5-gallon bucket (the 5-gallon bucket is not
included in the system).
oAdd 6 inches of water and mix. Agitate the mix completely. Then stop agitating and let
the mix particles settle at the bottom of the column for 30 minutes, then dump the
murky water on top of the settled sand.
Note: do NOT dump the murky water in the drain. It might settle in the drainage pipes
and plug them.
oAdd water again up to the 6-inch mark. Agitate the mix completely. Then let the mix
particles settle at the bottom of the bucket for another 30 minutes. Dump the murky
water on top of the settled sand. Repeat the washing steps until the water on top of the
sand is almost clear after 30 minutes. Usually, 2 to 4 times of washing is enough.
oOnce the sand is clear from fine particles, dump the extra water and leave about one
inch of water on top of the sand.

11
SOILMOISTURE EQUIPMENT CORP. P.O. Box 30025, Santa Barbara, CA 93130 U.S.A.
Phone: (805) 964-3525 - Fax: (805) 683-2189 - Email: sales@soilmoisture.com Website: http://www.soilmoisture.com
Setting Up the Sandbox:
oPlace the Zero-tension Plate inside the Saturation Pan.
oConnect about 20 cm of the Tubing (item 14) to the Plate port.
oPass the tubing thru the small hole in the Saturation Pan’s wall.
oConnect the Luer connection and the Stopcock according to the schematic above.
oPour about 5 cm of water on top of the Zero-tension Pan. You’ll notice that some air
bubbles get trapped under the mesh screen of the Zero-tension Plate. The air bubbles
should be removed.
oUse the Syringe Pump to apply vacuum to the Water Trap Jar. Make sure that the
Stopcock is closed.
oNow use the Water Trap Jar to suck-in all the air bubbles that are trapped under the
mesh screen.
Note: Be extra careful not to damage or tear the mesh screen!
10
11
14
p
m

12
SOILMOISTURE EQUIPMENT CORP. P.O. Box 30025, Santa Barbara, CA 93130 U.S.A.
Phone: (805) 964-3525 - Fax: (805) 683-2189 - Email: sales@soilmoisture.com Website: http://www.soilmoisture.com
oAdd more water if water height over the Zero-tension Plate drops below 1 cm.
oConnect the Syringe to the Zero-tension Plate port.
oOpen the Stopcock and slowly pull the Syringe plunger back. The goal here is to
eliminate all bubbles trapped in the Zero-tension Plate and the Tubing. Close the
Stopcock once all bubbles are eliminated.
Note: It is very important to eliminated all air bubbles trapped in the Zero-tension Plate
and the Tubing. There should be no air bubbles in the system.
Eliminating bubbles might seem tricky in the beginning. It takes some practice to find
effective ways to get rid of air bubbles.
oOnce all air bubbles are eliminated, place the Pan over its intended place (where it will
not be moved for the duration of the measurement). This can be the Shelf included in
the system, or any other stable place that is elevated enough for the target tension
level. For example, if the target tension is 100 cmH2O, the Pan needs to be elevated at
least about 130 cm from the floor.
oLeave about one inch of water over the plate. Evacuate excess water by
suction/drainage. Be careful not to introduce air bubbles to the plate.
q
17

13
SOILMOISTURE EQUIPMENT CORP. P.O. Box 30025, Santa Barbara, CA 93130 U.S.A.
Phone: (805) 964-3525 - Fax: (805) 683-2189 - Email: sales@soilmoisture.com Website: http://www.soilmoisture.com
oAgitate the sand mix and pour it over the submerged Plate. In case some sand remains
in the Bucket, add more water, agitate the mix and pour it over the Zero-tension Plate.
oPut the transparent Lid on the Pan and let the sand settle for a day.
oThe sand will settle and create an even and level layer over the Plate. The sand surface
might be cracked around the perimeter of the Plate or other places. That is normal. You
can get rid of the cracks later. Take off the Lid
oUsing the Syringe Pump, apply vacuum to the Water Trap Jar and evacuate the extra
water on top of the sand layer. Leave about 0.5 cm of water on top of the sand surface.
oIf there are any cracks use a spatula or your hand to level them off with the sand
surface.
9

14
SOILMOISTURE EQUIPMENT CORP. P.O. Box 30025, Santa Barbara, CA 93130 U.S.A.
Phone: (805) 964-3525 - Fax: (805) 683-2189 - Email: sales@soilmoisture.com Website: http://www.soilmoisture.com
oPlace two paper filters over the sand surface. Make sure that no air bubble is trapped
under the paper filters.
oPlace the Lid over the Pan. Now your, Sandbox Tension Table is ready to use.
Assembling the Hanging Water Column Stand
Assembling the Stand
o
Screw the Stud Adaptor in the Stand Base
oScrew the Stud in the Stud Adaptor
oPlace the Base Support over the Base. Make sure that
the square recess on the Base Support is facing up.
8
9
j
6
u
2

15
SOILMOISTURE EQUIPMENT CORP. P.O. Box 30025, Santa Barbara, CA 93130 U.S.A.
Phone: (805) 964-3525 - Fax: (805) 683-2189 - Email: sales@soilmoisture.com Website: http://www.soilmoisture.com
oPlace the Riser over the Base Support. Make sure that
the Riser is right-side up (see the schematic). The
bottom of the Riser sits inside the Base Support square
recess.
o
Place two Washers (item d) over the Stud.
oScrew two Hex-nuts (item c) over on the Stud. Tighten
the first nut first and then the second one. The second
nut prevents the first one from loosening over time.
o
Place a Stand Extension over the Raiser. Note that the
kit includes two Stand Extensions (items 4) that are
longer than the third one (item 5). Use one of the two
longer Extensions for this step.
7
c
d
4

16
SOILMOISTURE EQUIPMENT CORP. P.O. Box 30025, Santa Barbara, CA 93130 U.S.A.
Phone: (805) 964-3525 - Fax: (805) 683-2189 - Email: sales@soilmoisture.com Website: http://www.soilmoisture.com
oSecure the Extension to the Stand Base using a Screw
Knob.
oPlace the second longer Extension on top of the first
one. Make sure that the screw holes are on the same
side (see the schematic).
o
Secure the second Extension to the first one using a Set
Screw.
n
4
v

17
SOILMOISTURE EQUIPMENT CORP. P.O. Box 30025, Santa Barbara, CA 93130 U.S.A.
Phone: (805) 964-3525 - Fax: (805) 683-2189 - Email: sales@soilmoisture.com Website: http://www.soilmoisture.com
oPlace the third Extension (item 5) over the second one.
Make sure that the screw hole is on the same side as
the others. Make sure that the Extension is right-side
up (see the schematic).
oSecure the third extension to the second extension
using a Set Screw.
oPut the Stand End Cap on top of the Stand.
o
Assembling the Reservoir
Insert the Reservoir Tube inside the Reservoir Clamp.
5
b
v
15
18

18
SOILMOISTURE EQUIPMENT CORP. P.O. Box 30025, Santa Barbara, CA 93130 U.S.A.
Phone: (805) 964-3525 - Fax: (805) 683-2189 - Email: sales@soilmoisture.com Website: http://www.soilmoisture.com
oSecure the Reservoir Tube to the Reservoir Clamp using
the Set-screw (item 19) that is already in the Reservoir
Clamp. Note that there are two Set Screws
implemented in the Reservoir Clamp. The Set-screw
that secures the Tube in place is not visible in this
schematic.
Also, note that there is a small O-ring between the Set-
screw and the Reservoir Tube. Make sure it is in place.
Otherwise, the Set-screw will scratch the Tube.
It does not matter if the if the Clamp is fixed a little
higher or lower to the Tube. We recommend fixing the
Reservoir Clamp closer to the bottom of the Reservoir
Tube (see the schematic).
Insert the Reservoir End Caps into the Reservoir Tube (the
End Cap is items 16 plus 20 plus S, already assembled).
Make sure that the side ports of the End Caps are parallel
to the side of the Reservoir Clamp side (see the schematic).
oAssemble the Drainage Port Assembly (see the
schematic)
oThe Reservoir has six ports, three on each End Cap. Not
all of them are usually needed. Use Luer Male Plugs
(item i) to plug all ports on the top End Cap.
oConnect a Luer Stopcock to the port on the bottom of
the Reservoir. This port is used to connect the Reservoir
to Sandbox Tension Table.
oConnect the Drainage Port Assembly to one of the
ports on the side of the bottom End Cap. Plug the other
port with a Luer Male Plug.
19
s
20
L
m
s
g
f
i
m
i

19
SOILMOISTURE EQUIPMENT CORP. P.O. Box 30025, Santa Barbara, CA 93130 U.S.A.
Phone: (805) 964-3525 - Fax: (805) 683-2189 - Email: sales@soilmoisture.com Website: http://www.soilmoisture.com
oInsert the Tension Level Indicator in the small hole on
the bottom of the Reservoir Clamp.
oAdjust the horizontal part of the Indicator at the center
of the side port of the bottom End Cap (see the black
arrow in the schematic). Make sure that the horizontal
part of the Indicator is parallel with the side of the
Reservoir Clamp.
oSecure the Indicator in place by tightening the Set-
screw implemented in the Reservoir Clamp. The Set-
screw is shown in the schematic. Use the Allen Wrench
included in the system to tighten the Set-screw.
oAttach the Reservoir to the Stand. This requires a
special maneuver because the Indicator gets in the
way.
Once the Reservoir is attached to the Stand, slide the
Reservoir close to the bottom of the Stand. Leave
enough room for the Beaker (item 1) to be placed
under the Drainage Port. The Beaker collects water
drained out of the Drainage Port.
The exact height of the Reservoir will be adjusted later.
oSecure the Reservoir to the Stand using a Screw Knob.
a

20
SOILMOISTURE EQUIPMENT CORP. P.O. Box 30025, Santa Barbara, CA 93130 U.S.A.
Phone: (805) 964-3525 - Fax: (805) 683-2189 - Email: sales@soilmoisture.com Website: http://www.soilmoisture.com
oOpen the top Luer Plug for vent (see the schematic).
oFill the Syringe with water and fill the Reservoir using
the Syringe.
oOpen the Drainage Stopcock for a few seconds and let
water drain out. Then close the Stopcock. The goal of
this step is to fill the drainage path with water and
eliminate any potential trapped air bubbles.
Secure the Luer Plug back to the port on top of the
Reservoir.
This manual suits for next models
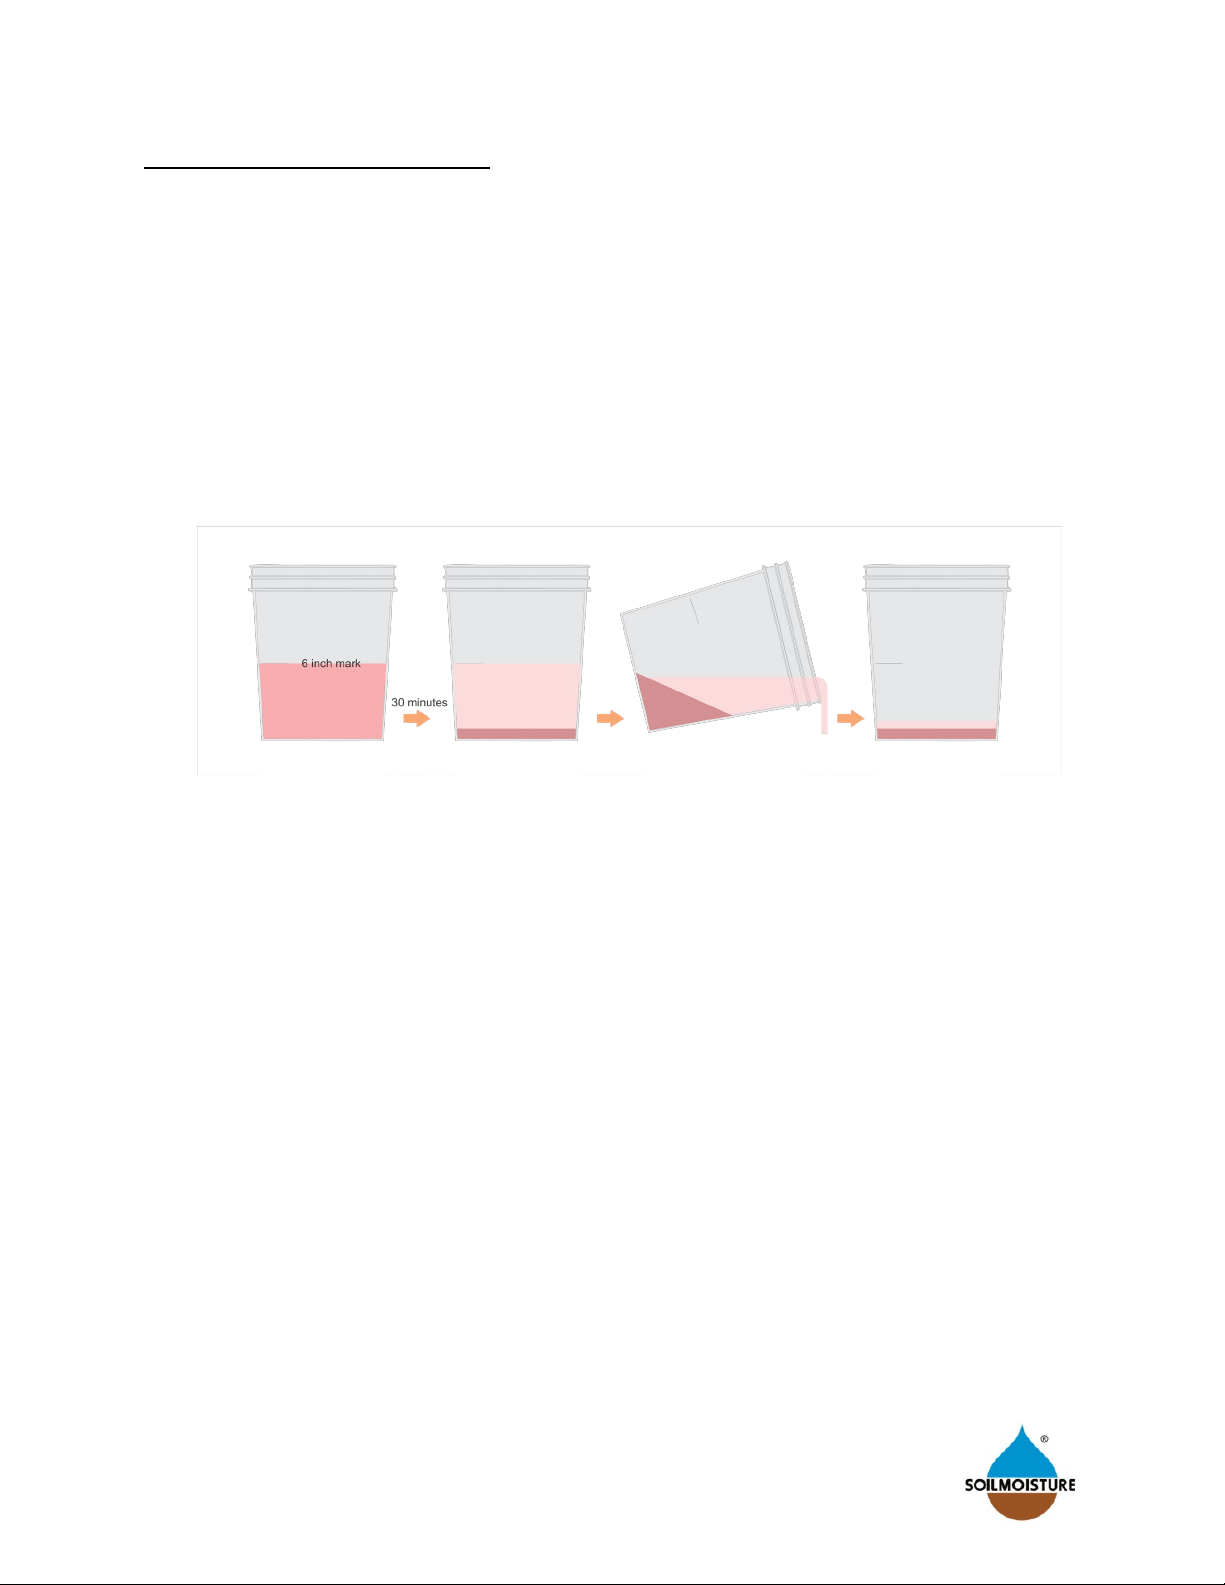
1
Table of contents
Other Soilmoisture Equipment Laboratory Equipment manuals
Popular Laboratory Equipment manuals by other brands

Logicube
Logicube TALON ULTIMATE user manual

HHP
HHP Imageteam 3800LTP quick start guide

COMINOX
COMINOX Sterilclave 6 B Speedy Service manual

Analytik Jena
Analytik Jena CyBio Well vario OL3381-25-300 operating manual

Applied Photophysics
Applied Photophysics Chirascan Integrating Sphere user manual

TESTO
TESTO 882 Brief instructions

Eisco
Eisco WBTH-6H instruction manual

Biosan
Biosan MMS-3000 User instructions

Apera Instruments
Apera Instruments LabSen 821 user manual

Labnet
Labnet BioPette PLUS BPP2 Instuction manual

Agilent Technologies
Agilent Technologies 1260 Infinity II user manual

Thermo Scientific
Thermo Scientific KingFisher Presto user manual