HYRIS bCUBE User manual

HYRIS System™
Quick-Start Guide
(English)
Version 2.1
Hyris Srl
Corso Garibaldi, 60
20121 Milano, Italy
Phone: +39.02.82951302
Mail: office@hyris.net
Other contacts:
Hyris Ltd
Lower Ground Floor, One George
Yard, EC3V 9DF, London UK
Phone: +44.2039361227
Mail: office.uk@hyris.net
Hyris Asia Pac
38 19 Cecil Street
#04-01 - The Quadrant at Cecil,
Singapore (049704)
Phone: +65.8160.7207
Mail: office.uk@hyris.net
Hyris Americas
Los Gatos
Phone: +1 (408) 966-1495
Mail: office.us@hyris.net

HYRIS SystemTM | Quick-Start Guide (ENG)
May 2022
2
Product info
info@hyris.net
Ordering info
office@hyris.net
bCUBE (REF: bCUBE 2.0)
bCUBE3 (REF: H0001)
bAPP (REF: bAPP, H00001)
bPANEL (REF: H00002)
Visit our website at
www.hyris.net
Hyris Srl
Corso Garibaldi, 60 20121
Milano (MI) Italy

HYRIS SystemTM | Quick-Start Guide (ENG)
May 2022
3
Copyright ©2022 Hyris S.r.l. All rights reserved.
Reproduction of this document, either in printed or electronics form, is prohibited without the permissionof Hyris S.r.l.
Information in this document is subject to change without notice. Hyris S.r.l. assumes no responsibility for any incorrect
information that may appear in this document.
Notice:
HYRIS S.R.L.DISCLAIMS ALL WARRANTIES WITH RESPECT TO THIS DOCUMENT,EXPRESSED OR IMPLIED,INCLUDING BUT NOT LIMITED TO THOSE OF
MERCHANTABILITY OR FITNESS FOR A PARTICULAR PURPOSE.IN NO EVENT SHALL HYRIS S.R.L.BE LIABLE,WHETHER IN CONTRACT,TORT,WARRANTY,OR
UNDER ANY STATUTE OR ON ANY OTHER BASIS FOR SPECIAL,INCIDENTAL,INDIRECT,PUNITIVE,MULTIPLE OR CONSEQUENTIAL DAMAGES IN CONNECTION
WITH OR ARISING FROM THIS DOCUMENT,INCLUDING BUT NOT LIMITED TO THE USE THEREOF.
Trademarks:
HYRIS SystemTM, HYRIS bCUBETM, HYRIS bCUBE3TM, HYRIS bKITTM, HYRIS bAPPTM, HYRIS bDATATM and HYRIS bPANELTM
are a trademark of Hyris S.r.l.
Microsoft® and Windows® are registeredtrademarks of Microsoft Corporation. FAM™, HEX™ and CY5™ are a trademark
of Thermo Fisher Scientific or its subsidiaries in the U.S. and certainother countries.
Technical Support Contacts:
Hyris S.r.l
Corso Garibaldi 60, 20121 Milano(MI) –ITALY
Phone: +39 02 82951302
Mail: support@hyris.net
Website: https://www.hyris.net/

HYRIS SystemTM | Quick-Start Guide (ENG)
May 2022
4
INDEX
About this Manual 5
HYRIS bCUBETM 6
Packing content.............................................................................................................................................................................6
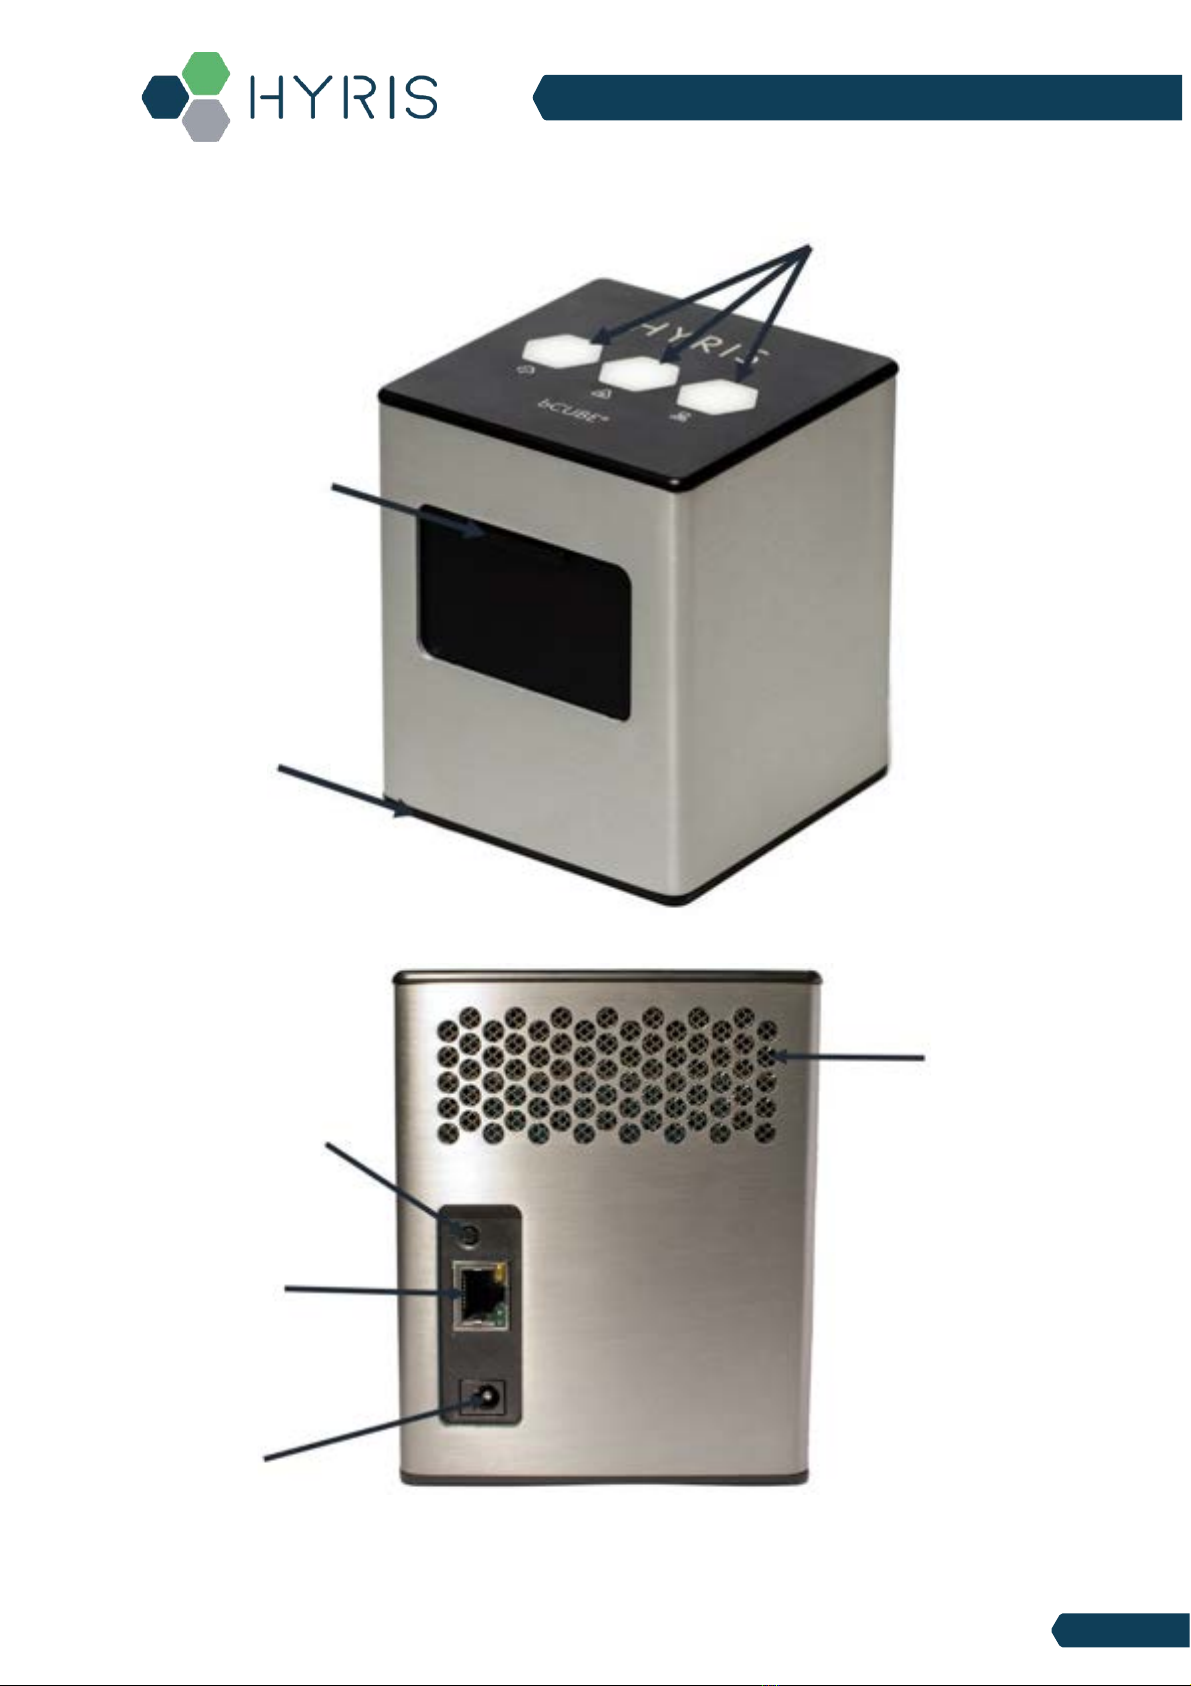
Hyris bCUBETM Instrument overview.................................................................................................................................................7
Status LEDs...................................................................................................................................................................................8
FIRST SETUP 10
PC settings..................................................................................................................................................................................10
HYRIS bCUBETM Connection...........................................................................................................................................................10
INTERACTING WITH HYRIS bCUBETM: HYRIS bAPPTM AND HYRIS bPANELTM 13
HYRIS bAPPTM interface ................................................................................................................................................................13
System Requirements..................................................................................................................................................................13
Access the HYRIS bAPPTM............................................................................................................................................................13
Create a new analysis...................................................................................................................................................................15
General information 15
Create a new analysis: the samples 18
Create a new analysis: the Cartridge Layout 18
Analysis details 20
GENERAL tab 20
STEPS tab....................................................................................................................................................................................22
STEPS tab –advanced features 23
RESULTS Tab 24
HYRIS bPANELTM interface.............................................................................................................................................................26
System Requirements 26
Installation 26
Main view 26
Settings: Log in/Sync and HYRIS bCUBETM connection 27
New analysis creation 28
Run the analysis 29
Old analyses view 30
HYRIS bCUBETM operative procedure 31
APPENDIX-1: Set HYRIS bCUBETM Wi-Fi from bCUBEs menu 32
APPENDIX-2: Custom Recipe 33
APPENDIX-3: HYRIS Cartridge Preparation 34
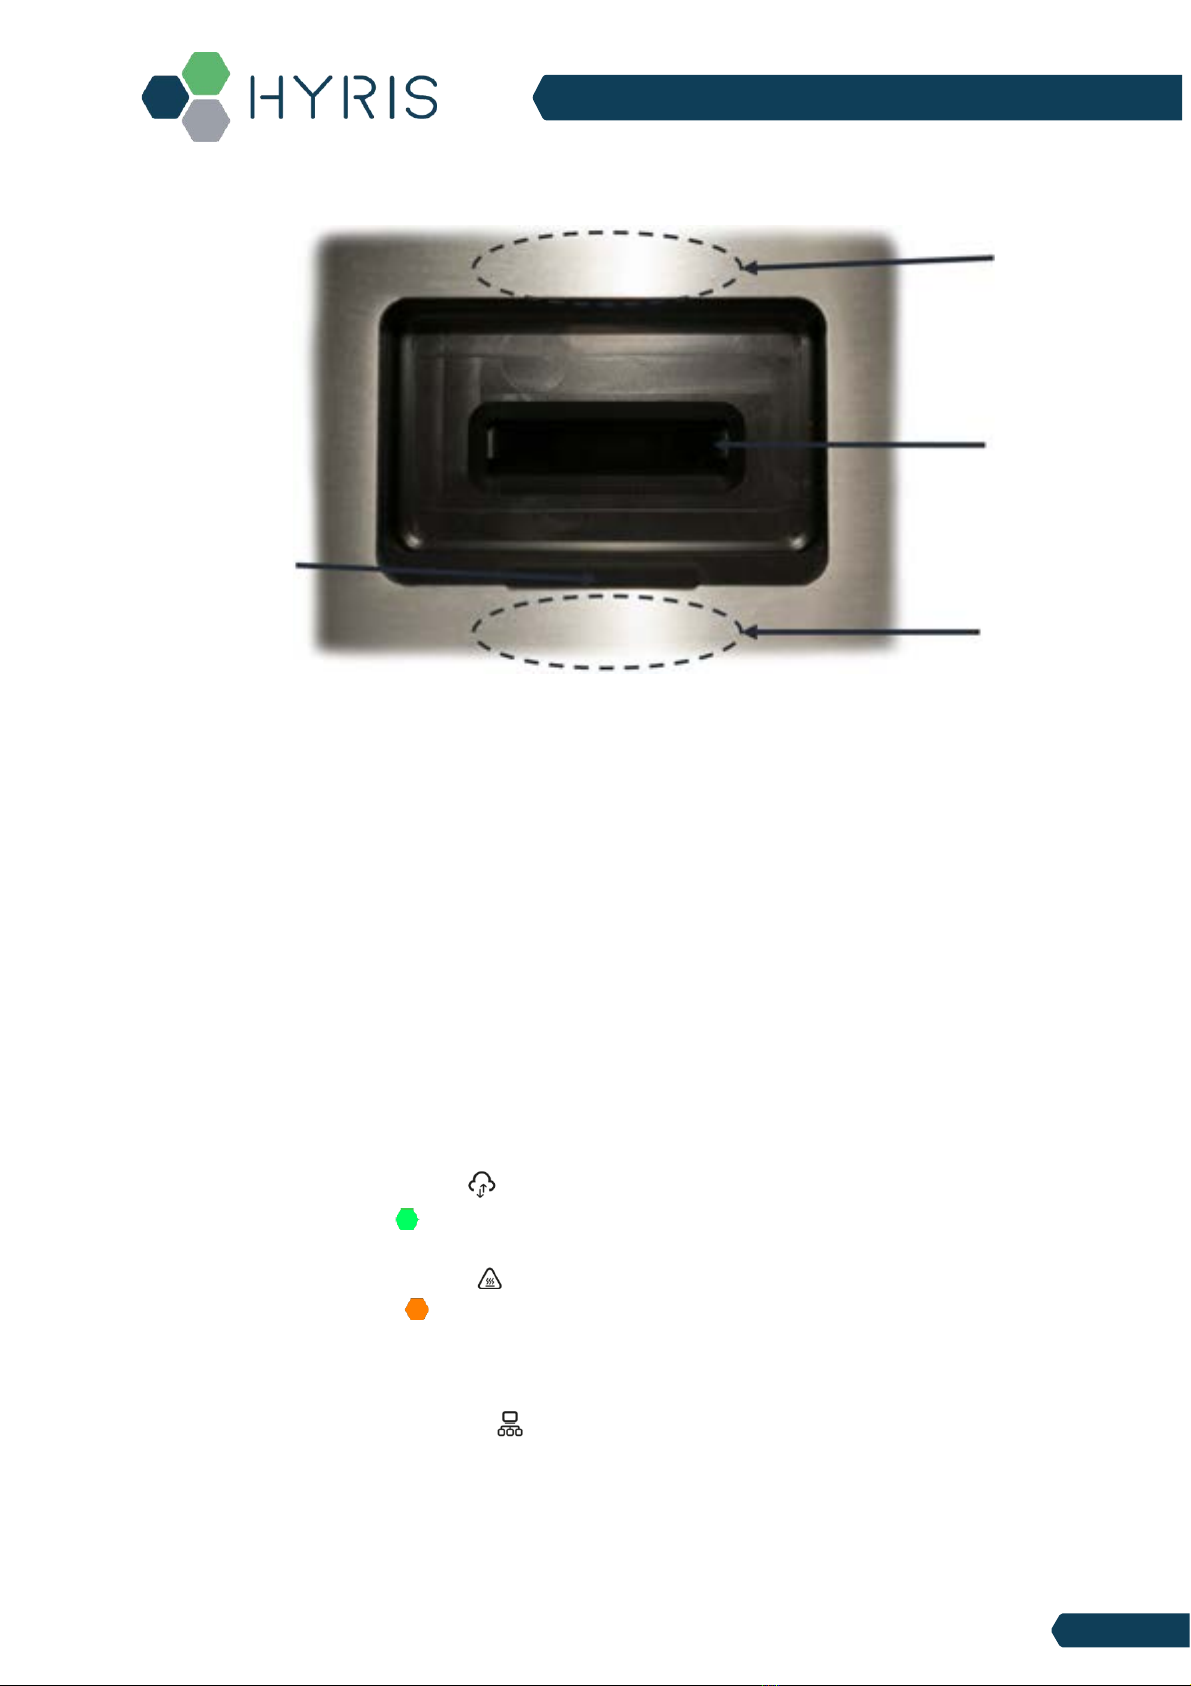
Load samples ..............................................................................................................................................................................34
Load the cartridge inside HYRIS bCUBETM........................................................................................................................................34
Removing the cartridge................................................................................................................................................................34
Technical support / Service 36
Support Contacts.........................................................................................................................................................................36

HYRIS SystemTM | Quick-Start Guide (ENG)
May 2022
5
About this Manual
This manual is referred to bCUBE (REF: bCUBE 2.0) and bCUBE3 (REF: H0001). All references to bCUBE will be referred also
to bCUBE3, unless explicitly specified.
For HYRIS bCUBETM connectivity and functionalities, refer to the Hyris bCUBETM –User Manual document.
For HYRIS bPANELTM offline use, refer to the Hyris bPANELTM –User Manual document.
For the online use of the instrument using HYRIS bAPPTM, please read the HYRIS bAPPTM –User Manual guide.
The information contained in this Guide is proprietary. No part of this document can be copied or reproduced in any form
without written permission of Hyris S.r.l.
The information contained in this manual is subject to change/revision without notice.
This Guide has not to be intended as User Manuals substitute.
In the event the Quick Start Guide should be ruined, incomplete or inadequate, please contact Hyris S.r.l. in order to
immediatelyrestore or replace the incompliant Guide.
The official version of the Quick Start Guide, of which Hyris S.r.l. is directly responsible, is theEnglish version. For countries
in which languages other than Englishare spoken, the official Guide is the one in the Englishversion. Hyris S.r.l. does not
undertake any responsibility for any translations in other languages made by distributors or users.
The observance of the operating procedures and of the warnings described in this Guide is a basic requirement for the
correct working of the equipment and to guarantee the operator’s safety.
The Guide must be read in every part in front of the equipment before using it, in order to become familiar with the
operating procedures, the commands, and the precautions for a correct and safe usage.
The Quick StartGuide should be kept, complete and readable in every part, in a safe place, and, at the same time, it should
be rapidly accessible to the user when using the equipment.

HYRIS SystemTM | Quick-Start Guide (ENG)
May 2022
6
HYRIS bCUBETM
Packing content
The following items will be found in the provided box:
•HYRIS bCUBETM (Figure 1a)
•Ethernet cable (Figure 1b)
•Power Supply including European and North American power cords (Figure 1c).
Characteristics:
oInput: 100 ~ 240 V c.a. 1.4A 50/60Hz
oOutput: 12V DC 5A
oPower: 60W
•USB stick with HYRIS bPANELTM software installer and User Manuals (Figure 1d)
Note: Please check the presence of all these items. Remove the items carefully from the shipping box and inspect
them for any external damage. If any of the parts is missing ordamaged, contact the manufacturer prior to
installation.

HYRIS SystemTM | Quick-Start Guide (ENG)
May 2022
7
Hyris bCUBETM Instrument overview
Status LEDs
Access Port
Instrument Base
Upper Venting Holes
Power-on/Power-off
Button
Ethernet Plug
Power Supply
Plug

HYRIS SystemTM | Quick-Start Guide (ENG)
May 2022
8
Description of the features highlightedin the pictures above:
•Access Port Slider: opened to insert/remove the cartridge inside Hyris bCUBETM. To be kept closed during
operations.
•Access port: insert the cartridge here. Always push the cartridge up to the end of the port.
•Thermal Block: precisely controls the temperature of the cartridge and contained samples. Heating/Cooling is
obtained with a Peltier element.
•Detection block: features highbrightness LEDs withdichroic filters for fluorophores excitation. Detection is
obtained thanks to a CMOS sensor with dichroic filters matched to fluorophores emissionwavelengths.
•Top venting holes: allows air exchange between the inside of the Instrument and the ambient
•Power supply Plug: insert here the 12 VDC adapter jack
•Power-on/Power-off button: press shortly to wake up the instrument from Stand-By. When the machine is
running, long press (about 5 seconds) to safelypower down the bCUBE
•Ethernet Plug: insert here the Ethernet cable for Windows PC / Network communication
•Status LEDs: Give informationabout the status of the instrument
Status LEDs
The status of the bCUBE and its functioning are communicated to the user by the different color combinations of the Status
LEDs on the top of the device.
•bDATA LED: corresponding to the symbol, it indicates the connection status to Hyris server.
Ready color: green
When Ready color is on, HYRIS bCUBETM is connected to HYRIS bDATATM
•Thermal LED: corresponding to the symbol, it indicates if the cartridge is hot or not.
Ready color: orange
When Ready color is on, the internal temperature of the HYRIS bCUBETM is not hot. If
cartridge is inserted, it can be safelyhandled.
•Connection LED: corresponding to the symbol, it indicates the internet connection state of the HYRIS
bCUBETM
Thermal Block
Access Port
Detection Block
Access Port
Slider

HYRIS SystemTM | Quick-Start Guide (ENG)
May 2022
9
Ready color: blue
When ready color is on, Hyris bCUBETM is connected to a network
For a graphical representation, the symbol (from left to right: bDATA, Thermal and Connection LEDs) will be
displayed in this document when color code explanation is required.
Some examples are reported in the following table:
bDATA
LED
Thermal LED
Connection
LED

HYRIS SystemTM | Quick-Start Guide (ENG)
May 2022
10
LEDs Colours
DESCRIPTION
INTERPRETATION
•bDATA LED steady green
•Thermal LED steady orange
•Connection LED steady blue
•HYRIS bDATATM connection OK
•Cartridge not hot
•Network connection OK
•bDATA LED steady green
•Thermal LED blinking orange and red
•Connection LED steady blue
•HYRIS bDATATM connection OK
•WARNING: Cartridge hot
•Network connection OK
•bDATA LED blinking green and yellow
•Thermal LED steady orange
•Connection LED blinking red and yellow
•Missing HYRIS bDATATM connection
•Cartridge not hot
•Missing network connection
•bDATA LED blinking green and yellow
•Thermal LED steady orange
•Connection LED steady blue
•Missing HYRIS bDATATM connection
•Cartridge not hot
•Network connection OK. HYRIS bCUBETM
can be used locally
•bDATA LED multicolour
•Thermal LED multicolour
•Connection LED multicolour
•Experiment is running on HYRIS
bCUBETM
•bDATA LED off
•Thermal LED off
•Connection LED off
•HYRIS bCUBETM off
FIRST SETUP
PC settings
PC has to be connected to a stable internet connection.
HYRIS bCUBETM Connection
In order to properly work, the following steps have to be respected:
1. Make sure the Hyris bCUBETM is set on a flat and stable surface
2. Make sure to have correctly provided the condition explained in the PC settings section
3. Connect Hyris bCUBETM and PC to the same LAN according to the following configuration
Note: not all the Status LEDs colour combinations are shown. For further information, please read the
HYRIS bCUBE - User Manual.

HYRIS SystemTM | Quick-Start Guide (ENG)
May 2022
11
4. Power on the PC. Wait until PC is ready
5. Connect the PC to internet. Make sure internet connection is stable
6. Power on the Hyris bCUBETM. Status LEDs colours:
7. bCUBE will start booting. Status LEDs colours:
8. Wait until Connection LED colour is steady blue: or
If LEDs colours are different from the above mentioned, try to repeat the steps. Otherwise, check the HYRIS
bCUBETM - User Manual
9. Access the HYRIS bAPPTM (see the Access the HYRIS bAPPTM section) and go to the bCUBEs section. Select the
desired bCUBE by checking the Serial number of the machine (see the HYRIS bCUBETM - User Manual), then click
on the button and on one of the suggestedlinks to access the Local settings page. Go to the Network
section. Click on the button to scan the network for available WiFis. Available WiFi andrelated signal
information are shown. Click on the button to scan the network.
Click on the desiredWiFi and add the correspondent password.

HYRIS SystemTM | Quick-Start Guide (ENG)
May 2022
12
10. When all the desired Wi-Fi networks are saved, goback to the HYRIS bCUBETM and unplug the Ethernet cable
from the HYRIS bCUBETM. After some seconds, the Status LEDs should show the Hyris Ready colours .
If not, check the troubleshooting section on the HYRIS bCUBETM - User Manual.
Note: Status LEDs may display different colours while HYRIS bCUBETM is looking for network connection. If no
connection is detected, the following LEDs colours may be displayed aftera minute of waiting time: . If the
problem persists, see the HYRIS bCUBETM - User Manual.

HYRIS SystemTM | Quick-Start Guide (ENG)
May 2022
13
INTERACTING WITH HYRIS bCUBETM: HYRIS bAPPTM AND HYRIS bPANELTM
HYRIS bCUBETM can be controlled and monitored with two Hyris tools: HYRIS bAPPTM and HYRIS bPANELTM.
•HYRIS bAPPTM: it’s a web app software and there’s no need to install it on the PC. Ready-to-use recipes or custom
recipes (see dedicated section) can be used to create and run analyses on the available devices according to the
account permissions. Account and devices management are possible by this application. It can be run on PC or
Smartphone. Internet connection is mandatory.
•HYRIS bPANELTM: this software interface is designed for offline usage of the HYRIS bCUBETM device, while also
providing internet data sharing when connection is available. HYRIS bPANELTM can start new analyses by using the
already existing recipes (createdon HYRIS bAPPTM).
HYRIS bAPPTM interface
System Requirements
PC
Minimum computer requirements are:
•Intel Core i3 or equivalent, 4 GB RAM, Windows 7 or later, Ethernet or Wi-Fi connection.
•Windows PC minimum requirements: Windows 7, Windows 8, Windows 8.1, Windows 10 or later, Intel Pentium 4
processor or later that's SSE2 capable
•Mac minimum requirements: OS X Yosemite 10.10 or later
•Linux PC minimum requirements: 64-bit Ubuntu 14.04+, Debian 8+, openSUSE 13.3+, or Fedora Linux 24+ with Intel
Pentium 4 processor or later that's SSE2 capable
Mobile
Minimum phone requirements are:
•Android 5.0 (Lollipop) or later,or iOs 12.0 or later
HYRIS bAPPTM has been entirely developed on Google Chrome browser on for both PC and mobile. Forthis reason, Google
Chrome is the only tested browser:
Minimum version required for Google Chrome browser: 84.0.4147.89 or later
Access the HYRIS bAPPTM
In order to log in:
1. Go to https://bapp2.hyris.net
2. Login page will be shown. Login is required to access HYRIS bAPPTM. Select your Server and insert your email and
password, which are corresponding to the credentials used to register the user to the HYRIS bAPPTM. Enable the Remember
me option to keep the user logged in.

HYRIS SystemTM | Quick-Start Guide (ENG)
May 2022
14
In case 2 Factors Authentication is enabled (see Enable/disable two factors authentication for further information),
the 2FA Code is required.
3. The Home window will be shown. The screen is mainlydivided in twosections:
oMain Menu: list of available HYRIS bAPPTM sections.
oTab View Area: content is related to the selected Main Menu section
NOTE: Side menu access is different from PC to Phone Browser.
4. After the Login, different HYRIS bAPPTM sections will be shown according to the account permissions.
Sections will be available in the Main Menu, while section content will be loaded in the Tab View Area on the
right.
The available sections are:
•Home: Welcome Window. Log-incredentials required when starting a new session on HYRIS bAPPTM
•Analyses: all the available analyses are listed inthis section. New analyses can be created
Main Menu
Tab View Area

HYRIS SystemTM | Quick-Start Guide (ENG)
May 2022
15
•bKITs: HYRIS bKITTM are reagent sets used to analyze a specific genetic sequence. The HYRIS bKITTM developed
and sold by Hyris S.r.l. are listed inthis section
•Recipes: a “Recipe” is a detailed list of steps and settings that the HYRIS bCUBETM has to execute while performing
an analysis. New recipes can be customized from this menu. All the available recipes are listed here
•Swarms: “Swarm” is used to define a collector of analyses and recipes. User can have access to multiple swarms
according to his permissions. Visible Swarms are listed inthis section
•Users: list of available users and relative permissions (see Users and user profiles section for further information)
•bCUBEs: list of available HYRIS bCUBETM withrelative extra information
•Certificates: list of requested certificates.
•Settings: personal account settings page
•Help center: access to Hyris Support Help Center
In case of forgotten password, press on and insert the user mail. Then check your mailbox for further
instructions.
Create a new analysis
In order to create a new analysis, click on the button from the Home page or from
the Analyses section.
The user will be guided through few steps to correctly fill all the requested information.
General information
In the General Information section, user is asked to fill the following fields:
•Name: name of the analysis
•Description: brief description of the experiment
•Swarm: select the Swarm to which the analysis will be linked to
•Use custom recipe toggle button: use HYRIS bKITTM as default. Select among Custom Recipes when selected
•Recipe: choose a recipe among the ones related to the selected Swarm.
•bKITs: show available HYRIS bKITTM. Each HYRIS bKITTM is associated to a Global Recipe, which is automatically
selectedon the kit selection.
In case Use custom recipe is not selected, following fields will be visible:

HYRIS SystemTM | Quick-Start Guide (ENG)
May 2022
16
A. Use custom recipe flag: if flag is disabled, fields [B],[C],[E],[F],[G] and [H] are shown
B. Type (mandatory): the available HYRIS bKITTM depend on the selected category (examples: Probiotics, Botanicals,
Immunology,Virus Finder...)
C. bKITs (mandatory): HYRIS bKITTM part number list of available HYRIS bKITTM according to the selected category.
The HYRIS bKITTM part number is reported on the HYRIS bKITTM package.
D. QR Code Scanner: if the desired HYRIS bKITTM is provided with dedicated QR code, click on this button and scanit.
The QR code could be placed on the HYRIS bKITTM box and/ or in the provided datasheet. The fields [B] and [C] are
automatically set by scanning the QR code.
E. Global Recipe: this is a read only field, whichshows the name of the Global Recipe associated tothe selected HYRIS
bKITTM. It’s automatically filled once [C] is selected
F. Instruction for use: this button allows the user to download the most updated IFU related to the selected HYRIS
bKITTM.
G. DNA extraction method: this button allows the user to download the most updated DNA extraction method
related to the selected HYRIS bKITTM.
H. bKIT Lot: lot of the HYRIS bKITTM featured in the analysis
Click on to proceed to the following step

HYRIS SystemTM | Quick-Start Guide (ENG)
May 2022
17
Custom recipe choice
In case of selected Use custom recipe option:
1. Select the desired Swarm among the list. In case only one Swarm is available for the user, it will be automatically
selected. After the selection, the relative Swarm Recipes are loaded.
2. Select the desired Recipe among the list. Clickon the button to see the recap of the thermal protocol relative
to the selected Recipe.
HYRIS bKITTM choice
In the new/edit analysis page, if Use custom recipe option is notselected
1. Select the desired Swarm among the list. In case onlyone Swarm is available for the user, it will be automatically
selected.
2. Select the desired HYRIS bKITTM type (Botanicals, Probiotics, Virus Finder, etc…)
3. Select the desired HYRIS bKITTM among the list. The related Global Recipe will be automatically loaded.
4. Insert the bKIT Lot number
Note: Each VERSION of the HYRIS bKITTM is associated with a specific Global Recipe. Verifythat the selected HYRIS
bKITTM and its Version matchthe part number and version reported on the package.
BatchNumber (Lot
number)
Expiring Date
Part Number: *bKIT_ID*.*VERSION*
QR Code

HYRIS SystemTM | Quick-Start Guide (ENG)
May 2022
18
Create a new analysis: the samples
If a cartridge layout is already defined in the selectedrecipe/global recipe, samples names can be directly defined or edited.
Cartridge layout will be shown otherwise
For each sample, following informationcan be set or consulted:
A. Sample name: name of the sample. This fieldcan also be filledusing a barcode reader
B. Sample color: color assignedto the sample. Will be the same color shown in the fluorescence chart
C. Geolocation (optional): samples location canbe set
D. Cartridge layout feedback: a small window showing the cartridge wells layout is shown when clicked. Wells
designed for the sample are highlighted.
E. Delete sample: delete current sample.
Click on the button on the bottom of the page to go to the Cartridge Layout section.
Create a new analysis: the Cartridge Layout
Cartridge layout is shown. Number of cartridge wells can be changed according to available ones by clicking on the
respective model on the top left (9, 16 or 36).
Twobuttons are available on the top right of the screen:
•button: cartridge layout is exported in a .pdf file.
•button: access the Reaction set-up view.

HYRIS SystemTM | Quick-Start Guide (ENG)
May 2022
19
Click on the button to edit the cartridge. Single or multiple wells at once canbe edited.
For editing one single well, click on the relative button.
For selecting more than one well to be edited:
1. Move the mouse over a well, until cursor appears. Left click on each desired well. A symbol will appear
(not selected wells will show symbol instead). Multiple wells can alsobe selected: move the cursor outside
any well, until it turns into a cross and then keep the left button clicked while dragging the mouse over the
cartridge to extend the selection.
2. Click on the button to edit the selection. Click on the button to remove the wells from
the cartridge layout. Fluorescence will not be detected for removed wells.
For each well, following information can be edited:
•Selected well type: identifies the solution/mix the well will be filled with. Changes of this parameter will affect
the way automatic interpretation will consider the well.
•Sample: reports the Sample that will be contained by the selected well.
•Select sample type: identifies the treated sample type and control samples the well will be filledwith. Changes
of this parameter will affect the way automatic interpretation will consider the well.

HYRIS SystemTM | Quick-Start Guide (ENG)
May 2022
20
You can add wells by clicking the button on the empty wells.
Also, Samples can be edited inbatch by clicking the button on the top right of the screen.
Click on the button to exit the Layout edit view without saving the modifications. Click on otherwise.
You can finish the analysis creation/edit procedure by clicking the or button, for respectively launch and
save the analysis or only save the analysis.
If the Run after finish option is selected, a new window will open. Select the desired HYRIS bCUBETM among the available
devices. The selected HYRIS bCUBETM Status LEDs will blink. You canmake the Status LEDs blinking again by clicking on the
button. A recap of the thermal protocol that will be executed is visible by clicking the button. Reaction set-up
can also be shown, and cartridge .pdf file can be downloaded. Click on to immediately launch the analysis. The
live analysis view page will be shown.
If the Run after finish option is not selected, the user will be brought back to the Analyses list, where the new analysis can
be found.
Analysis details
When opening an analysis, the first tab to be shown depends on the analysis status. If the analysis status is Completed or
Aborted, the Result tabwill be shown, otherwise General tab will be opened
GENERAL tab
Note: Make sure the selectedcartridge model corresponds to the model of the cartridge in use
This manual suits for next models
7
Table of contents
Other HYRIS Laboratory Equipment manuals
Popular Laboratory Equipment manuals by other brands

Leica BIOSYSTEMS
Leica BIOSYSTEMS Aperio GT 450 Quick reference guide

Sartorius Stedim Biotech
Sartorius Stedim Biotech 16249 Directions for use

Omni
Omni Bead Ruptor 24 user manual

Agilent Technologies
Agilent Technologies 6890 Series Service manual

BioLAB
BioLAB BMRW-104 Operation manual

Leica
Leica CM3050 S Instructions for use