Singular Sound AEROS User manual

Manual
Firmware 3.0.0
AEROS
loop studio

1
Table of Contents
AEROS Loop Studio: Manual
Introduction.................................................................1
Navigating your AEROS...............................................2
Setting up for the First Time......................................4
Your Instrument..........................................................5
Starting a New Song..................................................6
2x2 Controls.............................................................10
6x6 Controls.............................................................13
Mixer..........................................................................17
Colors& Icons...........................................................18
Settings.......................................................................22
Loading and Exporting Songs..................................26
BeatBuddy Integration..............................................27
MIDI Compatability...................................................30
General Technical Information................................31
Changelog...................................................................33
INTRODUCTION
Welcome to your AEROS Loop Studio. Get ready to take
full advantage of your new looping powers!
IMPORTANT NOTE: The AEROS uses 9v, center
negative, 300 mA power. It is recommended to always
use the Power Supply that was included with the Aeros
to prevent unwanted noise and damage. It is also
recommended to give the AEROS a dedicated power
supply instead of powering it on a ‘daisy chain’ with
other pedals to prevent unwanted noise. If you still get
unwanted noise, please see the General Technical
Information section.

2
Navigating Your AEROS
AEROS Loop Studio: Manual
There are three ways to navigate your AEROS: The touch screen (just like your
smartphone), the wheel, and the footswitches.
You can always tell what the three bottom footswitches do by reading the
on-screen labels — this will come in handy when looping! The PLAY/STOP ALL
footswitch and the VOLUME WHEEL do not change functionality.
Note: The on-screen labels only show the single press commands. Hold
commands and double tap commands do not change, and therefore do not need
labels. These commands are discussed in “2x2 Controls” and “6x6 Controls”.

3
Navigating Your AEROS
AEROS Loop Studio: Manual
HOME SCREEN
When you turn on your AEROS, you will start in the Home Screen. From here you
can access different areas.
LOOP STUDIO - Where masterpieces are created. It will load your last saved song
automatically.
SONGS - Load your saved songs, either from internal memory or an SD card.
WIFI - Connect to your wireless internet network.
SETTINGS - Change settings that are applied AEROS-wide (to all songs).
QUICK START GUIDE - Familiarize yourself with the basics.
UPDATES - Check here to see if we’ve released new features. You must be
connected to WiFi internet.

4
Setting up for the First Time
AEROS Loop Studio: Manual
We know you’re itching to hop into the Loop Studio, but please do this
first:
1. Connect to your Wi-Fi
2. Check for updates
Try remaining connected to Wi-Fi whenever possible to ensure
your have all the latest improvements and features. We're
constantly improving the firmware, and there may be a new version
available at the time you set up your AEROS.
1
2

5
Your Instrument
AEROS Loop Studio: Manual
Plugging an instrument into the AEROS:
The AEROS has two ¼” (6.35mm) Inputs. You can record in stereo or in mono. The
two ¼” (6.35mm) outputs function in the same way.
The AEROS also has a stereo Aux In audio input that you can plug an additional
instrument into. To record from this source, see the main settings. You must use a
TRS (tip-ring-sleeve) cable to achieve a stereo input signal.
The AEROS does not have phantom power for microphones. This means you may
need a microphone preamp to adjust the microphone signal level — any preamp
will work.
Signal levels:
Before you start recording, play your instruments at the loudest expected level in
the loop studio. The signal meter will appear on the right side. If the signal reaches
the red level, turn down your instrument to prevent clipping. The volume wheel
only controls the output level, not the input level.
Note: Currently the signal meter only displays the input from the Main Left/Right
input ports, not from the Aux in. This will be added in a future update.
OUTPUT
L/R
INPUT
L/R

6
Starting a New Song
AEROS Loop Studio: Manual
To start looping, press the Loop Studio icon or press the Play/Stop All button
from the main menu.
Your last saved song will load automatically. (If you have no saved songs, a new
empty song will be loaded).

7
Starting a New Song
AEROS Loop Studio: Manual
When you go to the Loop Studio, your song will be stopped. From here you can
use the footswitches to record a new track or resume playback (if you already
have tracks recorded in this song). We discuss these options in 2x2 Controls
(p. 10) and 6x6 Controls (p. 13).
You can also press the icons on the screen to do the following:
Edit Song (including any of the song-specific settings)
Save Song
Home Page
Song List
New Song
STOPPED SCREEN

8
Starting a New Song
AEROS Loop Studio: Manual
NEW SONG PAGE
There are many settings available when creating a new song, which the (?) icon on the
far-right provides explanations for. We discuss these options in the “SETTINGS” section
of this manual. The default settings work for most people, and you can start looping
right away without changing anything if you wish.
Here's some information to start you out:
The AEROS Loop Studio is the first looper pedal to allow parallel tracks (loops that play
at the same time as each other) and song parts (groups of parallel tracks that you can
switch between).
Parallel tracks are represented by clocks and waveforms, and song parts are
represented by dots. The song part and track that is currently selected will be
indicated by the color green.
9
Starting a New Song
AEROS Loop Studio: Manual
2x2 6x6
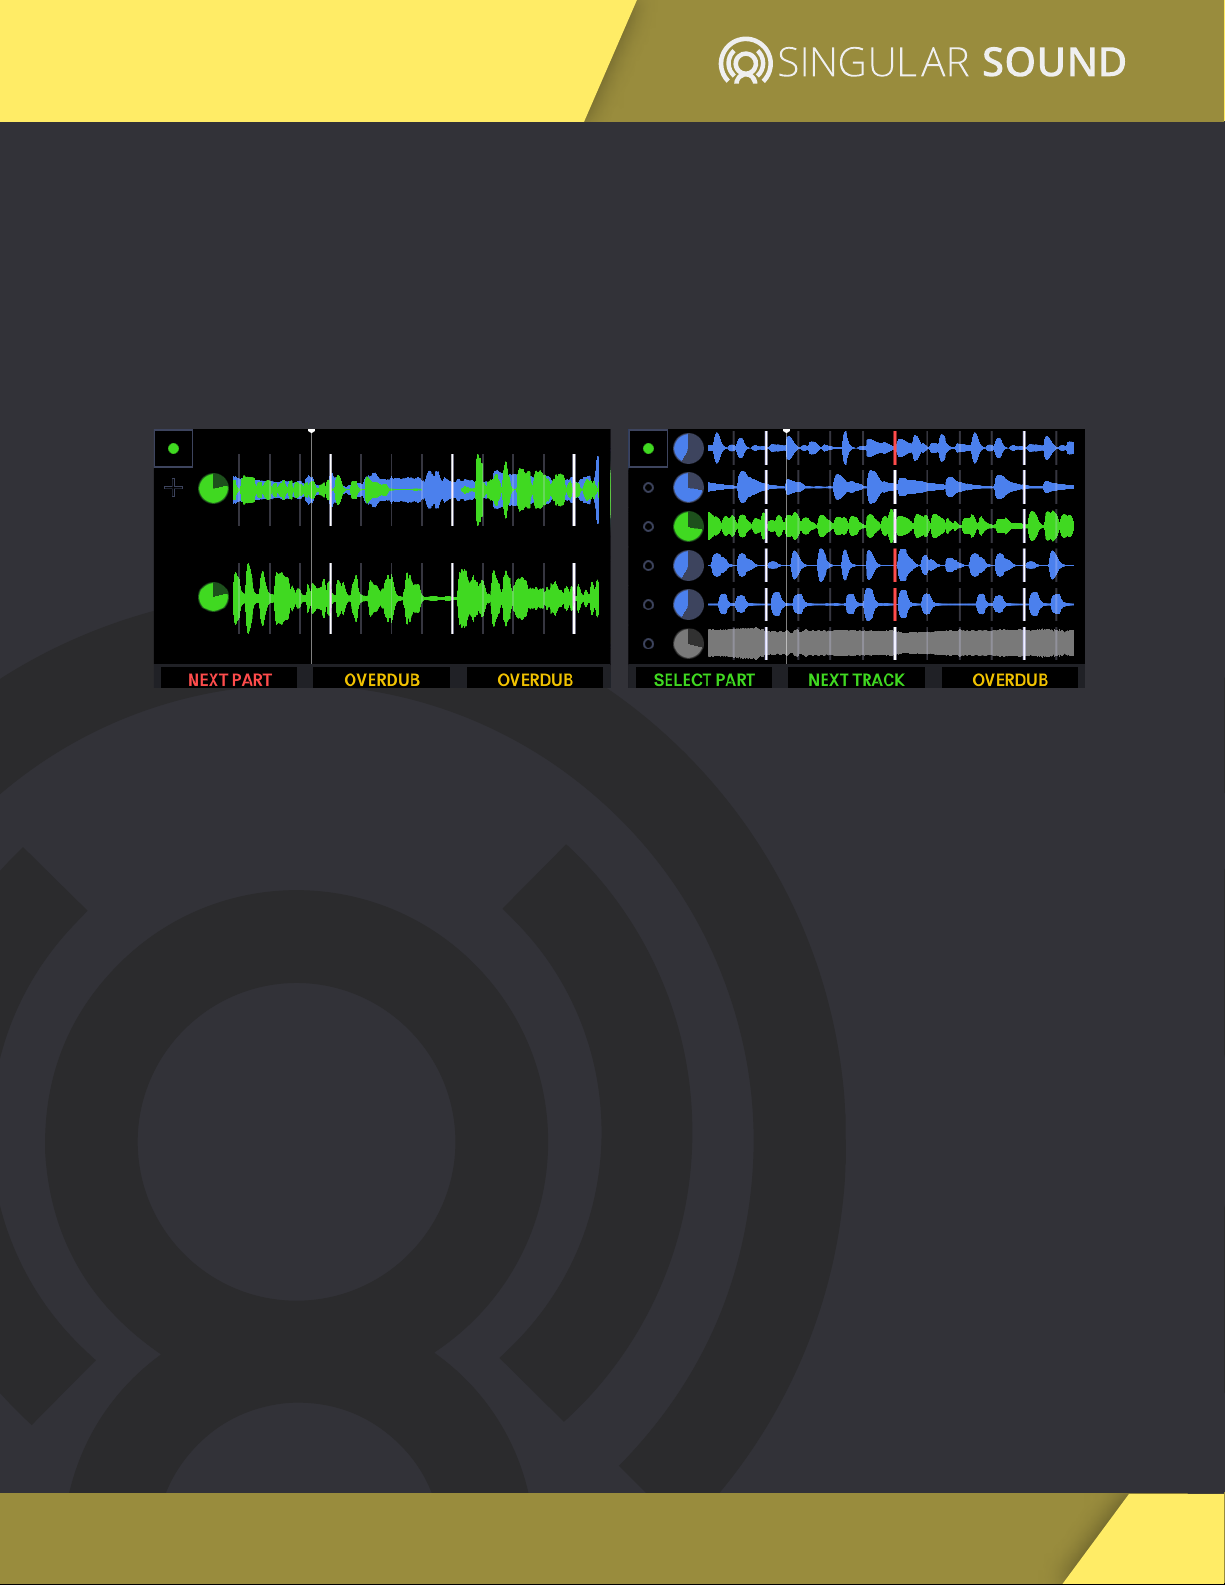
There are two basic modes you can loop with: 2x2 and 6x6.
●In 2x2, you have two song parts each with two parallel tracks, for a total
of four unique tracks.
●In 6x6, you have six song parts each with six parallel tracks, for a total of
36 unique tracks.
The controls are different when using 2x2 and 6x6.
In 2x2, each parallel track has its own footswitch, and a single press on the Select
Part button changes song parts, whereas in 6x6, you must first select the track or
song part before you perform an action. It's a small trade-off tied to the amount
of unique tracks you have available.
We recommend you try both modes and see what fits your style, or master both
to get the most out of your AEROS in any situation!

10
2x2 Controls
AEROS Loop Studio: Manual
In 2x2, you have two song parts each with two parallel tracks, for a total of four
unique tracks.
TRACK 1 and TRACK 2
Track 1 and Track 2 are controlled by their respective footswitches.
SINGLE TAP:
●Record (if track is blank)
●Playback recording
●Overdub
●Playback overdub
DOUBLE TAP:
●Mute (happens immediately, End of Measure or End of Loop. See page 25
for mute settings)
○Single tap to unmute
HOLD:
●Undo most recent layer
○Continue to hold undo second layer (if it exists)
○If you have undone all layers, single tap to overwrite track
●Redo most recent layer
○Continue to hold to redo overdub (if it exists)
Overdubs: Overdubs are additional layers of recordings on top of the original track.
You can have unlimited overdubs, but each new overdub will merge the previous
overdub to the base layer. So you can have at most two layers per track -- your base
layer and your most recent overdub layer. For each track, the most recent overdub
is merged with the base layer when the song is saved. This frees up internal
memory.
TRACK 2 (BOTTOM) TRACK 1 (TOP)
11
2x2 Controls
AEROS Loop Studio: Manual
SINGLE TAP:
●Changes between song parts. If the song part already has a recorded track
in it, it starts playback of the next part; otherwise, it starts recording.
HOLD:
●Opens the Mixer
SINGLE TAP:
●Stops playback of all tracks.
○You can choose in the Main Settings whether it stops immediately/at
the end of the measure or at the end of the longest loop (default) in
the song part.
●Resumes playback of all tracks.
DOUBLE TAP:
●Immediately stops playback of all tracks, regardless of setting.
Hold (when stopped) :
●Delete all tracks and song parts and start the song over.
PRESS/RELEASE: In Main Settings, set whether the Play/Stop All button reacts on the
press or on the release of the button. Press is more immediate, however, holding to
delete all tracks while stopped will start playback of the song for a few seconds
before the delete command is enacted.
NEXT PART
PLAY/STOP ALL

12
AEROS Loop Studio: Manual
2x2 Controls
VOLUME WHEEL
Use the volume wheel to control the master output volume at any time.
The thin bars on the right show the L and R input volume levels. If the bars are red
you are clipping and you should lower the volume of your instrument.
In the Mixer: You can use the volume wheel to control the relative volume levels
of each track.
If no tracks are muted, selecting the master track from the mixer view will give
option to “Mute All”. If at least one is muted, the option will be to “Unmute All”.
13
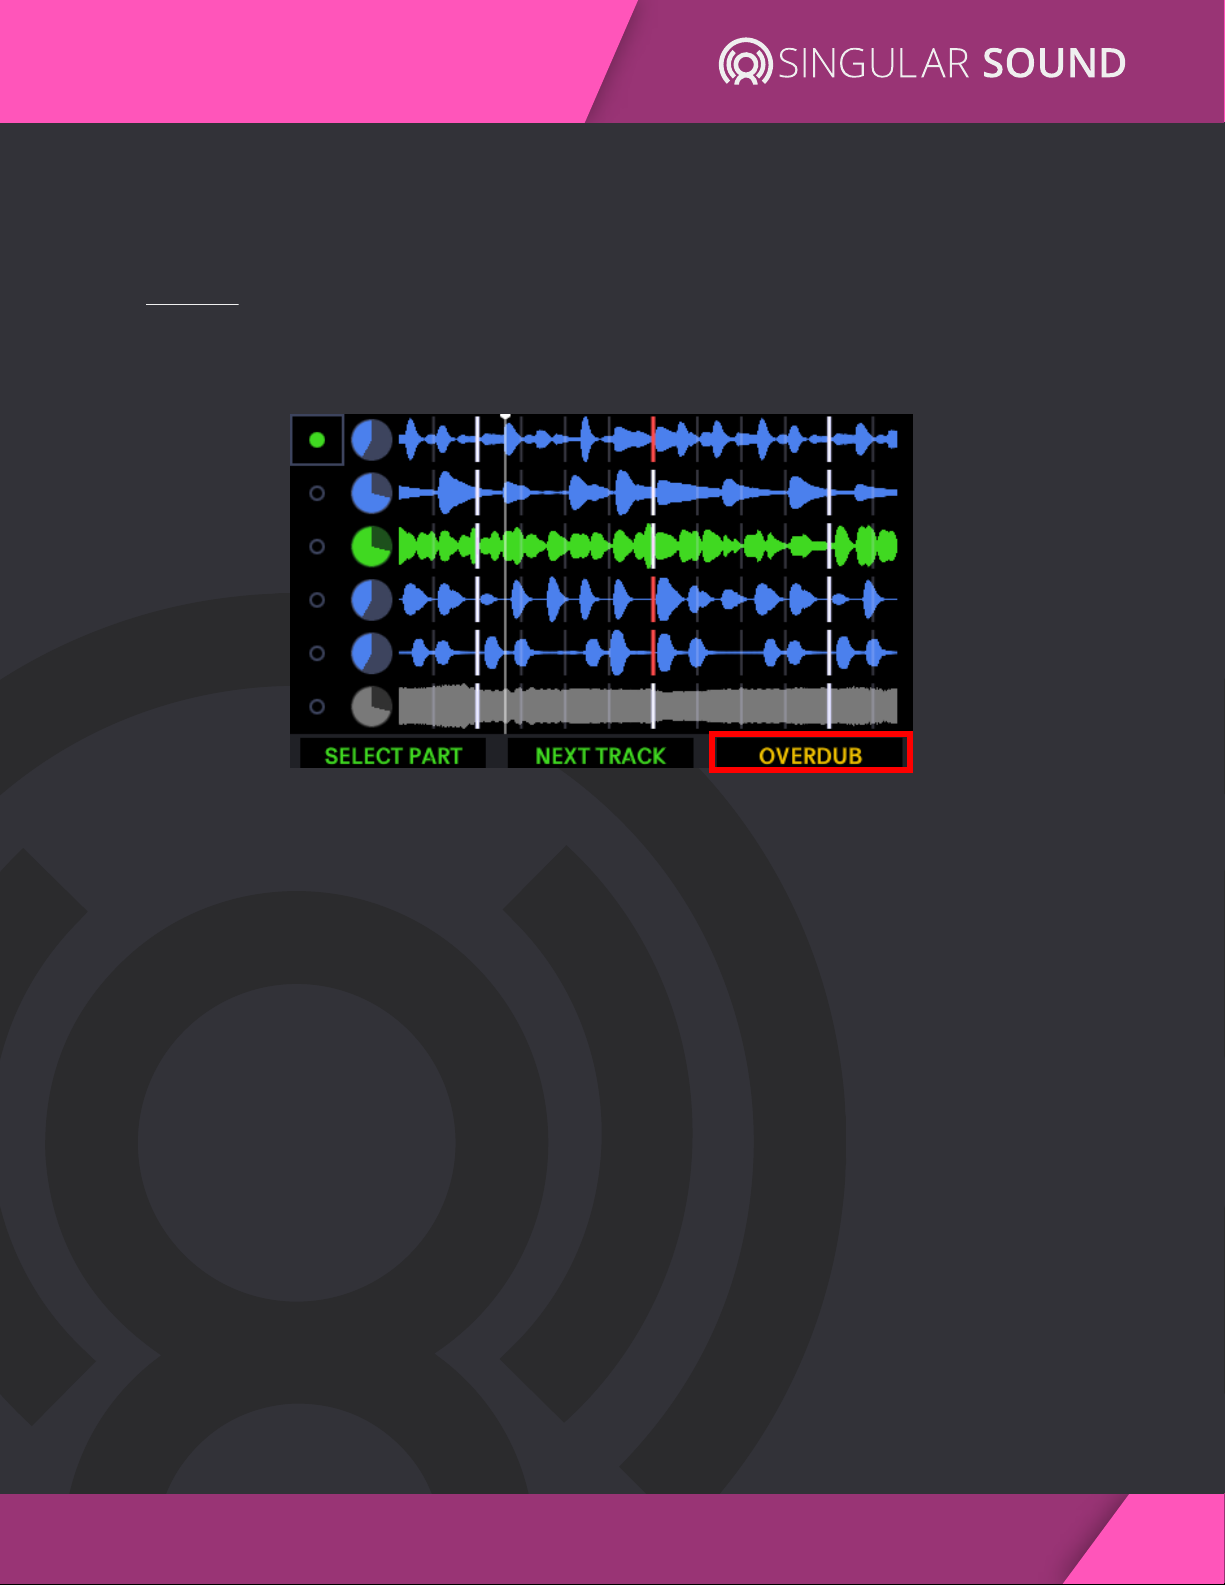
AEROS Loop Studio: Manual
6x6 Controls
In 6x6, you have six song parts each with six parallel tracks, for a total of 36
unique tracks.
ACTION
The Action button (lower right) executes actions on the selected track or song
part. Selected items are indicated by green color.
SINGLE TAP:
●Record (if track or song part is blank)
●Playback recording
●Overdub
●Playback overdub
DOUBLE TAP:
●Mute (happens Immediately, End of Measure or End of Loop. See page
25 for mute settings)
○Single tap to unmute
HOLD:
●Undo most recent layer
○Continue to hold undo second layer (if it exists)
○If you have undone all layers, single tap to overwrite track
●Redo most recently undone layer
○Continue to hold to redo overdub (if it exists)
Overdubs: You can have unlimited overdubs, but each new overdub will merge
the previous overdub to the base layer. So you can have at most two layers per
track -- your base layer and your most recent overdub layer. For each track, the
most recent overdub is merged with the base layer when the song is saved. This
frees up internal memory.

14
AEROS Loop Studio: Manual
6x6 Controls
NEXT TRACK
SELECT PART
SINGLE TAP:
●Selects next song part
○Press the action button to change to the selected song part.
○If the selected song part has no previous recording (it is a new
song part, as indicated by the “+” sign), pressing the Action button
will begin a new recording on that song part.
○If the selected song part already has a recorded track, the Action
button plays the song part.
HOLD:
●Opens the Mixer
SINGLE TAP:
●Selects next track
○If selecting an empty track, it will automatically start/cue a new
recording.

15
AEROS Loop Studio: Manual
6x6 Controls
PLAY/STOP ALL
SINGLE TAP:
●Stops playback of all tracks.
○You can choose in the Main Settings whether it stops
immediately/at the end of the measure or at the end of the
longest loop (default) in the song part.
●Resumes playback of all tracks.
○ You can select different song parts and tracks while the song
is stopped. Pressing the Action button will start overdubbing
or recording the selected track.
DOUBLE TAP:
●Immediately stops playback of all tracks, regardless of
setting.
HOLD (when stopped) :
●Delete all tracks and song parts and start the song over.
PRESS/RELEASE: In Main Settings, set whether the Play/Stop All button
reacts on the press or on the release of the button. Press is more
immediate, however, holding to delete all tracks while stopped will start
playback of the song for a few seconds before the delete command is
enacted.

16
AEROS Loop Studio: Manual
6x6 Controls
VOLUME WHEEL
Use the volume wheel to control the master output volume at any time. The
wheel can also be used to navigate menus and the song list.
The thin bars on the right show the L and R input volume levels. If the bars are
red you are clipping and should lower the volume of your instrument.
In the Mixer: You can use the
volume wheel to control the
relative volume levels of each track.

17
AEROS Loop Studio: Manual
Mixer
To open the mixer, you can hold the NEXT PART button or tap on any of the track
clocks.
Tracks in the current song part will be visible, ordered from left to right. You can
touch to adjust their relative volume or mute individual tracks. You can also mix
hands-free: select tracks with the middle button and adjust the relative volume with
the volume wheel. Mute or unmute with the right button.
Note: Opening the mixer does not stop the song!

18
AEROS Loop Studio: Manual
Colors & Icons
TIMING
Where you currently are in the loop. In quantized
mode, flashes on each beat and flashes brighter on
each measure.
Playhead
Beat
Measure
End of Loop
Each beat is shown by a thin white line
(only in quantized mode)
Each measure is shown by a thick white line
(only in quantized mode)
The end of the loop is shown by a thick red line
Beat Lines
End of Loop
Playhead
Measure Lines

19
AEROS Loop Studio: Manual
Colors & Icons
TRACK WAVEFORMS
Red Waveform:
Currently recording new track
Green Waveform:
Currently selected layer
Blue Waveform:
Layer is currently playing,
but is not selected
Yellow Waveform:
Currently recording overdub
Faded Waveform:
Layer is undone. Undone layer
can be brought back or overwritten
Gray Waveform:
Muted track
Other manuals for AEROS
1
Table of contents
Other Singular Sound Music Pedal manuals


