Sinopine N2 Operating and maintenance manual

INSTRUCTION MANUAL
ALL-IN-ONE GSM Home Alarm – N2
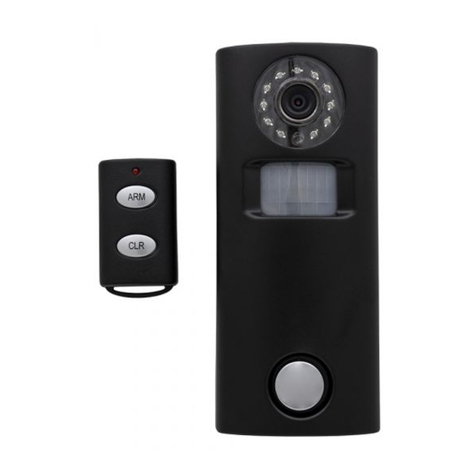
Product diagram
1. Top Solar Panel
2.Night Vision Light
3.Camera
4.Indication Light
5.PIR detector
6.Microphone
7.Siren
8. Power Switch
(Left on / Right off )
9.Power Interface
10. Indication Light
11.SD Card Slot
12.USB interface
13.SIM Card slot
14.Learn Code
1. IR extender
2. Indication Light
3. Arm Button
4. Disarm Button
GSM Function Setup
A:Set up GSM alarm ,below notice :
1. Pls make sure SIM Card connect with GSM network, When
Indication Light flashing 3times every 2.5Seconds means SIM
card connect successful.
2. Setup alarm parameters by sending SMS message to phone
number of the SIM Card in the alarm.
3. SMS message start with Password. the default Password
258000 , if you change new password, SMS message should
start with new password.
4.If setup successfully, you will receive a message notification
from alarm SIM card.
B.Edit SMS Message for GSM Alarm Setting :
1. :Password Setting :
SMS message “258000#01*6 digit new password# ”
For Example, Set new password 123456 :
258000#01*123456#
Remark: default password:258000, if you set new
password 123456, all below sms setting message
should start with new password 123456, not 258000 .
2. GSM Alarm Timer Setting:
a. Alarm System Time Setup
SMS message “258000#03* time #
For Example, Set alarm current time 11:45
258000#03*1145#
(Time range: 0000~2359, hours 00~23 minute: 00~ 59)
b. Alarm Arm and Disarm Time Setup
SMS message “258000#05*arm time*disarm time # ”.
For Example, if you want to arm on 20:30 ,and disarm on
08:30, sms message as below:
258000#05*2030*0830#
(Time range: 0000~2359, hours 00~23 minute: 00~ 59)

c. Use Timer Function
After the timer was set ok, you can control the timer function
by sending sms message : .
Send below message to use timer function
258000#04*1#
Send below message to close timer function
258000#04*0#
3.Alarm Telephone Number Setting :
SMS message “258000#30*1* Telephone Number # ”
For Example , Set 1st mobile number 13800138000
258000#30*1*13800138000#
If you want to set 2nd telephone, then as below :
258000#30*2*Telephone Number#
And so on total you can set 5 telephone numbers. Each group
telephone digit not exceed 20digits.
4.GSM Alarm Alert Message Setting :
SMS message “258000#80*Alert Message # ”.
The default alarm messages: >> N2 System alarm!
For Example, you want alert message “Intruder at home”
258000#80*Intruder at home#
Alert Message total should not exceed 48 letters.
5.GSM Siren Time Setting :
SMS message “258000#07*Time # ”. time from 00-30min.
For Example, if you want to set siren time 22min, send below
message to set :
258000#07*22#
If you want to use it as silent alarm, only video taking and
send alert message to mobile, can set siren time 00, send
below ;
258000#07*00#
6.Door Alarm Connection :
The GSM alarm total can connect 8 door alarms, press and
hold the learn code button ⒁, GSM alarm long “beep” and
Led flash slowly , it begin automatically build connection with
door alarm, alarm short “beep” and Led flash quickly means
the connection successful, total you can connect 8 door alarm
in this way.
7 .Door Alarm Alert Message Setting :
SMS message “258000#81*01* Location # ”.
For Example, you want set the 1st door alarm in Parlor and 2nd
door alarm in the bedroom.
258000#81*01*Parlor#
258000#81*02*bedroom#
For the same way, you can set door alarm message for 8 door
alarms in different rooms.
Message total should not exceed 48 letters.
If You want to delete all connected door alarm. Send below
sms message :
258000#21*0#
8.GSM Alarm Power Status Reminder :
Power Reminder Situation :
*System Power Down
*System Power Up
*System Low Power
SMS message 258000#06*1 # to turn on the power status
reminder .
SMS message 258000#06*0 # to turn off power status
reminder .
9.Door Alarm Low Power Reminder :
When door alarm in low power, it will send a message to your
mobile . Door-sensor low power![1]
For Example, the 3rd door alarm in lower power. You will
receive the message as below :
Door-sensor low power![3]
10.Recharge Function
N2 works with 9V power adaptor continue use. Meanwhile N2
is built-in 1000mA lithium battery, it can continue working
when power is off

Turning on the unit and accessing to external 9V power
adaptor, N2 will be automatically charge for built-in lithium
battery. Indicator red light means on charging, Indicator green
means charge done.
11.Reset to Defaults
If you want the GSM alarm resume to default factory status.
send below sms setting message:
99113377#
B. GSM Alarm Operation :
After All GSM Setup OK. You can begin Use the GSM
alarm.
1. Arm the alarm- 3 Methods
1.Press “Arm” button ⑶ on the remote controller. After
30seconds, if the PIR Detect any motion, the alarm will siren,
and send sms alert message to your mobile, also it will take
video record to save in the SD card.
2.Send below message to SIM Card to arm alarm
258000#101#
3.Call SIM Card Number, Input password 258000# ,and then
input 101# ,the alarm will be automatically in arm status.
Remark: Pls input correct password, if correct, alarm will
“beep” twice, if wrong alarm will “beep” three times.
2.Disarm the alarm -3Methods
1.Press “CLR” button⑷ on the remote controller, it will
disarm the alarm.
2.Send below message to SIM Card to disarm alarm
258000#102#
3.Call SIM Card Number, Input password 258000# ,and then
input 102# ,the alarm will be automatically in disarm status.
Remark: Pls input correct password, if correct, alarm will
“beep” twice, if wrong alarm will “beep” three times.
3.GSM Alarm Function :
When Alarm in arm status, if any burglar / Intruder detected.
* Alarm will siren
* Alarm will send alert message to your mobile.
* Alarm will take video record 30seconds for each trigger.
If GSM alarm have connected with door alarm.
If door was opened or vibration. It will also send warning
Message to your mobile phone.
4.Audio Monitor Function Setup
When you want to hear what happen around the GSM alarm,
You can Send below message to SIM Card, the alarm will call
you back, when telephone put through, you can hear the voice
in the alarm side.
258000#100#
5.Video Check and Delete
In standby mode, Connect PC with USB Line, You can Check
and delete the video in SD Card.
6.GSM alarm status Checking :
*Check the alarm time current time message: 258000#200#
*Check arm and disarm time : 258000#201#
*Check set Telephone number : 258000#202#
*Check Current arm or disarm status : 258000#203#
>> User’s Instruction Notice
1. Install SD Card, SIM Card correctly, make sure SIM Card
have connected with GSM network successfully.
2. Ensure built-in lithium battery power sufficiently or alarm
have connected with power adaptor.
3. Turn on power switch, system enters into standby mode, Pls
send related sms message to setup the GSM alarm.
4. If you want to delete all ready setting, Pls send sms message
to resume GSM alarm to factory default status.
Noted: .Operation should follow up User manual
Warning :.Keep away from children in avoid of Electrical Shot

FCC Statement
This equipment has been tested and found to comply with the limits for a Class B digital device, pursuant to part 15 of the FCC
rules. These limits are designed to provide reasonable protection against harmful interference in a residential installation. This
equipment generates, uses and can radiate radio frequency energy and, if not installed and used in accordance with the instructions,
may cause harmful interference to radio communications. However, there is no guarantee that interference will not occur in a
particular installation. If this equipment does cause harmful interference to radio or television reception, which can be determined
by turning the equipment off and on, the user is encouraged to try to correct the interference by one or more of the following
measures:
-Reorient or relocate the receiving antenna.
-Increase the separation between the equipment and receiver.
-Connect the equipment into an outlet on a circuit different from that to which the receiver is connected.
-Consult the dealer or an experienced radio/TV technician for help.
To assure continued compliance, any changes or modifications not expressly approved by the party Responsible for compliance
could void the user’s authority to operate this equipment. (Example- use only shielded interface cables when connecting to
computer or peripheral devices).
This equipment complies with Part 15 of the FCC Rules.Operation is subject to the following two conditions:
(1) This device may not cause harmful interference, and
(2) This device must accept any interference received, including interference that may cause undesired operation.
RF warning statement:
The device has been evaluated to meet general RF exposure requirement. The device can be used in portable exposure condition
without restriction.
Caution!
The manufacturer is not responsible for any radio or TV interference caused by unauthorized modifications to this equipment. Such
modifications could void the user authority to operate the equipment.
Note:
The equipment contains Transmitter Module FCC ID: UDV-0912142009007
Table of contents
