SIP Tempest P700/120 User manual

12
FOR HELP OR ADVISE ON THIS PRODUCT PLEASE CALL OUR
CUSTOMER SERVICE HELP LINE : 01509 500400
THE MANUFACTURER RESERVES THE RIGHT TO ALTER THE DESIGN OR
SPECIFICATION TO THIS PRODUCT WITHOUT NOTICE. PICTURES AND DIAGRAMS
ARE FOR ILLUSTRATION PURPOSES ONLY 1
High Pressure
Water Cleaners
Please read and fully understand the instructions in this manual
before operation. Keep this manual safe for future reference
MODELS
Tempest
P700/120

2
Congratulations for choosing one of our products! We would like to remind you that we took the
safety of the operator, the efficiency of its use and the protection of the environment into great
consideration when designing and manufacturing this product.
In order to preserve its features over time, please read and follow these instructions carefully.
Particular attention must be given to the parts with the following symbol:
WARNING
as they contain important instructions regarding safety when using the high-pressure cleaner.
The Manufacturer is not liable for damage caused by:
•failure to comply with these instructions:
•use of the high-pressure cleaner not included in the list in the “DESIGNATED USE” section;
•failure to comply with current safety regulations and regulations for the prevention of
accidents in the workplace when using the high-pressure cleaner;
•incorrect installation
•failure to carry out the anticipated maintenance;
•modifications or actions without prior authorisation by the Manufacturer;
•use of non-original or non-specific spare parts for this model of high-pressure cleaner;
•repairs which were not completed by a Skilled Technician.
INTRODUCTION
TECHNICAL SPECIFICATIONS
MODEL P700/120
INPUT
VOLTAGE 230V 50 HZ 13A
MOTOR
(Induction) 2900 Watt
MAX PRESSURE 110 BAR
1595 PSI
WATER FLOW RATE 700 L/HR
RECOIL (WHERE N = 0.1 KG) 29 N
HOSE LENGTH 10 Metres
HOSE Rubber
NOISE LEVEL 84 dB(A)
WEIGHT 43 KGS
VIBRATION < 2.5 M/S²
DIMENSIONS LxWxH 189 x 161 x 370 MM
11
DECLARATION OF CONFORMITY
WE
SIP LTD
GELDERS HALL ROAD
SHEPSHED
LOUGHBOROUGH
LEICSTERSHIRE
LE12 9NH
Declare that the
Tempest High Pressure Cleaners
P700/120
Complies with the following EEC Directives their supporting Statutory
Instruments and the relevant standard where applicable:
98/37/EEC Machinery Directive
EN 292-1/2
73/23/EEC Low Voltage Directive
EN 60335-1
EN 60335-2-79
89/336/EEC EMC Directive
EN 55014-1/2
EN 55104
EN 61000-3-2/3
2000/14 EEC Noise Directive
EN ISO 3744
Signed:
Joint Managing Director
Date: 8th September 2003

10
PROBLEM CAUSE SOLUTION
The high-pressure cleaner
does not start
•power supply plug is not
inserted correctly.
•Fuse in socket has blown.
•Other cause
•Replace correctly.
•Replace with a new 13 A
fuse.
•Contact a skilled technician.
The high pressure cleaner
vibrates a lot and is noisy
•The water filter is dirty
•Insufficient water supply.
•Valves worn blocked or
dirty
•Clean or replace.
•Check water tap is open.
•Contact skilled Technician
Cleaner does not reach high
pressure.
•Side handle turned for low
pressure.
•Nozzle is worn.
•Other Cause
•Set for high pressure as per
instructions.
•Replace nozzle.
•Contact skilled Technician.
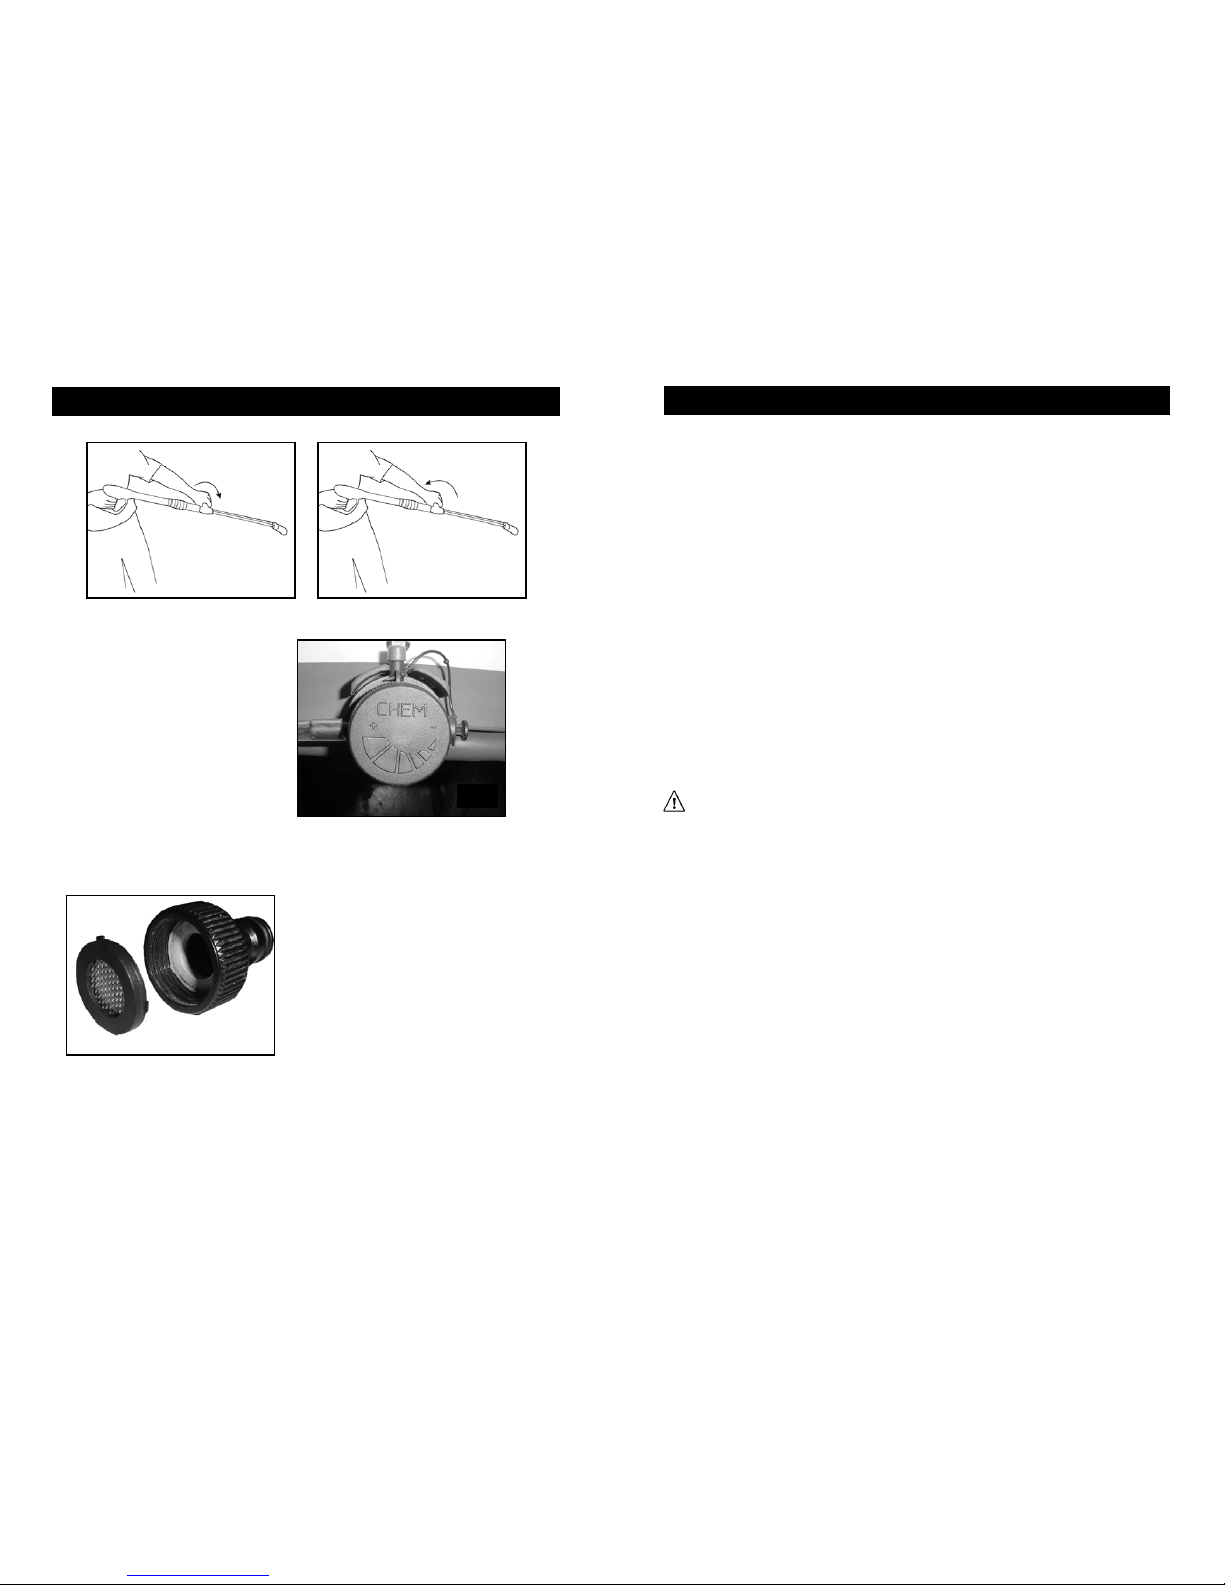
Poor suction of detergent. •Detergent tank empty.
•Detergent is too thick in
viscosity.
•Detergent Flow control
incorrectly set
•Fill tank with detergent.
•Dilute detergent with water.
•Adjust according to pg 6 FIG B
When starting the motor hums
but doesn’t start up.
•Mains power supply below
requirements.
•Faulty start capacitor.
•Pump blocked or frozen
•Check mains supply.
•Replace capacitor.
•Contact skilled technician.
Motor stops during use. •Thermal protector cut in.
•Mains supply fuse blown.
•Allow cleaner to cool down
and reset thermal protector.
•Replace fuse.
No water comes out of nozzle •No water connected to
cleaner
•Suction depth too high (if
sucking instead of mains
supply)
•Blocked water filter
•Connect or turn on water
supply.
•Reduce suction height.
•Clean water filter see
maintenance section of this
manual
TROUBLE SHOOTING
3
SAFETY INSTRUCTIONS
The high pressure cleaner must be used with care and attention. It is your responsibility to make
sure that all new users have read these instructions and are familiar with the operation of the
high-pressure cleaner. Otherwise do not allow others to use the high pressure cleaner.
•High-pressure cleaners must not be used by children or by unauthorised personnel.
•Comply with the safety warnings in the operating and maintenance instructions of any
optional accessories to be used.
•Do not use the high pressure cleaner if:
- the power supply cable or other important parts such as the high pressure pipe, the safety
devices, the cleaner gun and the lance are damaged;
- the high pressure cleaner has been tipped over or has been bumped;
- there are obvious leaks of water.
In these circumstances, the high-pressure cleaner should be tested by a Skilled Technician.
•It is especially important to pay great attention when the high pressure cleaner is used in
areas where there are moving vehicles as these can crush or damage the power supply
cable, the high pressure pipe, the cleaner gun etc.
•During operation, never leave the high-pressure cleaner unattended and make sure it is out
of children’s reach. Pay particular attention when in areas unsupervised children, elderly
people and disabled people may be present.
•Before using the high-pressure cleaner, make sure it is in a dry place and that it is in a flat
and stable position in order to avoid accidents and prevent it from falling over.
•Before moving the high-pressure cleaner, follow the instructions in the “Switching off”
section.
•Before starting the high-pressure cleaner, put on clothing which guarantees adequate
protection against the possibility of incorrect manoeuvres of the jet of pressurised water.
•Do not operate the high-pressure cleaner near people unless they are also wearing
protective clothing.
•High-pressure jets of water can be dangerous if they are not used properly. Do not point the
jet in the direction of people, animals, and energized electrical appliances or towards the
high-pressure cleaner itself.
•Hold the cleaner gun firmly during use: when operating the lever (9), the operator is
subjected to the backlash of the high pressure. The power of this recoil is indicated in the
table of technical specifications (recoil is expressed in N, where 1 N = 0.1 kg).
•Do not point the jet towards oneself or other people in order to clean off clothing or
footwear.
•Vehicle tyres must be cleaned at a distance of at least 50 cm to safeguard them from being
damaged by the high-pressure jet. The first evidence of damage to a tyre is a change in
colour.
•Do not point the high-pressure jet towards materials, which contain asbestos or other
harmful substances.
•Do not use the high-pressure cleaner in the rain.
•Pay particular attention to the instructions in the “Controls and connection to the mains
electricity supply” section.
•Pay particular attention to the instructions in the “Use with detergents” section.
•When the high-pressure cleaner is not in use, unplug from the mains power. More precisely,
make sure that the mains switch (1) is in position "0", remove the plug from the power
outlet, press the lever (9) on the cleaner gun to eliminate any remaining pressure and bring
the safety catch in its locked position (10) (Fig.B):

4
SAFETY Continued ...
•In addition, wait until the high pressure cleaner has completely cooled down before cleaning
or maintenance.
•During use, do not lock the lever (9) on the cleaner gun in the open position.
•Do not remove the plug from the power outlet by pulling on the power supply cable.
•Do not put any reducers or adaptors between the electric plug and the power outlet.
•Keep the power supply cable dry. Do not touch it with wet hands.
•Should the power supply cable be damaged, contact a Qualified Eletrician for its
replacement.
•Do not cover the high pressure cleaner during operation and do not place it where there is
inadequate ventilation.
•When the high pressure cleaner is used in enclosed spaces, make sure that there is adequate
ventilation.
No Description No Description
1 Handle 11 Nozzles
2 Accessory Storage 12 Low Pressure Lance
3 ON / OFF switch 13 Side Handle and high/Low pressure
changeover control
4 Mains Supply Cable 14 Cleaner Gun
5 Rating plate 15 Trigger
6 Pressure Adjustment Control 16 High Pressure Rubber Water Hose
7 Connection for Water Outlet 17 Connection to cleaner
8 Connection for Water Inlet 18 Detergent flow control
9 Pressure Gauge 19 Detergent Tank Cap
10 High Pressure Lance 20 Detergent Tank
GET TO KNOW YOUR HIGH PRESSURE CLEANER
9
MAINTENANCE
WARNING
Only start cleaning and maintenance once the instructions in the "Switching off" section
have been completed. It is particularly important to always disconnect the electricity supply.
To safeguard the safety of the high pressure cleaner, only use the original spare parts supplied
by the Manufacturer or those endorsed by him. The rubber pipes, the coupling and the high-
pressure lances are important for safety: only use those endorsed by the Manufacturer.
ROUTINE MAINTENANCE
Follow the instructions in the "Switching off" section and abide by the recommendations in the
table below.
1. Inspect the supply cable and plug for damage before each use.
2. Check the high pressure pipe, couplings and lance pipe for damage and leaks.
3. Clean the water inlet filter (as shown in fig C) regularly to remove debris and lime scale.
4. Clean nozzle if it becomes blocked by inserting the supplied pin into it. If the nozzle
becomes worn and water pressure appears to drop then replace the nozzle. This can be
removed by using an allen key.
5. The pumps oil should be replaced every 500 hours of use. Contact a skilled techician for
this operation and conduct a full service.
WATER SUPPLY
This high pressure cleaner can be connected to the mains water supply for normal operation or
in the case where mains water is not available the water inlet can be fed from a water butt, lake
or other static water supply.
MAINS WATER SUPPLY:
When using mains water the follow water supply specification must be adhered to.
•Maximum water temperature must not exceed 60°C (140°F)
•Minimum water temperature must not be below 5°C (41°F)
•Minimum water inlet flow rate 11 l/min.
•Maximum water pressure 8 bar (116 psi)
STATIC WATER SUPPLY:
When using a static water supply (i.e. from a water butt or lake) the water supply hose should
be connected as normal to the high pressure cleaner, but the other end should be lower into the
water supply. Avoid any possibility of sucking up debris such as leaves or mud.
•Maximum suction head 1 metre
•Minimum water temperature must not be below 5°C (41°F)
It is recommended that some form of water filtration be used at the suction end of the inlet hose
to prevent intake of unwanted debris.

8
INTERRUPTED USE
Release the lever (9) on the cleaner gun and the high-pressure cleaner will automatically stop.
The high-pressure cleaner starts operating normally again when the lever on the cleaner gun is
pressed again.
WARNING
It is important to remember that the high pressure cleaner is still operational when it is in
‘Total Stop’ mode. Therefore, always put the main switch (1) in position “0”, remove the plug
from the mains power supply, press the lever (9) on the cleaner gun to eliminate any remaining
pressure and lock the safety protection device (10) (Fig. B), before leaving it unattended, even
SWITCHING OFF AND STORAGE
SWITCHING OFF
Shut off the tap for the water supply. .
Put the main switch (1) in position “0”. Remove the plug from the mains power supply. Release
any stored pressure in the cleaner by depressing the lever (15) on the cleaner gun for a few
minutes.
Wind the electric power cable up (4) and carefully hang it up on the handle (1).
Wait for the high pressure cleaner to cool down.
WARNING
When the high-pressure cleaner is left to cool down, take care that:
- the high-pressure cleaner is not left unattended in the presence of unsupervised children,
elderly or disabled people;
- the high-pressure cleaner is in a stable position and not at risk of falling over;
- the high-pressure cleaner is not in contact with inflammable materials, or in their immediate
vicinity.
STORAGE
Wind up the high-pressure pipe (17) carefully and avoid bending it.
Put the high-pressure cleaner in a clean and dry place making sure that the electric power supply
cable and the high-pressure pipe are not damaged.
CAUTION
The high-pressure cleaner is not frost proof. In order to prevent the formation of ice inside the
high-pressure cleaner keep the cleaner in a frost free area. Then before re-use the cleaner
should be brought into a warm enviroment and left to stand for a couple of hours to allow any
frost or ice which may have formed to melt before starting.
Where possible before commencing with the switching off and storeage procedures introduce
vehicle grade antifreeze into the cleaner to prevent ice build up.
If these instructions are not followed, the high pressure cleaner may be seriously
damaged.
5
16
18
19
17
15
14
13
11
10
6
7
20
5
4
3
2
1
12
9
8
GET TO KNOW YOUR HIGH PRESSURE CLEANER

6
GET TO KNOW YOUR HIGH PRESSURE CLEANER
FIG A FIG A – 1
FIG B
Turning the detergent control
knob clockwise will increase
the detergent mix in the
water. Likewise turning this
knob counter-clockwise will
decrease the detergent mix.
The water inlet filter is located
inside the water inlet connection
(8) to access this unscrew the
connector and push out the
gauze filter for cleaning.
FIG C
7
VOLTAGE SETTINGS
PRELIMINARY PROCEDURES
Unroll the high-pressure pipe (16) completely.
Attach water supply pipe to the water inlet’s quick connection (8) using a normal garden
connector.
Open the tap to the water supply and make sure that there are no leaks.
Make sure that the main switch (3) is in the off position (the "0" position) and then plug into
the mains power supply.
Turn the main switch (3) to position "1".
Press the cleaner gun’s control lever (15) and wait for a continuous jet of water to be issued.
Turn the main switch (1) to position "0" and connect the lance pipe (10,11,12,13) to the cleaner
gun (14).
STANDARD OPERATION (HIGH PRESSURE)
Make sure that the Side handle (13) is twisted high pressure setting (also see the “Use with
detergents” section).
Restart the high pressure cleaner by turning the main switch (3) to position "1" and check that
the spray from the nozzle is uniform, without dripping.
Note: during this restart phase, the high pressure cleaner will immediately stop operating after
the initial peak, as the Total Stop device will take effect.
Use the cleaner gun’s lever (15) to start operation of the high pressure cleaner and thus start
cleaning.
The output pressure is shown on the pressure gauge (9).
USE WITH DETERGENTS
WARNING: The high pressure cleaner is designed to be used with recommended
detergents. Use of other detergents or chemicals can affect the safety of the high pressure
cleaner. Never suck up liquids which contain solvents, petrol, diluents, acetone and fuel oil, as
these products are highly inflammable, explosive and toxic when nebulized.
Read the instructions and warnings on the label of the detergent to be used.
Store detergents in a safe place out of children’s reach.
Should detergent come into contact with your eyes, wash immediately with water. Contact a
doctor without delay and remember to take the container of detergent with you.
If detergent is swallowed, do not provoke vomiting. Contact a doctor without delay and
remember to take the container of detergent with you.
When filling the tank with detergent, take care not to spill any detergent on the high pressure
cleaner. If this should happen, wait at least 24 hours before using the high pressure cleaner so
that any liquid, which may have entered the appliance, can evaporate.
Pour the detergent into the detergent tank (20) by removing the tank cap (19) replace cap as
soon as the detergent tank is full.
- unscrew the cap (19) and fill the tank taking care not to spill the liquid (maximum capacity 4lt /
1.06 US gal); follow the recommendations regarding the doses indicated on the label on the
container of detergent;
-twist the side handle (13) as illustrated in Fig. A and then operate the trigger (15) on the
cleaner gun and start releasing the detergent;
- twist the side handle (13) as illustrated in Fig. A-1 to restore high-pressure operation.
(suction and mixing occurs automatically as the water flows).
The detergent mix can be adjusted by turning the detergent flow control knob as indicated in fig
B
Table of contents
Popular Water Filtration System manuals by other brands

Bluewater
Bluewater Pro Series quick guide

Puretec
Puretec Z1-MW-K user guide

Ro-Man
Ro-Man 200 GPD installation guide

Aqua Guard
Aqua Guard SandMaster SM16102S owner's manual

Bluebird
Bluebird Pure Diamond Bio Purifier Instruction handbook for installation, operation and maintenance

Aqua Medic
Aqua Medic AC Runner 3.0 Operation manual