SIRCHIE MD700 Manual

TI5.08-593ENG-REV1
SIRCHIE®
Finger Print Laboratories
100 HUNTER PLACE
YOUNGSVILLE, NC 27596 USA
Phone: (919) 554-2244, (800) 356-7311
Fax: (919) 554-2266, (800) 899-8181
Website: www.sirchie.com
E-mail: [email protected]
Copyright© 2008 by SIRCHIE®Finger Print Laboratories, Youngsville, N.C. All Rights Reserved.
Getting Started
The MD700 is shipped
in 3 easy-to-assemble parts
(shown to the right): Upper
Handle, Extender Stem, and
Lower Search Coil Stem.
The only adjustments re-
quired after assembly of
the unit are the angle of the
search coil and the length of
the stem. Familiarize your-
self with the components of
the assembled unit shown
here before proceeding.
TECHNICAL INFORMATION
Metal Detection Sweeper
Catalog No. MD700
Control Panel
Cable Connector
Battery Access (2)
Search Coil Cable
Waterproof
ESI Shielded
Search Coil
Nylon Bolt
& Wing Nut
Hand GripPadded Armrest
Slip Nuts (2)
Extender Stem
Lower Search
Coil Stem
Initial Assembly and Setup
1. Carefully unpack the MD700. Save the carton and inserts for
future storage or shipment.
2. Note that the search coil cable is permanently attached to the
search coil. Be careful not to put any undue strain on it.
3. Insert the upper handle stem into the extender stem while
depressing the lock button. Push together until the lock button
lines up with the hole on the extender and locks. Twist the slip
nut to tighten this connection.
4. Insert the lower search coil stem into the other end of the STEP 3

2
TI5.08-593ENG-REV1
extender stem while depressing the lock button. Push together
until the lock button lines up with the appropriate hole on the
extender and locks at the desired length of the shaft. Twist the
slip nut to tighten this connection. NOTE: This slip nut can also
be used to lock the lower search coil stem at a height other than
those afforded by the holes in the extender stem.
5. If shaft length is properly adjusted, the search coil should be
about 12" (30cm) in front of, and slightly to the right of your
right foot (to the left of your left foot for left-handers). Your arm should be straight and relaxed,
the grip held loosely. Remember—the longer the shaft, the more you will have to bend your elbow
and the sooner your arm will get tired. Adjust coil angle (using the nylon wing nut) so that the
search coil rests flat on the ground. The MD700 is balanced for comfortable searching in a tight
semicircle around the front of the operator.
6. With the shaft length properly adjusted, loosen either slip nut and
rotate the lower stem to take up the cable slack and retighten.
Attach the search coil cable to the back of the control housing.
CAUTION: Never use anything (pliers, etc.) other than your
hand to tighten the slip nut. The cable should also never be
pulled tight at the control housing or search coil.
7. With the shaft length and coil angle properly adjusted, you should
be able to move into your SEARCH position as illustrated to
the right. Lean forward very slightly and raise your arm (still
straight) until the search coil is about 2" (5cm) above the ground
and 12" (30cm) in front of your foot. The search coil should be
parallel to the ground and may have to be slightly readjusted at
this point.
INSTALLING THE BATTERIES
The battery compartments
are located on the rear of the
control housing. Press the tab
on the compartment cover down
to remove. Slide a new 9V DC
alkaline battery inside while
observing the polarity indicated
above each compartment and
replace the battery cover. Repeat
for second battery.
CONTROL PANEL
1. DISC: This control turns the
power ON and automatically
tunes the MD700 for instant
operation. All types of metal are
detected at 0-level, while most
pieces of trash are rejected at 10.
NOTE: The DISC control has
no effect when the PINPOINT
button is engaged.
2. SENS: This control is normally
set at 10. It adjusts the sensitiv-
ity to targets and ground miner-
als. The higher the setting, the
deeper it will detect. You will,
however, also pick up false
signals in highly mineralized or
STEP 4
Press tab down to gain access to
battery compartment.
Insert 9V battery observing the polarity
marked above each compartment.
1
2
3
4
3
TI5.08-593ENG-REV1
trashy soil. In the extreme counterclockwise position, the control doubles as a battery test. A loud
tone indicates good batteries, faint tone is week batteries, and no tone indicates the batteries need
replacing.
3. HEADPHONES: This jack accepts most stereo and mono headphones equipped with a 1/4" diameter
plug. If using a stereo headset, set the stereo/mono switch to the “stereo” position. NOTE: Unit
has a xed volume setting of LOUD. Therefore, always use headphones with individual volume
controls to compensate.
4. PINPOINT: When pushed in and held, this button switches the MD700 into the zero-motion mode
for pinpointing all metal.
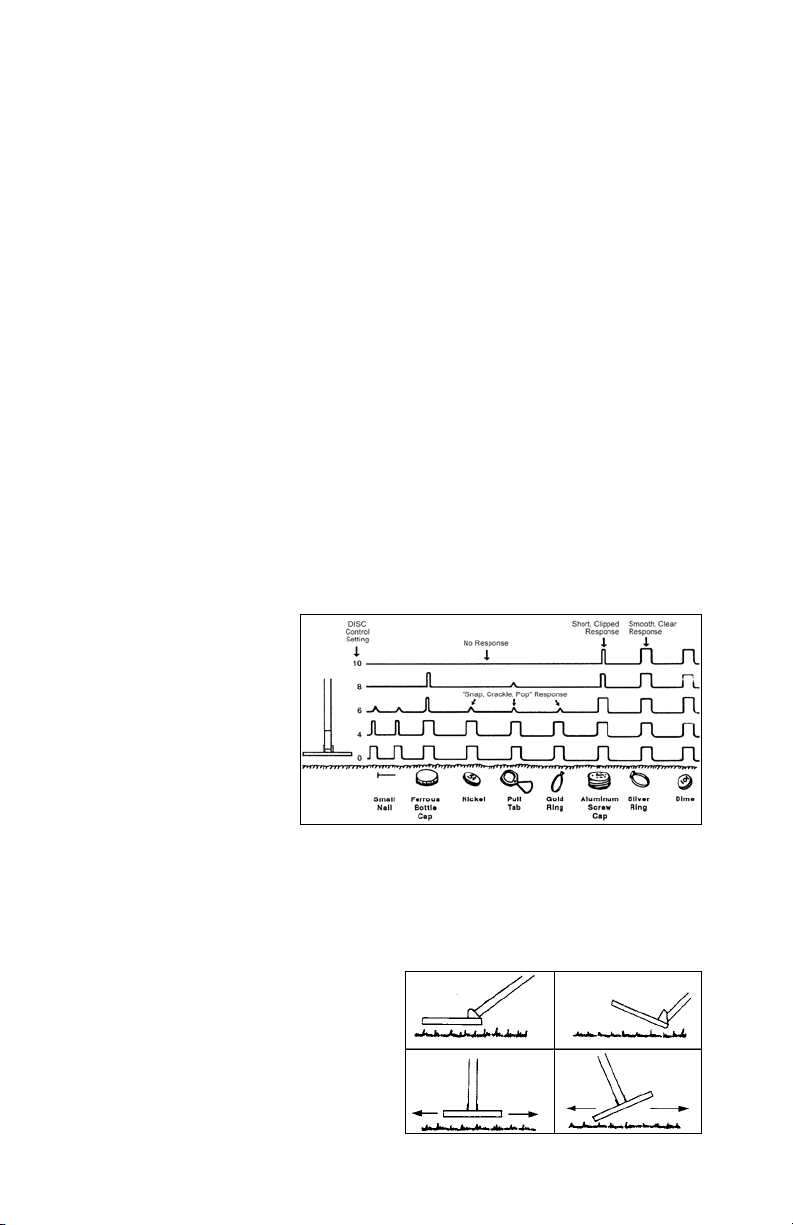
DISCRIMINATION POINTS
By adjusting the DISC control, you will be able to discriminate or reject small pieces of metallic
trash and ground minerals while detecting valuable targets. The lowest setting at which an object is
rejected is referred to as the objects discrimination point. These points are determined by such factors
as size, shape, depth, type of metal and ground mineralization.
1. Scatter some targets such as coins or small pieces of foil on the ground 1-2 feet apart (30-60cm).
2. Turn the DISC control ON, set it to 0 (zero) and set the SENS control to 8.
3. Hold the search coil about 2" (5cm) above and parallel to the ground. Move it slowly over the
samples. You will hear sharp, loud responses as you pass over each one. NOTE: The MD700 is a
motion-type detector. Therefore, motion of the coil is required to get a response.
4. Increase the DISC control setting to 3 and pass over the targets again. Continue to repeat this
process for the remaining settings 4-10. You will notice that as the trash rejection level increases,
the unit will reject some targets and continue to respond to others. You have now determined the
discrimination points for the rejected objects. NOTE: The unit will remain silent when rejecting
some objects and snap, crackle and pop as others are rejected. This is a normal response indicating
that the discrimination circuitry is operating properly.
5. Large pieces of trash such as beer cans or jar lids may sound like good targets no matter what
you do. With a little practice,
however, you will be able to
discern between a large target
and a small coin-like object.
6. The illustration to the right
shows some of responses you
may expect at different levels
of discrimination. As the
DISC level increases, more
targets are progressively
eliminated, including some
good ones such as nickels
and gold rings.
SEARCH METHOD
Decide how much trash rejection you want to use. In relatively non-trashy soil, you may want to
search at DISC level 0 (the most sensitive setting to detect all metal targets within range). Once an
object is detected, increase the level for further identication. For trashy areas, search at a higher
DISC level.
1. Search slowly and systematically, sweeping
in a tight semicircle illustrated to the right.
Always overlap your sweeps at least 50%.
2. Keep the coil parallel and as close to the
ground as practical. If you're searching a lawn,
the coil can be set right on the grass.
3. Search in a methodical manner. Pay close at-
tention to where you're going and where you've
been.
ILLUSTRATION: Responses over 1" (2.5cm) deep targets with the search coil
sweeping 2"-3" (5.1-7.6cm) above the ground.
RIGHT WRONG

4
TI5.08-593ENG-REV1
4. Keep the search coil moving at a comfortable rate. NOTE: The MD700 is a motion-type detector.
Therefore, motion of the coil is required to get a response.
PINPOINTING TARGETS
Pinpointing takes practice! The more experience you have using the unit, the better, faster and
more accurate you will become.
1. Once a buried object is indicated with the unit by a beep response, simply place the coil lightly on
the ground away from the target area. Push and hold the PINPOINT button (at maximum sensitivity,
you may hear a faint tone that will disappear as soon as the coil is raised).
2. Raise the coil about 1/2" (1.3cm) and move it from side-to-side over the target area a few times.
Stop the search coil over the area where you received the loudest response.
3. Move the coil slowly forward and then straight back towards you a few times. Stop the coil over
the area where you received the loudest response.
4. Move the coil slowly side-to-side once more, zeroing-in on the loudest response area.
5. Stop the coil over this area and rest it on the ground.
6. Your target should be below the hot spot of the search coil, slightly below the center of the coil.
7. Slowly move the coil aside, keeping your eyes on the hot spot. Quickly mark the location with
your nger or digging tool.
8. For very strong signals, you may be able to improve your pinpointing accuracy by adding one or
more of the following steps:
a. Lift the coil until the signal is just barely heard.
b. Increase the discrimina-
tion level.
c. Rest the coil on the
ground and move it back
and forth very slowly.
9. For very weak signals, try
the following suggestions:
a. Move the coil closer to
the ground.
b. Decrease the discrimina-
tion level.
c. Speed up the sweep rate
slightly.
MINIMUM DEPTH:
• Very slow or very fast sweep speed
• Trash rejection level set at 10
• Highly mineralized soil
GOOD DEPTH:
• Moderate sweep speed
• Trash rejection level set at 5
• Moderate mineralized soil
MAXIMUM DEPTH:
• Moderate sweep speed
• Trash rejection level set at 10
• Non-mineralized soil
MISSED TARGET:
• Many targets well within the unit's
range will not be detected unless
you overlap you sweeps 50%.
MD700 LEADING PARTICULARS:
• Automatic, turn-on-and-go operation
• Silent, no-threshold operation
• VLF slow motion discrimination
• No-Motion Pinpointing
• Full-range discrimination control
• Stereo/mono headphone jack
• Patented double-derivative circuitry
• Shielded, electrostatic insulated search coil
8" (20.3cm)
• Only 3.1 lbs. (1.4kg)
• Cushioned arm rest and flexon grip
• Two 9V alkaline batteries
MD700 SPECIFICATIONS:
Frequency: VLF Search…5.5kHz; Audio Target
Response…495Hz
Operating Modes:
Search…VLF Slow Motion Discrimination;
Pinpoint…VLF All Metal No-Motion
Search Coil: Concentric, co-planar type w/100%
electrostatic insulation, submersible and
interchangeable
Batteries: two 9V alkaline w/approx. 40-50 hours
of operation (more if used w/headphones)
Length: 52" (132.1cm) extended; 46" (116.8cm)
collapsed
Weight: 3.1 lbs. (1.4kg)
MD650A OPTIONAL CARRYING CASE:
Dimensions: 48" x 11" x 5"
(121.9cm x 27.9cm x 12.7cm);
Weight: 11.5 lbs. (5.2kg)
Popular Blower manuals by other brands


IPC Gansow
IPC Gansow 1250 quick guide

GreenWorks
GreenWorks 2401702 owner's manual

Bissell
Bissell BigGreen Commercial BG355 Original operating instructions

AGM
AGM ABV 2520 Original instruction manual

Shindaiwa
Shindaiwa EB254 Owner's/operator's manual

Nilfisk Egholm
Nilfisk Egholm City Ranger 2200 Operator's manual