Toro 30393 User manual

FormNo.3356-435RevA
DebrisBlower
forGroundsmaster®7200/7210TractionUnit
ModelNo.30393—SerialNo.270000001andUp
Registeratwww.Toro.com.OriginalInstructions(EN)

Introduction
Readthisinformationcarefullytolearnhowtooperate
andmaintainyourproductproperlyandtoavoidinjury
andproductdamage.Youareresponsibleforoperating
theproductproperlyandsafely.
YoumaycontactTorodirectlyatwww.Toro.comfor
productandaccessoryinformation,helpndinga
dealer,ortoregisteryourproduct.
Wheneveryouneedservice,genuineToroparts,
oradditionalinformation,contactanAuthorized
ServiceDealerorToroCustomerServiceandhave
themodelandserialnumbersofyourproductready.
Figure1identiesthelocationofthemodelandserial
numbersontheproduct.Writethenumbersinthe
spaceprovided.
Figure1
1.Modelandserialnumberlocation
ModelNo.
SerialNo.
Thismanualidentiespotentialhazardsandhas
safetymessagesidentiedbythesafetyalertsymbol
(Figure2),whichsignalsahazardthatmaycauseserious
injuryordeathifyoudonotfollowtherecommended
precautions.
Figure2
1.Safetyalertsymbol
Thismanualuses2otherwordstohighlightinformation.
Importantcallsattentiontospecialmechanical
informationandNoteemphasizesgeneralinformation
worthyofspecialattention.
Contents
Introduction.................................................................2
Safety...........................................................................3
BeforeOperating.................................................3
WhileOperating...................................................3
Maintenance.........................................................3
SafetyandInstructionalDecals.............................4
Setup............................................................................6
1MountingtheCastorWheel...............................6
2MountingtheDebrisBlowertotheTraction
Unit..................................................................6
3AdjustingtheLinkAssembly..............................8
4GreasetheBlower.............................................8
5InstallFrontWeight...........................................8
Operation...................................................................11
AdjustDischargeOpening..................................11
SwitchOperation...............................................11
OperatingTips...................................................11
Maintenance...............................................................13
Lubrication.........................................................13
BearingAlignment..............................................13
TorquingFasteners.............................................14
ServicingtheCastorArmBushings.....................14
ServicingtheCastorWheelsandBearings............15
©2007—TheToro®Company
8111LyndaleAvenueSouth
Bloomington,MN554202
Contactusatwww.Toro.com.
PrintedintheUSA.
AllRightsReserved

Safety
Hazardcontrolandaccidentpreventionare
dependentupontheawareness,concern,and
propertrainingofthepersonnelinvolvedinthe
operation,transport,maintenance,andstorageof
themachine.Improperuseormaintenanceofthe
machinecanresultininjuryordeath.Toreduce
thepotentialforinjuryordeath,complywiththe
followingsafetyinstructions.
BeforeOperating
•ReadandunderstandthecontentsofthisOperator’s
Manualbeforeoperatingthemachine.Become
familiarwithallofthecontrolsandknowhowto
stopquickly.Afreereplacementmanualisavailable
bysendingthecompleteModelandSerialNumber
toTheToro®Company,8111LyndaleAvenue
South,Bloomington,Minnesota55420-1196.
•Neverallowchildrentooperatethemachine.Do
notallowadultstooperatemachinewithoutproper
instruction.Onlytrainedoperatorswhohaveread
thismanualshouldoperatethismachine.
•Neveroperatethemachinewhenundertheinuence
ofdrugsoralcohol.
•Keepallbystandersawayfromtheoperatingarea.
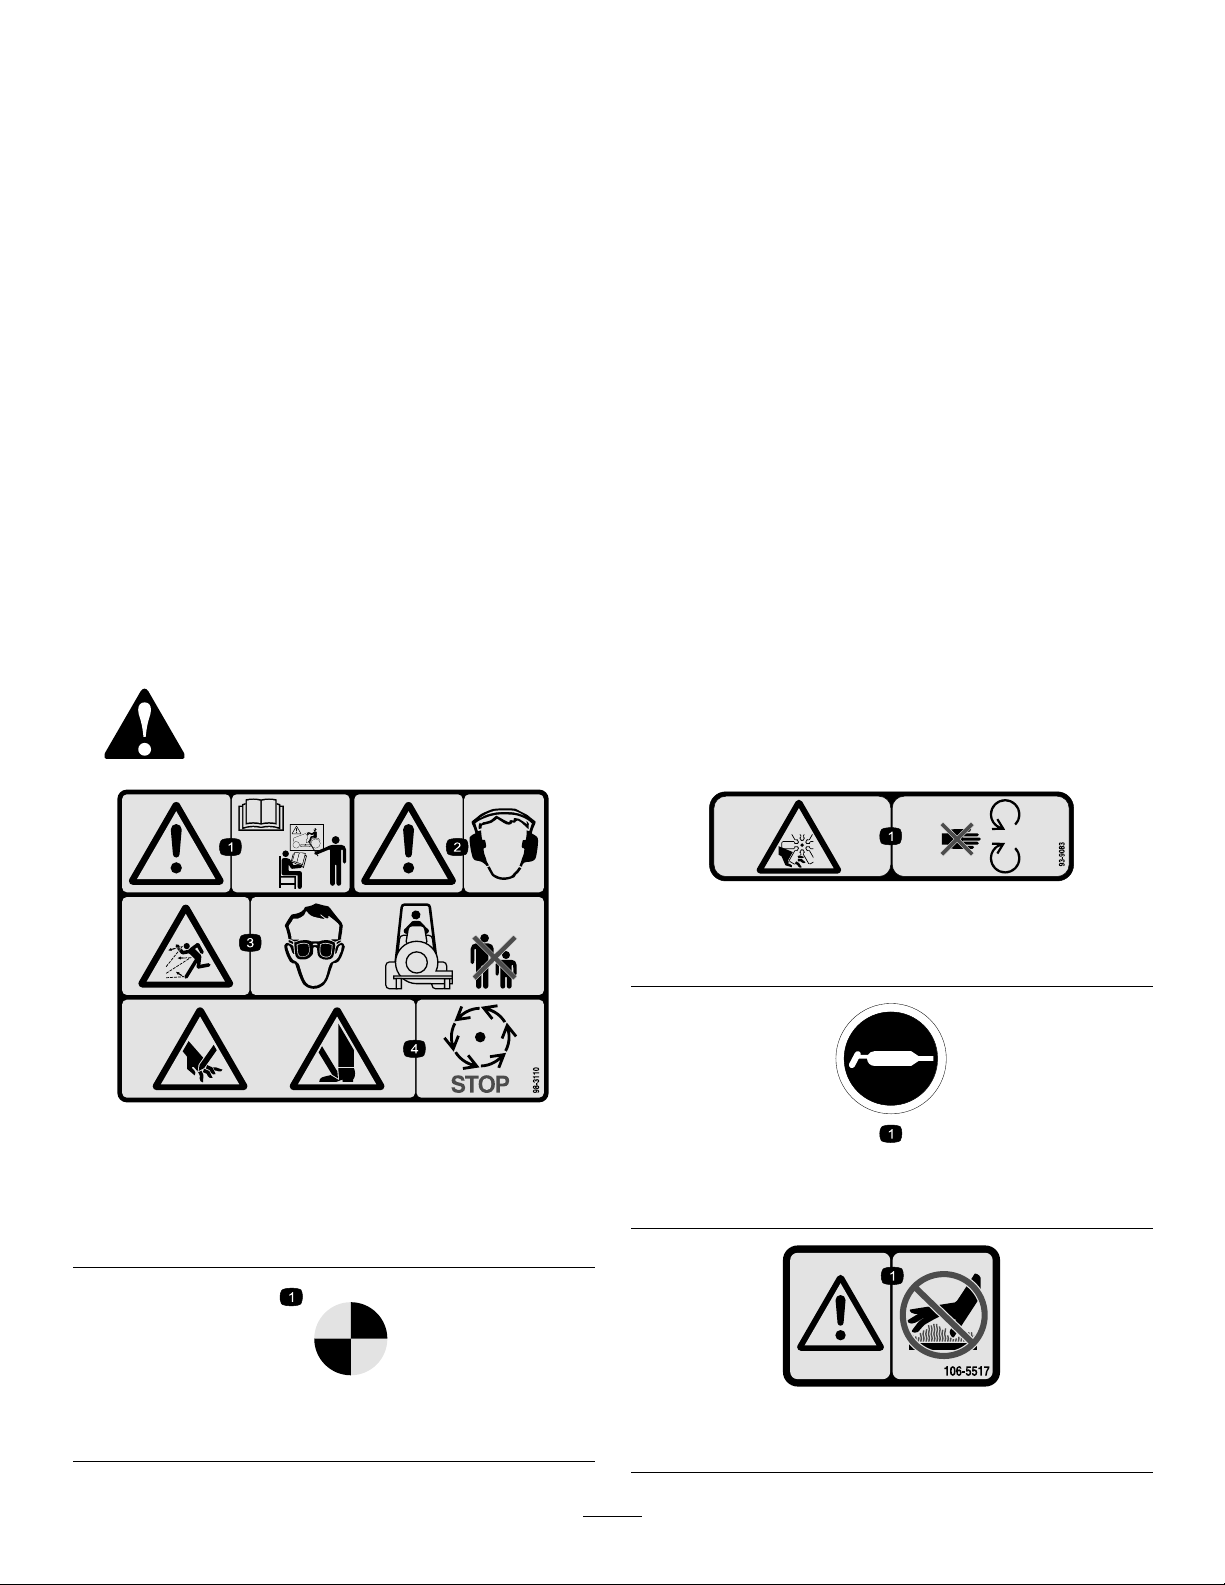
•Keepallshieldsandsafetydevicesinplace.Ifa
shield,safetydevice,ordecalisillegibleordamaged,
repairorreplaceitbeforeoperationiscommenced.
Alsotightenanyloosenuts,bolts,andscrews
toensurethatthemachineisinsafeoperating
condition.
•Donotoperatethemachinewhilewearingsandals,
tennisshoes,sneakers,orshorts.Also,donot
wearloosettingclothingwhichcouldgetcaught
inmovingparts.Alwayswearlongpantsand
substantialshoes.Wearingsafetyglasses,safety
shoes,andahelmetisadvisableandrequiredby
somelocalordinancesandinsuranceregulations.
WhileOperating
•Donotruntheengineinaconnedareawithout
adequateventilation.Exhaustfumesarehazardous
andcouldpossiblybedeadly.
•Themaximumseatingcapacityisoneperson.Never
carrypassengers.
•Sitontheseatwhenstartingtheengineandoperating
themachine.
•Thisproductmayexceednoiselevelsof90dB(A)
attheoperatorposition.Hearingprotectionis
recommendedforprolongedexposuretoreducethe
potentialofpermanenthearingdamage.
•Usingthemachinedemandsattention.Toprevent
lossofcontrol:
–Operateonlyindaylightorwhenthereisgood
articiallight.
–Driveslowlyandwatchforholesorotherhidden
hazards.
–Donotdriveclosetoasandtrap,ditch,creek,or
otherhazard.
–Reduceyourspeedwhenmakingsharpturnsand
whenturningonhillsides.
–Avoidsuddenstartsandstops.
–Beforebackingup,looktotherearandensure
thatnooneisbehindthemachine.
–Watchoutfortrafcwhennearorcrossing
roads.Alwaysyieldtheright-of-way.
•Stayawayfromthedischargeopeningwhenthe
machineisoperating.Keepallbystandersawayfrom
thedischargeopeninganddon’tdirectdischarge
towardbystanders.
•Iftheenginestallsorthemachinelosesheadwayand
cannotmakeittothetopofaslope,donotturnthe
machinearound.Alwaysbackslowlystraightdown
theslope.
•Donottakeaninjuryrisk!Whenapersonorpet
appearsunexpectedlyinorneartheoperatingarea,
stopoperation.Carelessoperation,combinedwith
terrainangles,ricochets,orimproperlypositioned
guardscanleadtothrownobjectinjuries.Donot
resumeoperationuntiltheareaiscleared.
•Donottouchtheengineormuferwhiletheengine
isrunningorsoonafteritisstopped.Theseareas
couldbehotenoughtocauseaburn.
Maintenance
•Removethekeyfromtheignitionswitchtoprevent
accidentalstartingoftheenginewhenservicing,
adjusting,orstoringthemachine.
•Performonlythosemaintenanceinstructions
describedinthismanual.Ifmajorrepairsare
everneededorassistanceisdesired,contactan
AuthorizedToroDistributor.
•Toreduceapotentialrehazard,keeptheenginefree
ofexcessivegrease,grass,leaves,andaccumulations
ofdirt.Neverwashawarmengineoranyelectrical
partswithwater.
3

•Besurethatthemachineisinsafeoperating
conditionbykeepingnuts,bolts,andscrewstight.
Checkthefanshaftbearingmountingboltsand
nutsfrequentlytobesurethattheyaretightenedto
specication.
•Makesurethatallhydrauliclineconnectorsare
tightandallhydraulichosesandlinesareingood
conditionbeforeapplyingpressuretothesystem.
•Keepyourbodyandhandsawayfrompinholeleaks
inhydrauliclinesthatejecthighpressurehydraulic
uid.Usecardboardorpapertondhydraulic
leaks.Hydraulicuidescapingunderpressurecan
penetrateskinandcauseinjury.Fluidaccidentally
injectedintotheskinmustbesurgicallyremoved
withinafewhoursbyadoctorfamiliarwiththis
formofinjuryorgangrenemayresult.
•Beforedisconnectingorperforminganyworkon
thehydraulicsystem,allpressureinthesystemmust
berelievedbystoppingtheengineandloweringthe
blowertotheground.
•Iftheenginemustberunningtoperforma
maintenanceadjustment,keephands,feet,clothing,
andotherpartsofthebodyawayfromthefanand
othermovingparts.
•Donotoverspeedtheenginebychangingthe
governorsettings.Tobesureofsafetyandaccuracy,
haveanAuthorizedToroDistributorcheckthe
maximumenginespeedwithatachometer.
•Theenginemustbeshutoffbeforecheckingtheoil
oraddingoiltothecrankcase.
•Toensureoptimumperformanceandsafety,always
purchasegenuineTororeplacementpartsand
accessoriestokeepthemachineallToro.Never
use“will-t”replacementpartsandaccessories
madebyothermanufacturers.LookfortheToro
logotoensuregenuineness.Usingunapproved
replacementpartsandaccessoriescouldvoidthe
warranty.
SafetyandInstructionalDecals
Safetydecalsandinstructionsareeasilyvisibletotheoperatorandarelocatednearanyareaof
potentialdanger.Replaceanydecalthatisdamagedorlost.
98-3110
1.Warning—readtheOperator’sManualandreceivetraining.
2.Warning—wearhearingprotection.
3.Thrownobjecthazard—weareyeprotectionandkeep
bystandersasafedistancefromthemachine.
4.Cuttinghazardofhandorfoot—waitformovingpartstostop.
98-3111
1.Pointofrotation
93-9083
1.Cutting/dismembermenthazard,fan—stayawayfrom
movingparts.
58-6520
1.Grease
106-5517
1.Warning—donottouchthehotsurface.
4

114-4054
1.Warning—readtheOperator’sManual,donotoperatethe
machinewithoutthecrosspininplace.
105-4593
1.Entanglementhazard,shaft—donotremovecoverwhile
partsaremoving,keepallguardsinplace.
5

Setup
LooseParts
Usethechartbelowtoverifythatallpartshavebeenshipped.
ProcedureDescriptionQty.Use
1Castorwheelassembly1Mountthecastorwheeltothedebris
blower
Debrisblowerassembly1
Lockingpin1
2Hairpincotter1
Mountthedebrisblowertothetraction
unit
3Nopartsrequired–Adjustthelinkassembly
4Nopartsrequired–Greasetheblower
MediaandAdditionalParts
DescriptionQty.Use
PartsCatalog1
Operator’sManual1Readbeforeoperating.
Note:Determinetheleftandrightsidesofthemachine
fromthenormaloperatingposition.
Note:Toinstallandoperatethedebrisblower,the
tractionunitmustbeequippedwiththeRearQuick
AttachSystem,Model30377andtheAuxiliaryHydraulic
PowerKit,Model30380.
1
MountingtheCastorWheel
Partsneededforthisprocedure:
1Castorwheelassembly
Procedure
1.Removethetensioningcapfromthecastorwheel
spindleshaft(Figure3).Slidethespacerandone
thrustwasheroffthespindleshaft.Leaveonethrust
washerontheshaft.
Figure3
1.Tensioningcap4.Blowerframecastortube
2.Spacer5.Castorwheel
3.Thrustwasher(2)
2.Pushthecastorspindleupthroughthebushings
intheblowerframe,insertanotherthrustwasher
ontotheshaft,slidethespacerontothespindleshaft
andinstallthetensioningcaptosecuretheassembly
(Figure3).
3.Makesurethecastorwheelassemblytireisinated
to35to50psi.
6

2
MountingtheDebrisBlowerto
theTractionUnit
Partsneededforthisprocedure:
1Debrisblowerassembly
1Lockingpin
1Hairpincotter
Procedure
1.Removeanyattachmentfromtherearofthe
machine.
2.Backthetractionunitintopositionbehindthe
attachmentadapter.
Note:Makesurethelockinglever(Figure4)is
pivotedtotheleft(unlockedposition)asviewed
fromtherearofthemachine.
G003810
1
2
Figure4
1.Attachmentadapter2.Lockinglever(locked
position)
3.Raisethetractionunitadapterintotheattachment
adapter.
4.Pivotthelockinglevertotherighttolockthe
adapterstogether.
5.Insertthelockingpinthroughtheadaptersand
securewithahairpincotter(Figure5).
1
G006618
Figure5
1.Lockingpin
6.Routethehosesthroughthehosesupportloop.
7.Removethedustplugsfromthehydrauliccouplers
andmakesurecouplersarefreeofanydirtor
contamination.
8.Connecttheattachmenthydraulichosecouplers
tothehydrauliccouplersonthetractionunitrear
auxiliaryhydraulicpowerkit.
Important:Wheneverthehydraulichose
couplersaredisconnected,makesurethedust
plugsarecleanedandtheninstalledtoprevent
contaminationfromenteringeitherhydraulic
system.
7

3
AdjustingtheLinkAssembly
NoPartsRequired
Procedure
1.Withthedebrisblowermountedandsecuredonthe
tractionunit,raisetheattachment.
2.Measurethegapbetweenthetopwasherandthe
spacerinthelinkassemblyontheattachment
adapterasshowninFigure6.
Note:Thegapbetweenthewasherandtheshoulder
shouldbe0.060to0.080inch
G00381 1
1
2
3
Figure6
1.0.060to0.080inchgap3.Adjustmentnut
2.Jamnut
4
GreasetheBlower
NoPartsRequired
Procedure
BeforetheDebrisBlowerisoperated,itmustbegreased
toassureproperlubrication.RefertoLubrication
sectionofmanual.Failuretoproperlygreasetheunit
willresultinprematurefailureofcriticalparts.
5
InstallFrontWeight
NoPartsRequired
Procedure
Whenanattachmentisnotinstalledonthe
machine,looseweightsmustberemoved.
Neveroperatethemachinewithnoattachment
installedandfrontweightsonthemachine
Usethefollowingweightchartstodeterminethecorrect
amountoffrontweightrequiredforyourmachine.
8

GM7200 & GM7210 with NO Additional Weight
Hard Canopy (model 30359) Fr ont Weight Part Weight
Models 30360, 30361, 30363, & 30364 Requir ed Number Description Qty
Rear QAS and no attachment 0 lb. n/a
(Model 30377)
QAS Finish Grader (Box Rake) 0 lb. n/a
(Model 08754)
Steel Drag Mat 0 lb. n/a
(Model 08757)
Tooth Rake 0 lb. n/a
(Model 08751)
Tooth Rake With Spring Rake 0 lb. n/ a
(Model 08752)
Coco Drag Mat 67 lb. 114-4090 &Front Weight Bracket &1
(Model 08758) 114-4096 42 lb. front Weight 1
QAS Nail Drag 67 lb. 114-4090 &Front Weight Bracket &1
(Model 08761) 114-4096 42 lb. front Weight 1
QAS Debris Blower 109 lb. 114-4090 &Front Weight Bracket &1
(Model 08759) 114-4096 42 lb. front Weight 2
Rahn Groomer 109 lb. 114-4090 &Front Weight Bracket &1
(Allied Product) 114-4096 42 lb. front Weight 2
72" width of cut
GM7200 & GM7210 with Additional Weight
Hard Canopy (model 30359) Fr ont Weight Part Weight
Models 30360, 30361, 30363, & 30364 Requir ed Number Description Qty
Rear QAS and no attachment 0 lb.
(Model 30377)
QAS Finish Grader (Box Rake) 25 lb. 114-4090 O R Front Weight Bracket O R 1
(Model 08754) Model 30374 Jack Stand Kit 1
Steel Drag Mat 25 lb. 114-4090 O R Front Weight Bracket O R 1
(Model 08757) Model 30374 Jack Stand Kit 1
Tooth Rake 25 lb. 114-4090 O R Front Weight Bracket O R 1
(Model 08751) Model 30374 Jack Stand Kit 1
Tooth Rake With Spring Rake 25 lb. 114-4090 O R Front Weight Bracket O R 1
(Model 08752) Model 30374 Jack Stand Kit 1
Coco Drag Mat 109 lb. 114-4090 &Front Weight Bracket &1
(Model 08758) 114-4096 42 lb. front Weight 2
QAS Nail Drag 109 lb. 114-4090 &Front Weight Bracket &1
(Model 08761) 114-4096 42 lb. front Weight 2
QAS Debris Blower 151 lb. 114-4090 &Front Weight Bracket &1
(Model 08759) 114-4096 42 lb. front Weight 3
Rahn Groomer 151 lb. 114-4090 &Front Weight Bracket &1
(Allied Product) 114-4096 42 lb. front Weight 3
G006619
72" width of cut
Figure7
9

62" width of cut
GM7200 & GM7210 with NO Additional Weight
Hard Canopy (model 30359) Fr ont Weight Part Weight
Models 30362 & 30365 Requir ed Number Description Qty
Rear QAS and no attachment 67 lb. 114-4090 &Front Weight Bracket &1
(Model 30377) 114-4096 42 lb. front Weight 1
QAS Finish Grader (Box Rake) 151 lb. 114-4090 &Front Weight Bracket &1
(Model 08754) 114-4096 42 lb. front Weight 3
Steel Drag Mat 151 lb. 114-4090 &Front Weight Bracket &1
(Model 08757) 114-4096 42 lb. front Weight 3
Tooth Rake 109 lb. 114-4090 &Front Weight Bracket &1
(Model 08751) 114-4096 42 lb. front Weight 2
Tooth Rake With Spring Rake 151 lb. 114-4090 &Front Weight Bracket &1
(Model 08752) 114-4096 42 lb. front Weight 3
Coco Drag Mat 151 lb. 114-4090 &Front Weight Bracket &1
(Model 08758) 114-4096 42 lb. front Weight 3
QAS Nail Drag 151 lb. 114-4090 &Front Weight Bracket &1
(Model 08761) 114-4096 42 lb. front Weight 3
QAS Debris Blower 151 lb. 114-4090 &Front Weight Bracket &1
(Model 08759) 114-4096 42 lb. front Weight 3
Rahn Groomer 151 lb. 114-4090 &Front Weight Bracket &1
(Allied Product) 114-4096 42 lb. front Weight 3
62" width of cut
GM7200 & GM7210 with Additional Weight
Hard Canopy (model 30359) Fr ont Weight Part Weight
Models 30362 & 30365 Requir ed Number Description Qty
Rear QAS and no attachment 109 lb. 114-4090 &Front Weight Bracket &1
(Model 30377) 114-4096 42 lb. front Weight 2
QAS Finish Grader (Box Rake) 193 lb. 114-4090 &Front Weight Bracket &1
(Model 08754) 114-4096 42 lb. front Weight 3
Steel Drag Mat 193 lb. 114-4090 &Front Weight Bracket &1
(Model 08757) 114-4096 42 lb. front Weight 4
Tooth Rake 151 lb. 114-4090 &Front Weight Bracket &1
(Model 08751) 114-4096 42 lb. front Weight 3
Tooth Rake With Spring Rake 193 lb. 114-4090 &Front Weight Bracket &1
(Model 08752) 114-4096 42 lb. front Weight 4
Coco Drag Mat 193 lb. 114-4090 &Front Weight Bracket &1
(Model 08758) 114-4096 42 lb. front Weight 4
QAS Nail Drag 193 lb. 114-4090 &Front Weight Bracket &1
(Model 08761) 114-4096 42 lb. front Weight 4
QAS Debris Blower 193 lb. 114-4090 &Front Weight Bracket &1
(Model 08759) 114-4096 42 lb. front Weight 4
Rahn Groomer 193 lb. 114-4090 &Front Weight Bracket &1
(Allied Product) 114-4096 42 lb. front Weight 4
G006620
Figure8
10

Operation
AdjustDischargeOpening
Thedischargeopening(Figure9)isadjustabletodirect
theairowfromtheblower.
1.Loosendischargeopeningdeectormounting
screws(Figure9).
G003812
1
2
Figure9
1.Dischargeopening
deector
2.Mountingscrew
2.Pivotdeectortodesiredopening.
3.Tightenmountingscrews.
SwitchOperation
Lift/LowerSwitch(Figure10)—MoveswitchtoLift
toraiseattachmentandtoLowertolowerattachment.
Float/PowerDownSwitch(Figure10)—Movingthe
switchtoFloatallowstheattachmenttofollowthe
contouroftheground.MovingtheswitchtoPower
Downwilladdweightfromthemachinetoincrease
groundengagementforce.Highergroundengagement
forcewilldecreasethetractioncapacityofthemachine.
Important:Onlyrunthedebrisblowerinthe
FLOATmode.NeverruninthePowerDown
modeordamagetotheblowerwilloccur.
Figure10
1.Float3.Lift/Lower
2.Powerdown
OperatingTips
Dischargedairhasconsiderableforceandcould
causeinjuryorlossoffooting.
•Stayawayfromdischargeopeningwhen
machineisoperating.
•Keepbystandersawayfromdischarge
openingwhenmachineisrunning.
•Practiceblowingmaterial.Itisadvisabletoblow
thesamedirectionthewindisblowingtoprevent
materialfromblowingbackintotheclearedarea.
•Donotclimbcurbswiththedebrisblowermounted
tothemachine.Alwaysndaramp.
Note:Iftheattachmentadapterbecomesstucktothe
tractionunitadapter,insertaprybar/screwdriverinto
thepryslottodisengagetheparts(Figure11).
11

G003783
1
Figure11
1.Pryslot
12

Maintenance
Lubrication
Thedebrisblowerhasbearingsandbushingsthatmust
belubricatedregularly..Ifthemachineisoperated
undernormalconditions,lubricatebearingswithNo.2
generalpurposelithiumbasegreaseafterevery8hours
ofoperationordaily,whichevercomesrst.Lubricate
ttingsimmediatelyaftereverywashing,regardlessof
theintervallisted.
Thelubricationpointsandquantitiesareasfollows:
Fanshaft–2(Figure12)
G003730
Figure12
Castorarmtube(Figure13)
Castorwheel(Figure13)
Figure13
GreasingtheAttachmentAdapter
Ifthelockingleverontheattachmentadapterdoesnot
pivotfreelyandeasily,applyalightcoatofgreasetothe
areashowninFigure14.
G003731
Figure14
BearingAlignment
Ifthemotormountingbracketsareeverremoved,they
mustbere–alignedbeforethedebrisblowerisoperated.
RefertothePartCatalogfortheAlignmentToolpart
number.
1.Makesurethemountingbracketsareinstalledtothe
blowerhousingbutcapscrewsandnutsareloose
(Figure15).
G003814
1 2 2 3
Figure15
1.Alignmenttool3.Fancoupler
2.Mountingbracket
2.Insertthebearingalignmenttoolthroughthe
mountingbracketsandintothefancoupler
(Figure15).Makesurethespidercoupler(Figure16)
isnotinthecoupler.
13

G003815
1
4
2
3
Figure16
1.Motorcoupler3.Setscrew(2each)
2.Fancoupler4.Couplerspider
3.Tightenthecapscrewsandnutssecuringthe
mountingbracketstogetherandtotheblower
housing.
4.Removethealignmenttoolandnishassembly.
TorquingFasteners
Ifthebloweriseverdisassembled,thefollowing
fastenersmustbetorquedasspecied.Also,apply
Loctite242tothethreadsbeforeinstalling.
•Thesetscrewssecuringthemotorandfanshaft
couplers(Figure16)mustbetorquedto58to82
in–lb.
•Thefanshaftbearingsetscrews(Figure17)mustbe
torquedto58to82in–lb.
G003816 1
Figure17
1.Setscrew
•Thefanmountingnut(Figure18)mustbetorqued
to500ft–lb.
G003817
1
Figure18
1.Fanmountingnut
ServicingtheCastorArm
Bushings
Thecastorarmshavebushingspressedintothetopand
bottomofthetubeandaftermanyhoursofoperation,
thebushingswillwear.Tocheckthebushings,movethe
castorforkbackandforthandfromsidetoside.Ifthe
castorspindleislooseinsidethebushings,thebushings
arewornandmustbereplaced.
14

1.Raisethedebrisblowersothatthewheelsareoff
oftheoor.Blocktheblowersothatitcannot
accidentallyfall.
2.Removethetensioningcap,spacer,andthrust
washerfromthetopofthecastorspindle.
3.Pullthecastorspindleoutofthemountingtube.
Allowthethrustwasherandspacertoremainonthe
bottomofthespindle.
4.Insertapinpunchintothetoporbottomofthe
mountingtubeanddrivethebushingoutofthetube
(Figure19).Alsodrivetheotherbushingoutofthe
tube.Cleantheinsideofthetubestoremovedirt.
Figure19
1.Bushings2.Castorarmtube
5.Applygreasetotheinsideandoutsideofthenew
bushings.Usingahammerandatplate,drivethe
bushingsintothemountingtube.
6.Inspectthecastorspindleforwearandreplaceitif
itisdamaged.
7.Pushthecastorspindlethroughthebushingsand
mountingtube.Slidethethrustwasherandspacer
ontothespindle.Installthetensioningcaponthe
castorspindletoretainallpartsinplace.
ServicingtheCastorWheels
andBearings
1.Removethelocknutfromtheboltholdingthecastor
wheelassemblyandwashersbetweenthecastorfork
(Figure20).Graspthecastorwheelandslidethe
boltoutofthefork.Removethetirespannerfrom
insidethewheelassembly.
Figure20
1.Locknut4.Castorfork
2.Washer5.Castorwheel
3.Tirespanner6.Bolt
2.Removeoneoftheouterbearingsfromthe
wheelhubandallowtheinnerbearingtofallout
(Figure21).Removethebearingfromtheopposite
sideofthewheelhub.
Figure21
1.Bearing(outer)3.Bearing(inner)
2.Wheelassembly
3.Checkthebearings(innerandouter),tirespanner,
andinsideofthewheelhubforwear.Replaceany
damagedparts.
4.Toassemblethecastorwheel,pushaouterbearing
intothewheelhub.Wheninstallingthebearings,
pressontheouterraceofthebearing.
5.Slidetheinnerbearingintothewheelhub.Pushthe
otherbearingintotheopenendofthewheelhubto
captivatethebearingspacerinsidethewheelhub.
6.Insertthetirespannerintothewheelassembly.
7.Installthecastorwheelassemblyandwashers
betweenthecastorforkandsecureitinplacewith
theboltandlocknut.
15

The Toro General Commercial Products Warranty
A Two-Year Limited Warranty
Conditions and Products Covered
The Toro Company and its affiliate, Toro Warranty Company,
pursuant to an agreement between them, jointly warrant your Toro
Commercial Product (“Product”) to be free from defects in
materials or workmanship for two years or 1500 operational
hours*, whichever occurs first. Where a warrantable condition
exists, we will repair the Product at no cost to you including
diagnosis, labor, parts, and transportation. This warranty begins
on the date the Product is delivered to the original retail purchaser.
* Product equipped with hour meter
Instructions for Obtaining Warranty Service
You are responsible for notifying the Commercial Products
Distributor or Authorized Commercial Products Dealer from whom
you purchased the Product as soon as you believe a warrantable
condition exists.
If you need help locating a Commercial Products Distributor or
Authorized Dealer, or if you have questions regarding your
warranty rights or responsibilities, you may contact us at:
Toro Commercial Products Service Department
Toro Warranty Company
8111 Lyndale Avenue South
Bloomington, MN 55420-1196
952-888-8801 or 800-982-2740
E-mail: [email protected]
Owner Responsibilities
As the Product owner, you are responsible for required mainte-
nance and adjustments stated in your operator’s manual. Failure
to perform required maintenance and adjustments can be grounds
for disallowing a warranty claim.
Items and Conditions Not Covered
Not all product failures or malfunctions that occur during the
warranty period are defects in materials or workmanship. This
express warranty does not cover the following:
•Product failures which result from the use of non-Toro
replacement parts, or from installation and use of add-on,
modified, or unapproved accessories
•Product failures which result from failure to perform required
maintenance and/or adjustments
•Product failures which result from operating the Product in an
abusive, negligent or reckless manner
•Parts subject to consumption through use unless found to be
defective. Examples of parts which are consumed, or used up,
during normal Product operation include, but are not limited to,
blades, reels, bedknives, tines, spark plugs, castor wheels,
tires, filters, belts, and certain sprayer components such as
diaphragms, nozzles, and check valves, etc.
•Failures caused by outside influence. Items considered to be
outside influence include, but are not limited to, weather,
storage practices, contamination, use of unapproved coolants,
lubricants, additives, or chemicals, etc.
•Normal “wear and tear” items. Normal “wear and tear” includes,
but is not limited to, damage to seats due to wear or abrasion,
worn painted surfaces, scratched decals or windows, etc.
Parts
Parts scheduled for replacement as required maintenance are
warranted for the period of time up to the scheduled replacement
time for that part.
Parts replaced under this warranty become the property of Toro.
Toro will make the final decision whether to repair any existing part
or assembly or replace it. Toro may use factory remanufactured
parts rather than new parts for some warranty repairs.
General Conditions
Repair by an Authorized Toro Distributor or Dealer is your sole
remedy under this warranty.
Neither The Toro Company nor Toro Warranty Company is
liable for indirect, incidental or consequential damages in
connection with the use of the Toro Products covered by this
warranty, including any cost or expense of providing substi-
tute equipment or service during reasonable periods of
malfunction or non-use pending completion of repairs under
this warranty. Except for the Emissions warranty referenced
below, if applicable, there is no other express warranty. All
implied warranties of merchantability and fitness for use are
limited to the duration of this express warranty.
Some states do not allow exclusions of incidental or consequential
damages, or limitations on how long an implied warranty lasts, so
the above exclusions and limitations may not apply to you.
This warranty gives you specific legal rights, and you may also
have other rights which vary from state to state.
Note regarding engine warranty: The Emissions Control System
on your Product may be covered by a separate warranty meeting
requirements established by the U.S. Environmental Protection
Agency (EPA) and/or the California Air Resources Board (CARB).
The hour limitations set forth above do not apply to the Emissions
Control System Warranty. Refer to the Engine Emission Control
Warranty Statement printed in your operator’s manual or con-
tained in the engine manufacturer’s documentation for details.
Countries Other than the United States or Canada
Customers who have purchased Toro products exported from the United States or Canada should contact their Toro Distributor (Dealer)
to obtain guarantee policies for your country, province, or state. If for any reason you are dissatisfied with your Distributor’s service or
have difficulty obtaining guarantee information, contact the Toro importer. If all other remedies fail, you may contact us at Toro Warranty
Company.
Part No. 374-0031 Rev. C
Other manuals for 30393
1
Table of contents
Other Toro Blower manuals

Toro
Toro 51521 User manual

Toro
Toro UltraPlus 51621 User manual

Toro
Toro 319000001 User manual

Toro
Toro Super 325 User manual

Toro
Toro 51593 User manual

Toro
Toro 78551 User manual

Toro
Toro 44536 User manual

Toro
Toro 51619 User manual

Toro
Toro Flex-Force Power System 51822 User manual

Toro
Toro QuieTech 51568 User manual

Toro
Toro Power Sweep 51586 User manual

Toro
Toro 30506 User manual

Toro
Toro 850 Super Blower/Vac User manual

Toro
Toro Superblower 51591 User manual

Toro
Toro Rake and Vac 51617 User manual

Toro
Toro 51821 User manual

Toro
Toro 51690 User manual

Toro
Toro 51594 User manual

Toro
Toro 51619 User manual

Toro
Toro QuieTech 51589 User manual