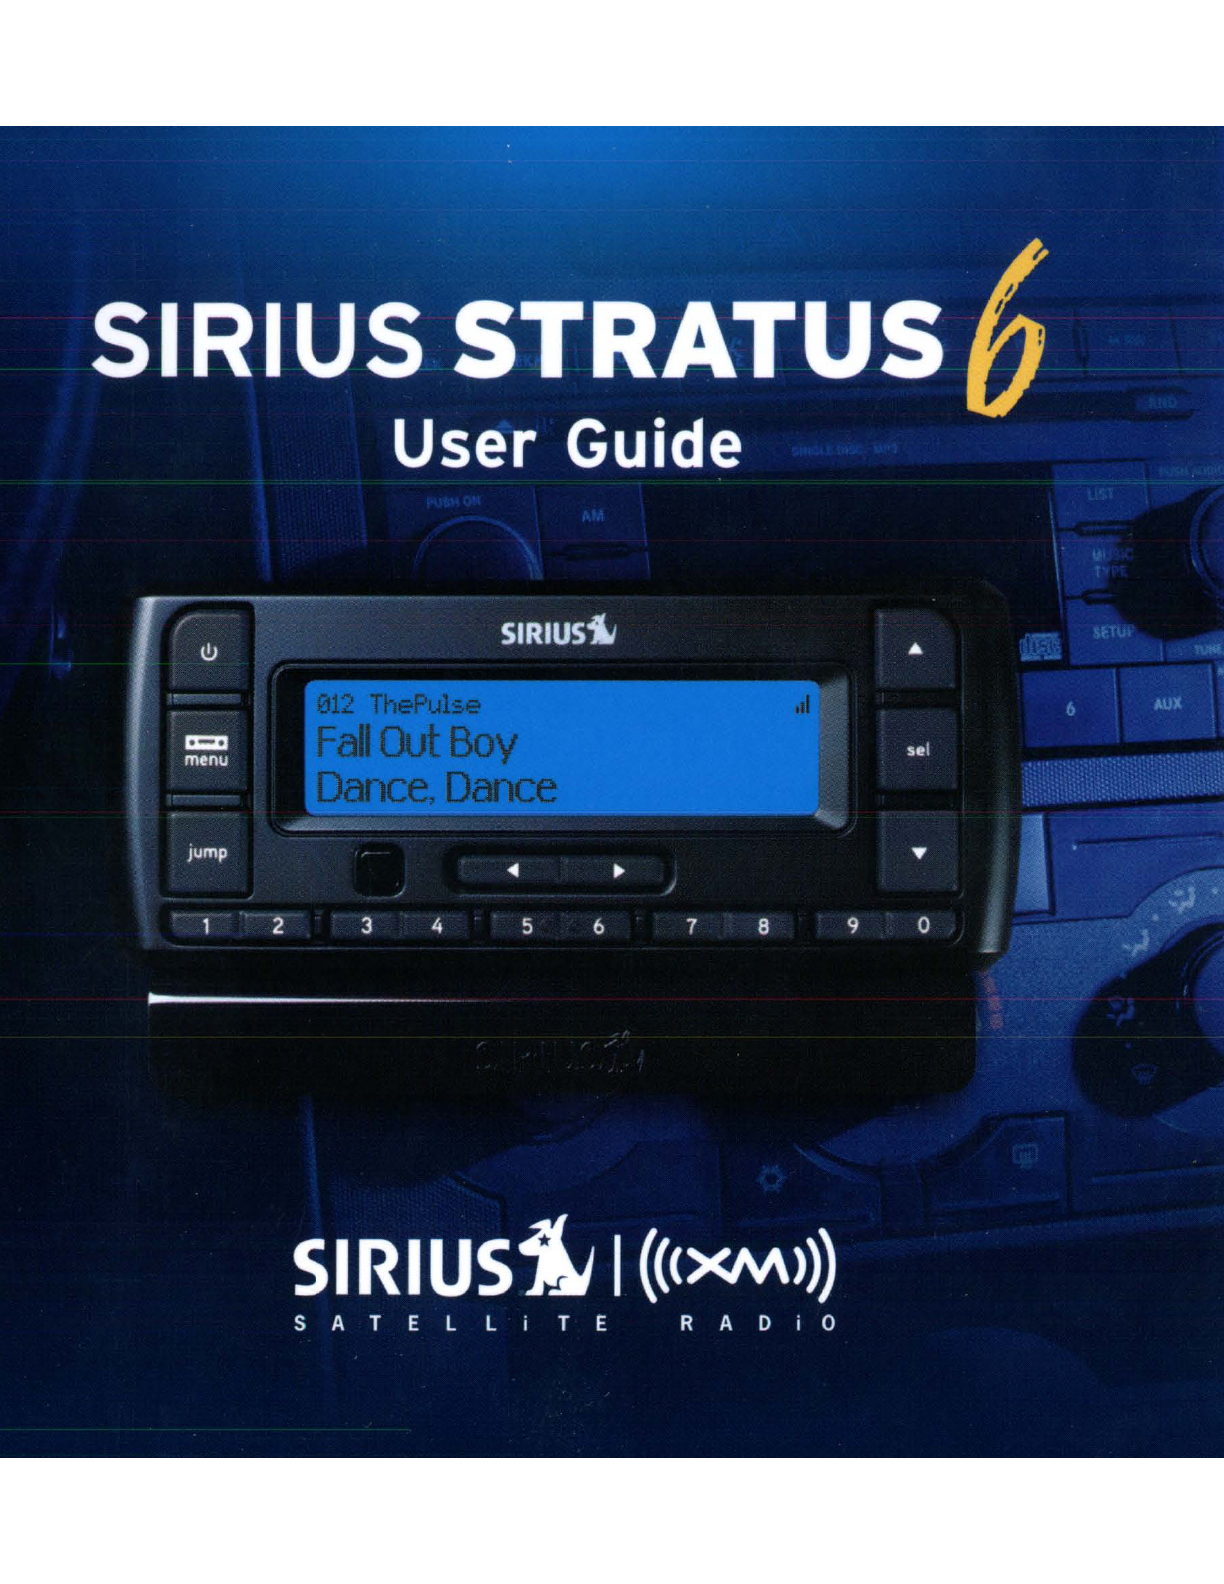
Sirius XM RAdio Stratus 6 User manual

Introduction 5
~<
6
Features .
Sft"a
..
..J
r_~_
1
..
"
"':__
"'7
t
a e y
IIU
'vcle
IIIIVI
"IClIVI
••••••••••••
What's in
the
Box? 9
Stratus 6Functions
10
PowerConnect Vehicle Dock
11
Vehicle Installation
13
Step
1:
Choose aLocation
for
Your
Radio
14
Step 2: Install
the
Vent or
Dash
Mount.
16
Step 3: Mount
the
Magnetic Mount
Antenna
20
Step 4: Route
the
Magnetic Mount
Antenna Cable 27
Step 5: Connect
the
Magnetic Mount
Antenna and
PowerConnect
Power
Adapter 39
Activation
53
Using
Your Stratus 6
57
The
Main Display
58
My
Channels 59
Navigation Basics
60
Listening
to
Satellite Radio 62
FM
Presets
66
Special Features
67
Parental Lock
68
Where
Else
Can
You
Use
Your
stratus 61
71
Configuring
Your
Stratus 6
73
Sirius ID 74
Find Available
FM
Channels in Your
Area
75
Turn
FM
Transmitter On/Off 78
Set and Select
an
FM
Channel. 79
Jump
Settings
81
Display
82
Audio Level.
84
Signal
85
Factory Default
86
Product Specifications
91
Patent Information 93
Environmental Information 93
Owner's Record
96


Introduction
. •
",.
<'
.-
••
'.
,
Features
Congratulations, on
your
purchase of
the
Stratus
6!
The Stratus 6has these exciting features to enhance your overall experience:
•Easy to read blue display: View
artist
name, song
title,
and channel
information on an easy to read display.
• A
La
Carte programming capability: Make individual channel selection.
•Channel guide: View your individual channel lineup by category.
•Improved audio connection options:
Use
either
the included Aux
In
Cable,
or
the new PowerConnect technology
to
listen to the audio through
your
vehicle's stereo system.
•Favorite channel presets:
Save
and enjoy fast access to
up
to
10
of
your
favorite channels.
•
FM
preset button: Store and quickly access FM channels
that
give you the
best audio reception when using PowerConnect.
•One-Touch
JumpTM:
Directly access traffic and weather of
the
20
most
congested cities.
•Parental controls: Easily lock
and
unlock channels with mature content.
Please read
the
entire
User Guide before
using
your
Stratus
6!

Safety
and
Care Information
IMPORTANT! Always read and understand all the instructions to avoid
injury to yourseif and/or damage to your device. SIRIUS I
XM
Radio Inc.
disclaims all responsibility for damage from data loss due to breakdown,
repair, or other causes.
•
Do
not expose
to
extreme temperatures (above
140·F
or below -4·F, or
above
60·C
or
below -20·C).
•
Do
not expose to moisture.
Do
not use device near or
in
water.
•
Do
not let any foreign
matter
spill into device.
•
Do
not store
in
dusty areas.
•
Do
not expose
to
chemicals such
as
benzene and thinners.
Do
not use
liquid or aerosol cleaners. Clean with asoft damp cloth only.
•
Do
not expose to direct sunlight for aprolonged period of time, and
do
not expose
to
fire, flame, or other heat sources.
•
Do
not
try
to
disassemble and/or repair device yourself.
•
Do
not drop your device or subject
it
to
severe impact.
•
Do
not place heavy objects
on
device.
•
Do
not subject device
to
excessive pressure.
•
If
the
LCD
screen
is
damaged, do not touch the liquid crystal fluid.
Introduction
WARNING!
,.,.,
•Opening the case may result
in
electric
shock.
•
If
the
liquid crystal fluid comes in contact with your skin, wipe the skin area
with acloth and then wash
the
skin thoroughly
with
soap and running water.
If the liquid crystal fluid comes into contact with your eyes, flush
the
eyes
with clean water for
at
least
15
minutes and seek medical care. If
the
liquid
crystal fluid is ingested, flush your mouth
thoroughly
with water. Drink large
quantities
of
water, and induce vomiting. Seek medical care.
•Make sure
that
you
insert
the
PowerConnect
Power Adapter all the way into
the
vehicle's cigarette lighter
or
power adapter socket.
•
Do
not insert several devices into the same power socket.
•
Use
the
PowerConnect
Power Adapter and Vehicle Dock away from water
sources to avoid fire
or
electric shock.
•
Do
not touch the device with wet hands.
•
When
using
this
product,
it
is always
important
to
keep your eyes
on
the
road and hands
on
the wheel. Not doing
so
cou
Id
result in personal injury,
death, and/or damage
to
your device, accessories, and/or to your vehicle or
other property. ,
•This product contains chemicals known to the
State
of California
to
cause
cancer and
birth
defects
or
other
reproductive harm.
•Vehicle installation and radio configuration functions should not
be
performed
while driving. Park your vehicle
in
asafe location before beginning installation.
Your device should
be
placed in your vehicle where
it
will not interfere with
the
function of safety features,
e.g.,
deployment
of
airbags. Failure
to
correctly
place
device may result in injury to you
or
others,
if
the
unit
becomes detached during
an
accident and/or obstructs
the
deployment
of
an
airbag.

Vent Mount
and Extended
Vent Clamps
Alcohol
Prep
Pad
PowerConnect Vehicle Dock
00
11'
f"I
fu
I
I
I
SIRIUS~
Dash Mount
e
Magnetic Mount Antenna Screws Antenna &Dash Mount
and Rubber Tail Alcohol Preparation Pads
Aux
In
Cable
stratus
6Radio
PowerConnect
Power Ada
pter
What's
in
the Box?

Stratus 6Functions
Power
Button
Turn radio on and
off.
\
\
FM
/Menu
Button
FM: Press
to
access and
cycle
through
FM
presets.
Menu: Press and hold
to
access advanced
features
and
configuration
options;
also
when in
configuration
options,
press and hold
to
return
to
main
display screen.
Up and Down
Arrows
Scroll
through
lists
and
preview channels; also
highlight
menu
options.
/ I I
Select
Button
Press
to
confirm
selection
for
channel
+---+_
and menu
items;
also
press
first
before
entering
the
channel
number,
to
directly
tune
to
achannel.
Press and hold
to
go
back
to
the
previous
channel
to
which
you
were listening.
Number
Buttons
Select
your
favorite
channels; also
enter
achannel number.
Left
and
Right
Arrows
Search
for
channels by
category.
jump
r+-
/
SIRIUSf.J
:
Illr-:r::==================~l
menu l
\ X II2I I 3I4I I 5
1\
6II7I8I
1'\
9I
oJ}
/'
Jump
Directly
access
traffic
and
weather
of
the
20
most
congested cities.
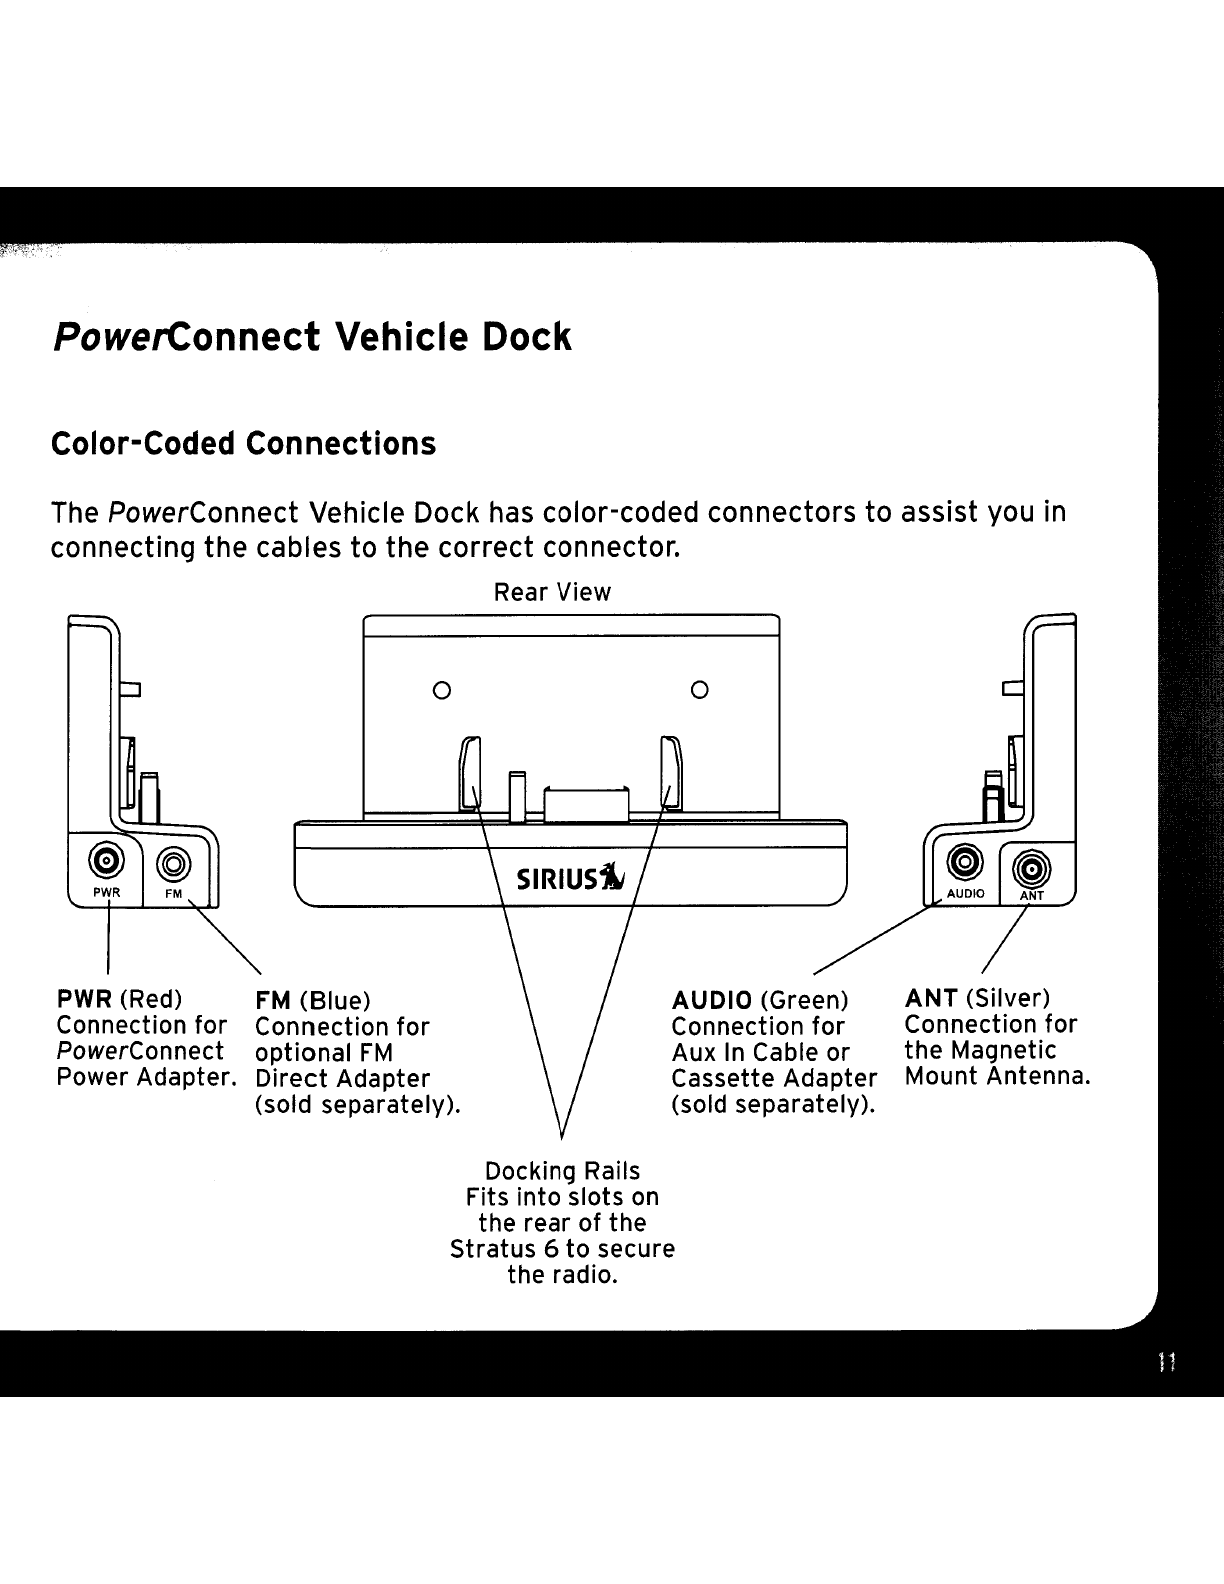
ANT
(Silver)
Connection
for
the
Magnetic
Mount Antenna.
o
AUDIO (Green)
Connection
for
Aux
In
Cable or
Cassette Adapter
(sold separately).
Docking Rails
Fits into slots
on
the rear
of
the
Stratus 6
to
secure
the radio.
o
FM
(Blue)
Connection
for
optional
FM
Direct
Adapter
(sold separately).
PWR
(Red)
Connection
for
PowerConnect
Power Adapter.
PowerConnect
Vehicle
Dock
The PowerConnect Vehicle Dock has color-coded connectors
to
assist you in
connecting
the
cables
to
the
correct
connector.
Rear View
Color-Coded
Connections


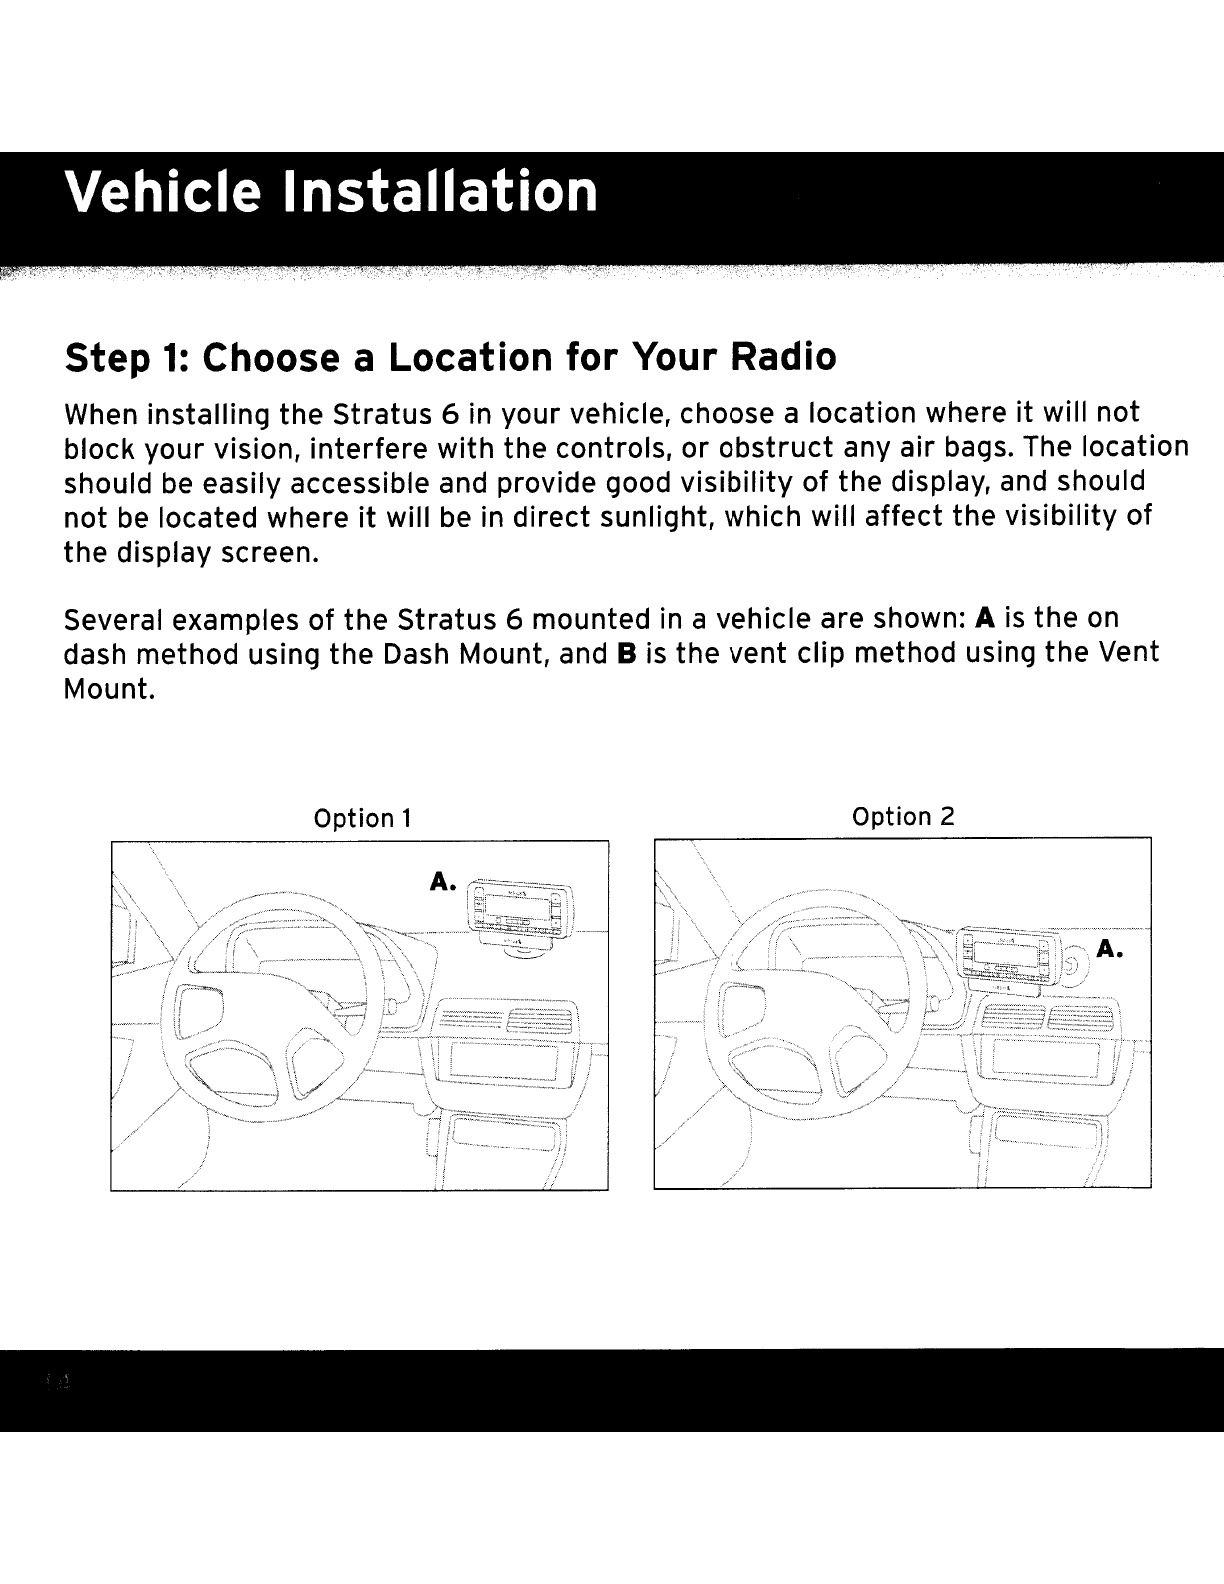
step
1:
Choose aLocation for Your Radio
When
installing the
stratus
6in your vehicle, choose alocation where
it
will not
block your vision, interfere with the controls,
or
obstruct
any air bags. The location
should
be
easily accessible
and
provide good visibility of the display,
and
should
not
be
located where
it
will
be
in direct sunlight, which will affect the visibility of
the display screen.
Several examples of the Stratus 6mounted in avehicle are shown: A
is
the
on
dash method using
the
Dash
Mount,
and
B
is
the vent clip method using the Vent
Mount.
Option 1Option 2
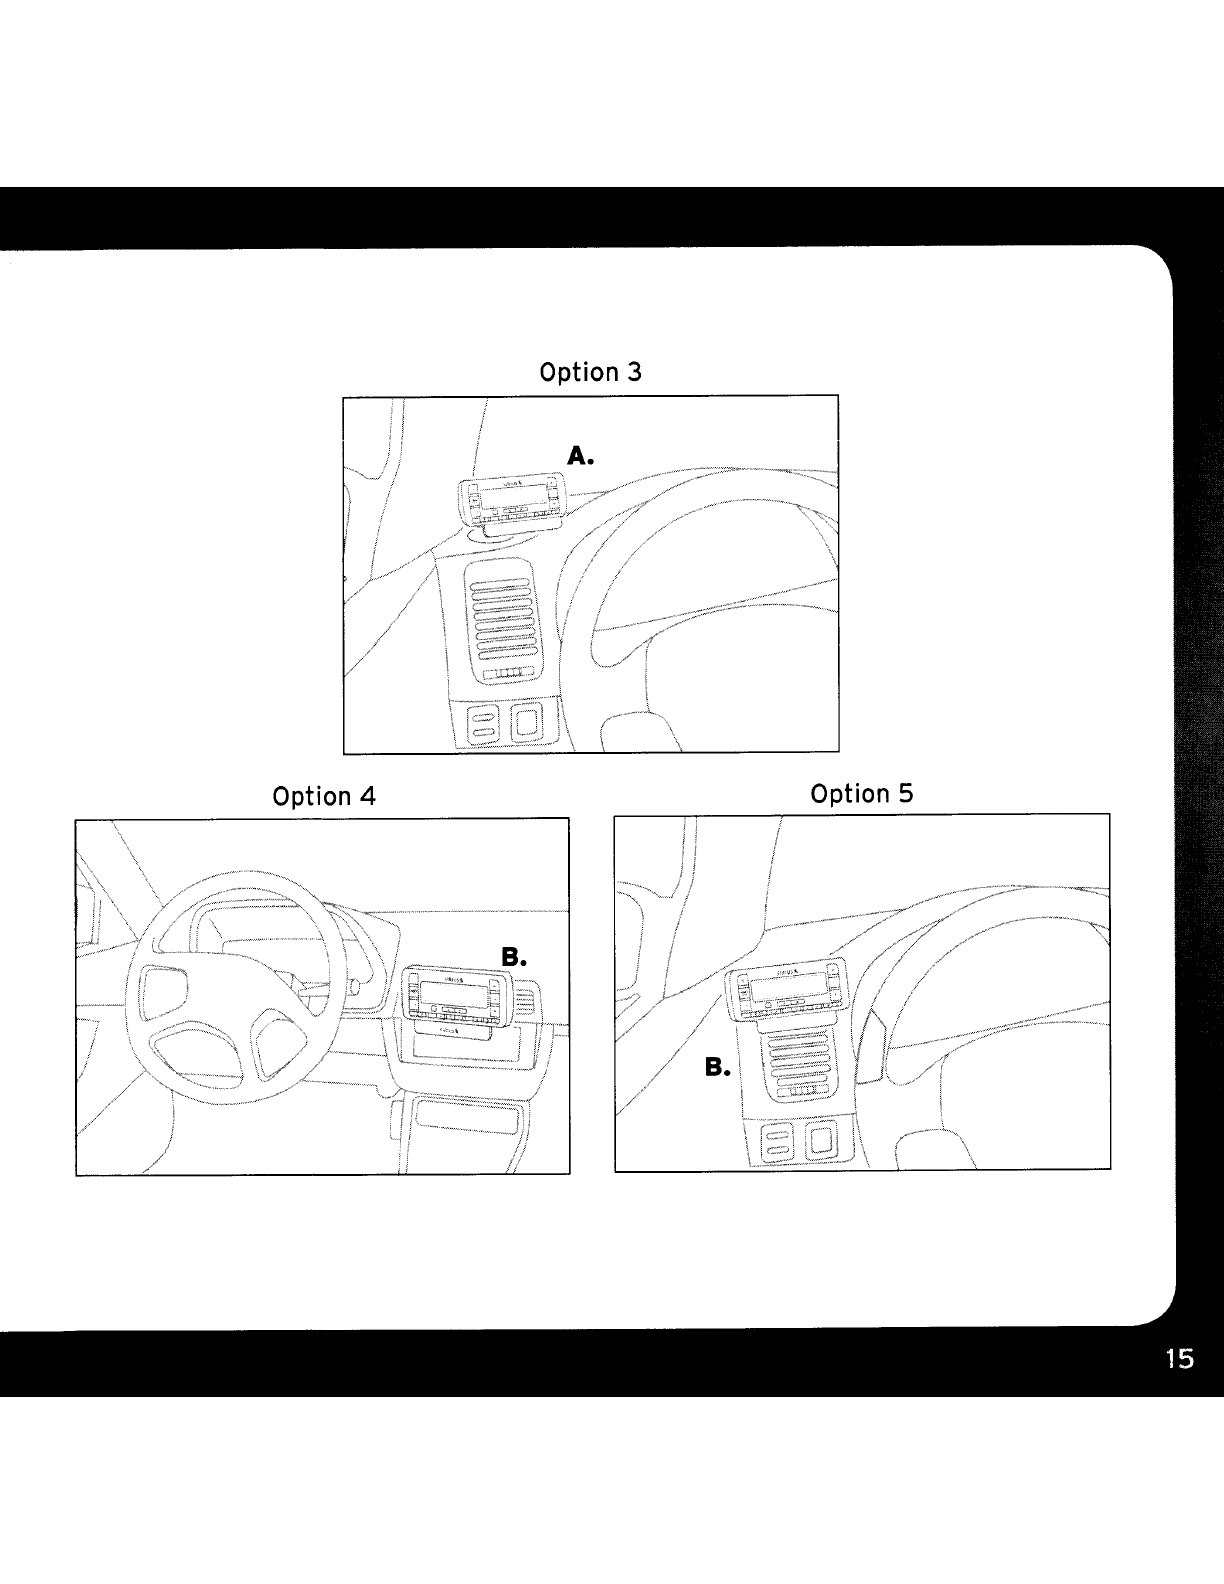
Option 3
Option 4Option 5
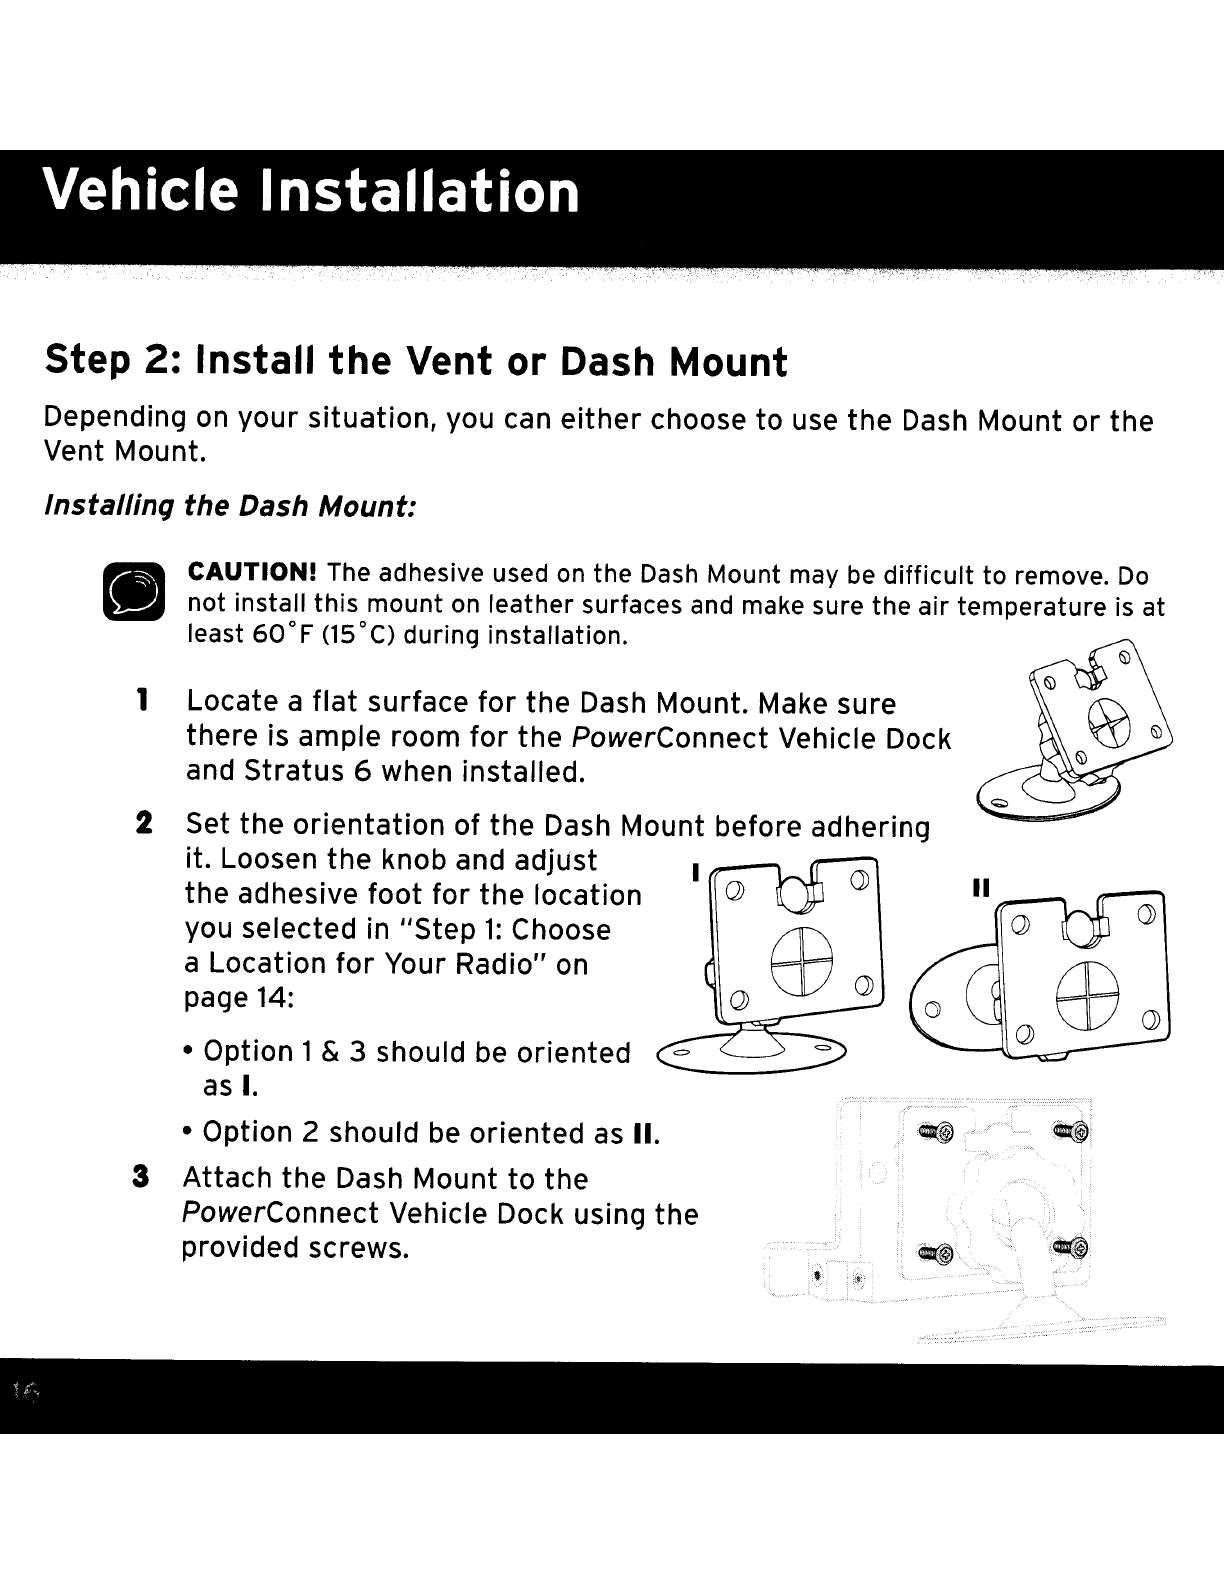
Step
2:
Install
the
Vent
or
Dash Mount
Depending on
your
situation,
you can
either
choose
to
use
the
Dash Mount
or
the
Vent Mount.
Instal/inC}
the
Dash
Mount:
.....
·>~·;:·:::·:~·:·:-::·:7·7";;:~~::::'':::-~
~I
"./'
i ,
'~,!l(i.
II
--
Locate a
flat
surface
for
the
Dash Mount. Make sure
there
is ample room
for
the
PowerConnect
Vehicle Dock
and
Stratus
6when installed.
CAUTIONIThe adhesive used
on
the
Dash
Mount may
be
difficult
to remove.
Do
not install
this
mount on leather surfaces and make sure
the
air temperature is at
least
60
0F
(15
0
C)
during installation.
Set
the
orientation
of
the
Dash Mount before adhering
it.
Loosen
the
knob and adjust I _
.......
the
adhesive
foot
for
the
location
Q)
you selected in HStep
1:
Choose
aLocation
for
Your Radio" on
page 14:
•Option 1& 3 should be
oriented
as
I.
•Option 2should be
oriented
as
II.
Attach
the
Dash Mount
to
the
PowerConnect Vehicle Dock using
the
provided screws.
2
3
1
•
Adhesive Foot
/
IMPORTANTI Allow the
Dash
Mount adhesive
to cure (dry) for aminimum of
2-4
hours before using the mount.
The
best
adhesion occurs
after
24 hours.
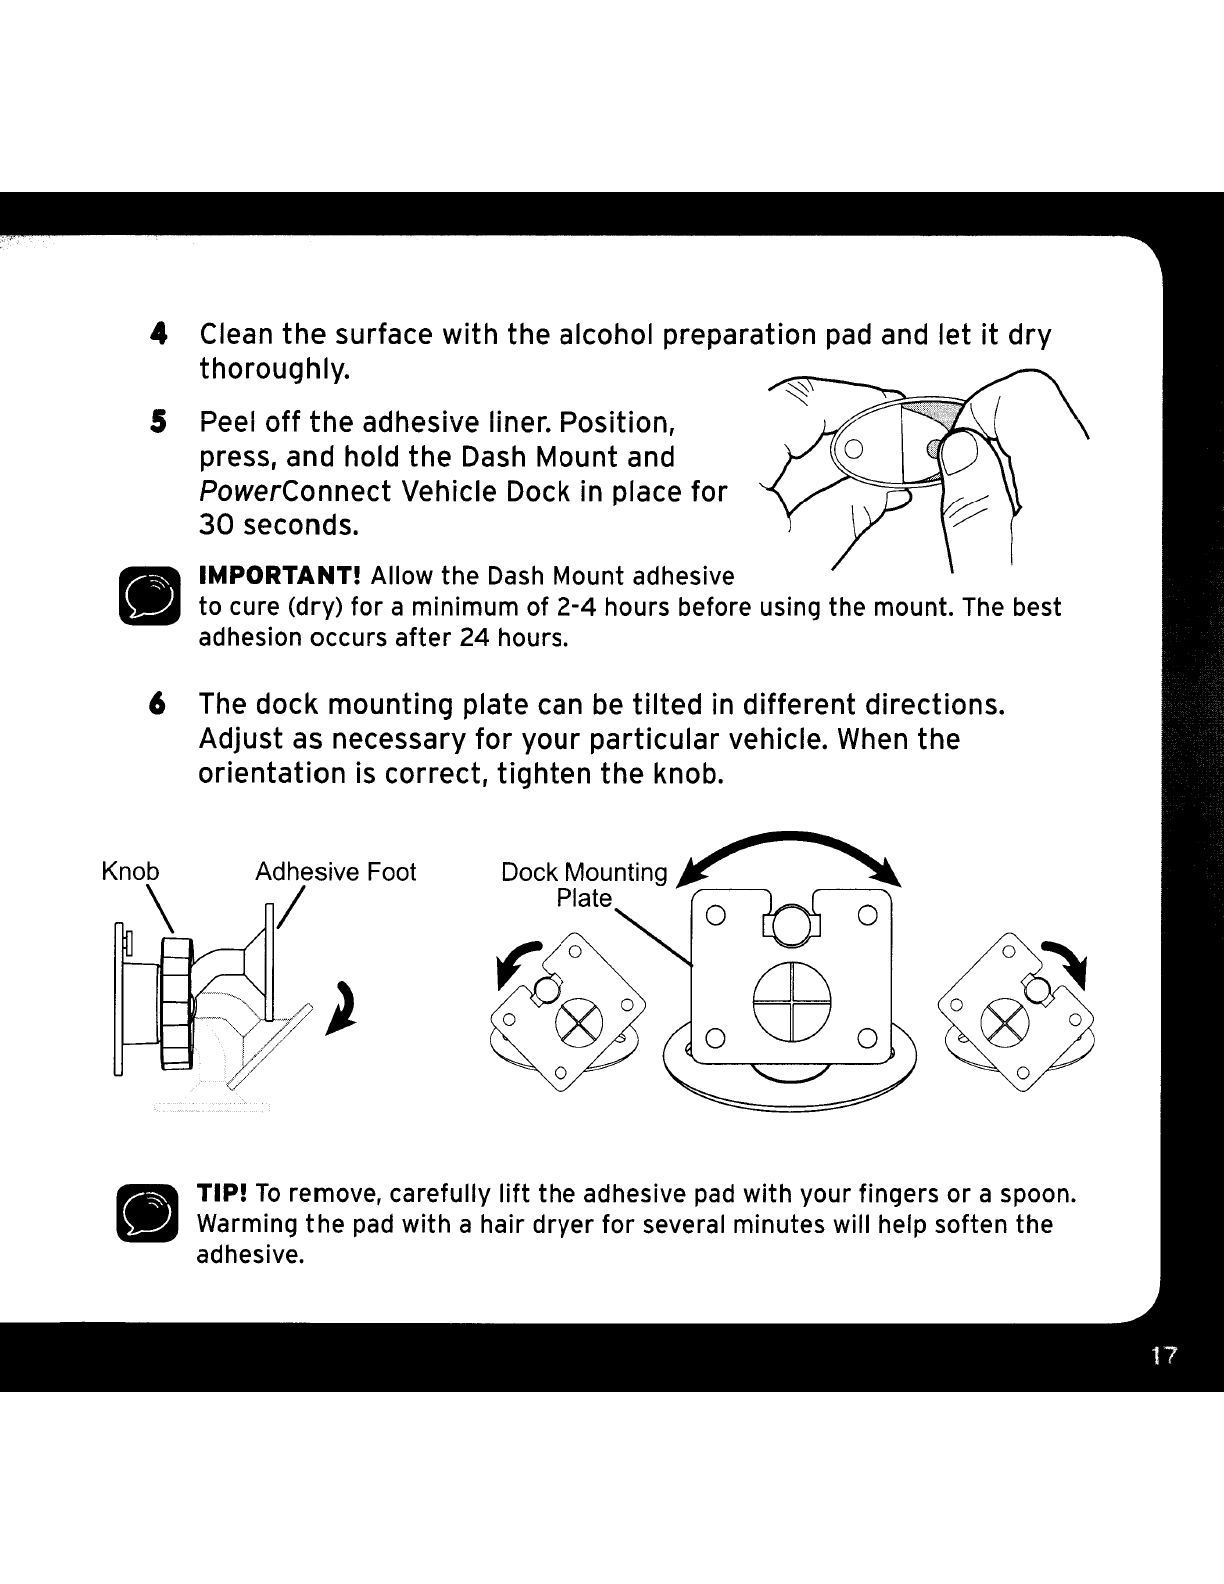
Clean
the
surface with the alcohol preparation
pad
and let
it
dry
thoroughly.
Peel
off
the
adhesive liner. Position,
press, and hold the
Dash
Mount and
PowerConnect Vehicle Dock in place for
30
seconds.
The
dock mounting plate can
be
tilted
in
different directions.
Adjust
as
necessary
for
your particular vehicle.
When
the
orientation is correct, tighten the knob.
TIPI
To
remove, carefully
lift
the adhesive
pad
with your fingers
or
aspoon.
Warming
the
pad
with ahair dryer
for
several minutes will help soften the
adhesive.
5
4
6
•
•
Knob
\
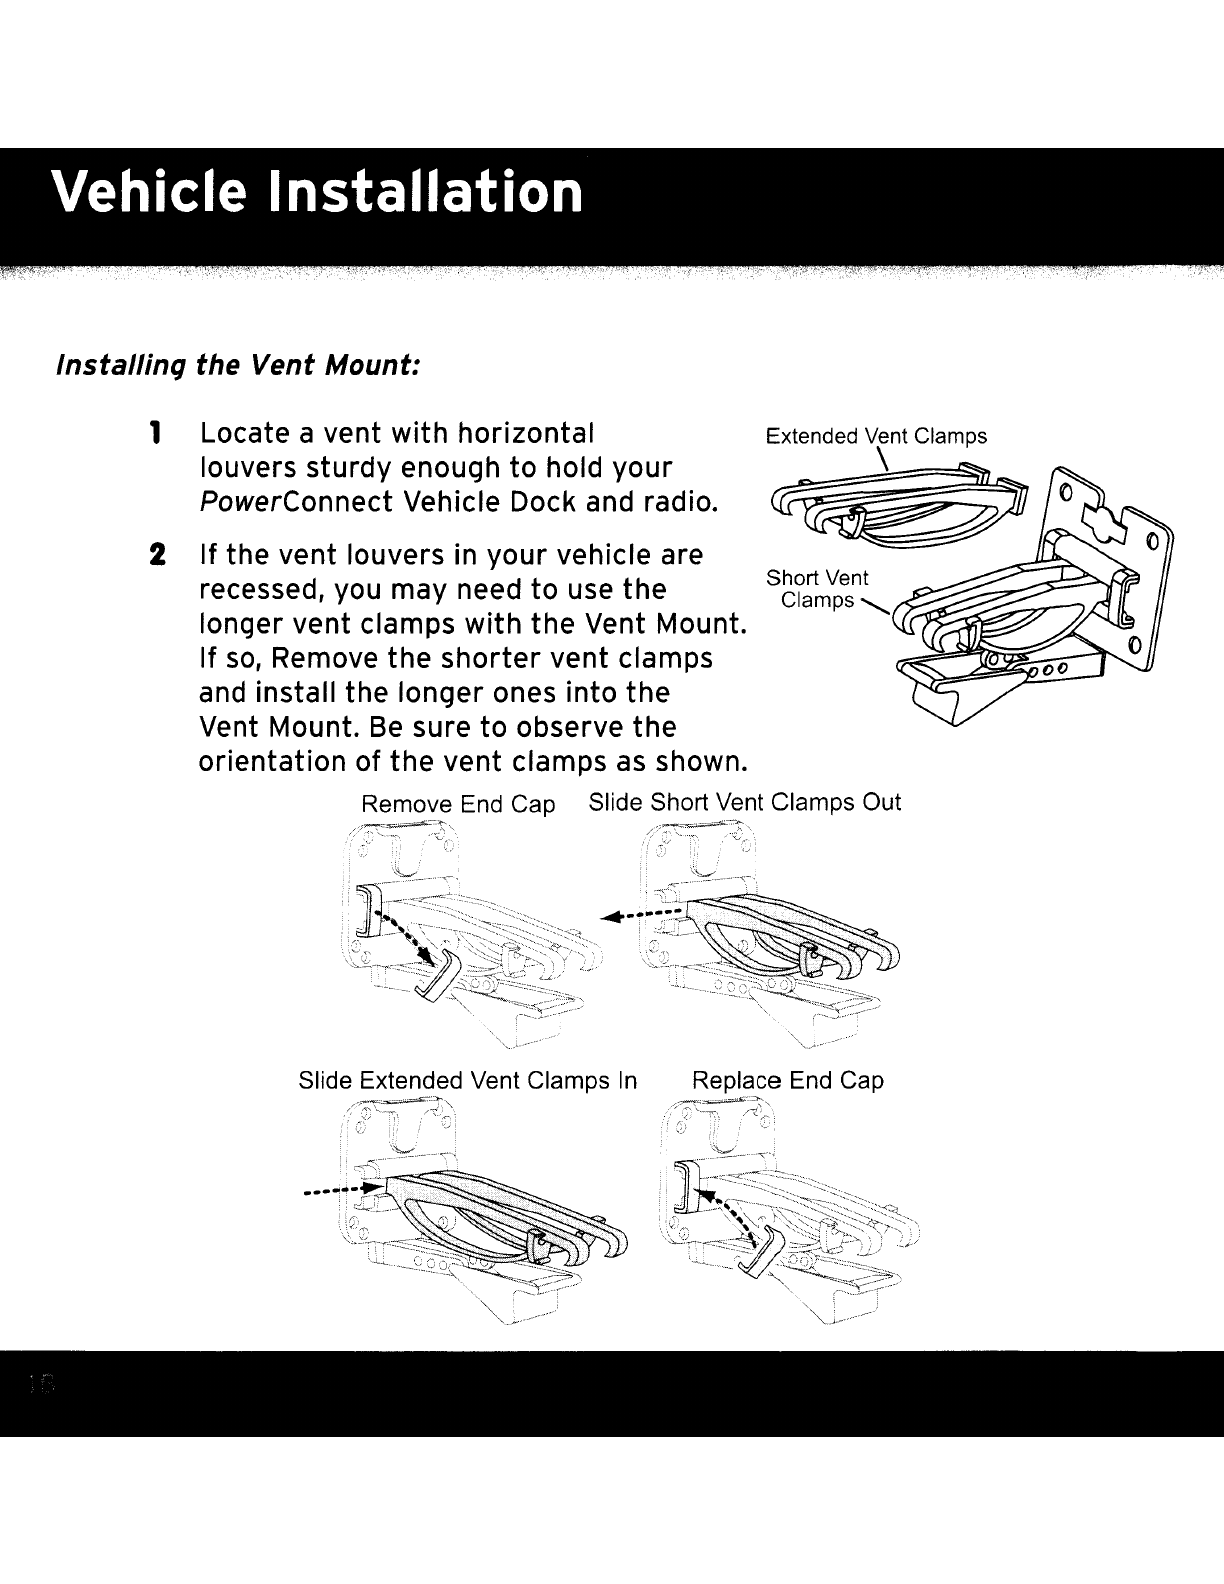
Installinq the Vent Mount:
1
2
Locate
a
vent
with
horizontal
louvers
sturdy
enough
to
hold
your
PowerConnect
Vehicle
Dock
and
radio.
If
the
vent
louvers
in
your
vehicle
are
recessed,
you
may
need
to
use
the Short Vent
Clamps",,-
longer
vent
clamps
with
the
Vent
Mount.
If
so,
Remove
the shorter vent
clamps
and
install the longer
ones
into
the
Vent
Mount.
Be
sure
to
observe the
orientation
of
the vent
clamps
as
shown.
Remove
End
Cap Slide Short Vent Clamps Out
Slide Extended Vent Clamps
In
Replace
End
Cap
;;:~~T~'~~~
CLl
- " ,
'i;~~~t~~J'
'~j--------'

Vent
TILT
ADJUSTMENT
HOLES
~_
Vent
~_
HOOKED
~~iI)/
____
Vent
....--..-
'"
FOOT./'
Louver
3Attach
the
Vent Mount
to
the
PowerConnect Vehicle Dock using
the provided screws.
4
Push
the
Vent Mount onto the
vehicle vent
as
shown (1) until
it
hooks
on
the rear of the vent
louver (2).
5
Rest
the foot against the
bottom
of
the vent (2),
and
adjust the
tilt
of the Vent Mount by
repositioning the foot to adifferent adjustment hole (3).
To
remove the Vent Mount, push the mount into the vent. Then
lift
up
until
disengaged from
the
rear of the vent louver, and remove the Vent Mount.

\
Magnet
e
Sedan/Coupe:
We
recommend mounting
the
antenna
above either the front windshield or the back window
as
shown.
1Choose the best location for your antenna considering
your own personal situation. Pay particular attention to
any accessories
that
you may have like luggage racks and
how frequently you may use them.
step
3:
Mount
the
Magnetic Mount Antenna
The Magnetic Mount Antenna contains astrong magnet which will stick
to
any
metal
part
of your vehicle, but will not damage the vehicle.
To
install
the Maqnetic Mount Antenna:
Other manuals for Stratus 6
4
Table of contents
Other Sirius XM RAdio Car Stereo System manuals


