Siva chaser f183 User manual

Betriebsanleitung
Bitte lesen sie sich diese Anleitung, vor dem ersten Gebrauch genau durch und bewahren Sie diese
auch nach Abschluss der Montage gut auf!
Manual Instruction
Read these instructions carefully before use. Please keep them after assembling.
Notice d´utilisation
Veillez lire attentivement la notice avant d´utiliser votre modéle et de conserver soigneusement
celle – ci après avoir termine les travaux.
Art.-Nr.: 60050
Achtung: Geeignet für Personen ab 14 Jahren!
Attention: Suitable for persons 14+ years!
Attention: Convient aux personnes de plus de 14 ans!
Made in China
Siva GmbH
Zeppelinstr.11
88410 Bad Wurzach
Tel.: +49 (0) 7564/9497010
Fax: +49 (0) 7564/9497011
info@sivatoys.de
www.sivatoys.de

2
DE
Liebe Kunden,
vi elen Dank, dass Sie sich für ein Siva Produkt
entschieden haben.
Da es zu geringfügigen Abweichungen kommen
kann, können gegenüber Daten und
Abbi ldungen dieser Betriebsanleitung keinerlei
Ansprüche a bgeleitet werden. Bei
Ni chtbeachtung der Betriebsanleitung und den
Sicherheitsanweisungen erlischt der
Garantieanspruch. Dadurch kann von Siva
GmbH keinerlei Haftung für Schäden Verluste
oder Kos ten übernommen werden. Anspruch
auf die Garantieleistung besteht nur, wenn das
Spielzeug gemäß der Betriebsanleitung genutzt
wird. Ebenso die Schäden oder Fehlfunktionen
ni cht auf höhere Gewalt oder betriebsbedingten
Verschleiß zurückzuführen sind. Ausgeschlossen
sind Verschleißteile wie Antennen, Akkus usw.
Die Garantiefrist beträgt 12 Monate ab
Verkaufsdatum. Beachten Sie bitte die Hinweise
in der Anleitung und bewahren Sie diese zu m
Na chlesen auf.
GB
Dear customers,
Thank you very much for purchasing a product
of Siva.
Since there may be slight differences, no claims
can be compared with data and drawings in this
manual. Failure to follow the operating
ins tructions and the safety instructions will void
the warranty. This can be accepted no liability
for damages or losses costs of Siva GmbH. Claim
on the warranty service is only available if the
toy is being used in accordance with the
operating instructions. Similarly, the damage or
mal functions are not due to force majeure or
normal wear and tear. Excludes wearing parts
such as antennas, batteries, etc. The warranty
period is 12 months from the date of purchase.
Please follow the instructions in the manual and
keep it for future reference.
FR
Cher clients,
Merci beaucoup d’avoir acheté un produit de la
société SIVA.
Du fait qu’il peut y avoir quelques petites
di fférences mineures entre votre produit et le
contenu de la notice (images, données,…) qui ne
change aucunement la fonctionnalité du
modèle, cela ne pourra pas faire office de
réclamation. Naturellement la garantie est
annulée suite à une non-conformité au niveau
de l’utilisation ou respect des indications
contenues dans la notice. La société Siva GmbH
ne peut en aucun cas être tenue pour
responsable en cas de perte ou de surcout. La
garantie ne sera appliquée que dans le cas
d’une utilisation du modèle conforme aux
indications contenues dans la notice
d’utilisation. De même, la garantie s’appliquera
uniquement si les dommages ne sont pas
causés par une manipulation de trop grande
vi olence ou usure normale du modèle. Ne sont
pas contenu dans la garantie les pièces d’usures
comme antenne, accu, etc. La durée de la
garantie est de 12 mois à partir de la date
d’achat. Veillez respecter les remarques et l es
indications contenues dans la notice
d’utilisation et gardez celle-ci précieusement
afin de pouvoir les relire à tout moment.
Veillez observer que les piles, accumulateur ou
accus vides ou défectueux , ainsi que les
appareils électroniques comme chargeurs,
modèle et radiocommande ne doivent pas être
jetés dans une poubelle traditionnelle mais être
ramenés vers un centre de tri afin de pouvoir
les recycler convenablement

3
Lieferumfang – Contents – Contenu du kit
DE
Chaser F183 Quadrocopter 2,4 GHz
Fernsteuerung 2,4 GHz mit LCD-Display
4x Ersatzrotorblätter
Li-Po Akku 7,4V 500mAh
Ladegerät
Mi cro SD-Karte
USB Stick
Schraubenzieher
Anleitung
Empfohlenes Zubehör (nicht enthalten):
Fernsteuerung: 4x AA-Batterien 1,5V
GB
Chaser F183 Quadrocopter 2,4 GHz
Radio control 2.4 GHz with LCD display
4x Propellers
Li-Po battery 7,4V 500mAh
Cha rge r
Mi cro SD card
USB stick
Screwdriver
Manual instruction
Accessories (not included):
Radio control: 4x AA-batteries 1,5V
FR
Chaser F183 Quadrocopter 2,4 GHz
Radiocommande 2.4 GHz avec display en LCD
4x Pales de réchange
Accu Li-Po 7,4V 500mAh
Cha rge ur
Ca rd Mi cro SD
Stick USB
Tournevis
Notice
Accessoires (pas inclus):
Radiocommande: 4x AA-piles 1,5V
Technische Daten – Technical data –
Données techniques:
Ma ße/Dimensions: ~ 400 x 400 x 115 mm
Gewicht/Weight/Poids: ~ 130g
Flugzeit/Flying time/Temps de vol: ~ 5–10 min.
Ladezeit/Charge time/Temps de charge: ~90
min.
Entsorgungshinweise – Disposal notes –
Consignes de recyclages
DE
Bitte beachten Sie, dass leere Akkumulatoren,
Batterien, Knopfzellen etc. und Elektrobauteile
wie Ladegerät, Modell und Fernsteuerung nicht
in den Hausmüll gehören, da sie der Umwelt
und Gesundheit schaden. Entsorgen Sie diese
bei den bekannten Sammelstellen, denn nur so
werden sie ordnungsgemäßem Recycling
zugeführt.
GB
Please note that empty a ccumulators, batteries,
button cells etc. and electrical components such
as charger, model and remote control should
not be disposed in the garbage, because they
ha rm the environment and health. Dispose i t
into the collect-boxes because only then they
are fed proper recycling.
FR
Veillez observer que les piles, accumulateur ou
accus vides ou défectueux , ainsi que les
appareils électroniques comme chargeurs,
modèle et radiocommande ne doivent pas être
jetés dans une poubelle traditionnelle mais être
ramenés vers un centre de tri afin de pouvoir
les recycler convenablement.

4
Sicherheitsbestimmungen – Safety instructions
– Consignes de sécurité
A ACHTUNG – kein Spielzeug!
WARNING – it’s not a toy!
ATTENTION – ce n’est pas un jouet!
B ACHTUNG – Enthält verschluckbare
Kl einteile Nicht für Kinder unter 36
Monaten geeignet.Erstickungsgefahr!
WARNING – Contains small parts! Not
suitable for children under 36 months!
Danger of suffocation!
ATTENTION - Contient de petites
pièces facilement avalables! N’est pas
ada pté pour des enfants de
moins de 36 mois!
Danger d’étouffement!
C ACHTUNG - Benutzung nur unter
unmittelbarer Aufsicht von
Erwachsenen!
WARNING - Use only under the
supervision of an a dult!
ATTENTION – A n’utiliser que sous la
surveillance d’une personne adulte!
D ACHTUNG - Nur im flachen Wasser
verwenden!
WARNING - Use only in shallow water!
ATTENTION – A n’utiliser que sur une
eau calme sans vagues!
Wichtige Hinweise – Importants notes –
Informations importantes
DE
1. Schalten Sie vor dem Betrieb zuerst die
Fernsteuerung, dann das Modell ein.
2. Schalten Sie nach dem Betrieb zuerst das
Modell, dann die Fernsteuerung aus.
3. Akkus und Batterien nur unter Aufsicht von
Erwachsenen laden!
4. Neue und gebrauchte Batterien oder
unterschiedliche Batterietypen sollten nicht
zusammen verwendet werden.
5. Nicht aufladbare Batterien und Akkus dürfen
ni cht aufgeladen werden!
6. Batterien nicht kurzschließen!
7. Batterien mit der richtigen Polarität einlegen!
GB
1. Before using turn first the remote control
then the model.
2. After using stop first the model and then the
remote control.
3. Charge the accumulators and batteries out of
reach of children and under the supervision of
an adult!
4. Do not mix different types of batteries or old
with new.
5. Non-rechargeable batteries should not be
recharged!
6. Don’t short-circuit the batteries!
7. Insert the batteries with the correct polarity!
FR
1. Mettez toujours en marche l’émetteur en
premier puis le modèle.
2. Après l’utilisation arrêtez l e modèle en
premier puis seulement l’émetteur.
3. Chargez toujours les accus hors de porté des
enfants et sous la surveillance d’un adulte!
4. Ne mélangez pas les différents types de piles
ni des anciennes avec des nouvelles.

5
5. N’es sayez jamais de recharger des piles ou
accus non rechargeables!
6. Ne court-circuitez pas les piles/accus!
7. Veillez à toujours mettre en place les
pi l es/accus en respectant impérativement la
bonne polarité!
Wichtige Hinweise zu Lithium-Polymer Akkus –
Important notes on batteries Lithium-Polymer-
Remarques importantes concernant les accus
Lithium-Polymère
DE
Das Gehäuse der Lithium-Polymer-Akkus
besteht a us einer Plastikfolie aus Aluminium.
Achten Sie darauf, dass die Folie nicht
beschädigt wird, da die Zelle sonst defekt wird.
Bei Beschädigung der Zellen kann Elektrolyt
aus treten, vermeiden Sie bitte Berührung, da
der Inhalt schädlich für Haut und Auge ist. Bei
Augen- und Hautkontakt mit viel Wasser
abs pülen und einen Arzt kontaktieren. Bei
falscher Verwendung des Akkus besteht Brand-
oder Verätzungsgefahr.
Li-Po Akkus nur auf feuerfesten und brennbaren
Untergründen laden und lagern. Die Lagerung
der Zellen müssen zwischen Halbvoll und Voll
seine – leere Zellen führen zu deren Zerstörung.
Wir empfehlen vor der Lagerung die Akkus zu
laden. Bei längerer Ladezeit den Ladezustand
gelegentlich kontrollieren.
Bitte beachten Sie, dass es zu Überladung
kommen kann, falls das Ladegerät durch einen
Defekt nicht automatisch abschaltet. Dadurch
kann die Zelle zu brennen beginnen. Sollte die
Zelle brennen oder sich überhitzen oder
aufblähen, darf es nicht mehr berührt werden.
Halten Sie bitte Sicherheitsabstand und sorgen
Sie für geeignete Löschmittel wie Pulverlöscher
oder Sand. Der Ladevorgang sollte regelmäßig
überwacht werden.
Akkus bitte von Kindern fernhalten und nicht
kurzschließen, öffnen, aufschneiden und nicht
ins Feuer legen! Achten Sie bitte auf die richtige
Polung! Bei Flugmodellen kann es nach einem
Absturz zu Beschädigungen der Akkus kommen
Achten Sie darauf, dass es eventuell nach 30-60
Minuten zu Aufheizungen kommen kann.
Die Ladetemperatur liegt zwischen 0°C bis
+50°C. Vor Hitzeeinwirkung über 65°C
schützen.
Die Entladetemperatur liegt zwischen -20°C bis
+50°C. Benutzung im Winter möglich mit
Beachtung, dass bei Minustemperaturen von
mindestens -30% mit reduzierter Kapazität und
geringeren Entladeströmen zu rechnen sind.
Haftungsausschluss: Bei falscher Bedienung
oder Handhabung der Ware und dadurch
entstandene Schäden übernimmt Siva GmbH
keine Haftung!
GB
The body of the Lithium-Polymer battery is
made of aluminium foil wrapped in a plastic
film. Be careful not to damage the film or coat
aluminium, otherwise the item is defective.
By cutting or opening this protection the
electrolyte can flow out. In this case avoid
contact, this substance is harmful to the skin
and eyes. If unfortunately you have been in
contact with it,
flush the affected areas with plenty of water
and contact a doctor quickly. Improper
ha ndling of this type of battery can cause
inflammation or acid burns.
Recharge and store Li -Po on a fire resistant
surface. Storage of such battery is with a load
from half full to full - empty elements can lead
to the destruction of the battery.

6
We advise you to recharge the batteries before
storage.
If the load had to take a lot of time, regularly
check the load. Ensure that there is no overload,
for example, if the charger had a problem with
automatic charge termination. The
consequence could be that the battery ignites.
If anything catches fire, heats or swells, do
not touch the battery. Observe the safety
distance and be sure to use a fire extinguisher
comprising a chemical compound or suitable
sand to extinguish a fire like this. The charging
process should be monitored regularly. Put
your batteries out of reach of children and do
not short-circuit, open or cut the body of them,
and especially do not throw them in fire!
Always observe the correct polarity! For flying
models, it is possible that after a crash the
ba ttery is defective. In this case, let it s at
between 30 a nd 60 minutes, during which time
it could overheat.
The cha rge temperature is between 0 ° C and
+50 ° C. Protect against temperatures over 65 °
C.
The discharge temperature is between -20 ° C
and +50 ° C. It is therefore possible to use them
in winter provided they do not exceed the
indicated temperatures and observing the
capacity and the discharge current is reduced by
approximately 30%.
Void the warranty: If bad handling or
manipulation does not comply with the notice
and any resulting damage, the company will
not apply Siva GmbH warranty!
FR
Le corps des accus Lithium-Polymère est
composé de feuilles d’aluminium emballées
da ns un film plastique. Veillez à ne pas
endommager le film ni le manteau en
aluminium, dans le cas contraire l’élément est
défectueux. Par rupture de cette protection
l’électrolyte peut s’en écouler. Dans ce cas
évitez tout contact, cette substance est
da ngereuse pour la peau et les yeux. Si par
mal heur vous êtes entré en contact avec
cell e-ci, rincez les parties touchées
abondamment avec de l’eau et contactez
di rectement un médecin. Une manipulation non
conforme de ce genre d’accu peut entraîner une
inflammation ou des brulures acides.
Ne recha rgez et ne stockez les accus Li-Po que
sur une s urface résistante au feu. Le stockage
de ce genre d’accu se fait avec une charge allant
de moitié plein à plein – les éléments vides
entrainent la destruction de l’accu. Nous vous
conseillons de recharger les accus avant leur
stockage. Si la charge devait prendre beaucoup
de temps, contrôlez régulièrement la charge.
Veillez à ce qu’il n’y ait pas de surcharges, si par
exemple le chargeur avait un problème de
coupure automatique de charge. La
conséquence pourrait être que l’accu
s’enflamme. Si un élément venait à prendre
feu, s’échauffe ou se gonfle, il ne faut
absolument pas le toucher. Respectez la
distance de sécurité et veillez à utiliser un
extincteur comprenant un composé chimique
ou sable adapté pour éteindre un feu de ce
genre. Le processus de charge doit être
surveillé régulièrement.
Mettez vos accus hors de portée des enfants et
ne l es court-circuitez, ouvrez ou découpez pas,
et s urtout ne les jetez pas dans le feu! Veillez à
toujours respecter la bonne polarité! Pour les
modèles volant, il est possible qu’après un crash
l’accu soit défectueux. Dans ce cas, laissez celui-
ci reposé entre 30 et 60 minutes, durée pendant
laquelle celui-ci pourrait s’échauffer.

7
La température de charge s e trouve entre 0°C et
+50°C. Protégez l e contre des températures de
pl us de 65°C.
La température de décharge se situe entre -
20°C et +50°C. Il es t donc possible de les utiliser
en hivers à condition de ne pas dépasser les
températures indiquées et en observant que les
capacité et le courant de décharge est réduit
d’environ -30% .
Annulation de la garantie : dans le cas d’une
mauvais manipulation ou manipulation non
conforme aux indications de la notice ainsi que
tous les dommages en résultants, la société
Siva GmbH n’appliquera pas la garantie!
Irrtum und technische Änderungen
vorbehalten – Errors and technical
modifications reserved – Sous réserve d’erreur
ou de modifications techniques
Service
Tel.: +49 (0) 7564 94970 12
Fax: +49 (0) 7564 94970 11
service@sivatoys.de
8
DE
9
Hinweis: die Wege der Auslenkungen von den verschiedenen Funktionen sind
auswählbar auf 4 Stufen, 25%, 50%, 75% und 100% und dies mit Hilfe der
Feineinstellungstasten der jeweiligen Funktionen. Der Benutzer kann dadurch die Wege
so einstellen, dass es seinen Fluggewohnheiten oder Kenntnisse entspricht. Diese sind
auf 25% eingestellt, wenn das Model das Werk verlässt. Dieser Wert wird I hnen
angezeigt nach dem Einschalten der Fernsteuerung.
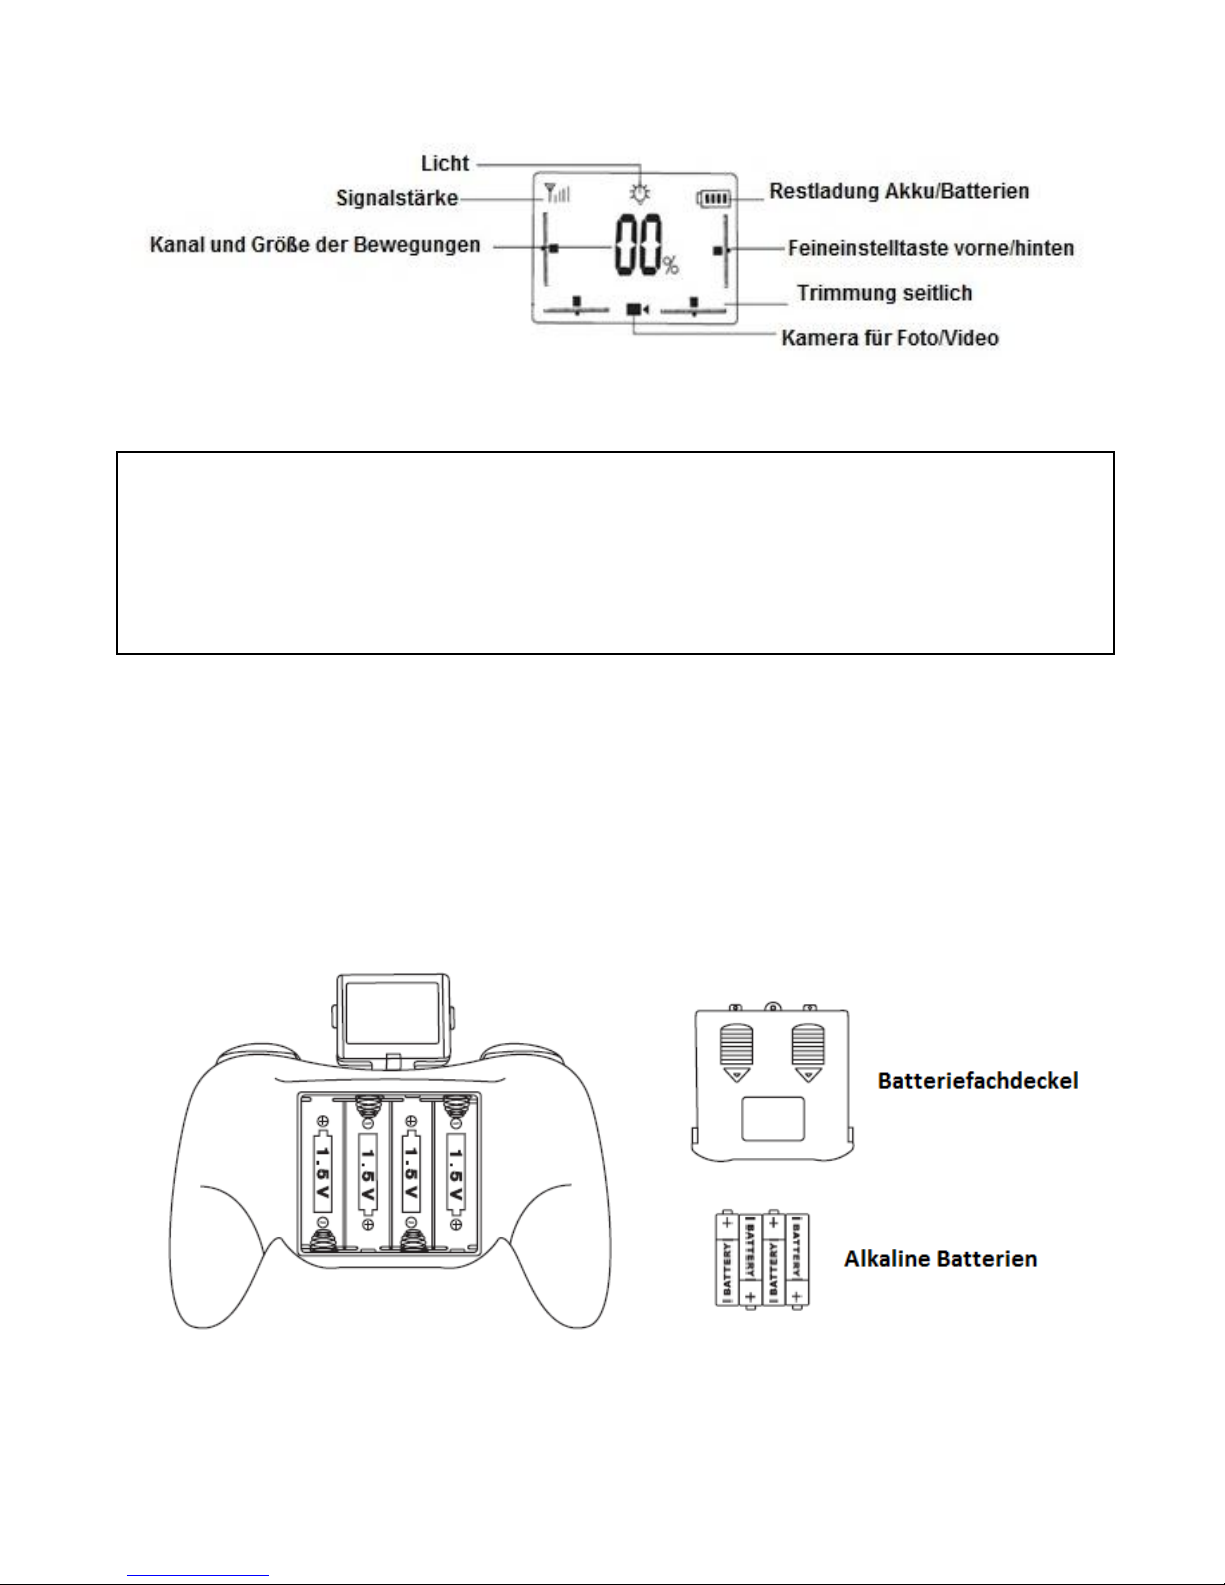
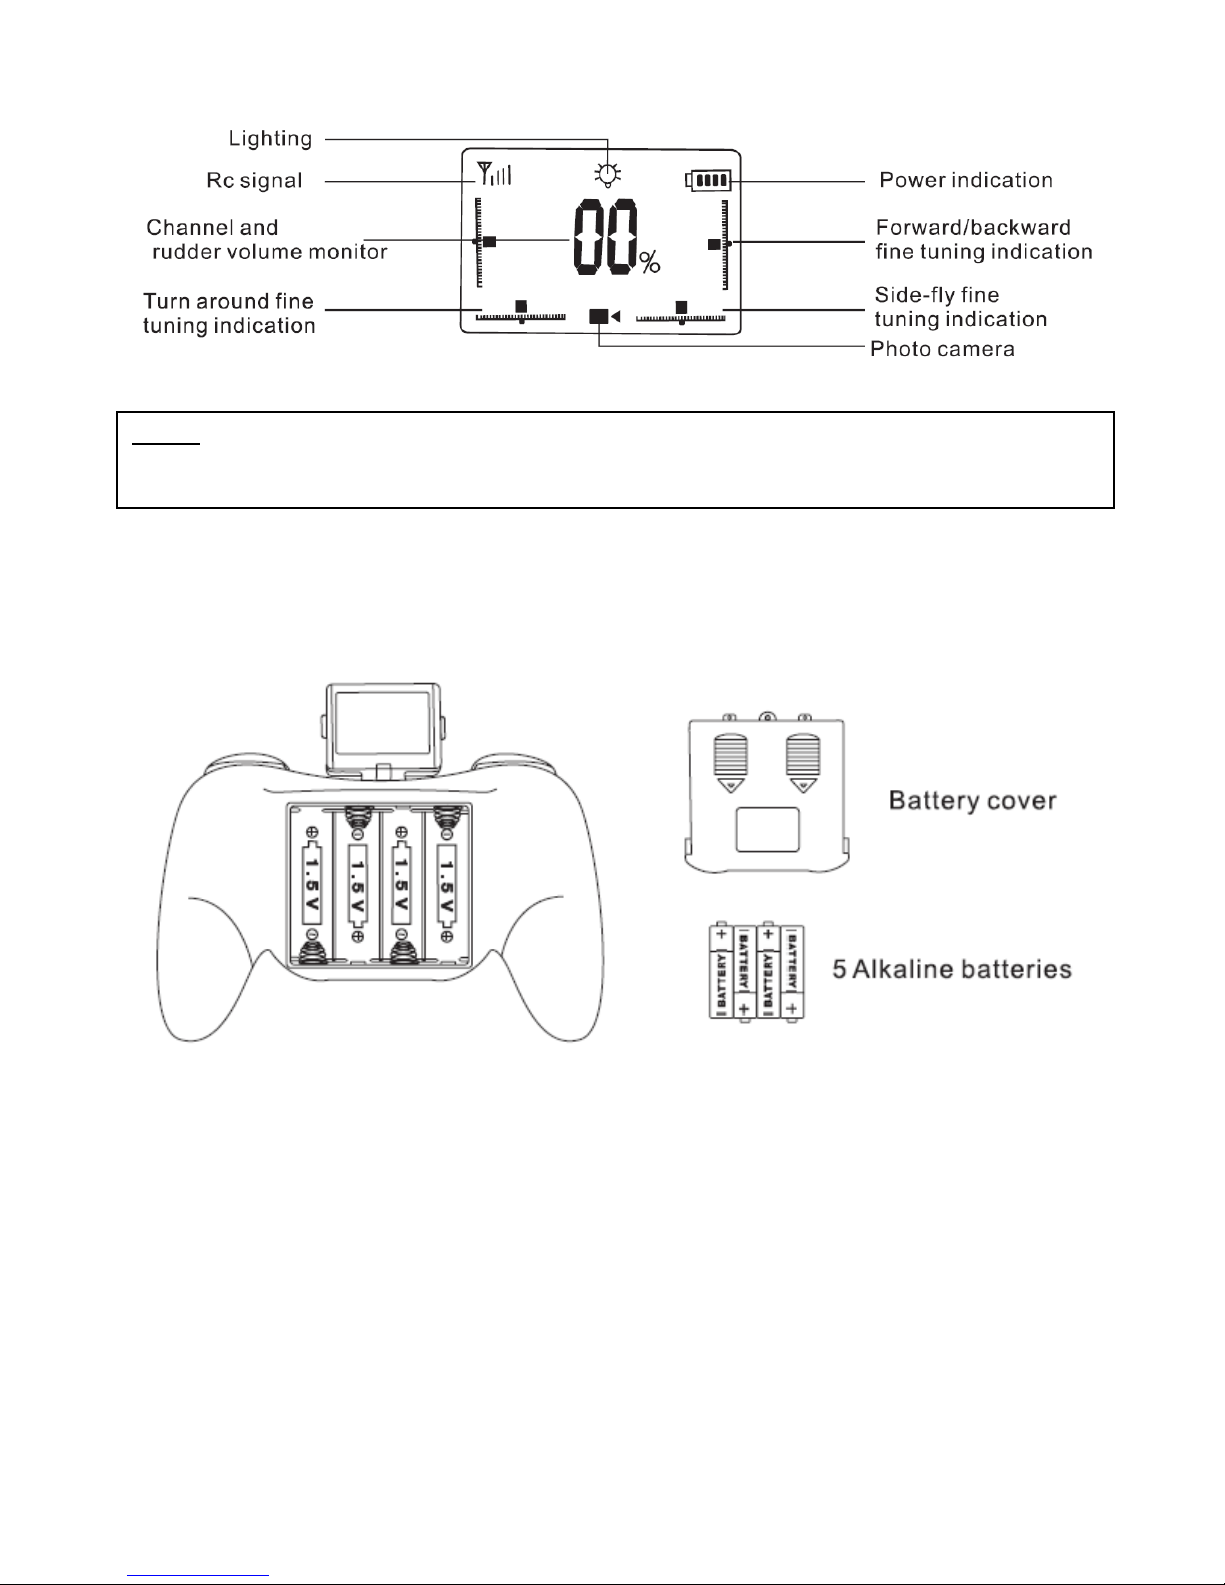
Einschalten des Senders
Öffnen Sie den Batteriefachdeckel auf der Rückseite des Senders. Legen Sie die Batterien
wie dargestellt ein
10
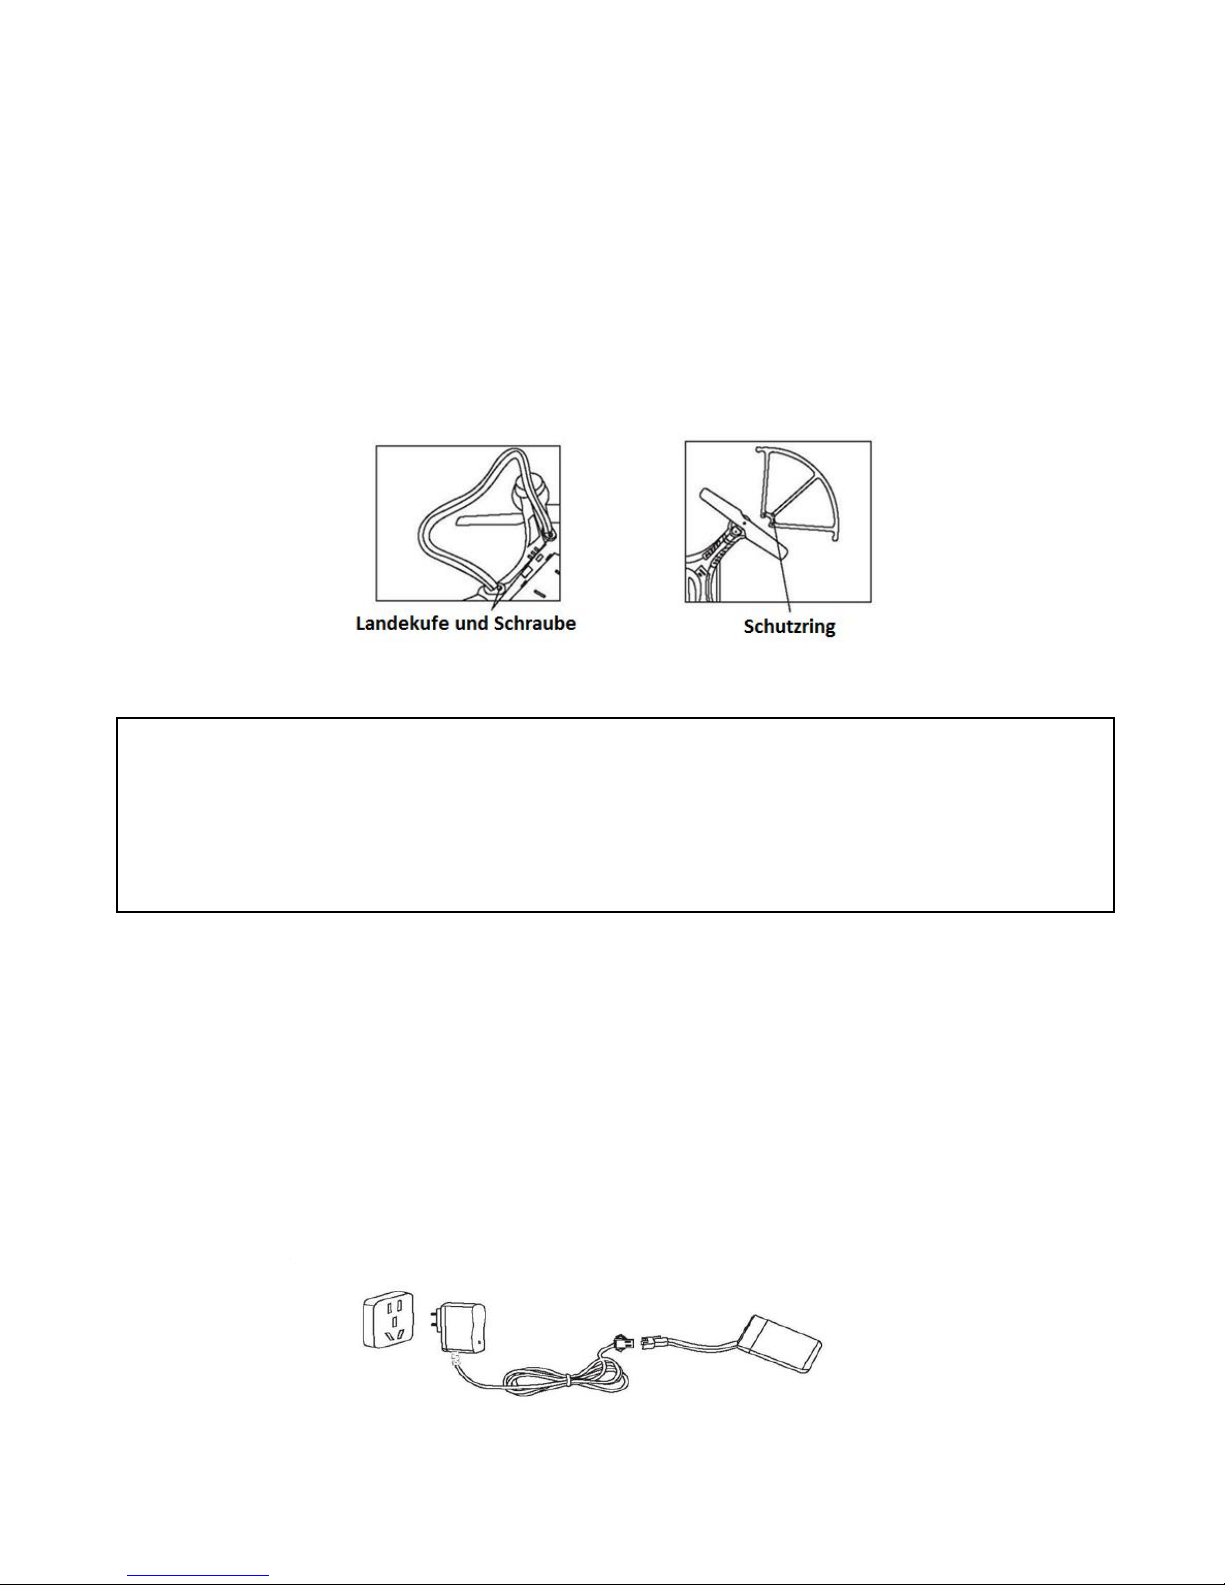
Einschalten des Quadrocopters
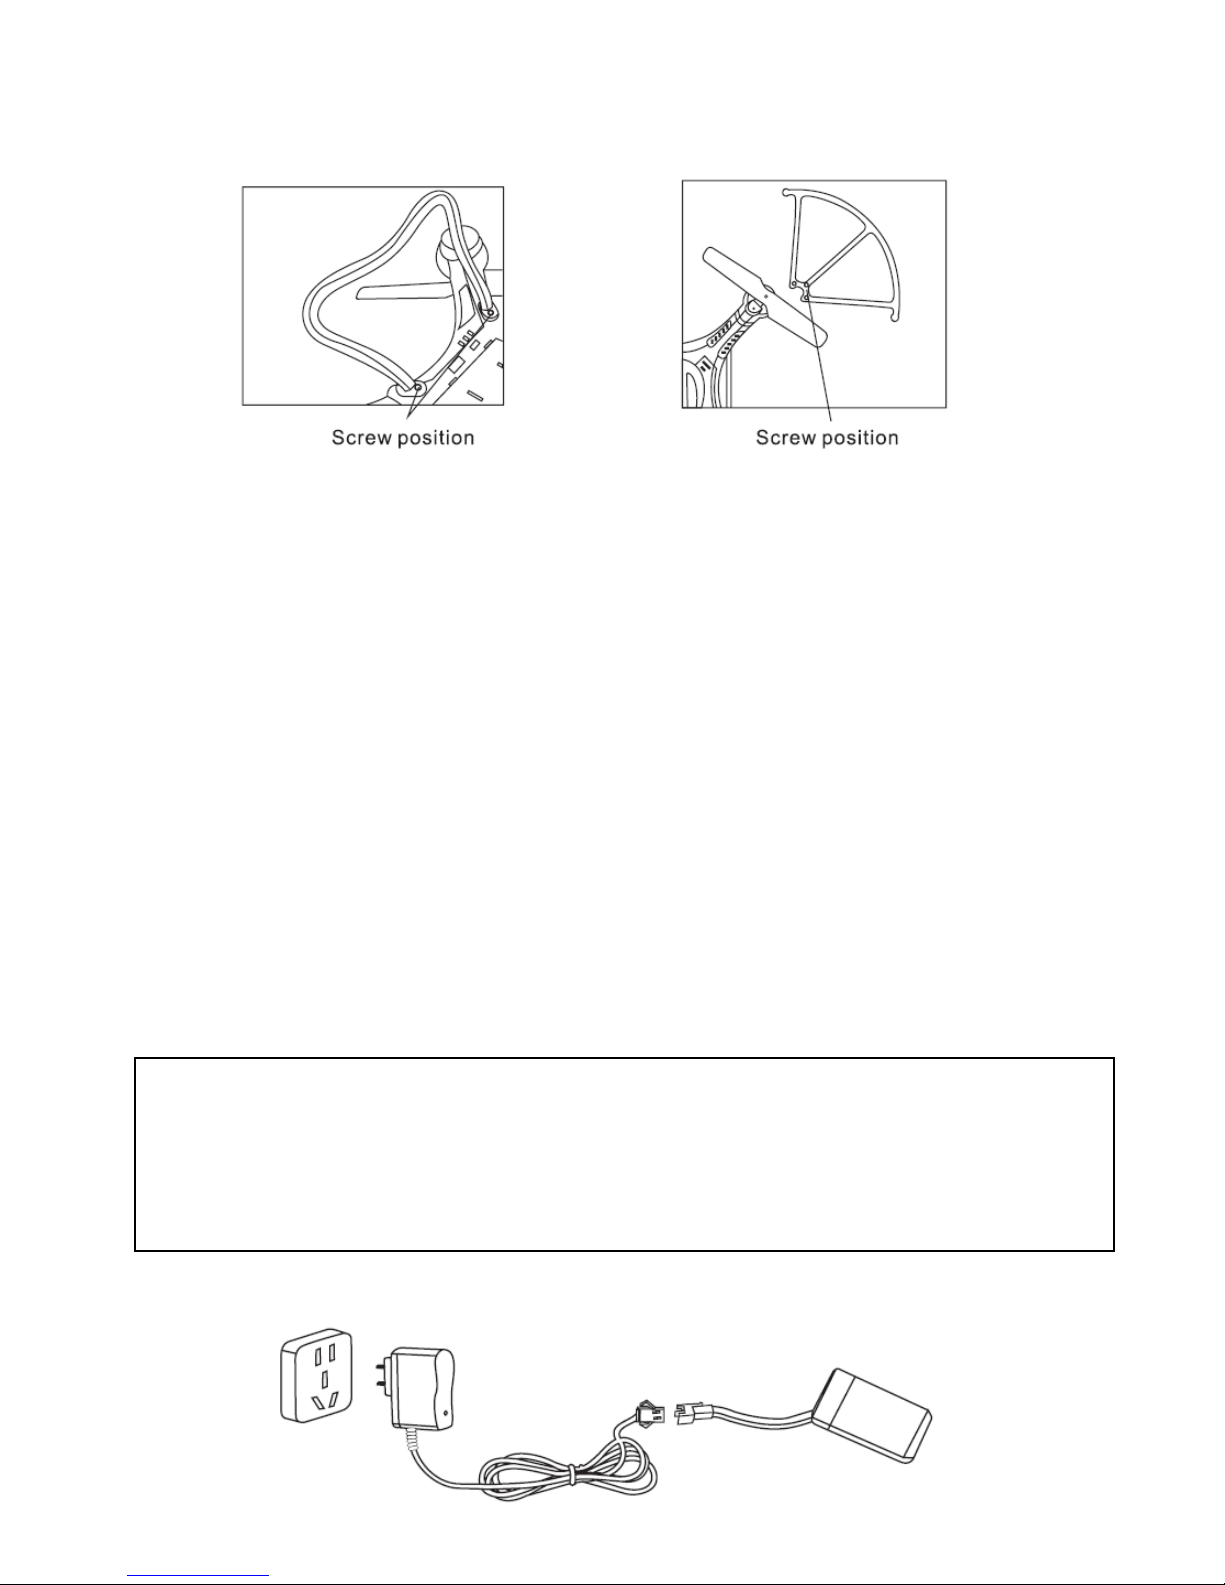
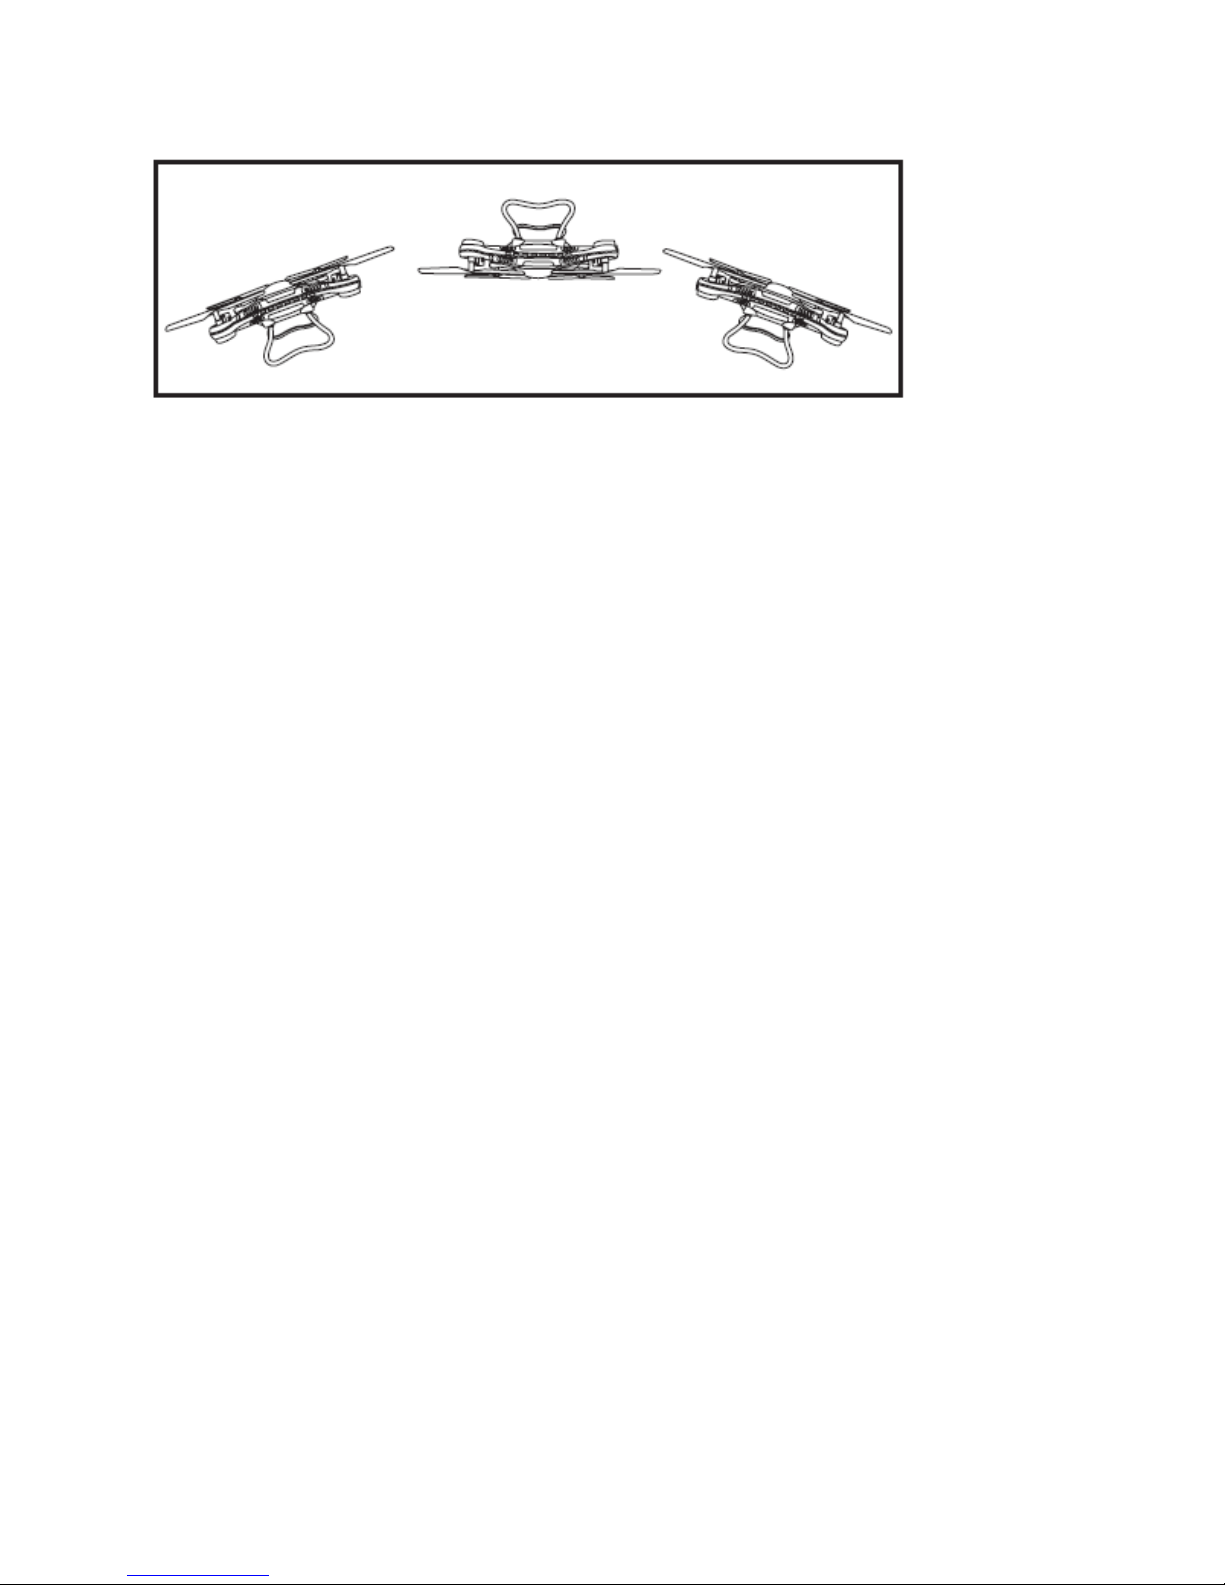
1. Bereiten Sie einen Schraubenzieher, Landekufen und Schutzringe vor.
2. Setzen Sie die beiden Enden der Landekufen in die Löcher unter der Drohne
(wie auf dem Bild angezeigt). Fixieren Sie diese Teile durch festschrauben der
Halteschrauben.
3. Setzen Sie die Schutzringe auf und fixieren Sie diese durch festschrauben der
Halteschrauben.
Hinweis: Falls Ihr Quadrocopter zu viel Höhe verlieren sollte aufgrund unzureichender
Batterieladung, dann sollten Sie landen und den Akku des Models wieder komplett
aufladen. Dies gilt vor allem, wenn Sie Ihr Model im Freien verwenden. Sollte die
Leis tung des Akkus stark abnehmen und nicht mehr reichen, dann blinkt die LED. Sollte
dies der Fall sein, benutzen Sie es nicht bevor der Akku wieder voll aufgeladen ist.
Aufladen des Akkus
Stecken Sie das Ladegerät in eine Steckdose. Die Ladeanzeige ist grün. Schließen Sie den
Antri ebsakku an den Ausgang des Ladegerätes. Die Anzeige leuchtet rot, das bedeutet
dass der Akku geladen wird. Wenn die Anzei ge wi eder grün leuchtet, bedeutet das dass
der Ladevorgang Ihres Akkus beendet ist. Die Ladezeit eines l eeren Akkus beträgt ca. 90
Minuten.
11
Vorbereitungen für den Flug
1. Sie können Ihr Model im Hausinneren oder im Freien benützen. Wählen sie
bitte ein Zimmer mit reichlich Platz oder ein windstillen Tag (kleiner als Stärke
4), ohne Regen oder Schnee, um Ihr Model zu benutzen. Bleiben Sie immer in
einem si cheren Abstand zu Personen oder Ti eren, oder auch Hi ndernissen.
2. Setzen Sie den Li-Po-Akku in Ihrem Quadrocopter ein und verbinden Sie es mit
der Elektronik. Die Status-LED vom Quadrocopter blinkt. Legen Sie Ihr Model
auf einer ebenen Fläche und warten Sie bis die Synchronisierung durchgeführt
wird.
3. Bewegen Sie den Gashebel in Ihre Richtung (Leerlaufstellung) und schalten Sie
den Sender ein. Drücken Sie den Gashebel ganz an den obersten Rand und
wieder in die untere Position. Ein Signalton "di" ertönt und die Status-LED
Ihres Quadrocopters leuchtet auf. Die Synchronisation ist abgeschlossen und
nun können Sie Ihr Model fliegen.
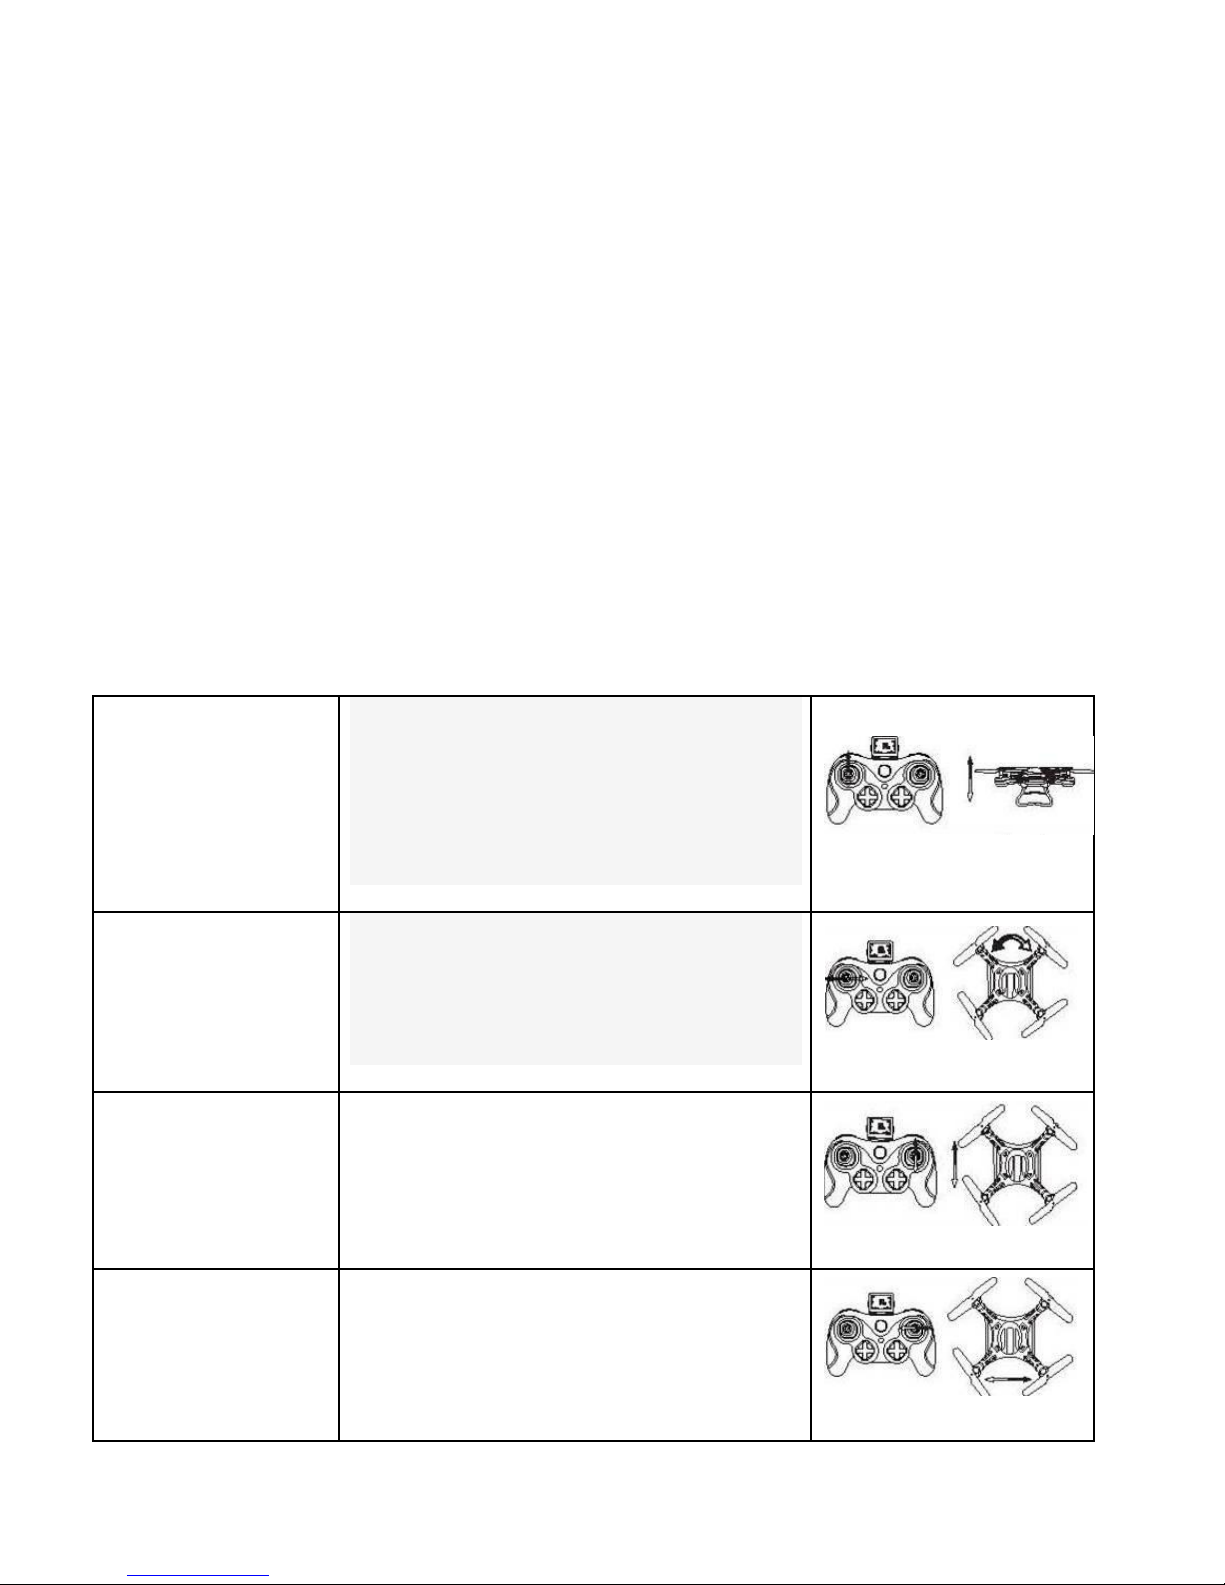
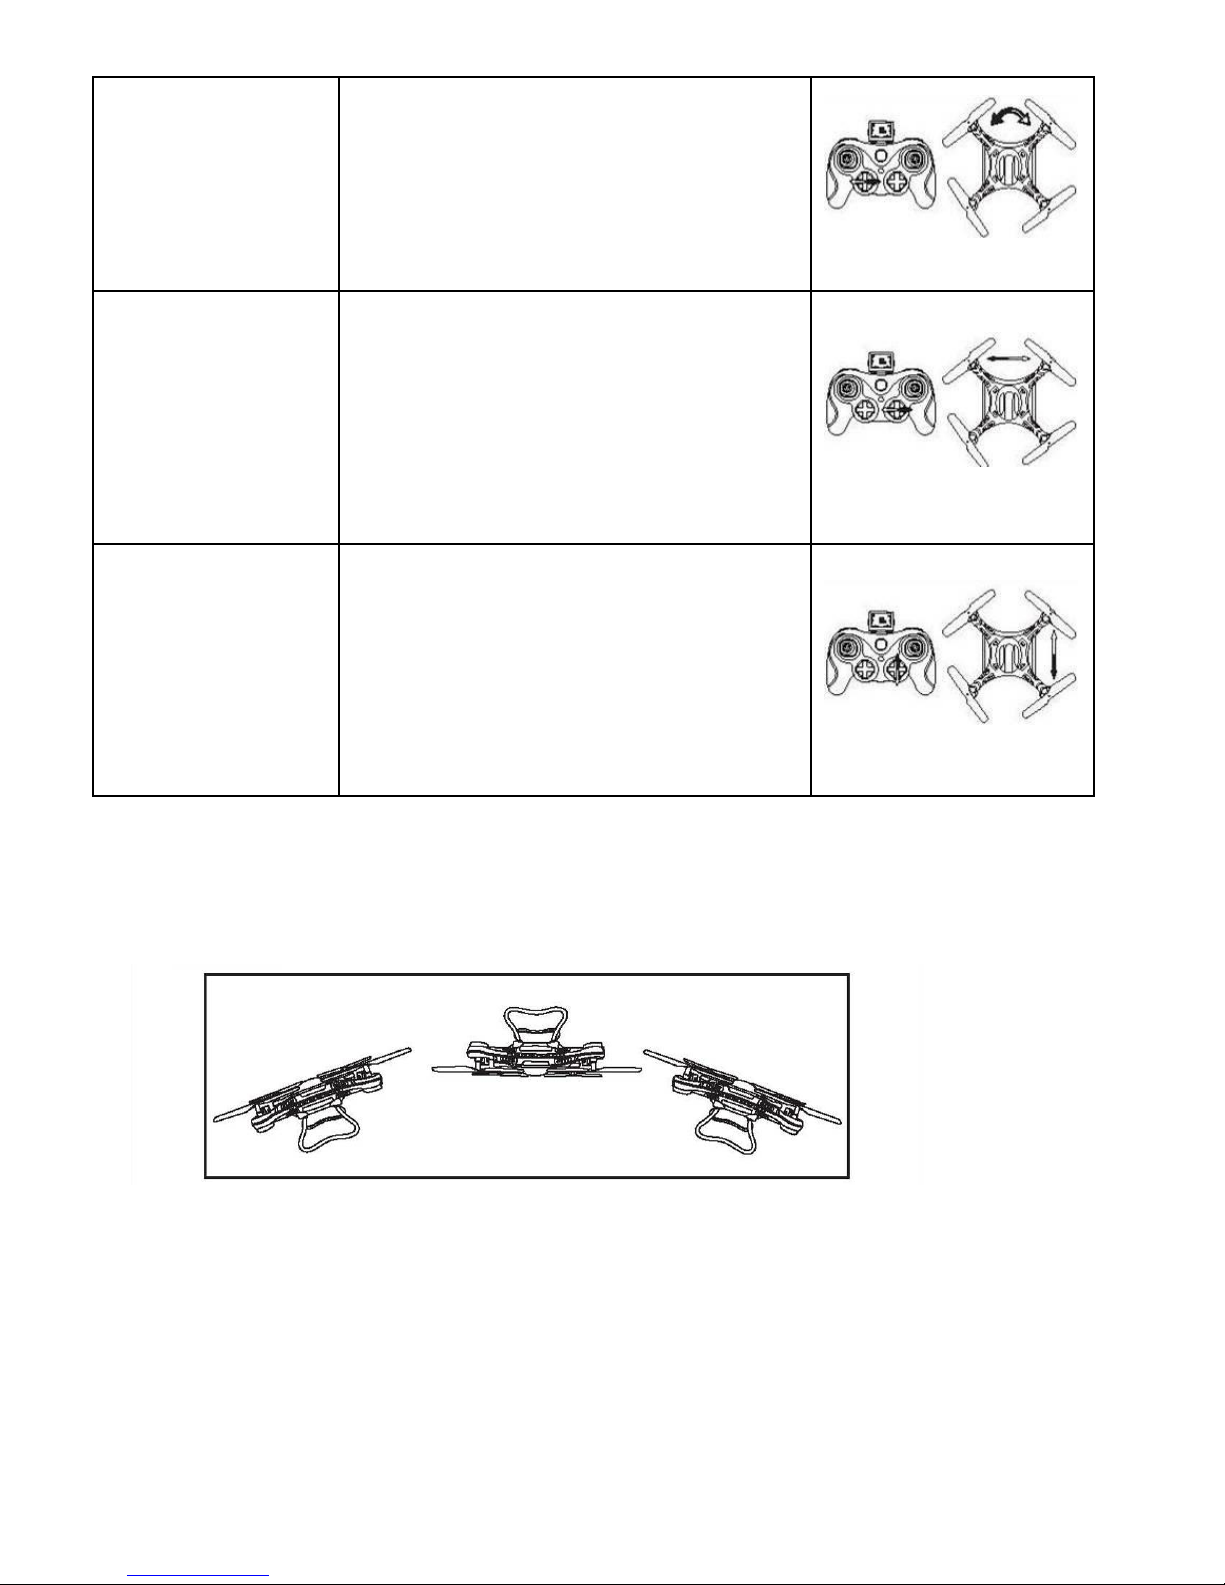
Flugbefehle und Feineinstellung
steigt/sinkt
Durch nach oben drücken des linken
Hebels erhöht sich di e
Drehgeschwindi gkei t der Motoren und
Ihr Quadrocopter steigt. Bei ziehen des
Hebels wird Ihr Model sinken.
drehen
Durch nach rechts drücken des linken
Hebels dreht sich Ihr Quadrocopter.
Wenn Sie nach rechts drücken dreht er
sich nach rechts .
nach
vorne/hinten
Durch nach vorne drücken des rechten
Hebels neigt sich Ihr Quadrocopter nach
vorne. Wenn Sie nach hinten ziehen
neigt er sich nach hinten.
seitliche
Verschiebung
Durch nach rechts drücken des rechten
Hebels fliegt Ihr Quadrocopter eine
seitliche horizontale nach rechts. Wenn Sie
nach links drücken fliegt es nach links.
12
Feineinstellung
drehen
Sollte Ihr Model sich nach rechts drehen,
ohne aufgefordert geworden zu sein,
dann benutzen Sie die Feineinstellung
nach links, um diesen zu stabilisieren.
Das gleiche gilt auch für links.
Feineinstellung
laterale
Verschiebung
Sollte Ihr Model sich nach rechts
verschieben, ohne aufgefordert
geworden zu sein dann benutzen sie die
Feineinstellung nach links um diesen zu
stabilisieren. Das gleiche gilt auch wenn
sich ihr Model nach rechts bewegt.
Feineinstellung
nach
vorne/hinten
Sollte ihr Model sich nach vorne neigen
ohne aufgefordert geworden zu sein,
dann benutzen Sie die Feineinstellung
nach hinten um diesen zu stabilisieren.
Das gleiche gilt auch wenn sich Ihr
Model nach hinten bewegt.
3D
Drücken Sie die 3D-Mode-Taste, die entsprechende Anzeige leuchtet auf Ihrem Sender.
Fliegen Sie ca. 2 m über dem Boden, dann schieben Sie schnell den rechten Stick in die
gewünschte Richtung und kommen wieder in die mittlere Stellung zurück. Ihr
Quadrocopter wird eine 360° Drehung in die gewünschte Richtung machen und sich
wieder stabilisieren.
13
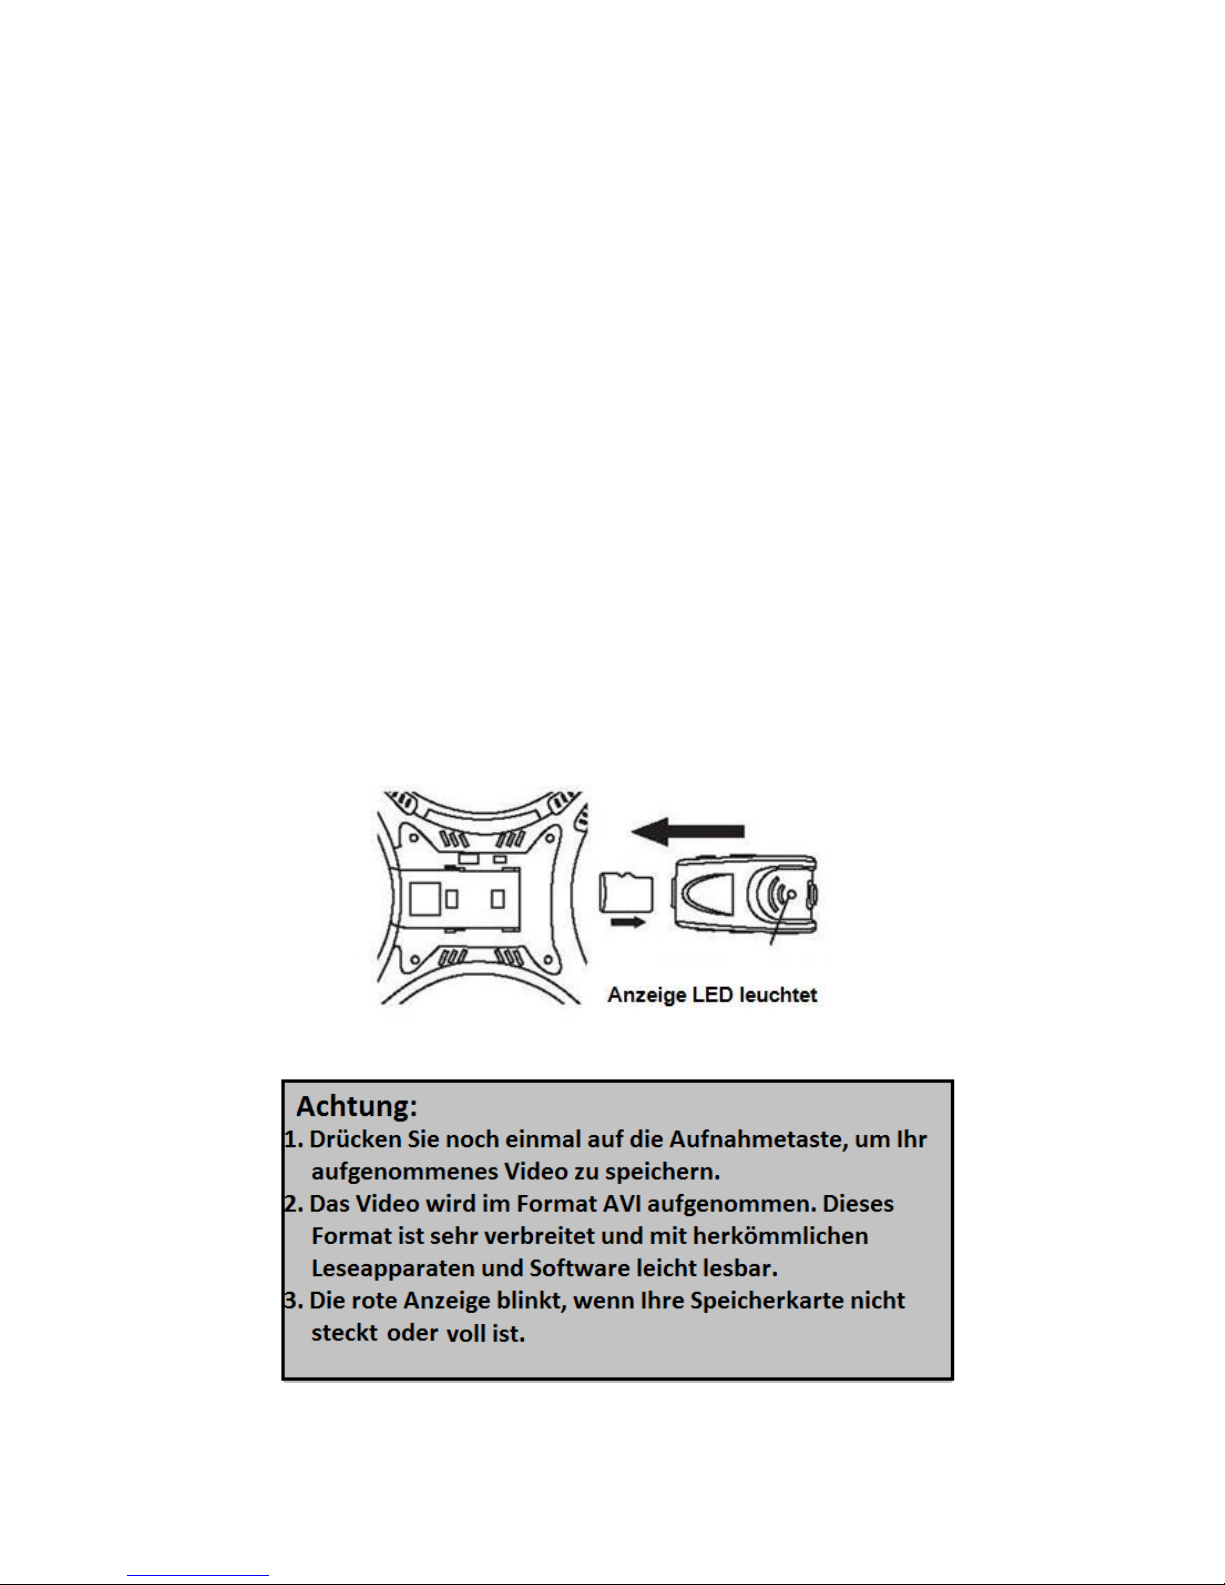
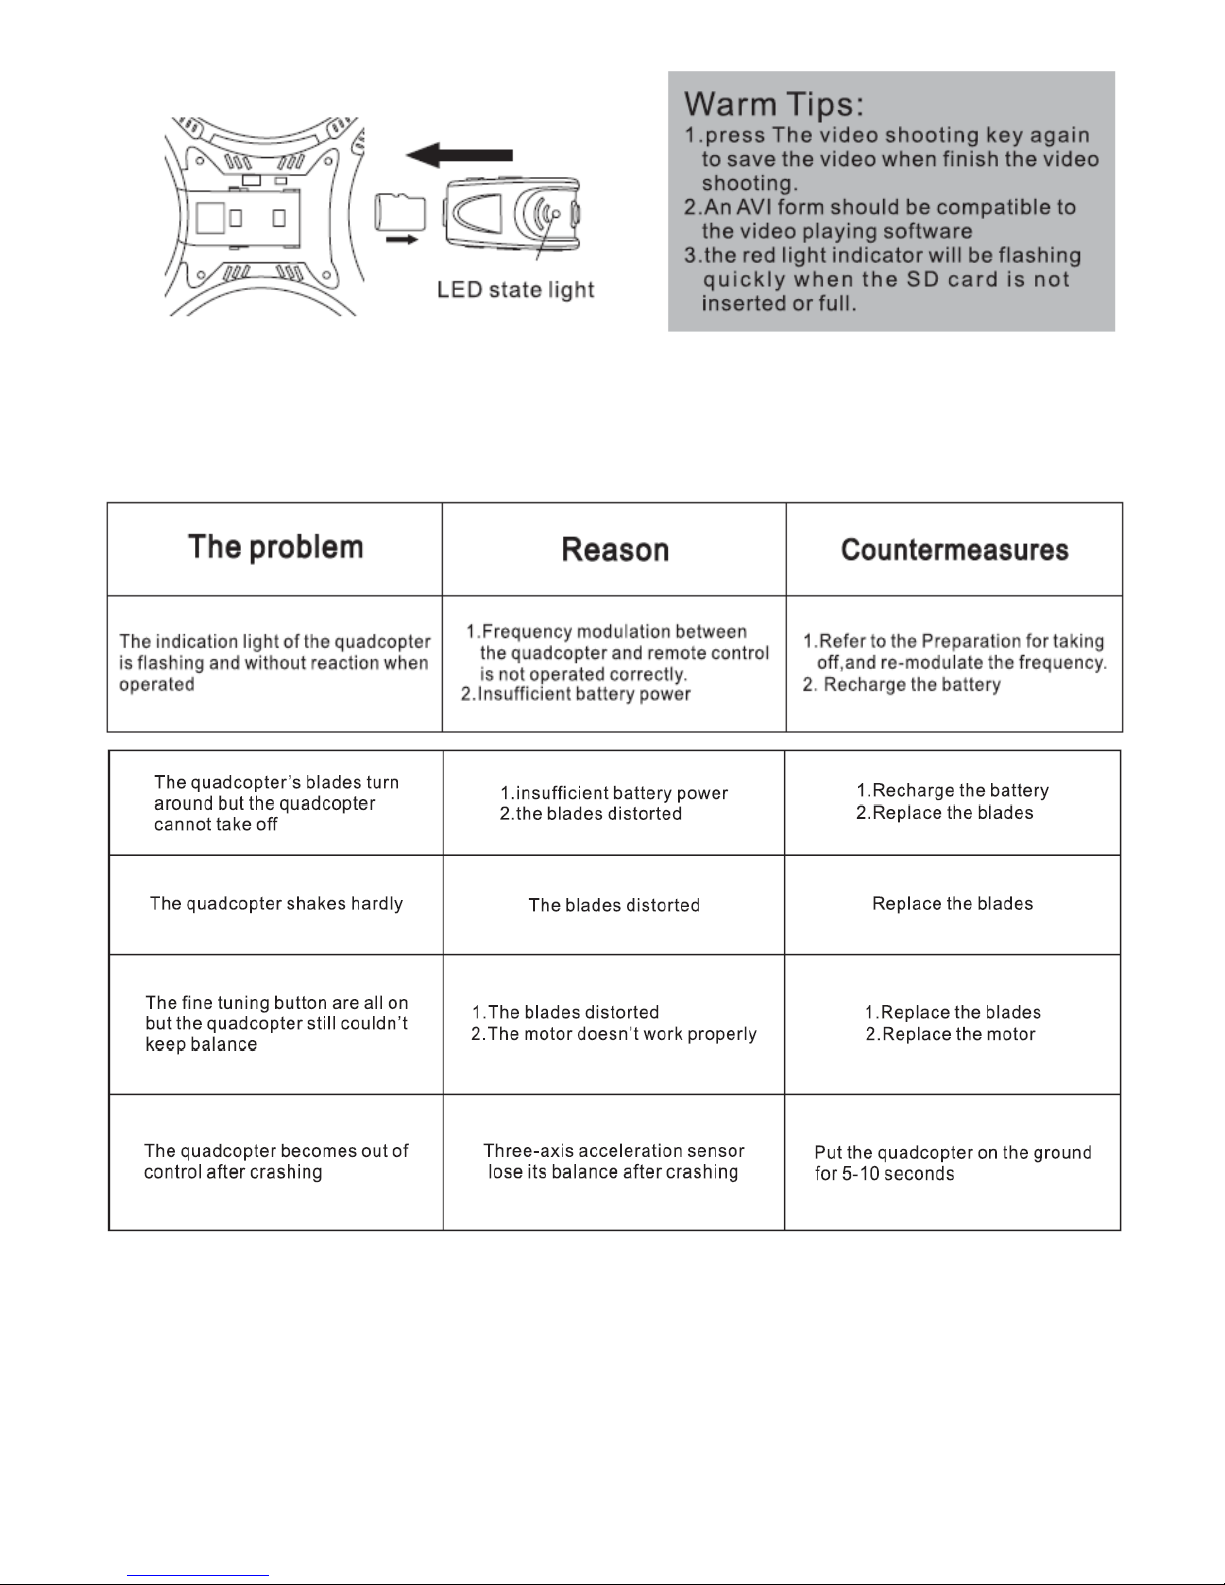
Hinweise für die Aufnahme von Bilder und Videos
1. Schieben Sie die SD-Karte in das Lesegerät auf der Seite des Webcam-Moduls
und setzen Sie das Modul in die Halterung über dem Batteriefach (siehe Abbildung).
Schließen Sie die Stromversorgung der Kamera mit der richtigen Polarität an die
Elektronik.
2. Drücken Sie die Bildmodus-Taste auf der Fernsteuerung. Wenn auf dem
Webcam-Modul das rote Licht blinkt bedeutet es, dass das Modul ein Bild aufnimmt
und abspeichert. Durch das Drücken der Video Mode-Taste bleibt das rote Licht
eingeschaltet, bis Sie die Aufnahme beenden. Drücken Sie erneut auf die Video Mode
Taste zum Beenden der Aufnahme. Das rote Licht geht aus, was darauf hinweist, dass
die Video-Aufnahme beendet ist. Auf der Fernsteuerung sehen Sie ebenso das Foto-
und Videozeichen. Dadurch erkennen Sie, ob Sie gerade ein Foto machen oder Video
aufnehmen.
3. Um die aufgenommenen Videos und Fotos zu sehen, drücken Sie leicht auf die
SD-Karte, um diese aus dem Laufwerk herausnehmen zu können und legen Sie diese
in den Kartenleser Ihres Computers ein.

14
Probleme und Lösungen
Problem
Grund
Lösung
Die Status LED blinkt, aber
das Model zeigt keine
Reaktion.
1. Die Signalmodulation
zwischen Sender und
Empfänger steht nicht richtig.
2. Restladung des/der
Akkus/Batterien ist zu
schwach.
1. Synchronisation erneut
durchführen, in dem Sie
den Sender und Empfänger
aus- und wieder
einschal ten.
2. Batterien wechseln oder
Akkus wieder aufladen.
Die Propeller des
Quadrocopters drehen,
aber dieser hebt nicht ab.
1. Akku nicht genügend
geladen.
2. Propeller beschädigt.
1. Akku neu aufladen.
2. Propeller durch neue
ers etzen.
Der Quadrocopter zittert
auf ungewöhnlicher
Weise.
Propeller beschädigt.
Propeller durch neue
ers etzen.
All e Eins tellungstas ten
sind benutzt, aber der
Quadrocopter fliegt
immer noch nicht ruhig.
1. Die Propeller sind nicht
mehr korrekt gewuchtet.
2. Die Motoren funktionieren
nicht korrekt.
1. Propeller durch neue
ers etzen.
2. Motor (en) ersetzen.
Der Quadrocopter ist
nach einem Absturz
unkontrollierbar.
Der 3-Achs -Gyro hat seine
Initialisierung beim Crash
verloren.
Setzen Sie Ihr Model auf
den Boden und warten si e
5 bis 10 Sekunden bevor
Sie die Initialisierung
wieder durchführen.

15
GB
16
Note : The vice-blade steering engine can be divided into four levels like 25%, 50%, 75% and
100% by the rudder volume fine tuning. The user could select any one of the levels according to
familiarity of operation. The original rudder volume is 25% when turn on the power.
Assembled remote controller
Open the battery cover on the back of remote controller. Insert four alkaline batteries in
accordance with the instructions on battery box. (Battery should be purchased
separately, old and new or different types of batteries shouldn´t be mixed.)
17
Quadrocopter assembling
1. Prepare screw driver, bracket and protect cover.
2. Insert the two sets brackets into the bracket holes at the bottom of the
quadrocopter (as picture shown), and then lock the four screws tightly.
3. Insert four protection covers into the holes of the protection cover, which
beside the four blades, and use the screw knife to lock four screws tightly.
Recharge the quadrocopter battery
Insert the factory equipped charger plug into the power, the recharger indicator is green,
then connect the product battery, the indicator will turn to red, it indicate the battery is
under recharging, when the indicator turns to green again under the recharge status,
that means recharge finish and the battery is full. Whole recharge time will be around 90
minutes press 3D mode key, the transmitter indicator turns on, fly the quadrocopter to 2
meters high and press the right control stick to any direction quickly to its bottom and
release it, the quadrocopter will roll to the direction corresponding to the right control
stick, if need to quit then press key again.
In case that the quadrocpter might descend on a further or insecure zone due to the
insufficient battery power when flying outsides, the quadrocopter is specially designed
with the function of secure warning. When the battery power is insufficient, the Led
light would turn from constant lighten to flashing. Then player may have time to take
back the quadrocopter and change the battery or recharge for the next flight.

18
Preperation before taking off
1. Please operate in spacious indoor or outdoor without rain or snow, and wind
power should be below 4 grade, be away from people, animals and obstacle.
2. Insert the Li-Po battery provided by factory into quadrocopter, the indication
light of the quadrocopter is flashing, then put the quadrocopter on leveled place
and wait for frequency adjustment.
3. Pull the acceleration lever to the lowest, turn on the remote control´s
switchover, push the acceleration lever to the highest, then pull it back to the
lowest again. There will be a « di » sound and the quadrocopter indication light
turns on, then the frequency adjustment is completed and it´s ready for taking
off.
Flying controlled and fine tuning
19
3D roll over
Press 3D mode key, the transmitter indicator turns on, fly the quadrocopter to 2 meters
high and press the right control stick to any direction quickly to its bottom and release it,
the quadrocopter will roll to the direction corresponding to the right control stick, if need
to quit then press the key again.
Instruction for video shooting and photographing
1. Insert the SD card slightly into the webcam module´s card channel, tie the
module as the picture shown to the card position which is at the bottom of the
battery box, and then open the upper cover and take out the webcam´s plug
and insert it into the red video shooting outlet of the circult board.
2. By pressing the photo mode key of the remote control, the red light would flash
once, meaning that the quadrocopter is taking photo ; by pres sing the video
shooting mode key, the red light turns into constant on, meani ng that the
quadrocopter is taking viedo, press the video shooting key again to stop the
shooting and the red light turns off, that means the video shooting is finished.
3. Press the SD card slightly to take it out, then insert the card into the card reader
and insert it into the USB outlet of the computer to read the data of aerial
photography from « my computer »-portable hard disk ».
20
Common problem and solution instruction :
Table of contents
Languages:


