Sizewise Envy Line G Series User manual

User
Manual
Rev. 2.0 #8047
SIZEWISE
06.23.2014
User Manual
Envy Line™: G Series™
Non-Powered Mattress System
with Optional Control Unit
TM

1
Table of Contents
Definition of Symbols..................................................................................................................... 2
Manual Definitions ......................................................................................................................... 2
Warnings and Cautions................................................................................................................... 2
Device Information......................................................................................................................... 3
Description of the Device ............................................................................................................... 3
Specifications.................................................................................................................................. 4
Unpacking and Set-Up Instructions................................................................................................ 6
Operating Instructions..................................................................................................................... 8
Modes of Operation ........................................................................................................................ 8
Keypad Quick Reference................................................................................................................ 9
Patient Care Functions.................................................................................................................. 10
Placing the Patient on the Mattress Surface.................................................................................. 10
Positioning the Patient .................................................................................................................. 10
Prone Position............................................................................................................................... 10
Bedpan Placement & Removal..................................................................................................... 10
Removing the Patient from the Mattress Surface......................................................................... 11
Safety Tips.................................................................................................................................... 12
Seven Zones of Bed Rail Entrapment........................................................................................... 12
Storage and Disposal..................................................................................................................... 13
Mattress Cleaning Instructions ..................................................................................................... 14
Approved Chemical List Extreme CARRFLEXTM Polycarbonate/Polyurethane ....................... 17
Laundry Instructions..................................................................................................................... 19
Control Unit Cleaning Instructions............................................................................................... 20
Maintenance.................................................................................................................................. 21
Troubleshooting............................................................................................................................ 22
Warranty Information ................................................................................................................... 23
60 Month Limited Warranty......................................................................................................... 23
5 Year Non-Prorated Warranty..................................................................................................... 23
User Assistance Information......................................................................................................... 24

2
Definition of Symbols
Manual Definitions
Throughout this manual different type fonts and icons are used to aid user readability and
understanding of the content. Below are some examples.
Standard Text Used for regular information.
Bold Face Text Emphasizes a word or phrase.
NOTE: SETS APART SPECIAL INFORMATION OR IMPORTANT
INSTRUCTION CLARIFICATION.
Warnings and Cautions
Warnings/Cautions: This symbol is intended to alert the user to the presence of
important operating, maintenance or servicing instructions. Disregarding a
warning could result in patient and/or user injury as well as damage to equipment.
Electrical Shock Hazard Warning: This symbol is intended to alert the user to
the presence of electrical shock hazards. It is important to follow all instructions
and special procedures to avoid electrical shock to the operator, care provider
and/or patient.

3
Device Information
Description of the Device
The system consists of a non-skid mattress base, a series of vented/foam filled air chambers, that
are encased in a foam cavity, and a low friction, anti-shear top cover. A viscoelastic comfort
layer foam topper is laminated to the top of the foam cavity and serves as the support surface
underneath the patient. The foam cavity also includes bolsters at the sides and ends of the
mattress, providing added patient stability and positioning. The system also includes a tapered
heel section that is designed to further reduce pressure for the sensitive heel area. The air cells
run laterally within the mattress. The optional air pump connects to the mattress at the patient
foot end.
CAUTION: Use of the NP24, NP12, NP9 and NP4 is only one element of care in
the prevention and treatment of pressure ulcers. Frequent repositioning, proper
care, routine skin assessment, wound treatment and proper nutrition are but a few
of the elements required in the prevention and treatment of pressure ulcers. As
there are many factors that may influence the development of a pressure ulcer for
each individual, the ultimate responsibility in the prevention and treatment of
pressure ulcers is with the health care professional.
Purpose of the Device
The NP4, NP9, NP12 and the NP24 non-powered systems provide non-powered zoned pressure
redistribution or alternating pressure redistribution when utilizing a control unit. These systems
are used for the prevention and treatment of pressure ulcers. The patient support surface fits any
standard hospital bed. The NP24 and NP12 consist of air cylinders that run laterally underneath
the entire body and are contained in a foam cavity. On top of the air cells is a viscoelastic foam
comfort layer laminated to a either a foam comfort layer. The heel section of the mattress is
tapered to further reduce pressure for the sensitive heel area. Both the air flotation system and the
foam top surface aid in pressure redistribution and in maintaining low interface pressures
throughout the surface. The optional alternating model comes with a quiet, energy-efficient
pump that provides a 10, 15, 20 or 25 minute cycle time designed to maintain low interface
pressures throughout the mattress, to redistribute peak interface pressures during the cycle and to
further relieve peak pressure points as the cycle alternates. The inflation levels are designed to
maintain low interface pressures throughout the mattress at all times. The surface is also
designed to be affective during treatment of pressure ulcers by preventing further tissue
breakdown.
The cover material is bacteriostatic, flame resistant, fluid proof, tear resistant, cleanable and
replaceable. Since the cover does not allow fluids to penetrate the surface, maintenance is
minimal. Clean and disinfect the outer surface using the cleaning protocol in this manual.
Indications for Use
The NP24, NP12, NP9 and NP4 are flotation therapy mattresses providing a pressure
management surface for the prevention and treatment of pressure ulcers. The Alternating
Pressure mode provided with the APM pump is indicated for use as a preventive tool against
further complications associated with critically ill, or immobile, patients.

4
Specifications
Dimensions
32” Wide Mattress ........................................7” X 32” X 80” / 17.5 cm X 81 cm X 203 cm
35” Wide Mattress ........................................7” X 35” X 75” / 17.5 cm X 89 cm X 191 cm
7” X 35” X 80” / 17.5 cm X 89 cm X 203 cm
7” X 35” X 84” / 17.5 cm X 89 cm X 213 cm
39” Wide Mattress ........................................7” X 39” X 80” / 17.5 cm X 99 cm X 203 cm
42” Wide Mattress ......................................7” X 42” X 80” / 17.5 cm X 107 cm X 203 cm
48” Wide Mattress ......................................7” X 48” X 80” / 17.5 cm X 122 cm X 203 cm
54” Wide Mattress ......................................7” X 54” X 80” / 17.5 cm X 137 cm X 203 cm
60” Wide Mattress ......................................7” X 60” X 80” / 17.5 cm X 152 cm X 203 cm
Weight Capacity
32” Wide Mattress ......................................................................................500 lbs. / 227 kg
35” Wide Mattress ......................................................................................500 lbs. / 227 kg
39” Wide Mattress ......................................................................................750 lbs. / 340 kg
42” Wide Mattress ......................................................................................750 lbs. / 340 kg
48” Wide Mattress ...................................................................................1,000 lbs. / 454 kg
54” Wide Mattress ...................................................................................1,000 lbs. / 454 kg
60” Wide Mattress ...................................................................................1,000 lbs. / 454 kg
Physical Characteristics
Air Cells.........................................................70 Denier Nylon / Polyurethane Foam Filled
Foam ..............................................................High-Density Polyurethane Open Cell Foam

5
Mattress Cover
The Mattress Cover is available in two different materials:
Nylon Taffeta-Nylon Taffeta offers a bacteriostatic, flame resistant, fluid proof and tear
resistant mattress cover. Nylon Taffeta is a cost effective mattress cover.
Extreme CARRFLEX is a Polycarbonate-Polyurethane material blend that offers a
bacteriostatic, flame resistant, fluid proof and tear resistant mattress cover. Extreme
CARRFLEX is resistant to a wide variety of cleaning chemicals that are typically
problematic with materials used in the medical industry concerning degradation.
Extreme CARRFLEX resists breakdown with disinfectants and cleaners based on
Chlorine, Alcohol, Peroxide, Quaternary Ammonium, Chloramine, and Phenol.
NP24, NP12, NP9 and NP4
Non-Powered, self-adjusting mattress systems.
Control Unit (optional)
Provides a 10, 15, 20 or 25 minute cycle time designed to maintain low interface pressures
throughout the mattress, to redistribute peak interface pressures during the cycle and to further
relieve peak pressure points as the cycle alternates.
6
Unpacking and Set-Up Instructions
Unpacking/Parts Breakdown
Foam Comfort Layer:..........A layer of high density viscoelastic memory foam for added
patient comfort is laminated to a polyurethane foam layer that is
then laminated to the foam cavity.
Foam Cavity: ........................A foam cavity is used to contain the air cells and stabilize the
entire surface. This foam cavity provides added edge support and
is tapered at the foot end to provide additional pressure relief in the
heel section.
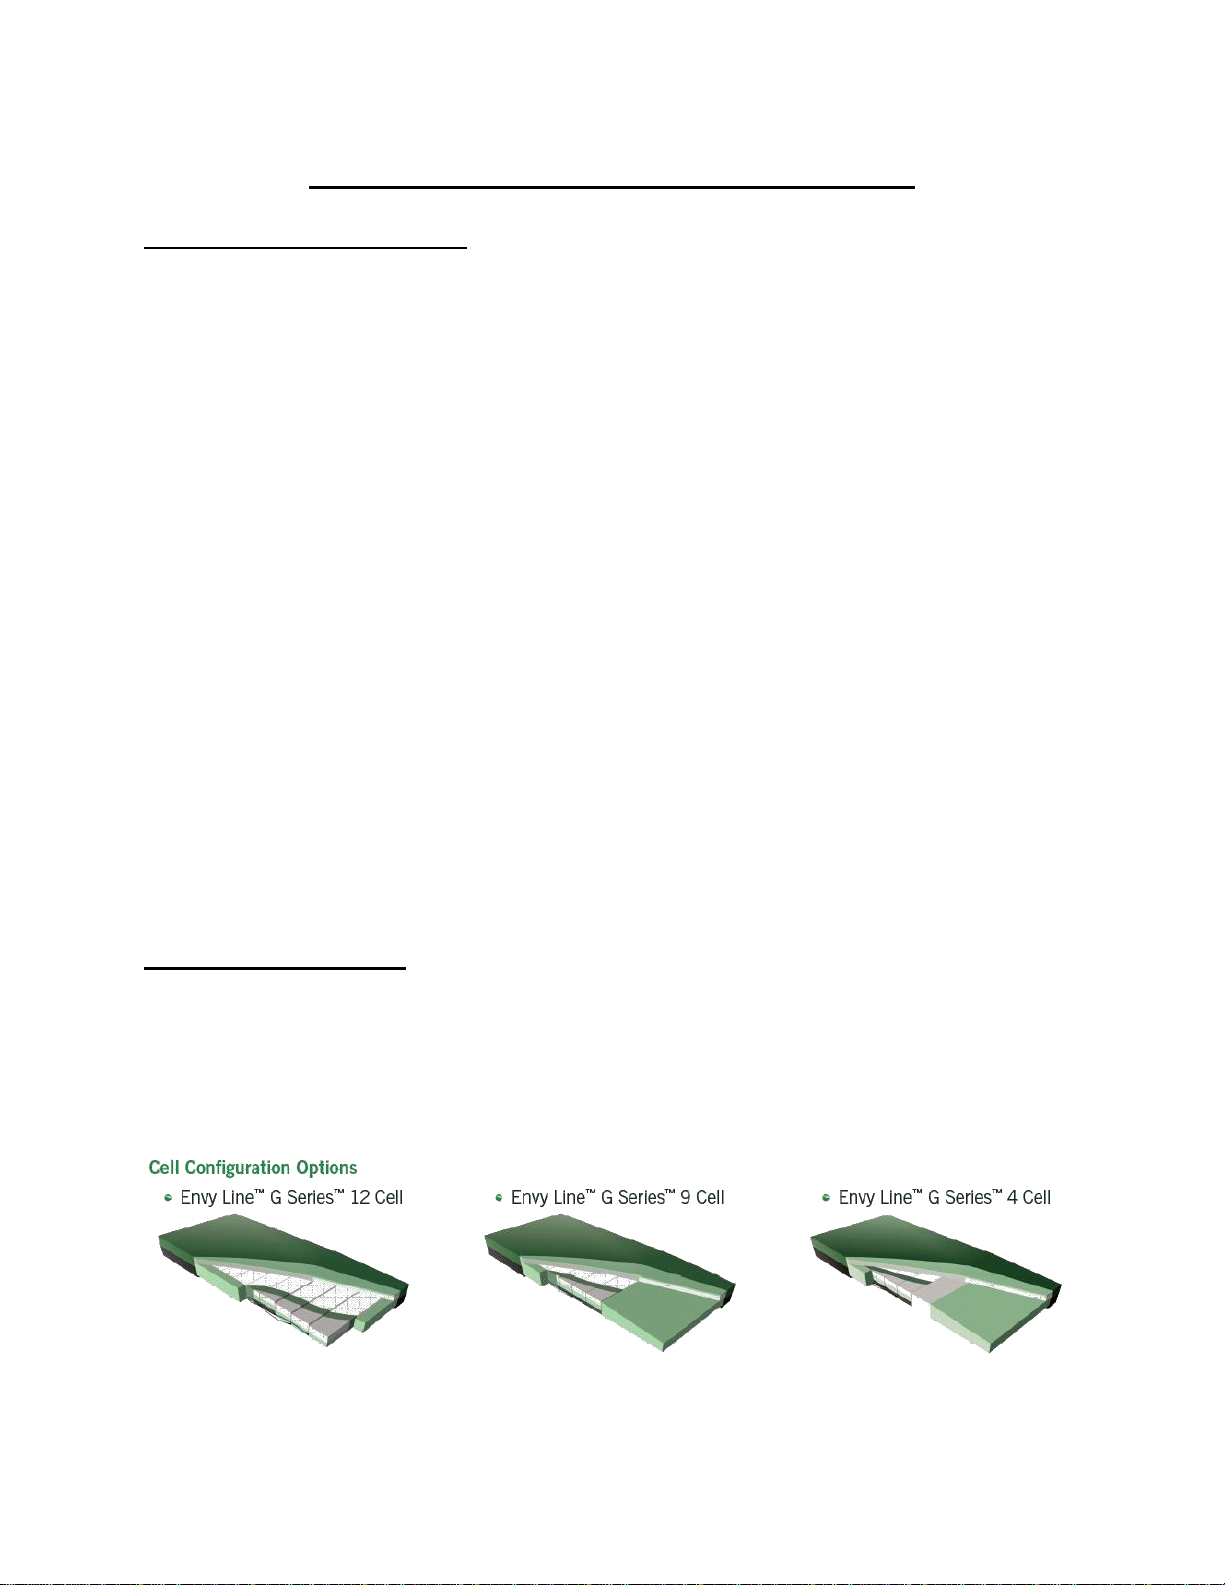
Air Cells:...............................24, 12, 9 or 4 foam filled polyurethane air cells are divided into
three separate pressure zones. By utilizing different foam densities
(firmness types) the air cells are specifically designed to meet the
pressure needs for the different zones of the body.
Cover:....................................The bacteriostatic top fabric is fire resistant, fluid proof, tear
resistant, cleanable and replaceable. It consists of either a nylon
cover, polycarbonate/polyurethane cover or a 4-way stretchable
cover.
Mattress Height:...................The total pressure management surface height is 7” (18 cm).
Friction/Shear: .....................All cover choices serve to reduce friction and shear.
Replacement Mattress:........The mattress can be placed directly on a hospital bed frame.
Pressure Management:........This combination air/foam replacement mattress system is
designed to provide pressure management in the prevention and
treatment of pressure ulcers.
Fire Barrier:.........................Internal fire barrier encases internal components in order to meet
all currently designated fire safety codes.
Unpacking Instructions (no tools required):
Remove the products from the packing material and examine for shipping damage. If damage is
detected in shipping, contact the freight company and file a damage complaint immediately.

7
Set-Up on Sizewise Bed Frames
Follow these steps for installation on Sizewise (and most non-Sizewise) bedframes:
1. Verify mattress is the correct size for the bed frame top deck. Refer to Side Rail Entrapment
Guidelines. (Table of Contents)
2. Place bed frame in flat position.
3. Install the mattress with the sloped heel section toward the foot of the bed.
4. Connect control unit (optional) and perform safety checklist in maintenance section. (See
Table of Contents)
5. Disinfect mattress prior to patient use. Refer to Mattress Cleaning Instructions (See table of
Contents)
Warning or Safety Instructions relating to set-up:
NOTE: Use of the NP24, NP12, NP9 and NP4 is only one element of care in the prevention and
treatment of pressure ulcers. Frequent repositioning, proper care, routine skin assessment, wound
treatment and proper nutrition are but a few of the elements required in the prevention and
treatment of pressure ulcers. As there are many factors that may influence the development of a
pressure ulcer for each individual, the ultimate responsibility in the prevention and treatment of
pressure ulcers is with the health care professional.
WARNING: Make sure power cord is plugged into a properly grounded AC
110V outlet.
Shown on SW Evolution™

8
Operating Instructions
Modes of Operation
The NP24, NP12, NP9 and NP4 mattresses provide static non-powered pressure redistribution.
Using the optional control unit provides alternating pressure in 10, 15, 20 or 25 minute cycle
times.
1. Place the NP24, NP12, NP9 and NP4 mattress on the bed frame with the sloped heel zone
and connectors at the foot of the bed.
2. If using the control unit, hang unit on the end of the bed using the hangers, or place on a
stable horizontal surface.
3. To connect the control unit, insert the connectors at the end of the external manifold into
the corresponding connectors on the side of the mattress. Ensure the hoses are not
"kinked" or "twisted". Push in securely until a "click" sounds. Next connect the opposite
end of the hose assembly to the alternating pressure controller.
Control Unit Operation (optional)
1. Turn Master Power switch to the ON position. A beep will sound at start of operation.
2. When power is turned ON, the control unit will indicate Alternating Pressure mode. It
will first inflate all mattress air cells to 30mmHg and then enter Alternation mode.
3. The alternating cycle time and pressure level are preset to the middle settings. Select
from the touch panel to adjust the cycle time and pressure level. It is recommended to set
the pressure level at a low setting.
4. For quick deflation:
a. Turn power OFF.
b. Remove the hoses from the control unit.
5. Low Pressure alarm
a. The Low Pressure alarm will sound if the mattress has not reached 30mmHg after
45 minutes when first turned on.
b. During normal operation the unit will constantly monitor air pressure. If the unit
senses a drop in pressure after reaching an input setting, the alarm will beep and
the LED will come on.
i. Press the Alarm Reset button to silence the audible alarm. The LED will
start blinking. Press the Alarm Reset button again to turn the audible
alarm back on and the LED will remain constantly on.
6. CPR
a. The standards for life support recommended by the American Heart Association
for performing CardioPulmonary Resuscitation (CPR) recommend a hard level
surface for performing CPR, moving the person to the floor if possible. For
performing CPR on the NP24, NP12, NP9 or NP4, place a CPR board underneath
the patient and follow standard CPR procedures/protocols of the facility.
7. Autofirm
a. Press the Autofirm button to automatically inflate the mattress to the maximum
level. The pressure will return to a previously set level after 30 minutes.
9
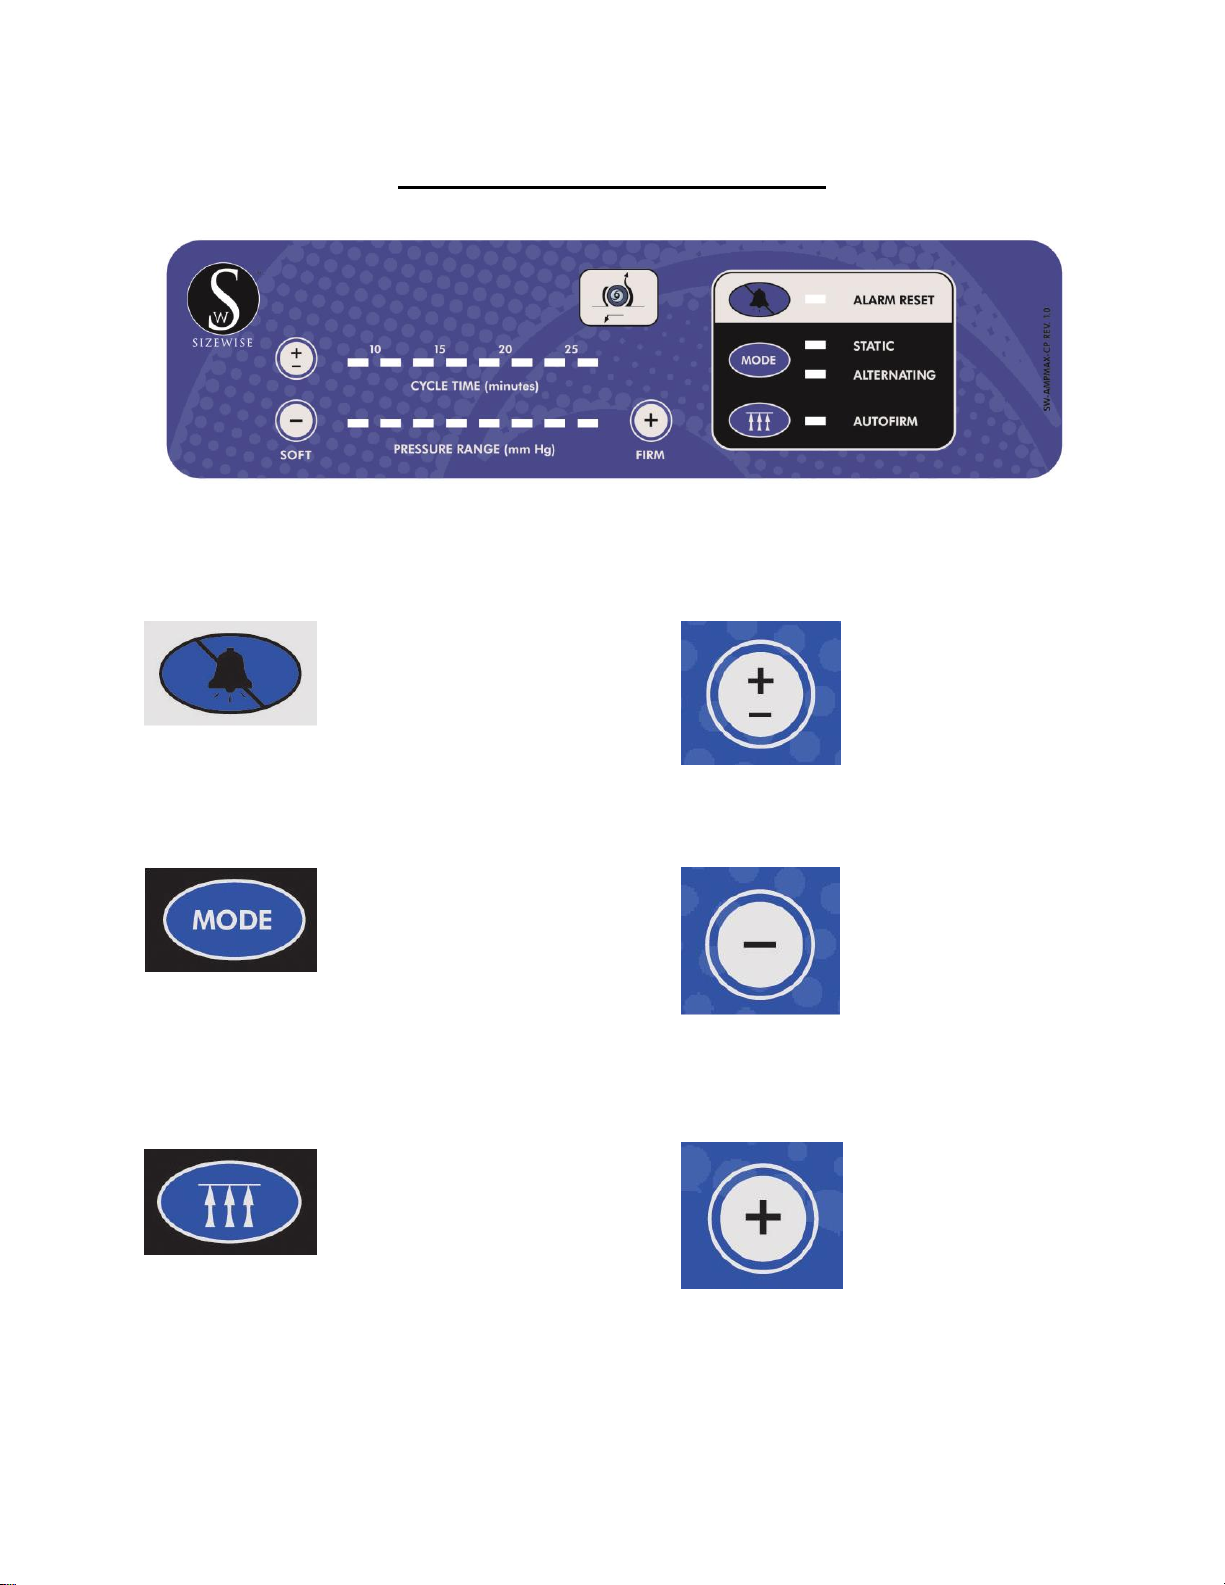
Keypad Quick Reference
Alarm Reset
Resets the audible alarm.
Mode
Push to select either “Static”
or “Alternate” therapy
mode.
Autofirm
Quickly inflates mattress to
maximum firmness. Unit
returns to previous setting
after 30 minutes.
Cycle Time
Press to change the cycle
time.
Soft
Press to decrease firmness
to the mattress.
Firm
Press to increase firmness to
the mattress.

10
Patient Care Functions
Placing the Patient on the Mattress Surface
Place the patient on the mattress surface from a bed or stretcher with a transfer device. The
mattress should be set in the Auto Firm mode.
1. Once fully inflated, position the patient in the center of the mattress with an equal distance
between the head and the top of the mattress and the feet and the foot of the mattress.
2. Set the control unit to the desired operational mode.
3. Make sure the patient has not “bottomed-out” on the foam pad in the base of the mattress.
4. The patient should be slightly immersed into the mattress but not “bottomed-out”. Use the
Soft/Firm button to make adjustments to the default settings if the patient needs firmer or
softer settings.
5. Observe the patient for a short time to make sure the patient is stable on the mattress
surface and is not slowly sinking further into the mattress. Increase the firmness setting if
the patient continues to sink into the mattress surface.
Positioning the Patient
When moving a patient the control unit should be in the Auto firm Mode.
To reposition the patient, change the control unit to Auto Firm Mode. This makes the mattress
surface firm and facilitates the repositioning of the patient with less strain on the care provider.
When the patient has been repositioned, press auto firm to return to the previous setting.
NOTE: DO NOT leave a patient unattended on the mattress surface with the safety side rails in
the down position. When leaving a patient, secure the safety side rails in the up position. Make
sure the safety side rails are high enough to properly protect the patient when the mattress is fully
inflated, while continuing to be mindful of the FDA guidelines on bed rail entrapment.
Backrest Up or Fowler Position
When the patient’s backrest is elevated, it may be necessary to manually increase the mattress
firmness to compensate for the additional weight placed in the center portion of the mattress.
Observe the patient for a short time after raising the backrest to make sure the buttocks and thigh
areas are not “bottomed-out”.
Prone Position
DO NOT leave a prone patient on the mattress surface. If the patient is unable to move without
help, the patient’s airway may be compromised. If the patient is to be kept prone for an extended
period of time, consult a Sizewise representative for assistance.
Bedpan Placement & Removal
Position the patient’s hips over the center of the mattress. Using Static Mode, lower the pressure
setting with the Firm/Soft button. Turn the patient into the side-lying position and place the
bedpan.

11
The pressure in the center section of the mattress will lower to make inserting the bedpan easier.
The firmness setting may be adjusted to increase the firmness of the center section after the pan
is placed in position.
When the bedpan is to be removed, logroll the patient off the bedpan and remove it. Readjust the
firmness level to the appropriate setting. Select Static mode and wait for the mattress to
completely re-inflate before activating alternating pressure mode again.
NOTE: Always remove the bedpan before entering the Alternating Pressure mode.
Removing the Patient from the Mattress Surface
If the patient is to be removed with a lift and transfer, set the control unit into Auto Firm mode.
Allow the mattress to firm and position the patient into the lift. When the patient has exited the
bed, the control unit can be turned off.
If the patient can sit up and is mobile, lower the firmness level to the lowest setting and wait for
the mattress to soften in the middle. The patient can sit up and the mattress will conform to the
body making a more stable platform for patient egress. When the patient has exited the bed, the
control unit can be turned off.

12
Safety Tips
Seven Zones of Bed Rail Entrapment
If the patient would have any clinical conditions that could result in risk of falling or improperly
lying in bed, the bed should be left at its lowest setting and in flat position when not attended.
Sizewise recommends the use of bed rails if they are available. There are seven zones of bed rail
entrapment.
WARNING: Bed rail entrapment is a serious health risk that can result in serious
injury or even death. Sizewise recommends the care provider be mindful of the
FDA guidelines relevant to bed rail entrapment, as serious injury can result.
These guidelines can be found on the FDA website. When using an Air Therapy
system the care provider is responsible for ensuring the mattress properly fits the
bed frame. It is also the care provider’s ultimate decision whether or not to use
bed rails with the patient.
Zone 1: Within the Rail
Zone 2: Under the Rail, Between the Rail Supports or
Next to a Single Rail Support
Zone 3: Between the Rail and the Mattress
Zone 4: Under the Rail, at the Ends of the Rail
Zone 5: Between Split Bed Rails
Zone 6: Between the End of the Rail and the Side
Edge of the Head or Footboard
Zone 7: Between the Head or Footboard and the
Mattress End
Zone Seven
Zone One
Zone Two
Zone Four
Zone Three
Zone Five
Zone Six

13
Storage and Disposal
Always store the surface flat on a clean, level surface. Avoid storage of other equipment on top
of the support surface. DO NOT expose the control unit to humidity greater than 95%.
End-of life Sizewise products must be disposed of properly according to local laws and
regulations. Please contact Sizewise or your local authorities for disposal and recycling options.
Important Safety Instructions
Unpacking and Set-Up Instructions
Keep out of direct sunlight.
(110V unit ONLY) Ensure the power cord is plugged into a properly grounded AC 110V
outlet.
Safety Tips
Medical equipment should not be used, stacked or located on or around equipment that
may create electromagnetic interferences.
Using other manufacturers’ cables and accessories may affect EMC performance.
Unauthorized use of these items will void warranty and could result in patient and/or user
injury as well as damage to equipment or other property.
The use of cables or accessories other than those for which the blower was designed or
tested can significantly degrade emissions and immunity performance.
DO NOT use the device if the power cord is cut, frayed or loosely connected.
Mattress Cleaning Instructions
It is recommended that gloves and protective clothing be worn at all times during
cleaning and disinfecting.
DO NOT autoclave.
The mattress requires regular maintenance to ensure performance and avoid premature
wear, damage and injury.
Troubleshooting
Only authorized personnel should engage in the troubleshooting process.
Troubleshooting by unauthorized persons could result in personal injury or equipment
damage.
To avoid electrical shock, DO NOT open the control unit. Refer servicing to qualified
personnel only.

14
Mattress Cleaning Instructions
WARNING and CAUTION:
It is recommended that gloves and protective clothing be worn at all times during
cleaning and disinfecting.
Do not autoclave.
NOTE: Improper cleaning, rinsing or the incorrect use of cleaning agents can lead to premature
fabric discoloration and breakdown of the fabric’s fluid-resistance, stain-resistance and fabric
strength. Properly rinsing all cleaning agents and disinfecting chemicals is a critical step in
extending the life of covers on medical mattresses and support surfaces.
Over time, cleaning solutions may cause damage to the integrity of the fabrics used for support
surfaces. Cleaning agents that are strong enough to be efficacious cleaners and disinfectants may
cause degradation of the same fabrics on which they are being used.
To minimize the negative impact of cleaning agents:
Contact time must be monitored and kept to the required time identified on the
manufacturer’s instructions.
All cleaning solutions must be diluted in accordance with manufacturer’s instructions.
All covers must be rinsed after every cleaning cycle. Rinsing of the support surface
covers with clean water as the immediate step after the disinfection process is
fundamental to extending the usable life of the covers.
NOTE: Only the outer cover of the mattress requires cleaning and maintenance. Disassembly
of the support surface for maintenance of internal components is not recommended. Do not use
harsh solvents or cleaners. Special care should be used to not puncture the mattress with needles
or sharp instruments. This may result in loss of integrity of the mattress cover or internal
components.
Mattress Top Covers
NOTE: There are significant differences between chemical cleaning agents that can be used
concerning the two different available mattress materials.
Nylon Taffeta Mattress Top Cover:
Personal Protective Equipment should always be used as directed by the disinfectant’s Material
Safety Data Sheet.
1. Prepare the disinfectant according to the manufacturer’s recommendations.
2. Prepare a separate bucket of warm, fresh water to be used for rinsing the equipment after
cleaning/disinfecting procedures are completed as instructed.
3. All surfaces of the mattress are to be wiped using a coarse cloth dampened with the
disinfectant, prepared as directed by the manufacturer’s recommendations, to remove
organic material and visible soil.

15
4. Allow the mattress shell to remain wet with disinfectant solution for the manufacturer’s
recommended contact time.
5. Stains on the mattress top cover may be treated using an approved stain remover,
according to the manufacturer’s recommendations.
6. Rinse all surfaces of the mattress with fresh water and clean cloth to remove chemical
and organic residue.
Recommended EPA Registered Disinfectants:
Wex-Cide 128 (Wexford Labs), EPA Reg. #34810-31
Equipment must be disinfected using an EPA registered, hospital-grade disinfectant, according to
the manufacturer’s recommendations for use.
Recommended Stain Remover(s):
Stain Away (ABC Compounding)
This stain remover is effective in removing most difficult stains and is intended to be used in its
original concentration.
Clostridium difficile (C. diff) Prevention:
Clorox Germicidal Wipes (Clorox Professional Products Company), EPA Reg. #67619-12
These pre-moistened wipes meet the CDC’s recommendations for Clostridium difficile (C.diff)
bacteria, after the manufacturer’s recommended “wet contact time”.
1. Perform hand hygiene using soap and warm water, or hand sanitizer, and then put on
disposable gloves and eye protection.
2. Use wipes to wipe the top and front of head/footboards, hand controls and cords, side
rails and mattress top cover, making sure to wipe between the mattress and side rails.
3. Change wipes often to ensure that surfaces remain wet with disinfectant for the
manufacturer’s required contact time. Used wipes are to be discarded in the trash.
4. Remove disposable gloves and discard in the trash; perform hand hygiene using soap and
warm water, or hand sanitizer, and then remove eye protection.
To reduce the discoloration of fabrics and degradation of the sleep surface lining, surfaces must
be thoroughly rinsed with clean, fresh water to remove chemical residues immediately after the
manufacturer’s recommended “wet contact time” has been reached. The use of bleach-based
solutions must be avoided whenever possible.

16
Extreme CARRFLEXTM Polycarbonate/Polyurethane Mattress Top Cover:
The polycarbonate polyurethane material is resistant to a wide variety of hospital cleaners and
resists breakdown with disinfectants and cleaners based on Chlorine, Alcohol, Peroxide,
Quaternary Ammonium, Chloramine and Phenol.
Personal Protective Equipment should always be used as directed by the disinfectant’s Material
Safety Data Sheet.
1. Prepare the disinfectant according to the manufacturer’s recommendations.
2. Prepare a separate bucket of warm, fresh water to be used for rinsing the equipment after
cleaning/disinfecting procedures are completed as instructed.
3. All surfaces of the mattress are to be wiped using a cloth dampened with the disinfectant,
prepared as directed by the manufacturer’s recommendations, to remove organic material
and visible soil.
4. Allow the mattress shell to remain wet with disinfectant solution for the manufacturer’s
recommended contact time.
5. Stains on the mattress top cover may be treated using an approved stain remover,
according to the manufacturer’s recommendations.
6. Rinse all surfaces of the mattress with fresh water and clean cloth to remove chemical
and organic residue.
No Abrasives: Abrasive cleaners and abrasive cleaning devices (scouring sponges) will
dramatically reduce the life of any polyurethane surface. Do Not Use Solvents!
Follow Dilution Recommendations: One of the most significant errors in cleaning
mattress surfaces is not diluting a cleaner according to manufacturer recommendations.
Most surface cleaners are sold in concentrated forms and are intended to be diluted,
usually with a large percentage of water. Failing to do this can shorten the life of the
mattress surface significantly.
Rinse After Using A Cleaning Agent: When you wipe across a surface with a
cleaner/chemical strong enough to kill bacteria, you must rinse afterward. Leaving the
cleaner to dry on the surface will shorten its lifespan.
NOTE: Only the outer cover of the mattress requires cleaning and maintenance.
Disassembly of the support surface for maintenance of internal components is not
recommended. Special care should be used to not puncture the mattress which would
result in loss of integrity of the mattress cover and/or internal components.

17
Approved Chemical List for Extreme CARRFLEXTM Polycarbonate/Polyurethane
Mattress Top Cover
PRODUCT CONCENTRATION
ACTICHLOR PLUS
2000 PPM
ACTIMAX
ACCORDING TO MANUFACTURERS
SPEC
ALCO-DC-7
ACCORDING TO MANUFACTURERS
SPEC
ALCO SANNI
ACCORDING TO MANUFACTURERS
SPEC
ARJO DISINFECTANT
ACCORDING TO MANUFACTURERS
SPEC
ASEPTI ACTIVE WIPES
READY TO USE
ASEPTIC ACTIVE LIQUID
ACCORDING TO MANUFACTURERS
SPEC
AZO MAX MULTI SURFACE WIPES
ACCORDING TO MANUFACTURERS
SPEC
AZO WIPE HARD SURFACE WIPES
ACCORDING TO MANUFACTURERS
SPEC
CID A-L CLEANER (SUREHANDS)
ACCORDING TO MANUFACTURERS
SPEC
CIDAL DISINFECTANT CLEANER
ACCORDING TO MANUFACTURERS
SPEC
CLINELL HAND & SURFACE SANITIZER
DISINFECTANCT
ACCORDING TO MANUFACTURERS
SPEC
CLINELL UNIVERSAL SANITIZING
WIPES
ACCORDING TO MANUFACTURERS
SPEC
CLINELL DETERGENT WIPES
ACCORDING TO MANUFACTURERS
SPEC
CLINELL SPORICIDAL WIPES
ACCORDING TO MANUFACTURERS
SPEC
DISINFECTING WIPES
ACCORDING TO MANUFACTURERS
SPEC
DISPATCH DISINFECTANT
ACCORDING TO MANUFACTURERS
SPEC
DIVERCLEANSE
125 ML:4 LITRES WATER
ECOPINE
5% (1:20 WATER)
HYGENA WASH (SUREHANDS)
ACCORDING TO MANUFACTURERS
SPEC
ISOPROPYL ALCOHOL
70%
ISOWIPES (KIMBERLY-CLARK)
READY TO USE
JUMBO LIV-WIPES
ACCORDING TO MANUFACTURERS
SPEC
LEGGESIDE HB (LEGGE SYSTEMS)
ACCORDING TO MANUFACTURERS

18
SPEC
LEMEX
ACCORDING TO MANUFACTURERS
SPEC
MEDIWIPES DISINFECTION (SULCO
LIMITED)
ACCORDING TO MANUFACTURERS
SPEC
MILTON ANTI-BACTERIAL TABLETS
1 TABLET: 2 LITRES OF WATER
MULTIKLEEN
ACCORDING TO MANUFACTURERS
SPEC
NEUTRAL DETERGENT WIPES
(REYNARD HEALTH SUPPLIES)
ACCORDING TO MANUFACUTRERS
SPEC
NON ACID BATHROOM CLEANER
(CERTO)
ACCORDING TO MANUFACTURERS
SPEC
OASIS PRO 12 CLEANER
5% (1:20 WATER)
ODACON SPRAY
ACCORDING TO MANUFACTURERS
SPEC
PAL DETERGENT WIPES
ACCORDING TO MANUFACTURERS
SPEC
PUREGREEN 24 (PURE GREEN)
ACCORDING TO MANUFACTURERS
SPEC
ROOM CARE R2L
ACCORDING TO MANUFACTURERS
SPEC
SANICARE TBX
ACCORDING TO MANUFACTURERS
SPEC
SANICARE DISINFECTANT WIPES
(BUCKEYE INTL)
ACCORDING TO MANUFACTURERS
SPEC
SODIUM HYPOCHLORITE
13000 PPM (1.3%)
SPRING CLEAN (ECO LAB)
5% SPRING CLEAN (1:20 WATER)
STERRIMATT (PURE) FOAM
READY TO USE
SUPER SANI CLOTH-GERMICIDAL
DISPOSABLE WIPES (PDI)
ACCORDING TO MANUFACTURERS
SPEC
SURFACE SANITIZING WIPES
ACCORDING TO MANUFACTURERS
SPEC
TERMINATOR ONE STEP DISINFECTANT
(BUCKEYE INTL)
ACCORDING TO MANUFACTURERS
SPEC
THERASOL (SUREHANDS)
ACCORDING TO MANUFACTURERS
SPEC
TRIGENE (BIO STRATEGY)
ACCORDING TO MANUFACTURERS
SPEC
TRIX (SOAP)
READY TO USE
TUFFIE 5 CLEANING WIPES
ACCORDING TO MANUFACTURERS
SPEC
TURBO CLEANER (SUREHANDS)
ACCORDING TO MANUFACTURERS
SPEC
USEALL (TRUE BLUE CHEMICAL)
ACCORDING TO MANUFACTURERS
SPEC

19
VIRACLEAN (WHITELY MEDICAL)
ACCORDING TO MANUFACTURERS
SPEC
VIREX (DIVERSEY)
ACCORDING TO MANUFACTURERS
SPEC
VIRKON (DUPONT)
5% VIRKON (1:20 WATER)
Equipment must be disinfected using an EPA registered, hospital-grade disinfectant, according to
the manufacturer’s recommendations for use.
Laundry Instructions
If additional cleaning is necessary, top covers may be removed and laundered using standard
hospital disinfectant/detergent. DO NOT use temperatures in excess of 120F (49C).
1. Set washing machine to Regular Cycle.
2. Pre-soak with disinfectant/detergent in cold water for 10 minutes. DO NOT USE
HARSH SOLVENTS OR CLEANERS.
3. Main wash cycle: 15 minutes (time dependent on soil level).
4. Rinse cycle: 5 minutes, minimum.
5. Spin/Drain cycle: 5 minutes, minimum.
After washing, the mattress top cover is to be air dried or dried in a dryer at very low or no heat
to protect it from heat related damage.
Mattress Base:
1. Prepare the disinfectant according to the manufacturer’s recommendations.
2. Prepare a separate bucket of warm, fresh water to be used for rinsing the equipment after
cleaning/disinfecting procedures are completed as instructed.
3. All surfaces of the mattress are to be wiped using a coarse cloth dampened with the
disinfectant, prepared as directed by the manufacturer’s recommendations, to remove
organic material and visible soil.
4. Allow the mattress shell to remain wet with disinfectant solution for the manufacturer’s
recommended contact time.
5. Stains on the mattress base may be treated using an approved stain remover, according to
the manufacturer’s recommendations.
6. Rinse all surfaces of the mattress with fresh water and a clean cloth to remove chemical
and organic residue.
7. After washing, the mattress base must be allowed to air dry.
Cleaning Blood and Other Excretions:
Blood and other excretions should be wiped up while wet, if possible. These substances are
more difficult to remove once they have dried to surfaces. Dried blood and other excretions are
to be removed using ample disinfectant solution in order to moisten the substance and make it
easier to clean.
Table of contents
Other Sizewise Personal Care Product manuals


