SKEDCO Micro Hauler User manual

Using the Micro Hauler Camming Pulley System
This system gives you a 4:1 mechanical advantage
♦Using a large steel locking carabiner attach the top end of the Micro Hauler system to a
substantial anchor (tripod, beam etc). Lock the carabiner.
♦Pull on the cord that is attached to the cam to release the cam from holding the rope. Do not
remove the safety pin because that will completely open the cam and allow the rope to come
out of the guide channel. Pull the cord around the frame and secure it into the dimpled
"retainer catch" on the back of the frame. This allows the rope to move freely through the
system in both directions.
♦Pull down on the steel carabiner that is attached to the lower pulley until it is low enough to
clip into the load (stretcher, equipment or rescuer). Holding the tail end of the rope lower the
load to the bottom of the space in which you will be working.
♦Re-engage the cam to the rope by pulling down firmly on the attached cord and releasing.
♦After the patient or litter is attached to the lower pulley with the carabiner the load can be
raised by pulling on the tail end of the rope.
♦To make it easier to grip the rope, a handled ascender can be used. Open the cam on the
ascender and insert the tail end of the rope into the rope channel and re-engage the cam.
♦To make raising the load even easier, attach a Skedco Rescue Stirrup to the handled rope
grab using a screw link or small carabiner. For your safety, attach the short end of the stirrup
(safety strap) to the front D ring on you harness. Insert your foot into one of the foot stirrups
(steps) at the bottom. Push down with the your foot. This will raise the load. Release the
pressure on your foot and slide the handled rope grab upward on the rope while raising your
foot. Press down with your foot again. Repeat this action until the load has been raised to a
point that you can remove it from the system.
Note: When hauling a rescue load long distances it will be necessary to change feet to prevent
over tiring of the leg muscles. This technique makes it much easier to raise the load and prevents
fatiguing your arm muscles which you will need to remove the load from the system. It is much
safer for you and the victim if your arms are not tired.
♦The Micro Hauler can be used on a "piggyback" haul system rather than taking time to do a
complicated Z rig. To do this, select a very strong anchor. Attach the upper end of the Micro
Hauler to the anchor using a large steel locking carabiner. Attach a Rescuescender or other
suitable rope grab to the lower pulley.
♦Attach the rope grab to the haul line. The haul line should be over an edge roller or suitable
rope protective device at the edge of the hole / roof / cliff to prevent abrasion. The haul
system will be horizontal. It is necessary to use prusiks or proper rope grabs on the haul line
to allow resetting and safe rope management.
♦It is always necessary to have a proper belay line (safety line) attached to a separate strong
anchor in case the main anchor or other part of the system fails. (You must have redundant
"back up" on any rope rescue system.)
♦To raise the load pull the lower pulley and rope grab toward the load / edge. Allow the cam
to grab the rope. Pull on the tail end of the Micro Hauler rope. This will raise the load.
When the pulleys come together, set the prusiks or rope grabs of the haul line. Release the
tension on the Micro Hauler. Open the Micro Hauler cam. Slide the rope grab and lower
pulley back toward the rescue load. Allow the rope grab to grip the haul line. Pull again on
the tail end of the Micro Hauler rope until the pullies come together. Repeat this action until
the rescue load is up to a point where it can be managed by hand. Disconnect the load, treat
and transport the patient.
♦To create a 5:1 system simply attach the double pulley to the anchor and the Micro Hauler to
the rope grab that is secured to the haul line.
Note: When a rescue load is on the haul system do not completely open the cam. Use the cord
that is attached to the cam to release it from the rope. This will prevent the rope from coming
out of the channel. In case of an emergency, simply let go of the cord and the cam will engage
the rope and stop the downward movement of the load.
Maintenance of the Micro Hauler 4:1 System
When the Micro Hauler or pulley becomes muddy wash it with mild soap and water. Flush all
soap and other residue with clean water and dry completely. Apply a small amount of oil to the
pulley axels. Wipe away all excess oil. For greasy substances clean with kerosene. Wipe away
all excess before using again.
Attaching Cam Release Cord to Cam
The end of the cam release cord must be tapered in order to get it through the cam. The easiest
way to do this is to heat the end of the cord with a lighter and then taper the end with a gloved
hand using your finger. (Be cautious as the end of the cord will be hot when heated.) It may be
necessary to pull the cord through with a pair of pliers. Tie the cord to the cam using an overhand
trace knot. Leave about a two inch loop in the cord as shown below. Tying the knot tight against
the cam will interfere with the operation of the Micro Hauler.
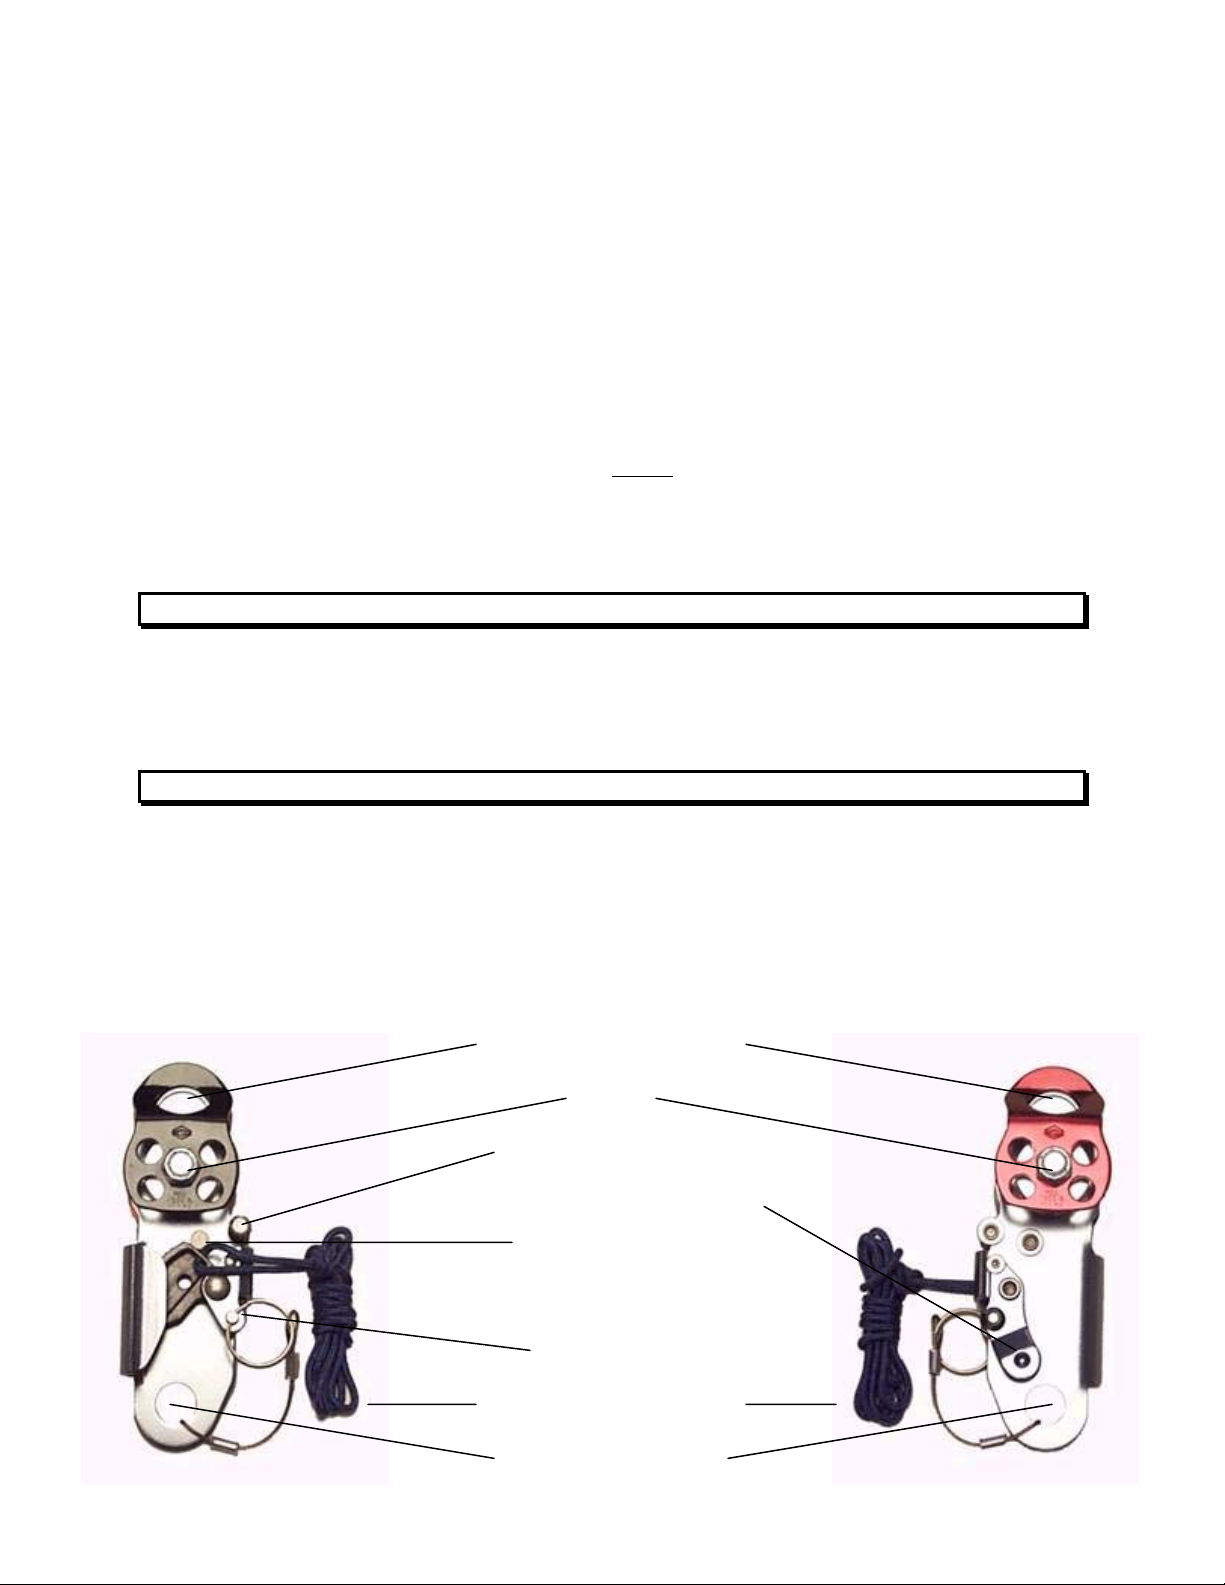
TOP BECKET (HOLE)
AXLE
ROPE GUIDE PIN
CORD RETAINER CATCH
CAM STOP PIN
SAFETY PIN CAM HOLE
SAFETY PIN
CAM RELEASE CORD
LOWER BECKET

SKEDCO
MICRO HAULER
WARNING
! USE ONLY IN ACCORDANCE WITH MANUFACTURER'S INSTRUCTIONS.
! INSPECT AFTER EACH USE IN ACCORDANCE WITH
MANUFACTURER’S INSTRUCTIONS.
! REPAIR ONLY IN ACCORDANCE WITH MANUFACTURER'S INSTRUCTIONS.
BEFORE USE
It is the responsibility of the purchaser and user of this product to:
Read the product instructions and labels and follow them.
Inspect the product immediately after purchase and before and after each use.
Receive training in the proper use of the equipment and in the appropriate techniques. Proper
training includes safety procedures, limitations of the equipment, inspection of equipment
and risk management.
Determine if the product is suitable for its intended use and that it meets all applicable
standards and regulations.
Use good judgment and do not exceed the limitations of the user? skill or the equipment.
Use adequate safety precautions including belays and backup systems. Practice risk
management at all times.
Do not alter the product in any way.
INSPECTION/RETIREMENT
SKEDCO recommends inspection before and after each use. Retire this product if there are any signs of
distortion, cracks, corrosion, sharp edges or wear. Equipment that has been shock loaded or subjected to
excessive loads including drops should also be retired. Equipment should be retired and replaced if
there is any doubt about the safety or serviceability of the equipment.
MAINTENANCE
Clean and dry this equipment after each use to remove any dust, debris, and moisture. Dry out of direct
sunlight. Store this and all other equipment in a clean, dry place.
SKEDCO recommends that a use log be maintained for this and any other piece of equipment. This log
should include date and manner of use, inspection results and inspector’s signature.

REPAIR
SKEDCO recommends that all repair work be done by the manufacturer. All other repair work or
modification of the product may void the warranty and releases SKEDCO from all liability and
responsibility as the manufacturer.
These instructions should be kept in a permanent record. A copy should be kept with the equipment for
reference before and after each use of the equipment. Failure to follow these instructions could result in
serious injury or death!
WARNING
! Serious injury or death may result from the improper use of this equipment.
! This equipment has been designed and manufactured for use by
experienced professionals only.
! Do not attempt to use this equipment without proper training!
- G (GENERAL USE)
- MBS 7,000 LBS
SKEDCO Inc., PO Box 3390, Tualatin, OR 97062
Tel: (503) 691-7909 Fax: (503) 691-7973 Order: 800-770-SKED
Website: www.skedco.com email: [email protected]
Table of contents
Popular Safety Equipment manuals by other brands

SafeWaze
SafeWaze 019-8000 user manual

SafeWaze
SafeWaze LATITUDE PRO SRL-P Series instruction manual

IKAR
IKAR HAS 9 Log book and instructions for use

Spanset
Spanset PowerForce Original operating instructions

Black Diamond Equipment
Black Diamond Equipment RECON LT quick start guide

Rescue Solutions International
Rescue Solutions International ResQmax Operation manual


