Thank you for purchasing a SKF bottom bracket unit. For best
performance of your bike, please read the following instruction thoroughly
before mounting and use this manual for SKF bottom bracket unit model
year 2005 and later. You can find more details for the use of SKF products
on the SKF website: www.skfbike.com.
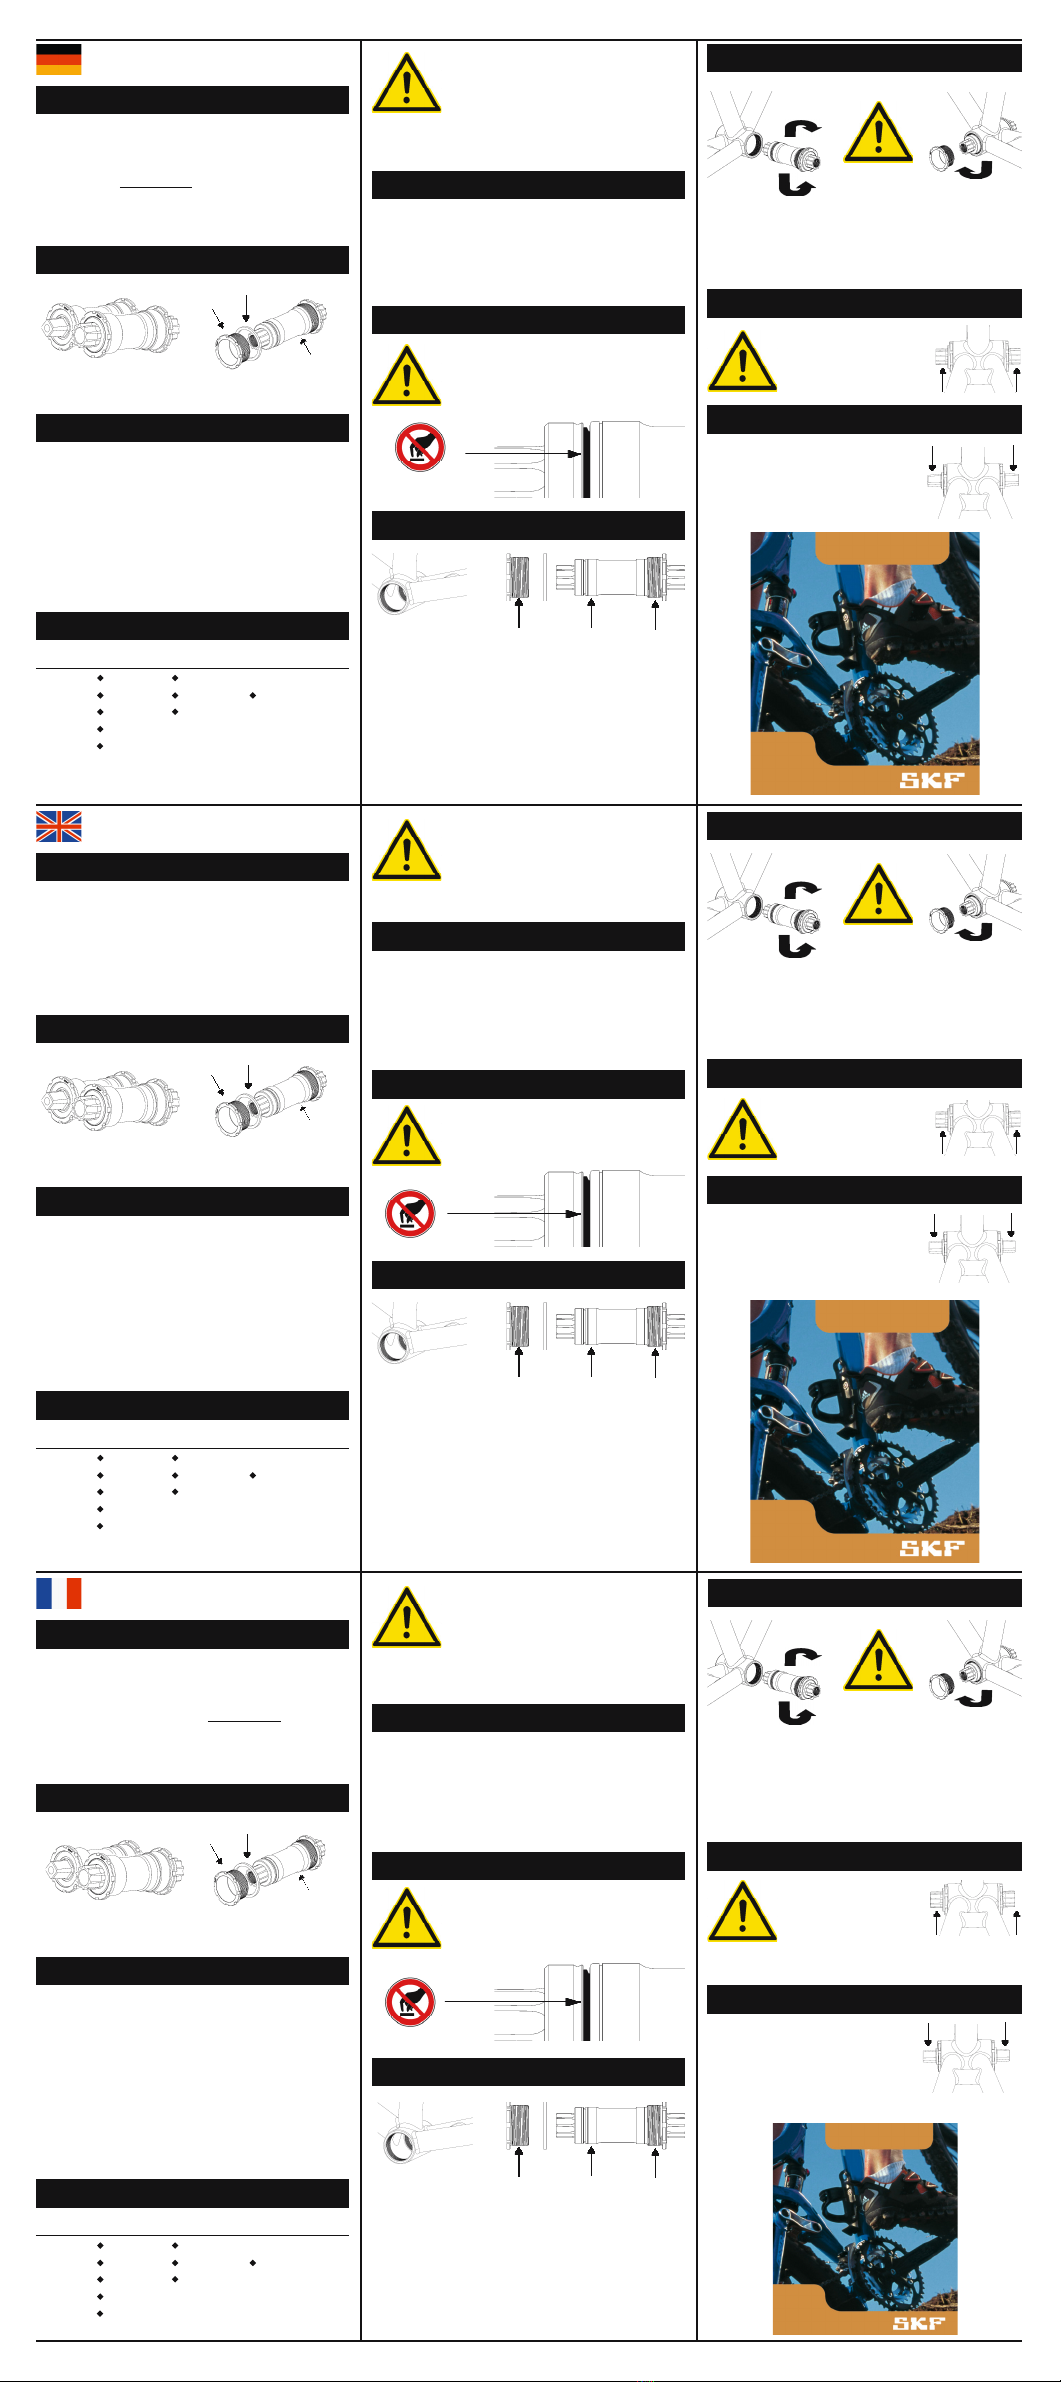
SKF bottom bracket unit and components
Trademarks and patents
Mounting instructions
Type of application and safety instruction
The design of the SKF bottom bracket unit and the SKF axial seal are
protected by international patents.
Threaded sleeve
Spacer (optional)
Bearing cartridge
SKF bottom bracket units are available with ISIS-Drive or tapered square
interface.
Please use the SKF bottom bracket unit only according
to the table above and mount properly as described in
this manual. Improper installation of your SKF bottom
bracket unit or loads in excess will result in loss of
warranty claim. You may cause an unexpected failure
For screwing the bottom bracket into the frame you can use the following
tools:
Tooling
You can find more tools at your local dealer. To grease the outer threads
of the bottom bracket unit you also need bearing grease or anti-fretting
paste.
Operation and service
Do never try to disassemble the bearing cartridge. The
integrated bearings are greased for lifetime and never
have to be adjusted. Do never touch the axial seal with a
tool or similar and do not try to clean it.
Parts preparation
1.) Clean both threads of the frame from rust, dirt and varnish.
2.) Apply bearing grease or anti-fretting paste to both outer threads of
the bottom bracket unit and the surface below the threaded sleeve.3.)
3.) Put the spacer over the bearing cartridge until the abutment. You only
need this ring for BXC, BFR and BAS types with 68mm frame width. All
other models and frame widths do not need a spacer.
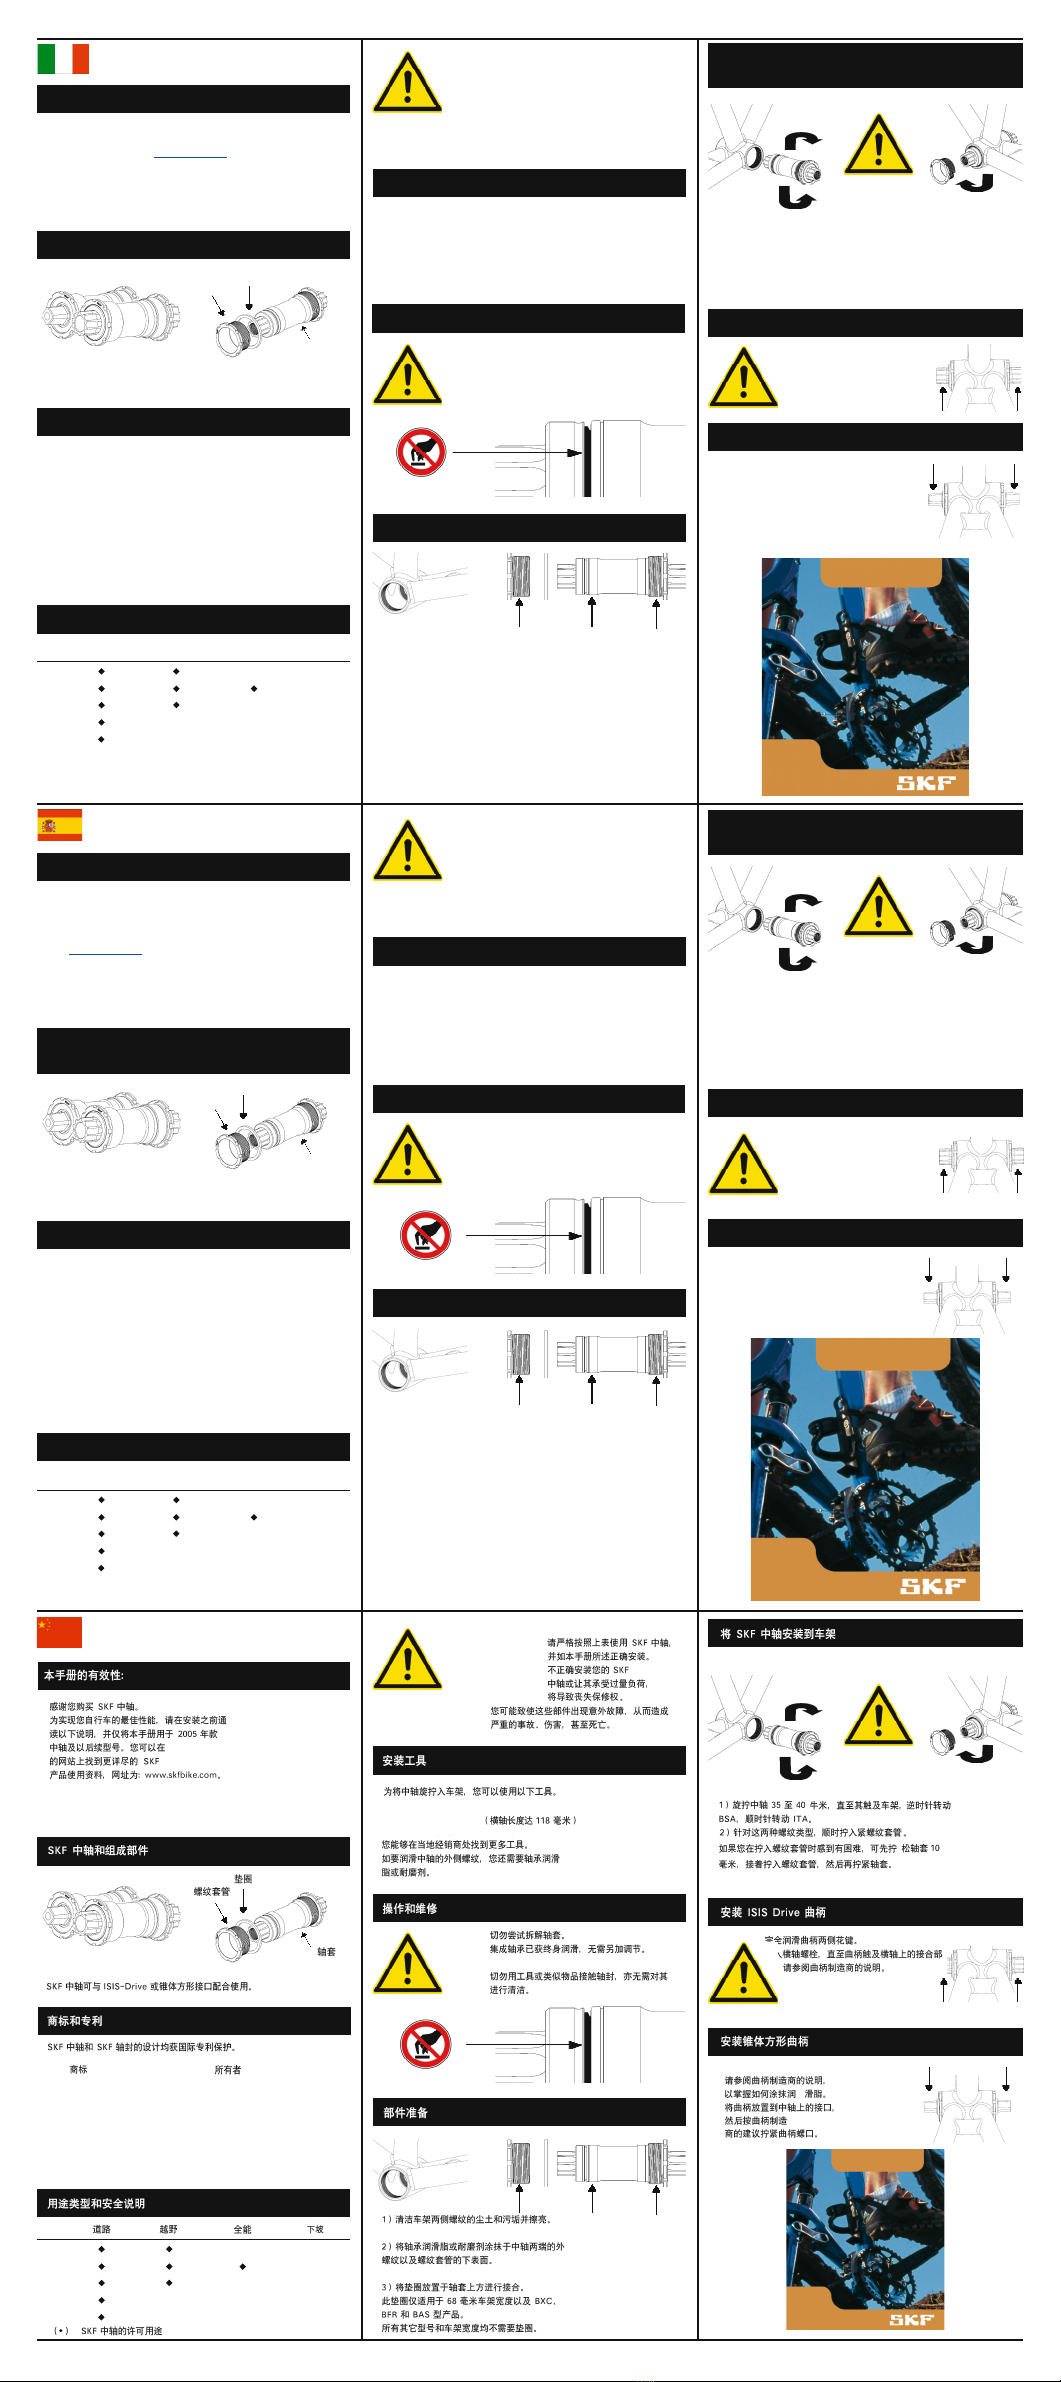
Mounting of the SKF bottom bracket
1) Screw the bearing cartridge with 35-40 Nm until it hits the frame, turn
BSA counter-clockwise and ITA clockwise. 2) Screw in the threaded sleeve
clockwise for both thread types. If you have difficulties screwing in the
threaded sleeve, unscrew the bearing cartridge for 10mm and screw in
the threaded sleeve before you finally turn the cartridge again.
Mounting of ISIS Drive -cranks
Thoroughly grease the ISIS-splines.
Screw in the spindle bolts until the
cranks touch the abutment on the
spindle. Please refer to the crank
manufacturer’s instructions.
Mounting tapered squared cranks
Please see the crank manufacturer’s instructions
for grease application. Put the crank on the
interface at the bottom bracket and tighten
the crank screw as recommended by the crank
manufacturer.
( • ) permitted use of the SKF bottom bracket unit.
Park Tool Company, USA
Shimano Ltd., Japan
Vielen Dank, dass Sie sich für eine SKF Tretlagereinheit entschieden
haben. Bitte beachten Sie die folgende Montageanleitung und montieren
Sie die Tretlagereinheiten (ab Modelljahr 2005) nach dieser Anleitung.
Weitere Hinweise zum Umgang mit SKF Tretlagereinheiten finden Sie auf
unserer Homepage www.skfbike.com.
SKF Tretlagereinheit: Bestandteile
Schutzrechte und Warenzeichen
Montageanleitung
Einsatzgebiete und Sicherheitshinweise
Der technische Aufbau der SKF Tretlagereinheiten und der Axialdichtung
sind international patentrechtlich geschützt.
Gewindering
Distanzring (optional)
Lagerpatrone
SKF Tretlagereinheiten werden mit Vierkant- oder mit ISIS-Drive-
Anschluss geliefert.
Benutzen Sie die verschiedenen SKF Tretlagereinheiten
nur in den oben beschriebenen Einsatzgebieten und
montieren Sie sie entsprechend dieser Anleitung. Bei
unsachgemäßer Montage, oder stärkeren Belastungen
als von SKF zugelassen, verlieren Sie den Gewähr-
Zum Einschrauben in den Rahmen eignen sich unter anderem folgende
Werkzeuge:
Werkzeug
Weitere Werkzeuge finden Sie im Fachhandel. Außerdem benötigen Sie
Lagerfett oder Montagepaste zum Einfetten der äußeren Gewinde.
Betrieb und Service
Zerlegen Sie niemals die Lagerpatrone! Die integrierten
Wälzlager sind für die gesamte Lebensdauer gefettet
und müssen nicht eingestellt werden. Berühren Sie die
empfindliche Gummidichtung niemals mit einem Werk-
zeug und versuchen Sie nicht, sie zu reinigen.
Vorbereiten der Montage
1.) Reinigen Sie beide Gewinde des Rahmens von Rost, Schmutz und
Farbe.
2.) Bestreichen Sie beide Außengewinde der Tretlagereinheit und die
Fläche unter dem Gewindering mit Montagepaste oder Fett.
3.) Schieben Sie den optional mitgelieferten Distanzring bis zum Ende
auf. Dieser Ring wird nur für die Typen BXC, BFR und BAS bei einer Rah-
menbreite von 68 mm benötigt. Alle anderen Typen und Rahmenbreiten
werden ohne Distanzring verbaut.
1) Einschrauben der Lagerpatrone mit 35-40 Nm bis zum Anschlag.
BSA links, ITA rechts drehend. 2) Einschrauben des Gewinderings
immer rechts drehend! Sollten beim Einschrauben Probleme auftreten,
drehen Sie die Lagerpatrone ca. 10 mm zurück und schrauben Sie diese
erst nach dem Festdrehen des Gewinderings wieder ein.
Montage ISIS-Drive™ Kurbeln (BXC, BFR, BRI)
Bestreichen Sie die ISIS-Verzahnung
mit Montagepaste oder Fett. Die Kur-
beln müssen mit den Achsschrauben
bis zum Anschlag aufgepresst werden.
Montage Vierkant-Kurbeln (BRC, BAS)
Beachten Sie die Vorgaben des Kurbelherstellers
für das Fetten der Vierkantoberflächen. Schieben
Sie die Tretkurbeln auf den Vierkant der Tretlager-
einheit und ziehen Sie die Tretkurbelschraube
mit dem vom Kurbelhersteller vorgeschrieben
Drehmoment an.
Tretlager
( • ) Zulässiger Einsatz der Tretlagereinheit.
leistungsanspruch und es kann zu unerwartetem Ausfall von Teilen des
Innenlagers kommen, was unter Umständen zu schweren Unfällen,
Verletzungen oder sogar zum Tod führen kann.
of the parts that could possibly result in serious accidents, injuries or
even death.
Deutsch
English
Francaise
Merci d’avoir acheté un axe de pédalier SKF. Afin de vous garantir les
meilleures performances, veuillez lire attentivement les consignes de
montage suivantes applicables à tous modèles fabriqués à partir de
2005 inclus. Pour de plus amples informations concernant l’utilisation des
produits SKF, connectez vous sur le site: www.skfbike.com
Axe de pédalier SKF et ses principaux composants:
Marques déposées et brevets:
Instructions de montage:
Domaines d’utilisation et consignes de sécurité:
La conception technique des axes de pédalier SKF ainsi que leurs joints
sont protégés par la législation internationale sur les brevets.
Manchon fileté Entretoise (optionnel)
Palier à roulements
Les axes de pédalier SKF sont livrés avec des embouts carrés ou ISIS-
Drive
Veuillez n’utiliser les axes de pédalier SKF que dans les
domaines d’application décrits ci-dessus et montez les
conformément aux présentes instructions. En cas de
montage incorrect ou de sollicitations supérieures à
celles autorisées par SKF, les conditions de garantie ne
Les outils suivants, sont conçus pour assembler les axes de pédalier
dans le cadre:
Outillage
Vous trouverez d’autres outils dans les magasins spécialisés. Afin de
graisser les filetages extérieurs de l’axe de pédalier, il est nécessaire
d’utiliser une graisse à roulements ou une pâte de montage.
Utilisation et maintenance
N’ouvrez jamais le palier à roulements! Les paliers à
roulements intégrés sont graissés à vie et ne nécessitent
aucun réglage. Ne mettez jamais le joint axial en
caoutchouc en contact avec les outils et n’essayez pas
de le nettoyer.
Préparation du montage
1.) Nettoyez toutes traces de rouille, de saleté ou de peinture sur les deux
filetages du cadre.
2.) Enduisez les deux filetages de l’axe de pédalier ainsi que la surface
située dans l’alésage du manchon fileté avec de la pâte de montage ou de
la graisse à roulements.
3.) Enfilez l’entretoise (option) sur le corps du palier à roulements jusqu’à
l’épaulement prévu à cet effet.Cette entretoise n’est nécessaire que pour
les modèles de cadres BXC,BFR et BAS de largeur 68mm.Tous les autres
modèles ne nécessitent pas d’entretoise.
Montage du jeu de pédalier dans le cadre
1) Vissez la cartouche de palier à roulements jusqu’à la butée avec un
couple de 35-40 Nm. Tournez dans le sens inverse des aiguilles d’une
montre pour le modèle BSA et dans le sens des aiguilles d’une montre
pour le modèle ITA. 2) Vissez le manchon fileté : toujours tourner dans
le sens des aiguilles d’une montre. En cas de difficulté lors du vissage
du manchon, dévissez le corps de palier d’environ 10 mm, revissez le
manchon à fond sur celui -ci et revissez enfin le corps de palier.
Montage des pédaliers ISIS-Drive™
Graissez abondamment les
cannelures de l’ISIS-Drive ou
enduisez les avec de la pâte
à montage. Vissez les écrous
jusqu’à ce que le pédalier
Veuillez vous référer aux instructions de
montage du constructeur quant à l’application
de la graisse. Assemblez le pédalier sur
l’embout carré de l’axe de pédalier et serrez
l’écrou conformément aux recommandations
du constructeur. Ne graissez ce carré que si le
constructeur le stipule.
( • ) Utilisation admissible des axes de pédalier.
Montage des pédaliers à assemblage carrés
Marque déposée Propriétaire
pourront s’appliquer. Vous seriez susceptibles d’engendrer des défaillances
prématurées des composants pouvant conduire à des accidents majeurs,
blessures voire même la mort.
BAS
Freeride
BXC
BFR
BRI
BRC
Straße Cross-Country Downhill
· BAS (JIS /Shimano, M8x1)
· BXC (ISIS-Drive, M15x1)
· BRI (ISIS-Drive, M15x1)
· BFR (ISIS-Drive, M12x1)
· BRC (ISO /Campagnolo, M8x1)
Montage der Tretlagereinheit in den Rahmen
ITA / BSA
BSA
ITA
35 - 40 Nm
· BAS (JIS /Shimano, M8x1)
· BXC (ISIS-Drive, M15x1)
· BRI (ISIS-Drive, M15x1)
· BFR (ISIS-Drive, M12x1)
· BRC (ISO /Campagnolo, M8x1)
ISIS Drive Committee
SKF AB, Schweden
SKF & SKF Logo
Trademark Proprietor
Park Tool
Shimano
Campagnolo Campagnolo S.A., Italien
Truvativ SRAM Corporation, USA
ISIS-Drive &
ISIS-Drive Logo
· Truvativ™ BB-02-SPL-Tool
· Shimano™ TL-UL74 (Achslängen bis 118mm)
· Park Tool ™ BB T8
· Truvativ™ BB-02-SPL-Tool
· Shimano™ TL-UL74 (Spindel lenght up to 118mm)
· Park Tool ™ BB T8
ITA / BSA
BSA
ITA
35 - 40 Nm
· BAS (JIS /Shimano, M8x1)
· BXC (ISIS-Drive, M15x1)
· BRI (ISIS-Drive, M15x1)
· BFR (ISIS-Drive, M12x1)
· BRC (ISO /Campagnolo, M8x1)
Park Tool Company, USA
Shimano Ltd., Japan
ISIS Drive Committee
SKF AB, Schweden
SKF & SKF Logo
Trademark Proprietor
Park Tool
Shimano
Campagnolo Campagnolo S.A., Italien
Truvativ SRAM Corporation, USA
ISIS-Drive &
ISIS-Drive Logo
· Truvativ™ BB-02-SPL-Tool
· Shimano™ TL-UL74 (Longueur d’axe jusqu’à 118mm)
· Park Tool ™ BB T8
ITA / BSA
BSA
ITA
35 - 40 Nm
touche l’épaulement de l’axe. Référez-vous ensuite aux instructions du
constructeur.
Park Tool Company, USA
Shimano Ltd., Japan
ISIS Drive Committee
SKF AB, Schweden
SKF & SKF Logo
Warenzeichen Inhaber
Park Tool
Shimano
Campagnolo Campagnolo S.A., Italien
Truvativ SRAM Corporation, USA
ISIS-Drive &
ISIS-Drive Logo
BAS
Freeride
BXC
BFR
BRI
BRC
Road Cross-Country Downhill
BAS
Freeride
BXC
BFR
BRI
BRC
Road Cross-Country Downhill