SKP Pro Audio DMP8006 User manual
OPERATING INSTRUCTIONS P01 10~OPERATING INSTRUCTIONS P01 10~
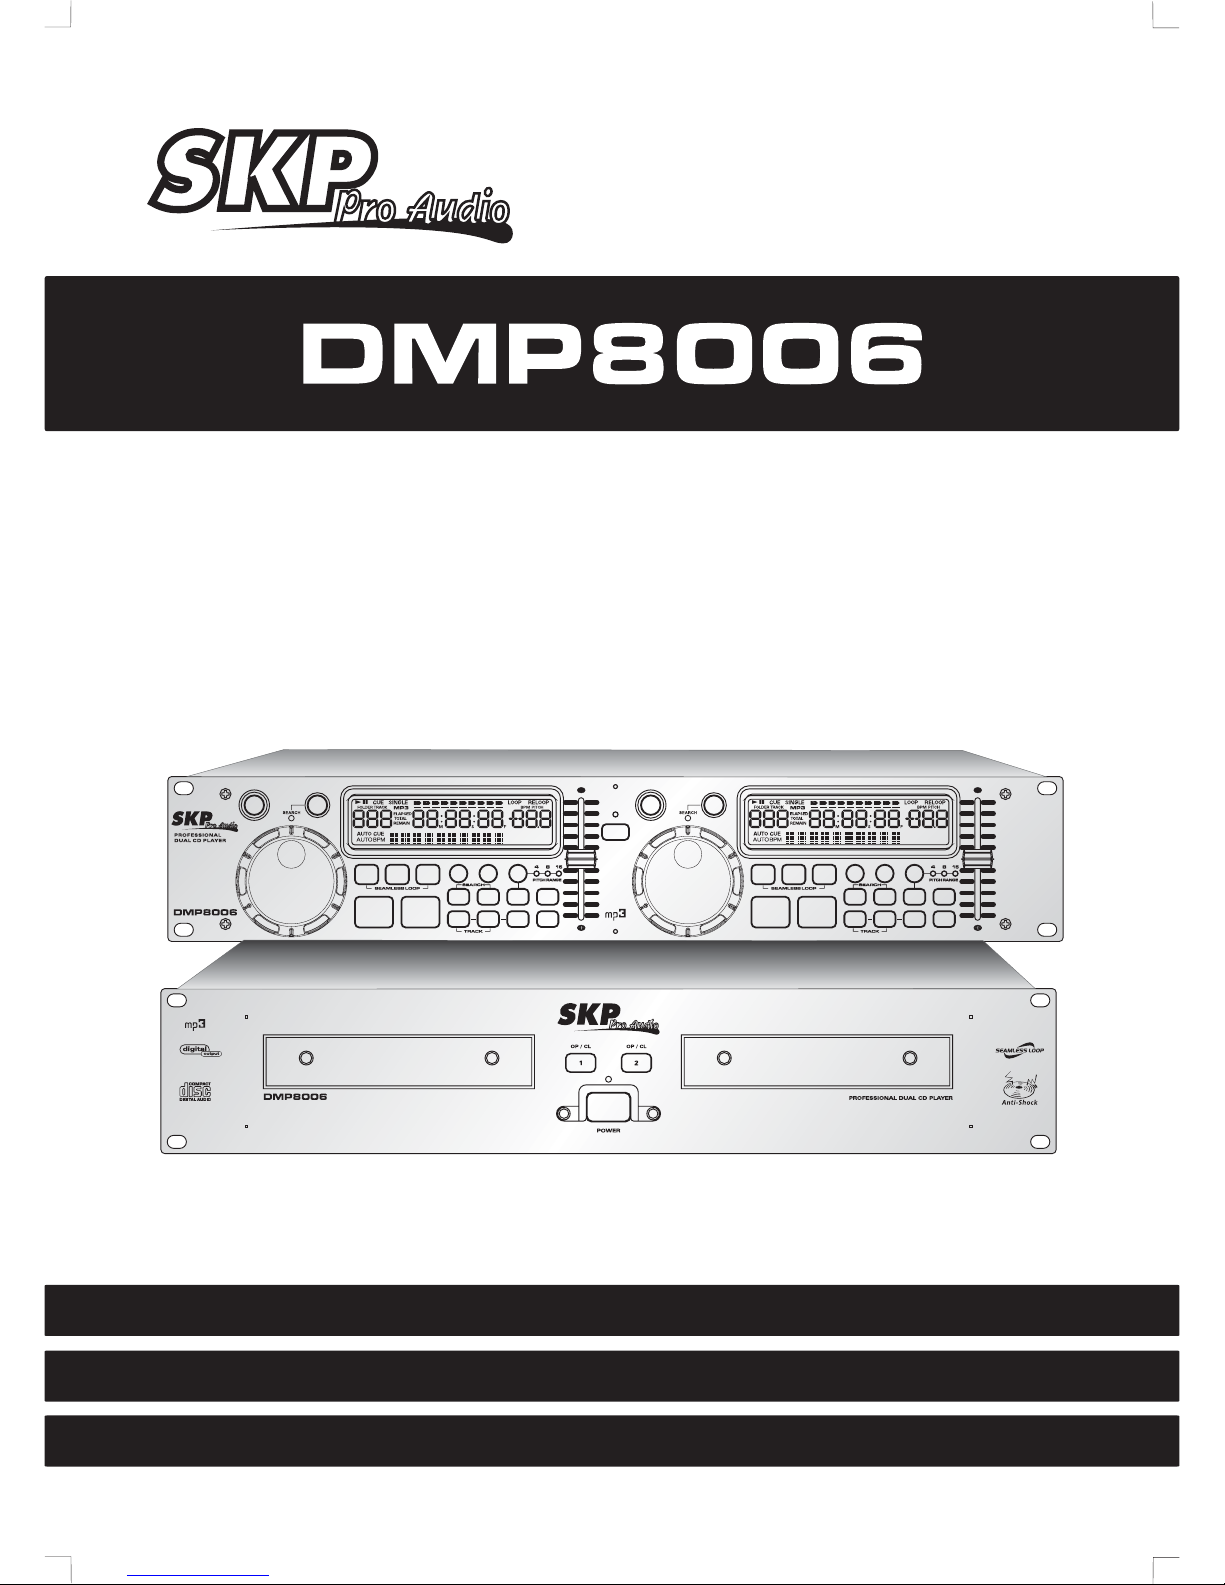
PROFESSIONAL DUAL CD PLAYERPROFESSIONAL DUAL CD PLAYER
REPRODUCTOR PROFESIONAL DE CD Y MP3REPRODUCTOR PROFESIONAL DE CD YMP3
REPRODUTOR PROFISSIONAL DE CD E MP3REPRODUTOR PROFISSIONAL DE CD EMP3
INSTRUCCIONES OPERATIVAS P11 21~INSTRUCCIONES OPERATIVAS P11 21~
INSTRUÇÕES DE OPERAÇÃO P22 32~INSTRUÇÕES DE OPERAÇÃO P22 32~

1. Read Instructions – All the safety and operating
instructions should be read before this product is
operated.
2. Retain Instructions
-The safety and operating
instructions should be retained for future reference.
3. Heed Warnings
-All warnings on the appliance
and in the operating instructions should be adhered
to.
4. Follow Instructions -All operating and use
instructions should be followed.
5. Water and Moisture
-The appliance should not
be used near water - for example, near a bathtub,
washbowl, kitchen sink, laundry tub, in a wet
basement, or near a swimming pool, and the like.
6. Carts and Stands
-The appliance should be used
only with a cart or stand that is recommended by the
manufacturer.
A
n appliance and cart combination
should be moved with care. Quick
stops, excessive force, and uneven
surfaces may cause the appliance
and cart combination to overturn.
7. Wall or Ceiling Mounting -The product should
be mounted to a wall or ceiling only as recommended
by the manufacturer.
8. Heat
-The appliance should be situated away
from heat sources such as radiators, heat registers,
stoves, or other appliances (including amplifiers)
that produce heat.
9. Power Sources – This product should be operated
only from the type of power source indicated on
the rating label. If you are not sure of the type of
power supply to your home, consult your product
dealer or local power company. For products
intended to operate from battery power, or other
sources, refer the operating instructions.
10.Grounding or Polarization – This product may be
equipped with a polarized alternation-current line
plug (a plug having one blade wider than the
other). This plug will fit into the power outlet only
one way. This is a safety feature. If you are
unable to insert the plug fully into the outlet, try
reversing the plug. If the plug should still fail to fit,
contact your electrician to replace your obsolete
outlet. Do not defeat the safety purpose of the
polarized plug.
11.Power-Cord Protection -Power-supply cords
should be routed so that they are not likely to be
walked on or pinched by items placed upon or
against them, paying particular attention to the
cord in correspondence of plugs, convenience
receptacles, and the point where they exit from
the appliance.
12.Cleaning - The appliance should be cleaned only
as recommended by the manufacturer.
Clean by wiping with a cloth slightly damp with
water. Avoid getting water inside the appliance.
13.For AC line powered units - Before returning
repaired unit to user, use an ohm-meter to
measure from both AC plug blades to all exposed
metallic parts. The resistance should be more
than 100,000 ohms.
14. Non-use Periods -The power cord of the
appliance should be unplugged from the outlet
when left unused for a long period of time.
15. Object and Liquid Entry-Care should be taken
so that objects do not fall and liquids are not
spilled into the enclosure through openings.
16.Damage Requiring Service-The appliance should
be serviced by qualified service personnel when:
A. The power-supply cord or the plug has been
damaged; or
B. Objects have fallen, or liquid has been spilled
into the appliance; or
C. The appliance has been exposed to rain; or
D. The appliance does not appear to operate
normally or exhibits a marked change in
performance; or
E. The appliance has been dropped, or the
enclosure damaged.
17.Servicing -The user should not attempt any
service to the appliance beyond that described in
the operating instructions. All other servicing
should be referred to qualified service personnel.
18.Ventilation – Slots and openings in the cabinet are
provided for ventilation and to ensure reliable
operation of the product and to protect it from
overheating, and these openings must not be
blocked or covered. The openings should never
be blocked by placing the product on a bed, sofa,
rug, or other similar surface. This product should
not be placed in a built-in installation such as a
bookcase or rack unless proper ventilation is the
manufacturer’s instructions have been adhered to.
19.Attachments – do not use attachments not
recommended by the product manufacturer as
they may cause hazards.
20.Accessories – Do not place this product on an
unstable cart, stand, tripod, bracket, or table. The
product may fall, causing serious injury to a child
or adult, and serious damage to the product. Use
only with a cart, stand, tripod, bracket, or table
recommended by the manufacturer, or sold with
the product. Any mounting of the product should
follow the manufacturer’s instructions, and should
use a mounting accessory recommended by the
manufacturer.
21.Lightning – For added protection for this product
during a lightning storm, or when it is left
unattended and unused for long periods of time,
unplug it from the wall outlet and disconnect the
antenna or cable system. This will prevent
damage to the product due to lightning and
power-line surges.
22.Replacement Parts – When replacement parts
are required, be sure the service technician has
used replacement parts specified by the
manufacturer or have the same characteristics as
the original part. Unauthorized substitutions may
result in fire, electric shock, or other hazards.
23.Safety Check – Upon completion of any service
or repairs to this product, ask the service
technician to perform safety checks to determine
that the product is in proper operating condition.
IMPORTANT SAF
ETY INSTRUCTIONS
1
CAUTION: To reduce the risk of electric shock, do not remove
any cover. No user-serviceable parts inside. Refer servicing to
qualified service personnel only.
The lightning flash with arrowhead symbol within the equilateral triangle is intended to alert the use
to the presence of un-insulated “dangerous voltage” within the product’s enclosure that may be of
sufficient magnitude to constitute a risk of electric shock.
The exclamation point within the equilateral triangle is intended to alert the user to the presence of
important operation and maintenance (servicing) instructions in the literature accompanying this
appliance.
CAUTION
To prevent electric shock, do not use this polarized plug with an extension cord, receptacle or other outlet
unless the blades can be fully inserted to prevent blade exposure.
1.Precautions on handling compact discs
Do not allow fingerprints, oil or dust to get on the surface of the disc.
If the disc is dirty, wipe it off with a soft dry cloth.
Do not use benzene, thinner, water, record spray, electrostatic-proof chemicals, or silicone-treated cloths
to clean discs.
Always handle discs carefully to prevent damaging the surface; in particular when removing a disc from its
case or returning it.
Do not bend the disc.
Do not apply heat.
Do not enlarge the hole in the center of the disc.
Do not write on the label (printed side) with a hard-tipped implement such as a pencil or ball point pen.
Condensation will form if a disc is brought into a warm area from a colder one, such as outdoors in winter.
Do not attempt to dry the disc with a hair dryer, etc..
2.Precaution on storage
After playing a disc, always unload it from the player.
Always store the disc in the jewel case to protect from dirt or damage.
Do not place discs in the following areas:
(1) Areas exposed to directs sunlight for a considerable time.
(2) Areas subject to accumulation of dust or high humidity.
(3) Areas are affected by heat from indoor heaters, etc..
IMPORTANT SAFETY INS
TRUCTIONS
DO NOT OPEN
RISK OF ELECTRIC SHOCK
COMPACT DISCS
2
Auto cue Digital out
Pitch Bend Folder Search
Pitch display Frame search
Auto/manual BPM Relay playback
Single/Continuous 4 fast search mode
Plays MP3 and CD discs Transport protection
8 times over sampling 1 bit D/A converter 10 seconds Anti Shock Protection (per side)
Seamless Loop (uninterrupted loop playback)
Selectable elapsed, remain and total remain time display
Relay play allow consecutive playback during two decks
Instant start within 10ms (sound is produced immediately when the PLAY button is pressed)
Adjustable pitch percentages: +/-4%,+/-8%,+/-16%,or +/-100% (+/-100% can only be done with actual music
CDs)
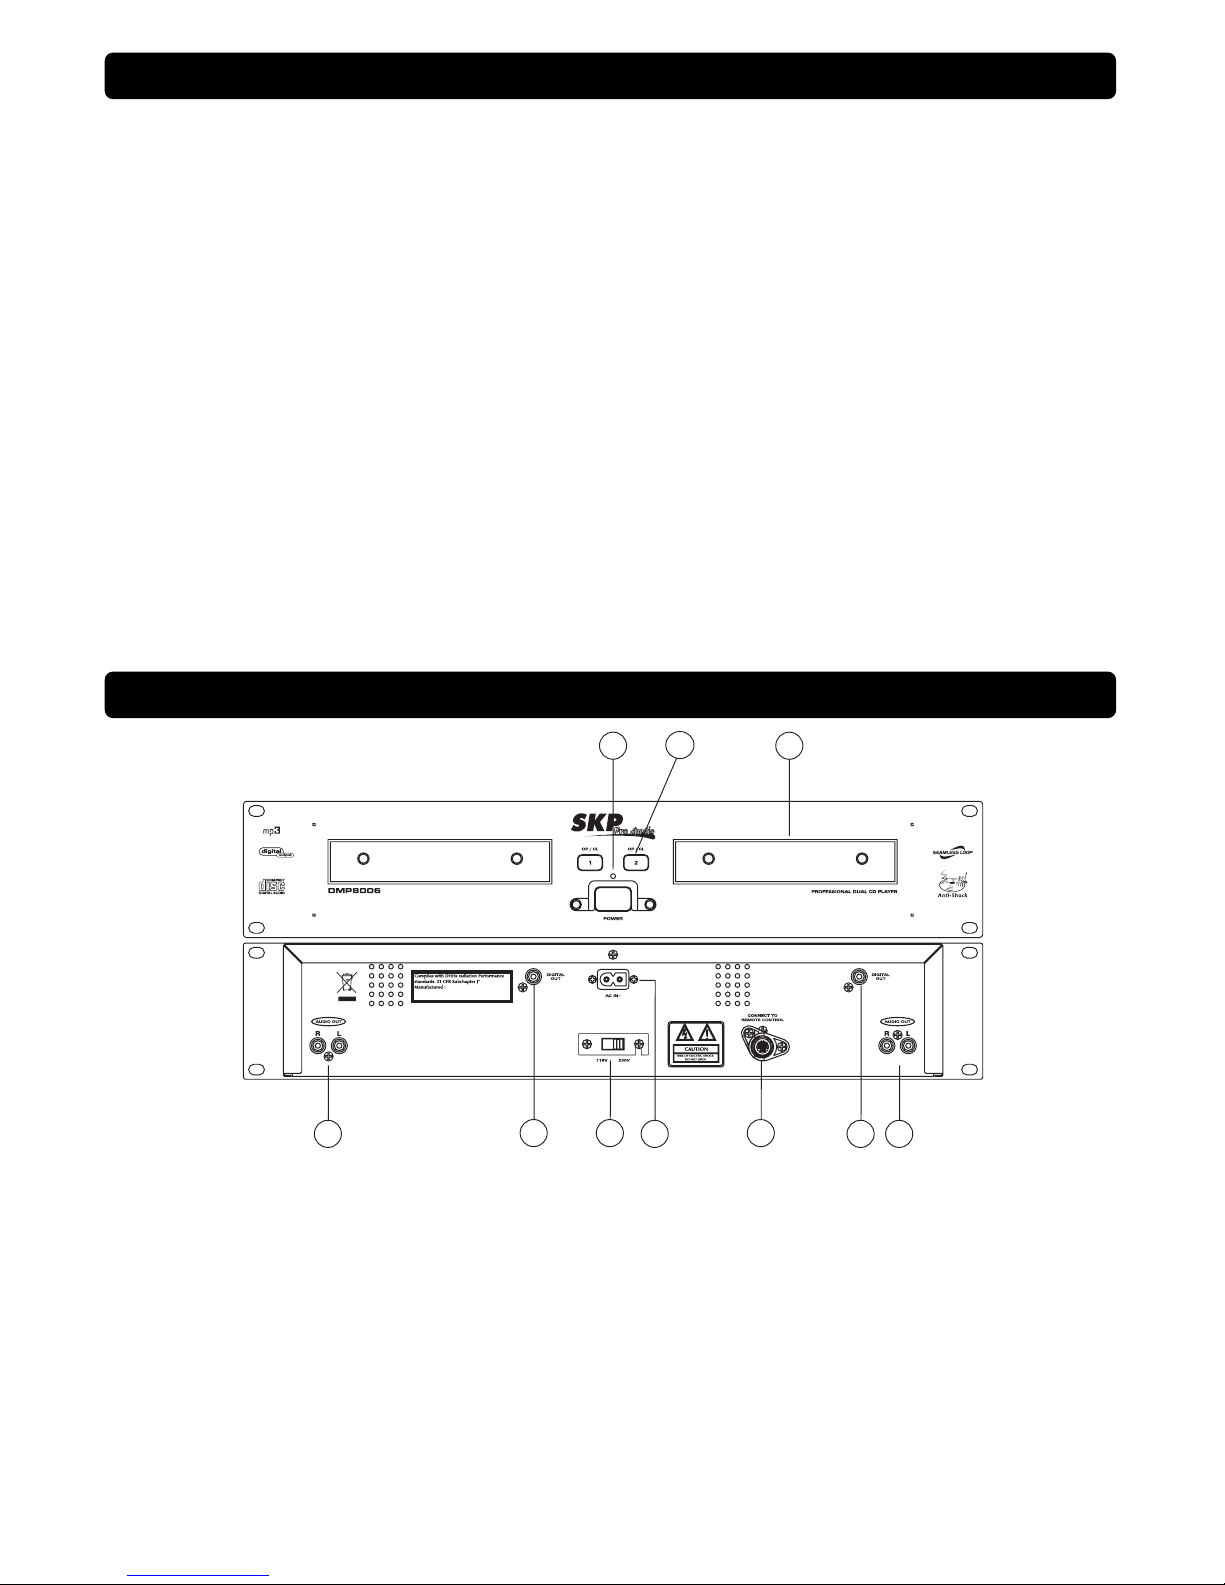
1. POWER SWITCH button: When the power switch
is pressed, the power turns on and the led is lit.
2. OPEN/CLOSE button:
Press this button to open
and close the disc tray. This button is disabled
during playback.
3. DISC tray: Use the OPEN/CLOSE button to
open disc tray and put the CD in place. If the tray
is not closed after 60 sec, it will close
automatically to prevent damage.
4. AUDIO OUTPUTS:
Output for the audio signals is
from each player. Use the supplied RCA cables to
connect these outputs to the CD/line inputs of
your mixing unit.
5. DIGITAL OUT socket: Use this connector to
connect the digital signal (S/PDIF format) to the
input of a digital amplifier or digital recorder (ex.
Mini disc)
6. VOLTAGE selector: 115V AC and 230V AC
switch.
7. POWER connector: This is the main power
connection. Only use the supplied power cord.
Use of any other power may result in sever
damage to the unit. Be sure the local power
matches the unit’s required power.
8. CONTROL connector:
Use the supplied mini-
DIN cable to connect this output to the control
unit.
FEATURES
CONTROLS AND FUNCTI
M
ain unit
13
2
4
8
7
5
4
5
6
3

1. OPEN/CLOSE button:
Press to load or eject the
disc. Each press will open or close the disc tray
on the transport. NOTE: If the tray will not open
when the disc is playing, first press the
PLAY/PAUSE button.
2. SEARCH mode button: Press this button to
toggle the function of the JOG WHEEL between
fast search mode (the yellow LED is lit) and
normal mode. The fast search function is
automatically turned off when the JOG WHEEL is
not used for more than 10 seconds.
PLAY MODE: normally the JOG WHEEL is used
as pitch bend tool to synchronize the beats of the
playing track to another track. When the fast search
mode is turned on, you can use the JOG WHEEL
to search very quickly forward /backward inside
the current track.
PAUSE MODE: normally the JOG WHEEL is used
to search very precisely (1 frame precision) for the
exact cue point. When the fast search mode is
turned on, you can use the JOG WHEEL to search
very quickly forward/backward inside the current
track.
3. LCD display: Shows all-important information
needed during playback. Refer to the next
chapter for more information.
4. PITCH slider:
This slider is used to adjust the
playback pitch percentage when the PITCH
function is activated. The slider is a set
adjustment and will remain set until the pitch
slider is moved or the PITCH function has been
turned off. The maximum pitch range of the slider
is +/-16%. This adjustment can be made with or
without a CD in the drive. The pitch adjustment
will remain even if a disc has been removed, and
will reflect on any other disc loaded into the unit.
That is to say, if you set a +2% pitch on one disc,
remove that disc and insert another, that disc will
also have a +2% pitch. The amount of pitch being
applied will be displayed in the LCD. Use this
slider to match the BPM’s of this unit to that of
another music source. By changing the pitch of
one disc with respect to the other in this way, the
beats can be matched.
5. RELAY button: When you switch the Relay
function on, alternately a track will be played from
both CDs until the relay function is disengaged.
You can always put a new CD in the player that
is waiting in standby mode. In this way you can
create an endless program. Perfect for use in
pubs etc.
6. SGL/CTN button: You can choose between
“single track mode” and “continuous play”.
Continuous play: the complete CD will be played
without interruption. (mostly used in pubs)
Single track: player stops at the end of each
track and waits at the beginning of the next
track. (mostly used by deejays) Push the SGL/
CTN button for more than 1 second to switch
between normal and “auto cue” mode. In “auto
cue” mode the player waits at the first music
note of each track. This means that badly
indexed CDs will not interfere with the instant
start capabilities of this CD player. This is a
very useful feature for deejays!
7. TIME button:
The TIME button switches between
elapsed playing time, remaining time in a selection
and total remaining time of the disc. (standard
=remaining / track)
8. JOG WHEEL:
This jog wheel serves 4 functions
depending on the mode you are working in.
The jog wheel acts as a slow frame search (1/75
sec) control when the CD is not playing but either
paused or set to a cue point. To set a new cue
point, spin the wheel then press PLAY or IN
when you have determined the proper position.
Press CUE to return to the “CUE POINT”.
CONTROLS AND FUNCTION Control unit
20 21
915
13
1235
467
811
10 12 16 17 18 19
14
4

If the track is playing and this search function
is not active, the jog wheel temporarily bends
the pitch of the music up to+/-10% by rotating
the wheel clockwise to speed it up or counter-
clockwise to slow it down. The amount of pitch
change is determined by the speed of rotation.
If the search function is active, you will be able
to search at a higher speed through the current
track.
As the selected songs function: Whenever press
or button to select the desired song,
the search LED will show by blinking. You can
rotate the wheel to select song when the LED
is blinking. The search LED will continue to
blink until the selected song is finished.
9. IN button:
Allows you to set the cue point without
stopping the playback (CUE ON THE FLY). This
button also sets the beginning of a seamless loop.
When the button contains a cue point it lights up.
10. OUT button: Used to set the end point when
looping music. The player starts to loop
seamlessly until you press this button again to
exit. When a loop is programmed but not active
you can also restart the loop. The point where
you press the button will be memorized as the
new end point of the loop.
11. RELOOP / STUTTER button :This button has 2
functions:
Reloop: When a loop was programmed and you
have hit the OUT button, press the RELOOP/
STUTTER button to enter the loop again. To exit
the loop presses the OUT button.
Stutter: When a loop is playing you can press this
button to restart the loop at once. You can also
press this button when a track is not playing in loop.
Every time the RELOOP/STUTTER button is
pressed, it will restart the music from the pre-
programmed cue point. The stutter effect adds
extra creativity to your performance.
12. TRACK search buttons: These buttons are
used to select the track to be played forward skip
& backward skip.
13. FOLDER button: This button is used to toggle
between folders and tracks. Press this button to
show the folder that is playing in the LCD. This
button is only for Mp3 discs.
14. TAP/BPM button
TAP/BPM button: The unit has a full automatic
BPM-counter. In some rare cases the automatic
beat counter doesn't count as it should do (beat are
out of the normal range or there' s simply no beat
to detect) In these cases you can help the beat
counter by manually tapping this button to the rhythm
of the beat.
Switching between BPM and PITCH display:
standard the display is set to PITCH mode, When-
ever press TAP/BPM button in order to look over
the function of automatic BPM or manual BPM for
the first time, BPM/PITCH METTER content on LCD
is BPM value, show time for about 3 seconds and
get back to PITCH and show automatically promptly.
Switching between automatic BPM and manual
BPM: Press and hold the TAP/BPM for about 1 sec
to turn the automatic BPM function on and off.
15. CUE button: Pressing the CUE button during
playback provides an immediate return to the
position at which play was started. Playback starts
immediately from the programmed cue point for
as long as the CUE button is pressed. The CD
player jumps back to the cue point as soon as the
CUE button is released.
Also with the unit in pause mode (Play/Pause button
blinks) the jog wheel is used to set a different start
point. By pressing "PLAY/PAUSE" or “IN” button
followed by "CUE", you can confirm this new cue
point.
16. PLAY/PAUSE button: Every time you press the
PLAY/PAUSE button the CD player changes from
play to pause or from pause to play. The button
blinks as long as the player is set to pause.
17. SEARCH buttons
This search button allows you to quickly
scan backwards through a track.
This search button allows you to quickly
scan forwards through a track.
18. PITCH button: This button is used to turn the
speed function on and off. You can also select 3
different pitch ranges (+/-4%, 8%, 16%): every
time you press the “-” button shortly while you
keep the PITCH button pressed, you will change
the pitch range. When the pitch range of +/-
100%(CD-A only) is selected, the 4%, 8% and
16% LEDs will be illuminated.
19. PITCH BEND buttons: The speed rises while the
“+button” is pressed and returns to the original
pitch when the button is released. The speed
drops when the “–button” is pressed and returns
to the original pitch when the button is released.
These buttons can be used to synchronize the
beats of 2 tracks.
20. CONTROL START sockets: If you are using a
mixer with fader start function, connect the player
with the fader start of the mixer. Please note that
these sockets must never be connected with any
voltage.
21. CONTROL CONNECTOR: Connect the main
unit here, using the supplied mini-DIN cable.
CONTROLS AND FUNCTI
ONS
C
ontrol un
it
5
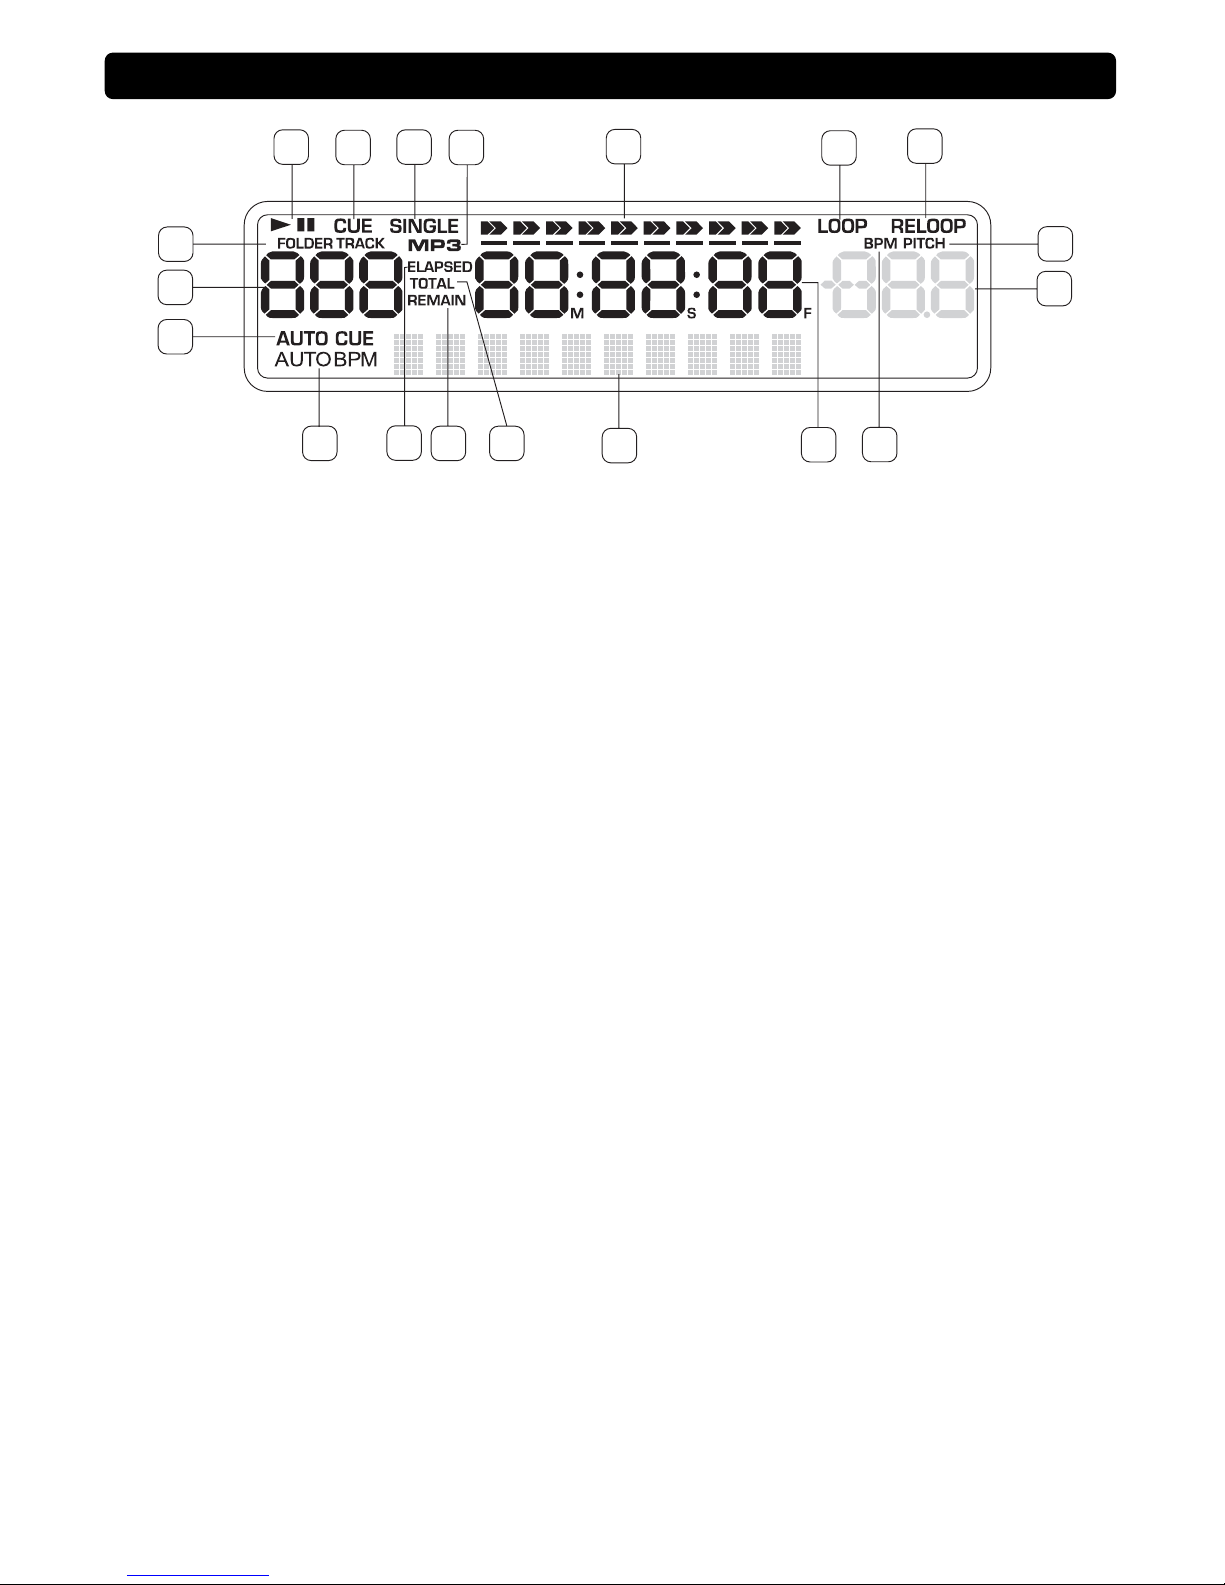
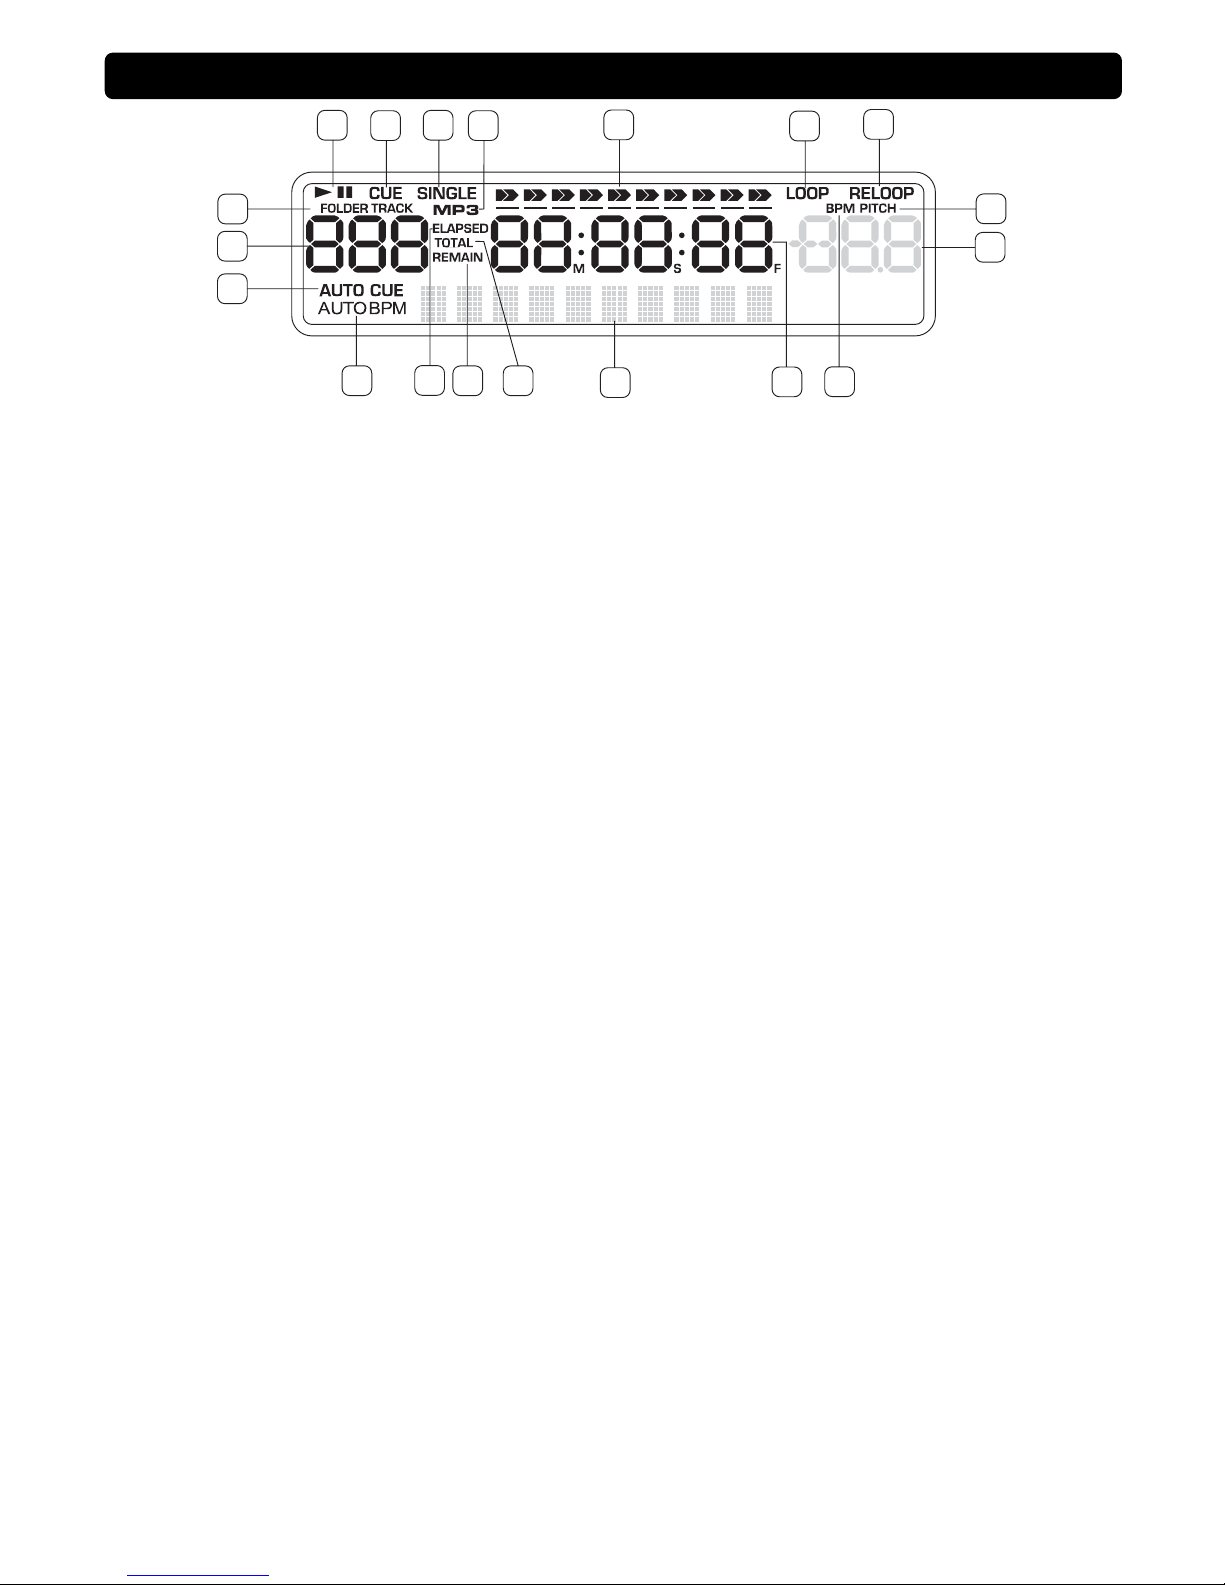
1. AUTO CUE : This will indicate if the Auto Cue is
on or off. Press and hold the SGL/CTN for 1 sec.
to turn the Auto Cue function on and off.
2. TRACK INDICATOR: This 3-digit indicator
details a current track. The number displayed in
the track indicator is a direct reference to a track
being selected a track in play, pause, or cue
mode.
3. FOLDER/TRACK INDICATOR: This indicator
shows you if you are looking at the track number
or the folder number.
4. PLAY / PAUSE INDICATOR: When the unit is in
play mode the “PLAY” indicator will glow, when
the drive is in pause mode the “PAUSE” indicator
will glow.
5. CUE INDICATOR: This indicator will glow when
the unit is in CUE mode and will flash every time a
new CUE POINT is set.
6. SINGLE INDICATOR: This indicates that the CD
drive is in single play mode, the track will play
once and return to CUE mode. If the single
indicator is not on the unit is in continuous mode
the drive will play all the remaining tracks on the
disc until you stop it or power is interrupted.
7. MP3 INDICATOR: This will indicate that a Mp3
disc is loaded in the drive.
8. TIME BAR INDICATOR: This bar gives a visual
approximation of a track's or disc's remaining
time. This bar will begin to flash when a CD is
ending or a track if the unit is in "SINGLE" mode.
9. LOOP INDICATOR: Appears when the CD is
repeating a particular area with the music on the
CD.
10. RELOOP INDICATOR: Appears when the CD
has had a loop set previously and can go back to
loop again.
11. PITCH INDICATOR: Indicator will light up when
the Pitch is activated.
12. BPM / PITCH METER: Shows either the
percentage change in pitch or the BPM of the
song.The meter will display either the BPM’s of
the current track or the pitch percentage applied
by the PITCH SLIDER.
13. BPM INDICATOR: Indicator will light up when
TAP/BPM button is engaged.
14. TIME DISPLAY: These indicators detail the
Minutes, Seconds, and Frames. The meter will
display either the elapsed time, or remaining time
of a track. The time displayed in the meter will
directly reflect the time indicator.
15. CHARACTER DISPLAY: This will display the
name of the file, artist, and title when a Mp3 disc
is loaded.
16. TOTAL REMAIN INDICATOR: When “TOTAL”
and “REMAIN” are indicated the TIME
DESCRIBED in the LCD will define the total disc
remaining time.
17. REMAIN INDICATOR: When “REMAIN” is
indicated in the LCD DISPLAY the TIME
DESCRIBED in the LCD will define the current
track's remaining time.
18. ELAPSED INDICATOR: It is for showing time as
it is taking place.
19. AUTO BPM: This will indicate that the AUTO
BPM counter is active.
CONTROLS AND FUNCTI
ONS
LCD display
3
2
1
45678910
11
12
13
14
15
19 17
18 16
6

Most of the common functions are explained in the previous chapter “controls and functions” In this chapter we
talk about the functions that need a little more explanation.
SOME GENERAL FUNCTIONS:
SLEEP MODE:
The CD player automatically shuts off the transport and laser after about 15 minutes (when in pause or cue
mode). This extends the life of your motor drive and laser. During sleep mode the display shows the word
“SLEEP”. To wake up the player, just press the cue or play button, the display turns to normal and is ready
to receive instructions.
RELAY FUNCTION:
First open the 2 faders of the CD inputs on your mixer. Press the RELAY button to enable the relay function,
the relay LED turns on. Put a disc in both players and start playback on one of the units. Alternately at rack
will be played from both units until the relay function is disengaged. You can always put a new CD in the
player that is waiting in pause. In this way you can create an endless program, perfect for use in pubs etc
PITCH BENDING:
This function is used to synchronize the beats of two tracks. This can be done in two ways:
(1) PITCH BEND buttons: The speed increases or decreases respectively as long as the PITCH BEND+ or
PITCH BEND- buttons are pressed.
(2) JOG WHEEL: During play mode the JOG WHEEL will temporarily bend the pitch of the music by turning
the JOG WHEEL clockwise to speed up or counterclockwise to slowdown. The rotation speed the JOG
WHEEL determines the percent of pitch bend.
PLAYING/RECORDING CD-R and CD-RW
Apart from normal audio CD’s the unit can play both CD-R (CD recordable) and CD-RW (CD rewriteable).
Please note that you should always use the “disc at once” and “track at once” disc writing options! Although
the unit is capable of reading CD-R and CD-RW recorded at higher speeds, we suggest not using recording
speeds more than x12 to increase readability. Always buy good quality brands for CD-R and CD-RW! If the
disc is multi session, it will only play the first session.
ABOUT LOOPS
CREATE A LOOP
While a track is playing, press IN button to program the starting point of the loop. Now press the OUT button to
program the endpoint of the loop. The seamless loop start splaying at once.(With some practice you will be
able to create perfect loops!) While the loop is playing, you can press the OUT button again to exit the loop and
continue the rest of the track.
RESTART A LOOP
This can be done in 3 ways
(1) When a loop is programmed and you left it by pressing the OUT button, just press RELOOP to restart the
loop.
(2) When a loop is programmed and you left it by pressing the OUT button, just press OUT again to restart
the loop. The point where you pressed OUT is now programmed as the new endpoint of the loop.
(3) When the loop is still playing, press the RELOOP button to restart the loop immediately. You can repeat
this several times to create a “Stutter” effect.
Frame search
This is done by first pausing then using the jog wheel to set the starting point. (When you use the jog wheel
the monitor function allows you to hear what is playing.) Once you reach your desired starting point, you can
set a cue (starting) point by pressing PLAY/PAUSE button.
GENERAL FUNCTION
S OVERVIEW
7
1. Checking the Contents
Check that the carton contains the following items:
(1) Main Unit
(2) Controller Unit
(3) Operating Instructions (This Booklet)
(4) ONE (1) 8P cable right angle
(5) Two (2)2P RCA path cord (L/R)
(6) Two (2) Auto-start cable
(7) ONE (1) AC power cord
2. Installing the Units
(1) Place your unit on a flat surface or mount it in a secure rack mount case.
(2) Be sure the player is mounted in a well-ventilated area where it will not be exposed to direct sunlight, high
temperatures, or high humidity.
(3) Try to place the unit as far as possible from TVs and tuners, as the unit may cause undesirable
interference.
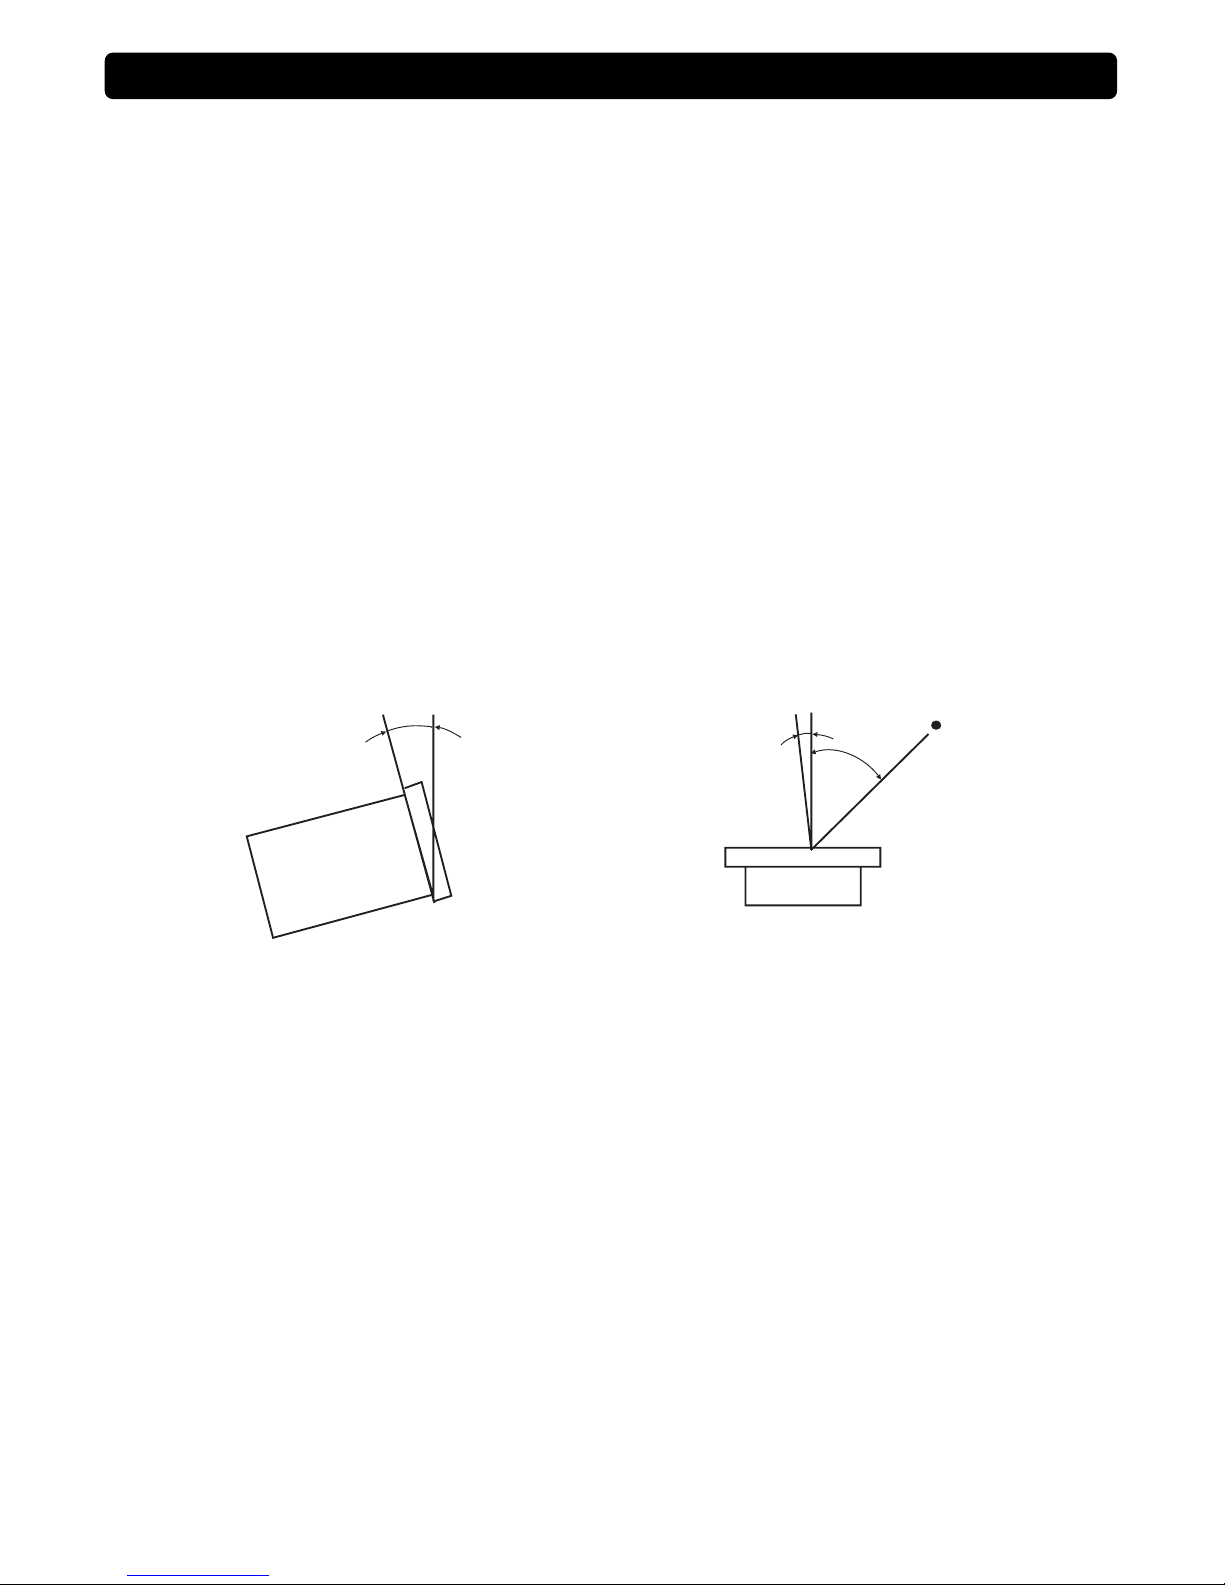
CAUTION:
The player will work normally when the main unit is
mounted with the front panel at within 15 degrees
of the vertical plane. If the unit is tilted excessively,
discs may not be loaded or unloaded properly.
The control panel's LCD’s are designed to be clearly
visible within the angles. Mount the control unit so
that the visual angle is within this range.
3. Connections
(1) Turn off the POWER switch
(2) Connect the RCA cord to the input on your mixer..
(3) Connect the control cords to the REMOTE connector on the main unit.
CAUTION:
Be sure to use the supplied control cords. Using another type of cable may result in damage.
Be sure the power is off when connecting the control cords. Otherwise the units may not work properly.
PREPARATIONS
15
0
Main unit
45
0
5
0
Sight point
8
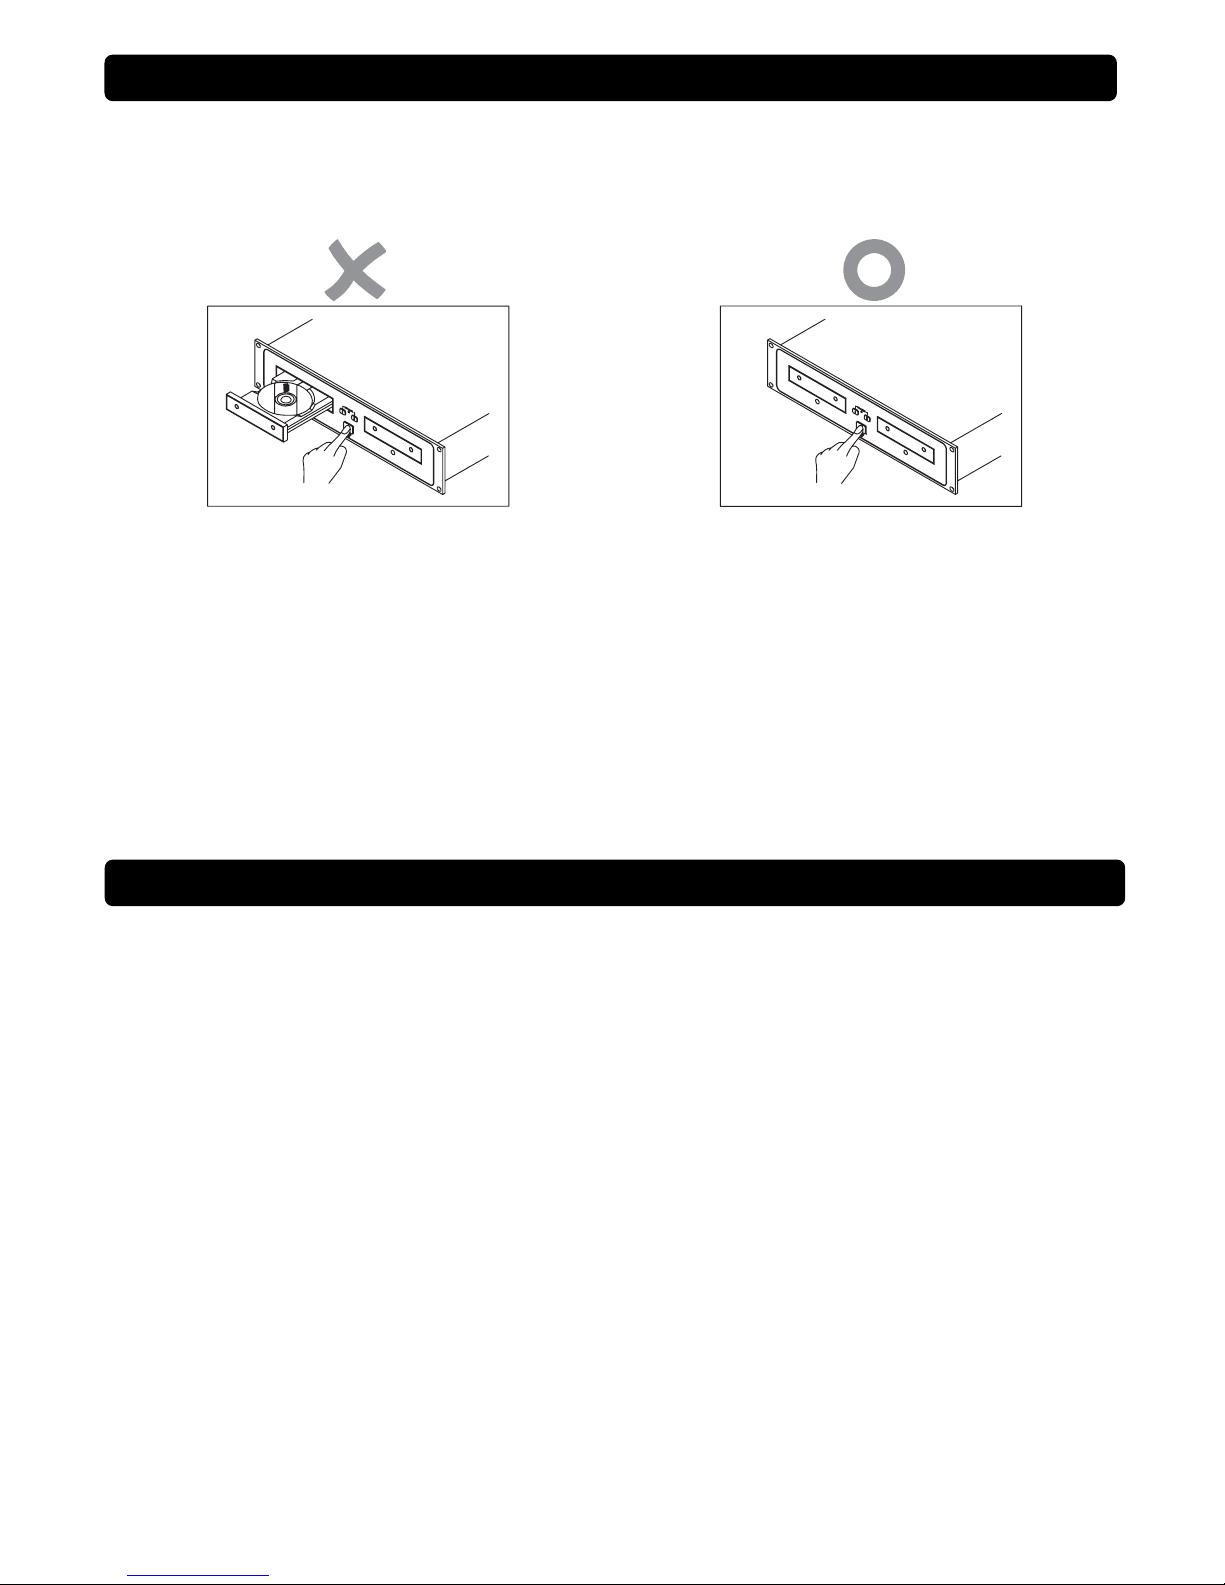
When you have finished using the CD player, before switching off the power, be sure that the disc holder had
been closed with the OPEN/CLOSE button.
CAUTION:
Do not forcibly close the disc holder when the power is off.
Do not switch off the power when the disc holder
is open.
POWER OFF
To avoid damage, please don’t switch off the power
until ”.no disc” or “time code” is showed on the LCD
after the disc holder has been closed with the
Open/Close button.
POWER OFF
APPLICATION Model MCD3000, Dual CD player with wired remote control.
POWER SOURCE AC 115/230V, 60/50Hz, 26Watts
DIMENSIONS
Main Unit 482(W)x 88.8(H)x 262.5(D)mm
Control Unit 482(W)x 88.8(H)x 94 (D)mm
WEIGHT
Main Unit 5.0 Kgs
Control Unit 1.6 Kgs
AUDIO CHARACTERISTICS (TEST DISC: TCD-782, LOAD=47KOHM)
ITEM TYPICAL LIMIT CONDITION
OUTPUT LEVEL 2VRMS +/-0.5dB 2VRMS +/-1dB 1KHz, 0dB
CHANNEL BALANCE WITHIN 0.2dB WITHIN 1dB 1KHz, 0dB
FREQUENCY RESPONSE 20-20KHz +/-0.4dB 20-20KHz +/-1dB 0dB OUTPUT
DE-EMPHASIS -20dB+2.4/-0dB -20dB+3/-0dB 16KHz,-20dB
CHANNEL SEPARATION (*2) 99dB 90dB 1KHz, 0dB
THD+N (*1) 0.0052% 0.01% 1KHz, 0dB
S/N (*2) 120dB 90dB 1KHz, 0dB
Note: *1: WITH 20KHz LOW PASS FILTER.
*2: WITH 20KHz LOW PASS FILTER AND "IHF-A" WEIGHTED.
SEARCHING TIME (TEST DISC: TCD-792)
ITEM TYPICAL LIMIT CONDITION
SHORT ACCESS TIME 2Sec 4Sec PLAY NEXT TRACK
LONG ACCESS TIME 4Sec 6Sec TRACK 1 TO 20,20 TO 1
BEFORE SWITCHING OFF
THE POWER
SPECIFICATIONS
9

PLAYABILITY
ITEM TYPICAL LIMIT CONDITION
INTERRUPTION 1mm 0.7mm TCD-725
BLACK DOT 1mm 0.6mm TCD-725
FINGER PRINTS 75um 65um TCD-725
ECCENTRICITY 140um 140um TCD-712 W/O TRACK JUMP
VERTICAL DEVIATION 1mm 0.5mm TCD-731R
PICK-UP (SONY KSM-213CCM)
System Object lens drive system optical pick-up
Object lens drive system 2 dimensional parallel drive
Tracking detection 3 spot beam detection
Optical source Semiconductor laser
Wave length 780nm
GENERAL
System Compact Disc Digital Audio
Disc loading Front loading CD player
Display LCD Display
Pitch control range Within +/-4%,+/-8%,+/-16%, +/-100% for CD
Pitch bend +/-16% (+/-100% for CD)
Pitch accuracy +/-0.25 % (Pitch TEST DATA/Pitch TYPICAL=pitch accuracy)
Digital out level 0.5V+/-0.1 p-p @ LOAD = 75 ohm (option)
ENVIRONMENTAL CONDITION
Operating Temperature 5 to 35 ℃
Humidity 25 to 85% RH (non-condensing)
Storage Temperature -10 to 60℃
NOTES
(1) The specifications are subject to change to any improvement by negotiations in advance.
(2) The parts are subject to change to any improvement within the range of the specifications.
MP3 FORMAT
A
pplicable file extensions mp3 . MP3 . mP3 . Mp3
ISO9660 max. 63 characters
Joliet max. 63 characters
CD-ROM sector format mode-1 only
Max. number of Folders 255
Disc Format
Max. number of files max. 999 files (* note #1)
MPEG 1 Layer 3 standard (ISO/IEC 11172-3),
which provides for single channel (‘mono’) and
two-channel (‘stereo’) coding at sampling rates
of 32, 44.1 and 48kHz.
32/40/48/56/80/96/112/128/160/192/
224/256/320 kbps
Xing/VBRI VBR
MPEG 2 Layer 3 standard (ISO/IEC 13818-3),
which provides for similar coding at sampling
rates of 16, 22.05 and 24 kHz.
32/40/48/56/64/80/96/112/144/160
Kbps
MP3 Format
MPEG 2.5 Layer 3 standard, which provides for
similar coding at sampling rates of 8, 11.025
and 12 kHz.
32/40/48/56/64/80/96/112/144/160
Kbps
Disc at Once and Track at Once
Disc Writing Method Multi Session If the 1st session is CDDA, you can
playback
Only CDDA track, If the 1st session is
MP3, you can playback only MP3 file.
Note #1: max.255 files each folder
SPECIFICATIONS
10

1. Lea las instrucciones. Todas las instrucciones de operación y seguridad deberían ser leídas antes de que
el producto sea utilizado.
2. Guarde las instrucciones. Las instrucciones de operación deberían ser conservadas como referencia futura.
3. Advertencias: todas las advertencias en el artefacto y las instrucciones de uso deben respetarse.
4. Siga las instrucciones: todas las instrucciones de operación y uso deberían ser seguidas.
5. Agua y humedad: el artefacto no debería utilizarse cerca del agua, por ejemplo cerca de una tubería de
baño, lavabo, fregadero, caño de lavadero, sobre una superficie húmeda o cerca de una pileta y demás.
6. Soporte: el artefacto debería de utilizarse sólo con el soporte que recomienda su fabricante. Un artefacto y
su soporte deberían de manipularse con cuidado. Detenimientos bruscos, fuerza excesiva, y superficies
desniveladas pueden causar vuelcos inesperados.
7. Montaje en pared o cielorraso: el producto debería ser montado a una pared o cielorraso sólo del modo en
que lo recomienda su fabricante.
8. Calor: el artefacto debería ser situado lejos de fuentes de calor como radiadores, estufas, caloventores y
demás (incluyendo amplificadores) productores de calor.
9. Fuentes de potencia: este producto debería ser operado sólo con la fuente de potencia indicada en la
etiqueta. Si usted no está seguro del tipo de potencia que posee en su hogar, consulte a su proveedor o
su compañía local de electricidad. Para aquellos productos que puedan utilizarse con baterías, pilas u otro
tipo de fuente, refiérase a las instrucciones de operación.
10.Toma a tierra y polarización: este producto puede estar equipado con un enchufe de línea de corriente
alterna polarizada (un enchufe con una hoja más ancha que la otra). Este enchufe sólo se ajusta al
tomacorriente de un modo. Esta es una medida de seguridad. Si usted no puede insertar el enchufe por
completo en el tomacorriente, intente invertirlo. Si aun así el enchufe no se ajusta, contáctese con un
electricista para que reemplace al tomacorriente obsoleto. No cambie el enchufe o no se cumplirá el
propósito de seguridad del enchufe polarizado.
11. Protección del cable: los cables de alimentación de energía deberían ser montados de modo que no
existan posibilidades de que se los pisen o dañen si un objeto es colocado sobre ellos. Preste especial
atención al cable y su correpondencia con los enchufes, receptáculos y el punto en que ellos salen del
artefacto
12. Limpieza: el artefacto debería ser limpiado sólo como lo recomienda su fabricante. Límpielo con un trapo
apenas humedecido con agua. Evite que el agua se introduzca en el artefacto.
13. Para unidades alimentadas con líneas AC, antes de retornar la unidad reparada al usuario, utilice un
óhmetro para medir la corriente de ambas hojas del enchufe AC hacia todas las partes metálicas
expuestas. La resistencia debería superar los 100.000 ohms.
14. Períodos de no utilización: el cable debería ser desenchufado del tomacorrientes cuando no se utiliza el
artefacto por un período largo de tiempo.
15. Entrada de líquido y objetos: deben tomarse las medidas apropiadas para evitar la filtración de objetos y
líquidos por medio de las aberturas.
16. Requerimiento de servicio técnico: el artefacto debería ser revisado por un personal especializado cuando:
el cable principal de energía o el enchufe hayan sido dañados; o
hayan caído objetos o se haya filtrado agua dentro del artefacto; o
el artefacto haya sido expuesto a la lluvia; o
el artefacto pareciera no funcionar con normalidad o exhibiera un cambio importante en su rendimiento; o
el artefacto se haya caído, o dañado su recinto.
17. Servicio técnico: el usuario no debería acceder a cualquier tipo de servicio técnico fuera de los ítems
descriptos en el manual de instrucciones de operación. Cualquier otra anomalía debería ser indicado al
personal de servicio técnico especializado.
18. Ventilación: ranuras y aberturas en el gabinete tienen el propósito de ventilar y asegurar la operación
confiable del producto así como también protegerlo de posibles recalentamientos, y estas aberturas no
deben ser bloqueadas o cubiertas. Las aberturas nunca deberían bloquearse mediante la colocación del
producto sobre una cama, sofá, trapo, o cualquier superficie similar. Este producto no debería ser
colocado en instalaciones construidas tales como bibliotecas y estantes a menos que exista una
ventilación adecuada y hayan sido respetadas las instrucciones del fabricante.
19. Acoples: No utilice acoples no recomendados por el fabricante del producto ya que puede causar daños.
20. Accesorios: no coloque el producto sobre una superficie deslizable, estante, trípode, repisa, o mesa. El
producto puede caer, causando un daño serio a un niño o a un adulto, y serios daños al producto. Utilice
sólo un estante, trípode, repisa, o mesa recomendado por el fabricante, o vendido con el producto.
Cualquier montaje en el producto debería seguir las instrucciones del fabricante, y debería utilizar
cualquier accesorio de montaje recomendado pro el fabricante.
INSTRUCCIONES IMPORTANTES DE SGURIDAD
11

21. Tormenta: para mayor protección del producto durante una tormenta eléctrica, o cuando no se lo utilice
durante un período largo de tiempo, desenchúfelo del tomacorriente y desconecte la antena o sistema de
cableado. Este procedimiento ayudará a la prevención de daño del producto por descargas eléctricas y
aumentos repentinos de corriente.
22. Reemplazo de componentes: cuando se requiera el reemplazo de determinadas partes del equipo,
asegúrese que el técnico ha utilizado repuestos especificados por el fabricante o que poseen las mismas
características que el componente original. Reemplazos desautorizados pueden causar un incendio,
shock eléctrico u otras amenazas.
23. Controles de seguridad: cuando se trate de culminación de cualquier servicio técnico, pídale al técnico que
realice controles periódicos de seguridad para determinar que el producto está funcionando correctamente.
Seleccione el lugar para la instalación de su unidad, cuidadosamente
Evite instalarla donde reciba luz solar directa
También evite lugares sujetos a vibración, excesos de polvo, calor, frío o humedad
Mantenga el equipo, lejos de fuentes de zumbido, tales como transformadores o motores.
No abra el gabinete ya que puede causar daños al equipo ó choque eléctrico
Al desconectar el cable de alimentación, del tomacorriente, siempre agárrelo de la ficha. Nunca tire del
cable.
No use la fuerza al operar perillas, teclas y botones.
Antes de mover el equipo, asegúrese de desconectar el cable de alimentación y todos los cables de
conexión.
No use solventes químicos para limpiar la unidad, porque puede dañar su acabado. Para su limpieza,
utilice un trapo limpio y seco.
No exponga el aparato a goteos ni a salpicaduras, y no coloque sobre el, objetos que contengan líquidos.
El tomacorriente donde se conecta el equipo, deberá estar ubicado cerca de este, para fácil acceso.
Si el cable de tensión está dañado, debe ser reemplazado por el fabricante, por un agente de servicio
técnico o por una persona calificada para evitar cualquier tipo de peligro.
Guarde este manual en lugar seguro para futuras referencias.
Explicación de los Símbolos
El signo de exclamación dentro del triángulo equilátero intenta alertar al usuario de la presencia de
instrucciones operativas y de mantenimiento importantes en texto que acompaña este producto.
El relámpago con cabeza de flecha dentro de un triángulo equilátero intenta alertar al usuario de la
presencia de “tensiones peligrosas” no aisladas, dentro del producto, que pueden ser de suficiente
magnitud como para constituir un riesgo para las personas, de descarga eléctrica.
El trueno con una flecha hacia abajo dentro del triángulo equilátero está creado con la intención de
alertar al usuario de la presencia de “voltaje peligroso” noinsulado dentro de la inclusión del producto
que puede ser de una magnitud suficiente como para constituir el riego de descarga eléctrica.
El signo de admiración dentro del triángulo equilátero está creado con la intención de alertar al
usuario de la presencia de una operación importante e instrucciones de mantenimiento (servicio)
en la terminología que acompaña este artefacto.
CUIDADO
Para prevenir una descarga eléctrica, no utilice un enchufe polarizado con un cable de extensión, receptáculo u
otro tipo de salida a menos que las hojas encajen perfectamente de modo de evitar su exposición.
PARA UNA OPERACIÓN SEGURA Y EFICIENTE
IN
S
TR
UCC
I
O
NE
S
IMP
O
RTANTE
S
DE
SGU
RIDAD
DO NOT OPEN
RISK OF ELECTRIC SHOCK
12

1. Precaución al manipular discos compactos:
No permita que huellas, aceite o polvo alcancen la superficie del disco.
Si el disco está sucio, límpielo con una tela suave y seca
No utilice benceno, agua, aerosol para LPs, químicos electroestáticos, o telas tratadas con siliconas
para limpiar los discos.
Siempre trate los discos con cuidado para evitar daños en la superficie; en particular al remover o
guardar un disco en su estuche original.
No doble el disco
No aplique calor
No agrande el agujero del centro del disco
No escriba sobre la etiqueta con un instrumento de punta dura como un lápiz o una lapicera de punta
redonda (birome).
Se formará condensación si lleva el disco a un área cálida desde una más fría, como del exterior al
interior en invierno.
2. Precaución al almacenar
Luego de reproducir un disco, siempre sáquelo de la bandeja
Siempre guárdelo en su estuche para protegerlo de polvo o daño
No coloque los discos en las siguientes áreas:
(1) áreas expuestas a luz solar directa durante un tiempo considerable
(2) áreas sujetas a la acumulación de polvo o alto grado de humedad
(3) áreas que son afectadas por el calor de estufas dentro de una habitación, etc.
auto indicador
distorsión de tonos
visor de tonos
BPM automático/manual
Simple/continuo
Reproduce mp3 y cd
Selección de pistas, visor de tiempo restante y total
Reproducción consecutiva permitida durante dos pistas
Comienzo instantáneo dentro de los 10 ms (el sonido es producido inmediatamente cuando se presiona el
botón PLAY)
Porcentajes de tonos ajustable: +/-4%, +/-8%, +/-16%, o +/-100% (+/-100% sólo puede lograrse con cds
reales de música)
Salida digital
Buscador de carpetas
Buscador de cuadros
Reproductor
4 modos rápidos de búsqueda
Protección para su transporte
10 segundos de protección anti golpe (por lado)
8 times over sampling. Conversor D/A de 1 bit
Seamless Loop (Bucle ininterrumpido)
C
ARA
C
TERÍ
S
TI
C
A
S
DISCOS COMPACTOS
13

1. BOTÓN DE ENCENDIDO: cuando se presiona
el botón de encendido, el equipo se enciende y
se ilumina la luz LED
2. BOTÓN DE APERTURA/CERRADO: presione
este botón para abrir y cerrar la bandeja de
discos. Este botón se deshabilita durante la
reproducción.
3. BANDEJA DE DISCO: utilice el botón
OPEN/CLOSE para abrir la bandeja y coloque el
CD. Si la bandeja no se cierra dentro de los 60
segundos, se cerrará automáticamente para
evitar daños.
4. SALIDA DE AUDIO: la salida para las señales de
audio es desde cada equipo. Utilice los cables
RCA incluidos para conectar estas salidas a la
entrada de CD de su unidad mezcladora.
5. SALIDA DIGITAL: utilice este conector para
conectar la salida digital (formato S/PDIF) a la
entrada de un amplificador digital o una
grabadora digital (ejemplo, Mini Disc)
6. SELECTOR DE VOLTAJE: interruptor 115V AC
y 230V AC
7. CONECTOR DE ENERGÍA: este es el conector
principal de energía. Sólo utilice el cable de
corriente que viene con el equipo. El uso de
otros conectores puede causar daños severos
en la unidad. Asegúrese que la energía local
coincide con la requerida por la unidad.
8. CONECTOR DE CONTROL: utilice el cable
MINI-DIN que incluye el equipo para conectar
esta salida a la unidad de control.
CO
NTR
O
LE
S
Y F
U
N
C
I
O
NE
S
U
NIDAD DE REPR
O
D
UCC
I N
CO
NTR
O
LE
S
Y F
U
N
C
I
O
NE
S
U
NIDAD DE
CO
NTR
O
L
13
2
4
8
7
5
4
5
6
20 21
915
13
1235
467
811
10 12 16 17 18 19
14
14

1. Botón de apertura/cerrado: presione para
colocar o expulsar el disco. Cada vez que
presione el botón la bandeja del disco se abrirá o
cerrará. NOTA: la bandeja no se abrirá si la
reproducción está en curso, por lo pronto
presione primero el botón PLAY/PAUSE.
2. Botón modo de búsqueda: presione este botón
para cambiar la función de la rueda JOG entre el
modo rápido (la luz LED amarilla se enciende) y
el modo normal. La función de búsqueda rápida
se apaga automáticamente cuando la rueda JOG
no se usa por más de diez minutos.
MODO “REPRODUCCIÓN”: normalmente la
rueda JOG es utilizada como una herramienta
de cambio de velocidad para sincronizar los
compases de un track a otro. Cuando se
enciende el modo de búsqueda rápida, puede
utilizar la rueda JOG para buscar rápidamente
una pista avanzada o en retroceso dentro del
mismo track.
MODO “PAUSA”: normalmente la rueda JOG
se utiliza para buscar con alta precisión
(precisión de 1 cuadro) para alcanzar el punto
exacto. Cuando se enciende el botón de
búsqueda rápida, puede utilizar la rueda JOG
para buscar rápidamente una pista avanzada
o en retroceso dentro del mismo track.
3. Visor LCD: muestra toda la información que se
necesita durante la reproducción. Refiérase al
próximo capítulo para más información.
4. Pitch Deslizable: Se utiliza para ajustar la
velocidad y tono de reproducción cuando la
función PITCH está activada. El Pitch es un
dispositivo de ajuste y permanecerá fijo hasta
que el potenciómetro se mueva o se apague la
función PITCH. El rango máximo es +/-16%.
Este ajuste puede lograrse con o sin un CD en la
compactera. El ajuste del tono permanecerá aun
cuando retire el disco, y se reflejará en cualquier
otro disco que cargue en la unidad. Por lo tanto,
si fija un tono a +2% en un disco, remueva ese
disco e inserte otro, ese último disco también
tendrá un tono +2%. La cantidad de tono
aplicado aparecerá en el visor LCD. Utilice este
deslizador para hacer coincidir los BPMs de esta
unidad a otros de otra fuente. Al cambiar el tono
de un disco con respecto a otro utilizando este
modo, los beats pueden coincidir.
5. Botón RELAY (botón de transmisión): cuando
active la función del botón RELY se reproducirá
una pista de ambos CD hasta que se desactive
esta función. Siempre puede colocar un nuevo
cd en la compactera que está en modo “standby”.
De este modo, puede crear un programa eterno.
Ideal para utilizar en bares, etc.
6. Botón SGL/CTN: puede escoger entre el modo
“single track” (única pista) y “continuous play”
(reproducción continua).
Continuous play: el cd completo se
reproducirá sin interrupción (mayormente
utilizado en bares).
Single track: la reproducción se detiene al
final de cada pista y espera el comienzo de la
próxima (mayormente utilizado por deejays).
Pulse el botón SGL/CTN por más de un
segundo para alternar entre el modo normal y
el modo “auto cue”. En el modo “auto cue” se
escuchará la primera nota musical de la pista.
Esto significa que los discos mal catalogados
no interferirán con las capacidades de
comienzo de este equipo. Esta herramienta
muy útil para los deejays.
7. Botón TIME: el botón “Time” alterna el tiempo
transcurrido, el que resta en una selección y el
tiempo total del disco (Standard = restante/pista).
8. JOG WHEEL: Esta rueda cumple cuatro
funciones dependiendo del modo con el que está
trabajando.
La rueda JOG actúa como un control de
búsqueda de encuadre lento (1/75 seg) cuando
el CD no se está reproduciendo pero está en
pausa o fijado en un punto indicado. Para fijar
un nuevo punto, gire la rueda y luego presione
PLAY o IN cuando haya determinado la
posición apropiada. Presione CUE para volver
a “CUE POINT”
Si la pista está en reproducción y esta función
de búsqueda no está activada, la rueda JOG
cambiará la velocidad y el tono de la música
hasta +/-10%, rotando la rueda en el sentido
de las agujas del reloj para acelerar o en
contra de las agujas del reloj para disminuir la
velocidad. El nivel del cambio de tono se
determinará por la velocidad de la rotación.
Si la función de búsqueda está activada, la
búsqueda dentro de la pista será más veloz.
Mientras la canción seleccionada está en
funcionamiento, cuando sea que presione los
botones de avance y retroceso para
seleccionar la canción deseada, el LED de
búsqueda lo indicará por medio de guiños.
Puede rotar la rueda para seleccionar la
canción cuando el LED esté emitiendo guiños.
El LED de búsqueda continuará guiñando
hasta que la canción seleccionada haya
terminado.
9. Botón IN: le permite fijar un punto indicado sin
detener la reproducción (CUE ON THE FLY).
Este botón también establece el comienzo de un
seamless loop. Cuando el botón contiene un cue
point (marca) se enciende.
CO O
LE
S
Y F
U
N
C
I
O
NE
S
U
NIDAD DE
CO
NTR
O
L
15

10. Botón OUT: utilizado para fijar el punto de
finalización cuando reproduce música. El
reproductor comienza a realizar “loops” hasta
que este botón es presionado nuevamente para
salir. Cuando un “loop” está programado pero no
activado, también puede reiniciar el “loop”. El
punto donde presione el botón será memorizado
como el nuevo punto de finalización del “loop”.
11. Botón RELOOP/STUTTER: este botón posee
dos funciones:
Reloop: cuando un “loop” fue programado y
usted ha presionado el botón OUT, presione
RELOOP/ STUTTER para ingresar nuevamente
el “loop”. Para salir del “loop” presione el botón
OUT.
Stutter: cuando un “loop” está en reproducción
puede presionar este botón para reiniciar el
“loop” de inmediato. También puede presionar
este botón cuando una pista no esté funcionando
en modo “loop”. Cada vez que presione el botón
RELOOP/STUTTER, reiniciará la música desde
el “cue ponit” (punto indicado) programado. El
efecto “Stutter” agrega extra creatividad a sus
presentaciones.
12. Botones de búsqueda de pistas: estos
botones se utilizan para seleccionar la pista que
se adelantará o retrocederá.
13. Botón FOLDER (carpeta): este botón se utiliza
desplazarse entre carpetas y pistas. Presione
este botón para indicar en el LCD la carpeta que
se está reproduciendo. Este botón sólo puede
utilizarse para discos MP3.
14. Botón TAP/BPM:
Botón TAP/BPM: la unidad posee un contador
BPM totalmente automático. En raras
ocasiones el contador automático de de
golpes no funciona como debería (los golpes –
beats- pueden estar fuera del rango normal o
simplemente no se detecta ninguno). En estos
casos, puede ayudar al contador golpeando
manualmente este botón al ritmo del golpe.
Cambio entre visualización BPM y PITCH: la
visualización predeterminada está fijada en el
modo PITCH. Cada vez que presione el botón
TAP/BPM para examinar la función de BPM
automático o BPM manual primera vez, el
BPM/PITCH METTER contenido en el LCD es
un valor BPM, muestra el tiempo durante
aproximadamente 3 segundos y vuelve a
PITCH.
Cambio entre BPM automático y BPM manual:
presione y mantenga TAP/BPM durante 1 seg
para activar o desactivar la función automática
BMP.
15. Botón CUE: si presiona el botón CUE durante
una reproducción, inmediatamente retornará a la
posición en la que la reproducción había
comenzado. La reproducción comenzará
inmediatamente desde el punto (CUE)
programado por tanto el botón CUE continúe
siendo presionado. El reproductor del CD volverá
al “cue point” tan pronto como el botón CUE se
libere. También, con la unidad en modo de
pausa (el botón Play/Pause parpadea) la rueda
jog es utilizada para fijar un punto de comienzo
diferente. Presionando el botón “PLAY/PAUSE”
o “IN” seguido de “CUE”, puede confirmar este
nuevo punto.
16. Botón PLAY/PAUSE: cada vez que presione el
botón PLAY/PAUSE el reproductor de CD
cambia de reproducción a pausa o de pausa a
reproducción. El botón parpadea mientras esté
fijado el modo pausa.
17. Botones SEARCH: el botón con flechas hacia la
izquierda le permitirá un escaneo rápido hacia
atrás a través de una pista.
El botón con flechas hacia la derecha le permitirá
un escaneo rápido en avance a través de una
pista.
18. Botón PITCH (tono): este botón se utiliza para
activar y desactivar la función de velocidad.
También puede seleccionar 3 rangos diferentes
de porcentajes (+/-4%, 8%, 16%): cada vez que
presione el botón “-“ mientras mantiene el botón
PITCH presionado, cambiará el rango de
velocidad. Cuando el rango del tono de +/-100%
(CD-A solamente) es seleccionado, los LEDs 4%,
8% y 16% se iluminarán.
19. Botones PITCH BEND: la velocidad aumenta
mientras el botón “+button” es presionado y
vuelve a su tono original cuando se libera el
botón. La velocidad disminuye cuando cuando el
“-button” es presionado y retorna al tono original
cuando se libera. Estos botones puede ser
utilizados para sincronizar los golpes (beats) de
2 pistas.
20. Entradas CONTROL START: si usted está
utilizando un mezclador con función “fader”
conecte el reproductor con el comienzo del fader
del mezclador. Por favor, note que estas
entradas nunca deben ser conectadas con
cualquier voltaje.
21. Control de conector (CONTROL CONNECTOR):
conecte aquí la unidad principal, utilizando el
cable mini-DIN.
CO
NTR
O
LE
S
Y F
U
N I
O
NE
S
U
NIDAD DE
CO
NTR
O
L
16
1. Auto Cue: esto indicará si el “auto cue” está
activado o desactivado. Presione y mantenga
SGL/CTN durante 1 seg para activar o
desactivar la función Auto Cue.
2. Indicador de pista: este indicador de tres
dígitos detalla la pista actual. El número que
muestra el indicador de pistas es una referencia
directa a una pista seleccionada en modo de
reproducción, pausa o cue.
3. Indicador de Carpeta/Pista: este indicador
muestra si usted está mirando el número de pista
o de carpeta.
4. Indicador PLAY/PAUSA: cuando la unidad está
en modo de reproducción el indicador “PLAY” se
iluminará. Cuando el drive está en modo de
pausa el indicador “PAUSE” se iluminará.
5. Indicador CUE: este indicador se iluminará
cuando la unidad esté en el modo CUE y
destellará cada vez que se fije un nuevo “cue”.
6. Indicador SINGLE: indica que el drive del CD
está en modo de reproducir sólo una pista. La
pista sólo se reproducirá una vez y volverá al
modo CUE. Si el indicador SINGLE no está en la
unidad, sino en modo continuo, el drive
reproducirá todas las pistas restantes en el disco
hasta que lo detenga o interrumpa la energía.
7. Indicador MP3: indica que un disco MP3 está
cargado en el drive.
8. Barra indicadora de tiempo: la barra da una
aproximación visual del tiempo restante de la
pista y de disco. Esta barra comenzará a dar
destellos cuando un disco o pista estén
terminando si la unidad está en modo “SINGLE”.
9. Indicador LOOP: aparece cuando el cd está
repitiendo un área en particular con la música en
el cd.
10. Indicador RELOOP: aparece cuando el cd ha
tenido un loop fijado previamente y puede volver
al loop nuevamente.
11. Indicador PITCH: el indicador se iluminará
cuando el Pitch se active
12. BPM/PITCH METER: muestra el porcentaje de
cambio en el tono o el BPM de la canción. El metro
mostrará el BMP de la pista actual o el porcentaje
de tono aplicado por el PITCH SLIDER.
13. Indicador BPM: el indicador de iluminará
cuando el botón TAP/BPM se active.
14. Visor de tiempo: estos indicadores detallan
Minutos, Segundos y Encuadres. El metro
mostrará el tiempo transcurrido o el restante de
la pista. El tiempo indicado en el metro reflectará
directamente el indicador de tiempo.
15. Visualización de artista: aquí se reflejará el
nombre del archivo, artista y título cuando se
carga un disco Mp3.
16. Indicador de tiempo restante total (TOTAL
REMAIN): cuando “Total” y “Remain” estén
indicados en TIME DESCRIBED en el visor LCD,
aparecerá el tiempo total restante del disco.
17. Indicador REMAIN: cuando “Remain” esté
indicado en el visor LCD, el tiempo restante en el
LCD definirá el tiempo restante de la pista actual.
18. Indicador ELAPSED: es para mostrar el tiempo
actual y real de reproducción.
19. Auto BPM: indicará que el contador AUTO BPM
está activado.
CO
NTR
O
LE
S
Y F N
C
I
O
NE
S
V
I
SO
R L
C
D
3
2
1
45678910
11
12
13
14
15
19 17
18 16
17

La mayoría de las funciones comunes están explicadas en el capítulo anterior “controles y funciones”. En este
capítulo hablaremos de las funciones que necesitan de una explicación algo más detallada.
ALGUNAS FUNCIONES GENERALES:
MODO “SLEEP”: el reproductor de cd automáticamente dispara el transporte y el láser luego de
aproximadamente 15 minutos (cuando está en pausa o en modo cue). Esto prolongará la vida útil del driver
y del láser. Durante el modo “Sleep”, el visor muestra la palabra “sleep”. Para despertar al reproductor, sólo
presione el botón cue o play, el visor volverá a su estado normal y estará listo para recibir instrucciones.
FUNCIÓN “RELAY”: primero abra los 2 “faders” de las entradas del cd en su mezcladora. Presione el
botón RELAY para activar la función “relay”, el LED del relay se encenderá. Coloque un disco en ambas
reproductoras y comience la reproducción en una de las unidades. Alternativamente comenzará la
reproducción desde ambas unidades hasta que la función “relay” sea desactivada. Siempre puede colocar
un nuevo cd en la bandeja que está esperando en pausa. De este modo puede crear un programa sin fin,
ideal para utilizar en bares, etc.
PITCH BENDING: esta función se utiliza para sincronizar los beats de dos pistas. Esto puede hacerse de
dos modos:
(1) Botones PITCH BEND: la velocidad aumenta o disminuye respectivamente en tanto los botones PITCH
BEND+ o PITCH BEND- son presionados.
(2) JOG WHEEL: durante el modo de reproducción la rueda JOG alterará en forma temporal el tono de
música girando la rueda en el sentido de las agujas del reloj para incrementar la velocidad y en contra
de las agujas del reloj para lograr el efecto contrario. La velocidad de rotación de la rueda JOG
determina el porcentaje de la alteración del tono.
REPRODUCCIÓN/GRABACIÓN DE DR-R y CD-RW: además de los cds normales de audio, la unidad
puede leer CD-R (cd grabables) y CD-RW (cd regrabables). Por favor, note que siempre debería utilizar las
opciones de escritura “disco de inmediato” y “pista de inmediato”. A pesar que la unidad es capaz de leer
CD-R y CD-RW a altas velocidades, le sugerimos no utilizar velocidades de grabación de más de x12 para
que no pierda la capacidad de lectura. Siempre compre marcas de buena calidad de CD-r y CD-RW. Si el
disco es multi sesión, no reproducirá solamente la primera sesión.
ACERCA DE LOS LOOPS:
Creación de un “loop”: mientras una pista está en reproducción, presione el botón IN para programar el
comienzo del loop. Ahora presione el botón OUT para programar la finalización del loop. El seamless loop
comenzará su reproducción de inmediato (con algo de práctica podrá crear loops perfectos!). Mientras el
loop está en reproducción, puede presionar el botón OUT nuevamente para abandonar el loop y continuar
con el resto de la pista.
Volver a comenzar un “loop”: esto puede lograrse de tres modos:
(1) cuando un loop está programado y lo deja al presionar el botón OUT, sólo presione RELOOP para volver
a comenzar el loop.
(2) cuando un loop está programado y lo deja al presionar el botón OUT, sólo presione OUT nuevamente
para recomenzar el loop. El punto en el que presionó OUT es el que ahora estará programado como el
nuevo punto de finalización del loop.
(3) cuando el loop aun está en reproducción, presione el botón RELOOP para recomenzar el loop
inmediatamente. Puede repetir este procedimiento varias veces para crear un efecto “Stutter”.
Búsqueda de cuadro: esto se realiza primero realizando una pausa y luego utilizando la rueda Jog para
fijar el punto de comienzo (cuando utiliza la rueda Jog la función del monitor le permite escuchar la pista en
reproducción). Una vez que haya alcanzado el punto de comienzo deseado, puede fijar un punto cue
(comienzo) presionando el botón PLAY/PAUSE.
REPASO DE FUNCIONES GENERALES
18
1. Control de contenidos:
Controle que el cartón contenga los siguientes ítems:
(1) unidad principal
(2) unidad de control
(3) instrucciones operativas (este cuadernillo)
(4) Un (1) cable de ángulo derecho 8P
(5) Dos (2) cables rastreros 2P RCA (L/R)
(6) Dos (2) cables Auto-Start
(7) Un (1) cable de potencia AC
2. Instalación de la unidad:
(1)coloque la unidad es una superficie plana o móntelo en un compartimiento seguro.
(2)Asegúrese que el equipo esté montado en un área bien ventilada donde no esté expuesta a luz solar
directa, alta temperaturas u altos grados de humedad.
(3)Trate de colocar la unidad tan lejos de la TV como sea posible, ya que la unidad puede causar
interferencias indeseables.
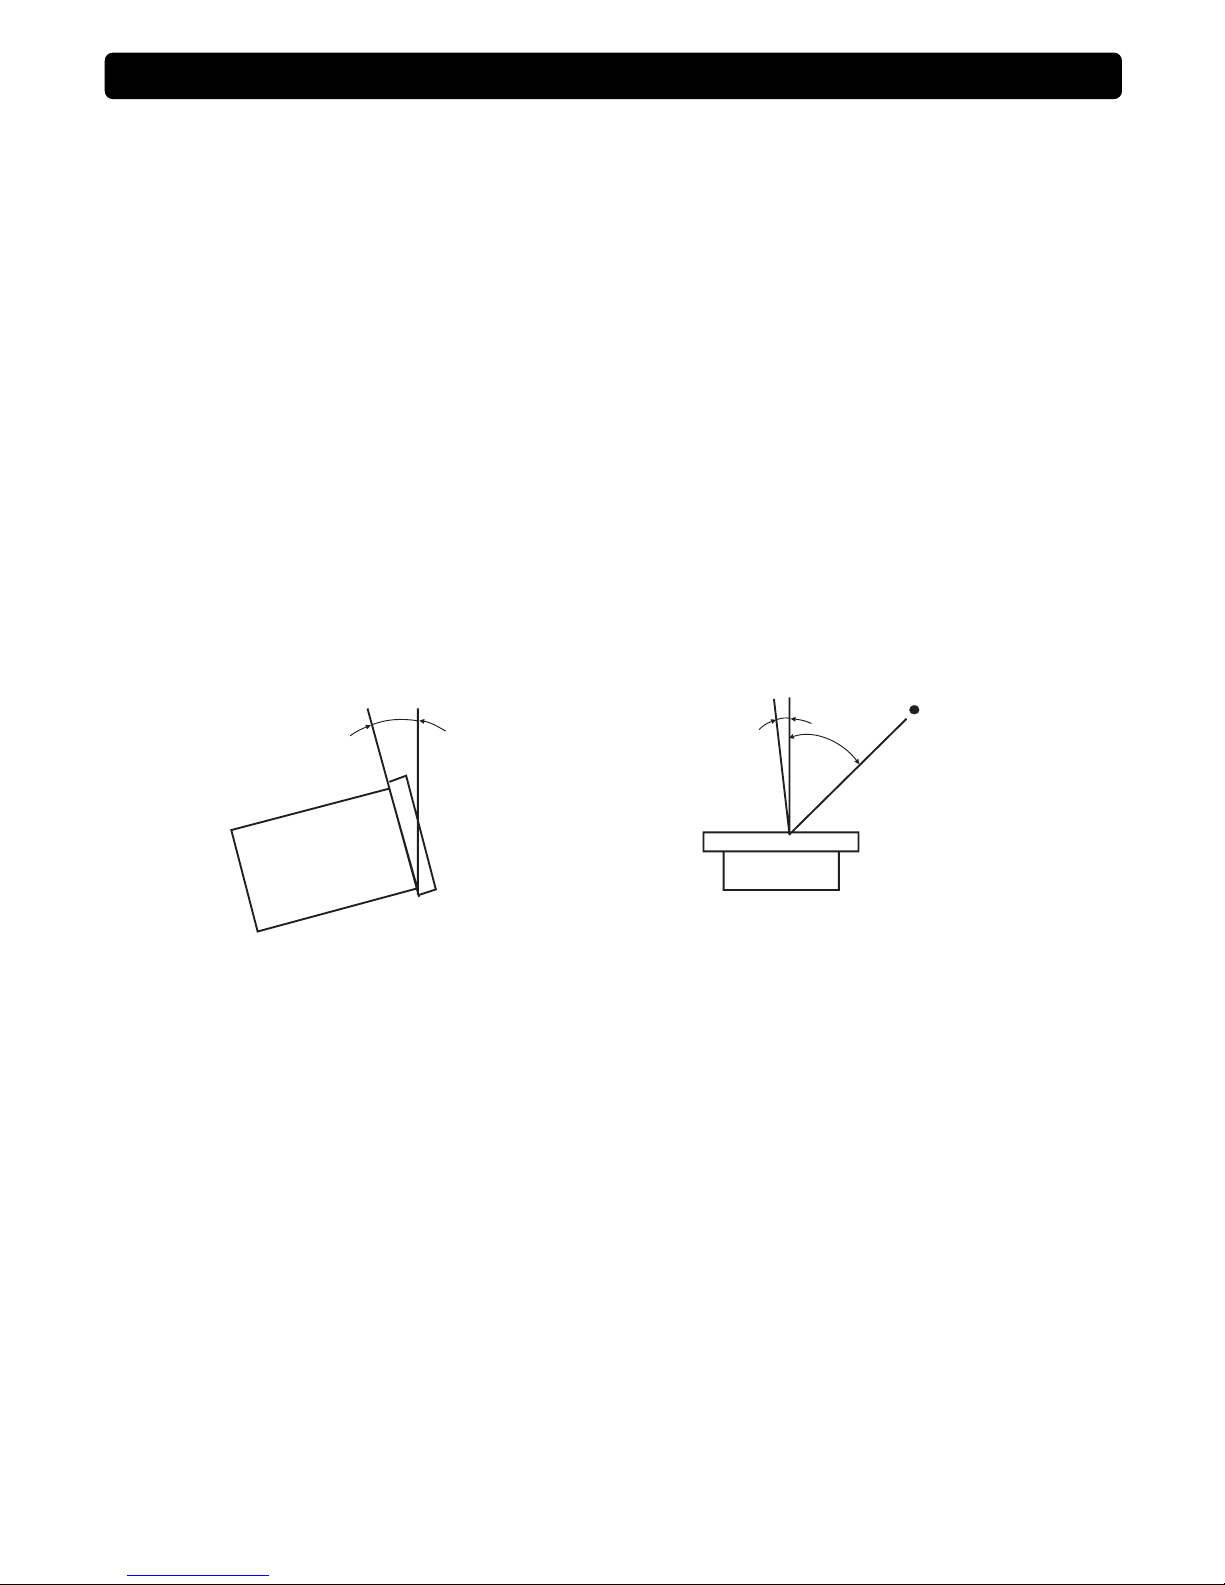
Atención:
el reproductor funcionará normalmente cuando la
unidad principal esté montada con el panel frontal
dentro de los 15 grados del plano vertical. Si la
unidad está desnivelada en exceso, existe la
posibilidad de que los discos no se carguen o
descarguen apropiadamente.
Los paneles de control del LCD están diseñados para
ser claramente visibles dentro de los ángulos.
Coloque la unidad de control de modo que el ángulo
visual esté dentro de este rango.
3. Conexiones:
(1) apague el interruptor de encendido (POWER)
(2) conecte el cable RCA a la salida en su mezcladora
(3) conecte los cables de control al conector REMOTE en la unidad principal.
Atención:
asegúrese de utilizar los cables de control que incluye la unidad. El uso de otro cable puede causar daños.
asegúrese que la corriente esté cortada al conectar los cables de control. De lo contrario las unidades
puede no llegar a funcionar adecuadamente.
PREPARACIONES
15
0
Main unit
45
0
5
0
Sight point
19
Table of contents
Languages:


