Sky Dragon SR210ITB006 User manual

User s’Manual of SOUND BLASTER
Pictures should be used only as reference. If there is any offset with the actual
device, please refer to the actual device!

1
Directory
1. Preface-----------------------------------------------------------------2
2. Accessories -----------------------------------------------------------2
3. Product introduction--------------------------------------------------2
4. Attentions------------------------------------------------------ -----2
5. Panel introduction ---------------------------------------- ---------3
6. Operational instructions---------------------------------------- -6
7. Device compatibility ---------------------------------------------- --9
8. Main technical parameters---------------------------------------------9
9. Solutions to simple troubles --------------------------------------------9

2
1. Preface
Dear users,
Welcome to join the CKY family! Your buying of our products is much
appreciated!
For full use of your player, please read this manual carefully before use, so as
to grasp connection methods and operational key points of this system. You will
also find our various explorations in design, manufacturing process and operational
humanization, all to meet your requirements.
Please keep this manual well for future reference.
Open the package
Please open the package carefully, confirm the following accessories, and put
them in one place in case of loss.
2. Accessories
-Device 1
-Users’ manual 1
-Remote control 1
-Power adapter 1
-RGA audio line 1
3. Product introduction
This product is a sound blaster audio, which adapts digital signal processing
technologies and supports Bluetooth playback, opticaldecoding and external audio
source amplification. It is suitable for music playback in different environments such as
office, home etc.
3
4. Attentions
First, thanks for your use of our digital audioproducts!
Before use, please read this manual for correct use of this product. For better services,
contents of this manual may change due to variation of product performance and
functions without further notice.
To maintain better performance, DO NOT use in places whereis too cold, too hot, dusty
or damp, more attention should be paid to the following circumstances:
1, moisture or underwater environment
2, heater or high-temp work environment
3, exposure directly to sunlight
4, easy to drop
5, DO NOT detach the combined audio by yourself, orthe warranty would be void
Warning
1, Please pay attention to waterproof of theproduct without water dropping or splashing.
Objects filled with liquids, such as vases,cannot be placed on thetop of device in case
of accidents.
2, To avoid accidents such as fire orelectric shock, please checkwhether the grid
voltage is exactly the same as required by this device
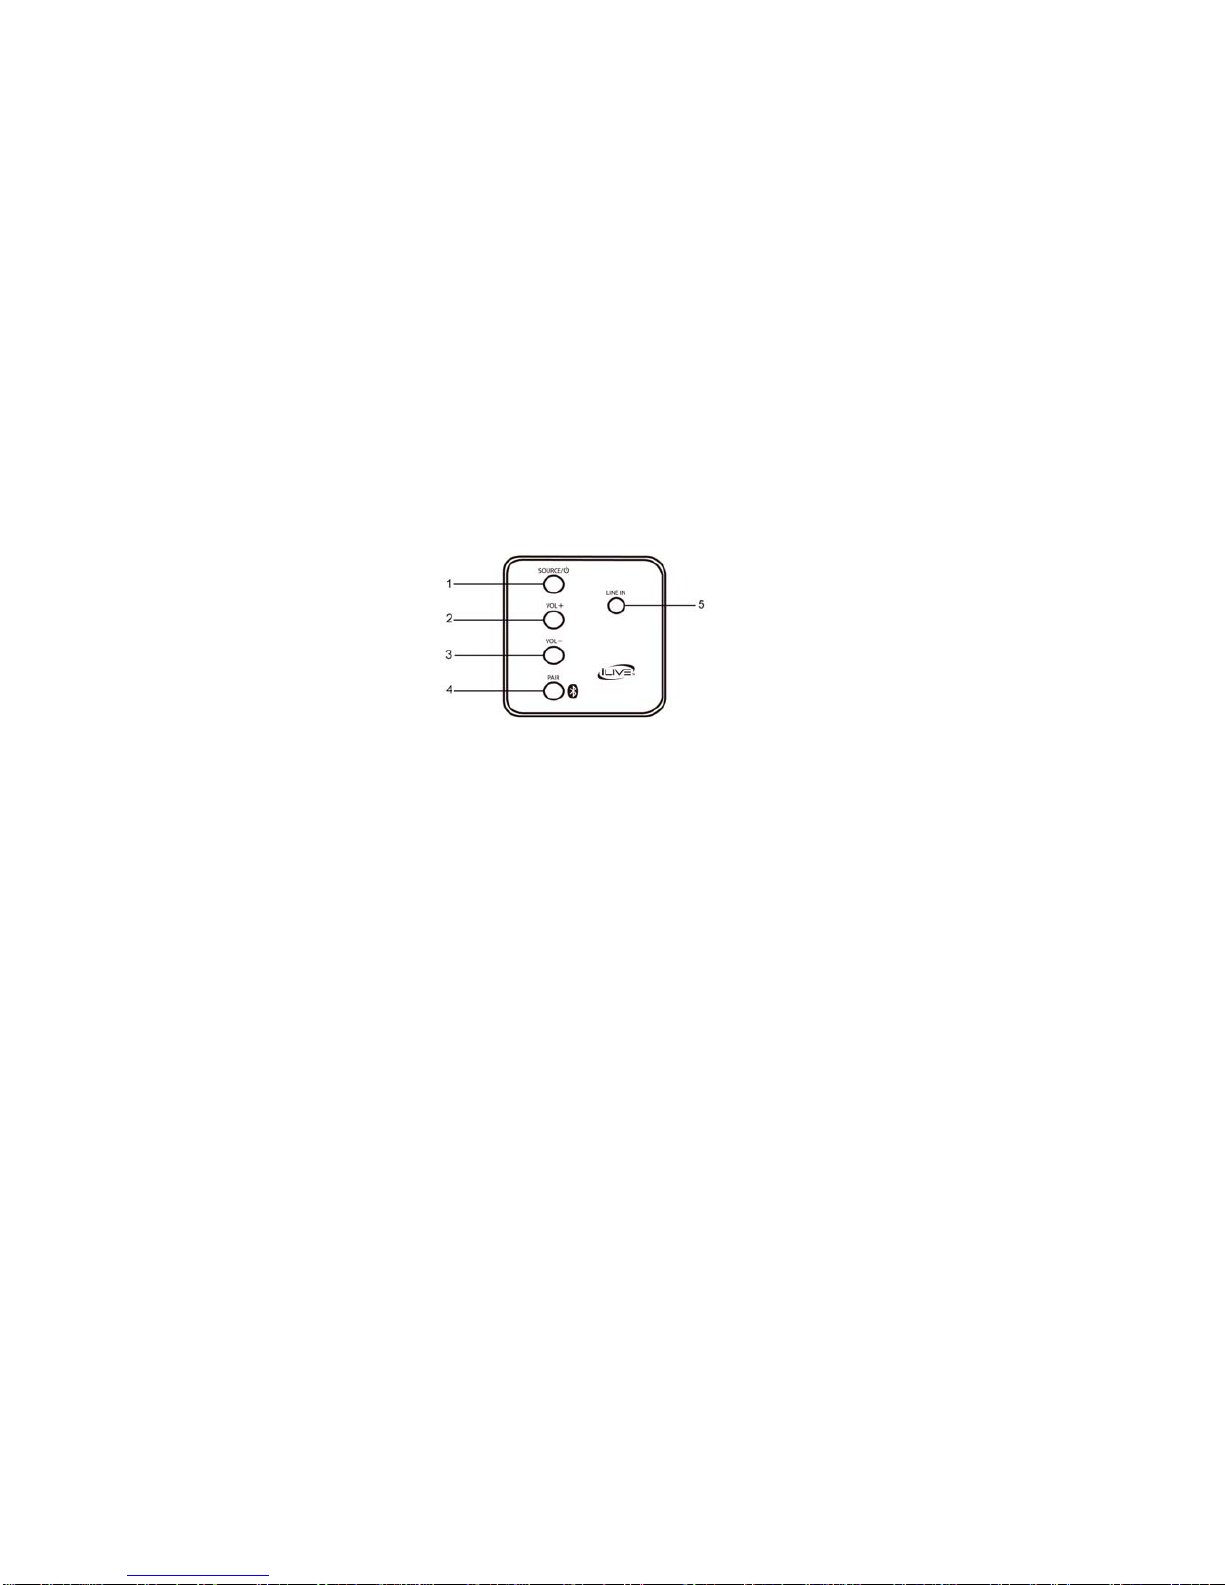
5. Panel introduction
Definitions of buttons and jacks :
There are 4 buttons and 5 jacks in total, defined as following:

4
1、SORUCE/ : short press to power on/switch functions, long press to power
off.
2、VOL+:short/long press to increase volume.
3、VOL-:short/long press to decrease volume.
4、PAIR:short/long press to pair Bluetooth.
5、LINE IN:Jack for external audio input(specification:3.5mm plug)
6、OPTICAL IN:Jack for optical input playback
7、AUX IN(L R):Jack for external audio input(specification:lotus form plug)
8、DC IN:Jack for DC 12 input
LED indicators:
LED(Red): Red lantern is on when ready to power on and goes off when poweris on.
LED(Green): for LINE IN function (green lantern is on).
LED(Orange): for OPTIC function (orange lantern is on).
LED(White): for AUX function (white lantern is on).
LED(Blue): for Bluetooth function (blue lantern flashes without Bluetooth connection as
the device is on and goes on after Bluetooth connection).
Use of the remote control
1, Before the use of remote control, please take out the PVC insulation film inside the
battery buckle, and the batteries inthe battery buckle wouldformally power the remote

5
control. Hold the remote control towards thedevice screen to operate various functions
respectively on the remote control;
2, When the remote control isout of use fora long time and the batteries have no power
for functions of the remote control, please detach the buckle as shown in thefigure and
remove the old batteries for new ones. Payattention to the "+ / -" direction in replacement
and pushed in the remote control withthe direction shown in the figure to finish the
replacement.
Use of buttons on the remote control
1、 :short press to power on/off
2、LINE IN :short press to switch to external audio input
3、MUSIC :short press for music
4、TREBLE+:short press to increase TREBLE
5、TREBLE–:short press to decrease TREBLE
6、 :short press for previous song in Bluetooth
7、 :short press to switch to Bluetooth,
long press to search for Bluetooth pairing
8、MUTE :short press for mute/audio on
9、AUX :short press to switch to external audio input
10、OPTIC :short press to switch to optical decoding
11、TALK :short press for speech effect
12、MOVIE :short press for movie effect
13、VOL+ :short/long press to increase volume.
14、BASS+:short press to increase BASS
15、VOL- :short/long press to decrease volume.

6
16、BASS–:short press to decrease BASS
17、 :short press for next song in Bluetooth
18、 :short press for music playback/pause in Bluetooth
Power supply Mode:
Get the DC plug of power adapter of the device into the DC 12 v socket of it, the
other end of the power adapter connected to the grid. The power indicator of the
device turns red, then short press “ ” button on the device or remote control can
power on.
6. Operational instructions
Bluetooth Pairing and Playback Mode:
After startup, the device directly enters Bluetooth mode and the blue lantern flashes. Bluetooth
is pairing!
1). put the mobile in the distance of 3 meters away;
2.) activate the Bluetooth function of the mobile to start searching for Bluetooth devices (please
refer to the user s’manual of the mobile specifically);
3.) select “ITB066”from the found devices by clicking to connect, the blue lantern is on.
4.) If the mobile prompts to enter password, please enter "0000" and press the confirm button to
get pairing of the device and the mobile.
5). press the return button to exit the mobile menu, ensure no obstacles within the distance of 10
meters from the mobile, now the device can be used to play music. Theblue lantern flicks
slowly.
6). short press“”button to play/ pause music. Short press “ ”or“ ”button to
select previous or next song.
7).If you wan to disconnect, long prees“PAIR∕ ”button on the device,you could use
another mobile to connect to Bluetoothfor playback. If connection is not selected, the
device awaits for connection and the blue lantern flashs.
●LINE IN Mode

7
After startup, use audio line with 3.5 mm plug to connect the external audio input to LINE IN jack of
the device, the device will automatically switch to the LINE IN function model. Then connect an
external audio source such as MP3 / CD to LINE IN jack on the device by audio line, you could
start to listen to external audio music. (Please adjust the volume of an external audio source to
moderate, and in playback mode).
●AUX IN Mode:
After startup, short press“∕MODE”button on the device or “AUX”button on the remote
control to switch to “AUX IN“ mode. Then connect an external audio source such as MP3 /
CD/TV to AUX(L R)jack on the device by audio line with lotus form plug, you could start to
listen to external audio music. (Please adjust the volume of an external audio source to
moderate, and in playback mode).
●Optical decoding Mode:
Short press “∕MODE”button on the device or the "OPT" button on the remote control to
switch to "OPT" decoding function. Then connect DVD audio and equipment with optical
decoding output to the "OPT" input jack on the back of the device with optical fiber digital line.
This device restores audio by amplifier with optical digital decoding.
Notes:
1, This "OPT" input model can only decode PCM audio signal flow and output stereo analog audio
signals. For the presently popular licensed digital audio stream such as "DOLBY “, "DTS" ,
"THX", it could not normally decode.
2, when the device is connected but has no audio output, please confirm whether optical fiber line
is well connected, and make sure whether the fiber optic terminal on your audio output signal
equipment gives a red light. If there is no red light with the equipment, please set your device
and open the optical output port, and set it to PCM output.
3, When your audio output device gives a red light, but still can't normally play, please make sure
your audio output device is set to the PCM output state. If it is confirmed as PCM output state
yet the system still has no audio output, please confirm your music again, such as DVDS, or
other audio signal, whether they are signal sources with audio compressed format, such as

8
"DOLBY *", "DTS", "THX" etc. If you can't confirm the format of audio signals, you can change
to CD to play. If there is a audio output with CD, it means the equipment connection and setup
is correct. If there is still no audio output, please consult a professional personnel or customer
service.
Volume and sound adjustment mode:
A, after startup, in any playback mode, short press or long press machine the “VOL-” button
on the device or the remote control to decrease the volume; short press or long press the
“VOL+” button on the device or the remote control to increase the volume;
Note: in the process of increasing/decreasing the volume, the indicator corresponding to its
function states flashes subsequently. When the volume is adjusted to the maximum or the
minimum, the indicator corresponding to its function states keeps on. To remind users!
B, After startup, in any playback mode, short press on audio mode respectively: MUSIC (music
mode), MOVIE (music mode), TALK (talk mode)
Notes: 1, Only in the MOVIE (movie mode), “BASS(+、-)”,“TREBLE(+、-)”buttons
on the remote control is useless. "BASS (+, -)", "TREBLE" (+, -) button is no effect; In MUSIC
(music mode), TALK (talk mode), press the “BASS(+、-)”,“TREBLE(+、-)”
buttons could adjust BASS and TREBLE between -5 to +5!
2, The user can adjust different audio modes according to his personal favors to enjoy music!
Shutdown:
As the device is on, long press “”button on the device or short press “ ”button on the
remote control to shutdown. If you pull out the power adapter off the grid, the device is totally
out of power.
7. Device compatibility
This device theoretically supports all mobilemobiles and related devices with
Bluetooth function to connect in Bluetooth and play music!
8. Main technical parameters
1,Bluetooth specification: Bluetooth V2.1
2,Output power: Output level 2, Maximum connection distance ≥10 m

9
3,Output power: L:5W R:5W
4,Operational frequency range: 2.4 GHz-2.480 GHz
5,Supporting Profiles: A2DP AVRCP GAVDP AVDTP
6,Speaker impedance: L 、R :4Ω
The product specifications and design may change without further notice!
9. Simple trouble solutions
Troubles Solutions
pairing
connection via
Bluetooth cannot
be completed
Other mobile device has connected before use and the mobile device
has not left as well as its Bluetoothis not off. When it connects,
Bluetooth of this device will automatically find the Bluetooth device and
connect. First, turn off Bluetooth ofthe connected Bluetooth devices,
then the next Bluetooth device can be found and normally pairedto
connect.
Volume of
playback via
Bluetooth is
small
1. After connections with mobile devices, volume of Bluetooth device is
not up but at the default output level. Turn on the mobile device output.
2. Output volume of Bluetooth device is low itself.
connection
distance via
Bluetooth is short
Obstruction exists between mobile devices and Bluetooth device.
Remove obstructions.
connection via
Bluetooth is right,
sometimes
staccato.
1. Obstruction exists between mobiledevices and Bluetooth device.
Remove obstructions. 2. Too far away from Bluetooth device to
connected mobile devices, beyond the connection range.
Shorten the distance between the Bluetoothdevice and mobile
devices.
silent play after
connection via
Bluetooth
After connections with mobile devices, Bluetooth device audio is off.
Turn on the mobile’s output volume.
Note: If the above methods are all excluded, the device still can not work, please notify the
technician or the customer service!

10
Warning:
This device complies with Part 15 of the FCC Rules. Operation is subject to the following two conditions: (1)
this devicemay not cause harmful interference, and (2) this device must accept any interference received,
including interference that may cause undesired operation. changes or modifications not expressly
approved by the party responsible for compliance could void the user's authority to operate the equipment.
NOTE: This equipment has been tested and found to comply with the limits for a
Class B digital device, pursuant to Part 15 of the FCC Rules. These limits are designed to provide
reasonable protection against harmful interference in a residential installation. This equipment generates,
uses and can radiate radio frequency energy and, if not installed and used in accordance with the
instructions, may cause harmful interference to radio communications. However, there is no guarantee that
interference will not occur in a particular installation.
If this equipment does cause harmful interference to radio or television reception,
which can be determined by turning the equipment off and on, the user is encouraged to try to correct the
interference by one or more of the following measures:
-- Reorient or relocate the receiving antenna.
-- Increase the separation between the equipment and receiver.
-- Connect the equipment into an outlet on a circuit different from that to which the receiver is connected.
-- Consult the dealer or an experienced radio/TV technician for help.
NOTE: This device and its antenna(s) must not be co-located or operation in conjunction with any other
antenna or transmitter.
Table of contents
Other Sky Dragon Speakers manuals


Popular Speakers manuals by other brands


Sunfire
Sunfire CRW-3 Installation instructions and user manual

Bigben
Bigben BTLSTURTLE operating instructions

essentiel b
essentiel b EKO 2 user guide

Tracer
Tracer Warp BT Instructions for use

EMPHASER
EMPHASER GRAVITY ECP-G4 manual

Cambridge Sound Works
Cambridge Sound Works PlayWorks PS2000 Digital Installation and operating instructions


