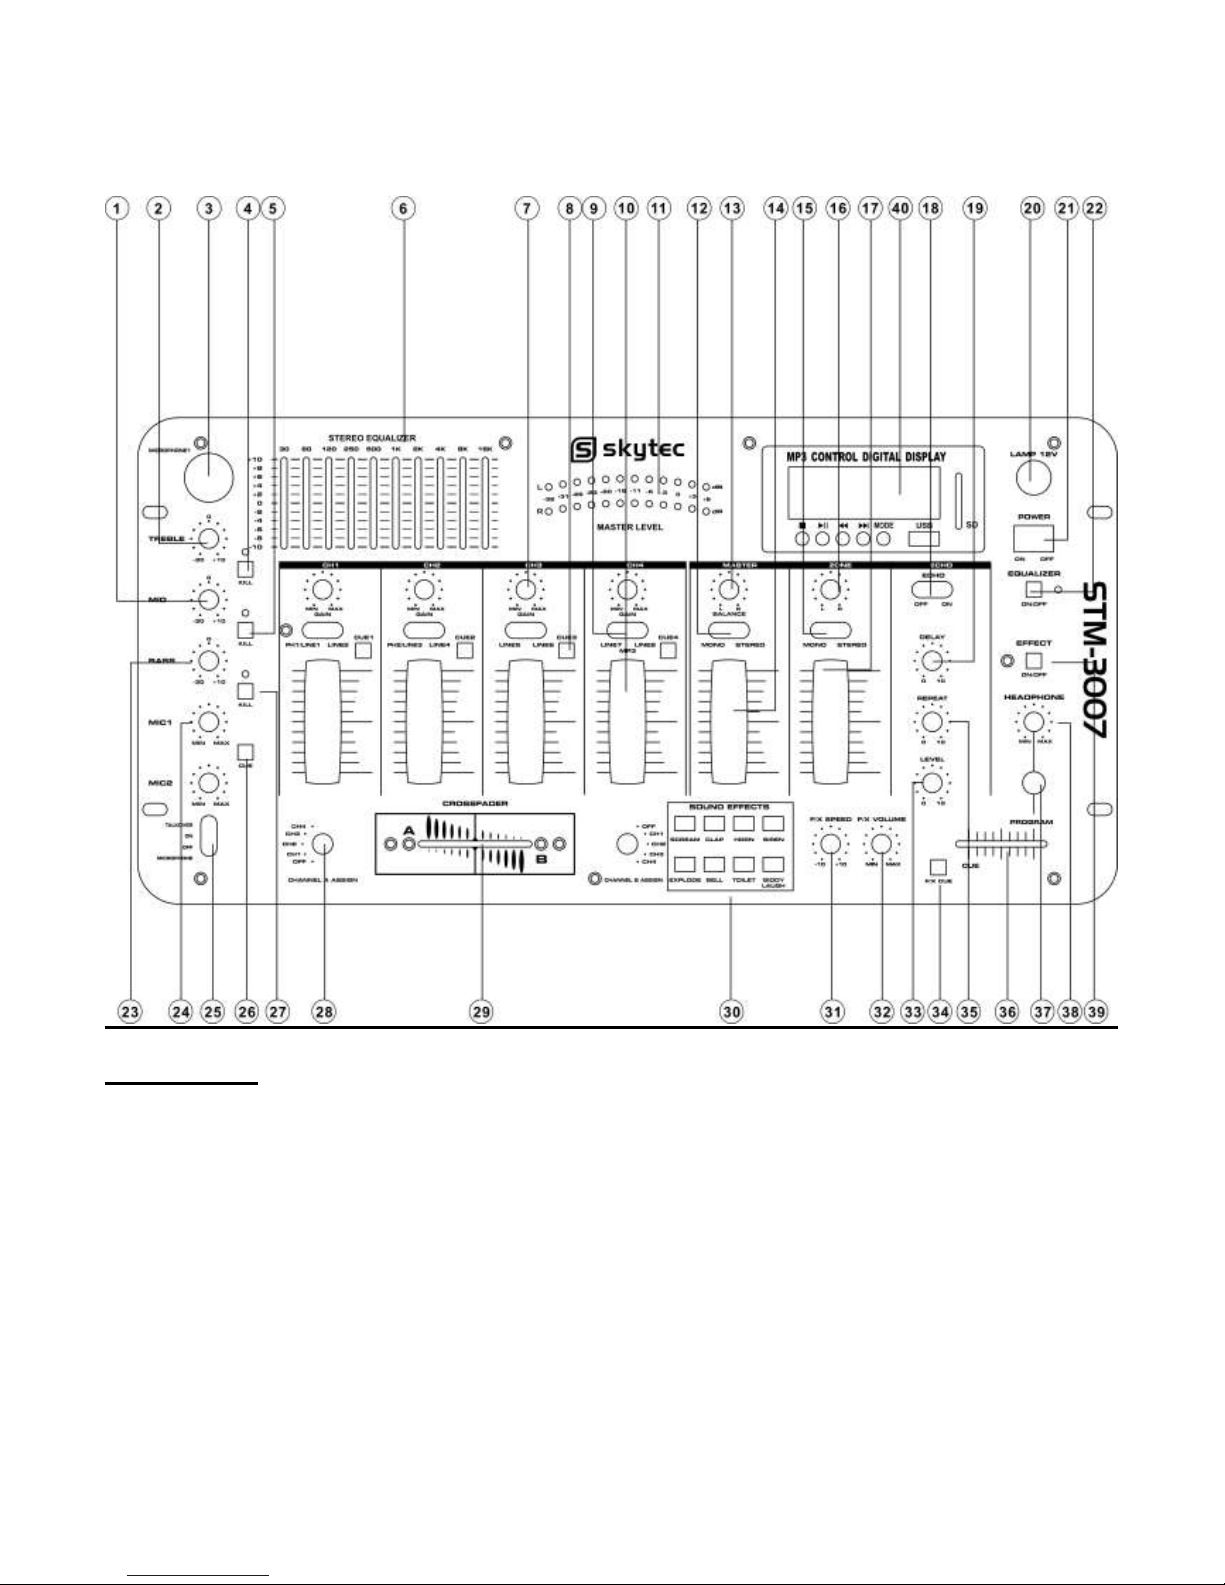
sky-tec STM-3007 User manual

USER GUIDE
STM-3007
INSTRUCTIONS
GEBRUIKSAANWIJZING
BEDIENUNGSANLEITUNG

172.736
Safety Precaution
Read all documentations carefully before operating the equipment.Retain this manual for future reference.Follow all
instructions printed on unit for proper operation.
Do not open cover (or back cover) to reduce the risk of electric shock or fire.
There are no user serviceable parts inside.Refer servicing to qualified service Personnel.
This symbol is used to alert the poerator to the presence of important operationg instructions and precautions detailed in
the documentation manual.
This symbol is used to warn operators that uninsulated dangerous voltages are present within the products enclosure that
may pose a risk of electric shock.
Warning: To avoid fire or risk of electric shock,do not expose this unit to rain or moisture.
Notes:
.Make sure power outlets conform to the power requirements listed on the back of the unit.
.Main voltage must be correct and the same as that printed on the rear of the unit.
.Do not use the unit if the electrical cord is frayed or broken.
.The unit shall not be exposed to dripping or splashing and that no objects filled with liquids,such as vases, shall be placed
on unit.
.The unit shall be connected to mains socket outlet with a protective earthing connection.
.Power plug sa a equipment that separate from power supply system, it must be easy to operating.
Warning:
.Using, adjustintg or changing program control beyond this specification may cause dangerous radiation.
.The unit should be serviced by qualified service personnel.
.When repairing,use only same specification parts.
Notes:
.Select the voltage requirement through the voltage selector switch at the real panel.
.Make sure that the power of the equipment is off and disconnected from the main voltage before switching the voltage
selector to the required setting .We will not be responsible for damages arising from the improper installation,wiring or
operation due to the fault or negligence of the user.
Record your model and serial number here:
Importance:
1) Read manual ---Please read through safety and operating instruction carefully before using this unit.
2) Keep manual ---Please keep this manual for future reference.
3) Attach importance to warning and note ---Please operate it according warning and bote of manual.
4) Do it according what the manual indicates ---Do it according to instruction of manual.
5) Water and moisture---Position of the unit don’t close to awter. E.g.close to bath,wash by tub,washtub,
6) Carriage and rack ---The unit ought to match carriage and rack that manufacturer recommended.
Please be careful while carriage with the unit is moving.
Sudden stop,great power and rough surface may cause combination turns over.
7) Fix on wall or ceiling ---Manufacturer suggest product only be fixed on wall or ceiling.
8) Heat ---Device do not leave heat source such as radiator,stove and amplifier etc.
9) Power supply ---The unit only operate with rated power supply.Please ask dealer or local power supply company
while not ensure type of power supply .If operationg with batteries or other power supply, please refer to this booklet.
10) Connectiong ground or polarization ---Perhaps this unit has a polarization AC plug. This plug only has a method to be
inserted.Its characteristic is safety.

11) Power cord protect ---Power cord do not be trampled or be pressed.
12) Clean ---Clean this unit with a soft cloth. Prevent water to enter into inner.
13) For device with AC power cord,check AC plug sheet and all of exposed metal parts with ohmmeter before using ,and
resistance ought to be more than 100K ohm.
14) Stop period --- Unplug the power cord if the unit is not used for a long time.
15) Prevent solid and liquid to enter into unit --- Be CARE FULLY ,DO NOT FALL SOLID OR SPATTER LIQUID AT
HOLE OF UNIT.
16) Mangle for repair --- If cause following case ,refer to qualified service personnel:
A) Power cord or plug mangle; or
B) Inside of unit have falling solid or liquid; or
C) The unit be rained ; or
D) Device do not work; or
E) The unit be fallen,or cover be mangle.
17) Repair ---User do not repair unit except operating to depend on manual instruction. All of above symptoms should
refer to qualified service personnel.
18) Ventilation --- Function of cover’s interval and hole is ventilation. It ensure operationg reliability and prevent to
overheat. Do not cover this hole absolutely. Do not place unit on bed , blandet, sofa or similar object’s surface .Do not
place unit in object’s inner,such as bookcase’s inner, Shelf’s inner etc.
19) Accessories---Not use parts that manufactory do not recommend in order to avoid damage.
20) Auxiliary equipment ---Do not place this unit on unstable vehicle,shelf,tripod or table. It will cause serious harm to
child or adult if the unit be fallen. Pleasel use the vehicle, shelf, tripod or table that manufactory recommen.
21) Preventing thunderbolt---Add preventing thunderbolt equipment, or if the unit is not used for a long time, unplug the
power cord.
22) Replace parts---If the unit require replacing part, you must replace with manufactory recommend, or same
characteristic part.
23) Safety check---After repairing, repairer must test the unit for security.
Not On Use
Allow for sufficient heat dispersion when installed on a rack.
1) Handle the power cord carefully.
Hold the plug when unplugging the cord.
2) Keep the set free from moisture,water and dust.
3) Unplug the power cord when not using the set for long periods of time.
4) Do not obstruct the ventilation holes.(For sets with ventilation holes.)
5) Do not let foreign objects in the set.
6) Do not let insecticidese, benzene, and thinner come in contact with the set.

Front Panel
1)MIC MID
This knob adjusts the middle tone of the microphone.
2)MIC TREBLE
This knob adjusts the high tone of the microphone.
3)MIC INPUT JACK
Connect your MIC at this location.
4)KILL FOR TREBLE
Press it to kill microphone trreble volume, and indicator light.
5) KILL FOR MID
Press it ro kill microphone middle volume, and indicator light.
6) EQUALIZER
Allow you to tailor the mixer output to suit be cut or boost by up to 10dB.
7) CHANNEL GAIN
This rotary control adjusts theinput level.

8) CHANNEL CUE
Use it to monitor the selected audio input source.
9) CHANNEL INPUT SELECTOR
Let you to choose the input source to play for each channel.
10) CHANNEL LEVEOL CONTROL
Let you control mixer’s overallchannel volume level.
11) DISPLAY METER
Indicate the levels of left and right master channels.
12) MASTER MONO/STEREO SELECTOR
Select mono mode or stereo mode.
13) MASTER BALANCE CONTROL
Let you adjust master balance.
14) MASTER LEVEL CONTROL
Let you control mixer’s overall master volume level.
15) ZONE MONO/STEREO SELECTRO
Select mono mode or stereo mode.
16) ZONE BALANCE CONTROL
Let you adjust zone balance.
17) ZONE LEVEL CONTROL
Let you control mixer’s overall zone volume level.
18) ECHO ON/OFF
Turn echo on or off
19) ECHO DELAY CONTROL
Let you adjust the delay tine for echo.
20) 12V POWER SUPPLY JACK
Allow you to connect 12v power supply via this jack.
21) POWER SWITCH
Use this switch to turn on the unit after all input devices are already connected to prevent damage to you equipment. Turn
the mixer on before you turn on amplifier and turn of amplifiers before you turn off the mixer.
22) EQUALIZER ON/OFF
Press it to turn equalizer on, the indicator light.
23) MIC BASS
This knob adjusts the bass tone of the microphone.
24) MIC LEVEL CONTROL
Let you control the MIC level as they enter the mix.
25) MIC TALK OVER
There are talk over, MIC on and MIC off funtion. The Sound Pressure Level of audio frrom input sources will be decreased
while TALK OVER mode is set
26) MIC CUE
Use it to monitor the MIC input source
27)KILL FOR BASS
Press it tot kill microphone bass volume, and indicator light.
28) CHANNELASSIGN SELECTOR
Let you select the input source to be mixed by the crossfader control.
29) CROSSFADER
Allow you to smoothlu switch between the input sources assigned to channelA and channel B.
30) SOUND EFFECTS
Let you create special sound performance mixes from the eight preprogrammed special effects.

31) SOUND EFFECTS SPEED CONTROL
Let you control the pitch of the selected sound effect.
32) SOUND EFFECTS VOLUME CONTROL
Let you control the volume level of the sound effect within the mix.
33) ECHO LEVEL CONTROL
Control the depth of the echo effect.
34) SOUNCD EFFECTS CUE
Let you monitor the selected sound effect before mixing it in.
35) ECHO REPEAT CONTROL
Let you control the time period during which the echo is repeated.
36) HEADPHONE CUE/PGM CONTROL
Allow you to listen simultaneously or separately to the CUE material or the active program.
37) HEADPHONE JACK
Accept headphone with 1/4”plug.
38) HEADPHONE LEVEL CONTROL
Let you to control the volume level of headphone.
39) EFFECT SWITCH (SEND/ RECEIVE)
Let you connect a sound effect device, such as reverb, sampler, etc. and either play the signal from it or play anpther input
through it.
40)MP3 PLAYER AND BLUE TOOTH
a)USB/SD:Connect to USB stick and SD card.
b)ID3 Display:Display to MP3's information.
c) Five Buttons from left to right function as follows
c1)Stop
Use this button to stop this music.
c2)Play/pause
Each time you press this button, the operation changes from play to Pause or from pause to play.
C3)|<< PREVIOUS
Use this button to re-start the track or to select the previous track.
C4)>>| NEXT
Use this button to select the next track.
C5)mode select
Short press to select the usb/sd and blue tooth function.long press to turn on/off the mode.

Rear Panel
1) POWER SUPPLY INPUT JACK
Input voltage from this jack.
2) VOLTAGE SELECTOR
Select voltage which you need.
3) 1/4”OUTPUT JACKS
Connect the mixer to a receiver use cables with 1/4”plugs
4) AMP OUTPUT JACKS
Connect the mixer to a amplifier use cables.
5) ZONE OUTPUT JACKS
Connect the mixer to a second receiver or amplifier powering speakers in the DJ booth or in a remote location.
6) RECORD OUTPUT JACKS
Connect the mixer to a second receiver or amplifier powering speakers in the DJ booth or in a remote location.
7) EFFECTS SEND/RECEIVE JACKS
Permit you to either include externally generated effects (such as a digital sampler) in the mix, or to process the mixed
sound (echo recerb, ect.)
8) LINE INPUTS
Let you connect most high-level audio source, such as CD players, tape deck, tuner or VCR.
9) INPUT SELECTOR
Set these swithches based on what is plugged into Phono/ Line input jacks.
10) MIC JACK
Microphones with a 1/4”connector can be connected to these input terminals.
11) GROUND
Ground Screw for turntables.
Specifications
Input Sensitivity/ Impedance
MIC 1-2--------------------------------------1.5mV/ 600 Ohms, bal/unbal
Phono 1-2------------------------------------3.0mV/ 50K Ohms
Line 1-8--------------------------------------150.0 mV/27K Ohms
Output Level
Amp-------------------------------------------2.0V/10K Ohms
Zone------------------------------------------2.0V/10K Ohms
Record---------------------------------------150Mv/10K Ohms
Frequency Response-----------------------20Hz-20kHz +/-3 dB
S/N Ratio ( at 1 kHz)
MIC ------------------------------------->60 dB/ 1.5mV input
Phono ------------------------------------>60 dB/ 3.0mV input
Line -------------------------------------->65 dB/ 150mV input
Distortion
MIC -------------------------------------0.5%
Phono ------------------------------------0.5%
Line --------------------------------------0.5%

Equalizer :
Control Frequencies------------30, 60, 120, 250, 500, 1K, 2K, 4K, 8K, and 16KHz
Boost/Cut Range-------------------------+/- 10 dB from center
MIC Tone Control
Treble----------------------------------10kHz; +10/- 30dB
MID-------------------------------------1kHz; +10/- 30dB
Bass-------------------------------------100kHz; +10/- 30dB
Talk over Attenuation-------------------- -16dB
Echo Delay Time--------------------------50mS-120Ms
Headphone output power-------------------30Mw @32 Ohms
Power Source-----------------------------115 VAC, 60Hz/ 230VAC, 50Hz
Consumed power---------------------------20W
Dimensions( WxDxH)-----------------------482x 105x240mm
Weight-----------------------------------3.5kg
Design and specifications are subject to change without notice.

NL 172.736
Hartelijk dank voor de aanschaf van dit SkyTec mengpaneel. Lees deze gebruiksaanwijzing aandachtig door alvorens het
apparaat in bedrijf te stellen.
WAARSCHUWING
- Lees altijd eerst de gebruiksaanwijzing voordat u een apparaat gaat gebruiken.
- Bewaar de handleiding zodat elke gebruiker hem eerst kan doorlezen.
- Bewaar de verpakking zodat u indien het apparaat defect is, dit in de originele verpakking kunt opsturen om
beschadigingen te voorkomen.
- Alleen voor gebruik binnenshuis.
- Voordat het apparaat in werking wordt gesteld, altijd eerst een deskundige raadplegen die u eventueel kan begeleiden.
- In het apparaat bevinden zich onder spanning staande onderdelen; open daarom NOOIT dit apparaat.
- Bij het verwijderen van de stekker uit het stopcontact nooit aan het netsnoer trekken.
- Verwijder of plaats een stekker nooit met natte handen resp. uit en in het stopcontact.
- Indien de stekker en/of netsnoer als snoeringang in het apparaat beschadigd zijn dient dit door een vakman hersteld te
worden.
- Indien het apparaat zo beschadigd is dat inwendige (onder)delen zichtbaar zijn mag de stekker NOOIT in het stopcontact
worden geplaatst én het apparaat NOOIT worden ingeschakeld. Neem in dit geval contact op met uw dealer.
- Reparatie aan het apparaat dient te geschieden door resp. een vakman of een deskundige.
- Sluit het apparaat alléén aan op een 220240Vac / 50Hz (geaard) stopcontact, verbonden met een 10-16Ameterkastgroep.
- Toestel niet opstellen in de buurt van warmte bronnen zoals verwarming etc. Plaats er geen voorwerpen/drinkbekers op.
- Bij onweer altijd de stekker uit het stopcontact halen, zo ook wanneer het apparaat voor een langere tijd niet gebruikt
wordt.
- Als u het apparaat lang niet gebruikt heeft en het weer wil gebruiken kan er condensatiewater ontstaan; laat het apparaat
eerst op kamertemperatuur komen alvorens het weer in werking te stellen.
- Om ongevallen in bedrijven te voorkomen moét rekening worden gehouden met de daarvoor geldende richtlijnen en
moeten de aanwijzingen/waarschuwingen worden gevolgd.
- Het apparaat buiten bereik van kinderen houden.
- Zorg er altijd voor dat wanneer het apparaat wordt ingeschakeld dat alle kanaalschuiven en het mastervolume op minimaal staan.
- Regel de kanaalschuiven met beleid, snelle variatie kan voor overbelasting zorgen met beschadiging van uw luidsprekers
als gevolg. Gebruik geen overmatige kracht of geweld bij het plaatsen en/of instellen van de mixer!
- Zorg ervoor dat de versterker nooit gaat clippen: Dit gebeurt wanneer de clip leds, meestal op het front van de versterker,
opgaan lichten. Regel het volume dusdanig dat dit niet gebeurt en u geen vervorming hoort.
- Schakel een versterker altijd als laatste aan en schakelt hem als eerste uit.
- Gebruik geen schoonmaakspray om de schuifregelaars te reinigen. Restanten van deze spray zorgen ervoor dat smeer en
stof ophopen in de regelaars. Raadpleeg bij storing te allen tijde een deskundige.

Bedieningspaneel
1)MIC MID
Met deze knop kunt u de midden tonen van het microfoonsignaal afregelen.
2)MIC TREBLE
Met deze knop kunt u de hoge tonen van het microfoonsignaal afregelen.
3)MIC INPUT JACK
Sluit hier uw microfoon op aan.
4)KILL FOR TREBLE
Druk deze toets om de hoge tonen van het microfoonsignaal uit te schakelen, én de indicator licht op.
5) KILL FOR MID
Druk deze toets om de midden tonen van het microfoonsignaal uit te schakelen, én de indicator licht op.
6) EQUALIZER
Om het mixersignaal van een kleurrijke sound te voorzien door deze naar wens in te stellen en te versterken tot 10dB.
7) CHANNEL GAIN
Het niveau van het ingangssignaal kan hier worden afgeregeld per kanaal.

8) CHANNEL CUE
Gebruik deze toetsen om het audio ingangssignaal te beluisteren.
9) CHANNEL INPUT SELECTOR
Ingangskeuzeschakelaar voor ieder kanaal
10) CHANNEL LEVEL CONTROL
Kanaalfader voor ieder kanaal
11) DISPLAY METER
LED Display voor het uitgangssignaal van het linker en rechter kanaal
12) MASTER MONO/STEREO SELECTOR
Hier kunt u mono mode of stereo mode selecteren.
13) MASTER BALANCE CONTROL
Voor het afstellen van de balans van het mastersignaal
14) MASTER LEVEL CONTROL
Masterfader om het uitgangssignaal af te regelen.
15) ZONE MONO/STEREO SELECTOR
Selecteer hier mono mode of stereo mode voor de zone.
16) ZONE BALANCE CONTROL
Selecteer hier de balans van het zonesignaal.
17) ZONE LEVEL CONTROL
Om het zone volume in te stellen.
18) ECHO ON/OFF
Echo aan- of uit te schakelen
19) ECHO DELAY CONTROL
Voor het afregelen van de delay tijd (vertraging) van de echo.
20) 12V POWER SUPPLY JACK
Voor het aansluiten van een externe12v voeding.
21) POWER SWITCH
Voor het aan- of uit te schakelen van de mixer.
22) EQUALIZER ON/OFF
Voor het aan- of uit te schakelen van de equalizer, indicator licht op.
23) MIC BASS
Met deze knop regelt u de bastoon van het microfoonsignaal.
24) MIC LEVEL CONTROL
Met deze knop regelt u het niveau van het microfoonsignaal..
25) MIC TALK OVER
Bij inschakelen zal de afgespeelde muziek worden gedempt wanneer in de microfoon wordt gesproken.
26) MIC CUE
Gebruik deze om het MIC ingangssignaal te controleren.
27)KILL FOR BASS
Druk deze toets om de lage tonen van het microfoonsignaal uit te schakelen, én de indicator licht op.
28) CHANNELASSIGN SELECTORS
Gebruik deze om de door u aangewezen/gewenste kanalen (A/B) te mixen.
29) CROSSFADER
Gebruik deze om soepel tussen de ingangen te mixen die op kanaal A en B zijn aangesloten.
30) SOUND EFFECTS
Er zijn 8 voorgeprogrammeerde speciale effecten aanwezig.

31) SOUND EFFECTS SPEED CONTROL
Gebruik deze om de snelheid van de effecten te regelen.
32) SOUND EFFECTS VOLUME CONTROL
Gebruik deze om het volume van de effecten te regelen.
33) ECHO LEVEL CONTROL
Gebruik deze om de “diepte”van het echo effect te regelen.
34) SOUNCD EFFECTS CUE
Gebruik deze om het geselecteerde effect te controleren voordat het gemixt wordt.
35) ECHO REPEAT CONTROL
Controleer hiermee de tijdsperiode van de echo herhaling.
36) HEADPHONE CUE/PGM CONTROL
Stelt u instaat om gelijktijdig of apart naar het Cuesignaal te luisteren.
37) HEADPHONE JACK
Ingang alleen geschikt voor een 6.35mm 1/4”plug.
38) HEADPHONE LEVEL CONTROL
Controleer hiermee het volume van het koptelefoonsignaal.
39) EFFECT SWITCH (SEND/ RECEIVE)
Stelt u in staat om een sound effect unit zoals reverb, sampler, etc. aan te sluiten en dit signaal af te spelen.
40) MP3 SPELER EN BLUE TOOTH
a) SB/SD: Voor het aansluiten van een USB stick en SD kaart.
b) ID3 Display: Weergeven van MP3 informatie.
c) 5 Toetsen van links naar rechts, functioneren alsvolgt :
c1)Stop: Om de muziek te stoppen.
c2)Play/pauze: Iedere keer als u de toets drukt springt de mode van Play naar Pauze en vice versa.
c3)|<< PREVIOUS: Om de track te re-starten of om de voorgaande track te selecteren.
c4)>>| NEXT: Om de volgende track te selecteren.
c5) Mode select:Als u kort op de toets drukt wordt usb/sd en blue tooth geselecteerd, toets vasthouden = aan/uit mode.

Achterpaneel
1) NETENTREE
Voor het aansluiten van de netspanning
2) VOLTAGE SELECTOR
Selecteer de juiste netspanning (220-240Vac/50Hz).
3) 1/4”OUTPUT JACKS
Sluit hier de mixer aan op een versterker met behulp van 6.35mm pluggen.
4) AMP OUTPUT JACKS
Sluit hier de mixer aan op een versterker.
5) ZONE OUTPUT JACKS
Sluit hier de mixer aan op een versterker in de booth mode voor een bepaalde zone.
6) RECORD OUTPUT JACKS
Sluit hier de mixer aan op een versterker.
7) EFFECTS SEND/RECEIVE JACKS
Om een externe effect generator op aan te sluiten zoals een digitale sampler of echo reverb, ect.
8) LINE INPUTS
Om CD spelers, tape deck, tuner of VCR op aan te sluiten.
9) INPUT SELECTOR- Om te selecteren tussen Phono/ Line ingangen.
10) MIC JACK
Om microfoons met een 6.35mm plug aan te sluiten.
11) GROUND-Aansluiting om de aardedraad van een platenspeler op aan te sluiten.
Specificaties
Ingangsgevoeligheid/ Impedantie :
MIC 1-2--------------------------------------1.5mV/ 600 Ohms, gebal/ongebal
Phono 1-2------------------------------------3.0mV/ 50K Ohms
Line 1-8--------------------------------------150.0 mV/27K Ohms
Uitgangsniveau’s :
Amp-------------------------------------------2.0V/10K Ohms
Zone------------------------------------------2.0V/10K Ohms
Record---------------------------------------150Mv/10K Ohms
Frequentie bereik-----------------------20Hz-20kHz +/-3 dB
S/R verhoudingen ( bij 1 kHz) :
MIC ------------------------------------->60 dB/ 1.5mV ingang
Phono ------------------------------------>60 dB/ 3.0mV ingang
Line -------------------------------------->65 dB/ 150mV ingang
Vervorming :
MIC -------------------------------------0.5%
Phono ------------------------------------0.5%
Line --------------------------------------0.5%
Equalizer, Boost/Cut Bereik-------------------------------------+/- 10 dB vanaf center
Control Frequencies------------30, 60, 120, 250, 500, 1K, 2K, 4K, 8K, en 16KHz

MIC Toon
Treble-------------------------------------10kHz; +10/- 30dB
MID----------------------------------------1kHz; +10/- 30dB
Bass-------------------------------------100kHz; +10/- 30dB
Talkover Demping------------------------------------- -16dB
Echo Delay Tijd-------------------------------50mS-120Ms
Koptelefoon vermogen-----------------30Mw @32 Ohms
Netspanning-------------115 VAC, 60Hz/ 230VAC, 50Hz
Vermogen-------------------------------------------------20W
Afmetingen( WxDxH)------------------482x 105x240mm
Gewicht--------------------------------------------------3.5kg

172.736 DEUTSCH
Herzlichen Glückwunsch zum Kauf dieses SkyTec Mischpults.
Bitte lesen Sie diese Anleitung sorgfältig vor der Inbetriebnahme durch.
Sicherheitsvorschriften:
- Bedienungsanleitung vor Inbetriebnahme sorgfältig durchlesen.
- Für spätere Bezugnahme aufbewahren.
- Originalverpackung für späteren Transport aufbewahren.
- Nur für Innengebrauch.
- Niemals das Gehäuse öffnen; Reparaturen nur von einem Fachmann ausführen lassen.
- BeimAbziehen des Steckers immer am Stecker ziehen, niemals an der Netzschnur.
- Stecker niemals mit nassen Händen anfassen.
- Sollten Stecker und/oder Netzschnur, sowie der Kabeleingang zum Gerät beschädigt sein, müssen diese durch
einen Fachmann ersetzt werden.
- Wenn das Gerät sichtbare Schäden aufweist, darf es NICHT an eine Steckdose angeschlossen und NICHT
eingeschaltet werden. Benachrichtigen sie in diesem Fall den Fachhändler.
- Das Gerät nur an eine (geerdete) 220-240Vac/50Hz Netzsteckdose mit 10-16ALeistung anschließen.
- Vor Regen schützen.
- Nicht in der Nähe von Wärmequellen aufstellen.
- Bei Unwetter sowie Nichtgebrauch das Netzgerät aus der Steckdose ziehen.
- Nach längerem Nichtgebrauch kann sich Kondenswasser im Gehäuse gebildet haben. Lassen Sie das Gerät
erst auf Raumtemperatur kommen.
- Unzugänglich aufbewahren und fernhalten von Kindern.
- Vor dem Einschalten alle Kanalschieberegler, sowie den Master Lautstärkeregler ganz herunterfahren.
- Die Schieberegler vorsichtig behandeln. Eine zu schnelle Veränderung kann die Lautsprecher beschädigen, weil
der Verstärker überfordert ist.
- Den Verstärker nicht überfordern (Clipping). Wenn die Clip LEDS am Verstärker aufleuchten, ist die Lautstärke
zu hoch eingestellt. Sofort die Lautstärke auf einen niedrigern Pegel einstellen.
- Den Verstärker immer zuletzt einschalten und zuerst ausschalten.
- Keine Reinigungssprays für die Schieberegler verwenden. Die Rückstände verursachen Schmier- und
Staubansammlungen in den Reglern. Im Problemfall einen Fachmann fragen.
- Legen Sie keine Gegenstände (Metall) oder Flüssigkeiten (in Tassen usw.) in der Nähe des Produkts (kann zu
irreparablen Schäden oder Stromschlag führen beim eindringen).

Bedienfeld
1)MIC MID
Zum einstellen der Mitteltöner des Mikrofonsignals .
2)MIC TREBLE
Zum einstellen der Hochtöner des Mikrofonsignals
3)MIC INPUT JACK
Zum anschließen der Mikrofone.
4)KILL FOR TREBLE
Drücken Sie diese Taste, um die hohen Töne des Mikrofonsignals heraus zu filtern (die Anzeige leuchtet dann ).
5) KILL FOR MID
Drücken Sie diese Taste, um die mittleren Töne des Mikrofonsignals heraus zu filtern (die Anzeige leuchtet dann).
6) EQUALIZER
Zur Bereitstellung des Mischpultssignals von einem bunten Sound nach Ihren Wünschen und max.10dB zu verstärken.
7) CHANNEL GAIN
Pro Kanal einstellen des Eingangssignals.

8) CHANNEL CUE
Verwenden Sie diese Tasten um das Audio-Eingangssignal anzuhören.
9) CHANNEL INPUT SELECTOR - Eingangswahlschalter pro Kanal
10) CHANNEL LEVEL CONTROL
Kanalfader pro Kanal
11) DISPLAY METER
LED Display, anzeige des Ausgangssignals betr. Kanal L/R
12) MASTER MONO/STEREO SELECTOR
Zum wählen des Mono- oder Stereo Modus.
13) MASTER BALANCE CONTROL
Zur Balance-Einstellung des Mastersignals
14) MASTER LEVEL CONTROL
Masterfader um dasAusgangssignal ein zu stellen.
15) ZONE MONO/STEREO SELECTOR
Wählen Sie hier den Mono- oder Stereo Modus der Zonen.
16) ZONE BALANCE CONTROL
Stellen Sie hier die Balance des Zonensignals ein.
17) ZONE LEVEL CONTROL
Um die Lautstärke der Zone ein zu stellen.
18) ECHO ON/OFF - Echo Ein/Aus Schalter
19) ECHO DELAY CONTROL
Zum einstellen der Delay Zeit (verzögerung) des Echosignals.
20) 12V POWER SUPPLY JACK
Zum anschließen der externen 12v Speisung.
21) POWER SWITCH
Zum Ein/Ausschalten das Mischpults
22) EQUALIZER ON/OFF
Zum Ein/Ausschalten des Equalizers, dieAnzeige leuchtet.
23) MIC BASS
Zum einstellen der Tieftöner des Mikrofonsignals
24) MIC LEVEL CONTROL
Pegeleinstellung des Mikrofonsignals.
25) MIC TALK OVER
Wenn die Musik spielt wird die Stummschaltung eingeschaltet wenn in das Mikrofon gesprochen wird
26) MIC CUE
Zum überprüfen des MIC Eingangssignals.
27)KILL FOR BASS
Drücken Sie diese Taste, um die tiefen Töne des Mikrofonsignals heraus zu filtern (die Anzeige leuchtet dann).
28) CHANNELASSIGN SELECTORS
Zum mischen der gewünsten Kanälen (zugewiesenA/B).
29) CROSSFADER
Zum flexibel mischen zwischen Kanal A und B .
30) SOUND EFFECTS
Es gibt 8 vorprogrammierten und besonderen Effekte.

31) SOUND EFFECTS SPEED CONTROL
Zum einstellen der Geschwindigkeit der Effekte.
32) SOUND EFFECTS VOLUME CONTROL
Zum einstellen der Lautstärke der Effekte.
33) ECHO LEVEL CONTROL
Zum einstellen der “Tiefe”des Echo Effekts.
34) SOUNCD EFFECTS CUE
Zum überprüfen des Effekts bevor es vermischt wird.
35) ECHO REPEAT CONTROL
Prüfen Sie diesen Zeitraum der Echo-Wiederholung.
36) HEADPHONE CUE/PGM CONTROL
Ermöglicht Ihnen um das Cuesignal gleichzeitig oder separat anzuhören.
37) HEADPHONE JACK
Eingang nur für 6.35mm Anschluß.
38) HEADPHONE LEVEL CONTROL
Zum überprüfen der Lautstärke des Kopfhörersignals.
39) EFFECT SWITCH (SEND/ RECEIVE)
Ermöglicht Ihnen um ein Sound Effekt Gerät wie Reverb, Sampler usw. an zu schließen und dieses Signal ab zu spielen.
40) MP3 SPELER EN BLUE TOOTH
a) SB/SD: Zum anschließen von USB Stick und SD Karte.
b) ID3 Display: Wiedergabe der MP3 Daten
c) 5 Tasten von links nach rechts, wie folgend :
c1)Stop: Um die Musik zu stoppen.
c2) Play / Pause : Jedes Mal, wenn Sie die Taste drücken, geht der Modus von Spielen auf Pause und umgekehrt.
c3) | << Previou s: Um den Titel neu zu starten oder um den vorherigen Titel zu wählen.
c4)>>| Next : Um den nächsten Titel zu wählen.
c5) Modus select: Wenn Sie die Taste 1x drücken wird USB / SD und Bluetooth ausgewählt, halten Sie die Taste = Ein /
Aus-Modus.

Rückseite :
1) 220-240Vac Buchse
Um die Stromversorgung anzuschließen
2) VOLTAGE SELECTOR
Wählen Sie die richtige Netzspannung (220-240Vac/50Hz).
3) 1/4”OUTPUT JACKS
Schließen Sie den Mixer an einen Verstärker mit 6,35 mm-Stecker.
4) AMP OUTPUT JACKS
Schließen Sie den Mixer an einen Verstärker.
5) ZONE OUTPUT JACKS
Schließen Sie den Mixer an einen Verstärker in Booth Modus.
6) RECORD OUTPUT JACKS
Schließen Sie den Mixer an einen Verstärker
7) EFFECTS SEND/RECEIVE JACKS
Um einen externen Effektgenerator anzuschließen wie ein digitaler Sampler oder Echo Reverb usw.
8) LINE INPUTS
Um hier CD Spieler, Tape deck, Tuner oder VCR anzuschließen.
9) INPUT SELECTOR- Um zu wählen zwischen Phono/ Line Eingänge.
10) MIC JACK
Um Mikrofone mit einem 6.35mm Stecker anzuschließen.
11) GROUND- Erdungsschraube zur Verbindung mit einem Plattenspieler um eine Verzerrung zu verhindern.
Technische Daten :
Eingangsempfindlichkeit/ Impedanz :
MIC 1-2--------------------------------------1.5mV/ 600 Ohms, symm/unsymm
Phono 1-2------------------------------------3.0mV/ 50K Ohms
Line 1-8--------------------------------------150.0 mV/27K Ohms
Ausgangspegel :
Amp-------------------------------------------2.0V/10K Ohms
Zone------------------------------------------2.0V/10K Ohms
Record---------------------------------------150Mv/10K Ohms
Frequenzgang----------------------------20Hz-20kHz +/-3 dB
S/R verhältnis ( 1 kHz) :
MIC ------------------------------------->60 dB/ 1.5mV Eingang
Phono ------------------------------------>60 dB/ 3.0mV Eingang
Line -------------------------------------->65 dB/ 150mV Eingang
Verzerrung
MIC -------------------------------------0.5%
Phono ------------------------------------0.5%
Line --------------------------------------0.5%
Equalizer, Boost/Cut Bereich------------------------------+/- 10 dB (ab center)
Frequenzen------------30, 60, 120, 250, 500, 1K, 2K, 4K, 8K, und 16KHz

MIC Ton :
Treble----------------------------------10kHz; +10/- 30dB
MID-------------------------------------1kHz; +10/- 30dB
Bass-----------------------------------100kHz; +10/- 30dB
Talkover Dämfung---------------------------------- -16dB
Echo Verzögerung----------------------------50mS-120Ms
Kopfhörer Ausgangsleistung---------30Mw @32 Ohms
Stromversorgung------115 VAC, 60Hz/ 230VAC, 50Hz
Leistung-------------------------------------------------20W
Abmessungen( WxDxH)--------------482x 105x240mm
Gewicht-------------------------------------------------3.5kg
Table of contents
Languages:
Other sky-tec Recording Equipment manuals