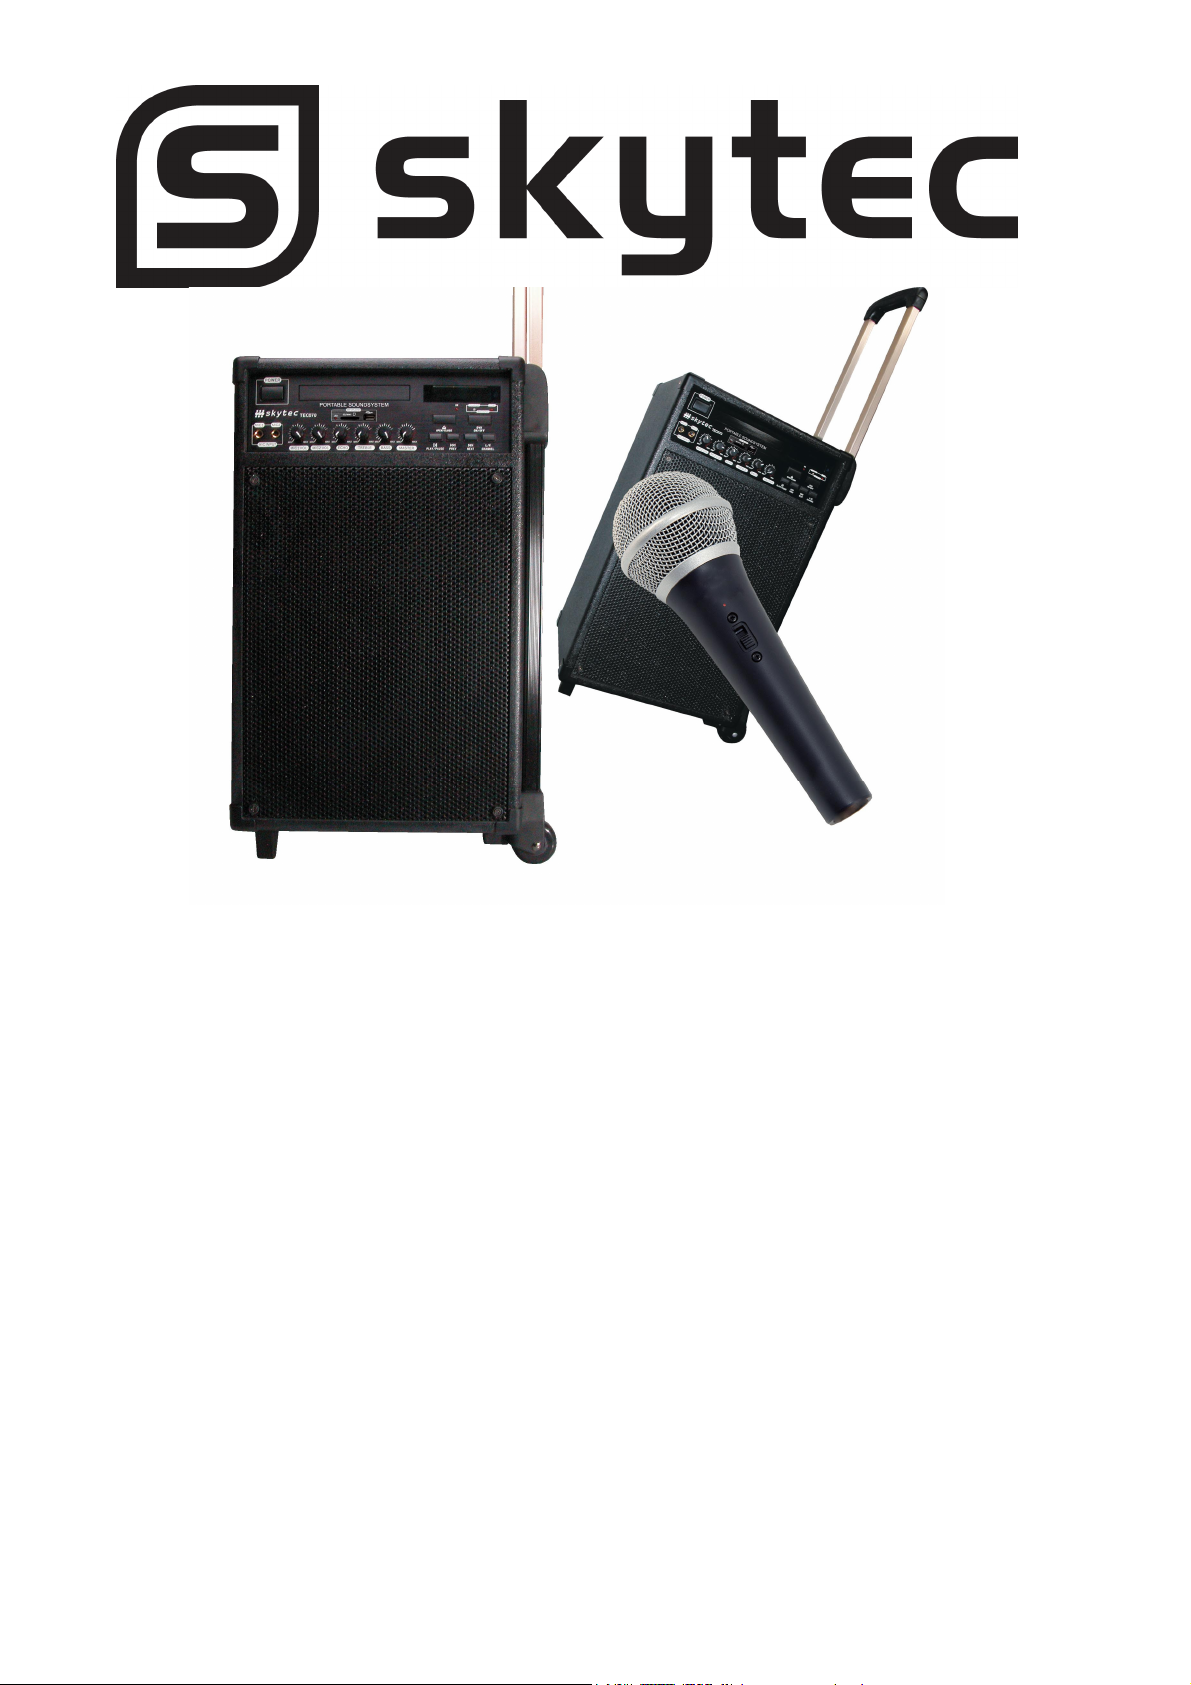
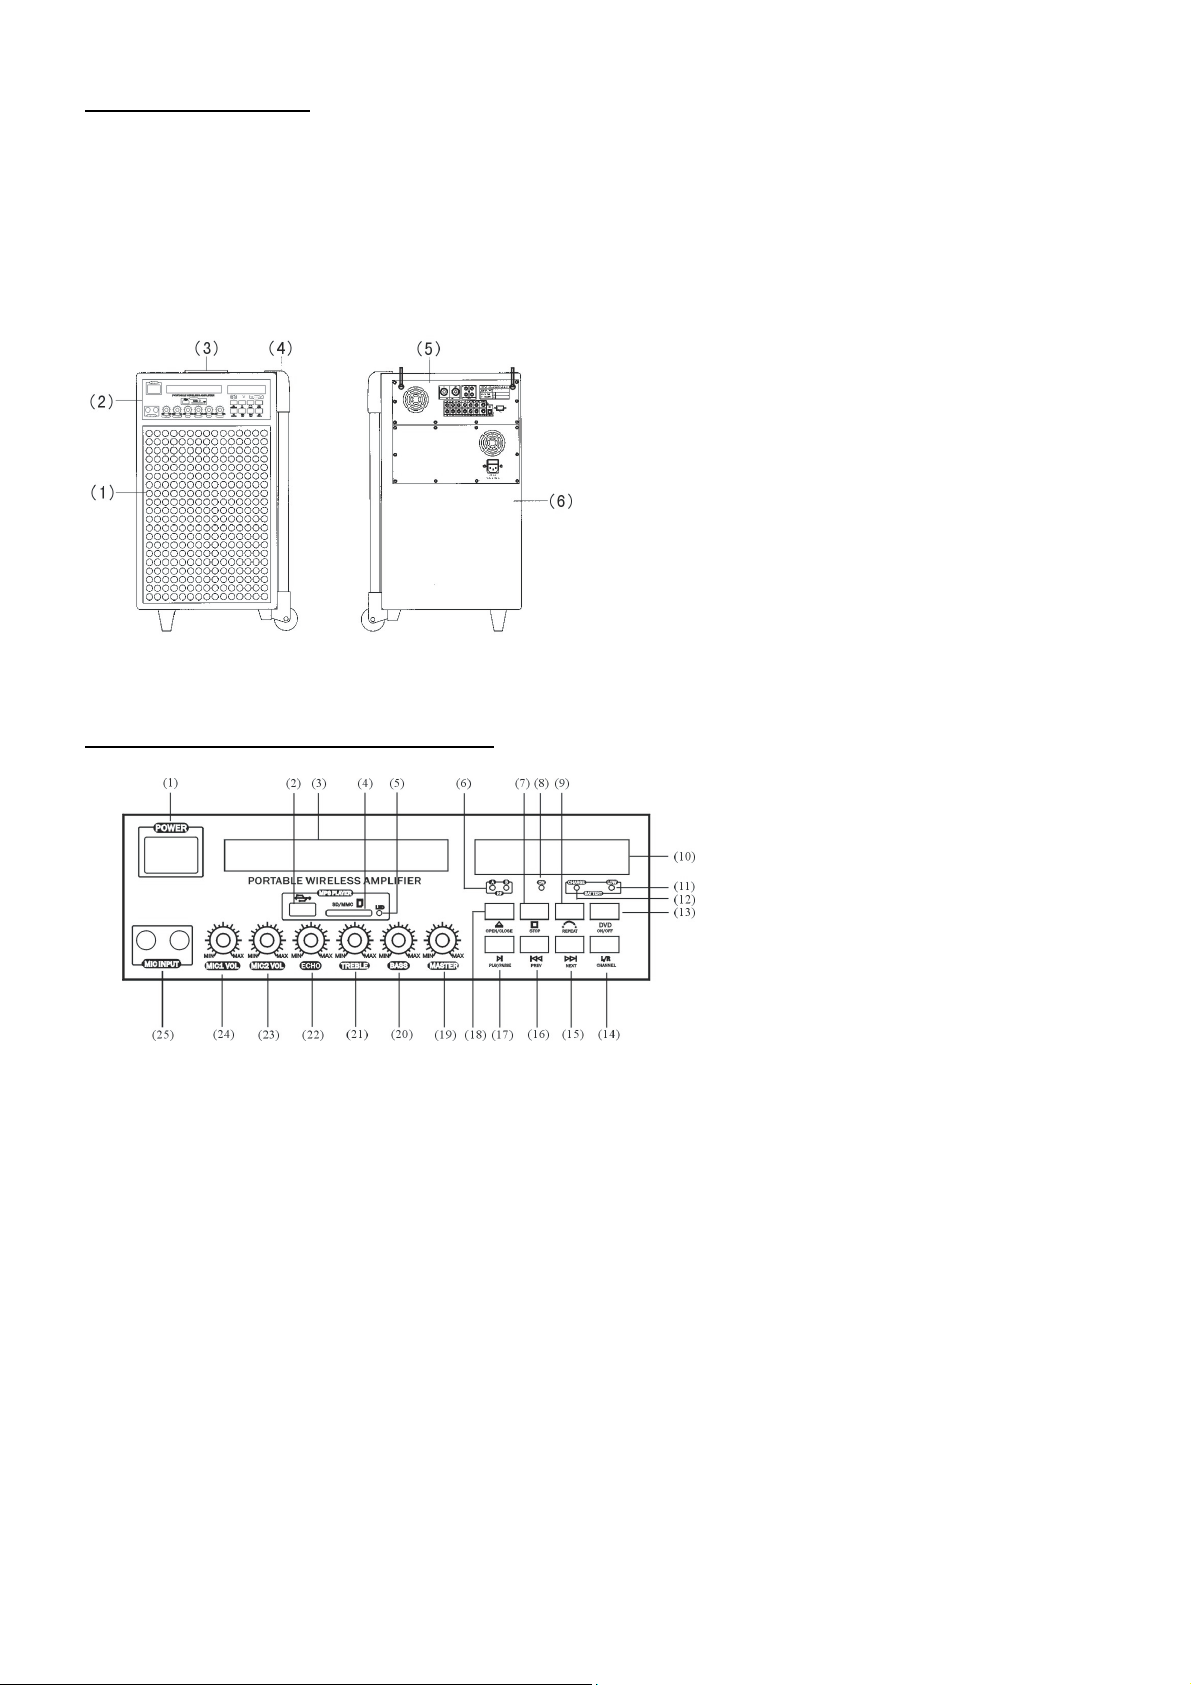
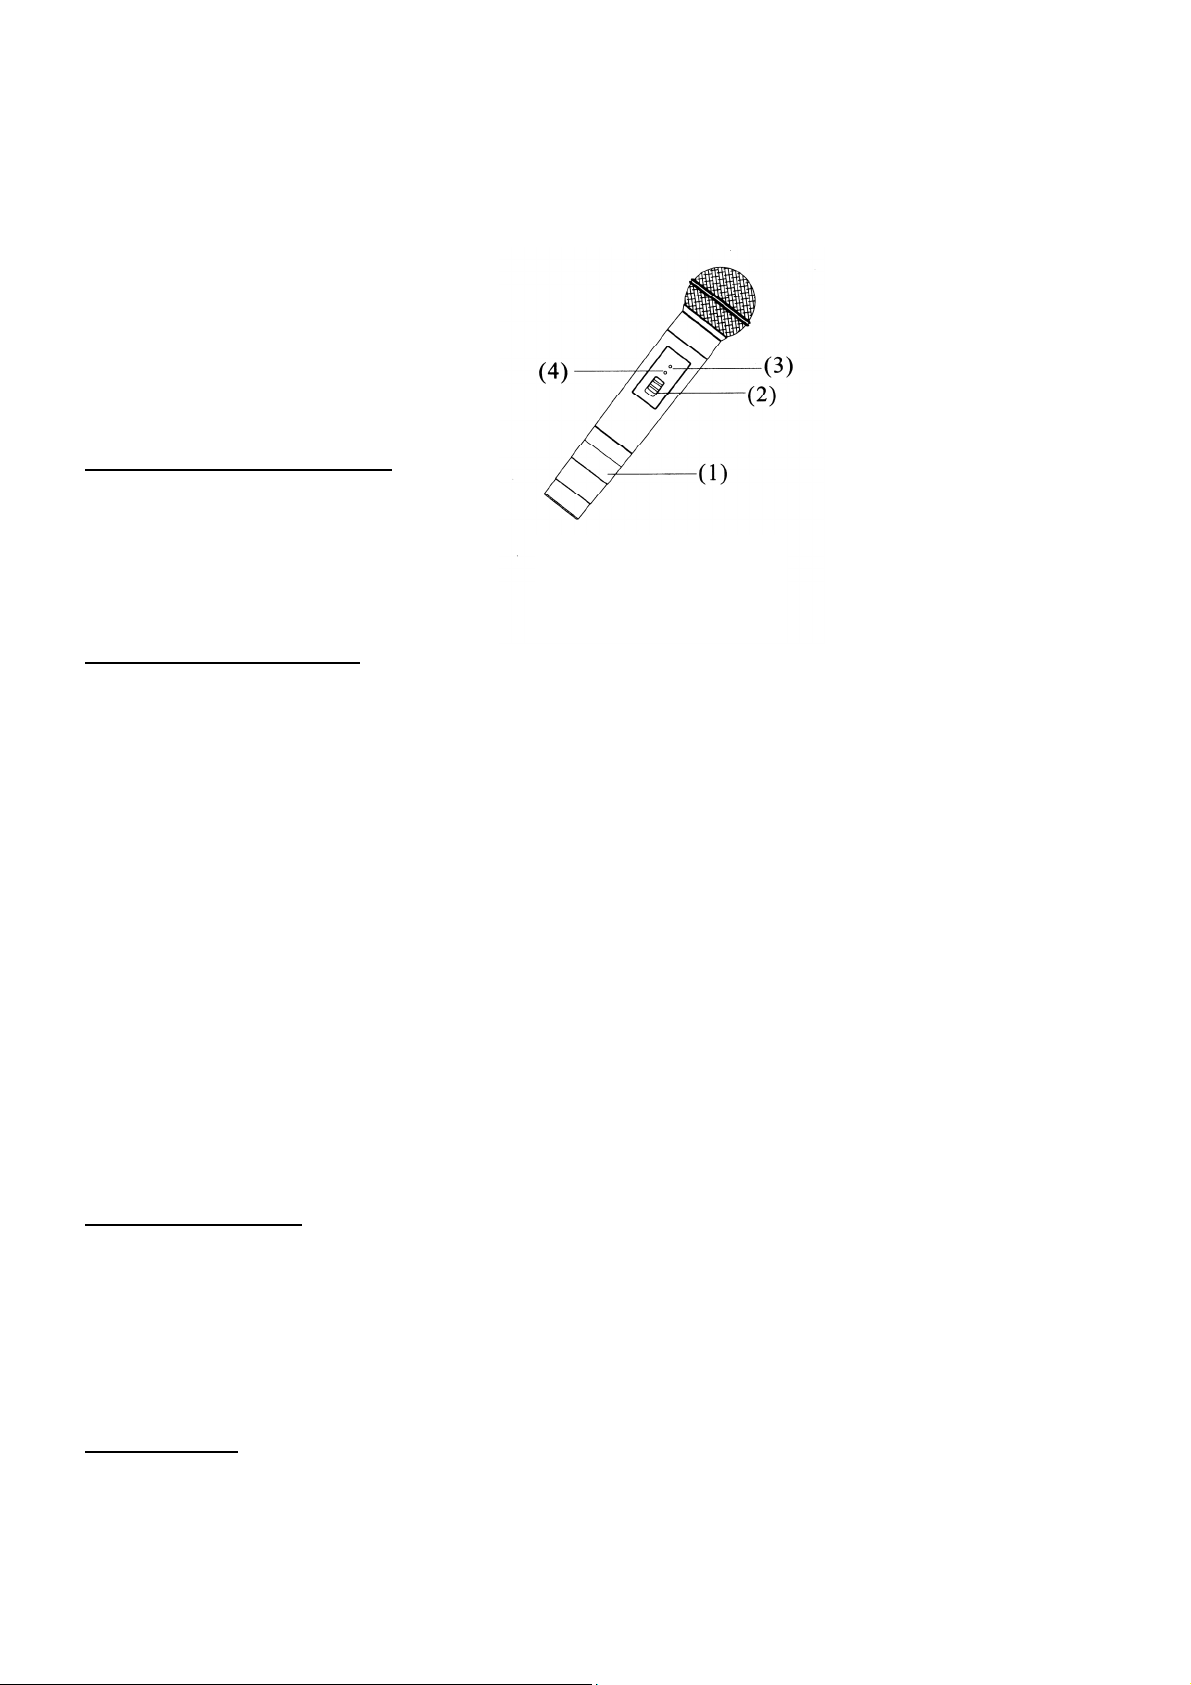
sky-tec TEC 075 User manual

TEC 075
PORTABLE SOUND SET WIRELESS
170.126
Instruction Manual
Gebruiksaanwijzing
Mode d’Emploi
Gebrauchsanleitung
Brugsanvisning

GB
Congratulations on the purchase of this SkyTec Karaoke set.
Please read this manual carefully prior to using the unit.
Warning:
- Read the manual prior to using the unit.
- Keep the manual for future reference.
- Keep the packaging for safer transport in its original packaging
- Prior to the first use, have the unit checked by a qualified person.
- The unit contains voltage carrying parts. DO NOT open the unit.
- When you unplug the unit from the mains always pull the plug, never the lead.
- Never plug or unplug the unit with wet hands.
- If the plug and/or mains lead are damaged, they need to be repaired by a qualified
technician.
- If the unit is damaged to an extent that you can see internal parts, do not plug the
unit into a mains outlet.
- Repairs have to be carried out by a qualified technician.
- Only connect this unit to an earthed mains outlet of 230Vac/50Hz and 10-16A.
- Do no place the unit near heat sources.
- Always unplug the unit during a thunderstorm or when it is not in use.
- If the unit has not been used for a longer period of time, condensation can occur
inside the housing. Please let the unit reach room temperature prior to use.
- To avoid accidents in public premises, the legal requirements must be fulfilled and
instructions/warnings must be adhered to.
- Keep out of the reach of children.
- All volume controls must be set to zero prior to switching the unit on.
- Do not use cleaning sprays for the slider controls. The residues of these spray
cause dust deposits in the controls. If a problem occurs, please consult a specialist.
- Always handle CDs with clean hands. Do not insert a damaged CD.
- Always close the CD tray to keep the laser eye clean.
- Do not clean the unit with chemical solutions. This might damage the finish. Only
use a dry cloth for cleaning.

PARTS DESCRIPTION
Thanks you for choosing our products.
Please take a few moments to read these instructions carefully, as we want you to enjoy
your new products quickly and to the full. The series of amplifier with new design of model
and nice looking, can suit different occasions, especially for office, meeting, exhibition,
outside party, teaching etc. The series is provided with wired, amplifying and amusement;
fully embody high quality, low price, portability and convenience. We believe firmly that the
series of amplifier will become your good assistant and friend because of its advantages.
MAIN FEATURES OF THE AMPLIFIER
•Excellent quality achieved by adopting SANYO dustproof digital chips and intelligent
fan.
•Assemble with advanced wired microphones.
•70W high power output to make your voice loud and clear.
•With AC-3, DTS etc. surround output.
•With fiber, coaxial, VGA and high distinct image output sockets.
•Function of connecting to outer speakers.
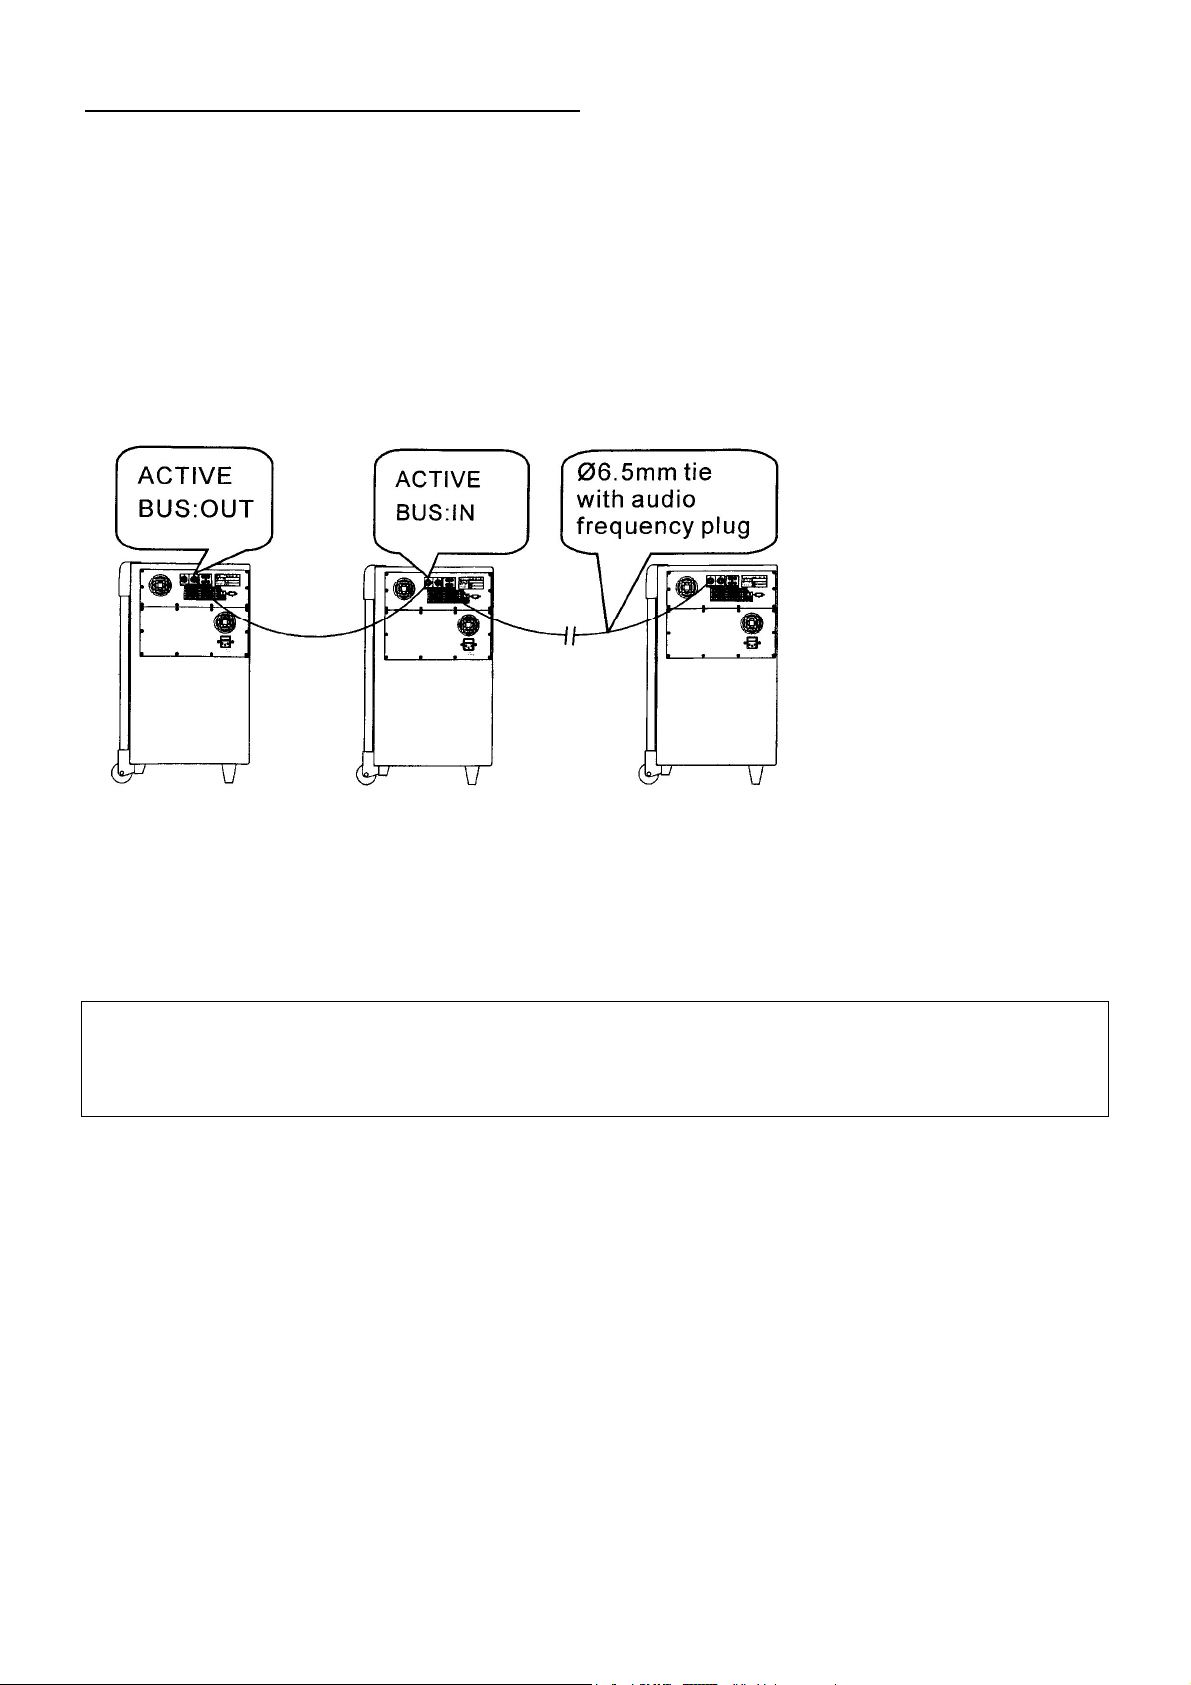
•Distinctive series connection of the system makes it suit for big speech occasion.
•Built-in sound source equipment: DVD
•Built-in AC-DC serving dual purposes power supply system with intelligence: auto
check the capacity of the battery, auto charge the battery, AC auto change to DC, it
makes you more convenient.
•The system can use wired microphone, DVD etc. different sound sources mixed-
amplifying.
•Special protection circuitry can effectively protect your amplifier.
•Support USB, Car reader function.
SPECIFICATION
MAX Output power: ..................................70W (RMS) / 4 Ωload impedance
T.H.D.: .................................................................................................<0.1%
Frequency Response: ...................................................... 50Hz-20kHz ± 3dB
Input Sound Source: .............DVD / wired mics/ external input sound source
Speaker: .............................. Built-in 8 inch bass speaker and 1 inch tweeter
Car reader memory medium:......................................... MMC Card, SD Card
Power supply: ..AC 220V at 50Hz, auto power source management system,
...................................intelligent battery charger and two pieces of 12V/5AH
...................................................................................rechargeable batteries.
Battery life: ........Voice-amplifying for 10 hours and DVD-playing for 5 hours.
Wired microphone: .................... Match different kinds of wired microphones.
Dimensions: ....................................................................540 x 330 x 290mm
FEATURES OF DVD PLAYER:
•With AC-3, DTS, PCM, MPEG etc. digital audio decoding output.
•With the quality of Hi-Fi, 96kHz/24bit audio digital processing.
•High definition of image details output, it can apply to the future display equipment.
•Fiber / coaxial audio output.
•With high stability and auto correction.
•Compatible with DVD, CD, CD-G, CD-R, MP3, KODAK Picture CD
•USB, Card reader support play form: MP3, WMA

ENTIRETY DESIGN:
1. Protect net
2. Front panel
3. Telescopic Handle
4. Trolley
5. Back Panel
6. Watch Case
FRONT PANEL OF THE AMPLIIFER:
1. Power Switch
2. USB Input
3. DVD room
4. SD/MMC Card Input
5. SD/MMC LED indicator
6. Wireless Microphone Indicator
7. DVD Stop Button
8. Power Source Indicator
9. Repeat Button
10.DVD LCD Display panel
11.Battery Low indicator
12.Battery-charge Indicator
13.DVD ON/OFF
14.DVD channel sound switch
15.Next button
16.Prev button
17.Play/Pause button
18.DVD IN/OUT Button
19.Master Volume control
20.Bass knob
21.Treble knob
22.Echo control knob
23.Wireless Microphone Volume knob
24.Wired Microphone Volume knob
25.Wired Microphone Input Socket

BACK PANEL OF THE AMPLIFIER:
1. Ventilate Holes.
2. Right surround output
3. Left surround output
4. Right pre.
5. Left pre.
6. Diapason connection input.
7. Diapason connection output
8. Audio output
9. Audio input
10. Super Bass output
11, 12, 13. Video separate output
14. Compound video output
15. VGA output
16. Optical fiber output
17. S-Video output
18. Figures Coaxial output
19. Right mix output
20. Left mix output
21. Midrange output
23. AC power jack.
OPERATION BOARD:
Telecontrol Instrument
1. LAST key
2. PAUSE key
3. BACKWARD key
4. STEP key
5. MENU key
6. VIDEO MODE key
7. PSCAN / NORMAL key
8. TITLE key
9. MUTE key
10. SETUP key
11. SYSTEM TYPE key
12. NUMBER key
13. STANDBY key
14. EJECT key
15. PROG key
16. DISPLAY key
17. LANGUAGE key
18. TIME key
19. SUBTITLE key
20. ANGLE key
21. ZOOM key

22. PLAY key
23. DIRECTION key
24. Left / Right Sound Channel
25. A-B key
26. VOLUME key
27. REPEAT key
28. SLOW key
29. FORWARD key
30. STOP key
31. NEXT key
HANDHELD MICROPHONE
1. Battery Compartment/Cover
2. Power Switch
3. Power LED Indicator
4. Low Battery LED Indicator
SYSTEM CONNECTION:
Video Connection:
•The system has five patters on output: standard video, S-Output, VGA socket,
chromatism, and PR PB PY output.
•The video connection is chosen according to the input socket of your TV/monitor.
•Remember that the five patterns of output cannot be connected at the same time, to
avoid affecting result of image output.
Audio Connection:
•The audio output of the system is divided into two kinds: simulated audio and digital
audio. Simulated audio has two sound channels of stereo audio, 5.1 channel audio of
AC-3, digital audio has fiber and coaxial output.
•Chose pattern according to your outer equipment. If your outer equipment is an
ordinary TV, you can only choose stereo output; if your outer equipment is an
amplifier with 5.1 sound channel input, you can watch the effect of AC-3 home
cinema.
•The DVD output has wide dynamic range, so the volume of the amplifier must be
moderate, or the speaker would be destroyed by the sudden produced super high
volume.
SYSTEM SETTING:
•Press the SETUP button, the panel displays the menu.
•Use the direction keys (←↑→↓) to move to corresponding item, then press the SETUP
button again to exit the setup menu.
•Sound / Subtitle / Language setup of disc menu needs support of the disc.
•When you setup the grade of disc play, you need to input the secret code of the system,
the preset of the company is 0000.
BASIC PLAY:
•EJECT: Press the POWER key to put trough the power supply. Press the EJECT key to
open the disc room, put in the disc, and press the EJECT key again to close the DVD
room. When the DVD amplifier finished reading the disc, it will display the disc type on
the TV screen and auto-play.

•PROG key: Press the PROG key and the TV screen displays the program menu. Then
you can use the number keys and the direction keys to adjust the play order of the songs
in the disc.
•SYSTEM TYPE key: According to the system of your TV, use the SYSTEM TYPE key to
adjust the output system type.
•SUBTITLE key: Press the SUBTITLE key, you can choose one kind of subtitle display
from your disc. (Your DVD disc must support this function)
•LANGUAGE key: Use the LANGUAGE key to choose the language you need when
playing multi-language disc.
•ANGLE key: If your DVD disc includes multi-scene taking, you can use the ANGLE key
to change from one angle to another.
•ZOOM key: With the ZOOM key, you can magnify or zoom the picture. You can use the
direction keys to change the position of the picture in the status of magnifying.
•SOUND CHANNEL key: When you are playing multi-channel VCD or CD, you can use
the SOUND CHANNEL key to choose output from the left sound channel or the right
sound channel and select stereo or mixed sound output.
•SLOW key: With the SLOW key, you can watch the slow down motion pictures in the
process of disc playing. But the DVD player mutes when you press the SLOW key.
•STEP key: Press the STEP key, the DVD player plays step by step. Press the PLAY key
to return to normal mode.
•A-B key: When playing DVD, VCD, CD, you can use the A-B key to watch any part in the
discs. When the DVD player is playing a disc, you can press the A-B key to choose the
start point (refer to Point A) of the part you want to repeat and press the A-B key again to
choose the end point (mend by Point B). Then the DVD player repeats the part between
A and B. Press the A-B key for the third time, you can cancel the preset part repeat and
return back to normal play.
•REPEAT key: With the repeat key, you can repeat to play any title, paragraph, song or all
the disc.
•TITLE key: When the DVD player is playing DVD disc, use the TITLE key to return to the
first class title to play.
•MENU key: When the DVD player is playing DVD disc, press the MENU key to change
subordinate menu, and press the MENU key again to return to the main menu.
•PSCAN / NORMAL key: With the PSCAN / NORMAL key, you can adjust the video
output mode in cycle.
•VIDEO MODE key: With this key you can adjust the brightness, contrast, and hue of the
state of your screen. The DVD player provides four states: memory, standard, dynamic
and soft.
•STANDBY key: With the STANDBY key you can control the power switch of the DVD
player.

SERIES CONNECTION OF THE AMPLIFIER:
•In order to suit larger area, we can use series connection of the system. The amount of
amplifiers can be up to ten. The connection way is as the attached figure.
•In the attached figure, (1) means the main control amplifier (2~10) mean the controlled
amplifiers. The controlled amplifier’s input sound source, volume and tone are controlled
by the main control amplifier.
•When the system is in series connection, the output power of the main control amplifier
auto reduces to suit for monitoring.
NOTE: When the system is in series connection, you should connect the amplifier correctly, or it
will possibly cause damage to the amplifier.
(1) (2) ~ (10)
Do not attempt to make any repairs yourself. This would invalid your warranty.
Do not make any changes to the unit. This would also invalid your warranty.
The warranty is not applicable in case of accidents or damages caused by inappropriate use or disrespect of the warnings contained in this
manual.
SkyTronic UK cannot be held responsible for personal injuries caused by a disrespect of the safety recommendations and warnings. This is also
applicable to all damages in whatever form.

NL
Hartelijk dank voor de aanschaf van deze SkyTec karaoke set. Lees deze gebruiksaanwijzing
aandachtig door alvorens het apparaat in bedrijf te stellen.
WAARSCHUWING
- Lees altijd eerst de gebruiksaanwijzing voordat u een apparaat gaat gebruiken.
- Bewaar de handleiding zodat elke gebruiker hem eerst kan doorlezen.
- Bewaar de verpakking zodat u indien het apparaat defect is, dit in de originele verpakking
kunt opsturen om beschadigingen te voorkomen.
- Voordat het apparaat in werking wordt gesteld, altijd eerst een deskundige raadplegen.
- In het apparaat bevinden zich onder spanning staande onderdelen; open daarom NOOIT dit
apparaat.
- Bij het verwijderen van de stekker uit het stopcontact nooit aan het netsnoer trekken.
- Verwijder of plaats een stekker nooit met natte handen resp. uit en in het stopcontact.
- Indien de stekker en/of netsnoer als snoeringang in het apparaat beschadigd zijn dient dit
door een vakman hersteld te worden.
- Indien het apparaat zo beschadigd is dat inwendige (onder)delen zichtbaar zijn mag de
stekker NOOIT in het stopcontact worden geplaatst én het apparaat NOOIT worden
ingeschakeld. Neem in dit geval contact op met de dealer.
- Reparatie aan het apparaat dient te geschieden door resp. een vakman of een deskundige.
- Sluit het apparaat alléén aan op een 230VAC / 50Hz (geaard) stopcontact, verbonden met
een 10-16A meterkastgroep.
- Toestel niet opstellen in de buurt van warmte bronnen zoals verwarming etc.
- Bij onweer altijd de stekker uit het stopcontact halen, zo ook wanneer het apparaat voor een
langere tijd niet gebruikt wordt.
- Als u het apparaat lang niet gebruikt heeft en het weer wil gebruiken kan er
condensatiewater ontstaan; laat het apparaat eerst op kamertemperatuur komen alvorens
het weer in werking te stellen.
- Om ongevallen in bedrijven te voorkomen moét rekening worden gehouden met de
daarvoor geldende richtlijnen en moeten de aanwijzingen/waarschuwingen worden gevolgd.
- Het apparaat buiten bereik van kinderen houden.
- Zorg er altijd voor dat wanneer het apparaat wordt ingeschakeld dat alle regelaars en het
mastervolume op minimaal staan.
- Gebruik geen schoonmaakspray om de regelaars te reinigen. Restanten van deze spray
zorgen ervoor dat smeer en stof ophopen in de regelaars. Raadpleeg bij storing te allen
tijde een deskundige.
- Zorg dat uw handen schoon zijn tijdens het plaatsen van de discs. Plaats nooit een disc met
beschadigingen.
- Gebruik geen overmatige kracht bij het bedienen van de schakelaars en knoppen.
- Om de laser schoon te houden, altijd de disclade sluiten.
- Tracht niet het apparaat schoon te maken met chemische oplossingen. Dit kan de lak
beschadigen. Gebruik een droge doek om schoon te maken.

Neemt U a.u.b. een paar momenten de tijd om deze handleiding zorgvuldig te lezen,
aangezien wij willen dat u onze producten snel en volledig gebruikt.
Deze nieuwe versterker met een nieuw en mooi design past bij verschillende locaties, zoals
in kantoren, vergaderingen, tentoonstellingen, feestjes etc. Deze versterker is van hoge
kwaliteit, is betrouwbaar en gemakkelijk mee te nemen.
HOOFDEIGENSCHAPPEN VAN DE VERSTERKER:
•Goede kwaliteit dat wordt geleverd door het gebruik van een SANYO stofbestendige
digitale chip en “intelligente” ventilator.
•Voor gebruik met geavanceerde microfoons.
•70W uitgangsvermogen om uw stem helder en zuiver weer te geven.
•Met AC-3 en DTS surround geluid.
•Met optische, coaxiale, VGA en andere verschillende (beeld) uitgangen.
•Mogelijkheid tot het verbinden van externe speakers.
•Aparte serieverbindingen mogelijk, zodat het ook bij gebruik van bv speeches in grote
zalen geschikt is.
•Ingebouwde DVD-speler
•Ingebouwde “intelligente” AC-DC voeding: kijkt automatisch naar de capaciteit van de
batterij. Automatische conversie van AC naar DC.
•Verschillende geluidsbronnen kunnen gemixt worden.
•Kortsluitvaste versterker voor effectieve bescherming.
•Ondersteunt USB , SD en MMC
SPECIFICATIES:
Max. uitgangsvermogen: ..................................... 70W RMS / 4Ωimpedantie
T.H.D.: ..................................................................................................<0.1%
Frequentie bereik: ..............................................................50Hz-20kHz ±3dB
Ingangsbronnen: ..................... DVD / microfoons met draad / externe ingang
Speaker: ........................ Ingebouwde 8 inch bass speaker en 1 inch tweeter
Geheugenkaart medium .................................................... MMC en SD kaart.
Voeding: .........ACC 220V op 50Hz, automatische voedingsbron schakelaar,
intelligente batterij lader en 2 12V/5AH oplaadbare batterijen
Batterijlevensduur: ................... Stem versterking: 10 uur, DVD speler: 5 uur.
Microfoons: .......................... Werkt met verschillende microfoons met draad.
Afmetingen: ..................................................................... 540 x 330 x 290mm
EIGENSCHAPPEN VAN DE DVD SPELER:
•Met AC-3, DTS, PCM, MPEG digitale audio ingangen etc.
•Hoge Hi-Fi kwaliteit, 96kHz/24bit digitale audio verwerking.
•Hoge definitie beeld uitgang, ondersteunt toekomstige beeldapparatuur.
•Optische / coaxiale audio uitgang.
•Hoge stabiliteit en auto correctie.
•Compatibel met DVD, CD, CD-G, CD-R, MP3, KODAK foto cd.
•USB, kaartlezer ondersteunt MP3,WMA.

DESIGN VAN DE VERSTERKER:
(1) Bescherming
(2) Voor paneel
(3) Telescopische hendel
(4) Trolley
(5) Achter paneel
(6) Behuizing
VOORPANEEL VAN DE VERSTERKER:
1. Netschakelaar
2. USB ingang
3. DVD lade
4. SD/MMC-kaart ingang
5. SD/MMC led indicator
6. Draadloze mic indicator
7. DVD STOP toets
8. Aan/Uit indicator
9. Repeat toets
10. LCD Display
11. Batterij “leeg” indicator
12. Batterij “laden” indicator
13. DVD Aan/Uit toets
14.DVD geluidskanaal toets
15.“Volgende” Track toets
16.“Voorgaande” Track toets
17.PLAY/PAUZE toets
18.Lade OPEN/SLUITEN toets
19.Master volume toets
20.21. Toonregelaars
22.Echo volumeregelaar
23.Volumeregelaar draadloze mic
24.Volumeregelaar mic
25.Mic ingangen

ACHTERPANEEL VAN DE VERSTERKER:
1. Ventilator
2. Rechter surround uitgang
3. Linker surround uitgang
4. Rechter Pre.
5. Linker Pre.
6. Actief bussysteem ingang
7. Actief bussysteem uitgang
8. Audio uitgang
9. Audio ingang
10.Super Bass uitgang
11.Gescheiden Video uitgang
12.Gescheiden Video uitgang
13.Gescheiden Video uitgang
14.Component Video uitgang
15.VGA uitgang
16.Optische uitgang
17.S-Video uitgang
18.Coaxiale uitgang
19.Rechter Mix uitgang
20.Linker Mix uitgang
21.Midrange uitgang
22.Ventilator
23.AC netsnoer aansluiting
AFSTANDSBEDIENING:
1. Vorige-Track toets
2. Pauze toets
3. Terugspoel toets
4. Step toets
5. Menu toets
6. Video Mode toets
7. Pscan/Normal toets
8. Title toets
9. Mute toets
10.Setup toets
11.Systeem toets(NTSC/PAL)
12.Nummerieke Kanaal toetsen
13.Standby toets
14.Eject toets
15.Programmeer toets
16.Display toets
17.Taalkeuze toets
18.Time toets
19.Subtitle toets
20.ANGLE toets
21.Zoom toets
22.Play toets
23.Positie pijltoetsen

24.L/R geluidskanaal toets
25.A-B toets
26.Volume +/- toetsen
27.Repeat toets
28.Slow toets
29.Verderspoel toets
30.Stop toets
31.Volgende-Track toets
DRAADLOZE MICROFOON
1.Batterij vak / kapje
2.Aan/Uit schakelaar
3.LED Indicator
4.Lege batterij LED Indicator
SYSTEEM AANSLUITEN:
Video aansluiting:
•Dit systeem heeft verschillende uitgangsmogelijkheden, waaronder S-Video en VGA.
•De video uitgang wordt gekozen aan de hand van de ingang op uw TV/monitor.
•Onthoud dat de verschillende uitgangen niet tegelijkertijd kunnen worden aangesloten,
dit om het beeldresultaat niet te beïnvloeden.
Audio aansluiting:
•De audio uitgang van het systeem is verdeeld in tweeën, namelijk gesimuleerde audio en
digitale audio. Gesimuleerde audio heeft twee geluidskanalen. 5.1 surround met AC-3 ,
digitale audio heeft coaxiale of optische uitgangen.
•Kies uw uitgang aan de hand van uw apparatuur. Als uw apparatuur een gewone TV is,
kunt u alleen stereo uitgang kiezen; als dit een versterker met 5.1 geluidsingang is, kunt
u genieten van AC-3 audio.
•De DVD uitgang heeft een groot dynamisch bereik, dus het volume van de versterker
moet worden aangepast anders kan de speaker defect raken wegens een te hoog
geproduceerd volume.
SYSTEEM INSTELLING:
•Druk op de SETUP knop op de afstandsbediening. Het menu komt dan tevoorschijn .
•Gebruik de pijltoetsen (←↑↓→) om door het menu te gaan, druk nog een keer op de
SETUP knop en u zult het menu verlaten.
•SOUND / SUBTITLE / LANGUAGE moeten door de DVD schijf worden ondersteund om
er gebruik van te kunnen maken.
•Als u de beperking van DVD schijven wilt aanpassen zult u een geheime code moeten
invoeren. De fabrieksstandaard code is 0000.

HET AFSPELEN VAN EEN DVD:
•EJECT: Druk op de POWER knop om het apparaat in te schakelen. Druk op de EJECT
knop van de afstandsbediening of OPEN/CLOSE op de speler om de DVD lade te
openen. Leg de schijf er in en druk nogmaals op de EJECT knop om de DVD lade te
sluiten. Als de DVD speler de schijf heeft gelezen zal deze automatisch op de TV worden
afgespeeld.
•PROG knop: Druk op de PROG knop , op het TV scherm zal het programma menu
worden weergeven. U kunt de numerieke toetsen en de pijltoetsen op de
afstandsbediening gebruiken om de volgorde van de af te spelen nummers te wijzigen.
•N/P knop: Om het systeem (NTSC/PAL) van uw TV aan te passen drukt u op deze knop.
•SUBTITLE knop: Druk op de SUBTITLE knop om de ondertiteling te selecteren. (Uw
schijf moet dit wel ondersteunen).
•LANGUAGE: knop: Gebruik de LANGUAGE knop om de taal te selecteren wanneer u
een schijf afspeelt met meerdere talen.
•ANGLE knop: Als uw DVD schijf scènes bevat die onder meerdere hoeken zijn
opgenomen kunt u een bepaalde hoek met deze knop selecteren.
•ZOOM knop: Met de ZOOM knop kunt u in- en uitzoomen tijdens het afspelen. Met de
pijltoetsen kunt u de positie van het beeld veranderen wanneer is ingezoomd.
•SOUND L/R CHANNEL knop: Als u een VCD of CD afspeelt met meerdere
geluidskanalen, kunt u de SOUND CHANNEL knop gebruiken om de uitgang te bepalen
van het linker en rechter kanaal en gemixte of stereo uitgangen te selecteren.
•SLOW knop: Met de SLOW knop kunt u uw film in slowmotion bekijken. Het geluid wordt
uitgeschakeld wanneer deze functie is ingeschakeld.
•STEP knop: Druk op de STEP knop, de DVD speler speelt uw film stap voor stap af.
Druk op de PLAY knop om de film verder in de normale mode af te spelen.
•A-B knop: Wanneer u een DVD, CD of VCD afspeelt kunt u de A-B knop gebruiken om
iedere scène van de schijf af te spelen. U kunt de A-B knop gebruiken om een start punt
te selecteren van het gedeelte dat u wilt herhalen (punt A). Druk nogmaals op de A-B
knop om het eindpunt te selecteren (punt B). De DVD speler zal het stuk tussen A en B
herhalen. Drukt u voor de derde keer op de A-B knop, dan annuleert u het zojuist
ingestelde stuk en zal het vervolg verder worden afgespeeld.
•REPEAT knop: Met de REPEAT knop kunt u een titel, scène, lied of de hele schijf
herhalen.
•TITLE knop: Als de DVD speler speelt gebruikt u de TITLE knop om terug te keren naar
de eerste titel die wordt afgespeeld.
•MENU knop: Als de DVD speler speelt, en u drukt op de MENU knop , dan kunt u het
sub-menu veranderen. Drukt u nogmaals op deze knop dan keert u terug naar het hoofd
menu.
•PSCAN / NORMAL knop: Met deze knop kunt u de tussen de video uitgangen switchen.
•VIDEO MODE knop: Met deze knop kunt het de helderheid, contrast en de kleur
veranderen van uw beeld. De DVD speler heeft 4 standen: geheugen, standaard,
dynamisch en soft.
•STANDBY knop: Met deze knop kunt u het apparaat in stand-by zetten.

SERIE AANSLUITING VAN VERSTERKERS:
•Om een grotere ruimte te voorzien van geluid kunt u versterkers in serie aansluiten. Het
aantal aan te sluiten versterkers kan oplopen tot 10 stuks ; zie figuur hieronder.
•In deze figuur betekent (1) de hoofdversterker. (2)~(10) zijn de overige aangesloten
versterkers. Het volume, de tone en ingangsbron moeten worden geregeld op versterker
1.
•Als het systeem in-serie is aangesloten wordt het uitgangsvermogen van versterker1
verminderd.
N.B.
Als het systeem in-serie is aangesloten zult u de versterkers correct moeten verbinden
anders kan dit leiden tot beschadiging van versterkers.
(1) (2) ~ (10)
BELANGRIJK:
Voer zelf geen reparaties uit aan het apparaat; in élk geval vervalt de totale garantie.
Ook mag het apparaat niet eigenmachtig worden gemodificeerd, ook in dit geval vervalt de totale garantie. Ook vervalt de garantie bij
ongevallen en beschadigingen in élke vorm t.g.v. onoordeelkundig gebruik en het niet in achtnemen van de waarschuwingen in het algemeen
en gestelde in deze gebruiksaanwijzing. Tevens aanvaardt SkyTronic BV geen enkele aansprakelijkheid in geval van persoonlijke ongelukken
als gevolg van het niet naleven van veiligheidsinstructies en waarschuwingen. Dit geldt ook voor gevolgschade in wélke vorm dan ook.

F
Nous vous remercions pour l’achat de cet ensemble karaoké SkyTec.
Lisez attentivement ce manuel avant la première mise en service.
Consignes de sécurité:
- Lire le mode d’emploi avant la première mise en service.
- Conservez le mode d’emploi pour référence ultérieure.
- Conservez l’emballage d’origine afin de pouvoir transporter l’appareil en toute sécurité.
- Uniquement pour utilisation à l’intérieur.
- Ne pas ouvrir le boîtier. Il contient des pièces sous tension.
- Pour débrancher, tirer toujours sur la fiche, jamais sur le cordon.
- Ne pas brancher ou débrancher l’appareil avec des mains mouillées.
- Si l’appareil est endommagé, ne le branchez pas sur une prise secteur et ne le mettez
pas sous tension.
- Si la fiche et/ou le cordon secteur sont endommagés, faites-les remplacer par un
spécialiste.
- Branchez l’appareil uniquement sur une prise de terre de 230Vac/50Hz d’une intensité
de 10-16A.
- Ne pas placer l’appareil à proximité d’une source de chaleur.
- Pendant un orage ou en cas de non utilisation, débranchez toujours l’appareil du secteur.
- Après une période de non utilisation prolongée, de l’eau de condensation a pu se former.
Attendez que l’appareil ait atteinte la température ambiante.
- Pour éviter des accidents dans les lieux publics, il faut tenir compte de la règlementation
en vigueur et respecter les consignes.
- Tenir hors de la portée des enfants.
- Lors de la mise sous tension, veillez à ce que tous les canaux et le volume général
soient réglés sur le minimum.
- Manipulez les contrôles de volume avec précaution. Une variation rapide risque
d’endommager les haut-parleurs.
- Mettez l’amplificateur sous tension en dernier, et éteignez-le en premier.
- N’utilisez pas de sprays pour nettoyer les potentiomètres. Les résidus de ces sprays
provoquent des dépôts de poussière et de graisse. Consultez un spécialiste en cas de
problème.
- Manipulez les CD avec des mains propres. Ne pas insérer un CD endommagé.
- Ne pas forcer les commutateurs et boutons.
- Tenir le tiroir CD fermé afin de garder la lentille laser propre.
- Ne pas nettoyer l’appareil avec des solutions chimiques. Elles endommageraient la
finition. Utilisez uniquement un chiffon sec.

DESCRIPTION
Lire attentivement ce mode d’emploi afin de profiter pleinement de toutes les possibilités que
vous offre cet ensemble karaoké. Cette nouvelle série d’amplificateurs convient à un grand
nombre d’applications telles que réunions, salons, foires, fêtes, conférences, enseignement,
etc. C’est un ensemble de haute qualité, fiable et facile à transporter d’un excellent rapport
qualité/prix.
PRINCIPALES CARACTERISTIQUES DE L’AMPLIFICATEUR
•Excellente qualité grâce aux puces numériques SANYO et un ventilateur intelligent.
•A utiliser avec des microphones filaires performants.
•Puissance de sortie de 70W pour rendre votre voix claire et audible.
•Sortie Surround AC-3, DTS, etc.
•Fiches de sortie optique, coaxiale, VGA et autres formats d’image.
•Possibilité de connecter des enceintes externes.
•Branchement possible en série de plusieurs ensembles pour couvrir de grandes salles.
•Sources audio intégrées: DVD
•Double système d’alimentation AC et DC: vérification automatique de la capacité de la
batterie, chargement automatique de la batterie, conversion automatique AC en DC.
•Le système peut fonctionner avec un microphone filaire, DVD, etc. Vous pouvez
mélanger et amplifier différentes sources audio.
•Circuits de protection spécifiques pour protéger efficacement l’amplificateur.
•Entrée USB et Lecteur des cartes SD/MMC.
CARACTERISTIQUES TECHNIQUES
Puissance de sortie max.: ................................ 70W (RMS) / Impédance 4 Ω
T.H.D.: .................................................................................................<0.1%
Bande passante: .............................................................. 50Hz-20kHz ± 3dB
Source d’entrée audio: ......................... DVD / micros filaires/ source externe
Haut-parleur: ................................................ Boomer 20cm et tweeter 25mm
Lecteur des cartes ............................................................ Cartes SD et MMC
Alimentation: ................. AC 220V à 50Hz, système de gestion automatique,
........ Chargeur de batteries intelligent et 2 batteries rechargeables 12V/5Ah
Autonomie de la batterie: .............Amplification vocale pendant 10 heures et
.................................................................Lecture de DVD pendant 5 heures
Microphone filaire: ................... Convient à différents types de micros filaires
Dimensions: ....................................................................540 x 330 x 290mm
CARACTERISTIQUES DU LECTEUR DVD:
•Sortie digital audio AC-3, DTS, PCM, MPEG, etc..
•Traitement audio digital de qualité Hi-Fi, 96kHz/24 bits.
•Sortie vidéo haute définition pour un téléviseur.
•Sortie audio optique/digitale.
•Haute stabilité avec correction automatique.
•Compatible avec DVD, CD, CD-G, CD-R, MP3, KODAK Picture CD
•USB, lecteur de carte SD/MMC support MP3, WMA

DESCRIPTION:
1. Filet de protection
2. Façade
3. Poignée télescopique
4. Trolley
5. Tableau arrière
6. Caisson
FAÇADE DE L’AMPLIFICATEUR:
1. Interrupteur M/A
2. Entrée USB
3. Tiroir DVD
4. Entrée SD/MMC Carte
5. Indicateur SD/MMC Carte
6. Indicateur mic sans fil
7. DVD Stop
8. Indicateur d’alimentation
9. Repeat (répétition)
10.Afficheur LCD
11.Indicateur de tension batterie
12.Indicateur de charge batterie
13.M/A DVD
14.Commutateur de canal DVD
15.Suivant
16.Précédent
17.Lecture
18.Ouverture/fermeture tiroir DVD
19.Volume général
20.Graves
21.Aigus
22.Mixage
23.Volume Mic. sans fil
24.Volume Micro filaire
25.Entrée Micro

ARRIERE DE L’AMPLIFICATEUR:
1. Orifices de ventilation.
2. Sortie Surround droite
3. Sortie Surround gauche
4. Pré droit.
5. Pré gauche
6. Entrée bus actif.
7. Sortie bus actif
8. Sortie audio
9. Entrée audio
10. Sortie Super Bass
11, 12, 13. Sorties vidéo séparées
14. Sortie vidéo Compound
15. Sortie VGA
16. Sortie optique
17. Sortie S-Vidéo
18. Sortie coaxiale
19. Sortie mix droit
20. Sortie mix gauche
21. Sortie médiums
23. Entrée alimentation secteur
TELECOMMANDE
1. Touche DERNIERE
2. Touche PAUSE
3. Touche arrière
4. Touche STEP (étape)
5. Touche MENU
6. Touche de Mode VIDÉO
7. Touche PSCAN/NORMAL
8. Touche TITRE
9. Coupure du haut-parleur
10.Touche de paramétrage
11.Type de système
12.Touches numériques
13.Touche de mise en veille
14.Touche d’éjection
15.Touche de programmation
16.Affichage
17.Sélection de la langue
18.Touche horaire
19.Touche Sous-titre
20.Touche ANGLE
21.Touche ZOOM
22.Touche Lecture
23.Touches de direction
24.Touche Canal gauche / Canal droit
25.Touche A-B

26.Touche de VOLUME
27.Touch REPEAT(Répétition)
28.Ralenti
29.Touche Avance
30.Touche STOP
31.Touche Suivant
MICROPHONE SANS FIL
1. Compartiment batterie
2. Interrupteur
3. Indicateur d’alimentation
4. Indicateur de charge batterie
CONNEXION DU SYSTÈME:
Connexion vidéo:
•Le système offre cinq types de vidéo: vidéo standard, S-vidéo, VGA, chromatisme et
PR PB PY.
•Le type de connexion vidéo choisi dépend de la fiche d’entrée de votre
téléviseur/moniteur.
•Vous ne pouvez pas connecter les cinq types de sortie en même temps afin de ne
pas détériorer la qualité de l’image de sortie.
Connexion Audio:
•La sortie audio du systeme est divisée en deux sortes: audio standard et audio digital.
L’audio standard possède deux canaux pour un son stéréo. Pour les systèmes 5.1 ou
AC-3 audio digital, il faut utiliser la sortie optique ou coaxiale.
•Choisissez la sortie en fonction de votre équipement externe. S’il s’agit d’un
téléviseur standard, vous ne pouvez choisir que la sortie stéréo. S’il s’agit d’un
amplificateur avec une entrée 5.1 Surround, vous pouvez bénéficier des effets du
Home Cinema AC-3.
•La sortie DVD possède une large plage dynamique. Le volume de l’amplificateur doit
donc être réglé sur un niveau modéré sinon le haut-parleur risque d’être endommagé
par des volumes soudainement très puissants.
PARAMÉTRAGE DU SYSTÈME:
•Appuyez sur la touche de paramétrage SETUP et le menu s’affiche sur l’écran LCD.
•Déplacez-vous au moyen des touches de direction (←↑→↓) sur la fonction souhaitée.
Appuyez de nouveau sur SETUP pour quitter le menu de paramétrage.
•Vous ne pouvez régler le son, les sous-titres et la langue que lorsqu’un DVD est inséré.
•Lorsque vous réglez le niveau de sécurité, vous devez saisir le code secret du système.
Celui-ci est réglé par défaut sur 0000.
LECTURE:
•EJECT: Appuyez sur l’interrupteur M/A POWER pour mettre le système sous tension.
Appuyez sur la touche EJECT pour ouvrir le tiroir DVD. Insérez le DVD et appuyez de
nouveau sur la touche EJECT pour fermer le tiroir DVD. Lorsque l’amplificateur DVD a
fini de lire le disque, il affichera le type de disque sur l’écran du téléviseur et la lecture
commence automatiquement.
Table of contents
Languages:
Other sky-tec Speakers System manuals