Skyfood MSK User manual

Data de Correção: 01/10/18
31015.8 - INGLÊS/ESPANHOL
- BESIDES THIS EQUIPMENT, A COMPLETE RANGE OF OTHER PRODUCTS ARE MANUFACTURED, CONSULT OUR DEALERS
- DUE TO THE CONSTANT IMPROVEMENTS INTRODUCED TO OUR EQUIPMENTS, THE INFORMATION CONTAINED IN THE PRESENT
INSTRUCTION MANUAL MAY BE MODIFIED WITHOUT PREVIOUS NOTICE.
Skyfood Equipament LLC
OFFICE
11900 Biscayne Blvd. Suite 616 - North Miami, FL 33181 - USA
1-800-503-7534 | 305-868-1603
MINI BAND SAW / MINI SIERRA PAA HUESOS
MSK
MSKL
INSTRUCTION MANUAL
MANUAL DE INSTRUC-
CIONES
C
TION MANUAL
A
L
D
E
I
N
S
T
R
U
C
-

2
INDEX
ENGLISH ................................................................................................3
ESPAÑOL............................................................................................. 20
___________________________________________________________
___________________________________________________________
___________________________________________________________
___________________________________________________________
___________________________________________________________
___________________________________________________________
___________________________________________________________
___________________________________________________________
___________________________________________________________
___________________________________________________________
___________________________________________________________
___________________________________________________________
___________________________________________________________
___________________________________________________________
___________________________________________________________
___________________________________________________________
___________________________________________________________
___________________________________________________________
___________________________________________________________
___________________________________________________________
___________________________________________________________
___________________________________________________________
___________________________________________________________
___________________________________________________________
___________________________________________________________
___________________________________________________________
___________________________________________________________
___________________________________________________________
___________________________________________________________
___________________________________________________________
___________________________________________________________
___________________________________________________________
___________________________________________________________
___________________________________________________________
___________________________________________________________
___________________________________________________________
___________________________________________________________
Equipment LLC
Registro de Garantía
Información del Usuario
Detalles del Producto
* Persona de Contacto:
IMPORTANTE:
Solamente para productos de las marcas by y
Página Web:
Fax:*Teléfono:
*Ciudad:
*Dirección:
*Nombre de lá Compañía:
* Adquirido en:
* Comprado em: ( mm / dd / yyyy )
* Item Comercial del Producto:
El item comercial del producto se puede encontrar en la etiqueta de identicación del producto de la máquina.
* Indica que el campo es obligatorio. ** Indica que el campo es obligatorio y no obligatorio por Fax.
Esta información, el número de serie del producto, también se puede encontrar en la etiqueta de identicación del producto de la máquina.
Nombre de la compañía
* Número de serie:
*Tipo de Empresa:
Panadería Bagel y Operaciones
Alojamiento
Hospital
Gobierno
Tienda de Alimentos
Delicatessen (Cadena / Restaurante)
Delicatessen (Independiente y No-Restaurant)
Club de Campo
Tienda de Conveniencia
Supermercado
Estadios / Coliseum
Escuela
Restaurantes (independiente / cadena)
Otros negocios que prepara o sirver alimentos
Otros negocios que vende, pero no sirven comida
Pizza (Cenar en /llevar)
Operación de cocción al por mayor (no institucional)
Clube de Almacenes
Viñedo
Universidad / Escuela
El parque temático
Empacador de Carne
Mayorista con Comestibles
Mayorista sin Comestibles
Club de Tiendas
Abastecimiento
Carniceria
Negocios e Industria en la Casa de Alimentación
Bolera
Panadería (Asociado con Restaurante)
Me gustaría unirse a la lista de correo.
Sí
No
*Zip Code:*Estado:
* Conrme el úmero de serie:
* Prueba de compra:
Preguntas sobre como llenar este formulario?
llamada 1-800-503-7534 / 305-868-1603
Devuelva el formulario completo a la:
SKYFOOD EQUIPMENT LLC
11900 Biscayne Blvd. Suite 512
North Miami, FL 33181 - USA
O fax formulario a:
305-866-2704
** E-mail:
3
1. Introducon ......................................................................................4
1.1 Safety .................................................................................................................... 4
1.2 Main Components ................................................................................................. 5
1.3 Technical Data........................................................................................................ 6
2. Installaon and Pre-Operaon...........................................................7
2.1 Installaon ............................................................................................................ 7
2.2 Pre Operaon ........................................................................................................ 8
3. Operaon ..........................................................................................9
3.1 Procedure for operaon......................................................................................... 9
3.2 Cleaning................................................................................................................. 9
3.3 Cauons with Stainless Steel ...............................................................................10
4.General Safety Pracces ................................................................... 11
4.1 Basic Operaon Pracces......................................................................................11
4.2 Safety Procedures and Notes Before Switching Machine ON .................................12
4.4 Operaon .............................................................................................................13
4.5 Aer Finishing The Work......................................................................................14
4.6 Maintenance ........................................................................................................14
4.7 Advice ..................................................................................................................14
5 Analysis and Problems Solving.......................................................... 14
5.1 Problems, causes and soluons ............................................................................14
5.2 Adjustments and Replacement of Components.....................................................16
6. General Advices............................................................................... 18
7. Electrical Diagram............................................................................ 19
SKYFOOD EQUIPMENT LLC - SERVICE ................................................... 37
SKYFOOD’S LIMITED WARRANTY ......................................................... 37
SUMMARY

4
1. Introducon
1.1 Safety
When misused, the Mini Band Saw Models MSK/MSKL is potenally DANGEROUS.
Maintenance, cleaning or any other service on this machine must be made only by
properly trained technicians and the power plug must be disconnected. For your safety,
the following instrucons must be followed in order to avoid accidents:
1.1.1 Unplug the machine when you need to remove any removable part during cleaning,
maintenance or any other service.
1.1.2 Never make use of any tool or instrument that is not originally part of the machine
during any operaon.
1.1.3 Never touch the blade #. 06 (Pic.01), even when the machine is off, because it has
sharp edges.
1.1.4 Never use water jets directly upon the machine.
1.1.5 Never use clothes with wide sleeves, especially on the wrists during the operaon.
1.1.6 Never adjust the Thickness Guide #.12 (Pic.01) with the blade in movement.
1.1.7 Wear steel gloves during operaon
1.1.8 Keep your hands away from movable parts.
1.1.9 Never turn the machine on with wet hands, shoes or clothes.
1.1.10 When seng the machine, do not forget to check the grounding.
IMPORTANT
If the Cord is not in good condions of use, to avoid accidents it must be replaced
by the supplier, an authorized technician or someone qualified for the service.
IMPORTANT
This equipment is not to be used by persons (including children) with any physical
or mental inabilies, or without operaon experience and knowledge, which can
only be acquired by means of instrucon and supervision of a security staff.
Todos los productos que se encuentren en instalaciones ó domicilios que no sean
comerciales, deben ser llevados o despachados, con flete prepago, sea para las
instalaciones de SKYFOOD, sea para una compañía de servicio (“Compañía de Servicio”)
indicada por SKYFOOD. Productos que se encuentren en instalaciones comerciales y con
peso menor que setenta (70) libras deben ser traídos o despachados, flete prepago, sea
para las instalaciones de SKYFOOD sea para la Compañía de Servicio. Distancia o empo de
viaje NO serán pagados. SKYFOOD ofrece una garana limitada en sito para productos que
estén solamente en instalaciones comerciales con peso neto superior a setenta (70) libras,
siempre que estén instalados en una dirección dentro de un rayo de treinta (30) millas de
una Compañía de Servicio. Usuarios finales son responsables por todos los costos extra
de viaje y costo por milla. En este caso servicios de garana serán provenidos durante las
horas de trabajo comerciales.
Este producto sera sustuido o reparado bajo la garana, por un periodo de seis (6)
meses desde la fecha de compra por el comprador original/usuario (“Usuario Final”), ó
diez ocho (18) meses a parr de la fecha de envío desde el almacén de SKYFOOD cual
sea la fecha que expire primero.
Accesorios serán remplazados ó reparados bajo la garana por un periodo de (30) días a
parr de la fecha de compra por el comprador/usuario (“Usuario Final”), ó diez ocho (18)
meses a parr de la fecha de envío desde el almacén de SKYFOOD cual sea la fecha que
expire primero.
La garana no será aplicable hasta que un formulario de REGISTRO DE GARANTÍA sea
recibido por SKYFOOD EQUIPMENT, LLC, dentro de treinta (30) días de la feche de la compra.
El REGISTRO DE GARANTÍA sea en el Manual de Instrucción de cada producto ó en el sito
de SKYFOOD: www.skyfood.us. El Usuario Final debe llenar el formulario de REGISTRO DE
GARANTÍA y mandarlo para SKYFOOD de acuerdo con las instrucciones indicadas en el
referido sito. Sin el cumplimiento de esta condición la garana NO será valida.
La garana no se exende para productos de terceros. No existen otras garanas ó
condiciones expresas otras que aquellas ofrecidas por cada fabricante de productos
vendidos por SKYFOOD que no sean bajo la marca FLEETWOOD by SKYMSEN y SKYMSEN.
Para preguntas ó asistencia, no devuelva el producto ó accesorios para la enda, por favor
llame a Toll Free 1-800-503-7534, ó visite la sección Servicio al Cliente en www.skyfood.us.
Para un servicio mas rápido tenga disponible el nombre del modelo, el numero de serie y
la prueba de compra para que el operador le asista.
SKYFOODsereservael derechodecambiarlos términosdela GaranaLimitadaa cualquier
momento sin previo aviso. También se reserva el derecho de cambiar el proyecto y las
especificaciones de sus equipos ó cualquier otra documentación a cualquier momento.
El usuario final no tendrá derecho a compensaciones resultantes de éstos cambios.
Actualización:
Estes Terminos y Condiciones fueran por ulmo actualizadas en 14 de Enero 2014.

SKYFOOD EQUIPMENT LLC - SERVICIO
Para preguntas o asistencia, llame SKYFOOD EQUIPMENT Toll Free: 1-800-503-7534, o
visite la sección de Servicio al Cliente en www.skyfood.us.
GARANTIA LIMITADA DE SKYFOOD
Salvo especificado diferentemente nuevos productos FLEETWOOD by SKYMSEN y
SKYMSEN, accesorios excluidos, vendidos por SKYFOOD EQUIPMENTS, LLC (“SKYFOOD”),
para uso solamente en los Estados Unidos ( colecvamente “Productos” ó singularmente
“Producto”) son garanzados de estar libres de defectos en los materiales y la mano de
obra por un periodo de un (1) año desde la fecha de compra por el comprador original/
usuario (“Usuario Final”), ó diez ocho (18) meses a parr de la fecha de envío desde el
almacén de SKYFOOD cual sea la fecha que expire primero. Varios productos nuevos y
accesorios pueden ser garanzados por un periodo diferente de un (1) año, mientras
otros podrían estar sujetos a limitaciones de transporte, como especificado en Manual
de Instrucción del producto. Es necesario presentar la Prueba de Compra, caso contrario
la garana NO SERÁ APLICABLE. Ninguna garana es dada ó implícita para usuarios
secundarios o para terceras partes. Es condición fundamental de la Garana que SKYFOOD
sea noficada de cualquier defecto en materiales ó mano de obra en el plazo de cinco (5)
días del ocurrido, dentro del plazo de la garana. Si el aviso del reclamo, bajo esta garana,
es hecho en empo por el usuario final, SKYFOOD ó una compañía de servicio (“Compañía
de Servicio”) indicada, hará el reparo o la sustución del Producto, a criterio de SKYFOOD,
bajo las condiciones adicionales escritas abajo.
Esta garana no se aplica si el daño ocurre de una instalación impropia ó mantenimiento
hecho por una compañía de servicio (“Compañía de Servicio”) no autorizada, tensión
eléctrica errada, ni si los productos ó partes hubieren sido usados fuera de conformidad
con las instrucciones de operación y mantenimiento, sujetos a mal uso ó abuso, ó
damnificados por accidentes, causas de fuerza mayor, uso anormal, tensión ó cualquier
otra causa que no sea de responsabilidad de SKYFOOD o afuera de su razonable control.
Esta garana NO cubre mano de obra de servicio y despensas de viaje para proceder
ajustes en los productos o /y accesorios. Además del desgaste y rasgue de algunos
ítems, como pero no limitado a; partes de vidrio, hojas de corte, piedras, cuchillas, platos,
cuchillas de corte, discos de corte, vedamientos, cambios de óleo, cinta para vedamiento,
cintas de aislamiento, gusanos, rodamientos auto-lubricados, carbones para motores
eléctricos, y otras partes desgastables por su naturaleza y que necesiten ser repuestas
con frecuencia. Componentes eléctricos están sujetos a desgaste y rasgue natural y
no están cubiertos por esta garana. ESTA GARANTÍA ESCLUDE TODAS GARANTÍAS
VERBALES, ESTRUCTURALES, EXPRESA, Ó IMPLICITA QUE PUDIERA SER APLICABLE
A SKYFOOD, INCLUSO, PERO NO LIMITADO A, CUALQUIER GARANTIA IMPLICITADE
COMERCIALIZACIÓN Y ADAPTABILIDAD PARA FINALIDADES PARTICULARES. Bajo ninguna
circunstancia SKYFOOD será responsable por perdida de uso, renta o lucros cesantes o por
daños incidentes ó consecuentes. SKYFOOD en ninguna circunstancia será responsable por
cualquier perdida, daño, daño oculto, despensa ó atraso de mercaderías, por cualquier
movo cuando dichas mercaderías estuvieren en custodia, posesión ó control de terceras
partes seleccionadas por SKYFOOD para despachar, tramitar, libertar, transportar ó otros
servicios relavos a estas mercaderías. El único remedio por la quiebra de cualquier
garana se limita a lo que es expuesto arriba.
5
1.2 Main Components
All components of this machine were made of raw materials carefully selected for each
funcon, according to the test paerns and SKYFOOD experience.
01- Handle for blade tension control
02- Wheels
03- ON / OFF Switch
04- Frame
05- Blade Guide
06- Blade
07- Staonary table
08- Sliding table
09- Loop
10- Upper Door
11 – Pusher
12 - Thickness Guide
13 – Lower Door
14 – Door Handle
15 – Thickness Guide Handle
16 – Spherical handle thickness guide
PICTURE 01

6
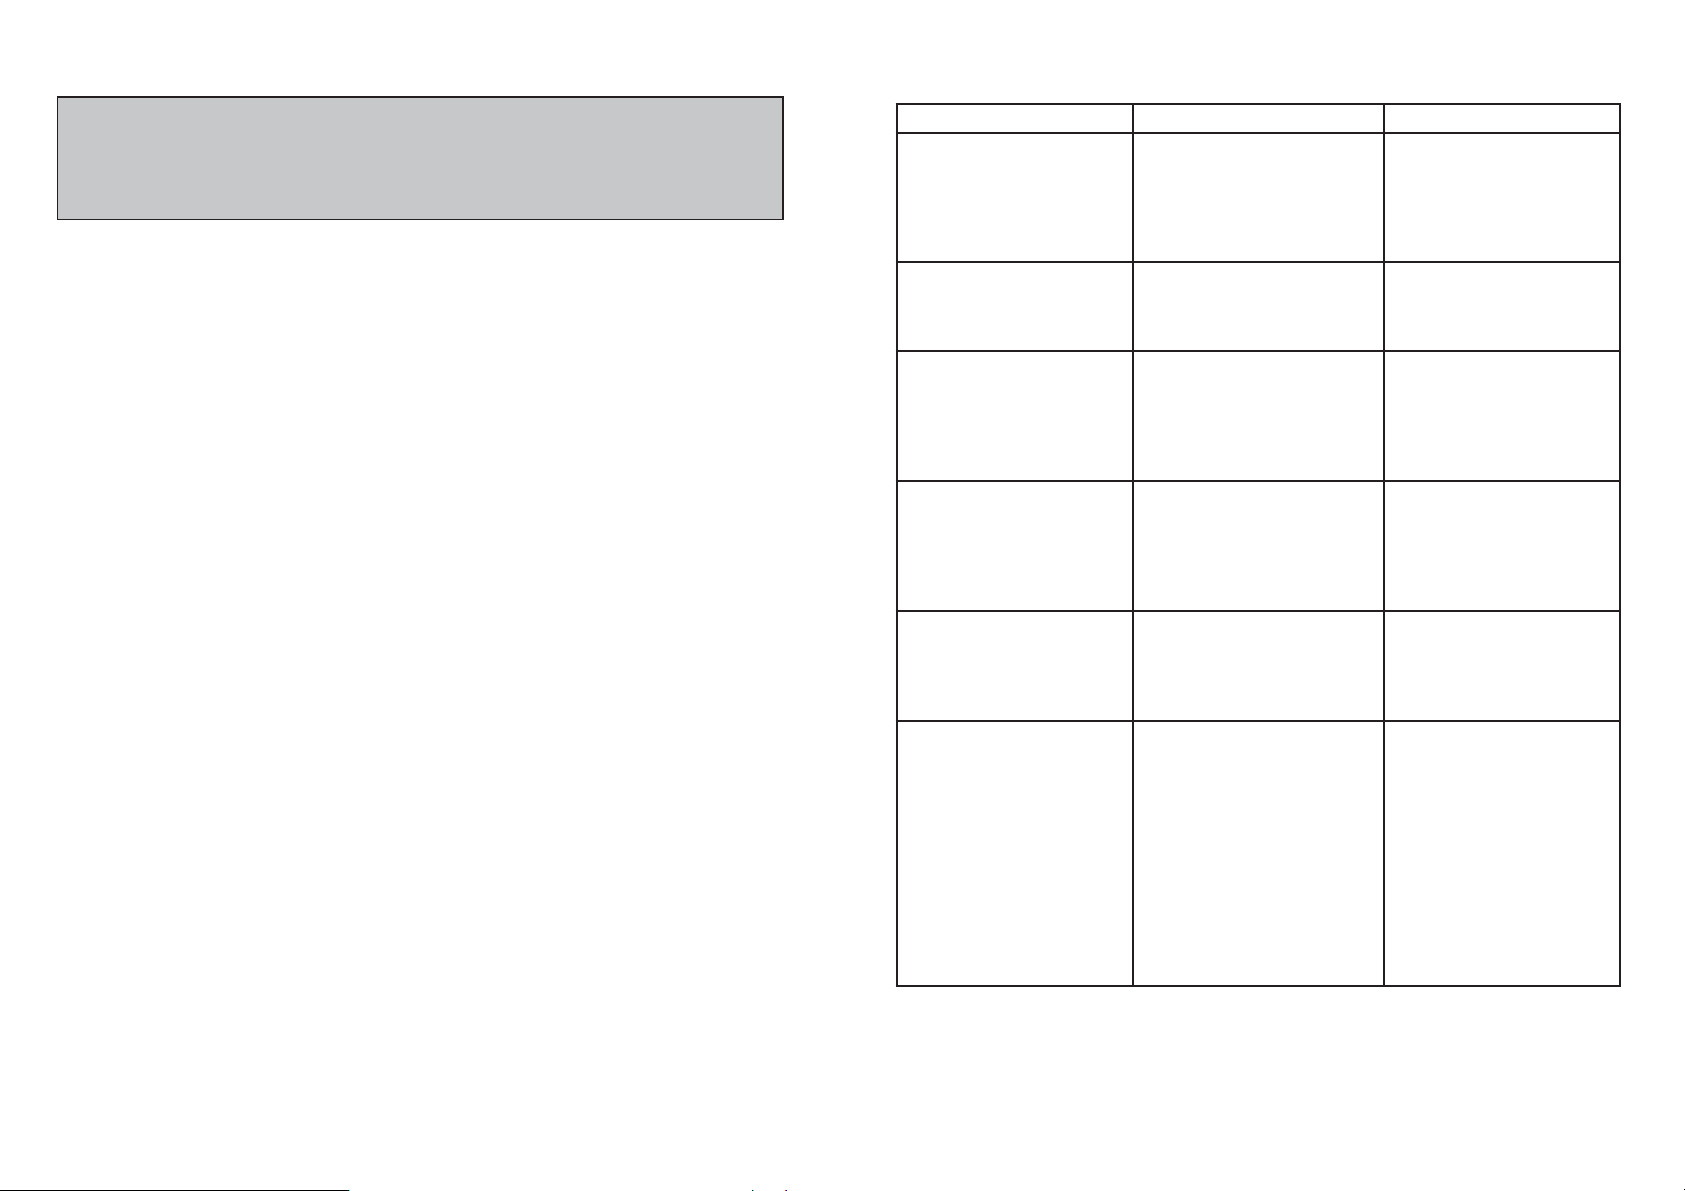
TABLE 01
CHARACTERISTICS UNIT MSK MSKL
Voltage V 110 or 220 110 or 220
Frequency Hz 50 or 60 50 or 60
Power Rang Hp 0,5 0,75
Consupon kW.h 0,37 0,55
Height in 36 7/16” 36 7/16”
Width in 23 5/8” 23 5/8”
Depth in 22 7/8” 22 7/8”
Net Weight lb 78 78
Gross Weight lb 123 123
Cung Width in 8 1/2” 8 1/2”
Cung Height in 9 7/8” 9 7/8”
1.3 Technical Data
PICTURE 02
39
38
shipping charges prepaid, either to SKYFOOD's facility or a SKYFOOD's designated service
company ("Service Company"). Products held at commercial facilies and weighing less
than seventy (70) lbs. must be taken or shipped, shipping charges are prepaid, either
to SKYFOOD's facility or to a Service Company. Mileage or travel me will NOT be paid.
SKYFOOD offers a limited on-site warranty for products ONLY held at commercial facilies,
whose net weight exceeds seventy (70) lbs., provided they are installed in a locaon that
is within a thirty (30) mile radius of a Service Company. End Users are responsible for
all extra travel and mileage rates. In this case, warranty services will be provided during
regular business hours.
This product will be replaced or repaired under warranty, for a period of (1) year,
beginning from the date of purchase by the original purchaser/user (“End User”), or
eighteen (18) months from the date of shipment from SKYFOOD’s warehouse, whichever
expires first.
Accessories will be replaced or repaired under warranty, for a period of (30) days, beginning
from the date of purchase by the original purchaser/user (“End User”), or eighteen (18)
months from the date of shipment from SKYFOOD’s warehouse, whichever expires first.
This warranty shall not take effect unl a properly completed and executed WARRANTY
REGISTRATION form has been received by SKYFOOD EQUIPMENT, LLC, within thirty
(30) days from the date of purchase. The WARRANTY REGISTRATION is available either
in the Instrucon Manual of every Product or at SKYFOOD’s website www.skyfood.us.
The End User must fill out the WARRANTY REGISTRATION form and send it to SKYFOOD
according to the instrucons posted on the referred website. Failure to do so will VOID
the warranty.
No extended warranes for third party products. There are no other express warranes
or condions other than the one offered by each manufacturer for products sold by
SKYFOOD, not under the FLEETWOOD by SKYMSEN and SKYMSEN brand.
For quesons or assistance, do not return the product or accessories to the store, please
call Toll Free 1-800-503-7534, or visit the Customer Service secon at www.skyfood.us. For
faster service please have the items name, serial number, and proof of purchase for the
operator to assist you.
SKYFOOD reserves the right to change the terms of its limited warranty at any me
without any prior noce. It also reserves the right to change the design and specificaons
of its equipment or any related documentaon at any me. The end user is not entled
to upgrades or refunds resulng from these changes.
Updates
These Terms and Condions were last updated on January 14th, 2014.
7
2. Installaon and Pre-Operaon
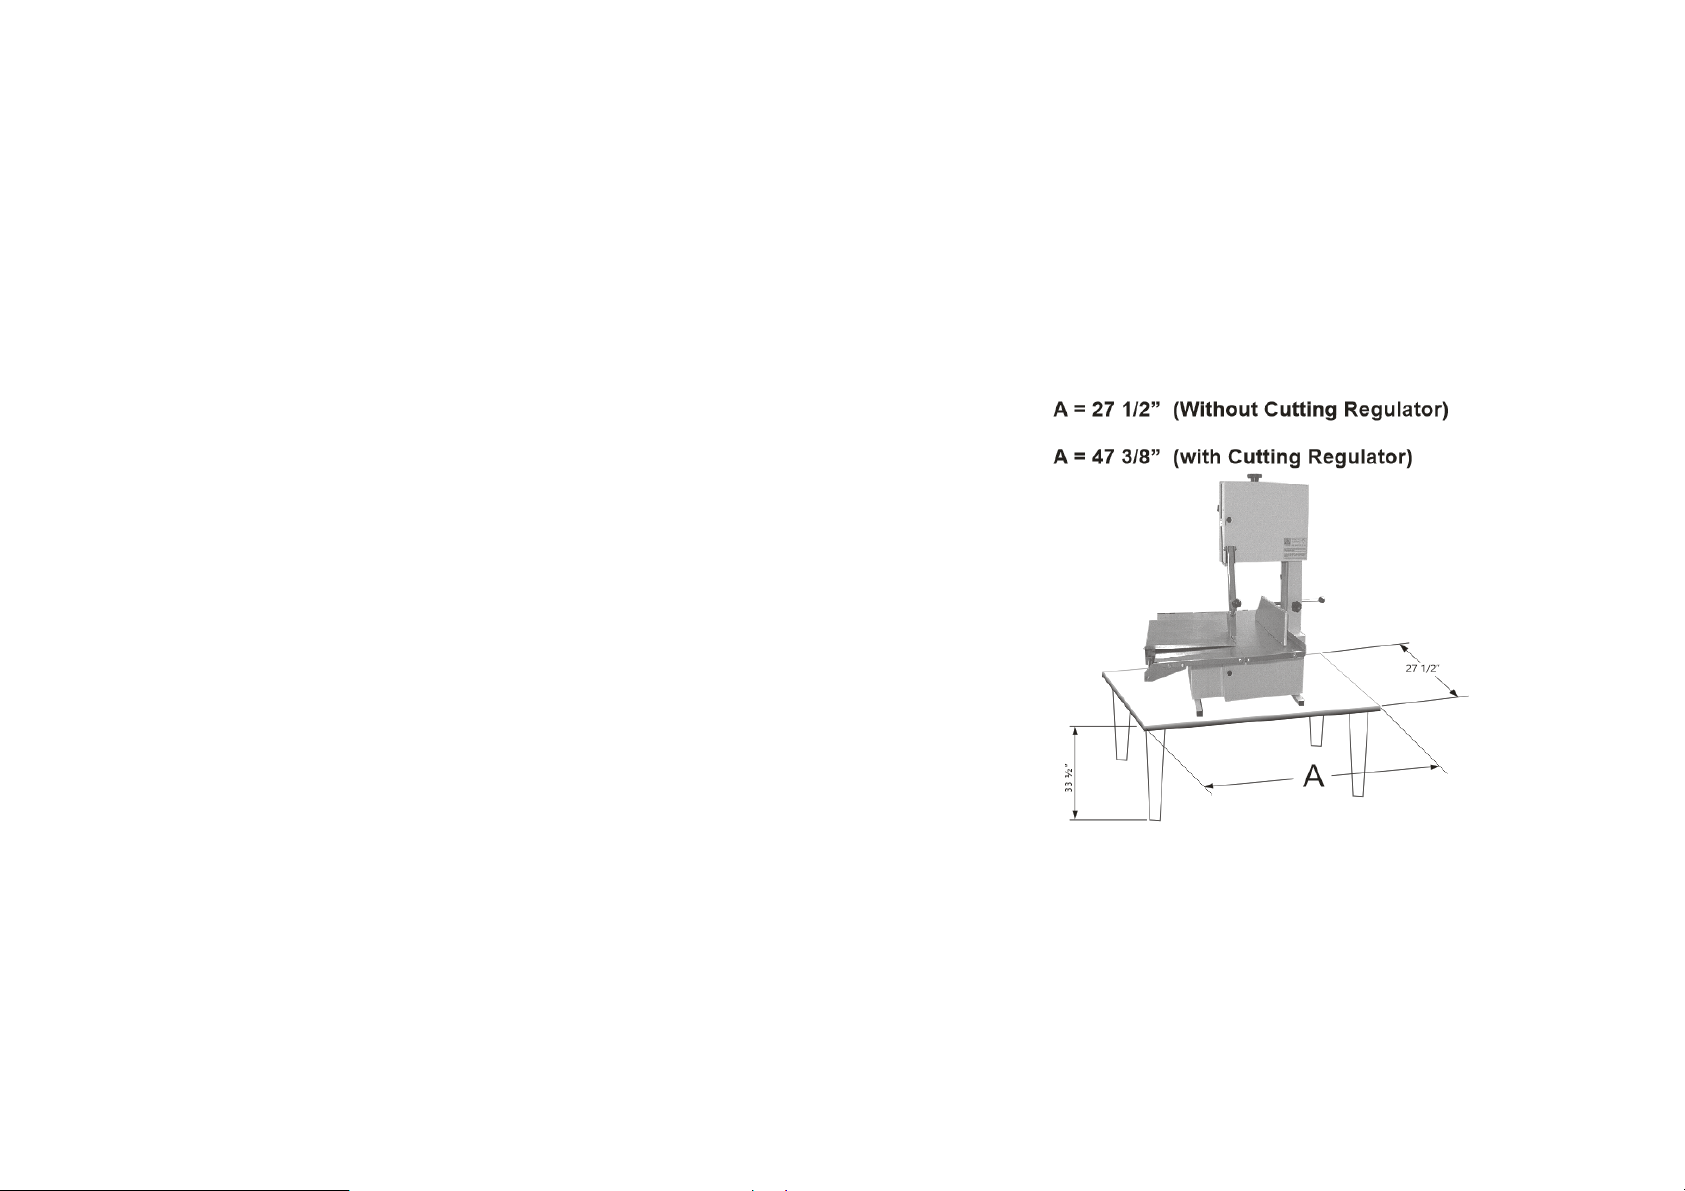
2.1 Installaon
The Mini Band Saw must be installed onto a steady working surface,with a 33 ½” inches
height. Verify if the voltage of the power point it will be connected to, is 110V.
The cord plug has two flat pins and one round, this last one is ground.
It is mandatory the three pins to be duly connected before to start the machine .
PICTURE 03
8
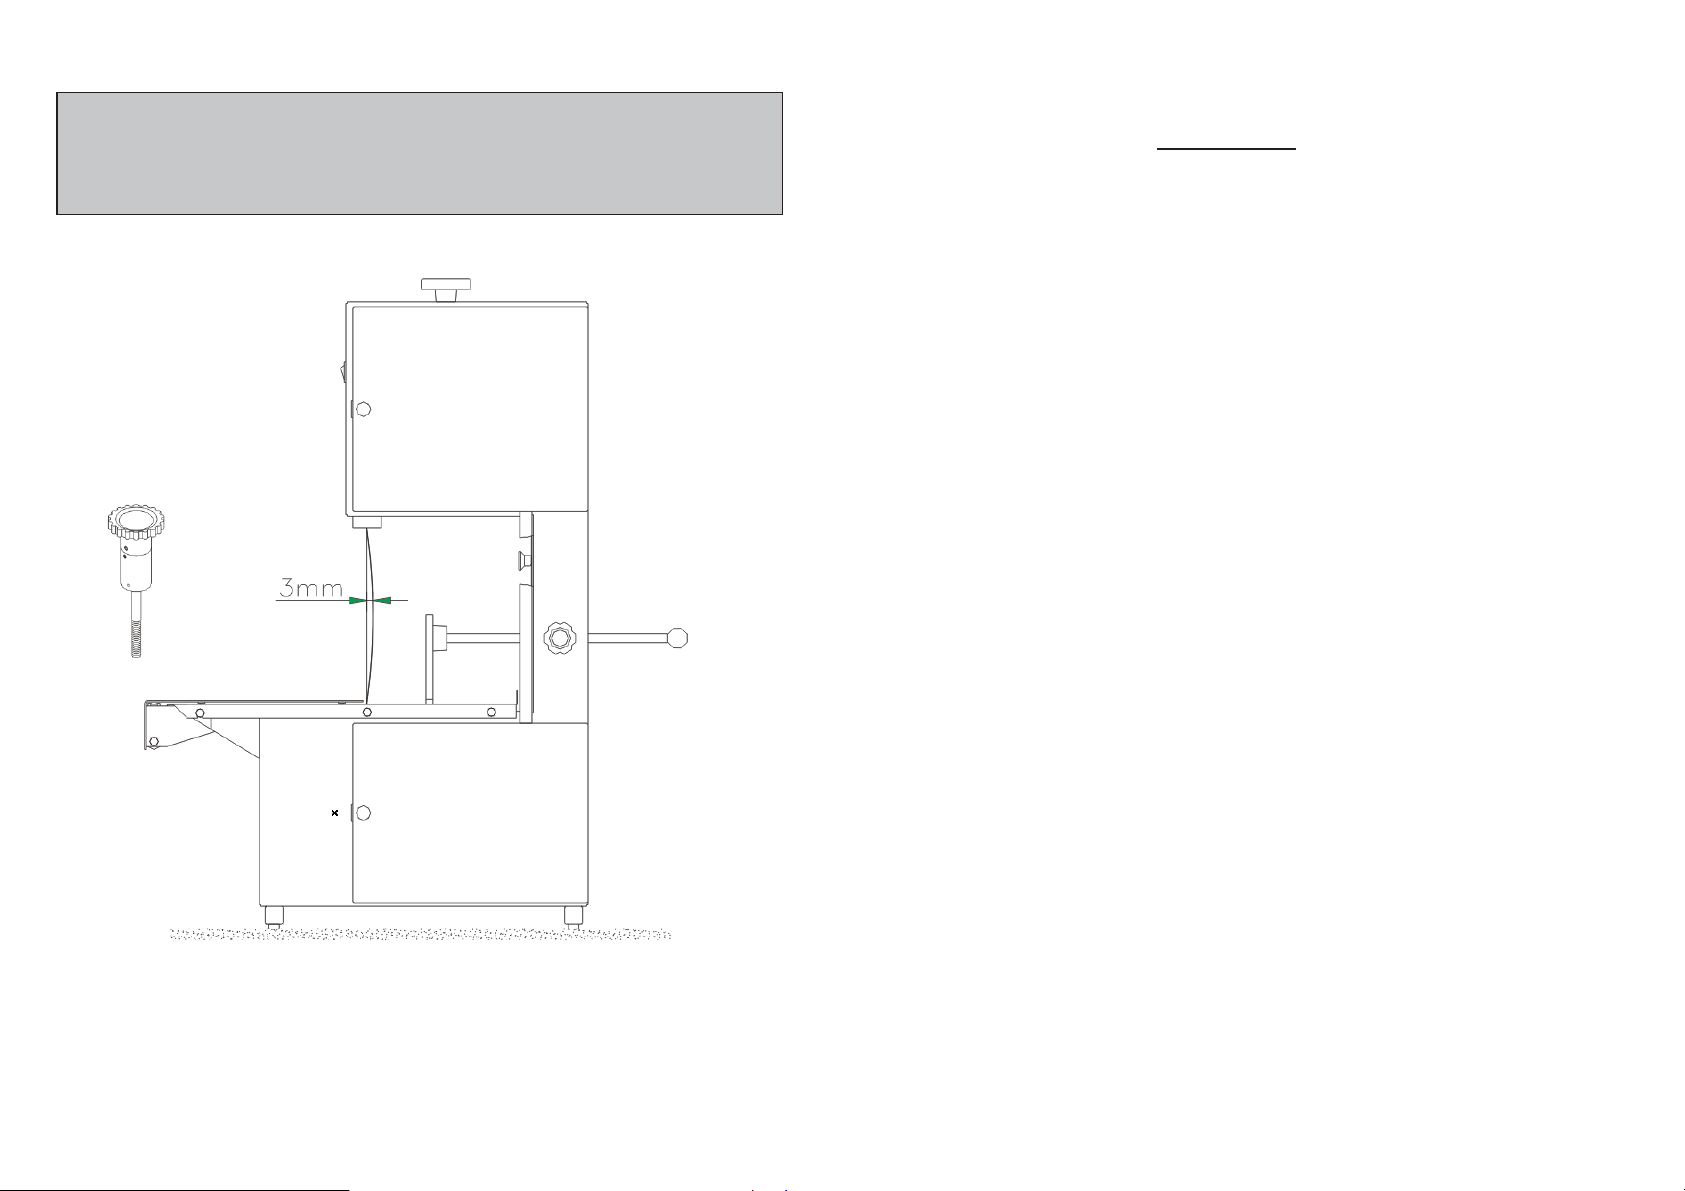
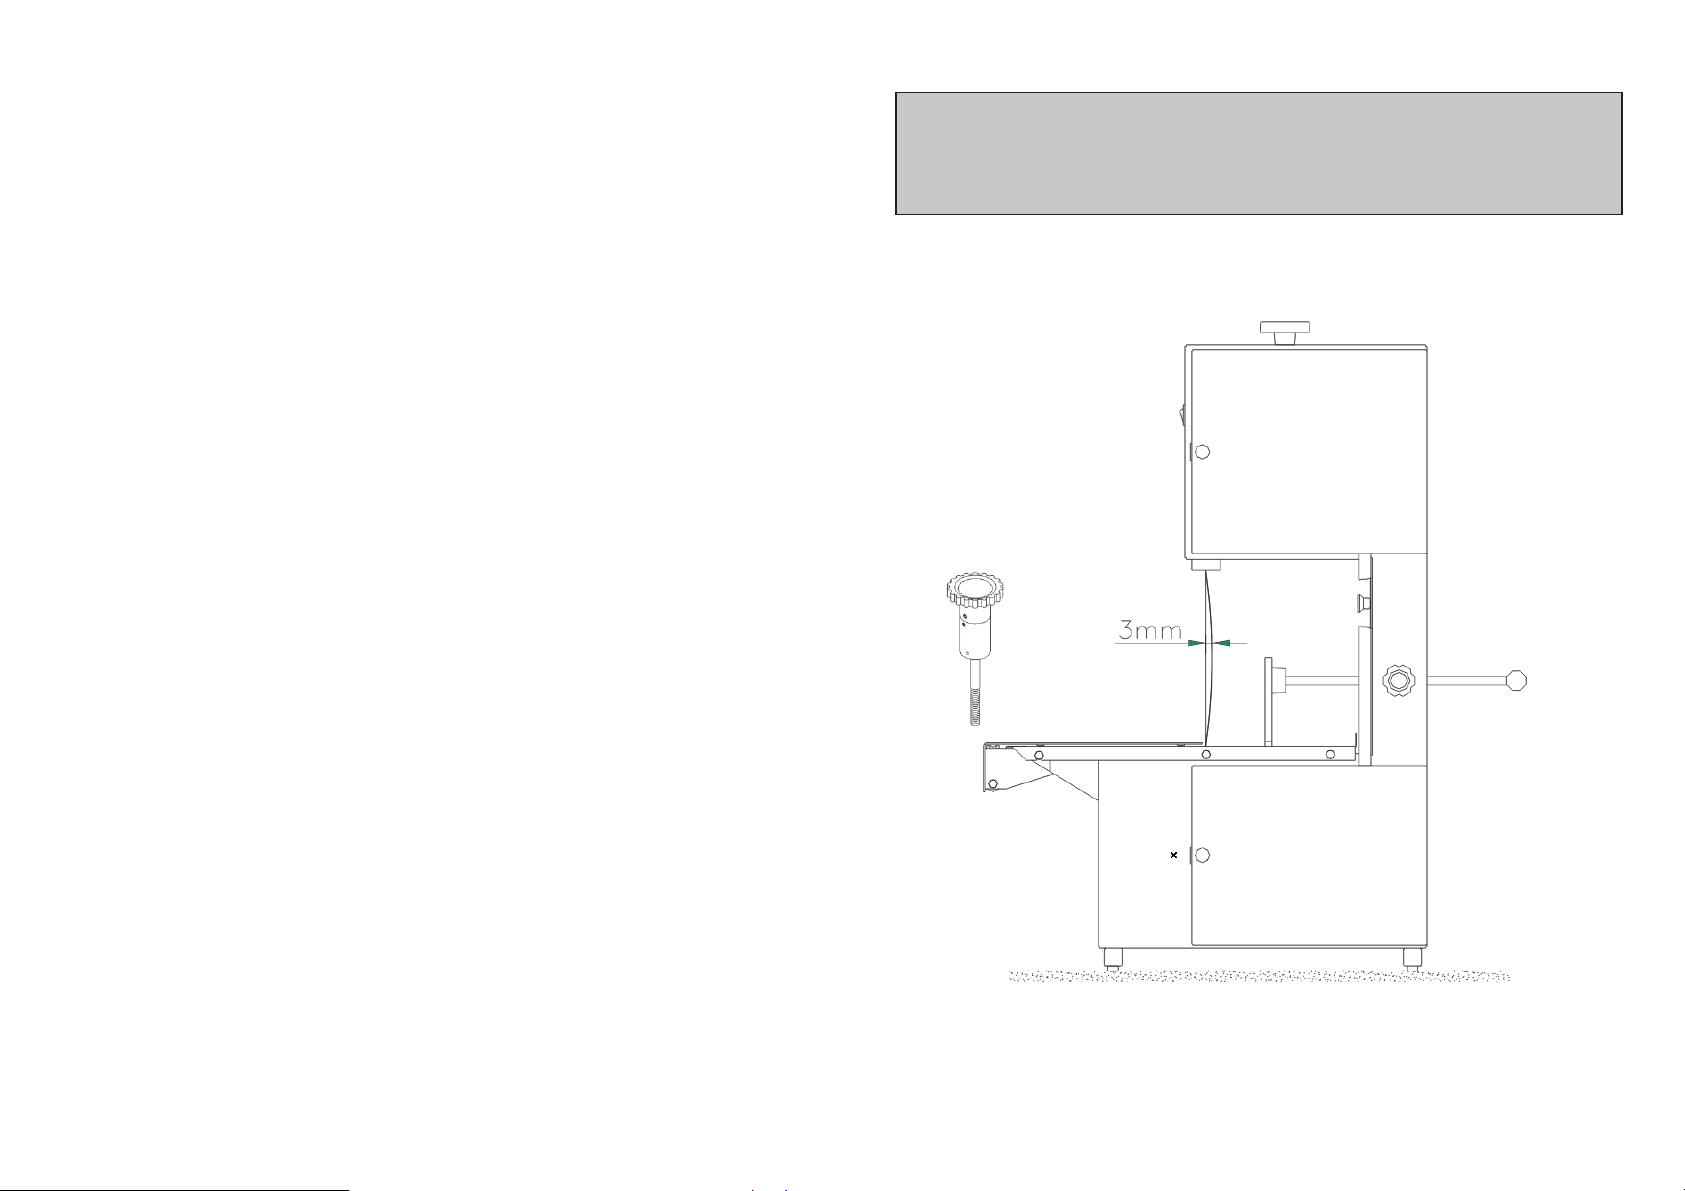
IMPORTANT
Before to operate ,make sure the blade is set with the correct tension , by rotang
the Handle #.01 (Pic.01) clockwise. Use the drawing below
to idenfy the correct tension of the blade.
2.2 Pre Operaon
The saw is equipped with a blade
tension control. Turn the handle
# 01 (Pct 01) unl it snaps. The
suitable tension is then reached
Check if the Mini Band Saw is firm on its posion. Before using it, all the parts in contact
with the product must be cleaned with water and neutral soap. In order to easily remove
the movable parts of the equipment, read carefully item (3.2 Cleaning ).
PICTURE 04
37
SKYFOOD EQUIPMENT LLC - SERVICE
For quesons or assistance, call SKYFOOD EQUIPMENT Toll Free: 1-800-503-7534, or visit
the Customer Service secon at www.skyfood.us.
SKYFOOD’S LIMITED WARRANTY
Unless otherwise specified, new FLEETWOOD by SKYMSEN and SKYMSEN products,
excluding accessories, sold by SKYFOOD EQUIPMENT, LLC. (“SKYFOOD”), for use only in the
connental United States (collecvely, “Products” or singularly, “Product”), are warranted
to be free from defects in materials and workmanship for a period of one (1) year from the
date of purchase by the original purchaser/user (“End User”), or eighteen
(18) months from the date of shipment from SKYFOOD’s warehouse, whichever expires
first. Several new products and accessories may be warranted for a period other than one
(1) year while others may be subject to travel limitaons, as specified on the products
Instrucon Manual. Proof of purchase must be presented; if not this warranty will be
VOID. No warranty is given or implied to a subsequent transferee or any other third party.
This warranty is expressly condional upon SKYFOOD being nofied of any defects in
materials or workmanship within five (5) days of its occurrence, within the warranted me
period. If a noce of a claim under this warranty is mely made by the End User, SKYFOOD
or a SKYFOOD’s designated service company (“Service Company”), will repair or replace
the Product, at SKYFOOD’s discreon, subject to the addional condions hereinaer
described.
This warranty shall not apply if damage occurs from improper installaon or maintenance
performed by an unauthorized service company (“Service Company”), wrong voltage,
nor to the extent that Products or parts have been used other than in conformance with
operang and maintenance instrucons, subjected to misuse or abuse or damaged by
accident, acts of God, abnormal use, stress or any other maer unrelated to SKYFOOD,
and beyond its reasonable control. This warranty does NOT cover service labor and travel
to perform adjustments on products and/or accessories. In addion to wear and tear
of certain items, such as, but not limited to; glass parts, blades, stones, chopper cung
knives, plates, slicing knives, cung disc, gaskets, oil changes, sealing tape, heat seal
wires, worm gears, self-lubricang bushings, carbon brushes for electric motors, and
other parts expendable by nature and that need to be replaced frequently. Electrical
components are subject to natural wear and tear, and are NOT covered by this warranty.
THIS WARRANTY EXCLUDES ALL ORAL, STATUTORY, EXPRESS OR IMPLIED WARRANTIES
WHICH MAY BE APPLICABLE TO SKYFOOD, INCLUDING, BUT NOT LIMITED TO, ANY
IMPLIED WARRANTY OF MERCHANTABILITY AND FITNESS FOR PARTICULAR PURPOSE.
Under no circumstances shall SKYFOOD be liable for loss of use, revenue or profit or for
incidental or consequenal damages. SKYFOOD shall under no circumstances be liable for
any loss, damage, concealed damage, expense or delay of goods for any reason when said
goods are in the custody, possession or control of third pares selected by SKYFOOD to
forward, enter, clear, transport, or render other services with respect to such goods. The
sole and exclusive remedy for breach of any warranty is limited to the remedies provided
in the paragraph above.
All products held at non-commercial facilies or domiciles, must be taken or shipped,

36
7. Diagrama Eléctrico
9
SIEMSEN HINT
To have an easy sliding movement of the meat on the staonary table spray a litle
water on the table .
IMPORTANT
Under no circumstances put your hands towards the blade to pushl the product to
be cut. For your safety, wear steel gloves.
With the machine turned off, adjust the Thickness Guide #.12 (Pic.01).
To operate the Mini Band Saw, acvate the ON / OFF Switch #.03 (Pic.01).
Place the product to be processed upon the Sliding Table #.08 (Pic.01),
Push the sliding Table towards the blade #.06 (Pic.01) .
When returning take care to avoid the product to touch the blade back side ( flat side )
such prevenng the blade from geng out of the wheels
It is possible to cut the meat using only the staonary table.
3.2 Cleaning
To clean the machine, firstly disconnect it from the power point. All the parts that have
contact with the meat must be cleaned.
Find below the descripon of the procedure to take down the removable parts:
3.2.1 - To remove the Door:
Open the Doors and lithem # 10 and # 13 (Pic 01) .
3.2.2 - To remove the blade:
Loosen the blade by rotang the handle #.01 (Pic.01) counter clockwise and remove it
from the upper and lower wheels.
3.2.3 - To remove the wheels
Take offthe loops # 09 (Pic.01) from the wheels and remove the wheels pulling them
towards the front side of saw .
3. Operaon
3.1 Procedure for operaon

10
IMPORTANT
Acid soluons, salty soluons, disinfectants and some sterilizing soluons
(hypochlorites, tetravalent ammonia salts, iodine compounds, nitric acid and
others), must be AVOIDED, once it cannot remain for long in contact with the
stainless steel:
3.2.4 – Wash all the parts with hot water and soap, drying them aerwards.
3.2.5 – Never use hard and sharp objects, such as: knifes, hooks and others, to clean pieces
of meat stuck to the machine. Use a plasc brush to make such cleaning.
3.2.6 To assemble the parts proceed as indicated above in the reversal mode .
3.3 Cauons with Stainless Steel
The Stainless Steel may present rust signs, which ARE ALWAYS CAUSED BY EXTERNAL
AGENTS, especially when the cleaning or sanizaon is not constant and appropriate.
The Stainless Steel resistance towards corrosion is mainly due to the presence of chrome,
which in contact with oxygen allows the formaon of a very thin protecve coat. This
protecve coat is formed through the whole surface of the steel, blocking the acon of
external corrosive agents.
When the protecve coat is broken, the corrosion process begins, being possible to avoid
it by means of constant and adequate cleaning.
Cleaning must always be done immediately aer using the equipment. For such end, use
water, neutral soap or detergent, and clean the equipment with a socloth or a nylon
sponge. Then rinse it with plain running water, and dry immediately with a socloth, this
way avoiding humidity on surfaces and especially on gaps.
The rinsing and drying processes are extremely important to prevent stains and corrosion
from arising.
These substances aack the stainless steel due to the CHLORINE on its composion,
causing corrosion spots (ping).
Even detergents used in domesc cleaning must not remain in contact with the stainless
steel longer than the necessary, being mandatory to remove it with plain water and then
dry the surface completely.
Use of abrasives:
Sponges or steel wool and carbon steel brushes, besides scratching the surface
and compromising the stainless steel protecon, leave parcles that rust and react
35
Gire la manipula de fijación No.16 (Foto 01) en el sendo an-horario para poder mover
el Regulador de Corte para la izquierda o para la derecha conforme lla distancia que Usted
desea dejar desde el Regulador hasta la hoja.
Después de ajustado gire la manipula de fijación No.16 (Foto 01) en el sendo
horario para fijar el Regulador de Corte en la posición deseada.
6. Consejos Generales
- Do not wear loose fing clothes while operang the unit. Do not use bracelets or any
other piece of jewelry. Have your hair always shortened and held up (use hair fishnets if
necessary) in a way it cannot reach any part of the machine. Roll up any loose sleeves.
- SKYMSEN is not responsible for any harm or injury caused by the negligent or inappropriate
use of this equipment by any operator. This equipment must be operated only by persons
whose age equals or exceeds 18 years old, in a safe and sound state of mind, free from the
influence of any kind of drugs and alcohol, that received proper training and instrucons
regarding the correct operaon of this machine, that are wearing correct and authorized
safety clothes. All and any kind of modificaons carried on and applied to this machine
immediately nullifies any kind of warranty and may result in harm and injuries to the
individuals operang this machine and to individuals that are located in the machine
surrounding areas while it is being operated.
- Under no circunstances place your hands in the moving parts of the machine while it
is being used. Make sure the machine has come to a complete stop before acessing the
processed ingredients.

34
FOTO 06
5.2.2 Ajuste del Cojinete Superior No.03 (Foto 06):
El propósito de este ajuste es centralizar la hoja en el volante y evitar que la misma salte
afuera de el.
Primero desconecte la maquina de la red eléctrica. Después afloje la hoja No.06 (Foto 01)
girando el manipulo No.01 (Foto 01) en el sendo an-horario.
Rere la tapa trasera superior removiendo los tornillos con un destornillador. Afloje las
tres tuercas No. 01 (Foto 06) usando una llave de tuerca de 10mm.
Usando un destornillador gire el tornillo superior No.02 (Foto 06) ¼ de giro en el sendo
an-horario si la lamina estuviera desplazada para adelante o gire el tornillo superior
No.02 (Foto 06) ¼ de giro en el sendo horario si la lamina estuviera desplazada para tras.
Apriete las tres tuercas No.01 (Foto 06) previamente aflojadas.
Calibre la tensión de la hoja como explicado en Pre-Operación , ítem 2.2 .
Gire el volante con las manos para averiguar si la hoja esta centralizada en el volante. Si
ella no está centralizada, connúe girando el volante hasta que la hoja se centralice .
5.2.3 Ajuste Del Regulador de Corte:
El Regulador de Corte No.12 (Foto 01) (opcional) fu desarrollado para proveer cortes con
el mismo espesor y también para proteger el usuario de accidentes.
Para ajustar el Regulador de Corte:
11
IMPORTANT
If any item from the GENERAL SAFETY NOTIONS secon is not applicable to your
product, please disregard it.
contaminang the stainless steel. That is why such products must not be used for cleaning
and sanizaon. Scrapings made with sharp instruments or similar must also be avoided.
Main substances that cause stainless steel corrosion:
Dust, grease, acid soluons such as vinegar, fruit juices, etc., saltern soluons (brine),
blood, detergents (except for the neutral ones), common steel parcles, residue of sponges
or common steel wool, and also other abrasives.
4.General Safety Pracces
The following safety instrucons are addressed to both the operator of the machine as
well as the person in charge of maintenance. The machine has to be delivered to the
operator in perfect condions of use by the Distributor to the user. The user shall operate
the machine only aer being well acquainted with the safety procedures described in the
present manual. READ THIS MANUAL WITH ATTENTION.
4.1 Basic Operaon Pracces
4.1.1 Dangerous parts
Some parts of the electric devices are connected to high voltage points. These parts when
touched may cause severe electrical shocks or even be fatal.
Never touch commands such as buons, switches and knobs with wet hands , wet clothes
and/or shoes. By not following these instrucons operator could be exposed to severe
electrical shocks or even to a fatal situaon.
4.1.2 Warnings
The operator has to be well familiar with the posion of ON/OFF Switch to make sure the
Switch is easy to be reached when necessary. Before any kind of maintenance, physically
remove plug from the socket.
Provide space for a comfortable operaon thus avoiding accidents.
Water or oil spilled on the floor will turn it slippery and dangerous. Make sure the floor is
clean and dry.
Before giving any manual command (switch, buons, turn keys or lever) be sure the
12
IMPORTANT
Carefully read ALL INSTRUCTIONS of this manual before turning the machine ON.
Be sure to be familiar with the instrucons and that you have well understood
all informaon contained in this manual. If you have any queson contact your
supervisor or your nearest Dealer.
command is the correct one. Check this manual for further details if necessary.
Never use a manual command (switch, buons, lever) unadvisedly.
If any work is to be made by two or more persons, coordinaon signs will have to be given
for each operaon step. Every step of the operaon shall be taken only if the sign has been
made and responded.
4.1.3 Advices
In case of power shortage, immediately turn the machine OFF.
Use recommended or equivalent lubricants, oils or greases.
Avoid mechanical shocks as they may cause failures or malfuncon.
Avoid penetraon of water, dirt or dust into mechanical or electrical components of the
machine.
DO NOT modify original characteriscs of the machine.
DO NOT remove, tear offor maculate any labels stuck on the machine. If any label has
been removed or is no longer legible, contact your nearest dealer for replacement.
READ CAREFULLY AND WITH ATTENTION THE SAFETY OR OPERATION INSTRUCTIONS
LABELS DISPLAYED ON THE MACHINE, AS WELL AS THE INSTRUCTION MANUAL AND THE
TECHNICAL CHARACTERISTICS WRITTEN INSIDE.
4.2 Safety Procedures and Notes Before Switching Machine ON
4.2.1 Danger
An electric cable or electric wire with damaged jacket or bad insulaon could cause
electrical shocks as well as electrical leak. Before use, check condions of all wires and
cables.
33
5.2 AJUSTE Y SUBSTITUICIÓN DE COMPONENTES
5.2.1 Correa de transmisión
Para garanzar un buen funcionamiento de la maquina y una vida longa de las correas ,
estas deben estar bien reguladas . Caso se queden flojas , las correas
iran panar durante la operación .
También debe se cuidar para que ellas no trabajen bajo demasiada tensión , pues en esta
condición causarán desgaste prematuro en los rodamientos .
Para el ajuste de las correas procedase como sigue :
OBSERVACIÓN
Al hacer el ajuste de las correas , verifique también el alineamiento de las poleas .
Con un destornillador , saque los tornillos que fijan la tapa trasera inferior y rerela , para
tener acceso a las poleas . Usando una llave de tuerca ( 9/16" ) No. 02 (Foto 05) afloje los
tornillos No.01 (Foto 05 ) girándolos en sendo an-horario . En seguida con el auxilio de
una palanca de madera No.03 (Foto 05) , empuje el motor en el sendo que provoque una
mayor tensión de las Correas No. 05 (Foto 05) , después apriete los tornillos No.01 (Foto
05) .
FOTO 05

32
5. Problemas, Causas e Soluciones
Las Mini Sierras (Mod MSK y MSKL) , fueran diseñadas para que necesiten un mínimo de
manutención . Sin embargo pueden ocurrir algunas irregularidades en su funcionamiento
, debido al desgaste natural causado por su uso .
Caso haya algún problema con su maquina , verifique la Tabla 02 abajo , donde están
indicadas algunas soluciones recomendadas .
* La vida de servicio - 2 años para la jornada de trabajo normal
TABLA 02
PROBLEMAS CAUSAS SOLUCIONES
La maquina no liga
La maquina esta desconectada
de la red eléctrica
Falta de energia eléctrica
Ligue el cable eléctrico de la
maquina en la red eléctrica
Averigue si hay energia
eléctrica
Olor de quemado ó humo Problema con el motor o otros
circuitos eléctricos Llame a su revendedor
Dificultades en el corte del
producto
Hoja o volante sucio
Hoja fuera del centro de los
volantes
Hacer limpieza de acuerdo con
item 3.2
Hacer ajuste en el cojinete
superior de acuerdo con item
5.2.2 deste manual, o en
casos mas graves llame a su
revendedor
La maquina liga, pero cuando
el producto entra en contacto
con la hoja, la misma para o
giro en baja rotación
Hoja parndo sobre el volante
Hoja soldada de forma
incorrecta
Ajuste la tensión de la correa
de acuerdo con el item 5.2
Haga la calibración de la hoja
de acuerdo con el item 2.2
Hoja se rompe seguidamente
Hoja o volante sucio
Volantes con defectos
Hacer limpieza de acuerdo con
item 3.2
Llame a su revendedor
13
4.2.2 Advices
Be sure ALL INSTRUCTIONS in this manual have been thoroughly understood. Every
funcon and operaonal procedure have to be very clear to the operator. Contact your
nearest Dealer for further quesons.
Any manual command (switch, buon or lever) shall be given only aer being sure it is the
correct one.
4.2.3 Precauons
The electric cable has to be compable with the power required by the machine. Cables
touching the floor or close to the machine need to be protected against short circuits.
Oil reservoir has to be full up to the required level as indicated. Check level and add oil if
necessary.
4.3 Roune Inspecon
4.3.1 Advice
When checking the tension of the belts or chains, DO NOT introduce your fingers between
the belts and the pulleys and nor between the chain and the gears.
4.3.2 Precauons
Check if motors and sliding or turning parts of the machine produce abnormal noises.
Check the tension of the belts and chains and replace the set when belt or chain show
signs of being worn out.
When checking tensions of belts or chain DO NOT introduce your fingers between belts
and pulleys, nor between the chains and gears.
Check protecons and safety devices to make sure they are working properly.
4.4 Operaon
4.4.1 Advice
Be sure your hair is not loose in order to avoid geng caught by turning parts which could
lead to a serious accident. Tie your hair well up and/or cover your head with a scarf.
The operaon performed by not trained or skilled personnel shall be forbidden.

14
Never touch turning parts with your hands or in any other way.
NEVER operate machine without all original safety devices under perfect condions.
4.5 Aer Finishing The Work
4.5.1 Precauons
Always TURN THE MACHINE OFF by removing the plug from the socket before cleaning
the machine. Never clean the machine unless it has come to a complete stop. Put all
components back to their funconal posions before turning it ON again. Check level of
oil. DO NOT place your fingers in between belts and pulleys nor chains and gears.
4.6 Maintenance
4.6.1 Danger
Any maintenance with the machine in working situaon is dangerous. TURN IT OFF BY
PULLING THE PLUG OFF THE SOCKET DURING MAINTENANCE.
IMPORTANT
Always unplug the machine when emergency cases arise.
4.7 Advice
Electrical or mechanical maintenance must be done by qualified personal for such
operaon.
Person in charge has to be sure that the machine is under TOTAL SAFETY condions when
working.
5 Analysis and Problems Solving
5.1 Problems, causes and soluons
The Mini Band Saw were designed to operate with minimum maintenance. However, some
irregularies may occur during its operaon, due to the natural wear out caused by the
equipment use.
If there is any problem with your machine, check the Table-02 bellow, where you will find
some possible soluons.
* Service life – 2 years for regular work shi
31
Verifique las protecciones y los disposivos de seguridad para que siempre funcionen
adecuadamente .
4.4 Operación
4.4.1 Avisos
No trabaje con pelo largo , que pueda tocar cualquier parte de la maquina , pues el mismo
podría causar serios accidentes . Amarrelo para arriba y para atrás , o cubralo con un
pañuelo .
Solamente operadores entrenados y calificados pueden operar la maquina .
Nunca toque con las manos o de cualquier otra manera , partes girantes de la maquina.
JAMÁS opere la maquina , sin algún de sus accesorios de seguridad.
4.5 Después de Terminar el Trabajo
4.5.1 Cuidados
Siempre limpie la maquina . Para tanto , deslíguela sicamente del soquete .
Nunca limpie la maquina antes de su PARADA COMPLETA.
Recoloque todos los componentes de la maquina en sus lugares , antes de ligarla otra vez.
Al verificar la tensión de las correas, NO coloque los dedos entre las correas y las poleas.
4.6 Manutención
4.6.1 Peligros
Con la maquina ligada cualquier operación de manutención es peligrosa . DESLÍGUELA
FÍSICAMENTE DE LA RED ELÉCTRICA , DURANTE TODA LA OPERACIÓN DE MANUTENCIÓN .
4.7 Avisos
La manutención eléctrica o mecánica debe ser hecha por una persona calificada para hacer
el trabajo .
La persona encargada por la manutención debe cerficarse que la maquina trabaje bajo
condiciones TOTALES DE SEGURIDAD .
30
IMPORTANTE :
Lea con atención y cuidado las INSTRUCCIONES contenidas en este Manual,
antes de ligar la maquina . Cerfiquese que entendió correctamente todas las
informaciones . En caso de duda , consulte su superior o el Revendedor .
4.2 Cuidados y Observaciones Antes de Ligar la Maquina .
4.2.1 Peligro
Cables o hilos eléctricos con aislamiento dañado , pueden provocar choques eléctricos .
Antes de usarlos verifique sus condiciones .
4.2.2 Avisos
Esté seguro que las INSTRUCCIONES contenidas en este Manual, estén completamente
entendidas . Cada función o procedimiento de operación y de manutención debe estar
perfectamente claro .
El accionamiento de un comando manual ( botón, llave eléctrica, palanca, etc. ) debe ser
hecho siempre después que se tenga la certud de que es el comando correcto .
4.2.3 Cuidados
El cable de alimentación de energía eléctrica de la maquina , debe tener una sección
suficiente para soportar la potencia eléctrica consumida .
Cables eléctricos que estuvieran en el suelo cerca de la maquina , deben ser protegidos
para evitar corto circuitos .
4.3 Inspección de Runa
4.3.1 Aviso
Al averiguar la tensión de las correas , NO coloque los dedos entre las correas y las poleas .
4.3.2 Cuidados
Verifique los motores y las partes deslizantes o girantes de la maquina , con relación a
ruidos anormales .
Verifique la tensión de las correas , y sustuya el conjunto , caso alguna correa o polea
tenga desgaste . Al verificar la tensión de las correas , NO coloque los dedos entre la s
correas y poleas.
15
TABLE 02
PROBLEMS CAUSES SOLUTIONS
The machine does not turn ON
Machine is not connected to a
power point
Power outage
Connect the electric cable to
the power point
Check if there is electric power
Burnt smell or smoke
Problem on the internal or
external electric circuit of the
machine
Call Technical Assistance
The machine turns on, but
when the product gets in
contact with the blade, it
stops or spins in low rotaon
Skidding belt
Innapropriate blade tension
Adjust tension of belt
Calibrate the blade according
to descripon on 2.2 Pre
Operaon
Blade tears frequently
Dirt on blade or flywheels
Defecve flywheels
Calibrate the blade according
to descripon on 2.2 Pre
Operaon
Call Technical Assistance
Strange noises
Skidding blade
Faulty ball bearings
Call Technical Assistance
Change the blade
Difficulty to cut the product
Incorrect blade welding
Dirt on blade or flywheels
Blade out of center
Do the cleaning according to
item (3.2 Cleaning)
Calibrate the blade according
to descripon on 2.2 Pre
Operaon
Adjust the upper bearing
according to item 5.2.2 of
this manual or, in a more
serious case, call a Technical
Assistance.

16
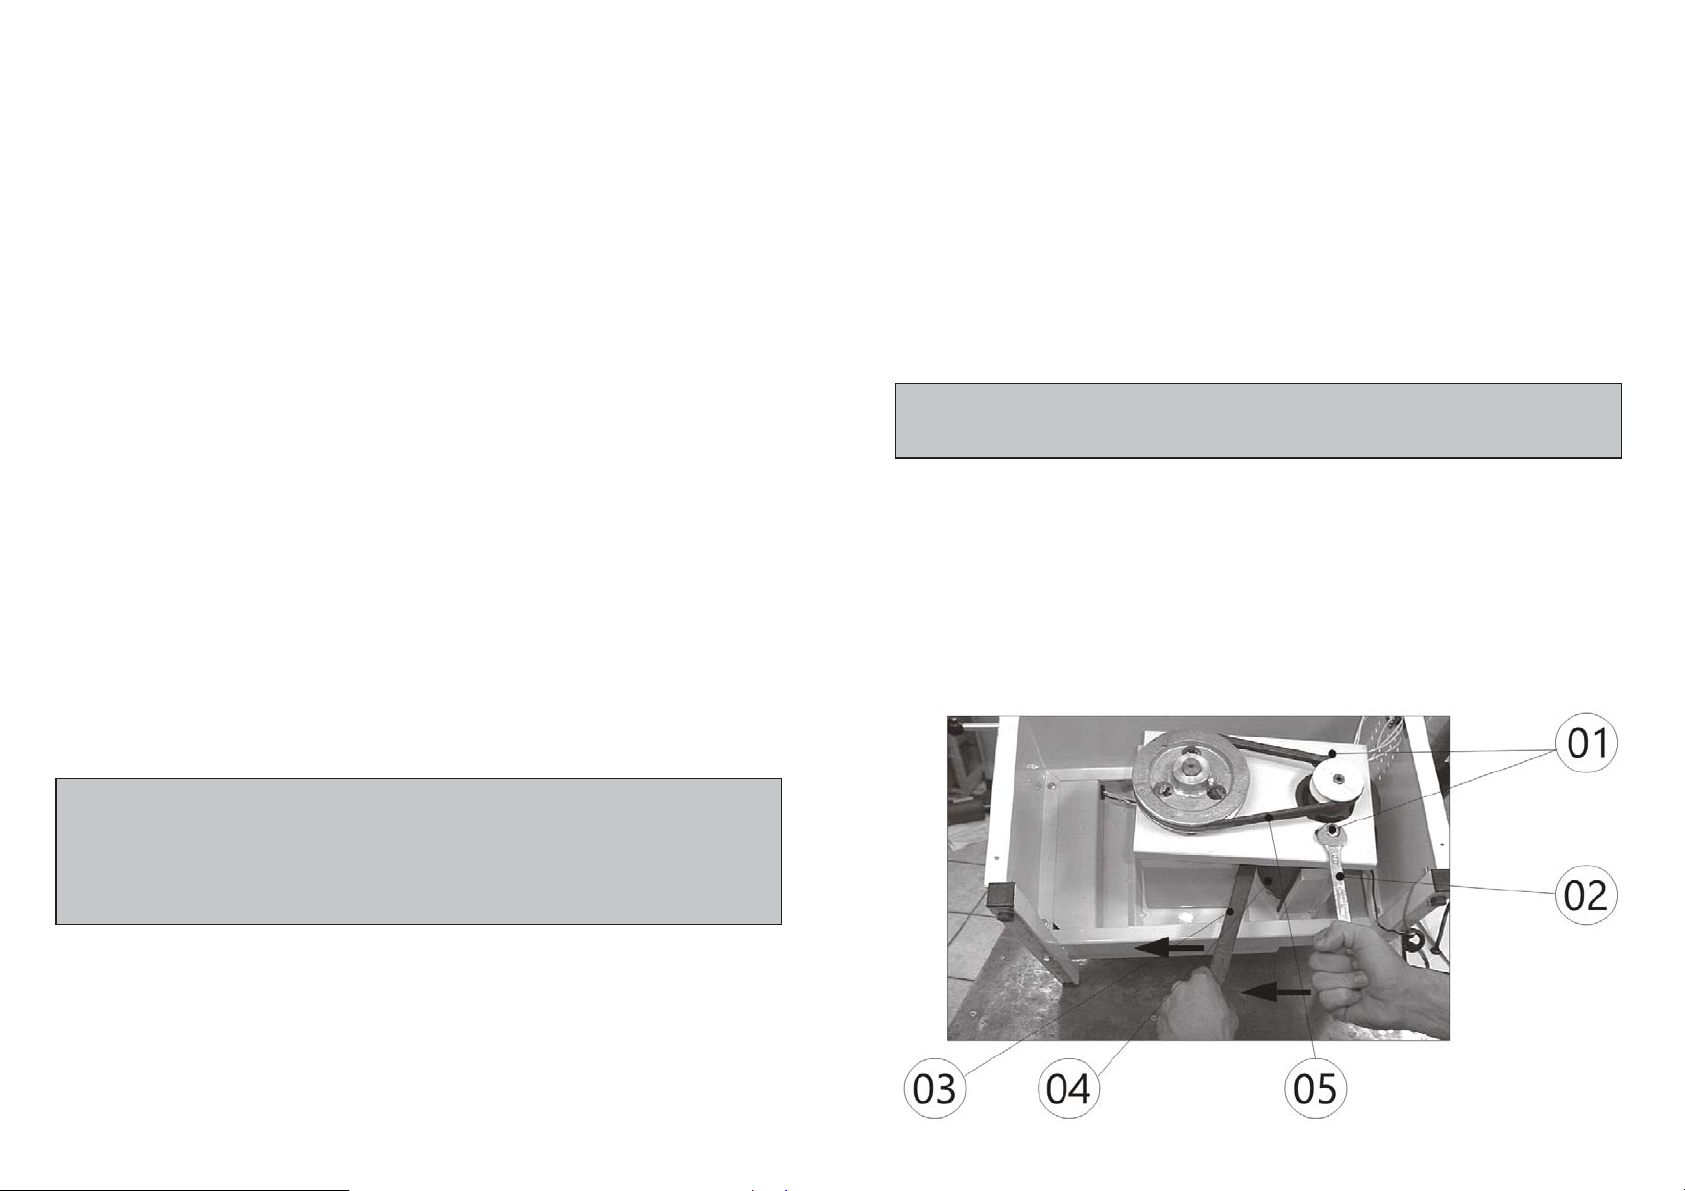
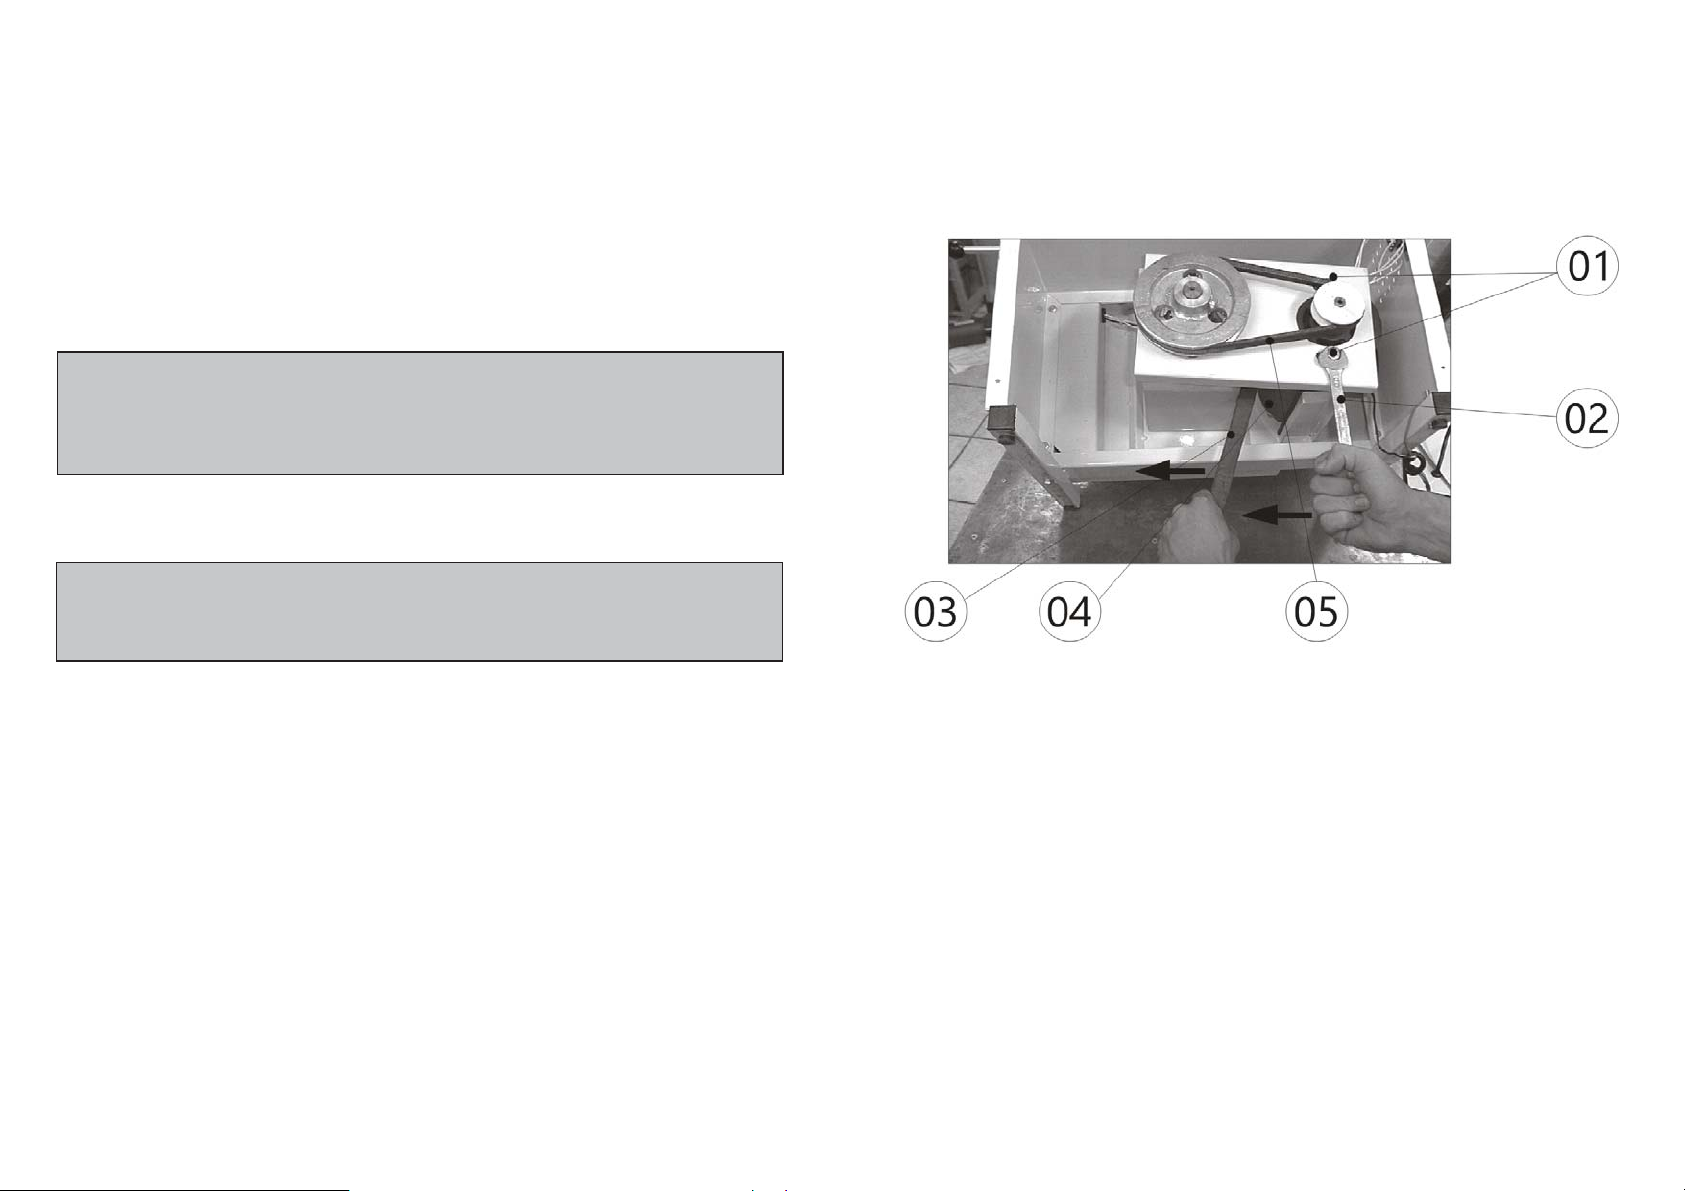
5.2 Adjustments and Replacement of Components
5.2.1 – Belt
To obtain longer life for the belt and a good performance of the machine, the belt must be
perfectly adjusted. In case it is loose, it will skid during operaon.
Be careful not to over stretch the belts, because it may cause premature wearing of ball
bearings.
To adjust the belt, proceed by following the instrucons below:
NOTE
When adjusng the belts, check for perfect alignment of the pulleys.
Remove the lower rear lid, by releasing the screws with a screw driver .
Sing a 9/16 spanner # 02 (Pict 05 ) loosen the screws # 01 ( Pct. 05 ) turning them counter
clockwise
Then, using a wood lever # 03 (Pct. 05 ) , dislocate the motor #.04 (Pic.05) in order to
stretch the belts # 05 (Pct.05) and then reghten the nuts #.01 (Pic.05)
5.2.2 – Upper Bearing Adjustment
The adjustment of the Upper Bearing #03 (Pct. 06) is made in order to centralize the blade
on the wheel, and to prevent it from skipping.
To adjust the Upper Bearing, proceed according to descripon below, keeping the machine
disconnected from the power line:
·Loosen the Blade #.06 (Pic.01) turning the Handle # 01 (Pct.01) counter clockwise .
·Take out the upper rear lid, removing the Screws using a screw driver .
·Loosen the three nuts #.01 (Pic.06) with a 10 mm spanner.
·Using a screw driver, rotate the screw #. 02 ( Pic. 06 ) ¼ of a turn an-clockwise, if te blade
is dislocated to the front. If the blade is dislocated to the back, rotate the Screw ¼ of a turn
clockwise.
·Tighten the three nuts #.01 (Pic.06), previously loosen.,
29
o ropas mojadas . No obedecer esta recomendación , también podrá provocar choques
eléctricos , o hasta la muerte de una persona .
4.1.2 Advertencias
El local de la llave liga/desliga debe ser bien conocido , para que sea posible accionarla a
cualquier momento sin la necesidad de procurarla .
Antes de qualquer po de manutenção, desligue fisicamente a máquina da rede elétrica.
Antes de cualquier manutención desconecte la maquina de la red eléctrica .
Proporcione espacio suficiente para evitar caídas peligrosas .
Agua o aceite podrán hacer resbaloso y peligroso el piso . Para evitar accidentes el piso
debe estar seco y limpio .
Antes de accionar cualquier comando manual ( botones , llaves eléctricas , palancas , etc. )
verifique siempre si el comando es el correcto , o en caso de dudas , consulte este Manual .
Nunca toque ni accione un comando manual ( botones , llaves eléctricas , palancas etc. )
por acaso .
Si un trabajo debe ser hecho por dos o más personas , señales de coordinación deben ser
dados antes de cada operación . La operación siguiente no debe ser comenzada sin que la
respecva señal sea dada y respondida .
4.1.3 Avisos
En el caso de falta de energía eléctrica , desligue inmediatamente la llave liga/desliga.
Use solamente óleos lubrificantes o grasas recomendadas o equivalentes .
Evite choques mecánicos , ellos pueden causar fallas o malo funcionamiento .
Evite que agua , suciedad o polvo entren en los componentes mecánicos y eléctricos de la
maquina .
NO ALTERE las caracteríscas originales de la maquina .
NO SUCIE , RASGUE O RETIRE CUALQUIER ETIQUETA DE SEGURIDAD O DE IDENTIFICACIÓN
. Caso alguna esté ilegible o perdida, solicite otra al Asistente Técnico mas cercano .
LEA ATENTAMENTE Y CON CUIDADO LAS ETIQUETAS DE SEGURIDAD Y DE IDENTIFICACIÓN
CONTENIDAS EN LA MAQUINA , ASÍ COMO LAS INSTRUCCIONES Y LAS TABLAS TÉCNICAS
CONTENIDAS EN ESTE MANUAL.
28
IMPORTANTE
Coloque Vaselina en el hueco de los volantes a cada 15 días. Observe la posición
de la hoja para no haber inversión. Los dientes deberán quedarse para el lado de
adelante de la maquina, con la inclinación para bajo.
IMPORTANTE
En el caso de algun item de las NOCIONES GENERALES DE SEGURIDAD no ser
aplicable en su producto, por favor desconsiderar el mismo.
Uso de abrasivos:
Esponjas o estropajos de acero y cepillos de acero en general, además de rallar la
superficie y comprometer la protección del acero inoxidable, dejan parculas que oxidan
y reaccionan, contaminando el acero inoxidable. Por eso, tales productos no deben ser
usados en la limpieza e higienización. Raspados hechos con instrumentos punagudos o
similares también deberán ser evitados.
Principales sustancias que causan la corrosión de los aceros inoxidables:
Polvos, grasas, engrases, aceites, soluciones ácidas como el vinagre, sucos de frutas u otros
ácidos, soluciones salinas (salmuera), sangre, detergentes (excepto los neutros), parculas
de aceros, residuos de esponjas o estropajos de acero común, además de otros pos de
abrasivos.
Las Nociones Generales de Seguridad fueran preparadas para orientar y instruir
adecuadamente a los operadores de las maquinas , así como aquellos que serán
responsables por su manutención .
La maquina solamente debe ser entregue al operador en buenas condiciones de uso , al
que el operador debe ser orientado cuanto al uso y a la seguridad de la maquina por el
Revendedor . El operador solamente debe usar la maquina con el conocimiento completo
de los cuidados que deben ser tomados , después de LER ATENTAMENTE TODO ESTE
MANUAL .
4.1 Praccas Básicas de Operación
4.1.1 Peligros
Algunas partes del accionamiento eléctrico presentan pontos o terminales con altos
voltajes . Cuando tocados pueden ocasionar graves choques eléctricos , o hasta la muerte
de una persona .
Nunca toque un comando manual ( botón , llave eléctrica , etc. ) con las manos , zapatos
4. Nociones Generales de Seguridad
17
·Adjust the blade according to descripon on item .2.2 Pre - Operaon
·Manually rotate the Wheel and check if the Blade is centered on it. Proceed like this unl
the blade is centered.
PICTURE 06
5.2.3 – Thickness Adjustment
The Thickness Guide # 12 (Pct 01) was developed to help user on cung and to improve
safety. Its main funcon is to provide cuts with the same thickness.
To adjust the Thickness Guide, follow the procedures below:
·Rotate theThickness Guide handle #.12 (Pic.01) an-clockwise to move the Thickness
Guide.
·Using the thickness guidel handle #15 (Pic.01), move the Thickness Guide horizontally
upon the Staonary Table #.07 (Pic.01), increasing or decreasing the distance between the
Thickness Guide and the Blade, according to your necessity.
·Rotate the thickness guide handle # 15 (Pic.01) clockwise to lock the Thickness Guide on
the desired posion.

18
PICTURE 07
6. General Advices
- Do not wear loose fing clothes while operang the unit. Do not use bracelets or any
other piece of jewelry. Have your hair always shortened and held up (use hair fishnets if
necessary) in a way it cannot reach any part of the machine. Roll up any loose sleeves.
- SKYMSEN is not responsible for any harm or injury caused by the negligent or inappropriate
use of this equipment by any operator. This equipment must be operated only by persons
whose age equals or exceeds 18 years old, in a safe and sound state of mind, free from the
influence of any kind of drugs and alcohol, that received proper training and instrucons
regarding the correct operaon of this machine, that are wearing correct and authorized
safety clothes. All and any kind of modificaons carried on and applied to this machine
immediately nullifies any kind of warranty and may result in harm and injuries to the
individuals operang this machine and to individuals that are located in the machine
surrounding areas while it is being operated.
- Under no circunstances place your hands in the moving parts of the machine while it
is being used. Make sure the machine has come to a complete stop before acessing the
processed ingredients.
27
IMPORTANTE
Soluciones ácidas, soluciones salinas, desinfectantes y determinadas soluciones
para esterilizar (hipocloritos, sales de amoníaco tetravalente, compuestos de
iodo, acido nítrico y otros), deben ser EVITADAS por no poder permanecer mucho
empo en contacto con el acero inoxidable.
3.2.5 Lave todas las partes con agua caliente y jabón, secándolas en seguida.
3.2.6 Nunca use herramientas como: cuchillas, tenedores, ganchos, o otros para remover
residuos de carne de la maquina . Para hacer eso use un cepillo de plásco.
3.2.7 Remonte los componentes siguiendo los pasos arriba inversamente. These
substances aack the stainless steel due to the CHLORINE on its composion, causing
corrosion spots (ping).
3.3 Cuidados con los aceros inoxidables
Los aceros inoxidables pueden presentar puntos de “corrosión”, que SIEMPRE SON
PROVOCADOS POR AGENTES EXTERNOS, principalmente cuando el cuidado con la limpieza
o higienización no sea constante y adecuado.
La resistencia a la corrosión del acero inoxidable se debe principalmente a la presencia
del cromo que, en contacto con el oxígeno, permite la formación de una finísima camada
protectora. Esta camada protectora se forma sobre toda la superficie del acero, bloqueando
la acción de los agentes externos que provocan la corrosión.
Cuando la camada protectora sufre un rompimiento, el proceso de corrosión es iniciado,
pudiendo ser evitado a través de la limpieza constante y adecuada.
Inmediatamente después de la ulización del equipamiento, es necesario proceder con
la limpieza, ulizando agua, jabón o detergentes neutros, aplicados con un paño suave o
esponja de nylon. A seguir, enjuagar con agua corriente, se debe enjugar e, inmediatamente
secar, con un paño suave, evitando la permanencia de humedades en las superficies y
principalmente en las grietas.
El enjuague y el secado son extremamente importantes para evitar el aparecimiento de
huellas o corrosiones.
Visto que generalmente poseen CLORO en su composición, tales sustancias atacan el acero
inoxidable, causando puntos de corrosión.
Mismo los detergentes ulizados en la limpieza domésca, no deben permanecer en
contacto con el acero inoxidable más de lo necesario, debiendo ser también removidos
con agua y la superficie deberá ser completamente seca.
26
3. Operación
3.1 Procedimiento para la operación
Sugerencia Siemsen.
Al usar la mesa fija , para facilitar el deslice del producto esparcer un poco de agua
sobre la mesa .
IMPORTANTE
Nunca coloque su mano en la dirección de la hoja para empujar el producto a ser
cortado. Para su mayor seguridad use guantes de acero.
Con la maquina desligada, ajuste el Regulador de corte (opcional) No.12.
Ligue la maquina colocando la llave Liga/Desliga No. 03 en la posición Liga.
Coloque el producto a ser procesado sobre la mesa fija No.07 o sobre la Mesa Movible
(opcional) No.08, empujandolo en dirección de la hoja No.06 . El producto debe estar en
contacto con Regulador de Corte No. 12 ( opcional ) para mantener el espesor deseado
de la tajada .
Después del corte de una tajada , al traer de vuelta el producto , cuide para que no toque
la parte de atrás de la hoja , para evitar que la hoja salga del volante .
Al usar la mesa fija , para facilitar el deslice del producto esparce un poco de agua sobre
la mesa .
3.2 Limpieza
Para hacer la limpieza desligue la maquina y desconectela de la red eléctrica. Todas las
partes que entren en contacto con la carne deben ser limpias .
3.2.1 Abra la puerta superior No.10 (Foto 01) y la Puerta Inferior No. 13 (Foto 01) rando
horizontalmente la manipula No. 15 (Foto 01) .
3.2.2 Afloje la hoja girando la manipula de control de tensión No.01 (Foto 01) en el
sendo an-horario, después rela de los volantes superior y inferior .
3.2.4 Rere el volante superior y inferior No.02, para eso es necesario sacar el clavillo
traba No.09 que está el la frente de los volantes.
19
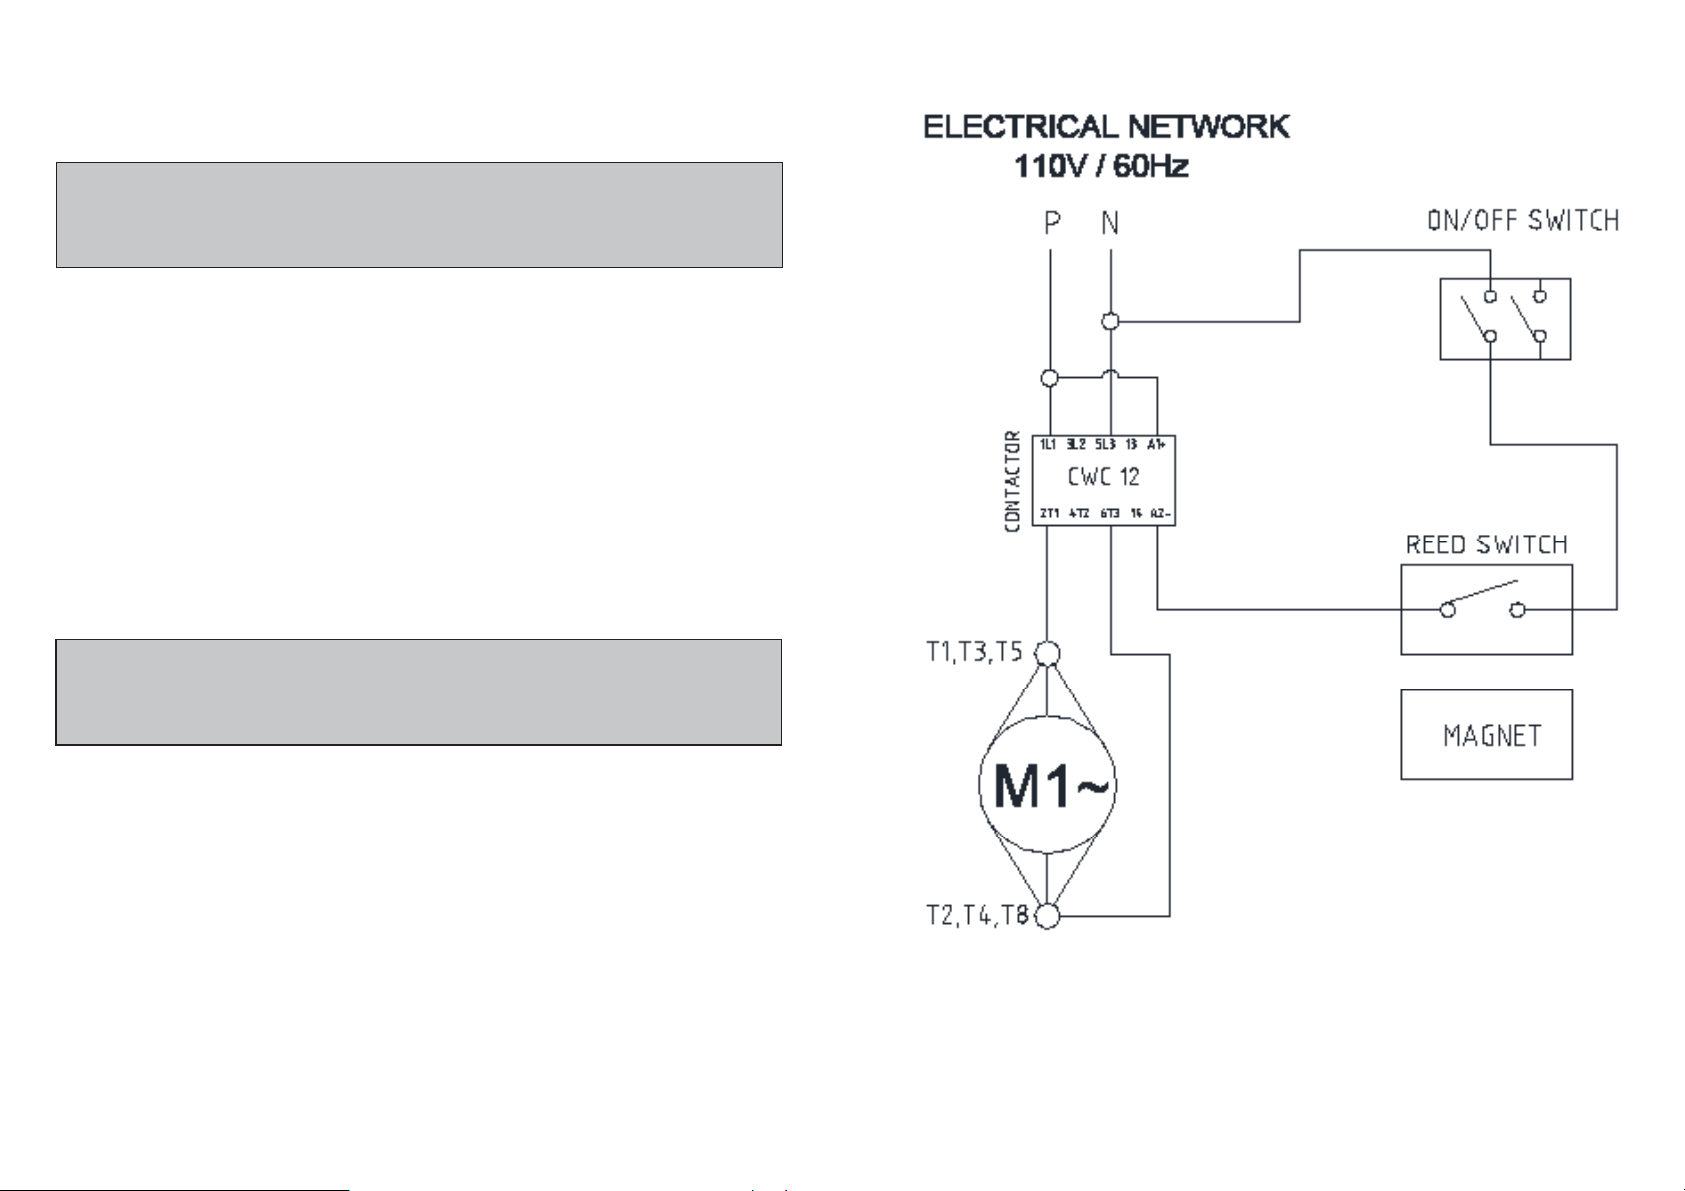
7. Electrical Diagram
20
INDICE
1. Introducción .................................................................................... 21
1.1 Seguridad .............................................................................................................21
1.2 Principales Componentes......................................................................................22
1.3 Caracteriscas Tecnicas.........................................................................................23
2. Instalación y Pre Operación ............................................................. 24
2.1 Installación ...........................................................................................................24
2.2 Pre Operación.......................................................................................................25
3. Operación........................................................................................ 26
3.1 Procedimiento para la operación ..........................................................................26
3.2 Limpieza ...............................................................................................................26
4. Nociones Generales de Seguridad.................................................... 28
4.1 Praccas Básicas de Operación .............................................................................28
4.2 Cuidados y Observaciones Antes de Ligar la Maquina ...........................................30
4.3 Inspección de Runa.............................................................................................30
4.4 Operación.............................................................................................................31
4.5 Después de Terminar el Trabajo ............................................................................31
4.6 Manutención ........................................................................................................31
4.7 Avisos ...................................................................................................................31
5. Problemas, Causas e Soluciones....................................................... 32
5.2 AJUSTE Y SUBSTITUICIÓN DE COMPONENTES ......................................................33
6. Consejos Generales.......................................................................... 35
7. Diagrama Eléctrico........................................................................... 36
SKYFOOD EQUIPMENT LLC - SERVICIO ................................................. 40
GARANTIA LIMITADA DE SKYFOOD ......................................................40
25
IMPORTANTE
La hoja debe estar bien calibrada. Use la manipula No.01 (Foto 01) girandola en
el sendo horario para lograr la tensión correcta de la hoja. Ulice el dibujo abajo
para idenficar aparentemente la tensión correcta de la hoja , antes de ligarla .
2.2 Pre Operación
Caso la maquina sea proveída con
el Calibrador de Tensión (opcional),
gire el manipulo Foto 01 (No.01),
hasta que el calibrador empiece a
escapar, eso significa que la hoja
alcanzo su tensión correcta.
Verifique si la maquina está firme, no debe ser permido ningún movimiento sobre la
superficie de soporte. Antes del uso, la hoja , los volantes y las puertas deben ser limpias
con agua y jabón neutro . Para auxiliarlo a rerar las partes removibles , favor leer el ítem
3.2 (pag. 06 ) LIMPIEZA .
FOTO 04
This manual suits for next models
1
Table of contents
Other Skyfood Saw manuals

Popular Saw manuals by other brands


Skil
Skil 5830 Original instructions

Altendorf
Altendorf ElmoDrive F45 operating manual

Bosch
Bosch GKS 235 PROFESSIONAL Original instructions

Craftsman
Craftsman 21221 - 12 in. Sliding Dual Bevel Compound Miter... Operator's manual

Stanley
Stanley V20 LITHIUM ION SBC550 Original instructions

Blaupunkt
Blaupunkt CR7010 Original instruction manual