SkyLine FREESAT 28222R User manual

1) Identify your South Facing Wall: The dish needs to be on a South facing wall in order to pick up the Astra 2A, 2B,
2D and Eurobird1 satellites. Identify your south facing wall and look to mount your satellite dish on the outside of
the wall, at the nearest point to your main TV. Tip: Look at your neighbours’houses someone is sure to have Sky, see
which way their dish is facing. If none of your neighbours have Sky, you can use a compass to determine which wall
faces south.
Please note that
the mounting
bracket can be
mounted on
either a wall or
a flat roof.
2) Check line of sight: Make sure there are
no obstructions (trees/tall buildings) in line
between the dish and the satellites.
The following website gives bearing/
direction by postcode,country:
http://www.dishpointer.com
3) Assemble the Dish and Brackets:
Before assembly check that your kit contains all the items
listed above. Assemble the dish and brackets as shown in the
diagram but do not yet attach to the wall mount arm (18).
LNB
FREESAT™ Installation Kit
SET-UP GUIDE
Wall Mount Roof Mount
1
28222R
Every satellite dish installation is
dierent in nature. To t suitable
brackets, xings and poles/masts you need to take into
consideration: a.) The state and type of surface being
mounted to. b.) The weight of the assembly to be mounted
c.) The exposure to and eect of prevailing winds.
Fixings
and brackets supplied with this product may not be suitable for
your particular installation.
If in doubt please consult a CAI
registered installer.
WARNING
GENERAL SAFETY The risk of accidents can be
greatly reduced by planning before starting a project.
Before starting installation check structure is sound and
check for hidden electrical wiring or plumbing. • When
working on an installation outside, beware of overhead
power lines. • Observe safe working practices, tread carefully
and ensure adequate lighting is available in loft or roof space.
• Before making any connections switch electricity o at the
mains. • Always follow manufacturer’s operating and safety
instructions before using tools and/or equipment.
• Only carry out work outdoors at height if you are
competent in the use of ladders and related access
equipment. • Always read and follow the manufacturer’s
instruction label axed to the ladder. • To avoid injury always
route cables or wiring carefully. Ensure cable is correctly
routed before xing into position, taking care not to over
tighten cable clips . • This product may contain small parts -
keep out of reach of children. • After installation make
regular maintenance checks for wear and tear.
This Freesat™ Installation Kit,can be fitted by a
competent DIYer, but please note warnings below.
List of Dish Assembly Parts -
for the rest of kit contents see page 4
No. Image Description Qty.
1M6 x 20mm bolts for LNB holder 2
2M6 x 12mm bolts for swivel
bracket/LNB holder 5
3PVC LNB arm inserts 2
4M6 x 30mm bolts for LNB arm 2
5M6 x 16mm bolts for dish xing 4
6M6 ange nuts for dish bracket 4
7 Washers 9
8M6 x 55mm bolts for mast clamp 2
9 M6 x 50mm expansion bolts 4
10 PVC cap for wall mount arm 1
11 Satellite dish 1
12 dish bracket 1
13 LNB arm 1
14 Mast bracket 1
15 Mast clamp 1
16 Upper part 40mm LNB holder 1
17 Lower part 40mm LNB holder 1
18 Wall mount arm Ø32mm 1
19 M6 nuts for LNB holder 2
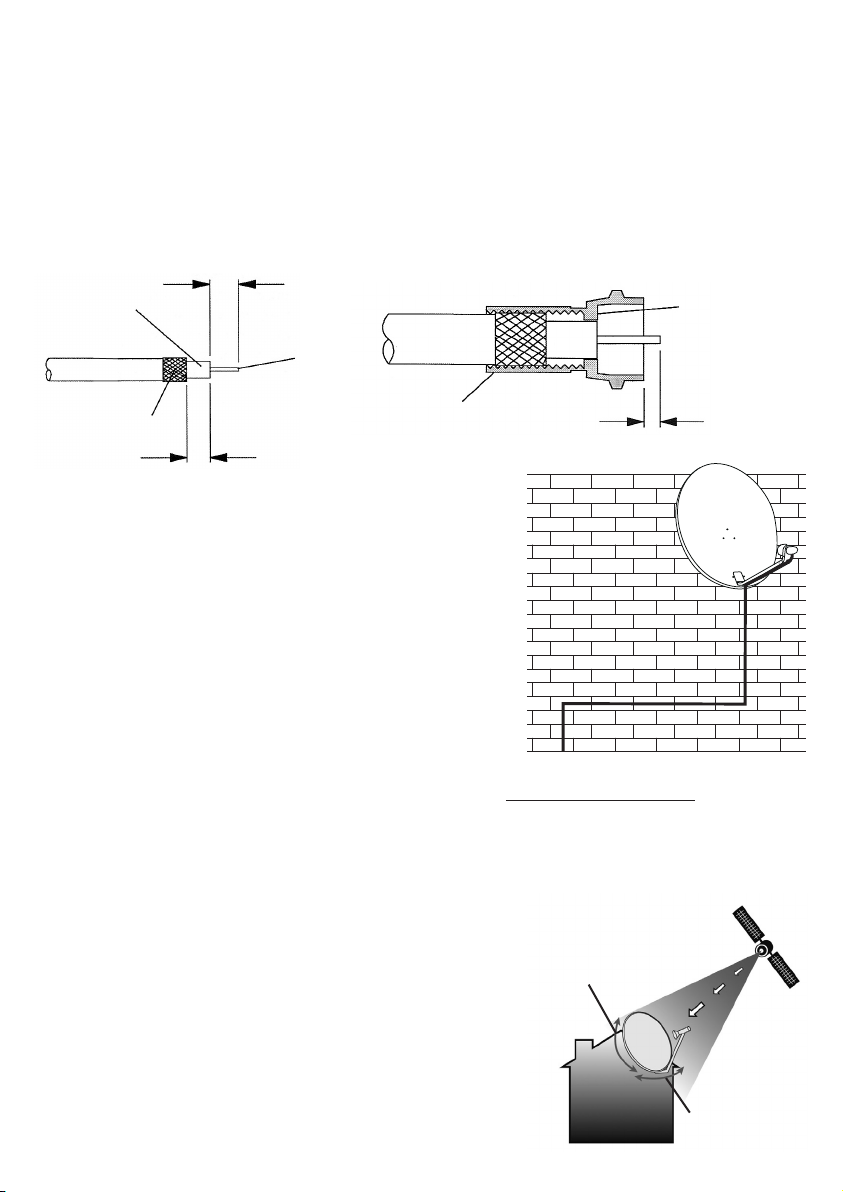
fold braid back
over sheath
8mm
inner
wire
remove
foil
6.5mm
screw connector
body onto cable
2mm approx.
end of
insulation
should be
ush with
this face
7) Run Cable Down the Wall: Once you have installed the dish you
need to run the cable to the room in which your receiver is going to be
installed. Start at the top and work down, you should clip the cable
every 50cm, always run the cable horizontally or vertically, never
diagonally across a wall.
8) Connect Cable to Satellite Receiver: The cable can be run into the
room by drilling a hole in through the window frame or the wall.
Once you have run the cable through to where you intend to position
the receiver, cut off any surplus cable and then fit the‘F’ connector
following the instructions in step 6. Screw the‘F’ connector to the LNB-in
terminal on your decoder.
9) Connect Satellite Receiver to your TV: Use a SCART lead and tune
the TV into AV1.
10) Align Satellite Dish: To obtain accurate settings go to the website: http://www.dishpointer.com
Enter your location and select satellite 28.2E Astr 2A,2B,2C and 2D. By locating your area on the map on the
website, the programme will give the precise settings that you will require to align to the satellites. If you do not
have access to the internet we have enclosed a chart showing settings for the key areas in the UK and Republic of
Ireland. Identify the town nearest to you and work on those settings.
Three settings are required:
a) Dish elevation - this is the angle that the dish has to be pointed
at the sky. This is done by aligning to the correct angle on the
elevation bracket.
b) Polarisation angle - this is the angle at which the LNB needs to be set at
in its mount. The LNB angle can be adjusted by loosening the screws of
the LNB mount and twisting the LNB to the correct position.
c) Azimuth angle - This is the compass direction required. For initial setting
you can use the compass supplied and then the satellite finder.
For fine tuning you will need two people, one person to align the dish and
the other to watch the TV screen for a signal quality and strength.
2
4) Mount the Wall Bracket: Mount the wall bracket (18) using the expansion bolts (9). Make sure that the mounting
holes are drilled into brick or stone and not into the mortar. Also ensure that the wall mount is horizontal and
perfectly level (check using a spirit level).
5) Attach Dish Assembly to Wall Bracket:
The complete dish assembly can now be attached to the wall bracket.
6) Prepare Digital Coax Cable: Firstly fit the LNB rubber weather boot provided,to the dish end of the cable.
Fitting the F connector: Strip the end of the cable as shown below.Once you have stripped the cable, twist the braid
and pull it back on itself, make sure that no braid is touching the copper core, this will cause a short on the cable
and you will not get any signal. Now, simply twist on the ‘F’ connector and connect to the LNB making sure that the
weather boot is correctly secured over the LNB connector.
Azimuth angle
Dish elevation

11) A satellite nder and a compass: have been included in the kit
to help you locate the satellite and set your dish in the optimum position.
a. First disconnect the downlead from the LNB mounted on your
satellite dish and connect the jumper lead supplied in its place,
connect the other end of the jumper lead to the F connection
on your Satellite Finder marked “Satellite LNB”.
b. Next connect the downlead (connected to the receiver) to the
“Receiver” connection on your Satellite Finder.
c. Ensure that your satellite receiver is switched on. The Satellite Finder’s power and signal strength LEDs will
light up, using the level control peg adjust the level control to reduce the number of lit red LEDs to 2 or 3 by
turning the control anti-clockwise (the pitch of the audible tone will also reduce).
d. Set your satellite dish to the correct azimuth and elevation settings. Using the compass supplied align the red
arrow to North 0˚ and then read o the correct azimuth angle.
e. Slowly scan the sky with the satellite dish (side to side movement) from around 5˚ either side of the correct
azimuth angle. The number of LEDs lit and the pitch of the tone will increase/decrease, if it does not then adjust
the elevation by half a degree and repeat the scan.
f. Keep adjusting the azimuth and elevation of the satellite dish so that you obtain the highest reading possible.
An audio signal also indicates the signal strength. If the signal reading goes beyond ‘6’ on the scale turn the
Level Control anti-clockwise to reduce the reading to ‘2’.
PLEASE NOTE: Do not use the Satellite Finder directly in front of your satellite dish - this can result in a continuous
full scale reading (ie. above ‘6’ LEDs). If the meter reading keeps jumping then adjust the Level Control on the
Satellite Finder. Turn anti-clockwise to lower the sensitivity.
12) Fine Tuning: Once you have set the dish position using the satellite nder you can ne tune the position using
the satellite receiver. Locate the signal levels function on your satellite receiver’s menu
You will probably notice that there is some signal strength straight away, don’t get excited, this is only reading ‘noise’
from the atmosphere.It is the signal quality that you need to concentrate on; this is reading a specific transponder
from the Astra 2A, 2B, 2D and Eurobird satellites.
With one person watching the screen, the other person needs to move the dish slowly around until the signal
quality and strength display starts to read a decent signal level, about 50% should be fine.The dish needs to be
within 0.1 of a degree of the satellite position (about 1mm in movement terms) when making these adjustments,
the quality and signal strength meter on the screen takes up to 5 seconds to register the signal, so you can’t just
sweep the dish around the sky, you need to make very precise, very subtle movements of the dish,stopping for
a few seconds after each movement. PLEASE NOTE Do not scan or search until you have a good signal QUALITY
reading (50%+).
If the Signal quality and strength readings are low on screen, but the satellite finder is indicating a strong signal then
you are aligned to another satellite, select other available satellites that may be giving a high signal strength like
Hotbird 13 E or Astra 1 19.2E,If Hotbird 13E shows high Signal and Quality level readings on screen, you need to turn
the dish 14 degrees towards the East to find the Astra 2 satellite,you may find another satellite as you turn the dish,
which is Astra 1 19.2E, If Astra 1 19.2E shows high Signal and Quality level readings on screen, you need to turn the
dish 9 degrees towards the East to find Astra 2.
Once you have some signal quality and strength, make tiny movements of the dish horizontally and vertically to find
the best signal quality. When you have at least 50% signal quality, tighten the dish up, remove the jumper cable and
your Satellite Finder, then reconnect the LNB to your satellite receiver. Your dish installation is complete.
3
To
Receiver
To
LNB
Level Control Peg
Insert Peg To
Control Level

Should you experience any difficulty in setting up your Free-to-Air Digital Satellite Kit,
download: technical.philex.com/downloads/Free to Air Satellite Installation Instructions.pdf
(or call our Customer Careline: 0901 293 0038. Calls are charged at £1 per minute from a BT
landline. Call charges from other networks may vary.)
To locate a CAl approved Satellite Installer in you area you can connect to the CAl website
http://cai.org.uk/asp/installer.asp
Other useful websites:
http://www.liveonsat.com
http://www.lyngsat.com
http://www.satcodx.com
http://www.dishpointer.com
Suggested list of useful tools not included:
Masonry drill and bit, adjustable wrench or spanners,
crosshead screwdriver, spirit level, hammer and cable strippers.
Kit Contents:
•60 cm satellite dish with fixings and wall mount
•Digital Low Noise Block (LNB)
•10 Metres of Digital Coaxial Cable
•Cable clips
•2x F type connectors
•Weather boot
•SCART lead
•Satellite finder
•Compass
4

Town County Elevation Azimuth Polarization
Aberdeen Aberdeenshire 19.76 145.17 -10.55
Abergavenny Gwent 23.96 142.37 -14.66
Aberystwyth Dyfed 23.05 141.46 -14.84
Alnwick Northumberland 21.39 145.06 -11.48
Ampthill Bedfordshire 24.77 145.24 -13.03
Athlone West Meath 20.62 137.71 -16.14
Aviemore Highland 19.12 143.34 -11.37
Ayr Ayrshire 20.32 141.85 -13.04
Ban Aberdeenshire 19.16 144.87 -10.43
Barnstaple Devon 24.16 140.96 -15.81
Basingstoke Hampshire 25.22 144.29 -13.92
Bath Avon 24.61 142.91 -14.61
Belfast Antrim 20.53 140.27 -14.24
Berwick-Upon-Tweed Northumberland 20.96 144.86 -11.38
Birmingham West Midlands 23.84 143.83 -13.57
Blackpool Lancashire 22.27 143.06 -13.28
Bodmin Cornwall 24.38 139.98 -16.66
Boston Lincolnshire 24.10 146.10 -12.12
Bournemouth Dorset 25.37 143.19 -14.80
Brecon Powys 23.71 142.02 -14.79
Brighton & Hove East Sussex 25.95 145.16 -13.65
Bristol Avon 24.44 142.68 -14.70
Bude Cornwall 24.17 140.33 -16.29
Burnley Lancashire 22.59 143.95 -12.84
Bury Saint Edmunds Suolk 25.02 146.66 -12.16
Caernarfon Gwynedd 22.36 141.52 -14.41
Cambridge Cambridgeshire 24.85 145.97 -12.56
Campbeltown Argyll & Bute 19.96 140.89 -13.47
Cardi Mid Glamorgan 24.19 142.06 -15.01
Cardigan Ceredigion 23.08 140.69 -15.41
Carlisle Cumbria 21.40 143.56 -12.48
Carmarthen Carmarthenshire 23.42 140.98 -15.39
Cavan Cavan 20.41 138.52 -15.41
Chelmsford Essex 25.37 146.21 -12.64
Chester Cheshire 22.86 143.01 -13.63
Colwyn Clwyd 22.43 142.12 -14.03
Cork Cork 21.57 136.57 -17.60
Coventry West Midlands 24.05 144.26 -13.37
Crainlarich Stirlingshire 19.53 142.26 -12.31
Dingwall Highland 18.58 142.81 -11.40
Dolgellau Gwynedd 22.84 141.78 -14.49
Douglas Isle of Man 21.44 141.64 -13.81
Dover Kent 26.23 146.91 -12.53
Dublin(Baile Atha Cliath) Dublin 21.36 139.47 -15.30
Dundee Angus 20.02 144.02 -11.43
Edinburgh Midlothian 20.39 143.60 -11.91
Elgin Grampian 18.91 144.01 -10.83
Exeter Devon 24.69 141.40 -15.76
Felixstowe Suolk 25.51 147.27 -11.96
Fishguard Dyfed 23.02 140.32 -15.65
Satellite alignment settings for Astra 2A, 2B, 2D and Eurobird 1
28.2 Degrees East for the UK and Eire (English Language Channels)
For other satellite settings see www.dishpointer.com
Mainland UK
5

Town County Elevation Azimuth Polarization
Folkestone Kent 26.24 146.76 -12.64
Fort William Highland 19.00 141.86 -12.26
Gairloch Highland 18.08 141.56 -11.90
Galway/Gaillimh Galway 20.28 136.52 -16.80
Glasgow Lanarkshire 20.09 142.45 -12.50
Gloucester Gloucestershire 24.24 143.22 -14.20
Great Yarmouth Norfolk 25.04 147.96 -11.29
Grimsby Lincolnshire 23.61 146.25 -11.78
Guildford Surrey 25.45 144.84 -13.64
Hastings East Sussex 26.22 146.01 -13.17
Hereford Hereford and Worcester 23.89 142.79 -14.33
Holyhead Gwynedd 22.09 141.17 -14.51
Ipswich Suolk 25.35 147.08 -12.02
Kendal Cumbria 21.95 143.56 -12.77
Killarney Kerry 20.99 135.57 -17.99
Kilmarnock Ayrshire 20.22 142.13 -12.79
King’s Lynn Norfolk 24.45 146.46 -12.04
Kingston upon Hull Humberside 23.30 145.98 -11.82
Kyle of Lochalsh Highland 18.42 141.37 -12.23
Lancaster Lancashire 22.17 143.40 -12.99
Largs Ayrshire 19.97 141.80 -12.86
Larne Antrim 20.35 140.47 -14.00
Leeds Yorkshire 22.83 144.69 -12.45
Leicester Leicestershire 24.00 144.74 -13.00
Limerick Limerick 20.93 136.72 -17.07
Lincoln Lincolnshire 23.70 145.62 -12.26
Liverpool Merseyside 22.63 142.99 -13.52
London Greater London 25.37 145.48 -13.15
Londonderry Londonderry 19.65 138.93 -14.64
Ludlow Shropshire 23.63 142.89 -14.12
Luton Bedfordshire 24.93 145.26 -13.09
Lyme Regis Dorset 24.92 142.04 -15.41
Maidstone Kent 25.83 146.07 -12.95
Mallaig Highland 18.59 141.16 -12.47
Manchester Greater Manchester 22.87 143.85 -13.05
Middlebrough North Yorkshire 22.30 145.38 -11.73
Moat Dumfries and Galloway 20.85 143.14 -12.46
Montrose Angus 20.01 144.64 -11.02
Newark upon Trent Nottinghamshire 23.74 145.24 -12.53
Newcastle upon Tyne Tyne and Wear 21.78 145.03 -11.69
Newhaven East Sussex 26.07 145.35 -13.57
Newry Down 20.70 139.69 -14.75
Newtown Isle of Wight 25.58 143.72 -14.51
Northampton Northamptonshire 24.45 144.93 -13.09
Norwich Norfolk 24.89 147.45 -11.56
Nottingham Nottinghamshire 23.69 144.81 -12.81
Oban Argyll & Bute 19.21 141.36 -12.71
Oxford Oxfordshire 24.75 144.27 -13.71
Peebles Borders 20.69 143.56 -12.09
Pembroke Pembrokeshire 23.30 140.27 -15.84
Penrith Cumbria 21.68 143.70 -12.53
Perth Perth & Kinross 19.94 143.52 -11.71
Peterborough Cambridgeshire 24.40 145.70 -12.54
Peterhead Aberdeenshire 19.54 145.63 -10.16
Pitlochry Perth & Kinross 19.57 143.31 -11.65
6

Town County Elevation Azimuth Polarization
Plymouth Devon 24.69 140.59 -16.37
Portree Skye 18.13 140.90 -12.37
Reading Berkshire 25.10 144.44 -13.76
Rosslare Wexford 22.20 138.93 -16.21
Scarborough Yorkshire 22.82 146.12 -11.49
Settle Yorkshire 22.35 144.00 -12.68
Sevenoaks Kent 25.70 145.72 -13.13
Sheeld South Yorkshire 23.22 144.63 -12.70
Shrewsbury Shropshire 23.32 143.02 -13.87
Sligo Sligo 19.74 137.48 -15.74
Southampton Hampshire 25.40 143.80 -14.37
Staord Staordshire 23.49 143.74 -13.45
Stirling Stirlingshire 19.99 142.84 -12.18
Stoke on Trent Staordshire 23.28 143.71 -13.36
Stranraer Dumfries and Galloway 20.61 141.31 -13.56
Stratford-upon-Avon Warwickshire 24.18 143.95 -13.65
Swansea (Abertawe) Swansea 23.76 141.28 -15.35
Swindon Wiltshire 24.24 143.41 -14.06
Tain Highland 18.54 143.28 -11.08
Thirsk North Yorkshire 22.55 145.07 -12.06
Thurso Highland 18.05 144.11 -10.28
Torquay Devon 24.92 141.31 -15.96
Tralee (Tra Li) Kerry 20.73 135.45 -17.92
Truro Cornwall 24.40 139.56 -17.00
Uig Skye 17.20 140.31 -12.17
Ullapool Highland 18.08 142.14 -11.54
Waterford Waterford 21.90 138.12 -16.62
Watford Hertfordshire 25.13 145.20 -13.24
Westport Mayo 19.65 136.21 -16.62
Weymouth Dorset 25.22 142.51 -15.22
Wick Highland 18.32 144.51 -10.19
Worcester Hereford and Worcester 23.97 143.38 -13.95
Workington Cumbria 21.37 142.79 -12.98
Yeovil Somerset 24.86 142.45 -15.08
York North Yorkshire 22.88 145.25 -12.10
7

8
Waste electrical and electronic products must
not be disposed of with household waste.
Please recycle where facilities exist. Check with
your Local Authority for recycling advice.
For further information, please contact:
Customer Careline: 0901 293 0038.
Calls are charged at £1 per minute from a BT landline.
Call charges from other networks may vary.
Technical Support: http://technical.philex.com
© Philex Electronic Ltd.2009. v1.7
Table of contents
Popular Antenna manuals by other brands

Ubiquiti
Ubiquiti airMAX Omni AMO-5G10 quick start guide

Proxim
Proxim Antenna Tsunami MP.11 installation guide

Mohu
Mohu Sail instructions

TERK Technologies
TERK Technologies AM/FM Tower Powered Indoor Antenna owner's manual

Steren
Steren ANT-1550 instruction manual

Globalstar
Globalstar Sat-Fi2 Quick installation guide


Laird
Laird VLQ69273B21J Assembly and installation instructions

Funkwerk
Funkwerk GSM 900 manual

Hama
Hama 44291 operating instructions

Winegard
Winegard AIR 360+ Installation & operation manual

Intellian
Intellian V60 Installation and operation guide

Andrew
Andrew 7.3-Meter ESA Installation, operation and maintenance