Proxim Antenna Tsunami MP.11 User manual

P/N 68333r1
Tsunami MP.11
Version 2.0
Antenna Installation Guide

TsunamiMP.11 Antenna Installation Guide
Contents
CONTENTS ................................................................................................................................................. 2
Figures .................................................................................................................................................. 3
Tables .................................................................................................................................................... 4
ABOUT THIS BOOK................................................................................................................................... 5
Who Should Use This Guide................................................................................................................. 5
Finding Additional Information............................................................................................................... 5
About the Tsunami MP.11...................................................................................................................... 6
CHAPTER 1. PREPARING FOR INSTALLATION .................................................................................... 8
Site Prerequisites .................................................................................................................................. 8
Overview of the Indoor Installation........................................................................................................ 8
Overview of the Outdoor Installation ................................................................................................... 12
Before Climbing the Roof.................................................................................................................... 17
CHAPTER 2. DETERMINING RANGE AND CLEARANCE ................................................................... 18
Determining the Outdoor Range ......................................................................................................... 18
Data Speed of the Wireless Link......................................................................................................... 22
Point-to-Multipoint Network................................................................................................................. 31
CHAPTER 3. INSTALLING THE ANTENNA ........................................................................................... 33
Planning Antenna Installation.............................................................................................................. 33
Safety Precautions .............................................................................................................................. 33
Installation Overview ........................................................................................................................... 34
Mounting the Antenna ......................................................................................................................... 35
APPENDIX A. ANTENNA CABLING SYSTEM ....................................................................................... 38
Outdoor Cabling Components............................................................................................................. 38
Selecting the Correct Connector Type ................................................................................................ 38
Surge Arrestor ..................................................................................................................................... 40
Low-Loss Antenna Cable .................................................................................................................... 42
APPENDIX B. 14 DBI DIRECTIONAL ANTENNA .................................................................................. 44
General Description ............................................................................................................................ 44
Contents of the Antenna Box .............................................................................................................. 44
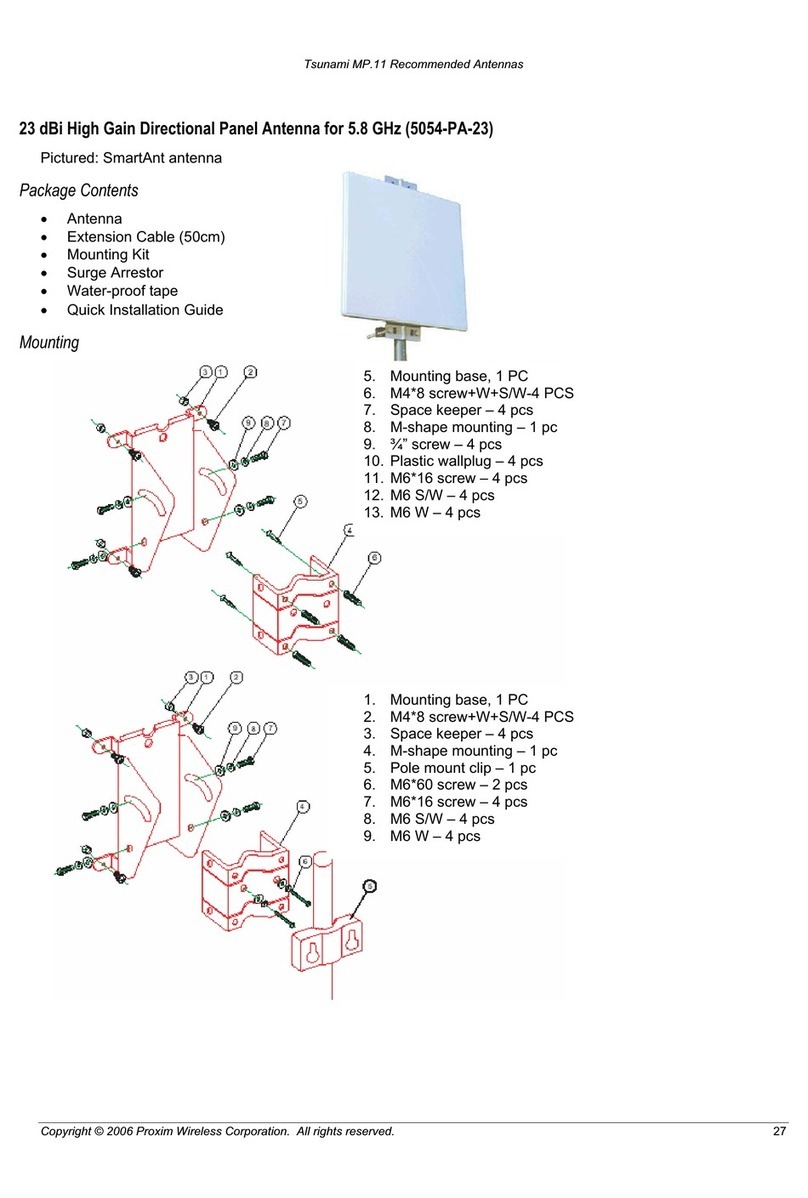
Mounting the Directional Antenna ....................................................................................................... 44
Technical Specifications ...................................................................................................................... 46
Pattern................................................................................................................................................. 47
APPENDIX C. 7 DBI OMNI-DIRECTIONAL BASE UNIT ANTENNA ..................................................... 49
General Description ............................................................................................................................ 49
Mounting the Omni-directional Antenna.............................................................................................. 49
Technical Specifications ...................................................................................................................... 50
Pattern................................................................................................................................................. 51
APPENDIX D. 10 DBI OMNI-DIRECTIONAL BASE UNIT ANTENNA ................................................... 53
General Description ............................................................................................................................ 53
Mounting Instructions.......................................................................................................................... 53
Technical Specifications ...................................................................................................................... 54
Pattern................................................................................................................................................. 55
APPENDIX E. 12 DBI DIRECTIONAL WIDE ANGLE ANTENNA .......................................................... 57
General Description ............................................................................................................................ 57
Mounting Instructions.......................................................................................................................... 57
Technical Specifications ...................................................................................................................... 58
Pattern................................................................................................................................................. 59
Contents 2
CPN 68333 R1 Issue Date: May 2004

TsunamiMP.11Antenna Installation Guide
APPENDIX F. 24 DBI DIRECTIONAL PARABOLIC GRID ANTENNA................................................... 61
General Description ............................................................................................................................ 61
Kit Contents......................................................................................................................................... 61
Assembling the Antenna ..................................................................................................................... 62
Mounting the Antenna ......................................................................................................................... 63
Technical Specifications ...................................................................................................................... 64
Horizontal Pattern ............................................................................................................................... 65
Vertical Pattern.................................................................................................................................... 66
APPENDIX G. 5 DBI OMNI-DIRECTIONAL ANTENNA.......................................................................... 67
General Description ............................................................................................................................ 67
Technical Specifications ...................................................................................................................... 68
Pattern................................................................................................................................................. 69
APPENDIX H. HIGH GAIN PANEL DIRECTIONAL ANTENNA FOR 2.4 GHZ ...................................... 71
General Description ............................................................................................................................ 71
Mounting Instructions.......................................................................................................................... 71
Coverage............................................................................................................................................. 72
Hardware Specifications ..................................................................................................................... 72
Pattern................................................................................................................................................. 73
APPENDIX I. CERTIFIED OUTDOOR SOLUTIONS............................................................................... 74
Introduction ......................................................................................................................................... 74
Selecting the Correct Cables .............................................................................................................. 75
ETSI Regulated Countries .................................................................................................................. 75
FCC Regulated Countries................................................................................................................... 75
Japanese Regulated Country.............................................................................................................. 76
Regulatory Information........................................................................................................................ 76
SUPPORT AND WARRANTY................................................................................................................... 77
Technical Support................................................................................................................................ 77
Warranty and Repair ........................................................................................................................... 77
FIGURES
Figure 1. Point-to-Point Link ....................................................................................................................... 6
Figure 2. Point-to-Multipoint Network ......................................................................................................... 7
Figure 3. Cable Setup for Indoor Installation.............................................................................................. 9
Figure 4. Potential Obstacles for a Directional Antenna........................................................................... 13
Figure 5. Fresnel Zone ............................................................................................................................. 24
Figure 6. Clearance Factor Diagram ........................................................................................................ 26
Figure 7. Calculating Point-to-Point Range .............................................................................................. 28
Figure 8. Calculating Point-to-Multipoint Range....................................................................................... 31
Figure 9. Surge Arrestor ........................................................................................................................... 40
Figure 10. Mounting 14 dBi Antenna to a Mast ........................................................................................ 45
Figure 11. Azimuth Plane (Horizontal), 14 dBi Directional Antenna ......................................................... 47
Figure 12. Elevation Plane (Vertical), 14 dBi Directional Antenna ........................................................... 48
Figure 13. Mounting the 7 dBi Antenna to a Mast .................................................................................... 50
Figure 14. Azimuth Plane (Horizontal), 7 dBi Omni-Directional Base Unit Antenna ................................ 51
Figure 15. Elevation Plane (Vertical), 7 dBi Omni-Directional Base Unit Antenna................................... 52
Figure 16. Mounting the 10 dBi Antenna .................................................................................................. 53
Figure 17. Azimuth Plane (Horizontal), 10 dBi Omni-Directional Base Unit Antenna .............................. 55
Figure 18. Elevation Plane (Vertical), 10 dBi Omni-Directional Base Unit Antenna................................. 56
Figure 19. Mounting the 12 dBi Wide Angle Antenna............................................................................... 57
Figure 20. Azimuth Plane (Horizontal), 12 dBi Directional Wide Angle Antenna...................................... 59
Figure 21. Elevation Plane (Vertical), 12 dBi Directional Wide Angle Antenna ........................................ 60
Contents 3
CPN 68333 R1 Issue Date: May 2004

TsunamiMP.11Antenna Installation Guide
Figure 22. Assemble the Reflector ........................................................................................................... 62
Figure 23. Determine Polarization............................................................................................................ 62
Figure 24. Attach Mounting Bracket ......................................................................................................... 63
Figure 25. Azimuth Plane (Horizontal), 24 dBi Directional Parabolic Grid Antenna ................................. 65
Figure 26. Elevation Plane (Vertical), 24 dBi Directional Parabolic Grid Antenna ................................... 66
Figure 27. 5 dBi Omni-Directional Antenna .............................................................................................. 67
Figure 28. Azimuth Plane (Horizontal), 5 dBi Omni-Directional Antenna ................................................. 69
Figure 29. Elevation Plane (Vertical), 5 dBi Omni-Directional Antenna.................................................... 70
TABLES
Table 1. Maximum Outdoor Range for FCC Products, Part 1 .................................................................. 21
Table 2. Maximum Outdoor Range for FCC Products, Part 2 .................................................................. 21
Table 3. Maximum Range for ETSI/FR/JP Products ................................................................................ 22
Table 4. Cable Factor ............................................................................................................................... 23
Table 5. FCC Outdoor Range with 10 m 933 ft) Clearance, Part 1 .......................................................... 26
Table 6. FCC Outdoor Range with 10 m 933 ft) Clearance, Part 2 .......................................................... 27
Table 7. Standard N-Type Connector Diagram......................................................................................... 38
Table 8. Reverse Polarity-N Cabling Diagram.......................................................................................... 39
Table 9. Specifications: Surge Arrestor.................................................................................................... 41
Table 10. Specifications 6 m (20 ft) Antenna Cable.................................................................................. 42
Table 11. Specifications 22 m (75 ft) Antenna Cable ................................................................................ 42
Table 12. Specifications 15 m (50 ft) Antenna Cable................................................................................ 43
Table 13. Specifications 14 dBi Directional Antenna ................................................................................ 46
Table 14. Specifications 7 dBi Omni-Directional Base Unit Antenna........................................................ 51
Table 15. Specifications 10 dBi Omni-Directional Base Unit Antenna...................................................... 54
Table 16. Specifications 12 dBi Directional Wide Angle Antenna ............................................................. 58
Table 17. Specifications 24 dBi Directional Parabolic Grid Antenna ........................................................ 64
Table 18. Specifications 5 dBi Omni-Directional Antenna ........................................................................68
Table 19. Certified Cable and Antenna Combinations FCC ..................................................................... 75
Table 20. Certified Channel and Antenna Combinations FCC ................................................................. 76
Contents 4
CPN 68333 R1 Issue Date: May 2004
TsunamiMP.11Antenna Installation Guide
About This Book
This Tsunami MP.11 Antenna Installation Guide explains how to install and set up an outdoor antenna with
the Tsunami MP.11 hardware.
This guide does not explain how to erect antenna masts, nor how to install a safety grounding system.
These prerequisites must be in place before installing the directional antenna.
WHO SHOULD USE THIS GUIDE
The installation of outdoor wireless links requires technical expertise. At the very least, you should be able to:
▪Install and configure the network components, such as the Tsunami MP.11 hardware.
▪Understand, or have a working knowledge of, installation procedures for network operating systems
using Microsoft Windows.
▪Mount the outdoor antenna and surge arrestor. Proxim Corporation recommends the installation is
performed by a qualified antenna installation service.
WARNING!
The Tsunami outdoor antennas are intended for mounting on a roof or on the side of a building. Installation is
not to be attempted by someone who is not trained or experienced in this type of work. The antenna must be
installed by a suitably trained professional installation technician or a qualified antenna installation service. The
site prerequisites must be checked by a person familiar with the national electrical code and other regulations
governing this type of installation.
FINDING ADDITIONAL INFORMATION
Installing Tsunami MP.11 Hardware
Tsunami outdoor antennas typically are used in combination with Tsunami MP.11 systems. The hardware
installation of these devices is described in the installation guide included with each product.
Configuration and Management
The configuration and management of outdoor wireless links is done with management tools which come
with the Tsunami MP.11 systems. Some examples of management tools are:
º Web-based management
º Telnet
º Wireless Network Manager
Hardware Specifications
Tsunami MP.11 hardware and radio frequency specifications are described in the documentation that
comes with the product. Hardware specifications for the outdoor antennas, the cabling system, and the
surge arrestor are listed in Appendixes of this guide.
About this Book 5
CPN 68333 R1 Issue Date: May 2004
TsunamiMP.11Antenna Installation Guide
Additional Files on Your Software CD-ROM
All software CD-ROMs that come with your Tsunami products, include a readme.txt file. This file
contains information about the software version and drivers. You are advised to print and read the
readme.txt file prior to installing your Tsunami products, as it may contain additional information that was
not available when this document was printed.
Other Sources of Information
All documentation listed above can be downloaded from the Proxim website: http://www.proxim.com.
Visit the website regularly for the latest available information and documentation, software updates and
other Proxim news.
ABOUT THE TSUNAMI MP.11
The Tsunami MP.11 lets you set up a wireless system based upon two basic topologies:
▪Point-to-point link to connect one location to another
▪Point-to-multipoint link to connect one location to two or more other locations.
A link between two locations always consists of a Base Unit and a Subscriber Unit. A Base Unit can,
depending upon its configuration, connect to one or more Subscriber Units; a Subscriber Unit, however, can
connect to only one Base Unit.
Point-to-Point Link
With a Base Unit and a Subscriber Unit, it is easy to set up a wireless point-to-point link as depicted in the
following figure.
Figure 1. Point-to-Point Link
About this Book 6
CPN 68333 R1 Issue Date: May 2004

TsunamiMP.11Antenna Installation Guide
The point-to-point link function lets you set up a connection between two locations as an alternative to:
▪Leased lines in building-to-building connections
▪Wired Ethernet backbones between wireless access points in hard-to-wire environments
Point-to-Multipoint Network
To connect more than two buildings, you can choose to:
▪Set up multiple point-to-point links, using multiple pairs of Base and Subscriber Units
▪Set up a single point-to-multipoint network using a single Base Unit and multiple Subscriber Units, as
depicted in the following figure.
Figure 2. Point-to-Multipoint Network
The system in this figure is designed as follows:
▪The central building (c) is equipped with the Base Unit, connected to either an omni-directional or a wide
angle antenna.
▪The two other buildings (aand b)are both equipped with a Subscriber Unit connected to a directional
antenna.
Note: Depending upon local radio regulations and legislation, the outdoor antenna solutions described in
this document may not be available in all parts of the world. Consult “Appendix I. Certified Outdoor
Solutions” on page 71 for more information.
About this Book 7
CPN 68333 R1 Issue Date: May 2004

TsunamiMP.11Antenna Installation Guide
Chapter 1. Preparing for Installation
SITE PREREQUISITES
Review all requirements outlined within the following sections before starting the installation procedure:
▪Overview of the Indoor Installation
▪Overview of the Outdoor Installation
▪Climbing the Roof
Prior to climbing on the roof or any other area where you intend to install the outdoor antenna, you are
advised to:
▪Verify that you have arranged all safety measures for outdoor or rooftop installation.
▪Verify that you have all equipment and tools required to install the outdoor antennas.
▪Install and verify proper operation of the equipment.
OVERVIEW OF THE INDOOR INSTALLATION
The indoor installation of the link consists of the following components:
▪The Tsunami MP.11 hardware
▪A cable system
Tsunami MP.11 Hardware
There are two types of hardware devices to setup a wireless link:
▪Tsunami MP.11 Base Unit
▪Tsunami MP.11 Subscriber Unit
▪Tsunami MP.11 Residential Subscriber Unit
Tsunami MP.11
The following figure shows an overview of the cable setup for this outdoor antenna. When the MP.11 is not
mounted close to the entrance of the antenna cable into the building (where the surge arrestor must be
mounted), an additional cable between the surge arrestor is needed, plus a female-female converter
connector. If the MP.11 is mounted close to the surge arrestor, the MP.11 can be connected directly to the
surge arrestor.
Chapter 1. Preparing for Installation 8
CPN 68333 R1 Issue Date: May 2004

TsunamiMP.11Antenna Installation Guide
connect to N-type
male connector
pigtail extending
from MP.11 unit
Figure 3. Cable Setup for Indoor Installation
On each end of the wireless link you will require the following items:
▪A Tsunami MP.11 Base Station or Subscriber Unit
▪A low-loss antenna cable to connect the indoor installation to the surge arrestor
▪A surge arrestor to protect your sensitive Tsunami MP.11 equipment from static discharge and transients
▪A low-loss antenna cable to connect the surge arrestor to the outdoor antenna
▪Female-female converter connector
▪Two outdoor antennas
▪A grounding system as described in “Grounding System” on page 16.
Placement of the Tsunami MP.11 Hardware
The electronics (power supply and unit) are designed for indoor mounting and operation. The ideal location
must satisfy the following requirements:
▪The location provides a connection to a grounding type AC wall outlet (100-240 VAC), using the standard
power cord supplied with the unit.
▪The ground of the AC wall outlet must be connected to the same grounding system as the surge arrestor
and antenna mast (see “Grounding System” on page 16).
▪The location must allow for easy disconnection of the Tsunami MP.11 hardware from the AC wall outlet.
▪The location provides a connection to the network backbone (an Ethernet LAN cable that is connected to
a hub, bridge, or directly into a patch panel)
Chapter 1. Preparing for Installation
CPN 68333 R1 Issue Date: May 2004
9

TsunamiMP.11Antenna Installation Guide
▪The location is as close as possible to the point where the antenna cable will enter the building (see
“Placement of the Surge Arrestor” on page 11).
▪The ideal location has a temperature of 0-55 degrees Celsius and a maximum relative humidity (non-
condensing) of 95%.
CAUTION! The Tsunami MP.11 hardware, the surge arrestor, and the antenna mast must be
connected to the same grounding system.
Cable System
CAUTION! The Tsunami MP.11 products are designed for indoor installation. At all times the
location of the Tsunami MP.11 radio unit and power supply must be indoors, to protect
the unit from extreme weather conditions, excessive heat and humidity, and to keep the
unit free from vibration and dust. The antenna and surge arrestor can be placed
outdoors.
Prior to mounting the Tsunami MP.11, you are advised to calculate carefully:
▪The distance between the intended location of your Tsunami MP.11 hardware and the location of the
antenna mast
▪The height of the antenna on the mast.
If the low-loss antenna cable is not long enough to cover this distance you can select another:
▪Cable length from the Proxim Systems low-loss cable offering
▪Location that satisfies the requirements listed previously to mount your Tsunami MP.11 hardware
As the length of the antenna cable may affect the actual range of your outdoor antenna installation, the last
option is preferred.
WARNING! You must not change the length of the low-loss antenna cable to a length shorter than
allowed by the radio’s certifications (see “Appendix I. Certified Outdoor Solutions “ on
page 71. Shortening the cable will void the Proxim Corporation warranty and may
conflict with radio certifications or approvals.
How to install the Tsunami MP.11 hardware is described in Tsunami MP.11 Installation and Management,
which comes on the Tsunami MP.11 product CD.
Chapter 1. Preparing for Installation
CPN 68333 R1 Issue Date: May 2004
10

TsunamiMP.11Antenna Installation Guide
Placement of the Surge Arrestor
The surge arrestor is an indispensable part of your outdoor antenna installation. It protects your sensitive
electronic equipment from transients or electro-static discharges at the antenna.
For optimal protection, the surge arrestor must be installed at a location that satisfies the following
requirements:
▪A location as close to the location where the antenna cable will enter the building (see “Placement of the
Tsunami MP.11 Hardware” on page 9).
▪The location allows for easy disconnection of the surge arrestor from the cable connected to the unit.
▪The location provides a connection to the same grounding system as the Tsunami MP.11 hardware and
the outdoor antenna mast (as described in “Grounding System” on page 16).
Antenna Cable Route
The antenna cable must be connected from the antenna through the surge arrestor to the pigtail connector of
the MP.11 unit. To plan the route of the antenna cable, consider the following:
▪Does the cable route require drilling through a wall or ceiling?
▪Do you have a building plan of the desired location showing other cabling routes like electricity,
telephone or networking?
▪Does the type of building materials require special drilling tools?
The cable should not be installed into tight positions, as bending or applying excessive force to the
connectors can damage the antenna cable. Always allow the cable to bend naturally around corners. The
recommended bend radius is at least 100 mm (4 in) or more for the low-loss cable of 10 mm (3/8 in)
diameter.
The cable must be secured along the complete distance between attachment points. No part of the antenna
cable should be allowed to hang free. This is particularly important for outdoor cable parts.
CAUTION!
▪The antenna cable and cable connectors are not designed to withstand excessive force:
º Do not use the connectors as ‘cable grips’ to pull cable through raceways or conduits.
º Do not use the cable connector to support the weight of the cable during or after installation.
º Do not use any tool to tighten the connectors.
▪Always seal the connectors using weatherproofing tape.
▪Avoid any water or moisture entering the cable as that impacts the performance of the wireless
link.
▪Prior to sealing the outdoor connectors and permanently securing the cable to the wall with cable
ties and wall hooks, you may want to verify whether the installation and all components function
properly.
Chapter 1. Preparing for Installation
CPN 68333 R1 Issue Date: May 2004
11

TsunamiMP.11Antenna Installation Guide
OVERVIEW OF THE OUTDOOR INSTALLATION
The outdoor installation of the link (point-to-point or point-to-multipoint) requires the following:
▪An antenna
▪A low-loss antenna cable (available in three lengths)
▪Antenna mast or wall bracket for the antenna
▪An adequate grounding system that meets the requirements described in “Grounding System.”
▪Waterproofing of all connections
Note: All outdoor cable connectors must be sealed with weatherproofing stretch tape to make the coax
connectors permanently waterproof. See “Sealing the Cable Connectors” on page 37.
DANGER! For your own safety, the antenna mast and the grounding system should only be
installed by experienced installation professionals who are familiar with local building
and safety codes and the national electrical codes.
Read carefully the instructions described in “Grounding System” on page 16 and verify
that your installation complies with the appropriate regulations and codes before
installing the antenna.
Antenna Placement
To achieve maximum performance of your wireless outdoor link, the outdoor antenna must have clear line-of-
sight to the antenna of the other Tsunami MP.11 unit. Line-of-sight can be defined as:
▪No obstacles in the direct path between the antennas (antenna beam).
▪No obstacles within a defined zone around the antenna beam.
You should be aware that the shape of an antenna beam is not straight and narrow like a laser beam. The
antenna beam, also referred to as Fresnel1Zone, is rather “bulged” in the middle, such as, for example, a
rugby ball.
The exact shape and width of the Fresnel Zone is determined by the path length and frequency of the radio
signal. The width as distance from the direct antenna beam is approximately 10 m (32 ft) in the middle of the
wireless link for a distance of 6.5 Km (4 mi) and a frequency of 2.4 GHz. This width also is the required
clearance of the antenna beam from obstacles in its path, to avoid loss of radio signal.
If any significant part of this zone is obstructed, a portion of the radio energy will be lost, resulting in reduced
performance. Reduced performance can also occur when obstacles close to the antenna beam cause signal
reflections or noise that interfere with the radio signal.
1Pronounced as ‘Fray-Nell’
Chapter 1. Preparing for Installation
CPN 68333 R1 Issue Date: May 2004
12

TsunamiMP.11Antenna Installation Guide
The following figure shows some typical examples of obstacles that you must avoid for the directional
antenna to operate effectively:
▪Neighboring buildings
▪Trees or other obstructions
▪Power lines
To allow optimal performance you must ensure that the type and placement of the antennas leave sufficient
clearance of the Fresnel Zone at the maximum width of the bulge, which is typically at the mid-point between
the antennas.
Figure 4. Potential Obstacles for a Directional Antenna
To minimize the influence of obstacles, signal interference, or reflections, note the following guidelines:
▪Mount the antenna as high as possible above the “ground” to allow maximum clearance:
º In open areas, “ground” is the actual surface of the earth.
º In dense urban areas, “ground” is to be interpreted as the height of the highest obstacle in the signal
path between the two antenna sites.
▪Avoid trees in the signal path to avoid signal absorption due to seasonal changes (leaves or ice).
▪Install the antenna at least 2 m (6 ft) away from all other antennas.
Chapter 1. Preparing for Installation
CPN 68333 R1 Issue Date: May 2004
13

TsunamiMP.11Antenna Installation Guide
Other situations, in which reflections of the radio signal may cause interference, are environments where
large reflecting surfaces exist in parallel or partly perpendicular to the antenna beam.
Environments with large reflective surfaces include:
▪Mirror-glass buildings
▪Crowded parking lots
▪Water or moist earth and moist vegetation
▪Above ground power and telephone lines
Weather conditions such as rain or snow usually do not have much impact on the performance of your
Tsunami MP.11 product, provided you have sealed all cable connectors with weatherproofing tape.
Seasonal influence on signal propagation can occur in the following situations:
▪A marginal communications quality in late fall (with no leaves on the trees in the signal path) might fail in
the summer.
▪In winter, a wireless link may fail when the antenna is exposed to ice buildup, or when the antenna
elements are covered with snow.
Radio paths over water or extremely flat ground may require optimization of antenna height at one end. This
is due to in-phase or out-of-phase reflections. Adjustment of antenna height by 1 to 3 meters may move the
signal from a null to a peak.
Long distance links may be obstructed b earth curvature, so the antenna height requirements must not only
take the height of obstructions and Fresnel Zone into account, but also earth bulge. The earth bulge is
approximately 2 m (6.5 ft) at a link distance of 10 Km (6.3 mi).
In these cases consult your supplier to take appropriate steps to maintain or optimize wireless link
performance.
Chapter 1. Preparing for Installation
CPN 68333 R1 Issue Date: May 2004
14

TsunamiMP.11Antenna Installation Guide
Antenna Mast or Wall Bracket
There are two ways to erect an antenna mast: Tripod Mount and Wall (Side) Mount.
Tripod Mount
The tripod mount is primarily used on peaked and flat roofs. The antenna mast must be secured to the
roof using 3 or 4 guy wires equally spaced around the mast. When the height of the antenna mast is
more than 3 meters (10 ft), you are advised to use at least three guy wires for each 3 meters (10 ft)
section of the mast.
Wall (Side) Mount
A wall (side) mount allows for mounting an antenna (mast) on the side of a building or on the side of an
elevator penthouse. This will provide a convenient mounting location when the roof overhang is not
excessive or the location is high enough to provide a clear line-of-sight.
In most situations mounting an antenna directly to the wall will not let you align the antenna properly with
the corresponding antenna at the opposite end of your wireless link. As poor alignment typically results in
poor performance, Proxim recommends always mounting the antennas to a mast. An exception to this
rule is the wide-angle window antenna that can be mounted on a window or wall facing the nearest Base
Station with line of sight.
Antenna Mast Requirements
To accommodate the antennas, the antenna mast must satisfy the following requirements:
▪The construction of the mast must consist of sturdy, weatherproof, and non-corrosive material such as,
for example, galvanized or stainless steel construction pipe.
▪Typical diameter of the mast should be between 35 mm (1.4 in) and 41 mm (1.6 in). Depending upon the
type of antenna you intend to install, other diameters also may be possible.
▪The height of the antenna mast must be sufficient to allow the antenna to be installed at least 1.5 m (5 ft)
above the peak of the roof. If the roof is of metal, the height of the antenna should be at least 3 m (10 ft)
above the roof.
▪The mast or wall bracket must be free from any substance that may prevent a good electrical connection
with the antenna such as, for example, paint.
Chapter 1. Preparing for Installation
CPN 68333 R1 Issue Date: May 2004
15

TsunamiMP.11Antenna Installation Guide
Grounding System
Direct grounding of the antenna mast, Tsunami MP.11 hardware and surge arrestor is very important.
Note: A safety grounding system is necessary to protect your Tsunami MP.11 hardware from lightning
strikes and the build-up of static electricity.
WARNING! The antenna mast, Tsunami MP.11 hardware and surge arrestor must be connected to
the same ground, using an equi-potential bonding conductor.
A good electrical connection should be made to one or more ground rods, using at
least a 10AWG ground wire and non-corrosive hardware. The grounding system must
comply with the National Electrical Code and safety standards that apply in your
country. Always check with a qualified electrician if you are in doubt whether your
Tsunami MP.11 hardware installation is properly grounded or not.
Antenna Alignment
For optimal performance of your wireless link, make sure the antennas are properly aligned (facing one
another “eye-to-eye”). To align the antennas:
▪Use a pair of binoculars or a map of the area and a compass to point the antennas to one another.
▪Use the Antenna Alignment Display feature (AAD) to display a measurement of signal quality at the
CLI and serial ports.
• When the AAD feature is enabled, a numeric signal value is output at the CLI and serial ports. The
SNR is numerically displayed on the CLI or serial port by two decimal characters representing a
number from 00 to 99. On the serial port, AAD is enabled by default after booting.
• To start the display, you must enable AAD and a WORP link must be established between the Base
Station and Satellite. For AAD configuration details, refer to the Tsunami MP.11/a Installation and
Management Guide.
▪You may also use the Link Test option of the management tools that come with the Tsunami MP.11a to
analyze the radio link quality. The Link Test option lets you display the radio signal strength in relation to
the noise in the signal path. If required, you can interactively optimize the antenna alignment with the
Link Test, by making small modifications in the antenna orientation.
▪Alternatively, consult a professional Antenna Installation Service to optimize the antenna alignment.
Omni-directional antennas are characterized by a wide radiation pattern. Therefore, alignment of this type of
antennas is less critical than alignment of directional antennas.
Chapter 1. Preparing for Installation
CPN 68333 R1 Issue Date: May 2004
16

TsunamiMP.11Antenna Installation Guide
The “AudioTune” tool can be used to read out loud the Link Test values, allowing direct feedback when
aligning the antenna. Run the Link Test diagnostics of the management tools that come with the Tsunami
MP.11 with the Signal and Noise fields selected.
You can download AudioTune from http://www.computron-usa.com/wireless_utilities.htm.
Antenna Polarization
Tsunami outdoor antennas are standard mounted for vertical polarization.
In some cases, you might consider mounting the antenna for horizontal polarization. For example, to
minimize the influence of cross-talk between antennas when:
▪You plan to mount multiple directional antennas to the same mast.
▪Your wireless link receives interference from a vertically polarized neighboring installation.
Mounting for horizontal polarization is not supported for omni-directional grid antennas.
Note: For optimal wireless link performance, you must always verify that the antenna polarization on both
ends of the wireless link is the same. Consult the corresponding instruction appendixes for changing
the antenna polarization.
Antenna Cable Routing
The antenna cable must be routed and fixed in such a way that installation technicians have a clear passage
area.
All connectors that are located outdoors must have a weatherproof seal. You are advised to seal connectors
only after you have completed the final radio tests.
BEFORE CLIMBING THE ROOF...
Before you start installing, check whether you have all the required components to set up an outdoor wireless
link. For each side of a wireless outdoor wireless link you need:
▪One or two low-loss antenna cables
▪A female-female converter N-connector in case you want to use two antenna cables
▪Tools and material to mount the antenna
▪Tape or wraps to attach the antenna cable, for example to the mast
▪Grounding material such as cable and connector
If an item is missing or damaged during shipment, inform your supplier.
Chapter 1. Preparing for Installation
CPN 68333 R1 Issue Date: May 2004
17

TsunamiMP.11Antenna Installation Guide
Chapter 2. Determining Range and Clearance
When you read about wireless outdoor products, you will often encounter the terms ‘output power’ of the
radio and ‘gain’ of the antenna equipment as measures for the “strength” of the transmitted signal.
▪Output power of radio equipment often depends on maximum limits as defined by local radio regulations.
Consequently, output power is, by definition, not the way to enhance wireless performance.
▪High gain antennas are larger in size than low gain antennas, and are characterized by a narrow focus of
the antenna beam. These two characteristics make it more difficult to aim the antennas and adjust
antenna alignment to optimize the performance of the wireless point-to-point link.
The Tsunami outdoor solution is based upon the following principles:
▪An output power and antenna gain that comply with the maximum limits as defined by local governing
bodies concerning radio transmissions.
▪Enhanced radio sensitivity for optimal receive quality of radio signals transmitted by remote antennas.
DETERMINING THE OUTDOOR RANGE
The range of your outdoor antenna installation is closely related to a number of different factors. To let you
determine the range of the Tsunami MP.11 antenna system in your situation, we have defined the following
formula:
Range = Maximum Range x Cable Factor x Clearance Factor
Maximum Range
Identifies the theoretical maximum that could be achieved under optimal circumstances using the
available Tsunami MP.11 products according to their specifications and in compliance with local radio
regulations. This value can be read from Table 1 or Table 2, according to the country in which the
antenna system is to be installed.
Cable Factor
Identifies a correction value (in percentage) that compensates for additional cable losses related to the
type of cables used at both ends of the wireless link. The Cable Factor value can be read from Table 4
on page 23.
Clearance Factor
Identifies a correction value (in percentage) that should be used in case the signal path of your wireless
link does not provide the minimum clearance as listed in the Maximum Range table. The Clearance
Factor can be read from Figure 6 on page 26.
Chapter 2. Determining Range and Clearance 18
CPN 68333 R1 Issue Date: May 2004

TsunamiMP.11Antenna Installation Guide
An example on how to use this formula is described in the “Examples.” This formula should be used only
as a rule-of-thumb to assess the possible range that could be achieved in your situation, or to select the
type and height of the antenna installations. Always perform on-site measurements to validate the
results from the range calculation. To perform these measurements, you can use the Link Test option of
the management tools that come with the Tsunami MP.11 product.
Maximum Range
The maximum range of your Tsunami MP.11 system is based upon:
▪The Type of Outdoor Antenna Equipment
▪The Data Speed of the Wireless Link
▪The clearance of the signal path (see “ Clearance Factor” on page 24).
The values in this section are based on calculations that assume optimal radio conditions. They do not
represent a guarantee that the same maximum distance can be achieved at your location. Differences in
performance figures may result from:
▪Incorrect alignment of antennas (see “Antenna Alignment” on page 16).
▪Polarization mismatch of the antennas.
▪Sources of interference or unexpected reflections in the signal path that affect the communications
quality (see “Antenna Placement” on page 12).
▪Severe weather conditions such as heavy rain or snow fall, or strong winds.
▪Seasonal influences such as leaves on trees, or icing on the antennas.
Type of Outdoor Antenna Equipment
As described previously, Proxim Corporation offers different types of outdoor antennas and cable lengths for
your network design.
The directional antennas provide maximum range, but due to their narrow beamwidth, these antennas
require precise antenna alignment to achieve optimal performance. The higher the antenna gain, the more
precise the alignment should be.
Directional antennas are typically used to connect:
▪A Base Unit and a Subscriber Unit in a point-to-point link
▪A Subscriber Unit in a point-to-multipoint network
The omni-directional antennas have, by nature, an omni-directional azimuth pattern that makes them easy to
install. There is also a gain beamwidth relation for omni-antennas: The higher the gain of the omni-antenna,
the narrower the vertical beamwidth. In a hilly terrain, a 7dBi omni-directional antenna can be a better
solution than the 10 dBi omni-directional antenna.
The 12 dBi wide-angle antenna is a good Base Station antenna for hilly terrain. It combines a wide opening
angle with relatively high gain. The mounting brackets allow tilting of the antenna. This antenna also is used
when the amount of traffic in a cell is too high for a single Base Station with an omni-directional antenna.
Chapter 2. Determining Range and Clearance 19
CPN 68333 R1 Issue Date: May 2004

TsunamiMP.11Antenna Installation Guide
The wide-angle antenna allows dividing the cell into three sectors that each can be serviced by a Base
Station.
For beamwidth and gain characteristics of the various antennas, consult the appendixes of this manual,
which describe each antenna in more detail.
The length of the antenna cable also has an impact on the maximum range that can be achieved with the
antenna combination (see “Cable Factor” on page 23).
Depending upon local radio regulations in a number of countries that limit the maximum output power,
Proxim Corporation offers different outdoor antenna products in the various countries around the world.
Therefore, you must consult the table that matches the radio regulations as they apply in your country:
▪Table 1 and Table 2 for the USA and Canada and any other country that adheres to the radio regulations
as defined by the US Federal Communications Commission (FCC).
▪Table 3 for all European countries, Japan, and any other country that adheres to the radio regulations as
defined by the European Telecommunications Standards Institute (ETSI) and MPT.
▪Tables 5 and 6 show the ranges in case of obstruction, where only 10 meters (33 feet) of clearance is
available in the path of the link.
The following tables show calculated ranges with 10 dB link budget (fading margin) and unlimited clearance.
The clearance is the average antenna height; it also incorporates earth bulge. Lower link budget results in
longer links, but less reliable communication.
On very short links, the link budget can be lower than 10 dB, while at longer links more fading occurs and a
high fading margin is needed.
24 dBi Directional Parabolic
Grid Antenna*
14 dBi Directional
Antenna
12 dBi Directional Wide
Angle Antenna
Antenna
Antenna
Speed
Mbps Range Clearance Range Clearance Range Clearance
1 112 km
70 mi
285 m
936 ft
35 km
22 mi
47 m
156 ft
28 km
17 mi
36 m
118 ft
2 79 km
49 mi
157 m
515 ft
25 km
16 mi
32 m
104 ft
20 km
12 mi
25 m
82 ft
5.5 50 km
31 mi
76 m
250 ft
16 km
9.8 mi
20 m
67 ft
13 km
7.8 mi
17 m
55 ft
24 dBi Directional
Parabolic Grid Antenna
11 28 km
17 mi
36 m
118 ft
8.9 km
5.5 mi
13 m
43 ft
7.1 km
4.4 mi
11 m
37 ft
1 35 km
22 mi
47 m
156 ft
11 km
7.0 mi
15 m
51 ft
8.9 km
5.5 mi
13 m
43 ft
2 25 km
16 mi
32 m
104 ft
7.9 km
4.9 mi
12 m
40 ft
6.3 km
3.9 mi
10 m
34 ft
5.5 16 km
9.8 mi
20 m
67 ft
5.0 km
3.1 mi
9.2 m
30 ft
4.0 km
2.5 mi
8.0 m
26 ft
14 dBi Directional Antenna
11 8.9 km
5.5 mi
13 m
43 ft
2.8 km
1.8 mi
6.7 m
22 ft
2.2 km
1.4 mi
5.9 m
19 ft
Chapter 2. Determining Range and Clearance 20
CPN 68333 R1 Issue Date: May 2004
Other manuals for Antenna Tsunami MP.11
13
Table of contents
Other Proxim Antenna manuals

Proxim
Proxim TeraStar EtherAnt User manual

Proxim
Proxim ORINOCO AP-2000 User manual

Proxim
Proxim Antenna Tsunami MP.11 User manual

Proxim
Proxim Antenna Tsunami MP.11 User manual

Proxim
Proxim Antenna Tsunami MP.11 User manual

Proxim
Proxim 5054-PA-23 User manual

Proxim
Proxim Antenna Tsunami MP.11 User manual

Proxim
Proxim Tsunami 10200 Series User manual