Skymsen FE-10-N User manual

ELECTRIC FRYER, 5 LITERS, INOX / FREIDORA ELECTRICA, 5 LITROS, INOX
MODELO/MODEL
FE-10-N
METALÚRGICA SKYMSEN LTDA.
Rodovia Ivo Silveira, 9525 - Volta Grande
88355-202 - Brusque - Santa Catarina
Fone: +55 47 3211 6000 - Fax: +55 47 3211 6020
69875.4 - INGLÊS/ESPANHOL
Data de Revisão: 28/06/2022
INSTRUCTIONS MANUAL
MANUAL DE INSTRUCCIONES
DUE TO TE CONSTANT IMPROVEMENTS INTRODUCED TO OUR EQUIPMENTS, THE INFORMATIONS CONTAINED HERE MAY BE MODIFIED WITHOUT PREVIOUS NOTICE.
DEBIDO A LA CONSTANTE EVOLUCIÓN DE NUESTROS PRODUCTOS, LAS INFORMACIONES AQUÍ CONTENIDAS PUEDEN SER MODIFICADAS SIN PREVIO AVISO.

2
SUMMARY
1. INTRODUCTION ........................................ 2
1.1 Safety .......................................................................2
2. COMPONENTS AND TECHNICAL FEATURES
..................................................................... 2
3. INSTALLATION AND PRE-OPERATION......... 3
3.1 Placing......................................................................3
3.2 Electrical Installaon.................................................3
3.3 Terminal Equipotenal..............................................3
3.4 Security System ........................................................3
3.5 Pre-Operaon...........................................................3
4. OPERATION............................................... 4
4.1 Starng.....................................................................4
5. CLEANING................................................. 4
6. MAINTENANCE ......................................... 4
7. OBSERVED NORMS ................................... 5
8. PROBLEM SOLVING................................... 5
9. ELECTRICAL DIAGRAMS............................. 7
1. INTRODUCTION
This product was developed to be used in comercial kitchens.
It is used, for example, in restaurants, cafeterias, hospitals,
bakeries, and similar places.
This equipment is not recommended when:
- The producon process is done in a connuous industrial
scale;
- The workplace is in a corrosive, explosive, contaminated
with vapor, powder or gas atmosphere. .
1.1 Safety
The instrucons below must be followed to avoid accidents,
failure to comply may cause serious injury:
1.1.1 Never use the equipment with: wet clothing or wet
feet and/or on a damp or wet surface, do not immerse in
water or any other liquid, and do not use water jet directly
on the equipment.
1.1.2 When the equipment suers a fall, is damaged in
any way or does not work, it is necessary to take it to an
Authorized Technical Service Center.
1.1.3 The use of accessories not recommended by the
manufacturer may cause personal injury.
1.1.4 Keep hands and any utensils away from moving parts
while the unit is in operaon to prevent personal injury or
damage to the equipment.
1.1.5 Make sure that the voltage of the equipment and
the mains are the same, and that the equipment is properly
grounded.
1.1.6 Disconnect the equipment from the power grid when
changing the OIL.
1.1.7 Never turn on the equipment without oil.
1.1.8 Never touch the heang element No. 6 (Fig. 01)
and the oil when the equipment is on or in cooling
me, because they will be hot and cause burns.
This equipment must not be used by children or any
persons with reduced physical or mental aptness, lack of
experience or knowledge, unless they are under supervision
or have received from the person responsible for safety,
proper instrucons on how to use the equipment.
Children shall be watched in order to avoid them to
play with the equipment.
Disconnect the equipment from the the main energy
source when: not in use, before cleaning, assembly or
removal of accessories, maintenance and any other type
of service.
Do not use the equipment if it is not working correctly,
nor if it has been damaged in any way. In case that happens,
take the equipment to the nearest Technical Assistance to
check it up. Do not leave the electric cable on the edge of
the table or counter nor let it touch hot surfaces.
In case of emergency take o the plug from its socket.
This equipment should not be immersed in water to
be cleaned.
This equipment should not be cleaned with a steam
cleaner.
We strongly recommend that the End Users of this
machine have readily accessible and available K Class (US
Standard or in accordance with local norms/laws) re
exnguishers at the place where the machine will be used.
Make sure that the oil level is at the indicated level at
ALL TIMES. The use of the machine with the oil below the
indicated level may result in a re.
Pay aenon and be careful with boiling sprouts that
may occur when placing excessively wet/frozen foods in
the tank. Boiling sprouts may also occur if excessive loads
of food are placed in the tank.
The oil should also be changed, as old oil can have a
reduced ash point and can be more prone to boiling
spurts.
This appliance must be installed and used in such a way
that any water cannot come into contact with grease or oil.
2. COMPONENTS AND TECHNICAL FEATURES
01
02
03 04
05
06
08
09
10
11
07
PICTURE 01

3
FEATURES UNIT FE-10-N FE-10-N
Maximum Load kg 0,6 0,6
Voltage V 110 220
Power Rang W 2000 2500
Height mm 280 280
Width mm 300 300
Depth mm 670 670
Net Weight Kg 4 4
Gross Weight kg 5,2 5,2
Oil Capacity L 5 5
3. INSTALLATION AND PRE-OPERATION
3.1 Placing
The Electric Fryer is to be installed onto a levelled, dry and
clean surface approximately 850mm high.
3.2 Electric Installaon
This equipment was developed to work at 110 or 220 V.
Make sure that the unit voltage and the voltage in the power
source are the same.
The electrical feed cord has 3 round pins, one of them is the
ground wire. Its is mandatory that all 3 points are correctly
connected before the machine is turned on.
3.3 Terminal Equipotenal
The gure indicates displayed beside the external connecng
terminal equipotenal.
This should be used to ensure there is no potenal dierence
between dierent devices connected to the power grid,
reducing the maximum risk of electric shock.
The separate equipment must be connected to one another
by their respecve equipotenal connecon terminals.
3.4 Security System
This machine is also equipped with a safety thermostat,
which has the funcon of disconnecng the electrical
resistance when the oil temperature reaches the maximum
allowable limit.
If during normal process of using the fryer, it o and not
return to restart, ie, the oil does not heat up again, turn o
the thermostat temperature, disconnect the machine from
the mains and wait for the complete cooling oil.
Then press the Reset buon nº01 (Fig. 03) and note that the
buon moves in, producing a sound and feeling a “plec”. If
this occurs, it indicates that the safety thermostat has been
triggered, then do not use more equipment, taking it to a
Technical Assistance nearest Authorized.
3.5 Pre-Operaon
It is recommended to use the machine on a levelled, dry and
clean surface at all mes, avoiding accidents.
Before turning on the machine, ll the Tank Nº03 (Pic.01)
with 5 liters of comesble oil, or unl the level mark is
reached Nº05(Fig.01).
Please follow the illustraons below to correctly place the
hoop in the basket:
1) Fit the wire of the hoop wire in the lower housing of the
basket unl the basket is well t, as shown in pictures Nº04
and Nº05.
2) Press the upper poron of the hoop wire against the
upper housing of the basket unl the basket is well t, as
shown in pictures Nº06 and Nº07.
PICTURE 04 PICTURE 05
01
01 – Basket
02 – Motor Housing
03 – Tank
04 – Resistance
05 – Oil Level
06 – Drainning Support
07 – Control Panel
08 – ON/OFF Switch
09 – Thermostat Handle
10 – Pilot Lamp
11 – Thermostat Pilot Lamp
PICTURE 06 PICTURE 07
PICTURE 02
PICTURE 03

4
4. OPERATION
• Before starng make sure that the electric fryer is rm
on its posion and stable.
• Before using your equipment, all parts that come in
contact with the product to be processed must be
washed with water and neutral soap.
4.1 Starng
1 - Place the Plug into the Socket.
2 - Fill the tank with comesble oil unl the level mark is
reached as shown on N°09 (Pic. 01)
3 - Start the equipment placing the ON/OFF Switch in the
ON posion Nº08 (Pic.01), this will make the Pilot lamp light
up (Green light) Nº10 (Pic.01) indicang that the machine
is turned on.
4 - Program the temperature control (thermostat) Nº09
(Pic.01) with the desired temperature. This will make the
thermostat pilot lamp light up (Orange light) Nº11 (Pic.01).
5 - When the oil in the tank reaches the programmed
temperature, the thermostat pilot lamp (Orange Light) Nº11
(Pic.01) will turn out.
6 - The thermostat pilot lamp (Orange light) Nº11 (Pic.01)
will light up and go out always when the oil temperature
oscillates, this will ensure that the programmed temperature
is kept.
7 - Always place food that you wish to fry in the basket and
then insert them in the oil. When the frying process is over,
to eliminate the excess of oil place the basket in the Draining
Support as shown on Nº06 (Pic.01).
8 - When the frying process is over, li up the control panel,
rotang it backwards in the vercal posion as shown
on Picture Nº02. This will also li up the electric element
allowing the oil to be drained. By adopng this procedure a
beer usage of the oil will be obtained.
Be very careful when placing the food when the oil
is heated up. Food must be placed gradually (slowly).
Sproung must be avoided. If sproung begins li up the
basket and slowly lower it back in the oil. Repeat this move
as many mes as necessary to avoid sproung. Sproung
will be intense when lower temperature / frozen food are
placed in the heated oil.
5. CLEANING
Remove the plug from its socket before to start
cleaning.
The equipment must be cleaned and sanized:
- Before being used the rst me;
- Aer everyday operaon;
- Whenever it will not be used for a prolonged period;
- Before pung it into operaon aer a prolonged period
of inacvity.
Wash all parts with mild soap and water.
1 - Before starng to clean the machine, remove all oil.
2 - Remove the plug from the socket and wait for the oil to
be cooled out.
3 - Aer the complete removal of the oil from the tank Nº03
(Pic.01), wash the internal poron of the tank with water
and neutral soap, rinse and dry it. For the remaining parts of
the machine use a lightly humid cloth.
4 - Aer the work, all the parts must be washed with water,
soap or neutral detergents, except for the control panel
which should be cleaned with a damp cloth.
This machine cannot be immersed in water or any
other kind of liquid in order to be cleaned.
Do not spray water directly on the equipment.
6. MAINTENANCE
The maintenance must be a group of procedures that have
the objecve of keeping the appliance in its best condion
of operaon and increasing its life expectancy and safety.
* Cleaning – Check the item 3.3 Cleaning of this Manual.
* Electrical wiring – Check all the cables to avoid deterioraon
and all the electrical contacts about their ghtening and
corrosion.
* Contacts – Turn on and o boom, emergency boom,
reset boom, electric circuits, etc. Check the appliance so
that all the components are working correctly and that the
operaon is working normally.
* Installaon – Check the installaon of your appliance
according to the item 2.1 Installaon of this manual.
1 - Items to be veried and implemented monthly:
- Check the electrical installaon;
- Check the outlet tension;
- Measure the operang current and compare it to the
Nominal one;
- Check all the eletrical terminal ghtening of the appliance,
to avoid bad contact;
- Check the possible clearance of the shi of the electric
motor;
- Check the wiring and the electric cable to avoid its
overheang, decient isolaon and mechanical breakdown.
2 - Items to be veried and implemented every 3 months:
-Check the electric components as ON/OFF Switch,
Emergency Buon, Reset Switch, and eletric circuit related to
overheang, decient isolaon and mechanical breakdown.
MAX Level.
5 Liters
MIN Level
3 Liters
PICTURE 08
Use Your QR Code Reader to access more
informaon regarding the cares needed
when handling Stainless Steel.

5
- Check possible loosens in the bearings
- Check retainers, o´rings, v´rings and other sealing systems.
7. OBSERVED NORMS
Brazillian Norm NBR NM 60335-1
IEC 60335-2-37
8. PROBLEM SOLVING
PROBLEMS CAUSES SOLUTIONS
- The equipment does not start.
- Energy shortage;
- Problem with the electric circuit;
- Resistance or thermostat burned.
- Check energy supply;
- Call Technical Assistance;
- Call Technical Assistance.
- Smoke and/or burning smell. - Problem in the machine’s internal or
external electrical circuit. - Call Technical Assistance.
- Danied Cable. - Product transportaon failure. - Call Technical Assistance.
- Oil boils in an exaggerated manner. - Defecve thermostat. - Call Technical Assistance.
Use Your QR Code Reader to access
more informaon regarding safety and
maintenance.

6
POWER SOURCE
ON/OFF
THERMIC PROTECTOR
GREEN LAMP
ELECTRIC ELEMENT
MICRO SWITCH
ORANGE LAMP
THERMOSTAT
9. ELECTRICAL DIAGRAM

7
INDICE
1. INTRODUCCIÓN .......................................7
1.1 Seguridad ...............................................................7
2. COMPONENTES Y CARACTERÍSTICAS
TÉCNICAS ....................................................7
3. INSTALACIÓN Y PREOPERACIÓN...............8
3.1 Posicionamiento .....................................................8
3.2 Instalación Eléctrica................................................8
3.3 Terminal equipotencial ...........................................8
3.4 Sistema de seguridad..............................................8
3.5 Preoperación ..........................................................8
4. OPERACIÓN .............................................9
4.1 Accionamiento........................................................9
5. LIMPEZA ..................................................9
6. MANUTENCIÓN .......................................9
7. NORMAS OBSERVADAS............................10
8. RESOLUCIÓN DE PROBLEMAS ..................10
9. DIAGRAMAS ELÉCTRICO...........................11
1. INTRODUCCIÓN
Este producto fue desarrollado para uso en cocinas
comerciales. Se uliza, por ejemplo, en restaurantes,
cannas, hospitales, panaderías, carnicerías y similares.
No se recomienda el uso de este equipo cuando:
-El proceso de producción es connuo en escala industrial;
-El lugar de trabajo es de atmósfera corrosiva, explosiva,
contaminado con vapor, polvo o gas.
1.1 Seguridad
Para evitar cualquier accidente siga las siguientes
instrucciones:
1.1.1 Nunca ulice el equipo con: la ropa o los pies mojados
y/o sobre una supercie húmeda o mojada, no lo sumerja en
agua ni en ningún otro líquido y no ulice un chorro de agua
directamente sobre el equipo.
1.1.2 Cuando el equipo sufre una caída, se daña de alguna
manera o no funciona es necesario llevarlo a un Servicio
Técnico Autorizado.
1.1.3 El uso de accesorios no recomendados por el fabricante
puede causar daños personales.
1.1.4 Mantenga las manos y cualquier utensilio alejado de las
partes móviles del aparato mientras esté en funcionamiento
para evitar lesiones personales o daños al equipo.
1.1.5 Asegúrese de que la tensión del equipo y de la red
eléctrica es la misma, y de que el equipo está correctamente
conectado a erra.
1.1.6 Desconecte el equipo de la red eléctrica cuando
cambie el ACEITE.
1.1.7 Nunca encienda el equipo sin aceite.
1.1.8 No toque nunca la resistencia nº 6 (Fig. 01) ni el aceite
cuando el equipo esté encendido o durante el empo de
enfriamiento, ya que estarán calientes y pueden provocar
quemaduras.
Este equipo no es para ser ulizado por personas
(inclusive niños) con capacidades sicas o mentales
reducidas, o con falta de experiencia o conocimiento, a no
ser que tengan recibido supervisión o instrucción referente
al uso de este equipo por una persona responsable por la
seguridad del mismo.
Mantenga este equipo alejado de los niños.
Desenchufe el equipo de la toma corriente cuando
el equipo no estuviera en uso, antes de la limpieza, ó
antes de instalar o remover accesorios, o aún cuando en
mantenimiento u otro po de servicio..
Cerquese que el cable de alimentación esté en
perfectas condiciones de uso. Si no estuviera, sustuya el
cable damnicado por otro que respete las especicaciones
técnicas y de seguridad. Esta sustución deberá ser hecha
por un profesional calicado y deberá respetar las normas
locales de seguridad.
En casos de emergencia, rere el enchufe de la toma
corriente.
Este equipo no debe ser sumergido en agua para ser
limpiado.
Este equipo no debe limpiarse con un limpiador de
vapor.
Se recomienda instalar en el local de uso EXTINTORES
DE INCENDIO, clase K (padrón USA), ó de acuerdo con las
normas y exigencias locales.
Cerquese que la carga de aceite esté siempre al nivel
indicado, pues caso el nivel esté abajo del especicado
podría causar un incendio.
Hay que tener cuidado para evitar los chorros de agua
cuando se alimenta el equipo con comida muy húmeda o
con una carga excesiva.
También se debe cambiar el aceite, ya que el aceite
viejo puede tener un punto de inamación reducido y
puede ser más propenso a los chorros de ebullición.
Este aparato debe instalarse y ulizarse de manera que
el agua no pueda entrar en contacto con la grasa o el aceite.
2. COMPONENTES Y CARACTERÍSTICAS TÉCNICAS
01
02
03 04
05
06
08
09
10
11
07
FIGURA 01

8
CARACTERÍSTICAS UNIDAD FE-10-N FE-10-N
Carga Máxima (lote) kg 0,6 0,6
Voltaje V 127 220
Potencia W 2000 2500
Altura mm 280 280
Largo mm 300 300
Profundidad mm 670 670
Peso Neto Kg 4 4
Peso Bruto kg 5,2 5,2
Candade de Aceite L 5 5
3. INSTALACIÓN Y PREOPERACIÓN
3.1 Posicionamento
Las freidoras eléctricas deben ser instaladas en una
supercie seca, nivelada y estable, preferentemente a
850mm de altura.
3.2 Instalação elétrica
Este equipo fue desarrollado para 110 o 220 V. Verique que
la tensión/voltaje de la máquina y de la red de alimentación
eléctrica sean las mismas.
El cable de alimentación (enchufe) posee 3 clavijas. Antes
de prender el equipo, es obligatorio que las 3 clavijas estén
debidamente conectadas a la red eléctrica del local donde
se va a instalar este equipo.
3.3 Terminal equipotencial
A gura apresentada abaixo indica o terminal de ligação
equipotencial externo.
Este deve ser ulizado para garanr que não haja diferença
de potencial entre diferentes equipamentos ligados á rede
elétrica, diminuindo ao máximo riscos de choques elétricos.
Os disntos equipamentos devem ser ligados um ao outro
pelos seus respecvos terminais de ligação equipotencial.
3.4 Sistema de Seguridad
Esta máquina también está equipado con un termostato
de seguridad, que ene la función de desconexión de la
resistencia eléctrica cuando la temperatura del aceite
alcanza el límite máximo permido.
Si durante el proceso normal de la ulización de la freidora,
apagado y no volver a reiniciar, es decir, el aceite no se
calienta de nuevo, apague la temperatura del termostato,
desconecte el aparato de la red y esperar a que el aceite se
enfríe completamente.
A connuación, pulse el botón de reinicio Nº01 (Fig. 03) y
observe que el botón se mueve en, produciendo un sonido
y una sensación de “Plec”. Si esto ocurre, se indica que el
termostato de seguridad ha sido acvado, entonces no
ulizar más equipo, llevándolo a una Asistencia Técnica
autorizado más cercano.
3.5 Preoperación
Se recomienda trabajar con el equipo sobre una supercie
seca, estable, evitando futuros accidentes.
Antes de prender la maquina, coloque 5 litros de aceite
comesble en la Cuba Nº03 (Fig.01), o hasta alcanzar la
marca de nivel Nº05 (Fig.01).
La operación de las asas en la cuba debe ser según ilustrado
abajo:
1) Encajar el alambre del asa en el alojamiento inferior de la
cuba, según las fotos Nº04 y Nº05.
2) Presione la parte del alambre del asa contra el alojamiento
superior de la cuba hasta que el mismo quede rmemente
encajado, según guras Nº06 e Nº07.
FIGURA 04 FIGURA 05
01
01 – Canasta
02 – Cabinete
03 – Cuba
04 – Resistencia
05 – Nivel de aceite
06 – Soporte de drenaje
07 – Panel de control
08 – Llave Prender/Apagar
09 – Manija Termostato
10 – Lámpara piloto
11 – Lámpara piloto do
Termostato
FIGURA 02
FIGURA 03

9
4. OPERACIÓN
• Verique que el equipo esté rme en su local de
trabajo.
• Antes de ulizar su equipo, todas las partes que entran
en contacto con el producto a procesar deben ser
lavadas con agua y jabón neutro.
4.1 Accionamento
1 - Conecte la maquina en la red eléctrica.
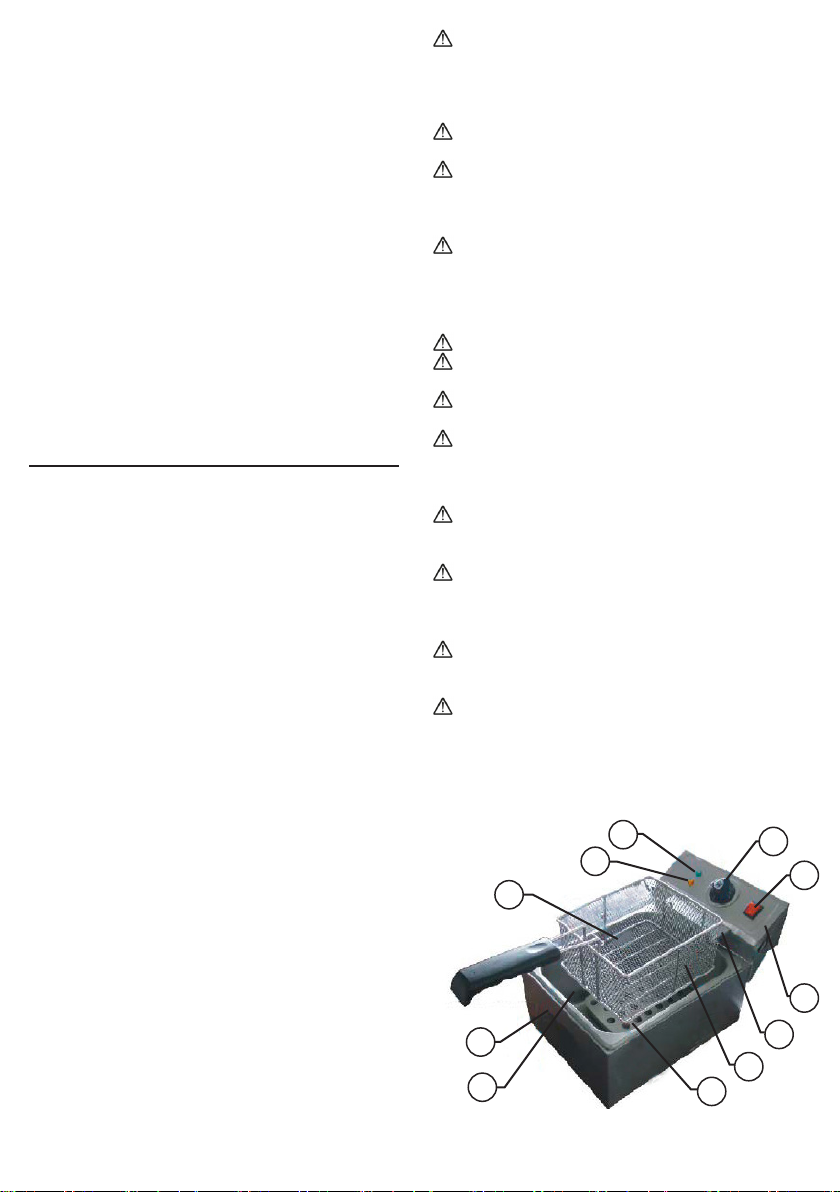
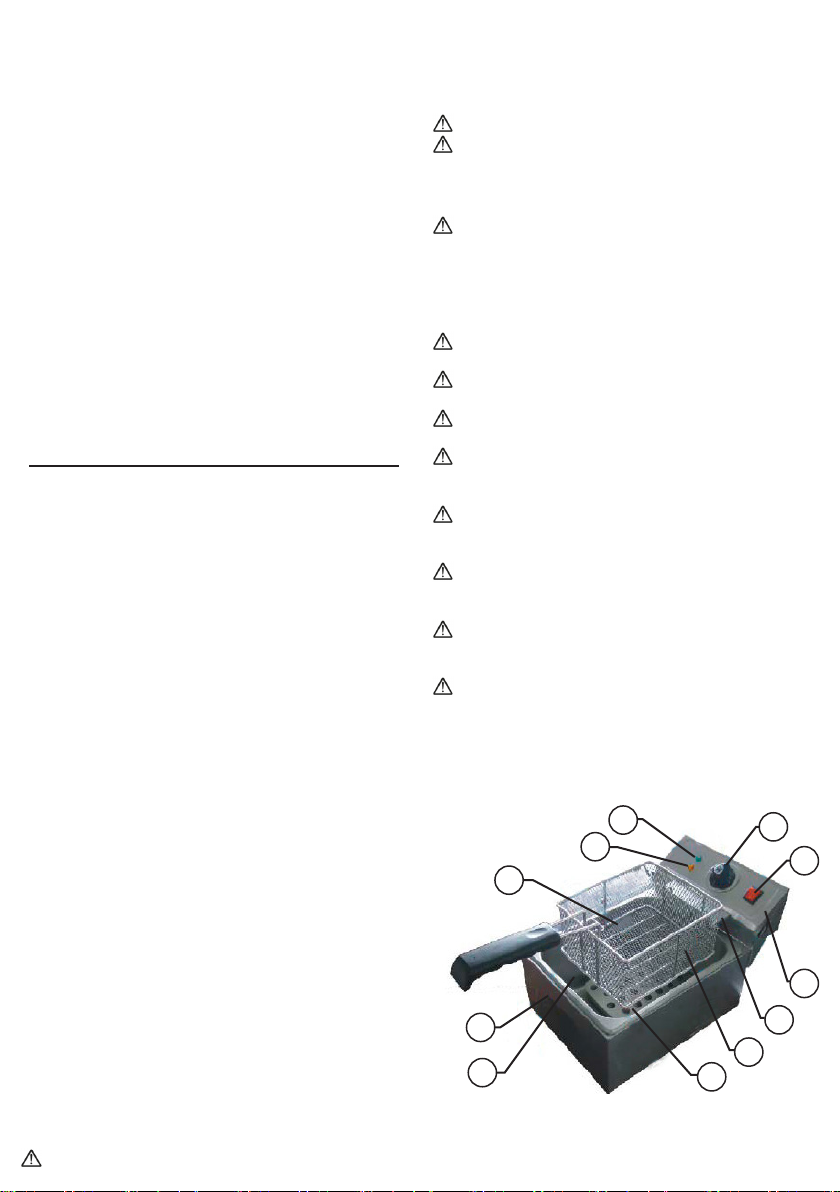
2 - Coloque 5 litros de aceite comesble en la Cuba N° 04
(Fig.01), hasta alcanzar la marca de nivel Nº05 (Fig.01)
3 - Prender la freidora ulizando la llave Prende/Apagar
Nº08 (Fig.01), donde automacamente prenderá el LED de
la lámpara piloto (color verde) Nº10 (Fig.01) indicando que
la maquina está energizada/prendida.
4 - Elija la temperatura más indicada para el alimento que
desea freír ajustando el Control de Temperatura, cuando
entonces encenderá el LED de lámpara piloto del termostato
(color naranja) Nº11 (Fig.01).
5 - Cuando la temperatura del aceite alcanzar la temperatura
elegida, el LED de la lámpara del termostato (color naranja)
Nº 11 (Fig.01) se apagará.
6 - El LED de la lámpara piloto del termostato (color
naranja) N° 11 (Fig. 01) encenderá y apagará siempre que
la temperatura del aceite oscilar, haciendo con que la
temperatura del aceite se mantenga según la temperatura
programada o elegida.
7 - Ulizar la canasta para colocar el producto que será frito
en el aceite, luego acomodar la canasta dentro de la cuba
con el aceite, con cuidado. Después de concluir la fritura,
para eliminar el exceso de aceite, colgar la canasta en el
soporte de la canasta Nº06 (Fig.01).
8 - Después de concluir la fritura, levante la caja del panel de
control, girándolo hacia atrás en la posición vercal, según
Figura Nº02, para que la resistencia también se levante
y permita el escurrimiento del aceite. De esta forma, se
logrará mejor provecho del aceite.
Tenga mucho CUIDADO al colocar la canasta con
alimentos que va a freír, cuando el aceite esté caliente en
la temperatura elegida, los mismos deberán ser colocados
de forma gradual (lentamente). La ebullición del aceite
debe ser evitado. Levante la canasta cuando comenzar
la ebullición, después sumergir nuevamente la canasta
en el aceite. Repita esta operación cuantas veces sean
necesarias. La ebullición será intensa cuando los alimentos
colocados en la canasta estén con baja temperatura o
congelados.
5. LIMPIEZA
Rere el enchufe de la toma de corriente antes de
iniciar el proceso de limpieza.
El equipo debe limpiarse y desinfectarse a fondo:
- Antes de ulizarlo por primera vez;
- Después de la operación de cada día;
- Siempre que no se ulice durante un periodo prolongado;
- Antes de volver a ponerlo en funcionamiento tras un
periodo prolongado de inacvidad.
Lavar todas las piezas con agua y jabón neutro.
1 - Para limpiar la máquina, rere el aceite.
2 - Antes de rerar el aceite, desconecte la máquina de la red
eléctrica y espere a que el aceite se enfríe completamente.
3 - Después de la remoción completa del aceite de la cuba
#03 (Fig.01), lave el interior de la misma con agua y jabón
neutro, enjuague y seque. Para el resto de la máquina,
límpiela con un paño ligeramente húmedo.
4 - Después del uso, todas las piezas deben ser lavadas con
agua, jabón o detergentes neutros, excepto el panel de
control que debe ser limpiado con un paño húmedo.
Este aparato no debe sumergirse en agua ni en ningún
otro líquido para su limpieza.
No use chorros de agua directamente sobre el aparato.
6. MANUTENCIÓN
La manutención comprende un conjunto de procedimientos
con el objevo de mantener el aparato en las mejores
condiciones de funcionamiento, permiendo el aumento de
su vida úl y de la seguridad.
* Limpieza – Vericar el ítem 3.3 “Limpieza” de este manual.
* Cableado: Revise todos los cables para corroborar posible
deteriorización y todos los contactos (terminales) eléctricos
para vericar posibles aplastados y corrosión.
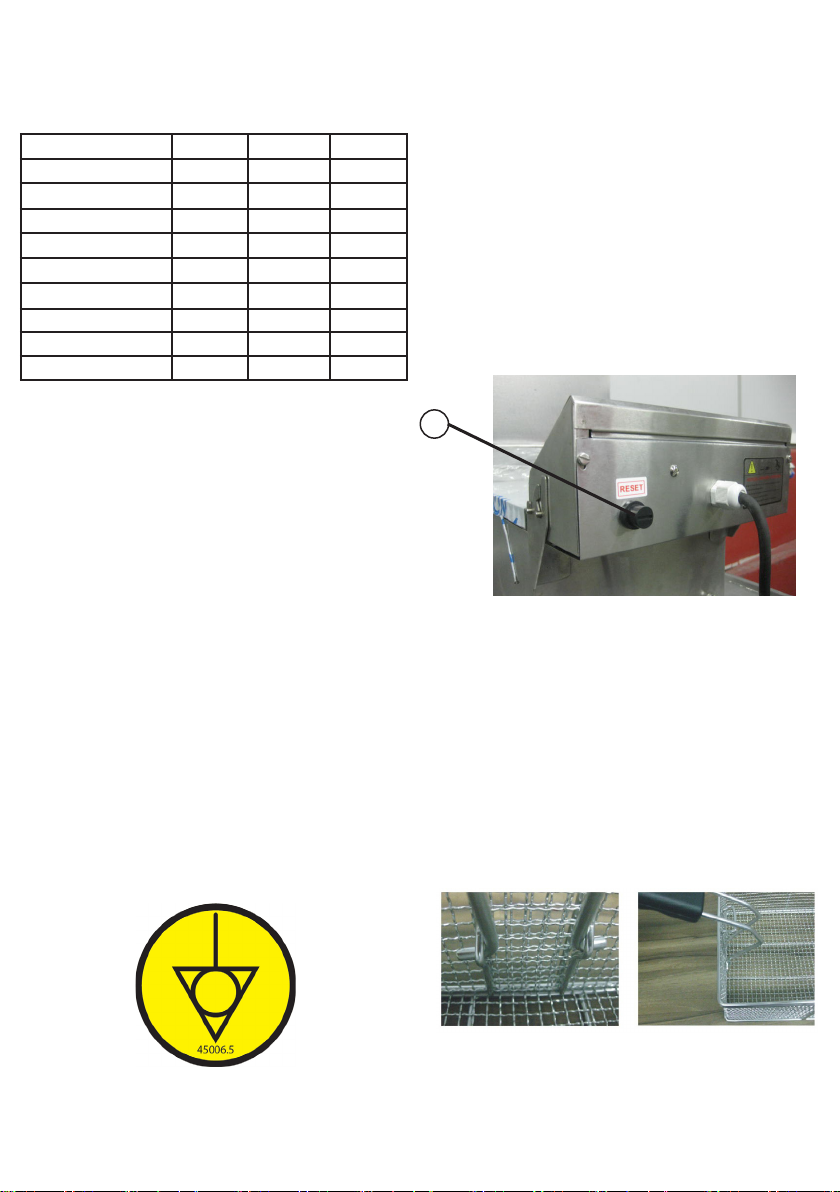
* Contactos – Interruptor Encendido / Apagado, botón de
emergencia, botón reset/restablecer, circuitos electrónicos,
etc. Verique el equipo para que todos los componentes
funcionen correctamente y que la operación del aparato sea
normal.
* Instalación – Verique la instalación de su aparato según el
ítem 2.1 “Instalación” de este manual.
1 - Ítems a vericar y ejecutar mensualmente:
- Vericar la instalación eléctrica;
- Medir la tensión del tomacorriente;
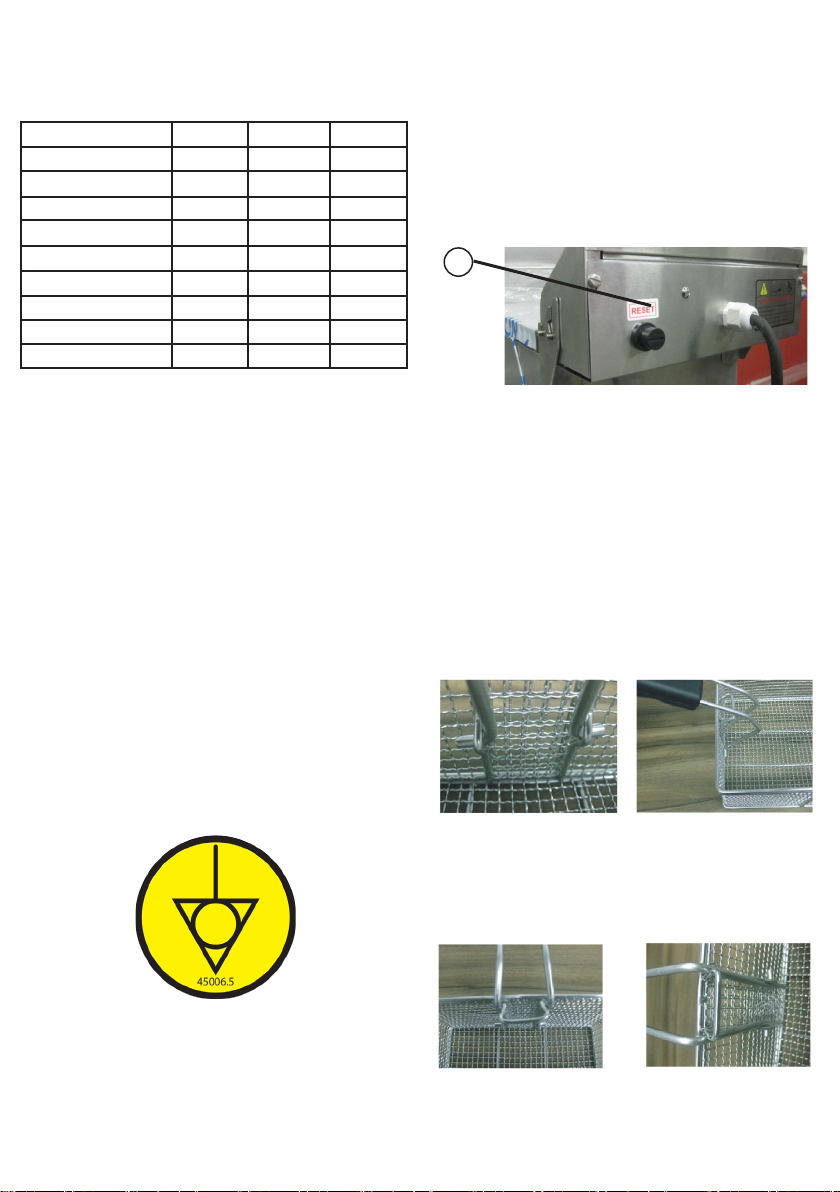
Nível Máx.
5 Litros
Nível Min.
3 Litros
FIGURA 06 FIGURA 07
FIGURA 08
Pase el lector de QR Code para obtener
informaciones sobre cuidados con los
aceros inoxidables.

10
- Medir la corriente de funcionamiento y comparar con la
nominal;
- Vericar aprietes de todos los terminales eléctricos del
aparato a n de evitar posibles malos contactos;
- Vericar posibles holguras del eje del motor eléctrico;
- Chequear el cableado y el cable eléctrico cuando haya
señales de supercalentamiento, aislación deciente o avería
mecánica.
2 - Ítems a vericar o ejecutar a cada 3 meses:
- Vericar componentes eléctricos como el Interruptor
Encendido/Apagado, botón de emergencia, botón reset/
reinicio y circuito electrónicos cuando haya señales de
supercalentamiento, aislación deciente o avería mecánica.
- Vericar posibles holguras en los cojinetes y rodamientos.
- Vericar retenes, anillos o’rings, anillos v’rings y demás
sistemas de sellamiento.
7. NORMAS OBSERVADAS
ABNT NBR NM 60335-1
IEC 60335-2-37
8. RESOLUCIÓN DE PROBLEMAS
PROBLEMAS CAUSAS SOLUCCIONES
- Máquina no prende.
- Falta de energia elétrica.
- Problema en el circuito eléctrico
interno o externo de la máquina.
- Resistencia o termostato quemado.
- Verique se hay energía eléctrica en la
red eléctrica.
- Llame el Servicio Técnico.
- Cheiro de queimado e/ou fumaça. - Problema en el circuito eléctrico
interno o externo de la máquina. - Llame el Servicio Técnico.
- Cabo elétrico danicado - Falla en el transporte del producto. - Llame el Servicio Técnico.
- Aceite hierve demasiadamente - Termostato con fallo. - Llame el Servicio Técnico.
Pase el lector de QR Code para obtener
informaciones sobre seguridad y
mantenimiento.

11
9. DIAGRAMA ELÉCTRICO

12
___________________________________________________________
___________________________________________________________
___________________________________________________________
___________________________________________________________
___________________________________________________________
___________________________________________________________
___________________________________________________________
___________________________________________________________
___________________________________________________________
___________________________________________________________
___________________________________________________________
___________________________________________________________
___________________________________________________________
___________________________________________________________
___________________________________________________________
___________________________________________________________
___________________________________________________________
___________________________________________________________
___________________________________________________________
___________________________________________________________
___________________________________________________________
___________________________________________________________
___________________________________________________________
___________________________________________________________
___________________________________________________________
___________________________________________________________
___________________________________________________________
___________________________________________________________
___________________________________________________________
___________________________________________________________
___________________________________________________________
___________________________________________________________
___________________________________________________________
___________________________________________________________
___________________________________________________________
___________________________________________________________
Other manuals for FE-10-N
1
Table of contents
Languages:
Other Skymsen Fryer manuals
Popular Fryer manuals by other brands

Buffalo
Buffalo CP793 instruction manual

Vulcan-Hart
Vulcan-Hart ERD40 Installation & operation manual

Henny Penny
Henny Penny LOV LVE-100 Series quick start guide

Elite Gourmet
Elite Gourmet EAF2612D user manual

Gourmia
Gourmia GDF450 user manual

Cook's Companion
Cook's Companion CCAF126 Instructions & recipes