2
01
02
06
03
04
05
07
08
09 10
1. INTRODUCTION
This Equipment was designed to be used in household
applicaons, or similar condions, we clarify:
-Household Kitchen spaces in oces, store or similar
spaces;
-Household kitchens located in farms;
-Gourmet Household Kitchen spaces of residenal buildings
or private homes.
1.1 Safety
The instrucons below must be followed to avoid accidents,
non-compliance can cause serious injuries:
1.1.1 Never use this Equipment with wet clothes or wet
feet or on a wet or humid surface, do not immerse it under
water, do not place under any kind of water ow or similar,
do not use water jets of any kind on the equipment.
1.1.2 If the Equipment physically falls down, suers any
kind of damage or has stopped working for any reason, it is
necessary to call specialized technical assistance.
1.1.3 The use of unauthorized accessories that are not
recommended by the manufacturer can lead to injuries.
1.1.4 Keep hands or any kind of devices, tools, accessories
away from the moving parts of the Equipment while it
is turning on and processing recipes to avoid potenal
damages to the Equipment and injuries to the end user.
1.1.5 Never operate the Equipment while wearing clothes
with long sleeves, especially on the wrists.
1.1.6 Make sure that the voltage of Equipment and of the
local electrical supply where the unit is going to be used
match and are adequate to this kind of equipment. Also
make sure that the equipment is properly grounded.
1.1.7 Before turning ON the machine, make sure the Large
Crown N°09 or the Small Crown N°10 and the Juice Chamber
N°02 are well ed on their posions.
This Equipment cannot be operated by persons
(children included) with reduced mental, sensorial or
physical capacies. Persons without proper training of
knowledge on how the equipment works cannot operate
this equipment. Only apt and trained persons or persons
under the supervision of an apt and trained supervisor
must operate the equipment.
We recommend children to be watched to not allow
them to play with the machine.
This equipment has a safety system to ensure the
operator’s integrity. The operaon of the equipment must
be in accordance with the item “Operaon Procedures”
of this manual. Other procedures for operang the
equipment are unsafe, in this condion the equipment
should not be used.
Always disconnect the Equipment from the power
supply when: It is not being used, before realizing any
cleaning or maintenance, before you place or take out any
accessories, before you realize any kind of procedure or
service with the unit.
Do not use the Equipment if there is any damage to
the cord or plug. Make sure that the cord does not stay
on the edge of a working table, staon or furniture and
make sure it is not in contact with hot surfaces. If the Cord
is not in good condions of use, to avoid accidents it must
be replaced by the supplier, an authorized technician or
someone qualied for the service.
If any emergency arises disconnect the Equipment from
the power supply, unplug it from the electrical socket.
This equipment can be used connuously as long
as the limits of the machine are respected, that is, the
extracon of the orange juice must be done in a so way,
compressing the orange against the nut without forcing
the engine to stop.
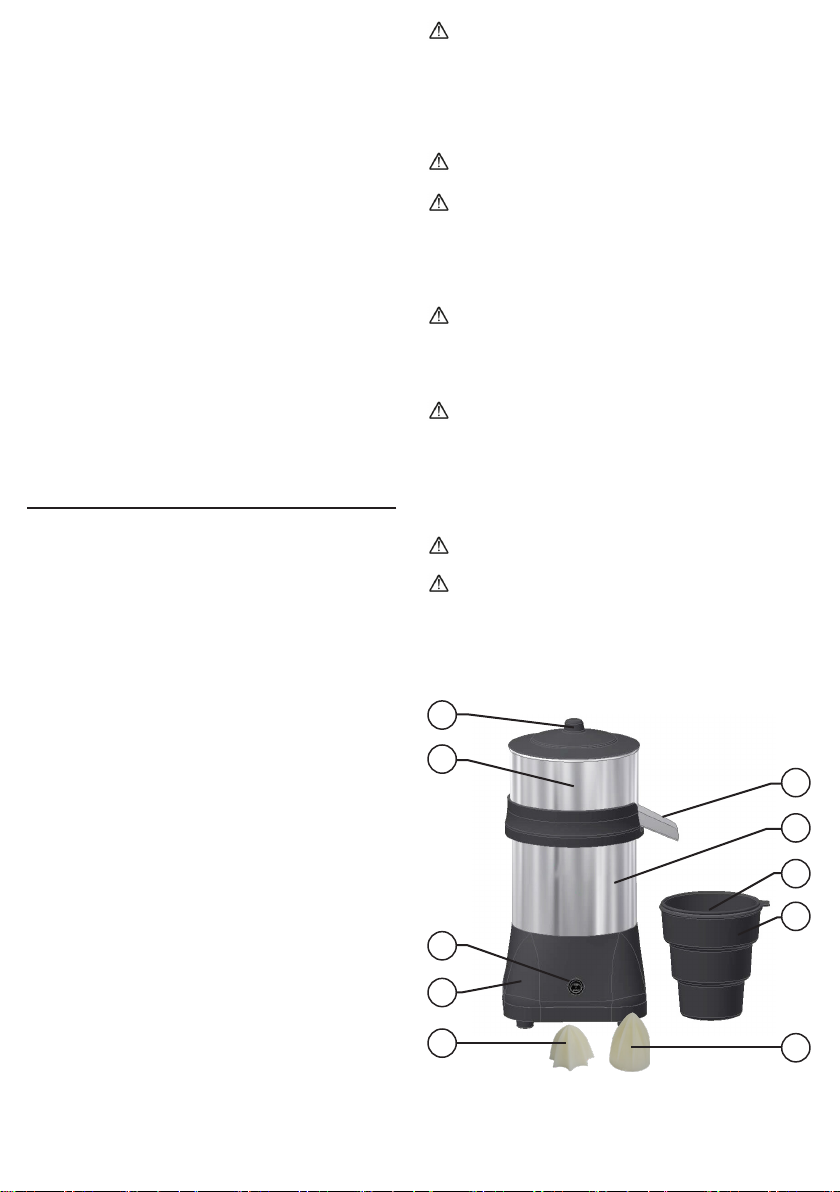
2. COMPONENTS AND TECHNICAL CHARACTERISTICS
01 – Lid
02 – Juice Chamber
03 – Motor Support Flange
04 – Motor Housing
05 – ON/OFF Switch
06 – Base
07 – Sieve
08 – Cup
09 – Large Crown
10 – Small Crown
SUMMARY
1. INTRODUCTION .......................... 2
1.1 Safety .................................................. 2
2. COMPONENTS AND TECHNICAL
CHARACTERISTICS .......................... 2
3. INSTALLATION AND PRE-OPERATION...... 3
3.1 Placement of the equipment................ 3
3.2 Electrical Installaon............................ 3
3.3 Safety System ...................................... 3
4. OPERATIONAL PROCEDURES....... 3
5. CLEANING................................... 3
6. MAINTENANCE ........................... 3
7. PROBLEMS RESOLUTION............. 4
8. ELECTRICAL DIAGRAMS............... 5