Skytech SkyBridge 7060TX User manual

Skytech: 7060TX SkyBridge Rev. 9-15-20 Page 1
INSTALLATION AND OPERATING INSTRUCTIONS
IF YOU CANNOT READ OR UNDERSTAND THESE INSTALLATION
INSTRUCTIONS DO NOT ATTEMPT TO INSTALL OR OPERATE
NOTE: This product is designed for use with an
attended hearth appliance or re feature. Adults must
be present when the Control System is operating. DO
NOT program or set this Control to operate a hearth
appliance or re feature when Adults are not physically
present. Furthermore, DO NOT leave the hearth
appliance or re feature burning unattended; it may
cause damage or serious injury. If an Adult is going
to be away from the hearth appliance or re feature
for any length of time, then the handheld/wall mount,
receiver/control module and application should be in
the“OFF” position.
INTRODUCTION
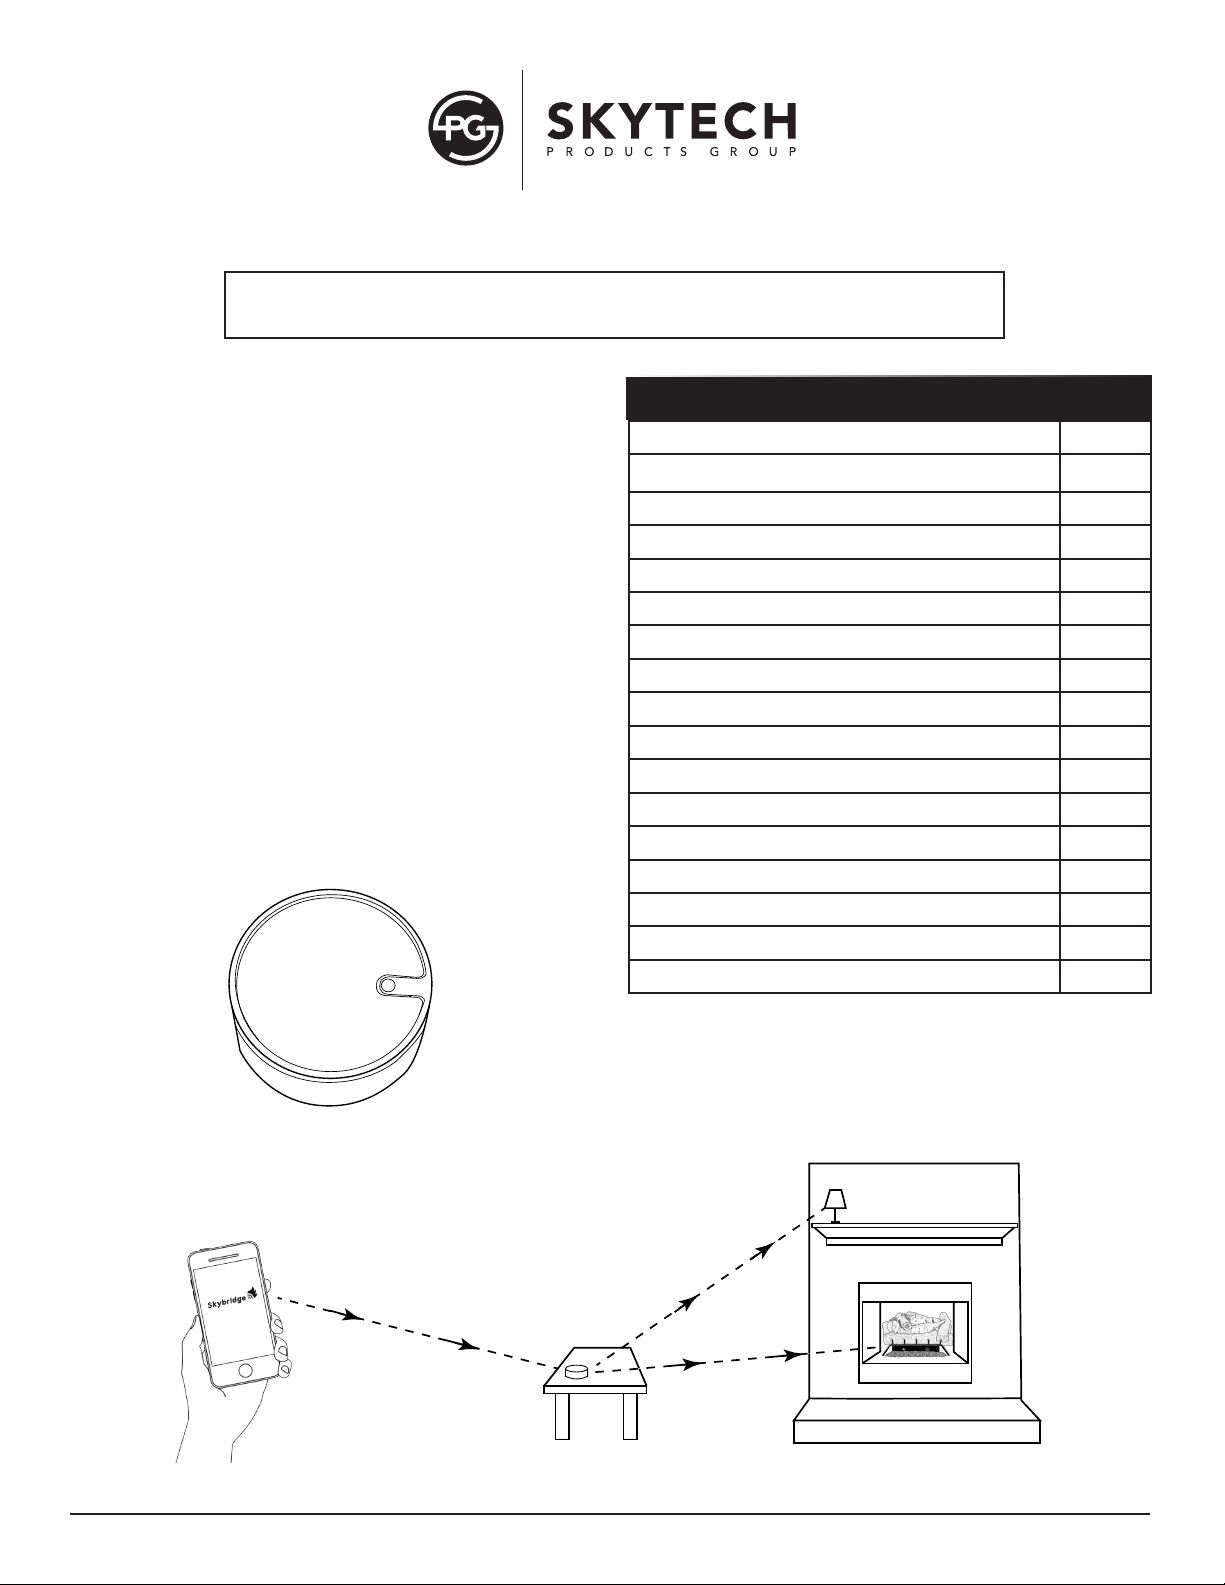
SkyBridge is a compact, battery operated, wireless,
Bluetooth to Radio Frequency (RF) converter. See Fig. 1.
It enables you to control a device, from any Smartphone or
Tablet and converts it into 433MHz radio frequency signal
to control compatible remote controls.
The system comes complete with (1) SkyBridge and (2)
AAA batteries.
Model: 7060TX SkyBridge
BASIC OPERATION
SkyBridge App
SkyBridge
Fireplace
Receiver
Lamp
Bluetooth Signal
Fig. 1 SkyBridge
Fig. 2 SkyBridge basic operation.
TABLE OF CONTENTS
Preparing SkyBridge 2
Downloading SkyBridge App 3
Bluetooth Settings 3
First Time Connection 3
Opening App 3
Home Screen 4
Settings Screen 4
Sync Conguration Screen 5
Room Selection Screen 5
Room Device Selection Screen 6
Device Control Screen 6
Event Selection Screen 7
Event Setup Screen 7- 8
Immediate 8
Scheduled 8
Cycle/Repeat 9
Troubleshooting 9

Skytech: 7060TX SkyBridge Rev. 9-15-20 Page 2
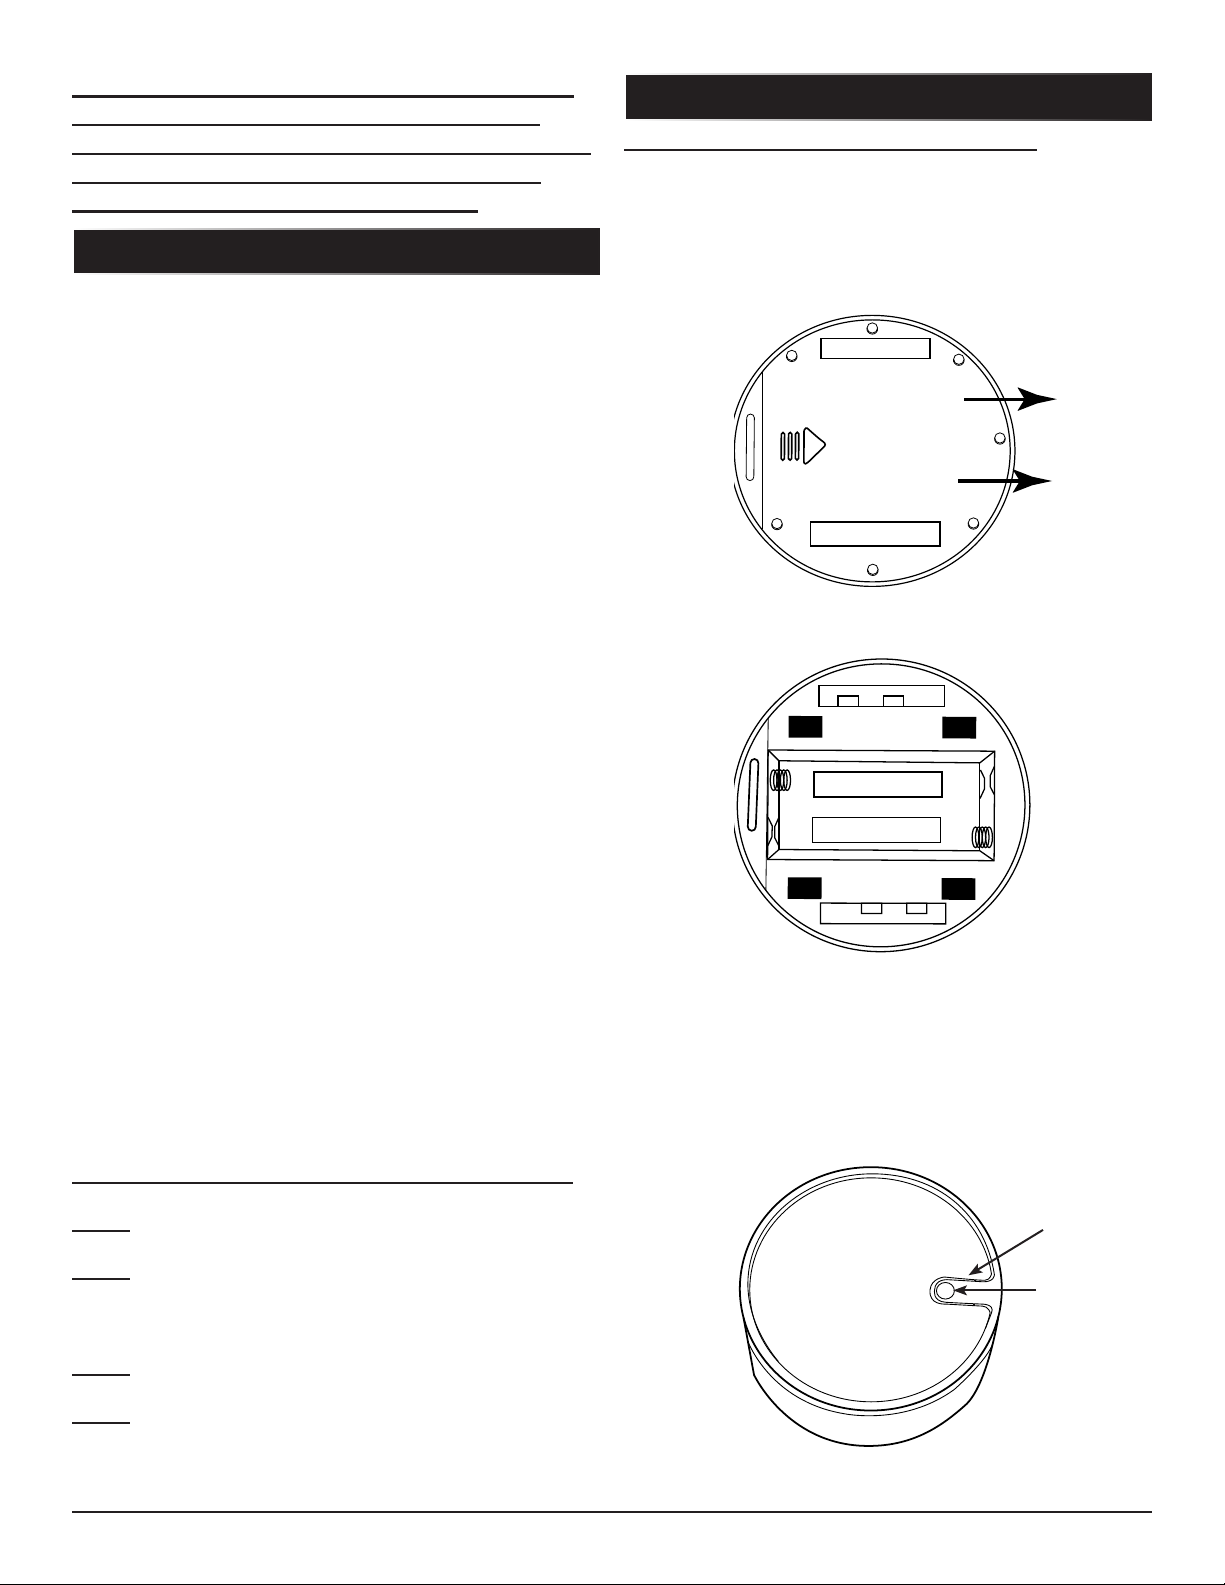
Turn the Skybridge upside down and slide the back cover
off using your thumbs in the direction of the arrow. This will
expose the battery compartment. Insert two (2) AAA
Alkaline batteries intoSkyBridge with the at side against
the spring. See Figs 3 and 4.
After the batteries are installed the red LED light will ash
3-times indicating it is ready to for use. Replace the cover.
Note: The red LED light is located under the button on the
top of the SkyBridge. See Fig. 5.
Slide
Battery
Cover
Off
AAA +
+
-
-
AAA
Fig. 3 Removing battery cover.
Fig. 4 Battery cover removed.
CAUTION: IT IS IMPERATIVE TO READ THE
INSTRUCTIONS THOROUGHLY BEFORE
PROCEEDING. YOU NEED TO UNDERSTAND
HOW THE SYSTEM OPERATES BEFORE
ATTEMPTING TO USE SKYBRIDGE.
PREPARING SKYBRIDGE
INSTALLING BATTERIES INTO SKYBRIDGE
The term "device" discussed in this manual can be dened
as a gas replace or gas heater that may be turned ON/
OFF with a dry contact switch including Millivolt systems
and many electronic ignition control systems (IPI). This
device is connected to a battery powered receiver.
Purchased seperately.
A device can also be dened as an electric replace, lamp,
radio or most anything with a switch, that enables you to
turn that device ON or OFF. That device is connected to
the model 7015 (120VAC receiver). Purchased seperately.
The system uses Bluetooh technology and does not
require Wi-Fi for operation.
Using a Smartphone or Tablet, a signal is sent from the
Smartphone to the SkyBridge. SkyBridge sends a signal to
a receiver that is connected to a replace to turn it ON or
OFF. SkyBridge can also control 120VAC outlet receivers
(optional) to turn ON or OFF a lamp, space heater, or
similar device. See Fig. 2 on front cover.
The working range of the radio frequency (RF) is 25-feet
and the Bluetooth (BLE) range is 100-feet.
The system is capable of operating 8 individual rooms,
with 8 devices in each room and each device can be
programmed using multiple timers to turn ON or OFF a
device(s). You have the ability to rename a device, room
name or a programmed event.
BASIC OPERATION CONTINUED
Red LED
Light
Fig. 5 Red LED light under button.
Pairing
Button
Optional Available Systems For Use With SkyBridge:
Model: 7001 - Button transmitter and receiver for a dry
contact switch (i.e. gas replaces, gas heaters).
Model: 7015 - Button transmitter and 120VAC electric
receiver for ON/OFF devices up to 1800 Watts (i.e. electric
replace, lamps and viturally any plug-in type of device with
an ON/OFF switch).
Model: 4001-A - Handheld remote control and receiver for
a dry contact switch (i.e. gas replaces, gas heaters).
Model: 4001TH-A - Thermostat handheld remote control
and receiver for a dry contact switch (i.e. gas replaces,
gas heaters).

Skytech: 7060TX SkyBridge Rev. 9-15-20 Page 3
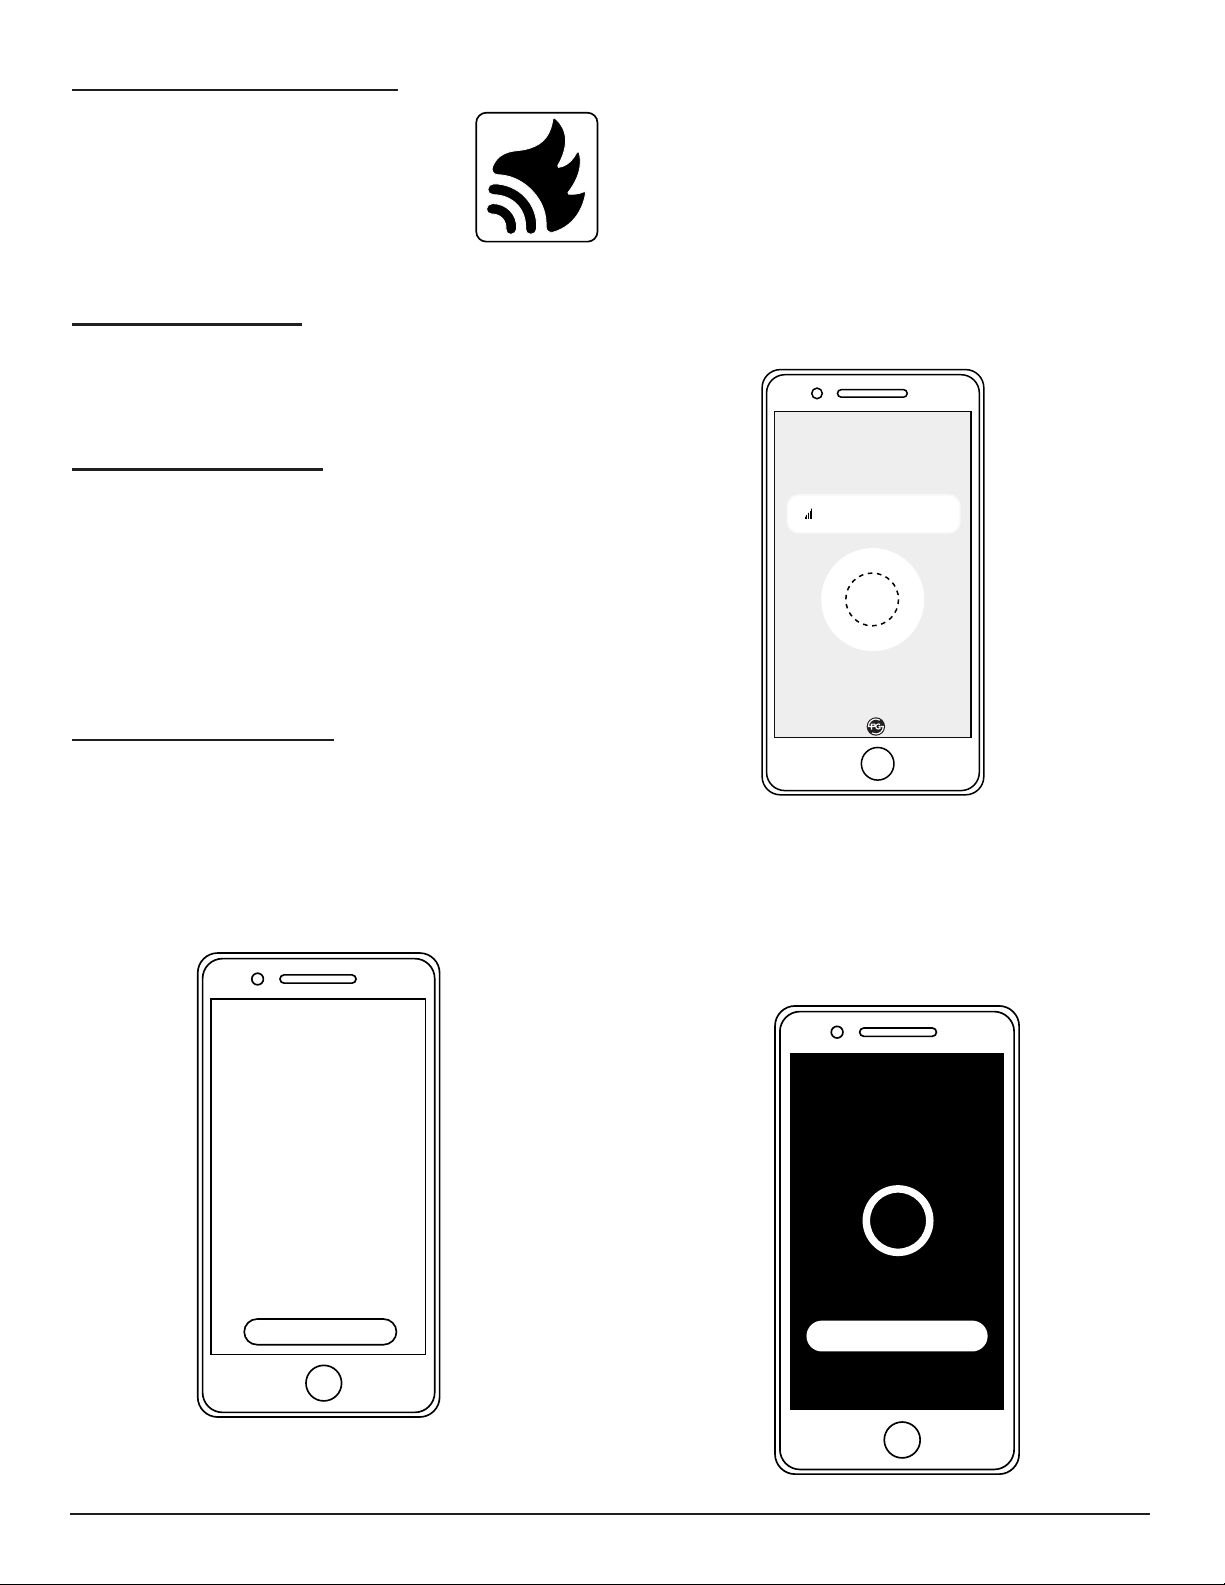
Begin the installation by rst downloading
the SkyBridge App onto your Smartphone.
This app is available in Apple Store or
Google Play. Look for the App icon (image
to right).
Ensure the Bluetooth option is enabled (turned ON) on your
Smartphone for operation. Note: Only one Smartphone,
Tablet or other Smart Device can control one SkyBridge at
a time.
BLUETOOTH SETTINGS
DOWNLOADING SKYBRIDGE APP
FIRST TIME CONNECTION
The rst time you connect to the SkyBridge App, the app
will prompt user to press pairing button. During the
linking process, the red LED light on top of the device will
ash until you press the “PAIRING” button on top of the
device. See Fig. 5 on page 2. Note: You must push and
release the button within 15 seconds.
After the pairing process is complete the app is ready to
use.
OPENING SKYBRIDGE APP
Step 1: Open the SkyBridge app by touching the ame icon
on your smartphone. As the app opens, it will rst show an
“Intended Use” disclaimer. You must read and accept the
disclaimer by pressing the yellow “ACCEPT” button at the
bottom of the screen before the app will fully open.
Note: Some phones may require scrolling through the
entire disclaimer before you can touch the ACCEPT button.
See Fig. 6.
Skytech Products Group
Usage Disclaimer
INTENDED USE
THIS APP IS USED TO OPERATE AN
“ATTENDED APPLIANCE”. “
ATTENDED APPLIANCE” MEANS
YOU ARE PRESENT WITH THE
APPLIANCE. BY CONTINUING WITH
THE USE OF THIS APP, YOU
CONSENT THAT YOU ARE
PHYSICALLY PRESENT IN THE ROOM
WITH THE APPLIANCE AND ITS IN
GOOD WORKING CONDITION.
FURTHERMORE, PLEASE BE SURE TO
MAINTAIN YOUR APPLIANCE
ACCORDING TO THE
MANUFACTURERS SPECIFICATIONS.
MOST MANUFACTURERS REQUIRE
APPLIANCES TO BE SERVICED AT
LEAST ONCE EVERY 12 MONTHS
Accept
Fig. 6 Shows disclaimer on smartphone screen.
Fig. 7 Shows connecting screen.
Step 2: After touching the “Accept” button, the phone will
automatically connect to SkyBridge within a few seconds
before opening to the “Home Screen”. If the app nds
mutiple SkyBridges within Bluetooth range, they will
appear on the connection screen; press to select one of
the SkyBridges, or the app will automatically connect to the
last SkyBridge to which it was connected. If no SkyBridge
is found, it will indicate that no SkyBridge was found and
instruct user to swipe down on the screen to re-scan for a
SkyBridge that is powered and in-range.
Note: A spinning circle will appear on the screen during the
connection process. See Fig. 7.
Connecting...
127
Connection
Discovered Devices
Scanning for SkyBridge
Note: The SkyBridge app will turn OFF automatically if it
has not been used within a 1-minute time frame. See Fig. 8.
A 15-second countdown will appear before completely
turning OFF. To prevent the app from closing touch the
"Yes, I am still using this app button".
Are you still using this app?
Yes, I am still using this app
15
Fig. 8 Shows 15 second countdown.

Skytech: 7060TX SkyBridge Rev. 9-15-20 Page 4
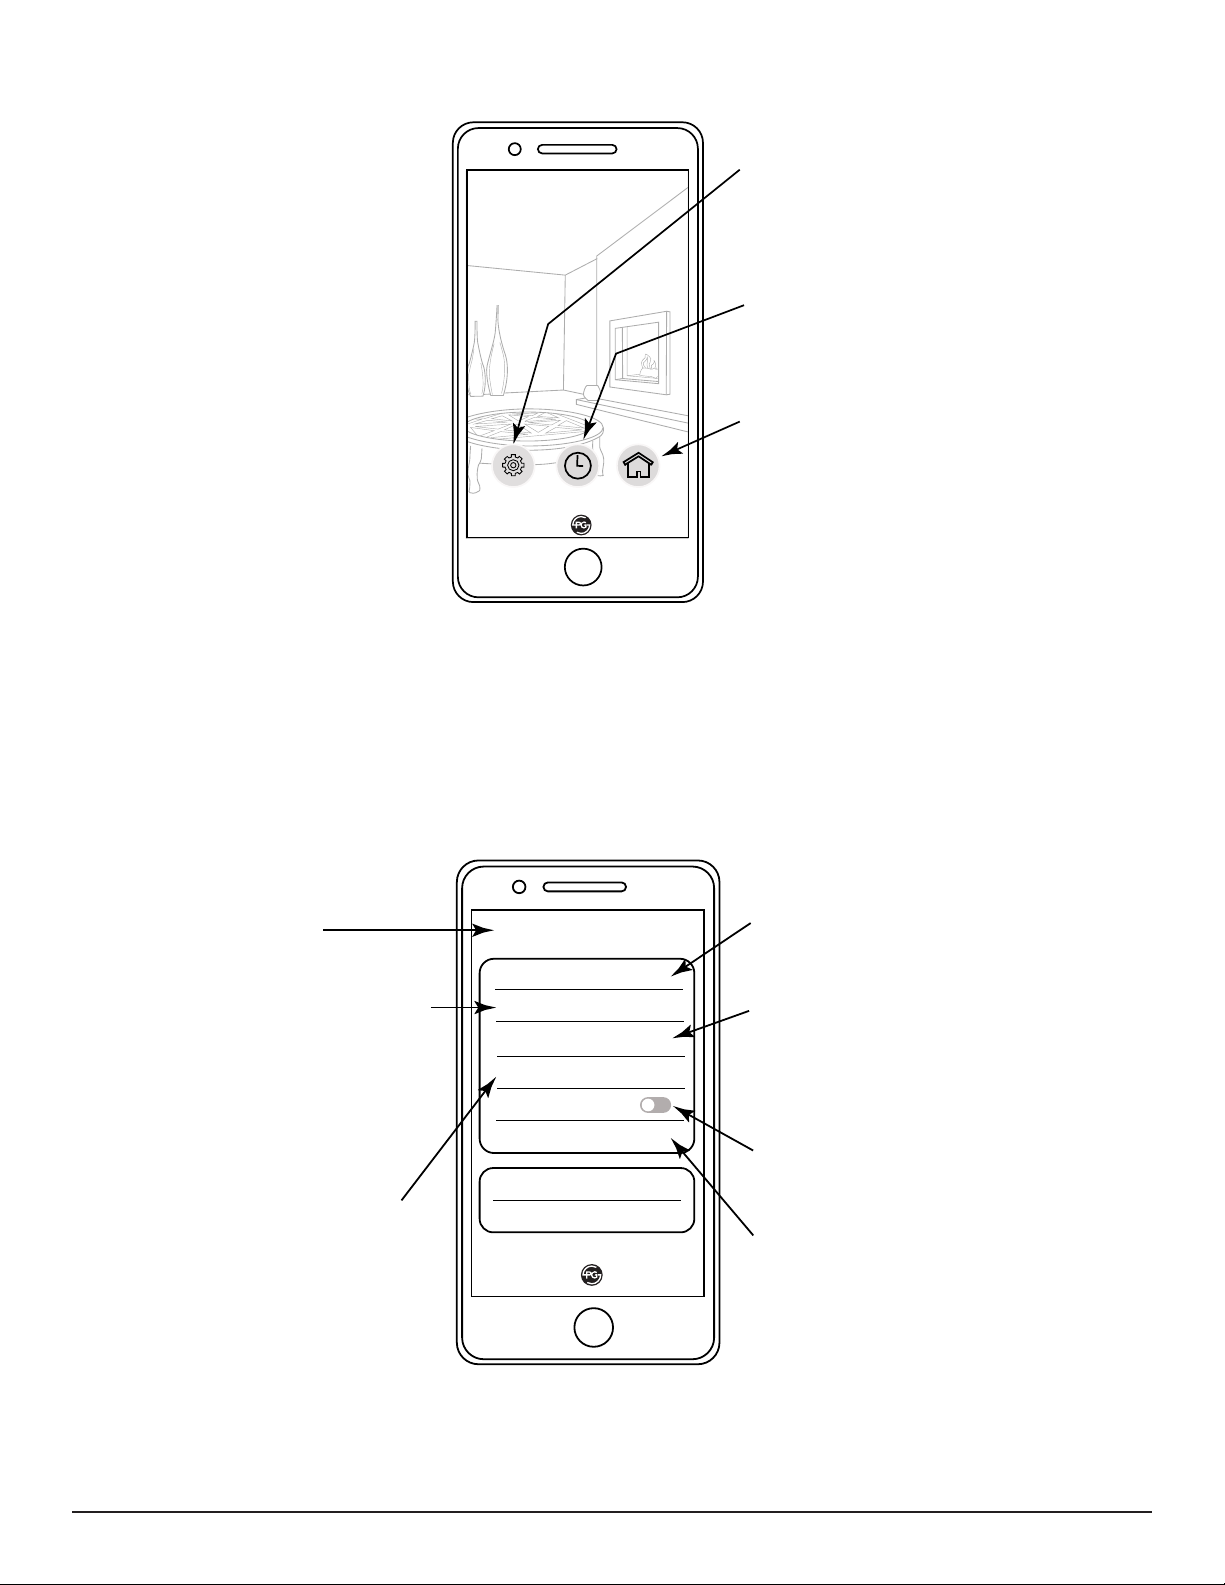
Settings Event Rooms
HOME SCREEN
Settings - enables the user to change the
SkyBridge Connection, Sync Configuration,
Rename SkyBridge, Access Help Information
and other settings. See SETTINGS for more
details.
Event - enable the user to set up specific
times to turn specific devices ON or OFF in a
specific room. See EVENT SELECTION
section for more details.
Rooms - Displays a list up to 8 rooms. Note:
Up to eight (8) devices can be connected in
one room, up to (8) rooms (64 devices total).
See ROOM SELECTION section for more
details.
Fig. 9 Shows the "Home Screen." This is what you see after the Smartphone or Tablet connects to SkyBridge.
Fig. 10 Settings Screen above provides various choices to select for SkyBridge operations.
<Settings
SkyBridge Connection
Sync Configuation
Rename SkyBridge
Firmware Version V1.300
Vibration
Disclaimer
>
>
>
>
>
App Version 2
Help
Back Button: Returns
to the Home Screen.
Sync Configuraton: Enables user to
upload their SkyBridge App
configuration to the internet to enable
sharing settings with another user or to
back up your current settings. See
Sync Configuration section for more
details.
Help : A quick reference guide to
SkyBridge device setup.
SkyBridge Connection: Returns to the
connection screen to scan and conect to
other nearby SkyBridges.
Rename SkyBridge: Allows SkyBridge to
have a custom name if multiply SkyBridges
are nearby. Name will appear on the
connection screen when scanning for
SkyBridges.
Vibration: Smartphone will vibrate
when an ON or OFF command is sent to the
SkyBridge.
Disclaimer: Displays the disclaimer regarding
safe SkyBridge operation.
SETTINGS SCREEN

Skytech: 7060TX SkyBridge Rev. 9-15-20 Page 5
<ROOMS
Room 1
Room 2
Room 3
Back Button:Returns to
the Home Screen.
Room Selection Button:
Scroll down to see up to 8
different rooms. Press to enter
Room Device Selection
screen. See Room Device
Selection section for more
details.
Entire Room ON/OFF Button:
Press to turn ALL devices in a room
ON or OFF.
ROOM SELECTION SCREEN
Fig. 12 Room Selection Screen provides the ability to choose any of the (8) rooms to add a device.
The Sync Conguration is used to synchronize SkyBridge data to the Amazon Web Service (AWS) cloud. This
enables user to share your settings with another Smartphone or a way to save the current settings as a backup, if ever
needed.
Fig.11 Synchronizing screen.
SYNC CONFIGURATION SCREEN
To Export the configuration press the “EXPORT
TO CLOUD” button. Follow the on-screen
prompts to confirm sync to the cloud.
To Import a configuration, you must first
download the app, and complete the initial
connection process on the SkyBridge on which
you have exported settings. Then, press the
IMPORT FROM CLOUD button and follow the
on-screen prompts.
Date and Time of last Export.
<Configuration Sync
EXPORT TO CLOUD
IMPORT FROM CLOUD
Last saved 2020-12-24 11:28:15
Back Button: Returns to
Settings Screen.

Skytech: 7060TX SkyBridge Rev. 9-15-20 Page 6
<Room 1
++
Devices
Device 1
Off
Back Button: Returns to the
Room Selection Screen. Edit Button: Press and follow on
screen prompts to enter a custom
room name.
Device Button: Device has
already been setup. Scroll to the
right to see up to 8 devices per
room. Press to enter Device Control
Screen. See Device Control
section for more information.
Add Device Button: Device has NOT
been setup. Scroll right to see up to 8
devices per room. Press to enter
Device Setup Screen. Follow the
on-screen prompts to select device
type. Refer to Device Control
section below and LEARN section of
Device Receiver instructions to
synchronize the App with the Device
Receiver.
+
ROOM DEVICE SELECTION SCREEN
<Device 1
I
O
ON Button: Press to
transmit an ON signal.
Break Link Button: Press to
remove device information from App.
You must also refer to LEARN
section of the Device Receiver
instructions to remove the SkyBridge
security code from the Device
Reciever’s LEARN memory.
Back Button: Returns
to the Room Device
Selection Screen.
OFF Button: Press to
transmit an OFF signal.
Edit Button: Press and
follow on-screen prompts
to enter a custom device
name.
DEVICE CONTROL SCREEN
Save
Save Button: Press to save
device setting. When setting
up an Event, Save button
replaces Break Link Button.
Fig. 13. Room Device Selection enables the ability to add up to (8) devices in (1) room.
Fig. 14 Device Control Selection enables the ability to turn an individual device ON or OFF.

Skytech: 7060TX SkyBridge Rev. 9-15-20 Page 7
<EVENTS
Event 1
Event 2
Event 3
EVENT SELECTION SCREEN
Back Button: Returns to the
Home Screen.
Event Selection Button:
Scroll down to see up to 8 different
events. Press to enter Event
Setup screen. See EVENT
SETUP section for more details.
If event is active, the icon will change to
a yellow “PLAY” icon. The Event will
then execute from the SkyBridge
and will execute as programmed by
the user without the app being open
or anyone present.
STOP/PLAY BUTTONS: Press to activate
(PLAY*) or deactivate (STOP**) an event.
If event is deactivated, the icon will
change to a grey “STOP” icon.
You must be within range and
connnected to the SkyBridge with
your Smartphone to stop Event
execution.
Fig. 15 Device Control Selection enables the ability to program an individual device to turn ON or OFF at
designated time frames.
Cancel Button: Cancels any changes made to
an event and returns to Events Selection Screen.
Event 1
Cancel Save
Immediate Scheduled Cycle/Repeat
+
+
+
Start
Hold to Delete
Hold to Delete
Hold to Delete
Device 1 ON
00:30:00
EVENT SETUP SCREEN
Event Start Day(s)/Time Button:
Displays start day and time as applicable.
Press to change start Day(s)/Time.
Immediate: No selection is available
Scheduled: Select one day and start time.
Cycle/Repeat: Select 1 or up to 7 days and
start time.
Save Button: Saves any changes made to
the event and returns to Event Screen.
Event Step:
Event step has a device already setup. Scroll
down to see up to 8 event steps. Press to
enter Event Device Control Screen, select
device state (ON or OFF); press SAVE to
change any device state changes and return
to Event Setup Screen. Press and Hold to
delete event step.
Delay Button: Press the small clock to set a
delay time and follow the on-screen prompts.
Once all Event segments are complete, the
Event is set to turn OFF all devices that had
been turned ON previously in the Event.
Therefore, a delay is necessary to leave a
device ON for a period of time. It is also
possible to turn other devices ON or OFF at
different intervals during the Event.
Delay time is displayed in the “Event Tree”.
Event Step:
Event step has NOT been setup.
Scroll down to see up to 8 event
steps. Press to enter Event Device
Control Screen, select device state
(ON or OFF); press SAVE to save
device state and return to Event
Setup Screen.
Saturday 08:00
Event Type Buttons (3):
Immediate - Will execute immediately after
touch “Play” button.
Scheduled - Enables the user to schedule a
specific time for a device to turn ON/OFF up to a
week in advance.
Cycle/Repeat - Allows event operation on
mutiple days of the week on a reoccurring basis.
Fig. 16 Event Setup Screen enables the ability to program start times, days of the week and how long to operate.

Skytech: 7060TX SkyBridge Rev. 9-15-20 Page 8
24-HR 12-HR12-HR 24-HR 12-HR
01hr 1AM 13hr 1PM
02hr 2AM 14hr 2PM
03hr 3AM 15hr 3PM
04hr 4AM 16hr 4PM
05hr 5AM 17hr 5PM
06hr 6AM 18hr 6PM
07hr 7AM 19hr 7PM
08hr 8AM 20hr 8PM
09hr 9AM 21hr 9PM
10hr 10AM 22hr 10PM
11hr 11AM 23hr 11PM
12hr 12PM 24hr 12AM
Table 1 24-hr to 12-hr AM/PM Time Table. These times are
used when setting Delay times or Program start and stop
times.
Symptom: App will not connect to SkyBridge
Remedy:
1. Ensure Smartphone is within Bluetooth range.
2. Ensure no other Smartphone is connected to
SkyBridge. Only one Smartphone or Tablet may be
connected at a time.
3. From connection screen, pull down to re-scan for
available SkyBridges.
4. Restart Smartphone (power OFF and back ON)
5. Remove batteries from SkyBridge, check voltage and
replace if less than 1.2 volts each. Reinstall fresh
batteries and reset SkyBridge.
Symptom: SkyBridge app works, but device will not
respond
Remedy:
1. Ensure device works with button or handheld
transmitter.
2. Repeat device learning process. See Fig. 14, page 6.
• Battery Powered Receivers: Check batteries in
receiver and ensure they are a min. 1.2 volts each
• Ensure the replace pilot is operating and gas control
valve is in the ON position (See Fig. 17).
• 120VAC Powered Receivers: Check LED power
indicator. Ensure receiver is plugged in and has
power (See Fig. 18).
• Ensure electrial device (i.e. Lamp) is plugged into
reciever and its switch is in the ON position.
TROUBLESHOOTING
LEAR
N
REMOTE
ON
OFF
Fig. 17 Battery powered receiver.
Fig. 18 120VAC powered receiver.

Skytech: 7060TX SkyBridge Rev. 9-15-20 Page 9
Federal Communication Commission Interference Statement
This device complies with part 15 of the FCC Rules. Operation is subject to the following two conditions:
(1) This device may not cause harmful interference, and (2) this device must accept any interference received, including
interference that may cause undesired operation.
Note: This equipment has been tested and found to comply with the limits for a Class B digital device, pursuant to part 15
of the FCC Rules. These limits are designed to provide reasonable protection against harmful interference in a residential
installation. This equipment generates, uses and can radiate radio frequency energy and, if not installed and used in
accordance with the instructions, may cause harmful interference to radio communications. However, there is no
guarantee that interference will not occur in a particular installation. If this equipment does cause harmful interference to
radio or television reception, which can be determined by turning the equipment off and on, the user is encouraged to try
to correct the interference by one or more of the following measures:
—Reorient or relocate the receiving antenna.
—Increase the separation between the equipment and receiver.
—Connect the equipment into an outlet on a circuit different from that to which the receiver is connected.
—Consult the dealer or an experienced radio/TV technician for help.
Note: The Grantee is not responsible for any changes or modications not expressly approved by the party responsible
for compliance. such modications could void the user’s authority to operate the equipment.
RF Warning
The device has been evaluated to meet general RF exposure requirement. This equipment complies with FCC’s RF
radiation exposure limits set forth for an uncontrolled environment. This device and its antenna(s) must not be co-located
or conjunction with any other antenna or transmitter.
IC Warning
This device complies with Industry Canada license-exempt RSS standard(s).
Operation is subject to the following two conditions: (1) this device may not cause interference, and (2) this device must
accept any interference, including interference that may cause undesired operation of the device.
Le présent appareil est conforme aux CNR d’Industrie Canada applicables aux appareils radio exempts de licence.
L’exploitation est autorisée aux deux conditions suivantes : (1) l’appareil ne doit pas produire de brouillage, et (2)
l’utilisateur de l’appareil doit accepter tout brouillage radioélectrique subi, même si le brouillage est susceptible d’en
compromettre le fonctionnement.
SKYBRIDGE SPECIFICATIONS
Power Source: 3 Volt DC - (2) 1.5 Volts AAA Alkaline Batteries
FCC ID No: K9L-7060TX Canadian IC ID No: 2439A-7060TX
Radio Frequency: 433.92MHz, 2.4GHz
Environment Temperature: 0-40ºF
Dimension: 2.55” x 1.18” (65 x 30mm)
Weight: 0.08lbs (40g)
For Technical Service, call: U.S. INQUIRIES
(855) 498-8324 or (260) 459-1703
Skytech Products Group
9230 Conservation Way
Fort Wayne, IN 46809
Sales: (888) 672-8929
Web site: www.skytechpg.com
MANUFACTURED EXCLUSIVELY FOR SKYTECH II, INC

Skytech: 7060TX SkyBridge Rev. 9-15-20 Page 10
1. Limited Warranty. Skytech II, Inc. (“Skytech”) warrants that each new Skytech Control System, including allhardware,
parts and components (the “System”), when used in accordance with the instructions furnished by Skytech provided
with each System, shall be free in all material respects, of defects in materials and any workmanship under normal
use, subject to proper installation (“Limited Warranty”). This Limited Warranty is non-transferrable and setsforth our
sole and exclusive liability and the sole and exclusive remedies available in relationship to any nonconformity, defect
or similar claim. This Limited Warranty only extends to the original retail purchaser of the System (the “Customer”) and
expires upon any sale or transfer of the home where the System is installed by the Customer.
2. System Sold As Is. Subject to this Warranty and any applicable state law, each System is sold by Skytech to a
Customers, limitations, reservations of rights, exclusions, and qualications set forth on Skytech’s website, www.
skytechpg.com, all of which are considered part of the Warranty and are incorporated herein (collectively, the “Addi-
tional Terms”). Each Customer, by purchasing and/or using any System or any portion thereof, does so subjectto the
Warranty and the Additional Terms.
3. Installation and Use of System. Improper Installation, adjustment, alteration, service, or maintenance can cause
property damage, personal injury, or loss of life. Thoroughly read the installation and operating instructions of this
Control as well as the appliance it will be used in conjunction with as a system. If applicable, read the maintenance
instructions before installing this control. This product is designed for use with an attended hearth appliance or re
feature. Adults must be present when the Control System is operating. DO NOT program or thermostatically set this
Control to operate a hearth appliance or re feature when Adults are not physically present. Furthermore, DO NOT
leave the hearth appliance or re feature burning unattended; it may cause damage or serious injury. If an Adult is go-
ing to be away from the hearth appliance or re feature for any length of time, then the handheld/wall mount, receiver/
control module and application should be in the “OFF” position.
4. Repair or Replacement of System or Parts. Should any System, or any hardware, components and/or parts con-
tained therein fail due to a defect in workmanship or material provided by Skytech after the purchase of a System by a
Customer, Skytech shall repair or, at its option, replace the defective System or part, hardware or component, subject
to the Customer’s compliance with all terms and conditions contained herein governing service and claims under the
Warranty. Skytech shall provide replacement parts at no charge for the rst (5) ve years of this warranty, and at mar-
ket cost for the Lifetime of the product to the original Customer. Gas valve and gas valve components will be available
at no charge for one (1) year. If Skytech does not have the parts for an individual model, then a comparable replace-
ment System will be provided at no charge within the rst (5) ve years after purchase, and then at market cost for the
Lifetime of that product to the Customer.
5. Warranty Claims; Skytech Service. To submit a valid claim under the Warranty (each, a “Valid Claim”), a Customer-
must comply with the following:
a) Obtain a Return Material Authorization (“RMA”) number from Skytech by calling (855) 498-8324; and
b) Provide written notice to a Skytech or an Authorized Dealer (“Dealer”) and provide the Name, House Address, Email
Address and Telephone Number of the Customer;
c) Describe the System model number and nature of the defect, nonconformity, or other problem with the System;
d) Provide such notice within thirty (30) days of discovery of such defect, nonconformity, or problem;
e) securely pack and ship the defective Skytech Product to Skytech II, Inc. ATTN: Warranty Department at 9230
Conservation, Fort Wayne, IN 46809. Customer assumes all costs and risks associated with transportation to Skytech (i)
the RMA number is only valid for thirty (30) days from the date the RMA was issued, (ii) the RMA number should be
clearly marked on the outside of each box being returned. Skytech may refuse shipments that DO NOT meet all of the
Valid Claim requirements. Skytech is not responsible for any refused shipments or any damage caused due to shipping,
whether or not it was a Valid Claim. Skytech shall be responsible for return shipment charges. Compliance with these
requirements is a condition to coverage under this Limited Warranty.
Skytech may refuse any shipment(s) that does not meet all of the Valid Claim requirements. Skytech is not responsible for
any refused shipments or any damage caused due to shipping, whether or not it was a Valid Claim. Skytech shall be
responsible for reasonable return shipment charges for any Skytech System returned whether or not Skytech
determines there is no defect with the System, reject for failure of the Customer to submit a Valid Claim, or otherwise
determine is not eligible for service under the Warranty.
Upon receipt of a Valid Claim and the properly-returned System, Skytech shall, at its option, either (a) repair the System,
at no charge to the Customer, or (b) replace the returned System with a new comparable System, at no charge to the
Customer, or (c) provide the Customer with a refund in an amount equal to the price paid by the Customer for the
defective System not including any service or labor cost associated with the installation or otherwise. Any System or
LIMITED WARRANTY

Skytech: 7060TX SkyBridge Rev. 9-15-20 Page 11
hardware, component or part repaired by Skytech hereunder, or any replacement System, hardware, component or part
shall be shipped to the Customer by Skytech at Skytech’s cost and the Warranty, the Additional Terms, and all other
terms and conditions set forth herein shall extend to such repaired or replacement System, hardware, component or part.
Skytech shall pay no refund before Skytech from the Customer receives the defective System, hardware, component and/
or parts. Any obligation of Skytech under this Section 4 shall be and remain subject to Skytech’s right to physically inspect
the defective System, hardware, component and/or part returned to Skytech by the Customer. Some States do not allow
the exclusion or limitation of incidental and consequential damages or limitation on how long an implied warranty lasts, so
the above limitation may not apply to you. This warranty gives you specic rights and you may have other rights, which
vary from state, province, or nation. To the extent allowable under any law, the liability of Skytech is limited to the express
terms of this warranty, and Skytech expressly disclaims any and all implied warranties, including any warranties of tness
for a particular purpose or merchantability.
REV. 2-24-17
Print information and detach at dotted line and return to: Skytech Products Group, Attn. Warranty Dept.,
9230 Conservation Way, Fort Wayne, IN 46809 Phone: (855)498-8224
Warranty Information
Purchase Date: _____________ Model: _______________ Date Code: _________
Purchased From: ________________________________________________
Customer Name: ________________________________________________ Phone: _________________
Address: ______________________________________________________
City: _________________________________ State/Prov. ___________________ Zip/Postal Code _____________
E-mail Address: _____________________________________
Please send a Proof of Purchase (original receipt) copy along with your warranty form.
(4 Digit Number -
on bottom of SkyBridge)
Table of contents