Skytrofa Auto-Injector User manual

Instructions
for Use
Single-patient use

• Important Information
• Before You Begin
• Setting Up
• Step-by-Step Guide
• Troubleshooting
• Cleaning and Maintenance
• Charging and Charger Cable
• Storing
• Product Safety
• Expiration
• EMC Compliance Levels
• Technical Specication
• Symbols
• Warranty and Disclaimer
• Parts Overview
Getting Started
Troubleshooting
and Care
Product Information
Insert
cartridge
into
flashing
green
top.
3.1 3.2
Click
cartridge
inplace.
(Greentop
willstop
flashing,mixing
icon will
lightup, and
batteryicon
willswitch off)
After
click,
remove
finger
from
cartridge.
3.3
Thentake the second injection by repeating
Step1 to Step 11 with a new cartridge and needle
beforecontinuing to Step 12.
1Check and assemble cartridge and needle
1.1 1.2 1.3
9.29.1
Keepupright
untilyou hear
2loudbeeps
andthe entire
progressbar
lightsup.
Pulloff needle
cover.
Donot twist.
Keepneedle
coverfor
later.
Washhands.
Medicineis ok to use if it is colorless
andclear (some air bubbles are ok).
Goto Step 8.
Donot use the mixed
medicineif it has visible
particles.Press the green
buttonfor 3seconds and
goto Step 10.
Pressand hold
greentop against
theinjection site for
10to 15 seconds
until you hear 2
loudbeeps.
Removethe
auto-injector
fromskin and
waituntil you
hear2loud
beeps.
(Greentop
willflash 2times
andcheck
markicon
willlight up)
(Greentop will
startflashing)
Checkthat
cartridgeis empty.
Putused cartridge and
needlein a sharps
disposalcontainer.
(Moreinfo:
SeeInstructions for Use - page 34)
Puton the protective cover.
Storeat room temperature
between59°F to 86°F (15°C to 30°C),
tobe ready for next use.
Back
Front
Stomach(abdomen)
Thighs Buttocks
6.1 6.2
10.1 10.2
10.3
6Finish mixing
5Turn the auto-injector up and down
8Prepare for injection 11 Check cartridge and throw away
12 Store the auto-injector
9Inject medicine
2Turn on the auto-injector
3Insert cartridge
4Wait while mixing 10 Remove cartridge
7Check mixed medicine
Checkexpiration
dateand cartridge
doseon cartridge
pack.
Pressand
releasethe green
buttonto turn on
theauto-injector.
(Youwill hear 2
loudbeeps.
Batteryicon
willlight up and
greentop will
startflashing)
Waituntil you
hear2loud
beepsand the
entireprogress
barflashes.
(Eyeicon will
lightup)
Check
expiration
dateon
needle.
Wait4 to 8
minutesfor the
auto-injectorto
mixmedicine.
Watchprogress
bargradually
lightup.
Turnthe auto-injector up
anddown.
Atick sound confirms
theturns are correct.
Turn5 to 10 times
untilyou hear
2loudbeeps and
theprogress bar,
exceptthe top
element,lights up.
Remove
paper
from
needle.
year month
YYYY MM-
day
DD-
Expirationdate
Expirationdate
year
month
YYYY
MM-
Cartridgedose
Screwneedle
tightlyon cartridge.
Donot remove
needlecover. Press
needle
coverinto
flashing
greentop. Press
needle
cover
downto
release
cartridge.
Remove
used
cartridge.
8.1 8.2 8.3
Choosean injection site:
Stomach(abdomen),
thighs,or buttocks.
Changethe injection site for
everyinjection.
Cleaninjection
sitewith alcohol
wipe.Do not
injectthrough
clothes.
Doesyour weekly dose require 2 cartridges?
Prepare Mix
Inject After injection
Wait4 to 8
minutes
How to Use
1 4 7 10
2 5 8 11
3 6 9 12

Getting Started
2
Step-by-step Instructions
for the SKYTROFA Auto-Injector
Read and follow this Instructions for Use
that comes with your auto-injector before
you start using it. This information does not
take the place of talking to your healthcare
provider about your medical condition or
your treatment.
The back cover of this Instructions for Use
folds out for reference while you read the
rest of the instructions.
If you have any questions about the
auto-injector, the medicine, or these
instructions, please contact your healthcare
provider or Ascendis Pharma Customer
Support. For contact information
bback cover.
3
Getting Started
Page
Important Information …………… 4
Before You Begin ………………… 6
Setting Up ………………………… 8

Getting Started
54
Important Information
Important information about your
SKYTROFA Auto-Injector:
The auto-injector is used to give
(administer) SKYTROFA under your skin
(subcutaneously).
Do not use the SKYTROFA Auto-Injector
for the first time until you receive training
from a healthcare provider. If you do not
follow the instructions for the auto-injector,
you may not get the right dose, cause
injury, or get an infection.
The auto-injector should only be used with
SKYTROFA cartridges and needles that are
prescribed by your healthcare provider.
Cartridges and needles come together
in the same packaging. Follow the
instructions that come with SKYTROFA
cartridges. If refrigerated, take the
cartridge out of the refrigerator and leave
at room temperature for 15 minutes
before use.
Your weekly dose may require
that you use 2 cartridges.
Do not use your auto-injector with other
medicines or needles.
Do not share your auto-injector with
other people, even if the needle has been
changed. You may give other people a
serious infection or get a serious infection
from them.
Do not reuse needles.
Do not drop the cartridges because they
may break.
Keep out of the reach of children.
This product contains small parts that may
present a choking hazard to small children.
The cable can present a strangulation
hazard. The auto-injector should only be
used under the supervision of a caregiver.
Do not point the auto-injector at yourself
or other people, except when you are
ready to inject.
Do not use or place the auto-injector
closer than 12 inches (30 cm) to microwave
ovens or electronic equipment with
antennas such as mobile phones and
WiFi transceivers.
Getting Started
76
Before You Begin
The SKYTROFA Auto-Injector
The auto-injector is an electronic, reusable
device for people needing injections
of SKYTROFA. It automates parts of the
procedure for injecting SKYTROFA. The
auto-injector is designed for personal
home use, so that the injections may be
given without the assistance of a medical
professional.
The SKYTROFA Cartridge
SKYTROFA comes in a single-use cartridge.
The cartridge has 2 chambers, 1 filled with
powder and 1 filled with water. The
auto-injector automatically mixes the
powder and the water during preparation,
making it ready for injection.
The Needle
The single-use needle comes with
SKYTROFA cartridges and is used for
injecting the medicine.
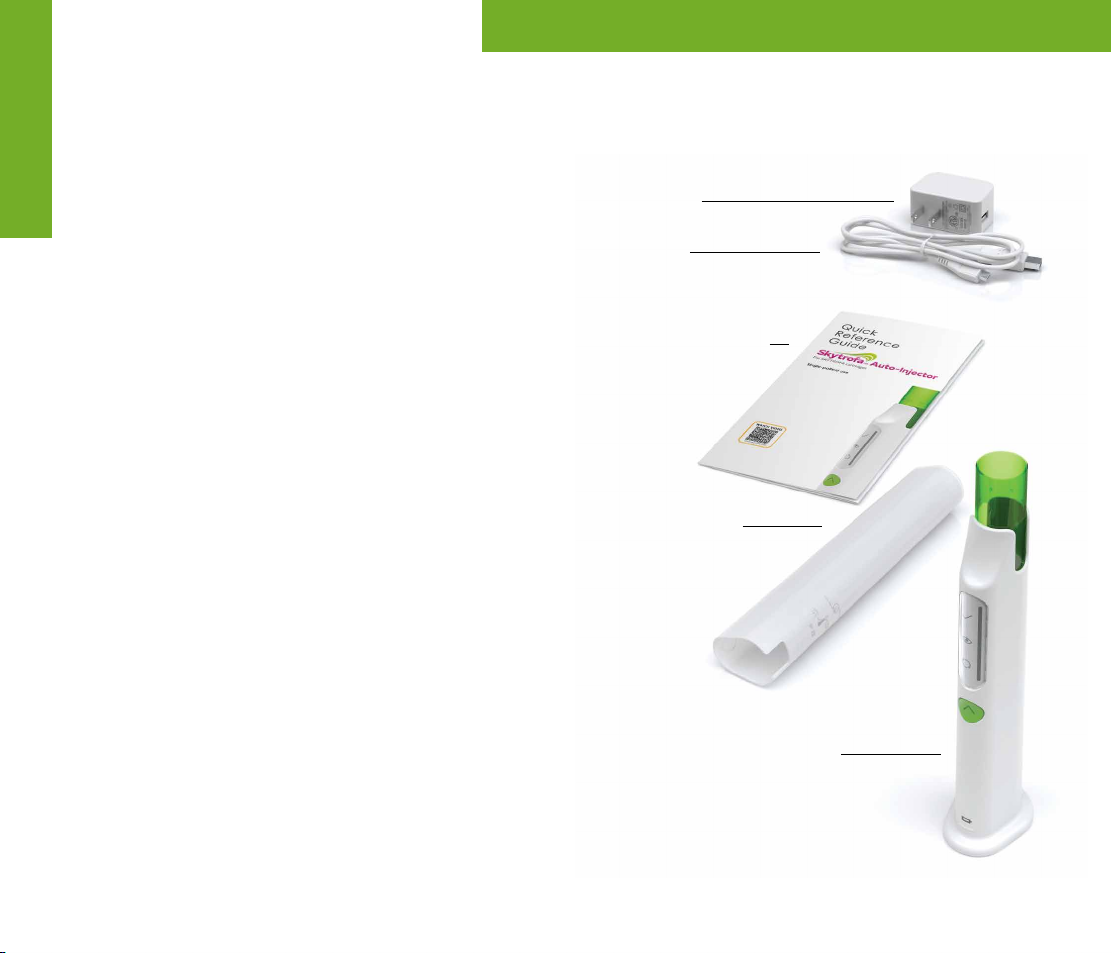
Charger
Quick Reference
Guide
SKYTROFA Auto-Injector
Figure A
USB to
Micro-USB Cable
Auto-Injector
Protective Cover
Product Overview

Battery
icon
Getting Started
98
1. Remove the SKYTROFA Auto-Injector
from the package.
2. Connect the USB (large end of the
cable) to the charger (only use the
provided charger). Plug the charger
into a power outlet. Connect the
Micro-USB (small end of the cable)
to the back of the auto-injector. For
protection, charge the auto-injector
with the protective cover on
(see Figure B).
• For more information on charging
bpage 49.
Setting Up
Figure B
3. Fully charge the auto-injector before
using it for the rst time. This will
take 2hours and 30 minutes. When
the battery icon located at the base
of the auto-injector (see Figure C) is
ashing red or green, it is charging.
When it shows constant green, the
auto-injector is fully charged and is
ready to use after the charging cable
is unplugged.
• When fully charged, the battery
should last for at least 4injections.
• When traveling, bring your charger
and the right adaptor for different
power outlets depending on your
destination.
• The auto-injector cannot be used
when connected to the charger.
Figure C
Getting Started
1110
4. Find a quiet place where you can
perform your injection.
5. Gather your supplies and place
them on a at, hard, clean surface.
Supplies needed for an injection:
From SKYTROFA Auto-Injector
packaging
(see Figure A):
• 1 SKYTROFA Auto-Injector
From SKYTROFA packaging
(see Figure D):
• 1 SKYTROFA Cartridge
• 1 Omnican ne 0.25 mm x 4 mm
(31G x 5/32”) B. Braun needle
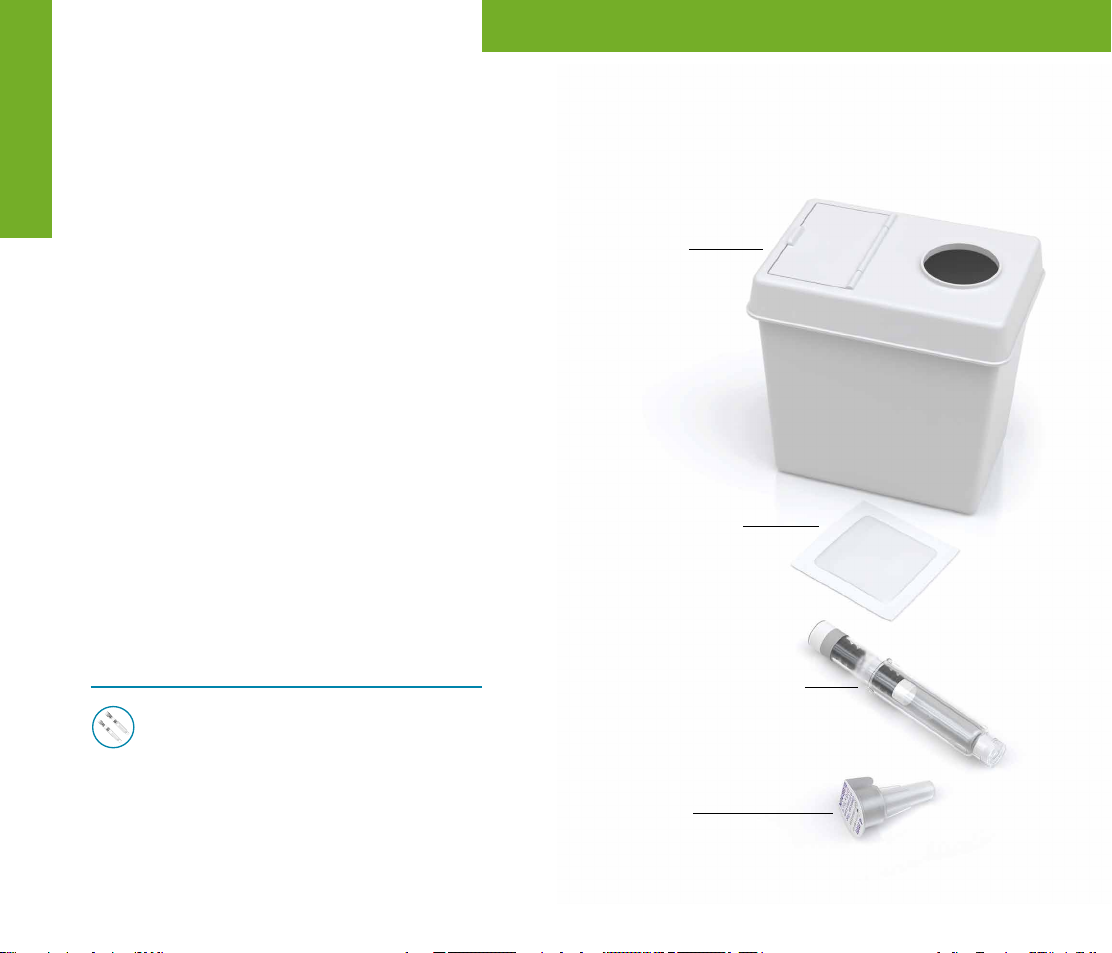
Other supplies (not included)
(see Figure D):
• 1 Alcohol Wipe
• 1 Sharps Container
If your weekly dose requires
2 cartridges, you will need the
following additional supplies:
• 1 SKYTROFA Cartridge
• 1 Omnican ne 0.25 mm x 4 mm
(31G x 5/32”) B. Braun needle
• 1 Alcohol Wipe
Setting Up
Alcohol Wipe
Needle
B.Braun
Sharps
Container
SKYTROFA Cartridge
Ascendis Pharma
Supplies Needed for Each Injection
Figure D

How to Use
12
Does Your Weekly Dose
Require 2 Cartridges?
Your healthcare provider may prescribe
a dose that requires use of the
medicine in 2 cartridges.
If you have been prescribed a dose
that requires 2 cartridges:
• Take your rst injection (Step 1
to Step 11, pages 14–35).
• Then take your second injection
by repeating Step 1 to Step 11
with a new cartridge and needle.
• After your second injection,
continue to Step 12 (page 36).
13
How to Use
Step-by-Step Guide Page
Prepare …………………………… 14
Mix ………………………………… 20
Inject ……………………………… 26
After Injection …………………… 32
1
How to Use
1514
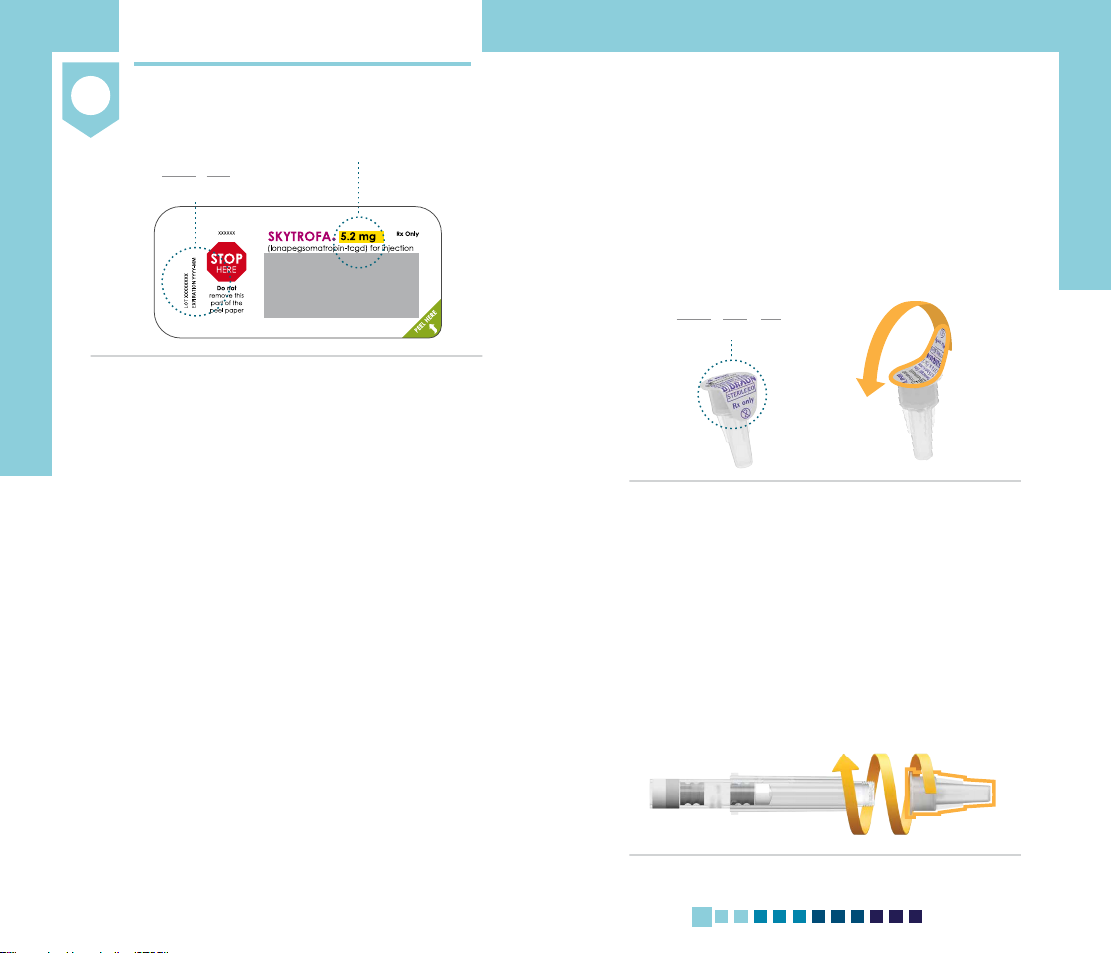
Check and assemble cartridge and needle
1.1 Check the expiration date and
cartridge dose on the cartridge
packaging (see Figure E).
Remove the SKYTROFA cartridge
from the packaging according to the
instructions on its lid.
Do not use if the expiration date has
passed on the cartridge.
• If you are unsure about your dose,
contact your healthcare provider.
• If you are unsure about the
medicine expiration date, please
call Ascendis Pharma Customer
Support. For contact information
bback cover.
Figure E
Prepare
Cartridge doseExpiration date
YYYY - MM
————
——
year month
1.2 Check the expiration date on the
needle. Remove the paper from the
needle (see Figure F).
Do not use if the expiration date has
passed on the needle.
1.3 Screw the needle straight on the
cartridge by turning clockwise until
there is a tight t (see Figure G).
Do not remove the plastic needle
cover. You will need it to insert
the cartridge into the
SKYTROFA Auto-Injector.
Figure F
Figure G
Expiration date
YYYY - MM - DD
————
——
——
year month day

2
How to Use
1716
Prepare
Turn on the auto-injector
2.1 Disconnect the auto-injector from the
charger when charged.
• The auto-injector cannot be used
when connected to the charger.
2.2 Find a quiet place where you can give
your injection.
2.3 Remove the protective cover. Place the
auto-injector upright on a at surface.
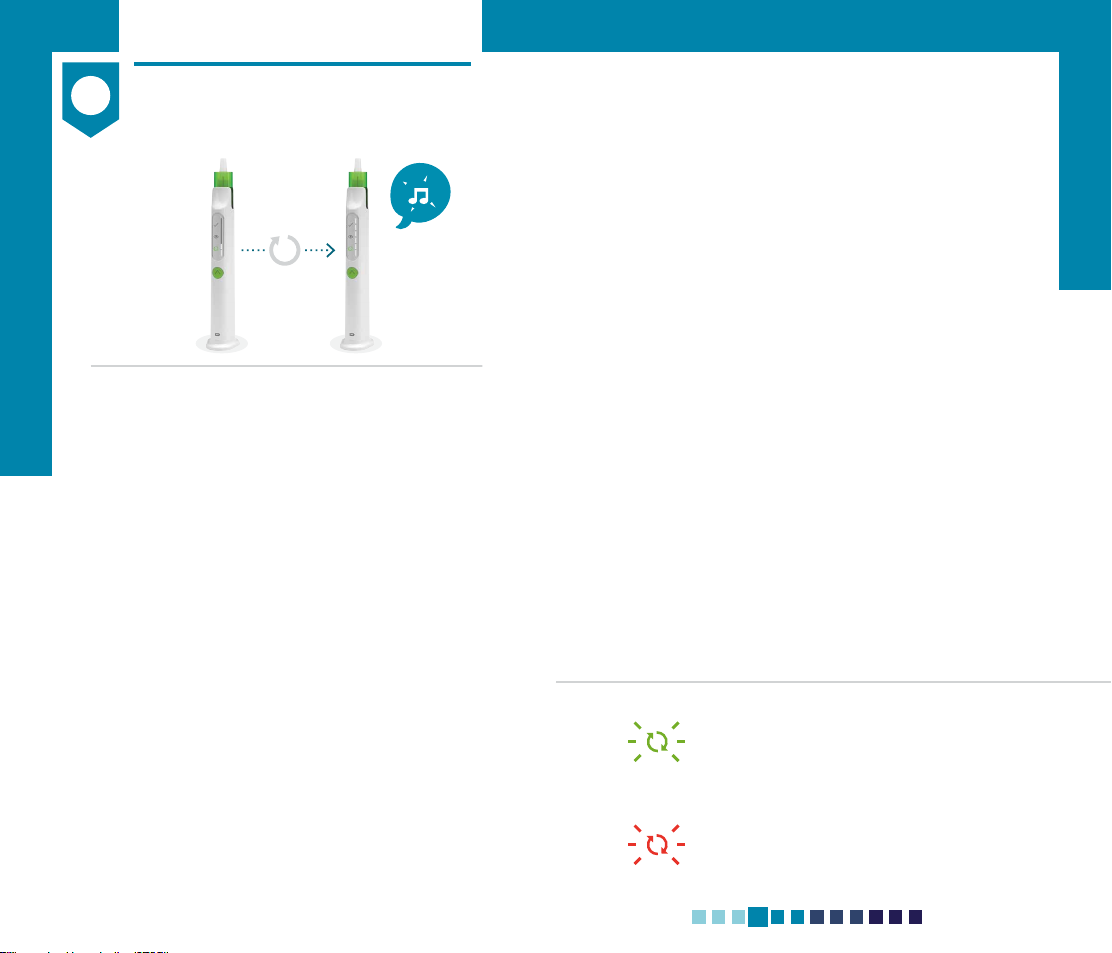
2.4 Press and release the green button to
turn on the auto-injector
(see Figure H).
• You will hear a humming sound. The
battery icon and the 3 icons above
the green button will light up. Then
all of the icons will turn off, except
the battery icon.
Press and
release the green
button to turn on
the auto-injector. (You will hear 2
loud beeps.
Battery icon
will light up and
green top will
start ashing)
Figure H
• You will hear 2loud beeps and the
green top will start ashing. The
auto-injector is ready for use.
• If the auto-injector is not active for
6minutes, it will turn off. Press the
green button to turn it on again.
2.5 Check the battery icon on the base
of the auto-injector to see if it is
charged. The battery icon is green
when the auto-injector is ready to use:
Constant Green
Battery is fully charged.
The auto-injector is ready to use.
Flashing Green
At least 1 injection remaining, but
charging is recommended after
use.
Flashing Red
Battery needs charging.
If no icons light up bpage 44.
If you see ashing icons (other than the battery)
bpages 46–47.

3
How to Use
1918
3.1 Insert the cartridge into the ashing
green top by pushing straight down
with the needle cover still on
(see Figure I).
3.2 Click the cartridge into place. Make
sure the cartridge is pushed all the
way down (see Figure J).
• You will hear a click, the green top
will stop ashing, the green mixing
icon will light up, and the battery
icon will switch off.
• The cartridge cannot be inserted
when the auto-injector is connected
to the charger.
Prepare
Insert cartridge
Insert
cartridge
into
ashing
green
top.
Click
cartridge
in place.
(Green top
will stop
ashing, mixing
icon will
light up, and
battery icon
will switch off)
After
click,
remove
nger
from
cartridge.
Figure I Figure J Figure K
3.3 After the click, remove your nger
from the cartridge (see Figure K).
If you cannot insert the cartridge,
check if an orange plug is still at-
tached to the cartridge. If an orange
plug is still attached to the cartridge,
remove it by pulling it straight off
(see Figure L). The orange plug only
protects the cartridge during
transportation.
Do not use the auto-injector if you
cannot insert the cartridge. Please call
Ascendis Pharma Customer Support.
For contact information bback
cover.
Figure L
If you see a ashing red mixing icon
bpage 46.
An orange plug may need to be removed
from the cartridge.
Wait 4 to 8
minutes
4
How to Use
2120
Mix
Wait while mixing
Figure M
4.1 Wait 4 to 8 minutes for the
auto-injector to mix your medicine.
The progress bar will gradually light
up, and you will hear steady ticking
during mixing (see Figure M).
• Make sure the auto-injector is
standing upright on a at surface. If
the auto-injector is not upright, the
medicine mixing will pause.
4.2 The auto-injector has nished the
automatic part of the mixing when
you hear 2loud beeps and the entire
progress bar ashes.
Wait 4 to 8
minutes for the
auto-injector to
mix medicine.
Watch progress
bar gradually
light up.
Wait until you
hear 2loud
beeps and the
entire progress
bar ashes.
4.3 Continue with Step 5 (page 22)
immediately after automatic mixing is
completed.
If you wait for more than 2hours
before completing the steps for
mixing by hand (Step 5), the
auto-injector will automatically cancel
the procedure. If this happens, the
cartridge will be released and cannot
be used. To remove the cartridge,
see Step 10 (page 32).
• If you still need to inject after the
auto-injector has canceled the
procedure, go back to Step 1 and
use a new cartridge (page 14).
If you see a slowly ashing green mixing
icon and the progress bar is frozen
bpage 42.
If you see a ashing red mixing icon
b page 46.

5
How to Use
2322
Mix
Turn the auto-injector up and down
Figure N
5.1 Turn the auto-injector up and down to
mix the medicine by hand. You
will hear a ‘tick’ sound each time you
turn the auto-injector up and down
correctly. To mix the medicine
correctly:
• Each turn up and down should take
no more than 2seconds.
• The auto-injector should point
straight down and straight up
(see Figure N).
The progress bar, except the top
element, will light up as you turn the
auto-injector up and down correctly.
Do not press the green button when
you turn the auto-injector up and
down.
Turn the auto-injector up and
down. A tick sound conrms
the turns are correct.
Turn 5 to 10 times until
you hear 2loud beeps
and the progress bar,
except the top
element, lights up.
Do not press
the green button.
If you see a ashing red mixing icon
bpage 46.
After 5 to 10 correct turns, you will
hear 2loud beeps and the progress
bar, except the top element, will
light up.
5.2 Continue with Step 6 (page 24)
immediately after you nish mixing
by hand.
If you wait more than 2hours before
preparing and doing the injection
(Step 6 to Step 9, pages 24–31), the
auto-injector will automatically cancel
the procedure. If this happens, the
cartridge will be released and cannot
be used. To remove the cartridge,
see Step 10 (page 32).
• If you still need to inject after the
auto-injector has canceled the
procedure, go back to Step 1 and
use a new cartridge (page 14).
6
How to Use
2524
Mix
Finish mixing
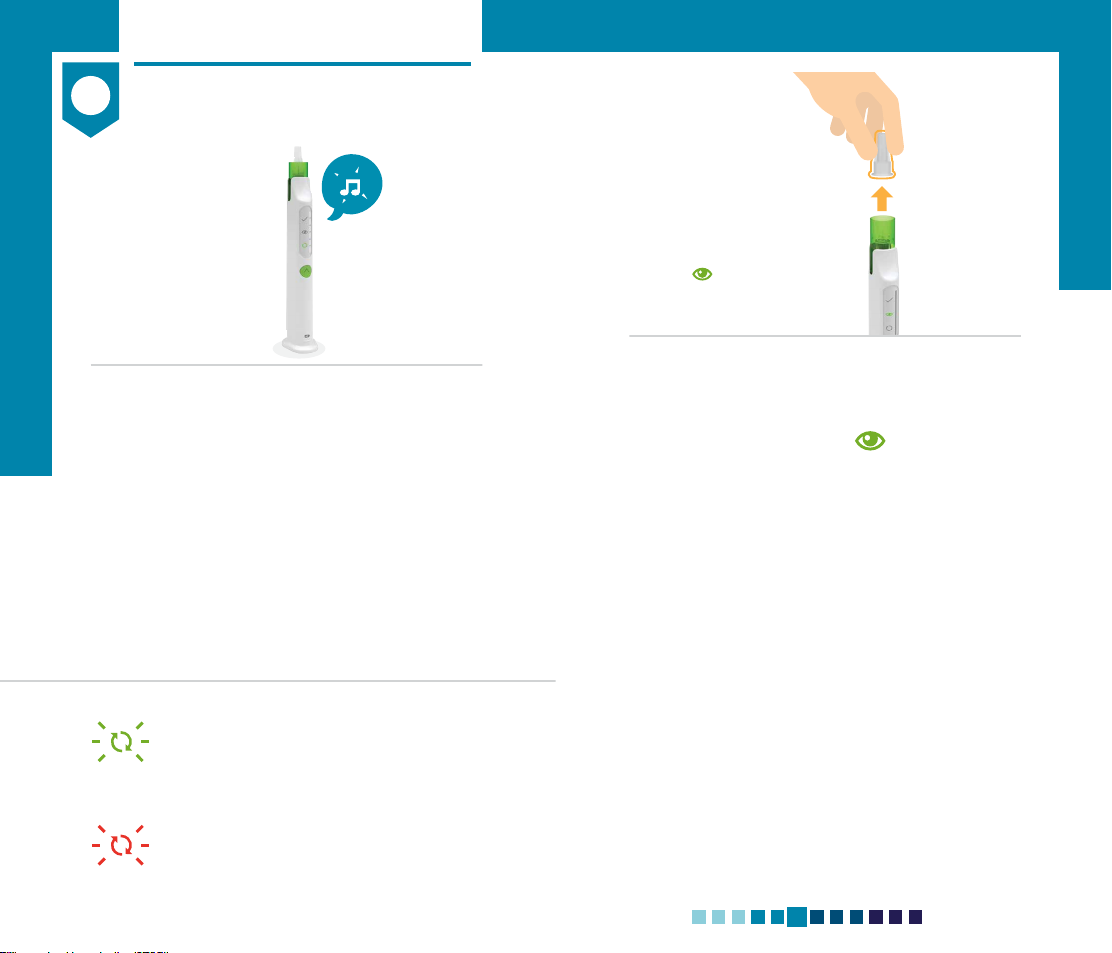
6.1 Keep the auto-injector upright for
automatic air removal (see Figure O).
Wait until you hear 2loud beeps and
the entire progress bar lights up.
Figure O
If you see a slowly ashing green mixing
icon and the progress bar is frozen
bpage 42.
If you see a ashing red mixing icon
b page 46.
Keep upright
until you hear
2loud beeps
and the entire
progress bar
lights up.
Figure P
6.2 Pull off the needle cover (see Figure P).
The green eye icon will light up.
Removing the needle cover will allow
you to check the mixed medicine in the
inspection window (Step 7 on page 26).
Do not twist the needle cover off. If you
have trouble removing the needle
cover, gently pull up the green top.
Keep the needle cover for later use.
It is needed to safely remove the
cartridge after injection.
Pull off the needle
cover.
Do not twist.
Keep needle
cover for
later.
(Eye icon
will light up)
7
How to Use
2726
Inject
Check mixed medicine
Figure Q
Medicine is ok to use if
it is colorless and clear
(some air bubbles are ok).
Go to Step 8.
Do not use the mixed
medicine if it has visible
particles. Press the green
button for 3seconds and
go to Step 10.
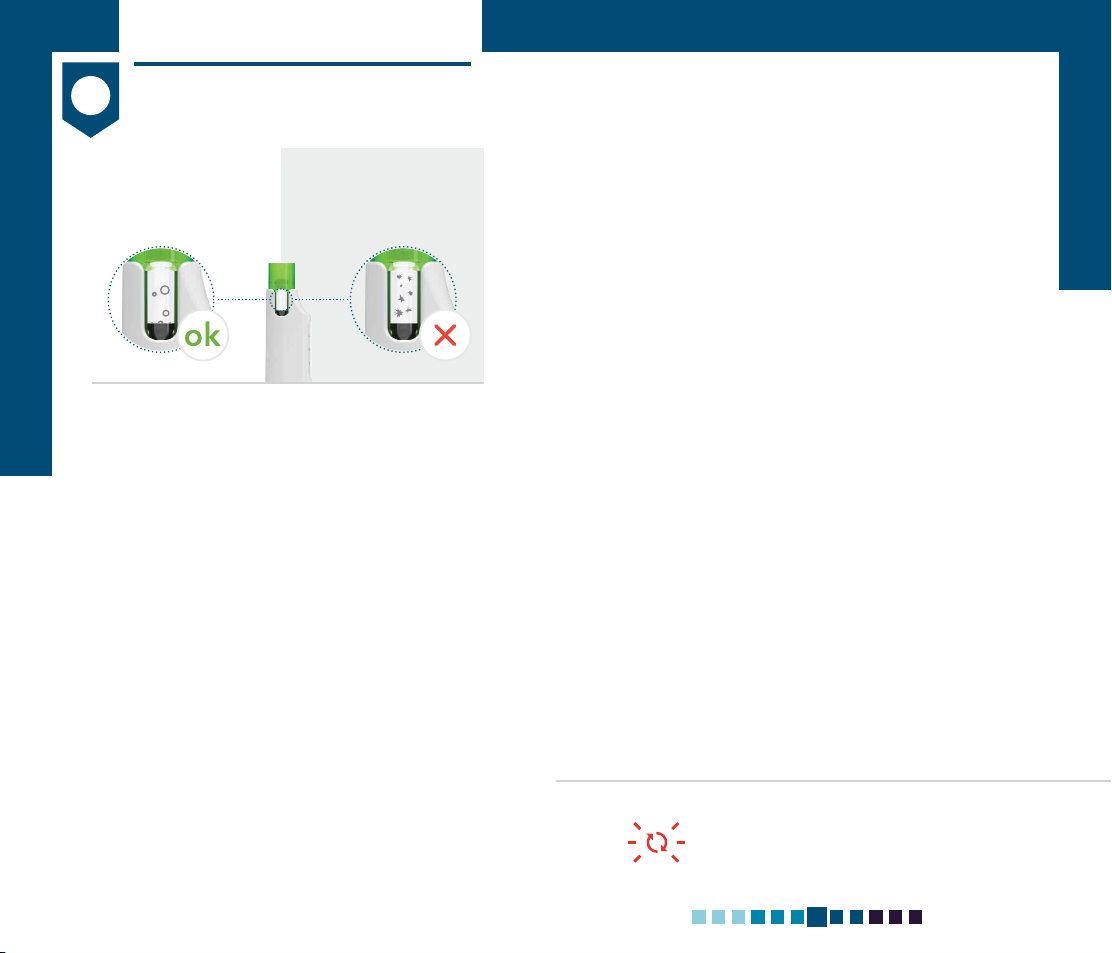
7.1 Check the mixed medicine in the
inspection window on the side of
the auto-injector (see Figure Q). The
medicine should look colorless and
clear. Some air bubbles are okay.
Do not inject the medicine if there
are visible particles (medicine is not
dissolved) or the mixed medicine is
discolored.
If you see a ashing red mixing icon
bpage 46.
If you see visible particles or the
medicine is discolored:
• Cancel the injection procedure by
pressing and holding the green
button for 3seconds. This will
unlock the cartridge. Go to Step 10
(page 32).
• Get a new cartridge. Follow the
instructions beginning at Step 1
(page 14).

8
How to Use
2928
8.1 Choose an injection site.
There are 3areas of your body you
can inject into (see Figure R):
• Stomach (abdomen)
• Thighs
• Buttocks
Change the injection site for every
injection.
Figure R
Inject
Prepare for injection
Stomach (abdomen)
Thighs
Front
Buttocks
Back
8.2 Wash your hands with soap and water
(see Figure S).
8.3 Clean the injection site with an
alcohol wipe (see Figure T).
Do not inject through clothes. Inject
directly into the skin.
Do not touch the cleaned area before
injecting.
Do not fan or blow on the cleaned
area.
Figure T
Figure S

9
How to Use
3130
Inject
Inject medicine
9.1 Press and hold the green top against
the skin of the injection site to inject
(see Figure U). Hold for 10 to 15
seconds until you hear 2loud beeps
and the green top ashes 2times.
The green check mark icon will
light up.
• The medicine is injected automatically
when you press the green top against
the skin.
• You will hear steady ticking and the
progress bar will light up as you
inject.
Figure VFigure U
Press and hold
green top
against the
injection site for
10 to 15 seconds
until you hear 2
loud beeps.
(Green top
will ash 2times
and check
mark icon
will light up)
Remove the
auto-injector
from skin and
wait until you
hear 2loud
beeps.
(Green top will
start ashing)
Do not remove the auto-injector from
the injection site until the injection is
nished to ensure you get your full
cartridge dose.
The injection is nished when you
hear 2 loud beeps and the green top
ashes 2 times. The green check
mark will light up.
9.2 Remove the auto-injector from the skin
after the injection is nished
(see Figure V).
• After the injection is nished, the
auto-injector makes a buzzing
sound as it unlocks the cartridge.
Wait until you hear 2loud beeps,
and the green top starts to ash.
If you see a slowly ashing green check
mark icon and the progress bar is frozen
bpage 43.
If you see a ashing red check mark icon
bpage 46.
10
How to Use
3332
After Injection
Remove cartridge
Figure YFigure XFigure W
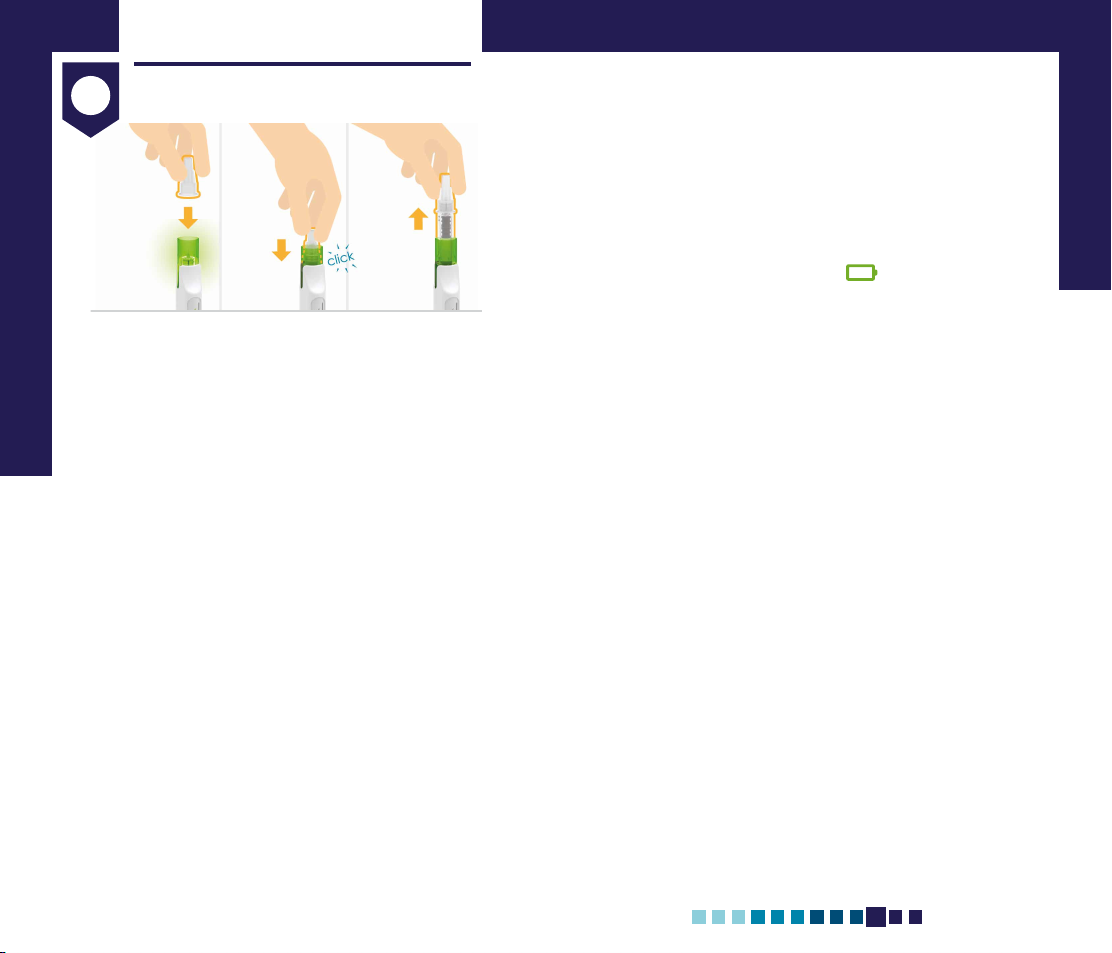
10.1 Press the needle cover back on when
the green top ashes (see Figure W).
Be careful when handling needles to
reduce the risk of needlestick injury
and infection.
10.2 Press the needle cover down to
release the cartridge.
• You will hear a click and the green
top will stop ashing (see Figure X).
Do not twist the cartridge.
Press
needle
cover into
ashing
green top.
Remove
used
cartridge.
Press
needle
cover
down to
release
cartridge.
10.3 Remove the used cartridge by pulling
straight up (see Figure Y).
Only remove the cartridge by using the
needle cover.
• After you remove the cartridge,
the battery icon will display the
battery level. The auto-injector turns
off automatically.
Do not use the auto-injector if you
cannot remove the cartridge as
instructed. Please call Ascendis
Pharma Customer Support. For contact
information bback cover.

11
How to Use
3534
Check cartridge and throw away
Figure Z
11.1 Check that the cartridge is empty of
medicine (see Figure Z).
Do not use the auto-injector if there
is medicine left in the cartridge after
injection. Please call Ascendis Pharma
Customer Support. For contact
information bback cover.
11.2 Put your used cartridge and needle
in an FDA-cleared sharps disposal
container right away after use (see
Figure Z).
Do not throw away (dispose of)
loose needles and cartridges in your
household trash.
Do not recycle your used sharps
disposal container.
After Injection
Check that cartridge
is empty.
Put used cartridge and
needle in a sharps
disposal container.
If you do not have an FDA-cleared
sharps disposal container, you may
use a household container that is:
• Made of a heavy-duty plastic
• Can be closed with a tight-tting,
puncture-resistant lid without
sharps being able to come out
• Upright and stable during use
• Leak-resistant
• Properly labeled to warn of
hazardous waste inside the
container
When your sharps disposal container
is almost full, you will need to follow
your community guidelines for the
right way to dispose of your sharps
disposal container. There may be
state or local laws about how to throw
away used needles and syringes.
For more information about safe
sharps disposal, go to the FDA’s
website at: http://www.fda.gov/
safesharpsdisposal.
Healthcare providers, relatives, and
other caregivers should follow this
Instructions for Use for removal and
throwing away (disposal) of needles
to prevent needlestick injury and
infection.

12
How to Use
3736
After Injection
Store the auto-injector
12.1 Make sure that the auto-injector is
clean. If it is dirty or if medicine has
been spilled onto it, clean with
a damp cloth.
Do not place the auto-injector under
water. For more information on
cleaning bpage 48.
12.2 Put the protective cover on the
auto-injector by sliding it straight
down (see Figure AA).
Figure AA
Does Your Weekly Dose
Require 2 Cartridges?
Then take the second injection by
repeating Step 1 to Step 11 (pages
14–35) with a new cartridge and
needle before continuing to Step 12.
Put on the protective cover.
Store at room temperature
between 59°F to 86°F (15°C to 30°C),
to be ready for next use.
12.3 Charge the auto-injector if the battery
icon has been ashing before or after
the injection. For more information
about how to charge the auto-injector
bpage 49.
12.4 Store the auto-injector at room
temperature between 59°F to 86°F
(15°C to 30°C), between use. Store
with the protective cover on until the
next injection. For more information
about how to store the auto-injector
b page 50.
12.5 Write down the date of every weekly
dose taken under Keep Track of Your
Injections bback cover fold out.
• When the auto-injector reaches its
expiration date, maximum number
of injections, or needs replacing,
return it to the Ascendis Pharma
Customer Support. For more
information, see Expiration
b page 56.
Other manuals for Auto-Injector
2
Table of contents
Popular Personal Care Product manuals by other brands


Remington
Remington CI-97M1 Use and care guide

SnoreMender
SnoreMender 4 instructions

Withings
Withings WSM02 Product guide

Orliman
Orliman Feetpad OV03B005 Use and maintenance instructions

HoMedics
HoMedics spa REFLECTIVES M-6011 Instruction manual and warranty information

OSIM
OSIM uSqueez Hand Operation manual